GBP Microclean User manual

MANUAL
Cleaners for factory tools and small parts
Microclean
Maxiclean
Masterclean
MANUAL
-Vaskemaskiner for maskin- og motordeler
Microclean
Maxiclean
Masterclean
MANUAL
-Vaskemaskiner for maskin- og motordeler
Microclean
Maxiclean
Masterclean
1

MASTERCLEAN
FUNCTION 12
INSTALLATION 12
Assembly instructions 12
CLEANING INSTRUCTIONS 13
MAINTENANCE 14
How to change liquid 14
How to change pump gasket 14
How to change pump 14
How to change power cord 14
SPARE PARTS 14
ACCESSORIES 15
TECHNICAL SPECIFICATION 15
INTRODUCTION 3
SAFETY 4
MICROCLEAN
FUNCTION 5
INSTALLATION 5
Assembly instructions 5
CLEANING INSTRUCTIONS 6
MAINTENANCE 6
How to change liquid 6
How to change pump gasket 7
How to change pump 7
How to change power cord
SPARE PARTS 7
ACCESSORIES 7
TECHNICAL SPECIFICATION 7
MAXICLEAN
FUNCTION 8
INSTALLATION 8
Assembly instructions 8
CLEANING INSTRUCTIONS 9
MAINTENANCE 10
How to change liquid 10
How to change pump gasket 10
How to change pump 11
How to change power cord 11
SPARE PARTS 11
ACCESSORIES 11
TECHNICAL SPECIFICATION 11
2

MASTERCLEAN
FUNCTION 12
INSTALLATION 12
Assembly instructions 12
CLEANING INSTRUCTIONS 13
MAINTENANCE 14
How to change liquid 14
How to change pump gasket 14
How to change pump 14
How to change power cord 14
SPARE PARTS 14
ACCESSORIES 15
TECHNICAL SPECIFICATION 15
3
INTRODUCTION
In order to maintain maximum safety, be sure to read the section ”SAFETY”
carefully before any maintenance is carried out on the cleaner.
This instruction manual is valid for the cleaners: MICROCLEAN, MAXICLEAN
AND MASTERCLEAN manufactured by GBP Ergonomics AB (GBP). It is
recommended by GBP to study the instruction manual carefully and –most
important of all- make sure that the manual is available for those who install,
maintain and use the cleaner.
GBP does not take responsibility for personal injury or damage on the cleaner, if
instructions are not followed.
Make sure to read the instruction manual before unpacking, installing or using
this cleaner. Observe all safety issues. Serious personal injury or damage to the
cleaner may occur if you choose to neglect this information
Furthermore it is important that you:
•Keep this information and other applicable documents during the lifetime of
the cleaner.
•Hand over the instructions to a possible new user.
•Insert possible changes and additional instructions in the manual, supplied
from GBP
This manual is valid for:
Serial No.
CE-certification
Our washers are CE certified, see fig 1 below. If the cleaner is modified or fitted
with other products, the CE certification is no longer valid.
fig 1
3

4
SAFETY
The warning labels in this manual stand for the following:
Negligence in the following instruction in this manual might be life threatening.
Negligence in the following instruction in this manual might lead to personal
injury.
Negligence in the following instruction in this manual might lead to damage to the
cleaner.
Work on electrical equipment shall only be performed by skilled personnel.
The definition of skilled personnel is:
•Personnel with the technical knowledge or enough experience to avoid the
risks involved in working with electricity.
How to act in case of an accident.
•If an accident has occurred, act promptly, send for medical help immediately.
•If the victim is breathing but unconscious, place him in semi-prone position
(stretched out on the side with mouth and respiratory passages free).
•If the victim is not breathing, start mouth to mouth resuscitation.
•In case of heart failure, give heart massage if you are trained in heart
massage.
4

5
MICROCLEAN (Part. No. 36-180-2101)
FUNCTION
MICROCLEAN can easily be fitted to the wall or placed on a workbench.
It is designed for manual cleaning using a spray gun.
The liquid is recycled automatically and cleaned using sedimentation.
Ventilation hose is available as an accessory.
MICROCLEAN has:
•A well designed ventilation system that is effective for manual cleaning.
•The ventilating cover is easy to connect to existing ventilation system.
•A spray gun that is easy to grip and manoeuvre.
•The electrical system is totally insulated from the liquid.
•Closed off workspace preventing the liquid from leaking.
INSTALLATION
Assembly instructions
1. Mount the cleaner on a wall or place it on a workbench
(when placing it on a workbench, pull out the adjustable legs).
2. Make sure that the sedimentation plate is in place in the sedimentation tank.
3. Put the unloading plate, with the open slots to the left, on top of the
sedimentation tank.
4. Mount the connection to ventilation system on the right side of the cleaner
with the enclosed screws.
5. Fill the tank with 8 litres of liquid, low aromatic degreaser with flash-point
above 70° C. The liquid must not exceed the inner unloading plate.
6. Connect the cleaner to a 230V/50Hz earthed socket. The input plug should
be easy to reach, when the cleaner is in use.
•Do not mix the liquid with for example gasoline, thinner, acetone or similar.
•Do not place the cleaner in rooms where volatile solvents or inflammable
gases are stored or used. This may cause an explosion!
•Do not place the cleaner in wet or humid rooms. This may cause flashover!
5

6
CLEANING INSTRUCTIONS
1. Open the cover and put the parts, which need to be cleaned on the wash
board.
2. Turn the main switch to position 1.
3. Clean manually using the spray gun.
4. Turn the main switch to position 0.
1. Unloading plate
2. Wash board for manual cleaning
3. Sedimentation plate
4. Connection to ventilation system
5. Spray gun with hose
6. Net strainer
7. Main switch
8. Pump
9. Adjustable leg
10 Brush
MAINTENANCE
A bad cleaning result may be caused by:
•The cleaning fluid needs to be changed.
•Pump gasket needs to be replaced.
•Pump needs to be replaced.
A leakage is most likely caused by a damaged pump gasket.
How to change the cleaning fluid
1. Unplug the machine from the power supply.
2. Remove the drainage plug from underneath the machine making sure to
place a bucket or similar to collect the old fluid.
3. Pick up and clean the unloading plate, sedimentation plate and net strainer.
4. Put them back into place. Fill the tank with 8 litre fluid, low aromatic
degreaser with flash point above 70°C. The level of the fluid must not
exceed the inner unloading plate. When diluting degreaser make sure to
add the water before the degreaser.
•The liquids flash point
must exceed 70°C.
If not, it may cause a fire!
•
Do not place the cleaner in wet
or humid rooms.
This may cause flash over!
6

How to change the pump gasket
1. Unplug the machine from the power supply!
2. Empty the liquid, see: 'How to change the liquid'.
3. Unscrew the front plate and loosen the hose clip.
4. Loosen the two screws underneath the ground plate and lift up the pump.
5. Loosen the pump block and unscrew the pump wheel.
6. Change the gasket and put the pump together again.
7. Mount the pump, attach the hose and put the hose clip back on.
8. Refill the tank. See: 'How to change the fluid.
How to change of pump
1. Unplug the machine from the power supply!
2. Empty the liquid, see: 'How to change the fluid’.
3. Unscrew the front-plate and loosen the hose clip.
4. Loosen the two screws underneath the ground plate and lift up the pump.
5. Mount the new pump, attach the hose and put the hose clip back on.
6. Refill the tank. See: 'How to change the Fluid.
How to change the power cord
Work on electrical equipment must be performed by skilled personnel only.
Spare parts and accessories can be ordered from your supplier.
SPARE PARTS
38-100-0001 Brush
38-110-0001 Pump
38-102-0001 Pump gasket
38-103-0001 Net strainer
38-105-0001 Spray gun with hose
38-107-0001 Main switch
ACCESSORIES
36-190-0001 Ventilations hose
TECHNICAL SPECIFICATION
Spray gun with hose 1 st
Tank volume 8 litre
Pump capacity/min 28 litre
Max wash weight 20kg
Cleaning area WxDxH 515x170x335 mm
Cleaning table, WxD 515x340 mm
Outside dimensions, WxDxH 590x250x625 mm
Net strainer 1 st
Voltage supply 230V/50Hz 1fas.
Pump effect 85W
Weight 24kg
Fluid Low aromatic degreaser with
Flash point above 70°C
7
7

8
MAXICLEAN (Part. No. 36-181-2101)
FUNCTION
MAXICLEAN has two cleaning systems, which can be used separately or integrated.
The parts can be cleaned either in a closed area, where the liquid is automatically
sprayed on the part by three nozzles or placed on a wash board and cleaned manually
with a spray-gun.
The fluid is recycled automatically and cleaned using sedimentation. Ventilation hose
and castors are available as accessories.
MAXICLEAN has:
A well designed ventilation system. The ventilating cover is easy to connect to existing
ventilation system.
•A spray gun that is easy to grip and manoeuvre.
•The electrical system is totally insulated from the liquid.
•Closed off workspace preventing the liquid from leaking.
INSTALLATION
Assembly instructions
1. Lay the cleaner on its back. Mount the castors using the enclosed screws, two for
each castor.
2. Make sure that the sedimentation box is located on the left hand side of the liquid
tank.
3. Put the unloading plate, with the open slots to the left and the gripping edge
backwards.
4. Mount the protection hood using the enclosed screws.
5. Mount the connection of the ventilation system on to the protective hood using the
enclosed screws.
6. Fill the tank with 30 litres of fluid, low aromatic degreaser with flash point above
70°C. The liquid must not exceed the inner unloading plate.
7. Connect the cleaner to a 230V/50Hz earthed socket. The input plug should be easy
to reach, when the cleaner is in use.
•Do not mix the liquid with for example petrol, thinner, acetone or similar.
•Do not place the cleaner in rooms where volatile solvents or inflammable gases are
stored or used.
This may cause an explosion!
8

9
•Improper supplements such as thinner or trichloroethylene may cause damage to the
pump and hoses.
CLEANING INSTRUCTIONS
Automatic wash.
1. Open the cover of the protective hood and put the parts, which need to be cleaned,
on the unloading plate.
2. Close the cover and turn the main switch (10) to position 1 and open the faucet (8).
3. Let the cleaner run until the parts are dean.
4. Turn the main switch to position 0. Close the faucet and open the cover.
Manual clean.
1. In order to improve the cleaning result, close the faucet (8).
2. Put the parts that need to be cleaned on the wash board.
3. Turn the main switch to position 1.
4. Clean manually using the spray-gun.
5. Turn the main switch to position 0.
1. Unloading plate
2. Nozzle
3. Sedimentation plate
4. Protective hood
5. Wash board for manual cleaning
6. Connection to ventilation system
7. Service space
8. Faucet
9. Spray gun with hose
10. Mains switch
11. Net strainer
12. Pump
13. Legs
14. Cover.
15. Door
16. Brush
•The liquids flash point
must exceed 70°C.
If not, it may cause a fire!
•
Do not place the cleaner in wet
or humid rooms.
This may cause flash over!
9

10
MAINTENANCE
•A bad cleaning result may be caused by:
•The liquid needs to be replaced.
•The pump gasket needs to be replaced. .The pump needs to be replaced. The
nozzles need to be cleaned
•A leakage is most likely caused by a damaged pump gasket.
How to change the liquid
1. Unplug the machine from the power supply!
2. Remove the drainage plug located underneath the cleaner and collect the old liquid
in a bucket or similar.
3. Pick up and clean the unloading plate, sedimentation plate and the net strainer.
4. Put them back in the same place, fill the tank with 30 litres of liquid, low aromatic
degreaser with flash point above 70° C. The level of the liquid must not exceed the
inner unloading plate.
How to change the pump gasket
1. Unplug the machine from the power supply!
2. Empty the liquid, see: 'How to change the liquid' above.
3. Unscrew the front plate and loosen the hose clip.
4. Loosen the two screws underneath the ground plate and lift up the pump.
5. Loosen the pump-block and unscrew the pump wheel.
6. Change the gasket and put the pump together again.
7. Mount the pump, attach the hose and put the hose-clip back on.
8. Refill the tank see: 'How to change the liquid'.
How to change the pump
1. Unplug the machine from the power supply!
2. Empty the liquid, see: 'How to change the liquid' above.
3. Unscrew the front-plate and loosen the hose clip.
4. Loosen the two screws underneath the ground plate and lift up the pump.
5. Mount the new pump, attach the hose and put the hose-clip back on.
6. Refill the tank see: 'How to change the liquid'.
How to change the power cord
Work on electrical equipment must be performed by skilled personnel only.
Cleaning nozzles
1. Unscrew the nozzles and clean them.
2. Return them.
Spare parts and accessories can be ordered from your supplier.
10

SPARE PARTS
38-100-0001 Brush
38-110-0001 Pump
38-102-0001 Gasket
38-103-0001 Net strainer
38-104-0001 Nozzle
38-105-0001 Spray gun with hose
38-107-0001 Main switch
ACCESSORIES
36-186-9001 Wash basket 420x270x190 mm
36-188-9001 Wash basket 250x120x90 mm
36-191-0001 Castor kit
36-193-0001 Ventilation hose
TECHNICAL SPECIFICATION
Number of nozzles 3
Spray gun with brush 1
Pump capacity/min 28 liter
Tank volume 30 liter
Max weight of parts to be cleaned 100 kg
Cleaning area, WxDxH 900x410x310 mm
Cleaning board, BxD 930x230 mm
Outside dimension, WxDxH (Without castors) 970x700x1130 mm
Wash boards height 830 mm
Net strainer 1
Voltage supply 230V/50Hz 1fas
Pump effect 85W
Weight 72 kg
Degreaser Low Aromatic degreaser with a,
Flash point over 70°C.
11
11

12
MASTERCLEAN (Part. no. 36-182-2101)
FUNCTION
MASTERCLEAN has two cleaning systems, which can used separately or integrated.
The parts can be cleaned either in a closed area, where the liquid is automatically
sprayed on the part by six nozzles or placed on a wash bench and cleaned manually
with a spray-gun.
The liquid is recycled automatically and cleaned using sedimentation. Ventilation hose
and castors are available as accessories.
MASTERCLEAN has:
•A well designed ventilation system. The cleaner is easy to connect to existing
ventilation system.
•A spray gun that is easy to grip and manoeuvre.
•The electrical system is totally insulated from the liquid.
•Closed off workspace preventing the liquid from leaking.
INSTALLATION
Assembly instructions
1. Make sure that the sedimentation box is located inside the liquid tank.
2. Put the unloading plate and the outflow plate on top of the sedimentation box.
3. Mount the connection of the ventilation system on to the protective hood using the
enclosed screws.
4. Fill the tank with 50 litres of liquid, low aromatic degreaser with flash point above
70°c.The liquid must not exceed the inner unloading plate.
5. Connect the cleaner to a 230V/50Hz earthen socket. The input plug should be easy
to reach, when the cleaner is in use.
•Do not mix the liquid with for example gasoline, thinner, acetone or the like.
•Do not place the cleaner in rooms where volatile solvents or inflammable gases are
stored or used. This may cause an explosion!
The flash point of the liquid must exceed 70°C.
If not, it may cause fire!
12
13
CLEANING INSTRUCTIONS
Automatic wash
1. Open the cover of the protective hood and place the parts on the unloading plate.
2. Close the cover.
3. If you wish to have the liquid sprayed only from above the part, turn the switch (6) to
position 1.
4. If you wish to have the liquid sprayed from both above and underneath the part, turn
the switch (6) to position 2.
5. Set the timer (7) for the desired cleaning time. 6. When the cleaning is finished open
the cover.
Manual cleaning
1. Put the parts, which need to be cleaned, on the wash table.
2. Turn the switch (5) to position 1.
3. Clean manually using the spray-gun.
4. Turn the switch to position o.
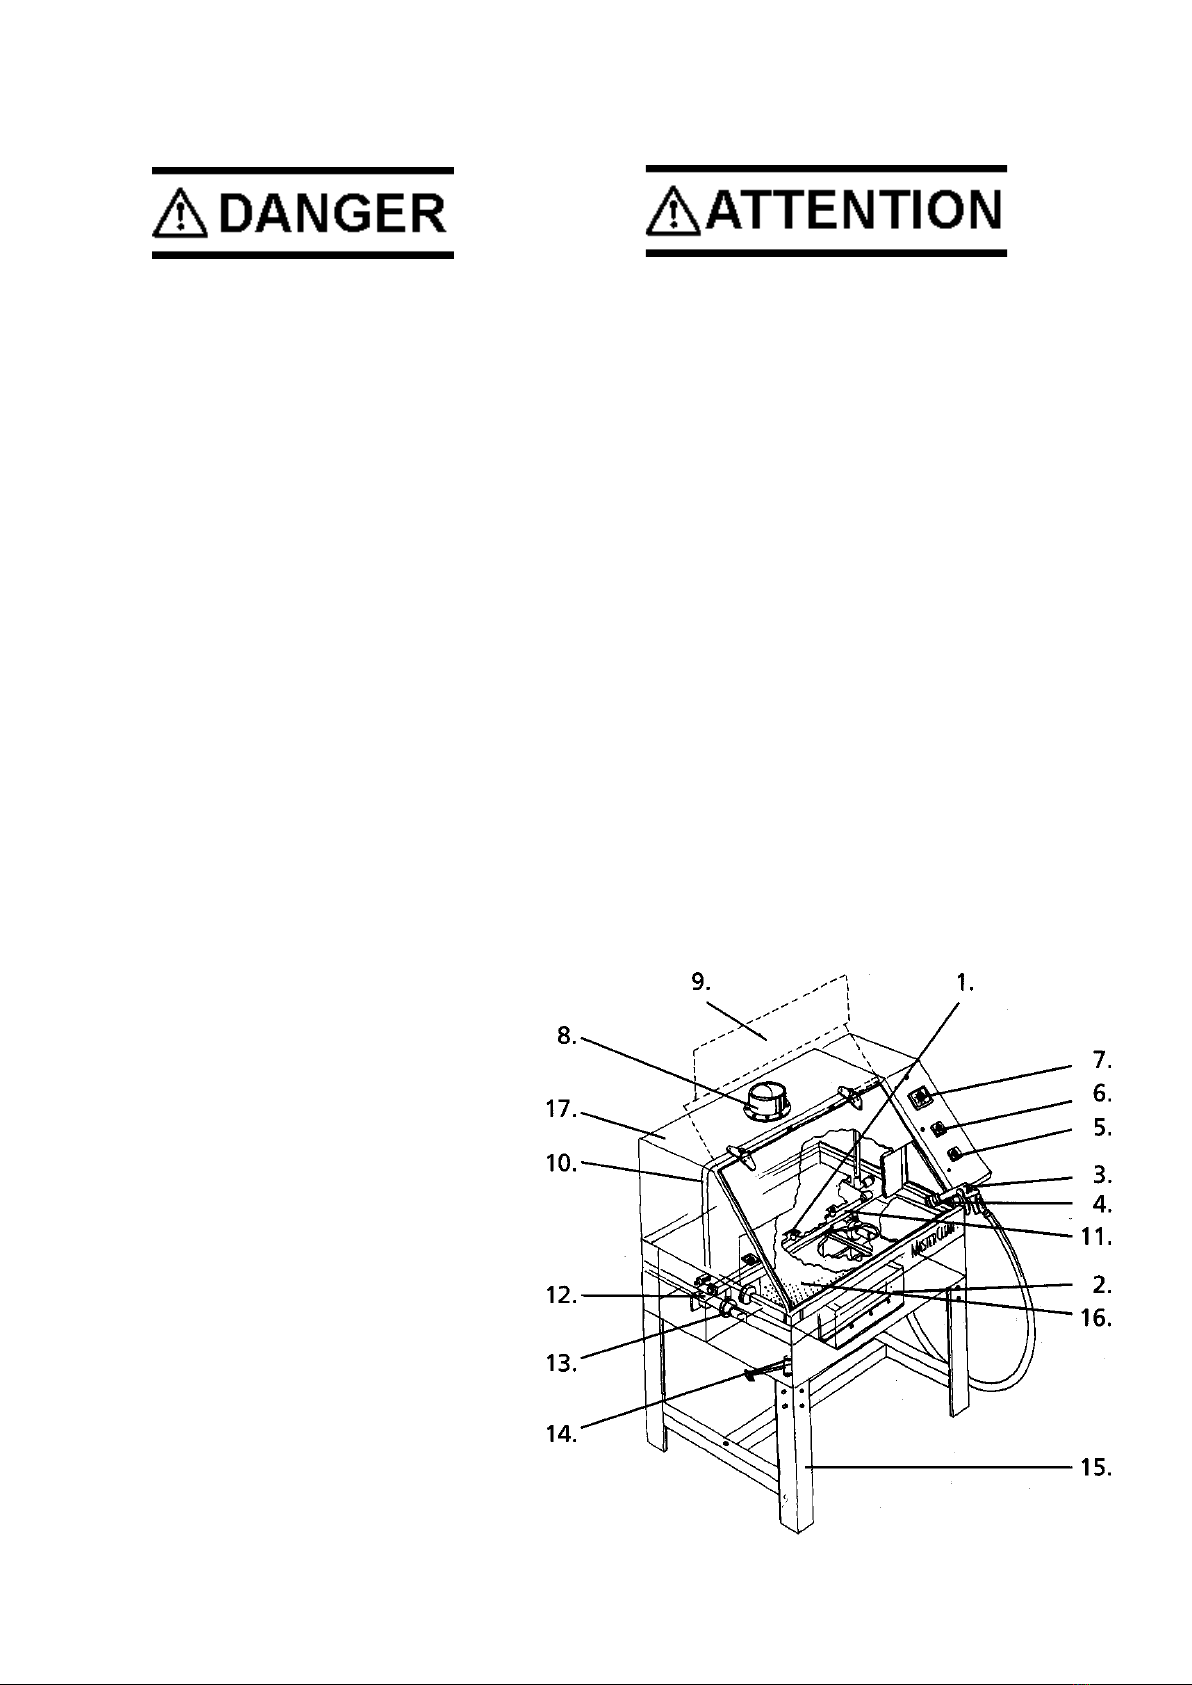
1. Nozzle
2. Sedimentation box
3. Spray gun with hose
4. Brush
5. Switch manual wash
6. Switch automatic clean
7. Timer
8. Connection for ventilation hose
9. Cover
10. Wash pipe, upper
11. Wash pipe, lower
12. Pump, 3
13. Net strainer 3
14. Valve
15. Leg
16. Wash board for hand wash
17. Protective hood
•Do not place the cleaner in
wet or humid rooms.
This may cause flash over.
•
Improper supplements such as
thinner or trichloroethylene may
cause damage to the pump and
hoses.
13
CLEANING INSTRUCTIONS
Automatic wash
1. Open the cover of the protective hood and place the parts on the unloading plate.
2. Close the cover.
3. If you wish to have the liquid sprayed only from above the part, turn the switch (6) to
position 1.
4. If you wish to have the liquid sprayed from both above and underneath the part, turn
the switch (6) to position 2.
5. Set the timer (7) for the desired cleaning time. 6. When the cleaning is finished open
the cover.
Manual cleaning
1. Put the parts, which need to be cleaned, on the wash table.
2. Turn the switch (5) to position 1.
3. Clean manually using the spray-gun.
4. Turn the switch to position o.
1. Nozzle
2. Sedimentation box
3. Spray gun with hose
4. Brush
5. Switch manual wash
6. Switch automatic clean
7. Timer
8. Connection for ventilation hose
9. Cover
10. Wash pipe, upper
11. Wash pipe, lower
12. Pump, 3
13. Net strainer 3
14. Valve
15. Leg
16. Wash board for hand wash
17. Protective hood
•Do not place the cleaner in
wet or humid rooms.
This may cause flash over.
•
Improper supplements such as
thinner or trichloroethylene may
cause damage to the pump and
hoses.
13
Manual cleaning
1. Put the parts, which need to be cleaned, on the wash table.
2. Set the timer (7) for the desired time.
3. Turn the switch (5) to position 1.
4. Clean manually using the spray-gun.
5. Turn the switch to position 0.

14
MAINTENANCE
A bad cleaning result may be caused by:
•The liquid needs to be replaced.
•The pump gasket needs to be replaced.
•The pump needs to be replaced.
•The nozzles need to be cleaned
A leakage is most likely caused by a damaged pump gasket.
How to change the liquid
1. Unplug the machine from the power supply!
2. Open the valve, that is located underneath the cleaner and collect the old liquid.
3. Pick up and dean the unloading plate, the wash bench, the sedimentation plate and
the net strainer.
4. Put them back in the same place, fill the tank with 50 litres of liquid, low aromatic
degreaser with flash-point above 70° C.
The level of the liquid must not exceed the inner unloading plate.
How to change the pump gasket
1. Unplug the machine from the power supply!
2. Empty the liquid, see: 'How to change the liquid' above.
3. Unscrew the front-plate and loosen the hose clip.
4. Loosen the two screws underneath the ground plate and lift up the pump.
5. Loosen the pump-block and unscrew the pump wheel.
6. Change the gasket and put the pump together again.
7. Mount the pump, attach the hose and put the hose-clip back on. 8. Refill the tank
see: 'How to change the liquid'.
Change of pump
1. Unplug the machine from the power supply!
2. Empty the liquid, see: 'How to change the liquid' above. 3. Unscrew the front-plate
and loosen the hose clip.
4. Loosen the two screws underneath the ground plate and lift up the pump.
5. Mount the new pump, attach the hose and put the hose-clip back on.
6. Refill the tank see: 'How to change the liquid'.
How to change the power cord
Work on electrical equipment must be performed by skilled personnel only.
Cleaning nozzles
1. Unscrew the nozzles and dean them.
2. Return them.
Spare parts and accessories may be ordered from your supplier.
14

SPARE PARTS
38-100-0001 Brush
38-110-0001 Pump
38-102-0001 Pump gasket
38-103-0001 Net strainer
38-104-0001 Nozzle
38-106-0001 Spray gun with hose
38-107-0001 Switch manual wash
38-108-0001 Switch automatic wash
36-183-0001 Timer
ACCESSORIES
36-186-9001 Wash basket 420x270x190 mm
36-188-9001 Wash basket 250x120x90 mm
36-193-6001 Ventilation hose
TECHNICAL SPECIFICATION
No. of nozzles 6
Spray gun with brush 1
Pumps 3
Pump capacity/min 28 liter
Tank volume 50 liter
Max weight of parts to be cleaned 100 kg
Cleaning area, WxDxH 770x400x370 mm
Wash board, BxD 840x200 mm
Outside measurements, WxDxH 1010x710x1300 mm
Wash boards height 870mm
Net strainers 3
Voltage 230VI 50Hz 1fas.
Pump effect 255W
Weight 96 kg
Cleaning fluid Low aromatic degreaser with,
Flash point over 70°C.
15
15

This manual suits for next models
5
Table of contents


