GDC LPU-1000 User manual

INSTALLATION MANUAL FOR
LPU-1000 LED PLAYER UNIT
[THIS DOCUMENT IS PROPRIETARY AND CONFIDENTIAL. NO PART OF THIS DOCUMENT MAY BE DISCLOSED IN
ANY MANNER TO A THIRD PARTY WITHOUT THE PRIOR WRITTEN CONSENT OF GDC TECHNOLOGY]
Feb 26, 2018

INSTALLATION MANUAL FOR LPU-1000 LED PLAYER UNIT -2- 26 Feb 2018
TABLE OF CONTENTS
1. Introduction.................................................................................................. 7
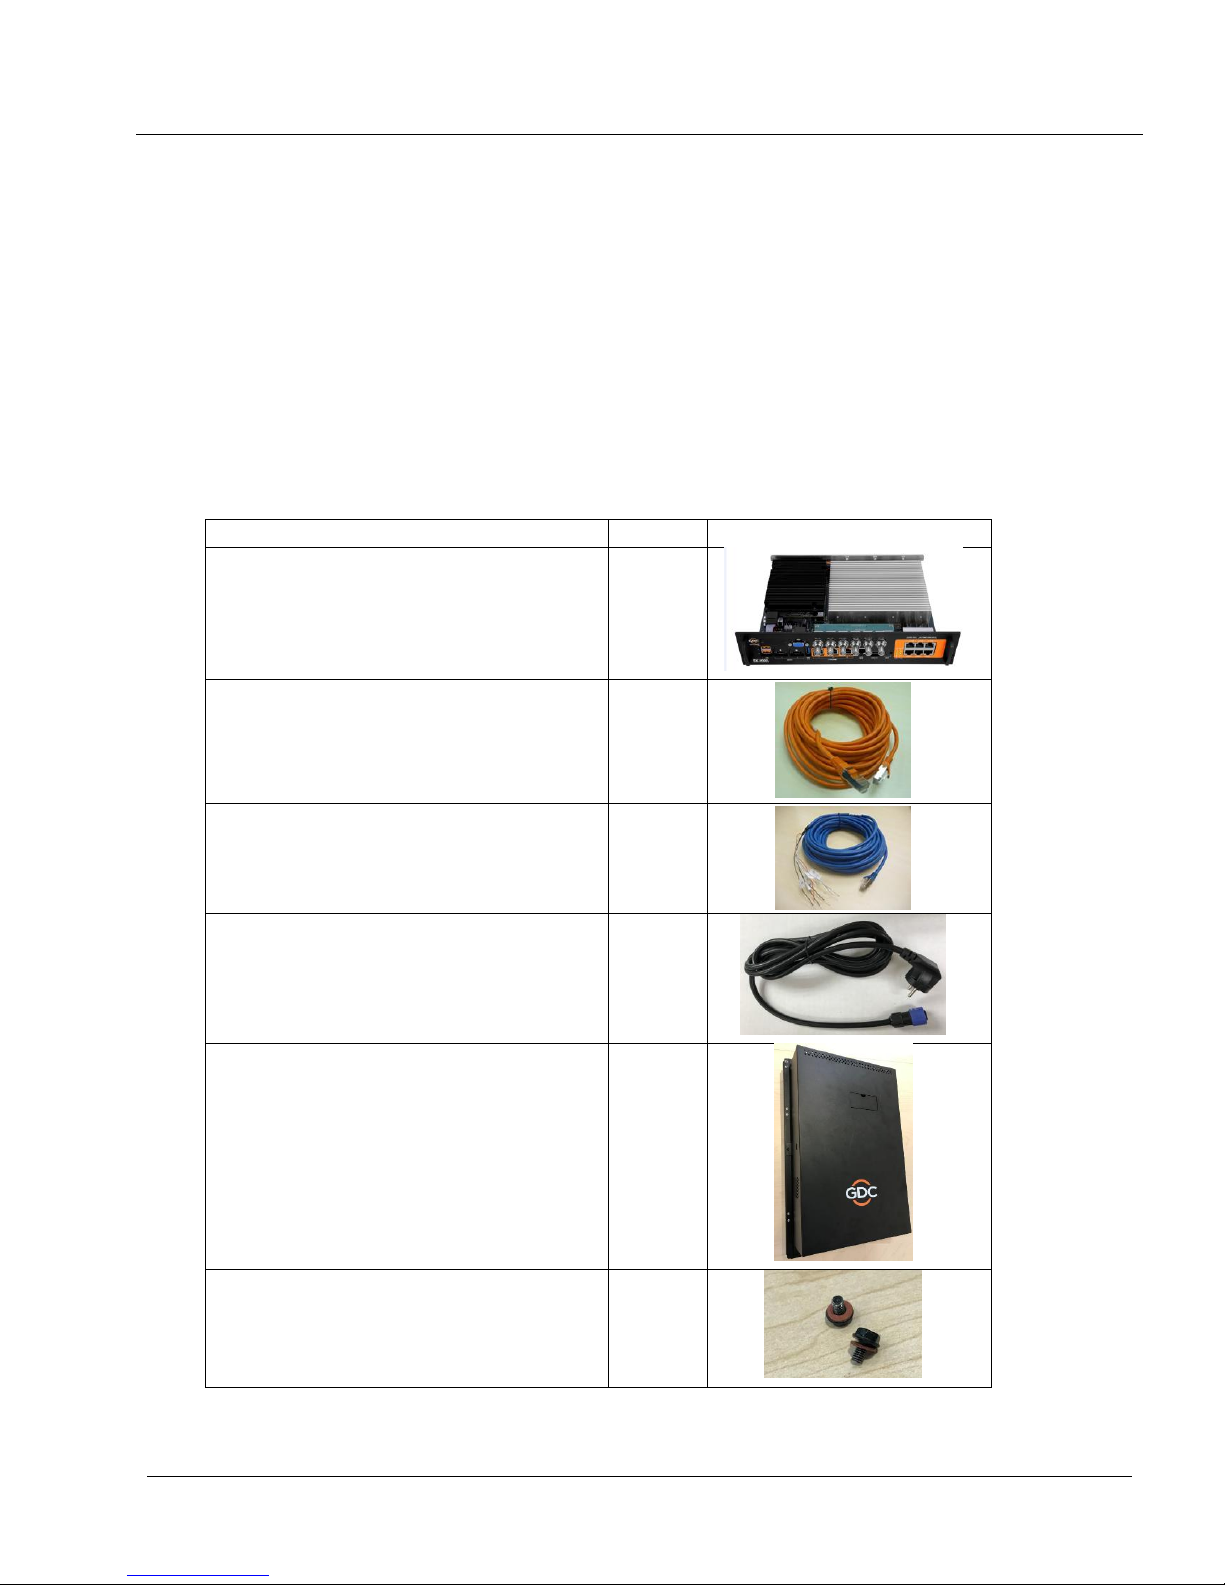
1.1 Equipment List...........................................................................................................7
2. Assembly of the Media Block in the LED Player Unit............................... 9
2.1 Performing visual physical check of the LED Player Unit .....................................9
2.2 Disassembly of the LED Cinema Processor Board..............................................12
2.3 Assembly of the Media Block.................................................................................18
2.3.1 Disassembly of the Media Block supporting coverplate .......................................... 18
2.3.2 Installation of the Media Block ................................................................................20
2.4 Assembly of the LED Cinema Processor Board...................................................26
2.5 Cabling Connection.................................................................................................29
3. Installation of the LED Player Unit ........................................................... 33
3.1 Assembly of the LED Player Unit...........................................................................33
3.2 Cable Connection with the LED Player Unit..........................................................37
3.3 Installation of the LED Player Unit Cover..............................................................40
3.4 Power Cord Connection to the LED Player Unit ...................................................42
4. External Monitor, Keyboard and Mouse .................................................. 43
5. Installation of Enterprise Storage/ Enterprise Storage Plus.................. 43
5.1. Product Specifications...........................................................................................43
5.2. HDD Tray Lock........................................................................................................43
5.3 Front Panel...............................................................................................................44
5.4 Back Panel ...............................................................................................................45
5.5Installation of Enterprise Storage/ Enterprise Storage Plus................................46
5.6 eSATA connection to the Media Block ..................................................................46
5.6.1. eSATA connection on the Enterprise Storage/Enterprise Storage Plus................... 46
5.7 Procedures to install the HDD................................................................................48
5.8 Indicators on the Enterprise Storage/Enterprise Storage Plus ...........................53
5.8.1. LED Indicator ...........................................................................................................53
5.8.2. Warning Buzzer ....................................................................................................... 55
5.8.3. Hard Drive Failure....................................................................................................55

TABLE OF CONTENTS
INSTALLATION MANUAL FOR LPU-1000 LED PLAYER UNIT -3- 26 Feb 2018
6. Sequences of Powering on the System...................................................... 56
7. Operation of Enterprise Storage/ Enterprise Storage Plus.................... 56
7.1. Selecting the Enterprise Storage/Enterprise Storage Plus for the Content Storage
56
8. Media Block Network Setup...................................................................... 57
8.1 Media Block Network Setup....................................................................................57
8.2 Media Block Marriage and Clearing Door Tampers from the Media Block........59
9. Touch Panel Control.................................................................................. 60
10. Time Zone Setup........................................................................................ 62
11. Content Ingest Management Setup.......................................................... 63
11.1 Configuring a content ingest source ...................................................................63
11.1.1.Content ingest from USB disk................................................................................. 63
11.1.2 Content ingest from FTP.........................................................................................64
11.2 Selecting an ingest source ...................................................................................64
12. Audio Setup................................................................................................ 65
13. Subtitles...................................................................................................... 67
14. Automation Setup...................................................................................... 68
14.1 Automation setup for server GPIO.......................................................................68
14.2 Automation setup for eCNA devices....................................................................69
14.3 Automation setup for JNIOR devices ..................................................................71
14.4 Automation setup for Christie ACT devices........................................................73
14.5 Automation Setup for GDC Sound Processor.....................................................75
14.6 Automation setup for Dolby devices ...................................................................77
14.7 Automation setup for USL DAX devices..............................................................79
14.8 Automation setup for USL JSD devices ..............................................................81
15. Component Engineering TA-10 Setup ..................................................... 83
17. Appendix .................................................................................................... 84
17.1. AES Audio and GPIO Pinout................................................................................84
17.2 GPIO Power Details ...............................................................................................84

-4-
Thank you for purchasing the LPU-1000 LED Player Unit from GDC Technology Limited.
To ensure proper operation and to maximize value of the LPU-1000 LED Player Unit, please review this installation
manual. It will guide you through all the features and benefits.
COPYRIGHT NOTICE
Copyright© 2018 by GDC Technology Limited
All rights reserved. No part of this manual may be copied or distributed, transmitted, transcribed, stored in a retrieval system,
or translated into any human or computer language, in a form or by anymeans, electronic, mechanical, photocopying, recording,
magnetic, optical, manual or otherwise, or disclosed to third parties without prior written permission of GDC Technology Limited.
MANUAL DISCLAIMER
The contents, features and specifications stated in this manual are subject to change without notice due to continuous product
development and improvements. In no other event shall GDC Technology Limited be liable for any loss of profit or any other
commercial damages, including but not limited to special, consequential, or other damages.

CONTACT AND OFFICES
INSTALLATION FOR LPU-1000 LED PLAYER UNIT -5- 26 Feb 2018
CONTACTS AND OFFICES
Website: www.gdc-tech.com Email: inf[email protected]m
24/7 Engineering
Support Hotline:
Hong Kong
(Headquarters)
China (Beijing)
China (Shenzhen)
Spain(Barcelona)
Unit 1-7, 20th Floor,
Kodak House II,
39 Healthy Street East,
North Point, Hong Kong
Tel: +852 2507 9555
Rm. 609-618, Office
Building,20# Xinde
Street, Xicheng
District, Beijing, P.R.
China 100088
Tel: +86 10 6205 7040
Room A701, 7/F,
Languang Technology Building,
No.7 Xinxi Road, North Zone,
HighTech Park, Nanshan District,
Shenzhen, China
Tel: +86 755 8608 6000
C/ Esteve Terradas, nº
27, esc. D, Despacho 1
08023 Barcelona, Spain
Tel: +34 93 159 51 75
Peru (Lima)
USA (Los Angeles)
Brazil
(São Paulo)
Singapore
Calle Manuel Miota 170,
Miraflores Lima 18, Peru
Tel: +51 1 340 5146
1016 West Magnolia
Boulevard, Burbank,
CA 91506, USA
Tel: +1 818 972 4370 /
+1 877 743 2872
(Toll Free)
Av. Antônio Carlos
Comitre, 540, 3º andar,
Conjunto 31, Campolim,
Sorocaba / São Paulo,
CEP 18047-620, Brasil
Tel: +55 15 33269301
10 Ubi Crescent,
Ubi Tech Park,
Lobby B, #06-25
Singapore 408564
Tel: +65 6222 1082
North America
+1 877 743 2872 (TollFree)
Latin America
+52 55 8851 1198
Europe
+34 928 912 295
China
+86 400 886 0966
(Toll Free)
North Asia
+852 3520 0920
India
+91 022 4044 0500
South East Asia
+65 6100 4328
Australia/
New Zealand
+61 407 040 744

CONTACT AND OFFICES
INSTALLATION MANUAL FOR LPU-1000 LED PLAYER UNIT -6- 26 Feb 2018
Indonesia (Jakarta)
Japan (Tokyo)
India (Mumbai)
Mexico
(Mexico City)
Total Building Lantai 4 Suite 0401,
Jl. Letjen S. Parman Kav. 106A,
Kel Tomang, Kec. Grogol
Petamburan,
Jakarta Barat 11440
Tel: +62 21 2920 4691
3F, Kyobashi-Chuo Bldg,
1-14-7 Kyobashi Chuo-ku,
Tokyo 104-0031, Japan
Tel: +81 3 5524 2607
Office No. B-207/208,
Everest Chamber,
Andheri Kurla Road,
Marol, Andheri (East),
Mumbai-400 059, India
Tel: +91 22 4044 0500
Ave. Santa Fe 94,
Torre A Piso 8,
Col. Zedec Santa Fe,
Alvaro Obregon,
Mexico, D.F.,
C.P. 01210 Mexico
Tel: +52 55 8851 1198/
___+52 55 8851 1165
United Arab Emirates
(Dubai)
Business Centre,
Dubai World Central,
PO Box 390667,
Dubai UAE

1.INTRODUCTION
INSTALLATION MANUAL FOR LPU-1000 LED PLAYER UNIT -7- 26 Feb 2018
1. Introduction
This document is a guide through the process of setting up the LPU-1000 LED Player Unit.
1.1 Equipment List
This section provides a suggested installation configuration of the LPU-1000 LED Player Unit for reference.
Please contact our sales representative to specify the accessory needed for the installation.
The LPU-1000 LED Player Unit Packaging includes:
Item
Qty
Photo (for reference only)
Media Block with Supporting Coverplate#
1
RJ45 AES Audio Cable
1
RJ45 GPIO Cables
2
Power Cord
1
Metal Enclosure
1
Screw for Media block
2
#Please keep the Media Block Supporting Coverplate and the packaging box after installation even if they are not in use. The
Media Block needs to be installed back with the supporting coverplate during shipment (e.g. in case of maintenance need).
Please refer to Section 2.3.1 Disassembly of Media Block supporting coverplate for details.

1.iNTRODUCTION
INSTALLATION MANUAL FOR LPU-1000 LED PLAYER UNIT -8- 26 Feb 2018
The Enterprise Storage Packaging Includes:
Item
Qty
Photo (for reference only)
Enterprise Storage
1
HDD Tray Key
1
3.5” SATA HDD
5#
Power Cord
1
eSATA Cable
1
Manual CD
1
Quick Start Guide
1
#The number of HDD varies according to the capacity of Enterprise Storage ordered.

2. ASSEMBLY OF THE MEDIA BLOCK IN THE LED PLAYER UNIT
INSTALLATION MANUAL FOR LPU-1000 LED PLAYER UNIT -9- 26 Feb 2018
2. Assembly of the Media Block in the LED Player Unit
2.1 Performing visual physical check of the LED Player Unit
1. Perform visual check of the physical appearance of the LED Player Unit. If there are any damages,
deformities, or other problems, please contact the GDC service teams at our regional offices or the engineering
support hotline.
2. Check the brackets below the settling plate. They can be bent outwards as shown in the photos.

2. ASSEMBLY OF THE MEDIA BLOCK IN THE LED PLAYER UNIT
INSTALLATION MANUAL FOR LPU-1000 LED PLAYER UNIT -10- 26 Feb 2018
3. Open the LED Player Unit cover by unscrewing the 6 screws as circled below.
4. Hold the center position of the cover. Remove the cover and set it aside.
5. Perform visual check of the components and cabling in the LED Player Unit. If there are any damages,
deformities, or other problems, please contact GDC service teams at our regional offices or engineering support
hotline.

2. ASSEMBLY OF THE MEDIA BLOCK IN THE LED PLAYER UNIT
INSTALLATION MANUAL FOR LPU-1000 LED PLAYER UNIT -11- 26 Feb 2018
6. The photo below shows the components and cabling available in the LED Player Unit.
Touch Panel
Sub-board
Power
Supply Unit
Lower
T-Con
Tamper
Switch
Fan
Fan
Cable
Fan
Fan Cable
8 Pin
Power Slot
Upper
T-Con
LED Cinema
Processor
Board
Flexible Flat
Cable (FFC)
8 Pin
Power Cable
with ferrite
core
Tamper
Switch Cable
Media Block
Coverplate

2. ASSEMBLY OF THE MEDIA BLOCK IN THE LED PLAYER UNIT
INSTALLATION MANUAL FOR LPU-1000 LED PLAYER UNIT -12- 26 Feb 2018
2.2 Disassembly of the LED Cinema Processor Board
To install the media block, the LED Cinema Processor Board needs to be disassembled first. Follow the
procedures below.

2. ASSEMBLY OF THE MEDIA BLOCK IN THE LED PLAYER UNIT
INSTALLATION MANUAL FOR LPU-1000 LED PLAYER UNIT -13- 26 Feb 2018
1. Disconnect all five cables around LED Cinema Processor Board.
a. Disconnect the fan cables on both sides by pressing the cable slot.

2. ASSEMBLY OF THE MEDIA BLOCK IN THE LED PLAYER UNIT
INSTALLATION MANUAL FOR LPU-1000 LED PLAYER UNIT -14- 26 Feb 2018
b. Disconnect the tamper switch cable by pressing the cable slot.
c. Disconnect the 8-pin power cable by pressing the cable slot.

2. ASSEMBLY OF THE MEDIA BLOCK IN THE LED PLAYER UNIT
INSTALLATION MANUAL FOR LPU-1000 LED PLAYER UNIT -15- 26 Feb 2018
d. To disconnect the FFC cable, lift the metal lock, and then pull out the cable.
Lift the metal lock up: Pull out the FFC cable:
→→
Metal lock

2. ASSEMBLY OF THE MEDIA BLOCK IN THE LED PLAYER UNIT
INSTALLATION MANUAL FOR LPU-1000 LED PLAYER UNIT -16- 26 Feb 2018
2. Unscrew the 6 screws on the LED Cinema Processor Board.

2. ASSEMBLY OF THE MEDIA BLOCK IN THE LED PLAYER UNIT
INSTALLATION MANUAL FOR LPU-1000 LED PLAYER UNIT -17- 26 Feb 2018
3. After unscrewing the screws, hold the center position of the LED Cinema Processor Board, take it out and
set it aside. Handle with care to avoid deforming or damaging the board.

2. ASSEMBLY OF THE MEDIA BLOCK IN THE LED PLAYER UNIT
INSTALLATION MANUAL FOR LPU-1000 LED PLAYER UNIT -18- 26 Feb 2018
2.3 Assembly of the Media Block
2.3.1 Disassembly of the Media Block supporting coverplate
1. The media block is delivered with a supporting coverplate indicated below, which is required for support
in the box during shipment.
2. Since the media block will be installed on an actual coverplate, remove the supporting coverplate by
unscrewing the screws and rings as indicated below.

2. ASSEMBLY OF THE MEDIA BLOCK IN THE LED PLAYER UNIT
INSTALLATION MANUAL FOR LPU-1000 LED PLAYER UNIT -19- 26 Feb 2018
3. The screws and rings are removed and set aside for installation in Section 2.3.2 step 8.
Important note:
Please keep the media block supporting coverplate after the installation even if it is not in use. The
media block needs to be installed back with the supporting coverplate during shipment (e.g. in case of
maintenance need).

2. ASSEMBLY OF THE MEDIA BLOCK IN THE LED PLAYER UNIT
INSTALLATION MANUAL FOR LPU-1000 LED PLAYER UNIT -20- 26 Feb 2018
2.3.2 Installation of the Media Block
1. Remove the media block supporting metal stand, by unscrewing the two screws indicated below.
→
2. Put the supporting metal stand at the back of the media block. Install by screwing in the indicated
positions below.
→
→
Important Note:
Check and make sure that the supporting metal stand is flat, and avoid physical damages or
deformities.
Other manuals for LPU-1000
1
Table of contents
Other GDC Turntable manuals