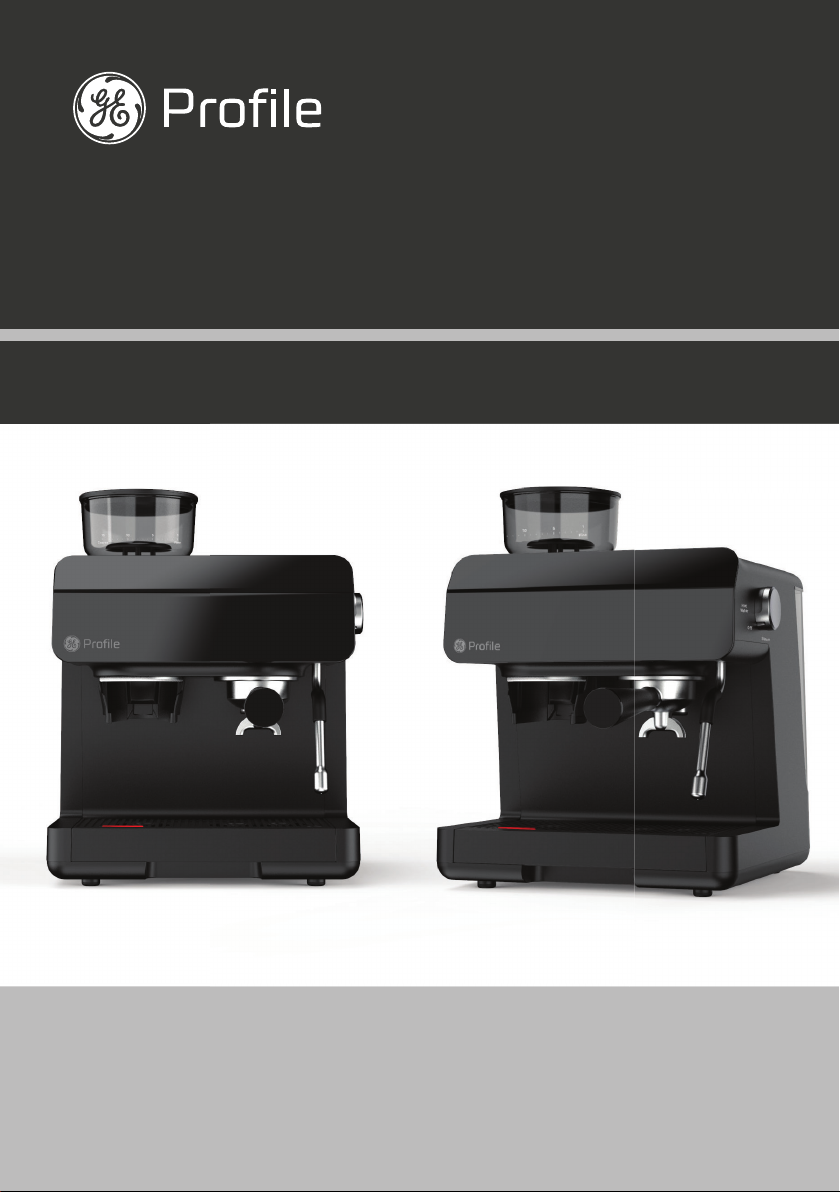
GE P7CESAS6RBB User manual

ENGLISH / FRANÇAIS / ESPAÑOL
SEMI AUTOMATIC
ESPRESSO MACHINE + FROTHER
P7CESAS6RBB
49-9000027 Rev. 1 08-21 GEA

2
THANK YOU FOR MAKING GE APPLIANCES A
PART OF YOUR HOME.
Whether you grew up with GE Appliances, or this is your first,
we’re happy to have you in the family.
We take pride in the craftsmanship, innovation and design that
goes into every GE Appliances product, and we think you will too.
Among other things, registration of your appliance ensures that
we can deliver important product information and warranty details
when you need them.
GE is a trademark of the General Electric Company. Manufactured under trademark license.

3
Table of Contents
Product Registration
SAFETY INFORMATION ......................................4
GETTING STARTED ..........................................6
COMPONENTS ..............................................7
CONTROLS .................................................8
ACCESSORIES ..............................................8
FUNCTIONS.................................................9
ALERTS ...................................................10
NOTIFICATION LED ......................................... 11
USING YOUR ESPRESSO MACHINE ...........................12
CARE AND CLEANING.......................................16
TIPS ......................................................18
TROUBLESHOOTING ........................................19
WiFi CONNECT.............................................21
FCC STATEMENT ...........................................22
LIMITED WARRANTY .......................................24
CONSUMER SUPPORT.......................................25
Write the model and serial numbers here:
Model #_________________
Serial # _________________
Find these numbers on a label on the back of the machine.

4
IMPORTANT SAFETY INFORMATION
READ ALL INSTRUCTIONS BEFORE USING THE APPLIANCE
SAVE THESE INSTRUCTIONS
WARNING Read the instructions carefully before using the appliance for
WKH¿UVWWLPH6DYHWKHVHLQVWUXFWLRQVIRUUHIHUHQFH7KHDSSOLDQFHLVGHVLJQHGIRU
domestic use and may only be operated in accordance with these instructions for
use. Always handle with care and warn other users of potential danger.
IMPORTANT SAFEGUARDS
Always follow these safety precautions when using this appliance.
• Read all instructions before using
• Use only a 120 V, 60 Hz standard electrical supply that is properly grounded in
accordance with the National Electric Code and local codes and ordinances.
0DNHVXUHWKHDSSOLDQFHLVVHWXSRQDÀDWDQGVWHDG\VXUIDFH
• 7XUQWKHDSSOLDQFH2))WKHQXQSOXJIURPWKHRXWOHWZKHQQRWLQXVHEHIRUH
DVVHPEOLQJRUGLVDVVHPEOLQJSDUWVDQGEHIRUHFOHDQLQJ7RXQSOXJJUDVSWKHSOXJ
and pull from the outlet. Never pull from the power cord.
• Do not use outdoors. Household use only.
• Use this product only for its intended purpose as described in this user manual.
• Use of any accessories not recommended by the manufacturer can cause
injuries.
• 7KLVDSSOLDQFHLVQRWLQWHQGHGIRUXVHE\SHUVRQVLQFOXGLQJFKLOGUHQZLWK
reduced physical, sensory, or mental capabilities, or lack of experience and
knowledge, unless they are closely supervised and instructed concerning use
of the appliance by a person responsible for their safety. Close supervision is
necessary when any appliance is used by or near children. Children should be
supervised to ensure that they do not play with the appliance.
$OORZWRFRROEHIRUHSXWWLQJRQRUWDNLQJRႇSDUWVDQGEHIRUHFOHDQLQJWKH
DSSOLDQFH'2127WRXFKWKHVWHDPZDQGDIWHUXVH'RLQJVRFDQFDXVHVHULRXV
burns.
• Make sure the drip tray is always present during use.
$OZD\VXVHFROGZDWHUWRPDNHFRႇHHLQ\RXUHVSUHVVRPDFKLQH:DUPZDWHURU
RWKHUOLTXLGVFRXOGFDXVHGDPDJHWRWKHFRႇHHPDNHU
'2127SXWDQ\OLTXLGRWKHUWKDQZDWHULQWKHZDWHUWDQN
• 7RUHGXFHWKHULVNRIILUHRUHOHFWULFVKRFNGRQRWDWWHPSWWRGLVDVVHPEOHUHSDLU
modify, or replace any part of your product.
,IWKHSRZHUFRUGLVGDPDJHGLWPXVWEHUHSODFHGE\WKHPDQXIDFWXUHU'2127
replace the power cord on your own.
• Do not operate any appliance with a damaged cord or plug or after the appliance
malfunctions, or is dropped or damaged in any manner. Contact GE Appliances
at the website listed in the Contact Us section for information on examination,
repair, or adjustment.

5
IMPORTANT SAFETY INFORMATION
READ ALL INSTRUCTIONS BEFORE USING THE APPLIANCE
SAVE THESE INSTRUCTIONS
WARNING Read the instructions carefully before using the appliance for
WKH¿UVWWLPH6DYHWKHVHLQVWUXFWLRQVIRUUHIHUHQFH7KHDSSOLDQFHLVGHVLJQHGIRU
domestic use and may only be operated in accordance with these instructions for
use. Always handle with care and warn other users of potential danger.
IMPORTANT SAFEGUARDS
Always follow these safety precautions when using this appliance.
8VHWKHFRႇHHJULQGHUWRJULQGFRႇHHEHDQVRQO\'2127SXWFRႇHHJURXQGVLQ
WKHHVSUHVVRPDFKLQHRQO\SXWZKROHFRႇHHEHDQVLQWKHFRႇHHEHDQFRQWDLQHU
• Do not allow children to touch the appliance or the power cord during the
operation
'2127XVHWKHHVSUHVVRPDFKLQHLIWKHGULSWUD\LVRXWRISRVLWLRQ
'2127LPPHUVHWKHDSSOLDQFHLQZDWHURUDQ\RWKHUOLTXLGV7KLVZLOOGDPDJH
the appliance and be a risk of an electric shock.
• Do not let cord hang over edge of table or counter.
• Do not let cord contact hot surface, including the stove.
• '2127XVHDQH[WHQVLRQSRZHUFRUG
7KHXVHRIDFFHVVRULHVQRWLQFOXGHGLQWKHER[LVQRWUHFRPPHQGHG,WPLJKWEH
dangerous and should be avoided.
• Do not operate the hot water function continuously for more than one tank of
water.
• Check hopper for presence of foreign objects before usage.
• Avoid contacting moving parts. Do not attempt to defeat any safety interlock
mechanisms.
• Do not touch hot surfaces. Use handles or knobs.
• Do not place on or near a hot gas or electric burner, or in a heated oven.
7RGLVFRQQHFWWXUQDQ\FRQWUROWRRႇWKHQUHPRYHSOXJIURPZDOORXWOHW
• Do not use appliance for other than intended use.
WARNING 7RDYRLGWKHULVNRILQMXU\GRQRWRSHQWKHEUHZFKDPEHUGXULQJ
the brew process.
WARNING RISK OF FIRE OR ELECTRIC SHOCK
ŶTO REDUCE THE RISK OF FIRE OR ELECTRIC SHOCK, DO NOT REMOVE
COVER (OR BACK).
ŶDo not attempt to repair or replace any part of your espresso machine unless
it is specifically recommended in this manual. All other servicing should be
performed by authorized service personnel.
ŶA short power-supply cord (or detachable power-supply cord) is provided to
reduce risks resulting from becoming entangled in or tripping over a longer
cord.

6
Getting Started
NOTE: For household use only.
Drip Tray
Ŷ5HPRYHWKHSDFNDJLQJIURPWKHGULSWUD\EHIRUHXVLQJWKHPDFKLQH
General Information
Ŷ(VSUHVVRLVVHQVLWLYHWREHDQVHOHFWLRQDQGJULQGVL]H:H
UHFRPPHQGWRVWDUWZLWKDJULQGVL]HRIWR2YHUO\ILQH
grounds may result in clogging and short shots. See page 15
for instructions on dialing in your perfect shot.
Ŷ3ODFHGULSWUD\LQSODFHSULRUWRSRZHULQJWKHPDFKLQHRQ
Machine purges when powered on.
Water Tank
ŶRemove the water tank and orange seal from the bottom
RIWKHWDQNDQG¿OOLWZLWKZDWHU*HQWO\SUHVVGRZQRQ
WKH:DWHU7DQNVRLWLVVHFXUHLQWKHPDFKLQHEHIRUHXVLQJDQ\IXQFWLRQV
ŶMake sure the water level is between the MIN and MAXOLQHVLQWKH:DWHU7DQN
before use.
&RႇHH%HDQ+RSSHU
ŶRemove the bean hopper from the packaging
ŶPlace the bean hopper into the machine by aligning the arrow with the
machine.
Ŷ7XUQWKHEHDQKRSSHUFORFNZLVHWRORFNLQSODFH
Ŷ7XUQWKHEHDQKRSSHUWRDJULQGVL]HEHWZHHQDQG
NOTE: 7KHKRSSHUJULQGVL]HVHWWLQJUDQJHVIURPLVWKHILQHVWDQGLVWKH
coarsest.
NOTE: ,WLVUHFRPPHQGHGWRXVHZKROHFRIIHHEHDQVLQVWHDGRISUHJURXQGFRIIHH
3UHJURXQGFRIIHHORVHVLWVDURPDDQGWDVWHTXLFNO\
NOTE:,WPD\WDNHVHYHUDOWULHVWRJHWDJULQGVL]HWKDWEHVWILWV\RXUWDVWH)ROORZLQ
dial instructions on page 15.
Ready to Use!
Ŷ3OXJLQ\RXUHVSUHVVRPDFKLQH7KH3RZHUEXWWRQZLOOOLJKWXS3UHVVWKH
Power button.
Ŷ&KRRVH\RXUGHVLUHGIXQFWLRQDQGHQMR\6HHWKH8VLQJWKH(VSUHVVR
0DFKLQHVHFWLRQIRULQVWUXFWLRQVRIHDFKIXQFWLRQ

7
Components
:DWHU7DQN
Bean Hopper
'ULS7UD\
Water Level
)ORDW 3RUWD¿OWHU
7DPSHU
7DPSHU
Holder
Steam
Wand
Milk
Pitcher
Cleaning Kit
3RUWD¿OWHU&UDGOH
Grinder Rotor and Burr
NOTE: :KHQWKHZDWHUOHYHOÀRDWUHDFKHVWKHWRSRIWKHGULSWUD\UHPRYHWKH
tray and dispose of the liquid. Replace back in the machine before next use.
*URXSKHDG

8
Accessories
Control Panel
Cleaning Kit
Control Knob
Controls
Control Knob
Cleaning Brush Cleaning Pin Cleaning Brush
3RUWD¿OWHU
Milk Pitcher
7RDFFHVVWKHFOHDQLQJNLWUHPRYHWKHGULSWUD\7KHNLWLVORFDWHGLQWKHERWWRPOHIWFRUQHURIWKH
machine.
NOTE: Ensure knob is in the
2ႇSRVLWLRQZKHQSRZHULQJRQ
WKHPDFKLQH%UHZ)XQFWLRQ
will not be available unless
knob is in neutral position
upon startup.
Water Hardness Strip
&OHDQLQJ6ROXWLRQ
Single Layer
Single Shot
)LOWHU
Single Layer
Double Shot
)LOWHU
Double
Layer Single
6KRW)LOWHU
Double Layer
Double Shot
)LOWHU

9
Functions
Buttons
Power
Press the power button to turn on the espresso
machine.
Grind
Press the Grind button once for a single espresso
and twice quickly for a double espresso.
Single (Espresso)
(VSUHVVRLVDIXOOIODYRUHGFRIIHHGULQNVHUYHGDV
DFRQFHQWUDWHGVKRW&DSSXFFLQRV)ODW:KLWHV
and Lattes are all made with an espresso shot.
'HIDXOWVHWWLQJaJUDPVRIFRIIHH\LHOGVa
P/RIHVSUHVVRR]
Double
7KLVZLOOFUHDWHDFXSWKDWKDVGRXEOHWKHZDWHU
and extraction time.
'HIDXOWVHWWLQJaJUDPVRIFRIIHH\LHOGV
aP/RIHVSUHVVRR]
NOTE: Coffee ground amounts and espresso
volumes may vary depending on bean type
and machine settings.
NOTE: Using an overly coarse grind will
result in an overflowing portafilter and weaker
coffee. Larger grind sizes can be used for
other coffee types.
NOTE: Using an overly fine grind size may
result in not enough grounds to fill the filter,
as well as overpressure. Finer grind settings
are included for user to adjust grind size as
grinder dulls with use.
Program
7KH3URJUDPEXWWRQLVXVHGWRVHWDGHVLUHG
espresso volume for Single, Double, or coffee
amount for Grind.
To program:
1. Press Program button. Grind, Single, and
DoubleZLOOÀDVKXQWLOWKHGHVLUHGIXQFWLRQLV
selected.
2. Press the same button repeatedly until the
GHVLUHGYROXPHRUJULQGDPRXQWLVVHW7KH
LED bar will increase with each press.
3. When desired volume or grind amount is
reached, press the Program button again to
confirm.
NOTE: Espresso volumes are inherently small,
and the range of volume adjustment is finite.
NOTE: Changes to volumes may affect the
flavor of the espresso.
NOTE: To return the machine to factory
default settings press and hold Grind and
Single buttons for 3 seconds.
NOTE: Only the Single shot grind amount can
be adjusted manually. To adjust Double grind
amount, refer to the SmartHQ app.
Control Knob
Steam
Steam is used to heat up liquids through the
VWHDPZDQG7KH6WHDPLQGLFDWRUZLOOLOOXPLQDWH
when the control knob is in the Steam position.
CAUTION To avoid possible burns to
body parts and/or other injury
from hot steam, do not touch liquids or steam
wand during or after steaming. Do not remove
pitcher until steaming is complete. Hold milk
pitcher by the handle.
Hot Water
7KH+RW:DWHUIXQFWLRQGLVSHQVHVKRWZDWHUIURP
the steam wand. No coffee is used during this
IXQFWLRQ7KH+RW:DWHULQGLFDWRUZLOOLOOXPLQDWH
when the control knob is in the Hot Water position.

10
WiFi
<RXUHVSUHVVRPDFKLQHLV:L)LFRPSDWLEOH6HH
page 20 for how to connect and use the SmartHQ
app.
Error Alerts
7KHUHDUHWKUHHHUURUDOHUWVOLVWHGEHORZ
Bean Hopper Removed:7KH/('EDUEHORZ
*ULQGVKRZV67$7,&:+,7(XQWLOEHDQKRSSHU
is in place.
Locked Rotor:7KH/('EDUEHORZ*ULQGDQG$OHUW
HUURU)/$6+:+,7(&OHDUJULQGHUZLWKSURYLGHG
brushes to resolve. Locked rotor error can be
removed after the issue is resolved and grinding
repeated, machine times out or is powered down.
Refer to page 17.
Cool Down:7KH/('EDUEHORZ*ULQGIODVKHV
DQG(UURUDOHUWVKRZV67$7,&:+,7(7KH
grinder has been running for at least 3 minutes
DQGQHHGVWRFRROGRZQIRUPLQXWHV2QFHWKH
grinder has cooled, the indicator will disappear
and the machine is ready to use again.
Descale / Descaling
Descale alert will appear when it is time to run a
descale cycle for best operation and life span of
the machine.
Descaling alert will appear when descaling is in
process. See page 16 for descaling process.
Grinding
7KH*ULQGLQJLQGLFDWRUDSSHDUVZKHQJULQGLQJLV
in process.
NOTE: Press the Grind button a second time to
cancel the function.
Add Water
Add water indicator appers when water tank is
low on water or water tank is missing.
Wifi
<RXUHVSUHVVRPDFKLQHLV:L)LFRPSDWLEOH6HH
page 21 for how to connect and use the SmartHQ
app.
Heating
7KH+HDWLQJLQGLFDWRUDSSHDUVZKHQWKHPDFKLQH
is heating water.
Check Knob
0DNHVXUHWKHFRQWURONQRELVLQWKH2IISRVLWLRQ
before using the function buttons.
Notification LED Bar
See page 10 for full list of notification colors.
Alerts

11
Notification LED
1RWL¿FDWLRQ/('%DU
)XOO,QWHUIDFHRQ3OXJLQ3RZHU2Q3RZHU2ႇ)DFWRU\5HVHW
System Emptying
Heating
2YHUSUHVVXUH
,GOHVWDWH:L¿&RQQHFWLRQ
Grinding process
Espresso and Double process
Program
Steam
Hot Water, Descale

12
Single and Double
NOTE:0DNHVXUH\RXKDYHDFRႇHHFXSRUFRQWDLQHUSODFHGXQGHUWKHGLVSHQVHUEHIRUH
using the Single or Double function.
NOTE:)ROORZGLDOLQLQVWUXFWLRQVIRUFRUUHFWJULQGVL]HDQG
volume of grounds.
3XVKHLWKHUWKHVLQJOHVKRWRUGRXEOHVKRW¿OWHULQWRWKH
SRUWD¿OWHUXQWLOLWFOLFNVLQWRSODFH
0DNHVXUHWKHUHDUHFRႇHHEHDQVLQWKHEHDQKRSSHU
3ODFHWKHSRUWD¿OWHUZLWKLQWKHJULQGHUFUDGOH
4. Press the Grind button. Refer to table.
5. When grinding is complete, remove the
SRUWD¿OWHUDQGJHQWO\WDSWRHYHQRXWWKH
FRႇHHJURXQGV
7DPSGRZQ¿UPO\XVLQJWKHWDPSHU
provided. Consistent pressure will
FUHDWHWKHEHVWFRႇHHSXFN&OHDUDZD\
any excess grounds from the rim of the
SRUWD¿OWHU5HIHUWR7LSVRQSDJHIRU
more information on tamping.
NOTE:7DPSLQJFOHDUVRXWDLUSRFNHWVWRDYRLGZDWHU
channeling through the grounds.
NOTE: 8VHUFDQUXQDQHPSW\VKRW¿UVWWRKHDWWKHJURXS
KHDGDQGRUFOHDQRXWIURPSUHYLRXVVKRW
3ODFHWKHSRUWD¿OWHUZLWKSUHVVHGFRႇHHSXFNLQWRWKH
JURXSKHDGDWDDQJOHDQGURWDWHLWWRWKHULJKWXQWLOLW
locks into place as shown.
NOTE:3RUWD¿OWHULQVWDOODWLRQKDVVRPHUHVLVWDQFH,ILWLVWRR
KDUGWRLQVWDOOWKHQWKHUHPD\EHWRRPXFKFRႇHHJURXQGV5HIHU
WR7LSVVHFWLRQRQSDJH
8. Press the Single or Double button to begin
brewing.
9. When your function is complete, dispose of
FRႇHHJURXQGVULQVHWKHSRUWD¿OWHUWKHQGU\
)ROORZFOHDQLQJLQVWUXFWLRQVIRUWKHSRUWD¿OWHULQ
the Care and Cleaning section.
NOTE:$IWHUHYHU\VLQJOHGRXEOHF\FOH\RXU
machine will release internal pressure as it is
cooling down by slowly releasing excess water into
the back of the drip tray. DO NOT remove the drip
tray until the process is complete.
NOTE:7KHUHPD\EHH[FHVVKRWZDWHULQWKH
SRUWD¿OWHU%HFDXWLRXVZKHQGLVSRVLQJRIJURXQGV
Using your Espresso Machine
Single Double
Press Grind 1 time Quickly press Grind 2x
6HHSDJHIRUWKHEHVW¿OWHUWRXVHIRU\RXUWDVWH
NOTE: Use the rubber
pad on the bottom of the
SRUWD¿OWHUWROHYHORQWKH
HGJHRIDÀDWVXUIDFHZKLOH
tamping.

13
NOTE: Make sure the control knob is always in the neutral position when NOT
using the Steam and Hot Water functions.
NOTE: The steam wand swivels for easier use. DO NOT pull on steam wand.
CAUTION To avoid possible burns to body parts and/or other injury from hot
steam, do not touch liquids or steam wand during or after steaming.
Do not remove pitcher until steaming is complete. Hold milk pitcher by the handle.
Steam
7KHSteam function can be used to steam milk and other liquids..
6HHWKH7LSVVHFWLRQIRUWHFKQLTXHVDQGUHFLSHV
7XUQWKHFRQWURONQRERQWKHVLGHRIWKHHVSUHVVR
machine to Steam. Ensure the steam wand is
pointing towards the drip tray as it will clear out
VRPHZDWHUGXULQJSUHKHDW2QFHVWHDPVWDUWV
WRFRPHRXWVZLWFKWKHNQREWRRႇSRVLWLRQDQG
quickly insert the wand into the milk. Proceed
with steaming process by turning the control knob
back to Steam.
NOTE: If there is a delay longer than a few seconds between heating and steaming,
WKHKHDWLQJZLOOVKXWRႇDQGQHHGWREHUHSHDWHG
7XUQWKHFRQWURONQREEDFNWR2ႇ when complete.
NOTE: 8VHDKRWZHWFORWKWRZLSHRႇVWHDPZDQGDIWHUHYHU\XVH,WLVDOVR
recommended to purge the steam wand immediately after every use by quickly
turning Steam back on for a short time.
NOTE: After every steam cycle your machine will automatically release internal
pressure as it is cooling down by slowly pumping access water and steam into the
GULSWUD\6WHDPFRPLQJRXWRIWKHGULSWUD\LVQRUPDOGXULQJWKLVSURFHVV'2127
remove the drip tray until the process is complete.
Hot Water
NOTE: If using the Hot Water function after steam, allow the machine to dispense
excess steam before using this function per note above.
NOTE: Hot water volume and temperature can be adjusted via the SmartHQ app.
1. Place your desired cup or milk pitcher provided under the steam wand.
7XUQWKHFRQWURONQRERQWKHVLGHRIWKHHVSUHVVRPDFKLQHWRHot Water.
)LOO\RXUFXSWR\RXUGHVLUHGDPRXQW,IWKHGLVSHQVHLVQRWVWRSSHGPDQXDOO\E\XVHU
the machine will continue to dispense until a programmed volume is set.
7XUQWKHFRQWURONQREEDFNWR2ႇ when complete.
Using your Espresso Machine

14
How to Wake the Machine
NOTE:(QVXUHNQRELVLQ2))SRVLWLRQZKHQSRZHULQJRQWKHPDFKLQH1RIXQFWLRQVZLOOEH
DYDLODEOHXQOHVVNQRELVLQ2))SRVLWLRQXSRQVWDUWXS
Press the PowerEXWWRQWRZDNHWKHPDFKLQH7KHRWKHUEXWWRQVZLOODSSHDUDIWHUWKH3RZHU
button is pressed.
Turn On/Off Sounds
Press and hold the Double and Grind buttons together for 3 seconds to turn off all sounds.
Factory Reset
Press and hold the Single and Grind buttons together for 3 seconds to turn reset all
programmable settings back to the factory settings.
Snooze Descale Alert
Press and hold the Program and Double buttons together for 3 seconds to snooze the Descale
DOHUW7RGHVFDOHWKHPDFKLQHVHHWKH&DUHDQG&OHDQLQJVHFWLRQRQSDJHIRUPRUHGHWDLOV
Overpressure
7KLVPHDQVWKHFRႇHHJURXQGVDUHWRRVPDOOWKHUHDUHWRRPDQ\JURXQGVRUWKHJURXQGV
DUHSDFNHGWRRWLJKWLQWKHSRUWD¿OWHU2YHUSUHVVXUHLVLQGLFDWHGE\DOOIXQFWLRQDOEXWWRQOLJKWV
)/$6+,1*:+,7(7R¿[GLVSRVHRIJURXQGVDQGWU\DJDLQE\LQFUHDVLQJWKHJURXQGVL]H
GHFUHDVLQJWKHGRVDJHRUWDPSLQJWKHJURXQGVZLWKOHVVSUHVVXUH2YHUSUHVVXUHPD\RFFXUPRUH
RIWHQDW¿UVWHVSHFLDOO\ZLWK¿QHUJULQGVL]HV
Portafilter and Filters
7RUHPRYH¿OWHUVIURPWKHSRUWD¿OWHUXVHWKHÀDW
HQGRIWKHFOHDQLQJEUXVKWROLIWWKH¿OWHURXWRI
WKHSRUWD¿OWHU
If excessive force is required while inserting the
SRUWD¿OWHULQWRWKHJURXSKHDGWKHUHDUHWRR
PDQ\FRႇHHJURXQGVLQWKH¿OWHU5HPRYHVRPH
grounds and try again.
*URXQGSXFNPD\EHGLႈFXOWWRUHPRYHIURP
WKH¿OWHU8VHDQXWHQVLOWRUHPRYHJURXQGV
([FHVVLYHLPSDFWWRSRUWD¿OWHUWRUHPRYHJURXQGVPD\UHVXOWLQGDPDJH
Single and Double Layer Filters
'RXEOH/D\HU¿OWHUVSURYLGHPRUH
consistent results between varying grind
sizes and bean types and generally
result in more crema.
6LQJOH/D\HU¿OWHUVDUHPRUHVHQVLWLYHWR
grind size adjustments and bean types
but allow for more adjustability.
SmartHQ App
Use the SmartHQ app to view and change
espresso machine settings.
See page 21 for how to connect your
PDFKLQHWR:L)L
Using your Espresso Machine
Single Layer
Single shot
)LOWHU
Single Layer
Double shot
)LOWHU
Double
Layer Single
VKRW)LOWHU
Double Layer
Double shot
)LOWHU

15
Dial In Instructions
Dial in your machine by altering the different parameters to create the best tasting shot
IRUDSDUWLFXODUFRIIHHFKRLFH2QFHWKHPDFKLQHLV³GLDOHGLQ´\RXFDQFUHDWHUHSHDWDEOH
results with ease.
6HOHFWDGHVLUHGJULQGVL]H6HWWLQJLVWKHUHFRPPHQGHGVWDUWLQJSRLQW
*ULQGDQGZHLJKFRIIHHIRUDQHVSUHVVRVKRWJZRUWKRIJURXQGVIRUGRXEOH
JIRUVLQJOH'LUHFWLRQVRQKRZWRFKDQJHWKHJULQGIXQFWLRQDUHRQSDJH
3. Gently tap the sides of the portafilter to even out the coffee distribution.
7DPSILUPO\WRFUHDWHDOHYHOVXUIDFHZLSHWKHH[FHVVFRIIHHJURXQGVIURPWKHHGJHVRI
the portafilter and brew your espresso.
5. Weigh the liquid espresso to find the brew ratio. Brew ratios are personal preference,
but can be used to guide your taste as well.
• Brew ratio is defined as the ratio of coffee grounds in the portafilter to liquid
espresso.
• Example: If 18g of coffee grounds yields 36g of liquid espresso, this is a 1:2
brew ratio.
Ristretto 1:1 to 1:2
Espresso 1:2 to 1:3
Lungo 1:3 to 1:4
7KHZDWHUYROXPHFDQEHLQFUHDVHGRUGHFUHDVHGWRDOWHUWKHEUHZUDWLR
Directions on how to do so are on page 9 of the manual.
$LPIRUDEUHZWLPHEHWZHHQVHFRQGVIRU\RXUVKRW
7LPHLVUHFRUGHGIURPZKHQWKHIXQFWLRQVWDUWVWRZKHQHVSUHVVRVWRSV
dispensing into cup.
• If time is below range, use a finer setting or larger water volume.
• If time is above range, use a coarser setting or lesser water volume.
7. If brew time is within range, taste the espresso.
Sour shot 8VHD¿QHUVHWWLQJRUODUJHUZDWHUYROXPH
Bitter shot Use a coarser setting or lesser water volume.
7KHVHDUHJXLGHOLQHVDGMXVWSHUSUHIHUHQFH
2WKHU7LSV
• It is important to only change one parameter at a time, and keep other variables
constant through this process.
,I\RXSUHIHUDPLONEDVHGHVSUHVVRGULQNWDVWHWKHHVSUHVVRZLWK\RXUPLON
choice as it will affect the flavor profile.
Using your Espresso Machine

16
WARNING Allow heating element to completely cool to avoid risk of fire
or injury and disconnect power prior to cleaning or service.
CAUTION To avoid possible burns to body parts and/or other injury from
hot steam, do not touch liquids or steam wand during or after frothing. Do not
remove pitcher until steaming is complete. Hold milk pitcher by the handle.
Cleaning your Espresso Machine
Ŷ8QSOXJWKHHVSUHVVRPDFKLQHIURPWKHZDOO
Ŷ3RXURXWDOOZDWHUOHIWLQWKHZDWHUWDQNDQGGULSWUD\:DVKDQGDLURUWRZHOGU\
Ŷ:LSHGRZQDSSOLDQFHXVLQJDQRQVFUDWFKFORWKDQGQRQDEUDVLYHFOHDQHU
ŶDO NOT place any part of the espresso machine in the dishwasher. Hand wash
only.
NOTE: When not in use for long periods of time, such as vacation, run System Empty
Cycle, dry water tank, and open water tank lid.
Descale
Descale process consists of 2 stages and will take approximately 30 minutes. Descale
$OHUWZLOOWXUQRႇDIWHUERWKVWDJHVDUHFRPSOHWHG
'2127XVHDQ\FOHDQLQJDJHQWVQRWSURYLGHGZLWKWKHSURGXFWRUUHFRPPHQGHGLQ
this manual.
NOTE: If descale is not properly completed, unit may timeout and return to IDLE state.
7KLVZLOODႇHFWWKHTXDOLW\RIWKHFRႇHHXQWLODOOFOHDQLQJVROXWLRQLVUHPRYHGDVZHOODV
the quality of descaling process. Run descale again.
NOTE: During descaling the unit will dispense continuously as well as pulse dispense
for a better cleaning.
STAGE 1
)LOOWKLUGRIWKHZDWHUWDQNZLWKZDWHU
$GGFOHDQLQJVROXWLRQRQHWDEOHWRUSDFNHW0L[ZHOOXQWLOFOHDQLQJDJHQWLVIXOO\
dissolved.
3ODFHDVXႈFLHQWO\ODUJHFRQWDLQHUXQGHUWKHEUHZKHDGDQGVWHDPZDQG
4. Press the Program button to enter edit mode. Grind, Single, and DoubleZLOOÀDVK
5. Rotate the control knob to Steam. Water starts dispensing.
6. After all water is dispensed, Check Knob will illuminate. Rotate the control knob to
WKH2ႇSRVLWLRQ
STAGE 2
5HPRYHULQVHIXOO\UH¿OODQGUHLQVWDOOWKHZDWHUWDQN5HSODFHFRQWDLQHUXQGHUWKH
brew head and steam wand.
2. Rotate the control knob to Steam. Water starts dispensing.
3. After all water is dispensed Check Knob will illuminate, Rotate the control knob to
WKH2ႇSRVLWLRQ'HVFDOHDOHUWWXUQV2))
5H¿OOWKHZDWHUWDQN0DFKLQHLVUHDG\IRUQRUPDORSHUDWLRQ
NOTE: As an alternative, a 1:1 ratio of water and white vinegar can be used as a
cleaning solution for the descaling process.
Care and Cleaning

17
Cleaning the Grinder
Be sure to place a cup or container under the grinder
when completing this process to collect loose grounds
RIFRႇHH,WLVUHFRPPHQGHGWRFOHDQWKHJULQGHUDW
least once a week.
Ŷ5HPRYHWKHEHDQKRSSHUIURPWKHHVSUHVVR
machine.
Ŷ5RWDWHWRXQORFNDQGSXOORXWWKHRXWHUEXUU
Ŷ8VHWKHEUXVKHVSURYLGHGWRZLSHDZD\DQ\JURXQGV
from the grinder. Make sure to clean the grinder
from top and bottom of the grinder chute.
Ŷ3ODFHWKHRXWHUEXUUEDFNLQWRWKHPDFKLQH
Ŷ3ODFHWKHEHDQKRSSHUEDFNLQWRSODFH
NOTE: Do not use hands to wipe away grounds,
only use the brushes provided.
Cleaning the Steam Wand
7RFOHDQWKHVWHDPZDQGUHPRYHWKHWLSE\XQVFUHZLQJ8VHWKH
cleaning pin provided to clear the tip of any debris.
&OHDQLQJWKH3RUWD¿OWHUDQG)LOWHUV
7RFOHDQWKHSRUWD¿OWHUDQG¿OWHUVGLVSRVHRIFRႇHHJURXQGV
WKHQULQVHZLWKZDWHU$OORZWKHSRUWD¿OWHUDQG¿OWHUVWRGU\
completely before using again.
Use the cleaning pin provided to clear out the bottom of the
¿OWHUVLIEORFNHGZLWKFRႇHHJURXQGV
System Emptying
7KH6\VWHP(PSW\LQJSURFHVVHPSWLHVWKHV\VWHPRIDOOZDWHU
Use this function when storing the machine for long periods.
Ŷ(PSW\WKHZDWHUWDQN
ŶPress and hold the Power and Double button together for 3
seconds to put the machine into system emptying mode.
Ŷ7KHPDFKLQHZLOOEHHSRQFHDQGPower and Double will flash to confirm the action.
Ŷ7KHV\VWHPZLOOHPSW\ZDWHULQWRWKHGULSWUD\DQGUHWXUQWRLGOHZKHQFRPSOHWH
Checking Your Water Hardness
,QFOXGHGZLWKWKHPDFKLQHLVD:DWHU+DUGQHVV7HVW.LW3OHDVHIROORZWKHLQVWUXFWLRQV
RQWKHSDFNDJHXVLQJWKHVDPHZDWHUWKDWZLOOEHXVHGWRPDNHHVSUHVVR2QFHUHVXOWV
are gathered, please refer to the SmartHQ app to set the water hardness level.
2XWHUEXUU
Cleaning
brushes
Care and Cleaning
C
Cleaning Brush

18
Ŷ(VSUHVVRLVRIWHQPLVWDNHQO\WKRXJKWRIDVDGULQNPDGHZLWKGDUNHUURDVWEHDQV6RPHFRIIHH
URDVWHUVHYHQPDUNWKHLUSURGXFWDV(VSUHVVR&RIIHH7KLVLVPLVOHDGLQJEHFDXVHHVSUHVVR
is mainly distinguished from other coffee drinks by the correct grind size and brew process, not
the type, origin, or roast of the coffee beans. Any coffee bean can be used in making your
espresso!
Ŷ%UHZDEODQNVKRWQRFRႇHHWRKHDWXS\RXUEUHZKHDGDQGHVSUHVVRFXSEHIRUHEUHZLQJ
Espresso has a very small volume and will cool quicker if brewed in a cold cup.
Ŷ6RPHIXQFWLRQVFDQEHDGMXVWHGZLWKLQWKH6PDUW+4$SSWRPHHW\RXUVSHFL¿FSUHIHUHQFHVRU
FRႇHHW\SH5HIHUHQFHWKH6PDUW+4VHFWLRQRQSDJH
Ŷ7KHWRSRIWKHHVSUHVVRPDFKLQHFDQDFWDVDFXSZDUPHULIOHIWRQIRUDQH[WHQGHGSHULRGRI
time. If using the machine for longer than an hour, place your cups on the top of the machine to
heat them up before use.
ŶMilks or Milk substitutes with higher fat contents are better at creating a creamier, thicker
IRDPZKLOH/RZ1RQIDW0LONRU0LONVXEVWLWXWHVDUHEHWWHUDWFUHDWLQJDOLJKWHUIRDPZLWKODUJHU
bubbles.
Ŷ,WLVUHFRPPHQGHGWKDWWKHHGJHRIWKHWDPSHULVDOLJQHGZLWKWKHHGJHRIWKHSRUWDILOWHUZKHQ
tamping. Adjust the amount of grounds to achieve optimal coffee puck thickness.
<RXUHVSUHVVRPDFKLQHFDQEHXVHGWRPDNHDYDULHW\RIHVSUHVVREDVHGGULQNV)URWKHGPLON
drinks like Cappuccinos and Lattes are classics admired by many.
0DNHVXUHWREUHZHVSUHVVR%()25(XVLQJVWHDP6WHDPIXQFWLRQUHTXLUHVKLJKHUWHPSHUDWXUHV
than espresso and brewing espresso immediately after steaming will affect the taste of espresso.
ŶCappuccino
7KLVGULQNLVPDGHZLWKHVSUHVVRPLONDQGODUJHDPRXQWRIPLFURIRDP'RQRW¿OOWKHPLON
SLWFKHUDERYHKDOIZD\WRDYRLGPLFURIRDPRYHUÀRZGXULQJVWHDPLQJ)URWKHGPLONPD\EHDV
much as doubled in volume.
ŶLatte
7KLVGULQNXVHVHVSUHVVRDQGVWHDPHGPLONZLWKDVPDOOHUKHDGRIIRDP
ŶHow to steam milk:
NOTE: Steam wand may purge hot water while preheating. Introduce steam wand into milk after
preheating.
1. After steam is preheated and ready, place the tip of the steam wand right under the surface
RIWKHPLONDWWKHHGJHRIWKHPLONSLWFKHUDWDSSUR[LPDWHO\DDQJOHWRFUHDWHDYRUWH[
6WDUWVWHDPLQJ7KHORQJHUPLONLVVWHDPHGXQGHUWKHVXUIDFHWKHPRUHPLFURIRDPLV
FUHDWHG2QFHWKHGHVLUHGDPRXQWRIPLFURIRDPLVUHDFKHGGLSWKHVWHDPZDQGORZHULQWR
the milk and continue to steam until desired temperature is reached. Place a hand under
WKHSLWFKHUWRIHHOWKHFKDQJHLQWHPSHUDWXUH2QFHWKHERWWRPLVZDUPHQRXJKWRIHHO
uncomfortable, optimal temperature is achieved.
2. Large bubbles can be broken into smaller bubbles by light tapping of the milk pitcher.
NOTE:7RKHDWXSPLON\RXZDQWWRSRVLWLRQWKHVWHDPZDQGORZHULQWRWKHSLWFKHUWRSUHYHQW
DLUIURPHQWHULQJWKHPLONDQGFUHDWLQJEXEEOHV7KLVZLOOUHVXOWLQDVWHDPHGPLONZLWKDVPDOOHU
head of foam.
Tips

19
Troubleshooting
Problem Cause Solution
Appliance does
not work/does not
turn on
No power is connected to the appliance. Ŷ&KHFNFDEOHDQGSOXJDUHFRQQHFWHG
WRSRZHUDQGSUHVVWKHRQEXWWRQ
Ŷ&KHFN*),SOXJ
No or delayed
response from
pressing buttons on
control panel
Panel may be dirty or wet. Clean the panel with cloth provided and
ensure panel is dry.
&RႇHHLVQRWKRW
enough
Cup is not preheated. Ŷ5XQKRWZDWHULQWKHFXSSULRUWR
brewing to warm up.
Ŷ2USODFH\RXUFXSRQWRSRIWKH
machine prior to use.
Water/Steam does
not come out of
steam wand
Excessive scale has built up. Descale the appliance as directed on
page 16.
Empty system function may have been
used.
Run the hot water function until water
starts dispensing.
3XPSDLUORFNDLULQWKHZDWHUSXPS Run the hot water function until water
starts dispensing.
Something is blocking the steam wand. Run the hot water function until water
starts dispensing.
&RႇHHGRHV
not come out of
SRUWD¿OWHU
&RႇHHLVWDPSHGWRRWLJKWO\LQWKH
SRUWD¿OWHURUJURXQGVDUHWRR¿QH
Empty portafilter and try again with
a larger grind size or less force while
tamping.
7KHGRVHRIFRႇHHLVWRRKLJK Use a coarser grind size or less
dosage.
Espresso shot has
no crema
Coffee grounds are too coarse. Adjust coffee bean grind size to a finer
setting during grinding operation or use
a double layer filter provided.
Coffee beans are not fresh. Change coffee beans.
Appliance takes too
long to heat up
Excessive scale has built up. Descale the appliance.
Water tank is empty
but "Add Water"
alert does not show
up
Water sensor is detecting water on the
outside of the water tank.
ŶWipe the water tank and back area of
the machine completely dry.
ŶAvoid pouring water directly into the
water tank. It is recommended to pull
RXWZDWHUWDQN¿OOWKHQUHSODFHLQWKH
machine.

20
Troubleshooting
Problem Cause Solution
Grinder is making
a very loud sharp
noise
7KHUHDUHIRUHLJQREMHFWVLQWKHJULQGHU Clear the grinder per the directions in
the Care and Cleaning section.
&RႇHHGLVSHQVHGLV
watery
Grinder setting is too coarse. Adjust coffee bean grind size to a finer
setting during grinding operation.
Water volume is too large. Go to the SmartHQ app and adjust
coffee settings.
No steam or hot
water is coming out
of the steam wand
7KHPDFKLQHLVQRWSUHKHDWHG\HW :DLWIRUPDFKLQHWRSUHKHDW2QFH
water is up to temperature, the process
will begin.
Steam or hot water
have stopped
dispensing
mid-process
Water tank is empty. Refill the water tank to continue
process.
7KHIXQFWLRQZDVFDQFHOOHGHDUO\
NOTE: Hot Water will stop automatically
RQFHSUHVHWYROXPHLVGLVSHQVHG7KLV
volume can be changed in SmartHQ.
Restart the desired function.
There is water
underneath the drip
tray
Residual water, steam, or condensation
may be present underneath the drip
WUD\7KLVLVQRUPDODQGVKRXOGQRWEHD
problem.
Wipe the area under the drip tray with a
cloth or towel.
7KHSRUWD¿OWHUGRHV
not turn and lock
into place in
group-head
3RUWD¿OWHULVQRWOHYHODQGRUQRWDWWKH
correct angle to be inserted.
Ensure the portafilter is level and
inserted at a 45 degree angle before
twisting.
Dosage is too large and is coming in
FRQWDFWZLWKJURXSKHDG
Remove a small amount of coffee from
portafilter or use a lower dosage.
Poor crema
formation and weak
espresso.
+LJKDOWLWXGHDႇHFWVERLOLQJSRLQWDQG
extraction.
Adjustments may be made using the
SmartHQ app for high altitude settings.
Table of contents
Languages:
Other GE Coffee Maker manuals
Popular Coffee Maker manuals by other brands

Technivorm
Technivorm MOCCAMASTER Cup-one Original instructions for use

TriStar
TriStar KZ - 2248 manual

TUR MIX
TUR MIX Nespresso TX 100 instruction manual

Technivorm
Technivorm Moccamaster THERMOSERVE Original instructions for use

Quickmill
Quickmill Super Automatic Espresso Machine owner's manual

Quickmill
Quickmill MILANO 0980 operating instructions