GE AF-600 FP Series User manual

AF-600 FPTM
Fan & Pump Drive
Design and Installation Guide
The instructions do not purport to cover all details or variations in equipment nor to provide for every possible
contingency to be met in connection with installation, operation or maintenance. Should further information be
desired or should particular problems arise which are not covered suciently for the purchaser’s purposes, the
matter should be referred to the GE company.
AF-600 FP is a trademark of the General Electric Company.
GE
41 Woodford Avenue
Plainville, CT 06062
www.geelectrical.com/drives
130R0412 *MG14F122* DET-768A
GE

Safety
WARNING
HIGH VOLTAGE!
Adjustable frequency drives contain high voltage when
connected to AC line power. Installation, start-up, and
maintenance should be performed by qualified personnel
only. Failure to perform installation, start-up, and
maintenance by qualified personnel could result in death
or serious injury.
High Voltage
Adjustable frequency drives are connected to hazardous
AC line voltage. Extreme care should be taken to protect
against shock. Only trained personnel familiar with
electronic equipment should install, start, or maintain this
equipment.
WARNING
UNINTENDED START!
When the adjustable frequency drive is connected to AC
line power, the motor may start at any time. The
adjustable frequency drive, motor, and any driven
equipment must be in operational readiness. Failure to be
in operational readiness when the adjustable frequency
drive is connected to AC line power could result in death,
serious injury, equipment, or property damage.
Unintended Start
When the adjustable frequency drive is connected to AC
line power, the motor may be started with an external
switch, a serial bus command, an input reference signal, or
a cleared fault condition. Use appropriate caution to guard
against an unintended start.
WARNING
DISCHARGE TIME!
Adjustable frequency drives contain DC link capacitors that
can remain charged even when the adjustable frequency
drive is not powered. To avoid electrical hazards,
disconnect AC line power, any permanent magnet type
motors, and any remote DC link power supplies, including
battery backups, UPS and DC link connections to other
adjustable frequency drives. Wait for the capacitors to fully
discharge before performing any service or repair work.
The wait time required is listed in the Discharge Time table.
Failure to wait for the specified period of time after power
has been removed to do service or repair could result in
death or serious injury.
WARNING
DISCHARGE TIME!
Adjustable frequency drives contain DC link capacitors that
can remain charged even when AC line power is discon-
nected. To avoid electrical hazards, remove AC line power
from the adjustable frequency drive before doing any
service or repair and wait the amount of time specified in
Table 1.1. Failure to wait the specified time after power has
been removed prior to doing service or repair on the unit
could result in death or serious injury.
Voltage Power Size Minimum Waiting
Time [minutes]
200–240 V 0.75–3.7 kW 1–5 HP 4
5.5–45 kW 7.5–60 HP 15
380–480 V
0.75–7.5 kW 1–10 HP 4
11–90 kW 15–125 HP 15
110–250 kW
150–350 HP 20
315–1000 kW
450–1350 HP 40
525–600 V
0.75–7.5 kW 1–10 HP 4
11–90 kW 15–125 HP 15
110–315 kW
150–400 HP 20
355–1000 kW
450–1350 HP 30
525–690 V
11–75 kW
15–125 HP 15
110–400 kW
150–550 HP 20
400–1400 kW
600–1900 HP 30
Table 1.1
Safety AF-600 FP Design and Installation Guide
DET-768A

Symbols
The following symbols are used in this manual.
WARNING
Indicates a potentially hazardous situation which, if not
avoided, could result in death or serious injury.
CAUTION
Indicates a potentially hazardous situation which, if not
avoided, may result in minor or moderate injury. It may
also be used to alert against unsafe practices.
CAUTION
Indicates a situation that may result in equipment or
property damage-only accidents.
NOTE!
Indicates highlighted information that should be observed
in order to avoid mistakes or operate equipment at less
than optimal performance.
Approvals
Table 1.2
Safety AF-600 FP Design and Installation Guide
DET-768A

Contents
1 Introduction
2-1
1.1 Purpose of the Manual 2-8
1.2 Additional Resources 2-8
1.3 Product Overview 2-8
1.4 Internal Adjustable Frequency Drive Controller Functions 2-8
2 Installation
3-1
2.1 Installation Site Checklist 3-1
2.2 Adjustable Frequency Drive and Motor Pre-installation Checklist 3-1
2.3 Mechanical Installation 3-1
2.3.1 Cooling 3-1
2.3.2 Cooling and Airflow 3-2
2.3.3 Lifting 3-3
2.3.4 Mounting 3-3
2.3.5 IP21 Drip Shield Installation (Unit Sizes 41 and 42) 3-4
2.4 Field Installation of Options 3-4
2.4.1 Installation of Top-only Duct Cooling Kit 3-4
2.4.2 Installation of Top and Bottom Covers 3-5
2.4.3 Outside Installation /NEMA 3R Kit of Industrial Enclosures 3-5
2.4.4 Installation of IP00 to IP20 Kits 3-5
2.4.5 Installation of cable clamp bracket in open chassis drives. 3-5
2.4.6 Installation on Pedestal 3-5
2.4.7 Installation of Line Power Shield for Adjustable Frequency Drives 3-6
2.4.8 USB Extension Kit 3-6
2.4.9 Installation of 4x or 5x Load Share Option 3-6
2.5 Electrical Installation 3-7
2.5.1 Requirements 3-8
2.5.2 Grounding Requirements 3-8
2.5.2.1 Leakage Current (>3.5 mA) 3-9
2.5.2.2 Grounding Using Shielded Cable 3-9
2.5.3 Motor Connection 3-9
2.5.4 AC Line Power Connection 3-10
2.5.4.1 External Fan Supply (Unit Sizes 41, 42, 43, 44, 51, and 52) 3-10
2.5.5 Knock-outs (Unit Sizes 15, 21, 22, 31, and 32) 3-10
2.5.8 Control Wiring 3-12
2.5.8.1 Access 3-12
2.5.8.2 Control Terminal Types 3-13
Contents AF-600 FP Design and Installation Guide
DET-768A

2.5.8.3 Wiring to Control Terminals 3-14
2.5.8.4 Using Shielded Control Cables 3-15
2.5.8.5 Control Terminal Functions 3-15
2.5.8.6 Terminal 53 and 54 Switches 3-16
2.5.9 Serial Communication 3-16
3 Start Up and Functional Testing
4-1
3.1 Pre-start 4-1
3.1.1 Safety Inspection 4-1
3.2 Applying Power to the Adjustable Frequency Drive 4-3
3.3 Basic Operational Programming 4-3
3.4 Auto Tune 4-4
3.5 Check Motor Rotation 4-4
3.6 Local Control Test 4-4
3.7 System Start-up 4-5
4 User Interface
5-1
4.1 Keypad 5-1
4.1.1 Keypad Layout 5-1
4.1.2 Setting Keypad Display Values 5-2
4.1.3 Display 5-2
4.1.4 Navigation Keys 5-3
4.1.5 Operation Keys 5-3
4.2 Back Up and Copying Parameter Settings 5-3
4.2.1 Uploading Data to the Keypad 5-4
4.2.2 Downloading Data from the Keypad 5-4
4.3 Restoring Default Settings 5-4
4.3.1 Recommended Initialization 5-4
4.3.2 Manual Initialization 5-4
5 About Programming
6-1
5.1 Introduction 6-1
5.2 Programming Example 6-1
5.3 Control Terminal Programming Examples 6-3
5.4 International/North American Default Parameter Settings 6-4
5.5 Parameter Menu Structure 6-5
5.5.1 Quick Menu Structure 6-5
5.5.2 Main Menu Structure 6-6
5.6 Remote Programming with DCT-10 6-13
Contents AF-600 FP Design and Installation Guide
DET-768A

6 Application Set-up Examples
7-1
6.1 Introduction 7-1
6.2 Application Examples 7-1
6.3 Advantages 7-5
6.3.9 Application Examples 7-9
7 Installation Consideration
8-1
7.1 General Aspects of EMC 8-1
7.2 Immunity Requirements 8-3
7.3 General Aspects of Harmonics Emission 8-5
7.4 Galvanic Isolation (PELV) 8-6
7.4.1 PELV - Protective Extra Low Voltage 8-6
7.5 Derating 8-7
7.6 Motor Insulation 8-8
7.7 Motor Bearing Currents 8-9
8 Status Messages
9-1
8.1 Status Display 9-1
8.2 Status Message Definitions Table 9-1
9 Warnings and Alarms
10-1
9.1 System Monitoring 10-1
9.2 Warning and Alarm Types 10-1
9.3 Warning and Alarm Displays 10-1
9.4 Warning and Alarm Definitions 10-2
10 Basic Troubleshooting
11-1
10.1 Start Up and Operation 11-1
11 Terminal and Applicable Wire
12-1
11.1 Cables 12-1
12 Specifications
13-1
12.1 Power-dependent Specifications 13-1
12.1.1 Power, Currents and Enclosures 13-1
12.1.2 Dimensions, Unit Size 1x 13-3
12.1.3 Dimensions, Unit Size 2x 13-5
12.1.4 Dimensions, Unit Size 3x 13-7
12.1.5 Dimensions, Unit Size 4x 13-9
12.2 General Technical Data 13-12
Contents AF-600 FP Design and Installation Guide
DET-768A

12.3 Fuse Tables 13-16
12.3.2 Recommendations 13-16
12.3.3 CE Compliance 13-17
12.3.4 Fuse Specifications 13-17
12.3.5 NEC and UL Compliance 13-20
Contents AF-600 FP Design and Installation Guide
DET-768A
1Introduction
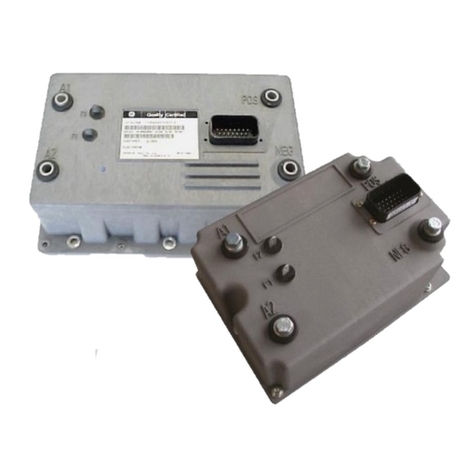
Figure 1.1 Exploded View Unit Size 12 and 13
1 Keypad 10 Motor output terminals 96 (U), 97 (V), 98 (W)
2 RS-485 serial bus connector (+68, -69) 11 Relay 1 (01, 02, 03)
3 Analog I/O connector 12 Relay 2 (04, 05, 06)
4 Keypad input plug 13 Brake (-81, +82) and load sharing (-88, +89) terminals
5 Analog switches (A53), (A54) 14 Line power input terminals 91 (L1), 92 (L2), 93 (L3)
6 Cable strain relief/PE ground 15 USB connector
7 Decoupling plate 16 Serial bus terminal switch
8 Grounding clamp (PE) 17 Digital I/O and 24 V power supply
9 Shielded cable grounding clamp and strain relief 18 Control cable cover plate
Table 1.1
Introduction AF-600 FP Design and Installation Guide
DET-768A 1-1
11

Figure 1.2 Exploded View Unit Sizes 15, 21, 22, 31, and 32
1 Keypad 11 Relay 2 (04, 05, 06)
2Cover 12Liftingring
3 RS-485 serial bus connector 13 Mounting slot
4 Digital I/O and 24 V power supply 14 Grounding clamp (PE)
5 Analog I/O connector 15 Cable strain relief / PE ground
6 Cable strain relief/PE ground 16 Brake terminal (-81, +82)
7 USB connector 17 Load sharing terminal (DC bus) (-88, +89)
8 Serial bus terminal switch 18 Motor output terminals 96 (U), 97 (V), 98 (W)
9 Analog switches (A53), (A54) 19 Line power input terminals 91 (L1), 92 (L2), 93 (L3)
10 Relay 1 (01, 02, 03)
Table 1.2
Introduction AF-600 FP Design and Installation Guide
1-2 DET-768A
1
1

Figure 1.3 Exploded View Unit Sizes 41h, 42h, 43h, 44h
1 Local control panel mounting bracket 10 Heatsink fan
2 Control card and mounting plate 11 Gate drive support bracket
3 Power card and mounting plate 12 Capacitor bank
4 Inrush card 13 Balance/High frequency card
5 Inrush card mounting bracket 14 Motor output terminals
6 Top fan (IP20 only) 15 Line power input terminals
7 DC inductor 16 Gate drive card
8 SCR/Diode modules 17 (optional) RFI filter
9 IGBT modules
Table 1.3
Introduction AF-600 FP Design and Installation Guide
DET-768A 1-3
11

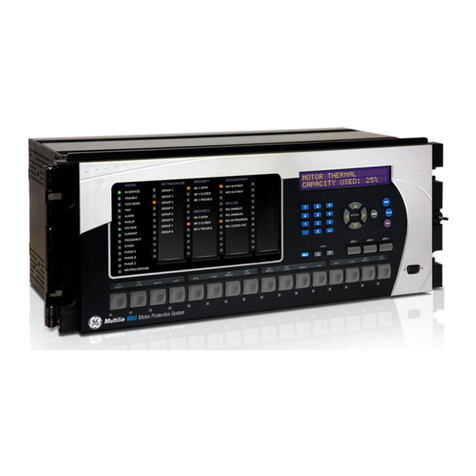
Figure 1.4 Compact IP21 (NEMA 1) and IP54 (NEMA 12), Unit
Sizes 41, 42, 43, 44, 51, 52
1) AUX Relay
01 02 03
04 05 06
2) Temp Switch 6) SMPS Fuse (see 12.3 Fuse Tables for part number)
106 104 105 7) AUX Fan
3) Line 100 101 102 103
R S T L1 L2 L1 L2
91 92 93 8) Fan Fuse (see 12.3 Fuse Tables for part number)
L1 L2 L3 9) Mains ground
4) Load sharing 10) Motor
-DC +DC U V W
88 89 96 97 98
T1 T2 T3
Table 1.4
Introduction AF-600 FP Design and Installation Guide
1-4 DET-768A
1
1

Figure 1.5 Position of Ground Terminals IP21 (NEMA Type 1) and
IP54 (NEMA Type 12)
Introduction AF-600 FP Design and Installation Guide
DET-768A 1-5
11

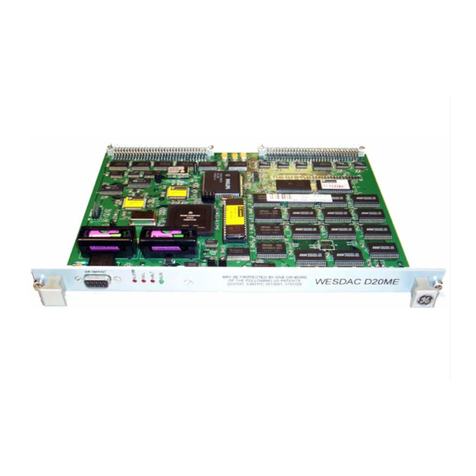
Figure 1.6 Rectifier Cabinet, unit sizes 61, 62, 63 and 64
1) 24 V DC, 5 A 5) Load sharing
T1 Output Taps -DC +DC
Temp Switch 88 89
106 104 105 6) Control Transformer Fuses (2 or 4 pieces). See 12.3 Fuse Tables for part numbers
2) Manual Motor Starters 7) SMPS Fuse. See 12.3 Fuse Tables for part numbers
3) 30 A Fuse Protected Power Terminals 8) Manual Motor Controller fuses (3 or 6 pieces). See 12.3 Fuse Tables for part
numbers
4) Line 9) Line Fuses, unit sizes 61 and 62 (3 pieces). See 12.3 Fuse Tables for part numbers
R S T 10) 30 Amp Fuse Protected Power fuses
L1 L2 L3
Table 1.5
Introduction AF-600 FP Design and Installation Guide
1-6 DET-768A
1
1

Figure 1.7 Inverter Cabinet, Unit Sizes 62 and 64
(Unit Sizes 61 and 63 are similar with two inverter modules)
1) External Temperature Monitoring 6) Motor
2) AUX Relay U V W
01 02 03 96 97 98
04 05 06 T1 T2 T3
4) AUX Fan 8) Fan Fuses. See 12.3 Fuse Tables for part numbers
100 101 102 103 9) SMPS Fuses. See 12.3 Fuse Tables for part numbers
L1 L2 L1 L2
Table 1.6
Introduction AF-600 FP Design and Installation Guide
DET-768A 1-7
11

1.1 Purpose of the Manual
This manual is intended to provide detailed information for
the installation and start-up of the adjustable frequency
drive. provides requirements for mechanical and electrical
installation, including input, motor, control and serial
communications wiring, and control terminal functions.
provides detailed procedures for start-up, basic operational
programming, and functional testing. The remaining
chapters provide supplementary details. These details
include user interface, detailed programming, application
examples, start-up troubleshooting, and specifications.
1.2 Additional Resources
Other resources are available to understand advanced
adjustable frequency drive functions and programming.
•
The AF-600 FP Programming Guide, DET-618
provides greater detail on working with
parameters and many application examples.
•
Optional equipment is available that may change
some of the procedures described. Reference the
instructions supplied with those options for
specific requirements. Contact the local GE
supplier or visit the GE website for downloads or
additional information.
1.3 Product Overview
An adjustable frequency drive is an electronic motor
controller that converts AC line power input into a variable
AC waveform output. The frequency and voltage of the
output are regulated to control the motor speed or torque.
The adjustable frequency drive can vary the speed of the
motor in response to system feedback, such as changing
temperature or pressure for controlling fan, compressor, or
pump motors. The adjustable frequency drive can also
regulate the motor by responding to remote commands
from external controllers.
In addition, the adjustable frequency drive monitors the
system and motor status, issues warnings or alarms for
fault conditions, starts and stops the motor, optimizes
energy efficiency, and offers many more control,
monitoring, and efficiency functions. Operation and
monitoring functions are available as status indications to
an outside control system or serial communication
network.
1.4 Internal Adjustable Frequency Drive
Controller Functions
Figure 1.8 is a block diagram of the adjustable frequency
drive's internal components. See Table 1.7 for their
functions.
Figure 1.8 Adjustable Frequency Drive Block Diagram
Area Title Functions
1 Line power input
•
Three-phase AC line power
supply to the adjustable
frequency drive
2Rectifier
•
The rectifier bridge converts
the AC input to DC current to
supply inverter power
3DCbus
•
Intermediate DC bus circuit
handles the DC current
4DCreactors
•
Filter the intermediate DC
circuit voltage
•
Provide line transient
protection
•
Reduce RMS current
•
Raise the power factor
reflected back to the line
•
Reduce harmonics on the AC
input
5 Capacitor bank
•
Stores the DC power
•
Provides ride-through
protection for short power
losses
6Inverter
•
Converts the DC into a
controlled PWM AC waveform
for a controlled variable
output to the motor
7 Output to motor
•
Regulated three-phase output
power to the motor
Introduction AF-600 FP Design and Installation Guide
1-8 DET-768A
1
1

Area Title Functions
8 Control circuitry
•
Input power, internal
processing, output, and motor
current are monitored to
provide efficient operation
and control
•
User interface and external
commands are monitored and
performed
•
Status output and control can
be provided
Table 1.7 Adjustable Frequency Drive Internal Components
Introduction AF-600 FP Design and Installation Guide
DET-768A 1-9
11

Introduction AF-600 FP Design and Installation Guide
1-10 DET-768A
1
1

2 Installation
2.1 Installation Site Checklist
•
The adjustable frequency drive relies on the
ambient air for cooling. Observe the limitations
on ambient air temperature for optimal operation
•
Ensure that the installation location has sufficient
support strength to mount the adjustable
frequency drive
•
Keep the adjustable frequency drive interior free
from dust and dirt. Ensure that the components
stay as clean as possible. In construction areas,
provide a protective covering. Optional IP54
(NEMA 12) enclosures may be necessary.
•
Keep the manual, drawings, and diagrams
accessible for detailed installation and operation
instructions. It is important that the manual is
available for equipment operators.
•
Locate equipment as near to the motor as
possible. Keep motor cables as short as possible.
Check the motor characteristics for actual
tolerances. Do not exceed
•
300 m (1000 ft) for unshielded motor
leads
•
150 m (500 ft) for shielded cable.
2.2 Adjustable Frequency Drive and Motor
Pre-installation Checklist
•
Compare the model number of unit on the
nameplate to what was ordered to verify the
proper equipment
•
Ensure each of the following are rated for the
same voltage:
Line power
Adjustable frequency drive
Motor
•
Ensure that the adjustable frequency drive output
current rating is equal to or greater than motor
full load current for peak motor performance
Motor size and adjustable frequency
drive power must match for proper
overload protection
If adjustable frequency drive rating is
less than motor, full motor output
cannot be achieved
2.3 Mechanical Installation
2.3.1 Cooling
•
To provide cooling airflow, mount the unit to a
solid flat surface or to the optional backplate (see
2.3.4 Mounting)
•
Top and bottom clearance for air cooling must be
provided. Generally, 100–225 mm (4–10 in) is
required. See Figure 2.1 for clearance
requirements
•
Improper mounting can result in overheating and
reduced performance.
•
Derating for temperatures starting between 104°F
[40°C] and 122°F [50°C] and elevation 3300 ft
[1000 m] above sea level must be considered. See
the equipment Design Guide for detailed
information.
Figure 2.1 Top and Bottom Cooling Clearance
Size 12-15 21-24 31, 33 32, 34
a/b (inch
[mm]) 3.94 [100] 7.87 [200] 7.87 [200] 8.86 [225]
Table 2.1 Minimum Airflow Clearance Requirements
Installation AF-600 FP Design and Installation Guide
DET-768A 2-1
2
2

2.3.2 Cooling and Airflow
Cooling
Cooling can be obtained in different ways, by using the
cooling ducts in the bottom and the top of the unit, by
taking air in and out the back of the unit or by combining
the cooling possibilities.
Duct cooling
A dedicated option has been developed to optimize instal-
lation of IP00/chassis drive types in Rittal TS8 Units
utilizing the fan of the adjustable frequency drive for
forced air cooling of the backchannel. Please consult GE
for more details.
The air out of the top of the enclosure could but ducted
outside a facility so the heat loses from the backchannel
are not dissipated within the control room reducing air-
conditioning requirements of the facility.
Please contact GE for more information.
Back cooling
The backchannel air can also be ventilated in and out the
back of a Rittal TS8 Unit. This offers a solution where the
backchannel could take air from outside the facility and
return the heat losses outside the facility thus reducing air-
conditioning requirements.
CAUTION
A door fan is required on the enclosure to remove the
heat losses not contained in the backchannel of the drive
and any additional losses generated from other
components installed inside the enclosure. The total
required air flow must be calculated so that the
appropriate fans can be selected. Some enclosure
manufacturers offer software for performing the
calculations (i.e., Rittal Therm software). If the drive is the
only heat generating component in the enclosure, the
minimum airflow required at an ambient temperature of
113° F [45°C] for the 43 and 44 unit size drives is 230 cfm
(391 m
3
/h). The minimum airflow required at an ambient
temperature of 113° F [45°C] for the 52 drive is 460 cfm
(782 m
3
/h).
Airflow
The necessary airflow over the heatsink must be ensured.
The flow rate is in Table 2.2.
Unit Size protection Unit Size Door fan(s) / Top fan airflow Heatsink fan(s)
IP21 / NEMA 1
IP54 / NEMA 12
41 and 42 100 cfm (170 m
3
/h) 450 cfm (765 m
3
/h)
51 350 HP @ 460 V, 500 & 550
HP @ 690 V
200 cfm (340 m
3
/h) 650 cfm (1105 m
3
/h)
51 450–550 HP @ 460V, 650–750
HP @ 690 V
200 cfm (340 m
3
/h) 850 cfm (1445 m
3
/h)
IP21 / NEMA 1 61, 62, 63 and 64 412 cfm (700 m
3
/h)* 580 cfm (985 m
3
/h)*
IP54 / NEMA 12 61, 62, 63 and 64 309 cfm (525 m
3
/h)* 580 cfm (985 m
3
/h)*
IP00 / Chassis 43 and 44 150 cfm (255 m
3
/h) 450 cfm (765 m
3
/h)
52 350 HP @ 460 V, 500 & 550
HP @ 690 V
150 cfm (255 m
3
/h) 650 cfm (1105 m
3
/h)
52 450–550 HP @ 460 V, 650–
750 HP @ 690 V
150 cfm (255 m
3
/h) 850 cfm (1445 m
3
/h)
* Airflow per fan. Unit Sizes 6X contain multiple fans.
Table 2.2 Heatsink Air Flow
Installation AF-600 FP Design and Installation Guide
2-2 DET-768A
2
2

External ducts
If additional duct work is added externally to the Rittal
cabinet, the pressure drop in the ducting must be
calculated. Use the charts below to derate the adjustable
frequency drive according to the pressure drop.
Figure 2.2 Unit Size 4X Derating vs. Pressure Change
Drive air flow: 450 cfm (765 m
3
/h)
Figure 2.3 Unit Size 5X Derating vs. Pressure Change (Small Fan),
350 hp @ 460 V and 500–550 hp @ 690 V
Drive air flow: 650 cfm (1105 m
3
/h)
Figure 2.4 Unit Size 5X Derating vs. Pressure Change (Large Fan)
Drive air flow: 850 cfm (1445 m
3
/h)
Figure 2.5 Unit Size 61, 62, 63 and 64 Derating vs. Pressure
Change
Drive air flow: 580 cfm (985 m
3
/h)
2.3.3 Lifting
•
Check the weight of the unit to determine a safe
lifting method
•
Ensure that the lifting device is suitable for the
task
•
If necessary, plan for a hoist, crane, or forklift with
the appropriate rating to move the unit
•
For lifting, use hoist rings on the unit, when
provided
Figure 2.6 Recommended Lifting Method, 4X and 5X Unit Sizes.
WARNING
The lifting bar must be able to handle the weight of the
adjustable frequency drive. See Mechanical Dimensions for
the weight of the different unit sizes. Maximum diameter
for bar is 1 in [2.5 cm]. The angle from the top of the
adjustable frequency drive to the lifting cable should be
60°or greater.
2.3.4 Mounting
•
Mount the unit vertically
•
The adjustable frequency drive allows side by
side installation
•
Ensure that the strength of the mounting location
will support the unit weight
Installation AF-600 FP Design and Installation Guide
DET-768A 2-3
2
2
Other manuals for AF-600 FP Series
10
Table of contents
Other GE Controllers manuals