GE GLD5604VWW User manual

GEAppliances.com
LLJ
Safety Instructions ............. 2-s
Operating Instructions
Care and Cleaning .................. lS
Control Panel and Settings .......... 6-9
Loading Place Settings .............. 14
Loading the Dishwasher Racks ...... 13
Unicouple ............................ 10
Using the Dishwasher ............ 11, 12
Troubleshooting Tips......... 16-18
Consumer Support
Consumer Support .................... 24
Warranty ........................... 23
TOP CONTROL MODELS
Tall Tub
Dishwashers
FRONT CONTROL MODELS
Write the model and serial
numbers here:
Model #
Serial #
Youcan find them on the tub wall
just insidethe door.
49-55077 05-11 GE

IMPORTANT SAFETY INFORMATION
READ ALL INSTRUCTIONS BEFORE USING-
SAVE THESE INSTRUCTIONS
_, WARNING!
For your safety, the information in this manual must be followed to minimize the risk of fire,
explosion, electric shock, and to prevent property damage, personal injury, or death.
_iADVERTENCIA!
Para su seguridad, siga las instrucciones de este manual a fin de minimizar riesgos de incendio,
explosiSn, descargas el_ctricas, y para evitar dafios en su propiedad, lesiones personales o la
muerte.
,_ WARNING! WATER HEATER SAFETY
Under certain conditions,hydrogen gas may be produced in a water heater that hasnot beenusedfor two or
more weeks.HYDROGENGASISEXPLOSIVE.
Ifthe hot water has not been usedfor two or more weeks, preventthe possibilityof damage or injury by turning
on all hot water faucets and allow them to run for several minutes. Dothis before usingany electrical appliance
connected to the hot water system.Thissimple procedure will allow any built-up hydrogen gas to escape.Since
the gas isflammable, do not smoke, usean open flame, or usethe appliance during this process.
""_'_ _, iADVERTENCIA! SEGURIDADDELCALENTADORDEAGUA
Bajo ciertascondiciones,sepodrd producir gas de hidr6geno en un calentador de agua que no rue usadopar dos
semanas o mds.ELGASDEHIDROGENOESE×PLOSlVO.
Siel agua caliente no seus6 par dos semanas o mSs,evite la posibilidad de que ocurran da5os o lesiones
abriendo todos losgrifos de agua caliente y dejando que corra agua par varios minutos. Haga esto antes de
usar cualquier artefacto el6ctrico conectado al sistema de agua caliente. Esteprocedimiento simple permitirc_la
sol!do de cuolquier acumulaci6n de gas de hidr6geno. Debidoo que el gas esinflomoble, no fume, no useuno
llama abierta ni useel electrodom6stico durante este proceso.
PROPER INSTALLATION AND MAINTENANCE
This dishwasher must be properly installed and located in accordance with the Installation Instructions
before it is used. If you did not receive an Installation Instructions sheet with your dishwasher, you can
receive one by visiting our Website at GEAppliances.com. In Canada, visit www.GEAppliances.ca.
[] Connectthe dishwasher/appliance to a grounded
metal,permanent wiring system;or run an
equipment-grounding conductor with the circuit
conductors and connect to the equipment-
grounding terminal or lead of the appliance.
[] Improper connection of the equipment-grounding
conductor can result in a riskof electric shock.Check
with a qualifiedelectrician or servicerepresentative
ifyou are in doubt whether the appliance is properly
grounded.
[] Disposeofdiscarded appliances and shipping
or packing material properly.
[] Donot attempt to repair or replace any part
of your dishwasher unless it isspecifically
recommended in this manual. Allother servicing
should be referred to a qualified technician.
[] Tominimizethe possibilityof electricshock,
disconnect this appliancefrom the power supply
before attempting any maintenance.
NOTE'.Turningthe dishwasheroff doesnot
disconnect the appliance from the power supply.We
recommend having a qualifiedtechnician service
your appliance.

IMPORTANT SAFETY INFORMATION
READ ALL INSTRUCTIONS BEFORE USING-
SAVE THESE INSTRUCTIONS GEApp'°,,ces.co,,
"CAUTION: To prevent minor injury and property damage
• Contents washed in SANI WASH/SANITIZEmode, if
available, may be hot to the touch. Usecure before
handling.
• Using a detergent that is
not specifically designedfor
dishwashers will cause the
dishwasher to fill with suds.
• If your dishwasher is
connected to a wall switch, ensurethat
the switch ison prior to use.
• On dishwashers with electronic controls,
ifyou choose to turn the wall switch
off between wash cycles,allow 5-10
secondsafter turning the switch on
before touching START/RESETto allow the control to
initialize.
• Non-Dishwure Items: Donot wash items such
as electronic air cleaner filters, furnace filters
and paint brushes in your dishwasher. Damage
to the dishwasher and discoloration or staining
of the dishwasher may result.
• Closesupervision isnecessary ifthis appliance
isused by or near children.
• Load light,plastic items sothey do not become
dislodged and drop to the bottom of the
dishwasher-they might come into contact with
the heating element and be damaged.
PRECAUCION: A tin _e evitar lesiones menores y dafios sobre la propiedad
• Loscontenidos lavados en el modo SANIWASH/
SANITIZE(Lavado Desinfectante/ Desinfecci6n},
sieste producto est6 disponible,podrSn estar
calientes al tacto. Tenga
cuidado antes de tomar los
mismos con las manos. tM
• Eluso de un detergente
que no est6 diseBado
espec[ficamente para !_
lavavajillas har6 que este Oltimose Ilene
de agua conjab6n.
• Siel lavavajillasest_ conectado a un
tomacorriente, asegOresede que el
interruptor est6 encendido antes del uso.
• Siel lavavajillastiene controles electr6nicos,en
caso de decidir apagar el interruptor entre ciclos
ELECTRICALREQUIREMENTS
de lavado, espere entre 5 y10 segundos luego de
encender el interruptor antes de presionar START/
RESET(Iniciaff Reiniciar)para permitir que el control
se inicie..
• items que no sean Utensilios:Nolave art[culos tales
como filtros electr6nicos de limpieza con aire,filtros
de horno ybrochas de pintura en su lavavajillas.Se
podrc_nproducir daBos,descoloraci6n o manchas
sobre el lavavajillas.
• Sedeber(_estar especialmente atento siel
electrodom6stico esusado por niBoso sise
encuentra cerca de losmismos.
• Cargueartfculos de plSstico livianos,de modo
que no sean desplazadosni caigan al rondo del
lavavajillas- es posibleque entren en contacto con
el elemento calentador ysean daBados.
• Thisappliance must be suppliedwith 120V,60 Hz,
and connected to an
individual, properly
grounded branch circuit,
protected bya 15or 20
amp circuit breakeror
time-delay fuse.
• If the electric sup-
ply provided does
not meet the above
Ensurepropergroundexist
beforeuse(portablemodels
only).
specifications, it is recommended that a licensed
electrician install an approved outlet.
• Your dishwasher circuit should not be used for
any other appliance while the dishwasher is in
operation as the dishwasher requires the full
capacity of the circuit.
imlf the wall receptacle you plug the dishwasher's
power cord into iscontrolled by a switch, turn on
the switch.

IMPORTANT SAFETY INFORMATION
READ ALL INSTRUCTIONS BEFORE USING-
SAVE THESEINSTRUCTIONS
WARNING! RISK OF CHILD ENTRAPMENT
PROPER DISPOSAL OF THE DISHWASHER
Junked or abandoned dishwashers (]re
dangerous...even if they will sit for "just a
few doys." If you (]re getting rid of your old
dishwasher, please follow the instructions
below to help prevent accidents.
Before You Throw Away Your Old
Dishwasher:
• Takeoff the door of the washing
compartment or remove the door latch
keeper (as shown). Front control latch keeper Topcontrol latch keeper
iADVERTENCIA! RIESGO DE QUE UN NINO QUEDE
ATRAPADO
FORMA ADECUADA DE DESCARTAR EL LAVAVAJILLAS
Los lavavajillas antiguos o abandonados son
peligrosos.., incluso aunque seconserven por "s61(
unos pocos dfas".Si se deshara de su antiguo
refrigerador, siga las siguientes instrucciones a fin
de evitar accidentes.
Antes de Descartar su Antiguo
Lavavajillas:
• Retire la puerta del compartimiento de
lavado o retire la traba de la puerta (como
se muestra). Control frontal de la traba
de seguridad Control superior de la traba
de seguridad

IMPORTANT SAFETY INFORMATION
READ ALL INSTRUCTIONS BEFORE USING-
SAVE THESE INSTRUCTIONS GEApplionces.com
...A WARNING! When using your dishwasher, follow basic precautions.
including the following:
• Usethis appliance onlyfor its intended purpose •
usdescribed in this Owner'sManual.
• Use only powder, Cascade ®Complete Action Packs, •
liquid detergentsor rinseagents recommendedfor •
usein u dishwasherand keepthem out of the reach
of children.Cascade®and Cascade®Complete •
Automatic DishwashingDetergents,and Cascade
Crystal Cleare rinseagents have beenapproved for
usein all GEdishwashers. •
• Locatesharpitems sothat they are not likelyto
damage the door seal.
• Loadsharp kniveswith the handlesup to reducethe •
risk ofcut-type injuries.
• Donotwash plasticitems unlessmarked dishwasher
safe or the equivalent.Forplasticitemsnot so marked, •
checkthe manufacturer's recommendations.
• Donottouch the heating element during or
immediately after use.
Donot operateyour dishwasherunlessall enclosure
panelsare properlyin place.
Donot tamper with controls.
Donot abuse,sit on or stand on the door or dish rack
ofthe dishwasher.
Donot allow childrento play around the dishwasher
when openingor closingthe door dueto the possibility
ofsmall fingers being pinched inthe door.
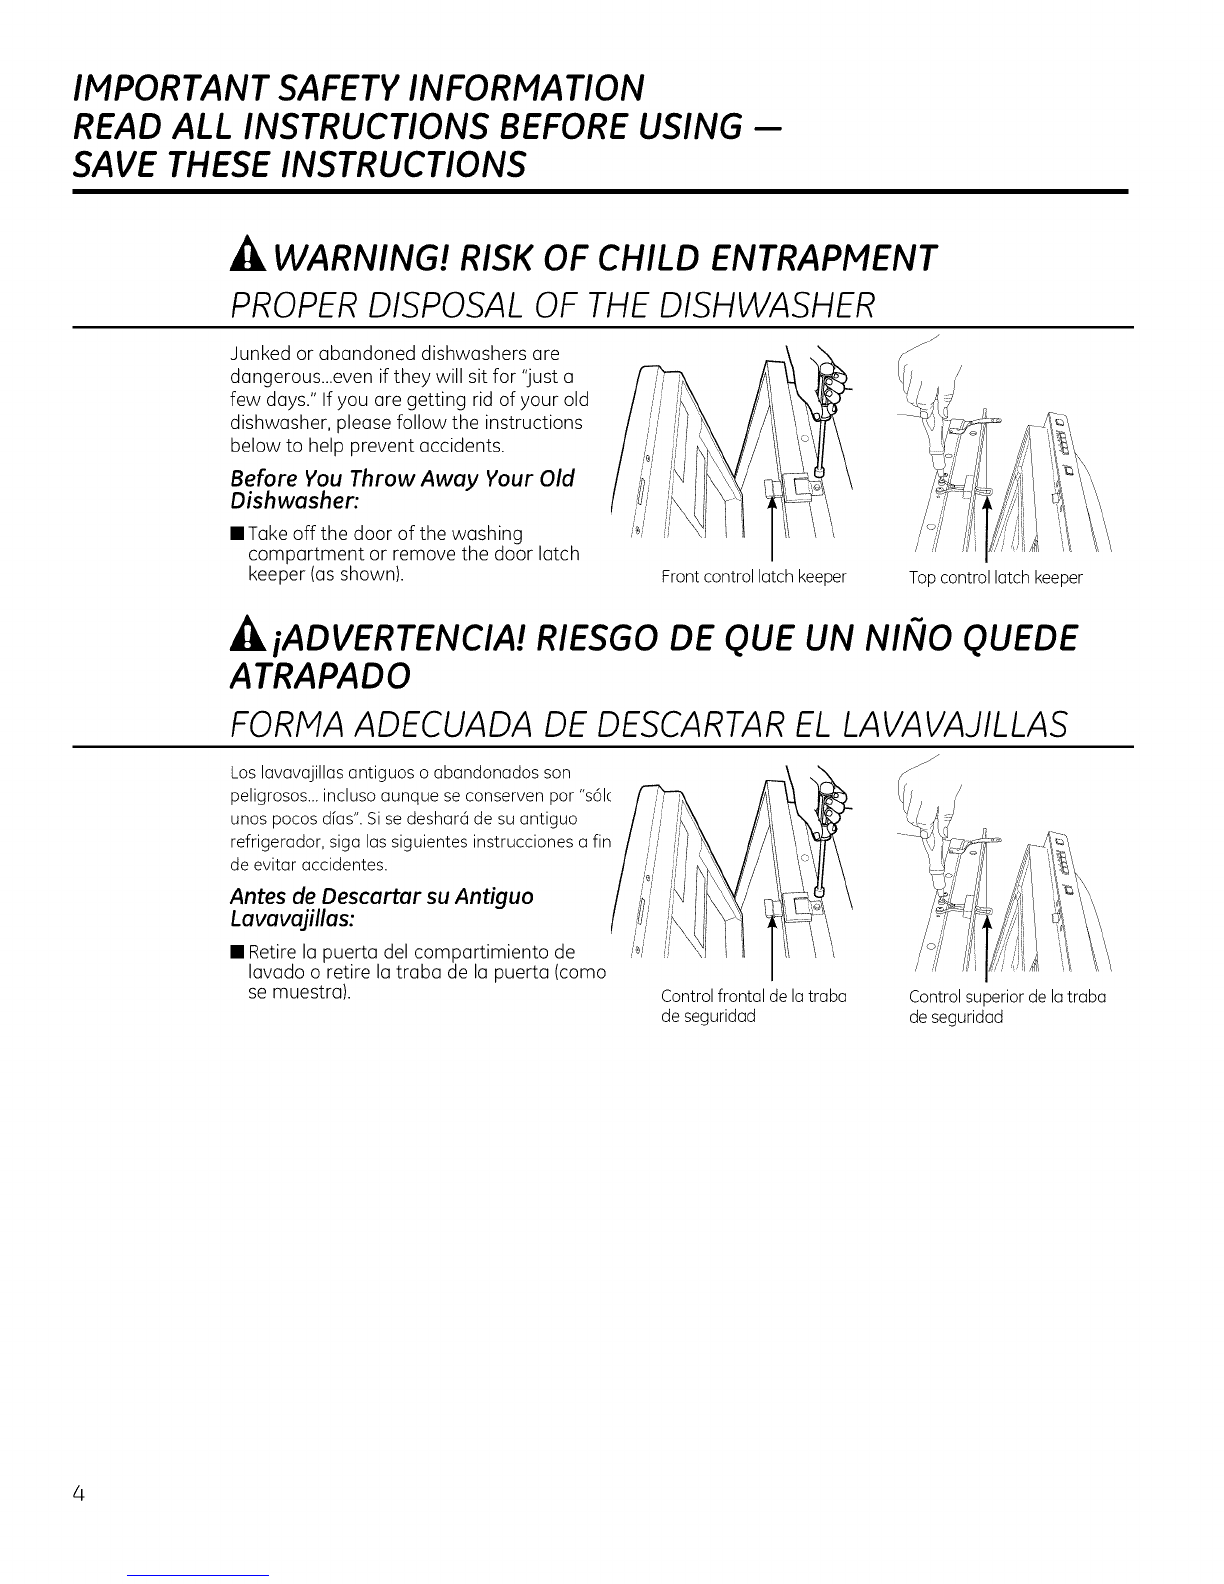
Donot discard a dishwasherwithout first removing
the door of thewashing compartment or the latch
keeper.
Donot store or usecombustible materials,gasolineor
otherflammable vapors and liquids in the vicinity of
this or any other appliance.
Donot allow childrento playwith, on or insidethis or
anydiscarded appliance.
AI usar su lavavajillas, siga las precauciones b6sicas,
iADVERTENCIA! incluyendo Io siguiente:
• Useeste electrodom6sticos61opar(]suprop6sito
original,como sedescribeen el Manualdel Propietario.
• Use s61opolvo, Paquetes de Acci6n Completa
de Cascade@, detergentes Ifquidos o ogentes de
enjuogue recomendodos p(]ro uso en un Iovovojillos,
y monteng(] los mismos fuer(] del (]lconce de los
niflos. Los Detergentes poro L(]vodoen Lovovojillos
Autom6ticos Cascade@ y Cascade@ Complete, y
los ogentes de enjuogue de Cascade Crystal Clear@
fueron oprobodos por su uso en todos los Iovovojillos
deGE
• Ubique (]rticulos puntiogudos de modo que no h(]yo
posibilidudesde duflos sobreel sellodorde Iopuertu.
• Ubiqueartfculos puntiagudos de modo que no hayu
posibilidudesde d(]flossobreel selludorde la puerto.
• Nolaveartfculosde pl(_stico,o menosque figure que
sonseguros par(]uso en Iovovojilloso una indicoci6n
equivolente.Sisetrot(] de artfculos de pl6stico
que no cuenton con dicha indicoci6n,consulte los
recomendocionesdel fobriconte.
• Notoque elelemento de colefacci6n duronte o
inmediotomente despu6sdel uso.
• Notoque el elemento de colefacci6n duronte o
inmediotamente despu6sdel uso.
• Notoque el elemento de colefacci6n duronte o
inmediatomente despu6sdel uso.
• Noabuse,no sesiente ni separe sobrelu puerto o Io
bundejo del platodel Iovovajillas.
• Nopermit(] que losniflosjueguen olrededor del
Iovovojillosal abrir o cerrarIo puerto,debido o
Ioposibilidadde que sus dedospequeflos seon
presionodoscontro lu puerta.
• Nopermit(] que losniflosjueguen olrededor del
Iovavojillasal abrir o cerrarIo puerta,debido a
la posibilidadde que sus dedospequeflos sean
presionadoscontra Iopuerta.
• Noguarde ni usematerialescombustibles,gasolina u
otrosvapores inflamoblesy Ifquidoscerca de _ste ni
de otros electrodom_sticos.
• Noguarde ni usematerialescombustibles,gasolina u
otrosvapores inflamoblesy Ifquidoscerca de _ste ni
de otros electrodom_sticos.
READAND FOLLOW THISSAFETYINFORMATIONCAREFULLY'.
SAVE THESE INSTRUCTIONS

About the dishwasher control panel.
Front Control Models Only. For top control models see Top Control Models Only section.
m
® SANmZED
R,NS_ " Cgcles
ONLY .... •
"__ U'_Y_ADC_,O.T'I " .... .
11
24 8
L_ .tu.Lj
m
CLEAN
Options
o
e
bTOR
Front Control Settings
R tatus Indicator Lights
TheStatus display tells you what's happening while the dishwasher isin operation and may flash, indicating
a malfunction. The lights will come ON indicating the sequence of operation the dishwasher is in.
CLEAN
SANITIZED
Displayed when a wash cycle is complete. The light stays ON as a reminder that
the dishes are clean. Openingthe door or pressingany keywhilethe door isclosedand
latchedwill turn off the light.
Displayedat the endof the cyclewhen SAN!WASHhas been selected and the dishwasher
has met the requirements for sanitization. SeeSAN! WASH,below,for complete cycle
description. Opening the door or pressing any key while the door isclosed and latched will
turn off the light.
B Cycles
The light above the selected pad willbe ON to indicate which cycle has been selected.
SANI WASH
(on some
models)
7.5-8.8 gal., 50-135 min.
This cycle raises the water temperature in the final rinse to sanitize your dishware.
The cycle length will vary depending on the temperature of your inlet water.
NOTE:The SANI WASH cycle is monitored for sanitization requirements. If the
cycle is interrupted during or after the main wash portion or if the incoming water
temperature is so low that adequate water heating cannot be achieved, the sanitizing
conditions may not be met. In these cases, the Sanitized light will not illuminate at the
end of the cycle.
NOTE:NSFcertified residentialdishwashersare not intendedfor licensedfood establishments.
POTS &PANS
or HEAVY
WASH (onsome
models)
8.8 gal., 88 min.
This cycle is meant for heavily soiled dishes or cookware with dried-on or baked-
on soils. Everyday dishes are safe to be used in this cycle.
NORMAL WASH 3.3 gal., 54 min..
This cycle is meant for normal every day soil levels and is designed to conserve both
water and energy. NOTE:NORMAL WASHwas used to rate the energy efficiency of
this dishwasher.
LIGHTWASH 7.6 gal., 46 min.
(onsome models) This cycle is for light to medium soiled dishes.
CHINA CRYSTAL6.3 gal., 41 min.
(onsome models) This cycle is for lightly soiled china and crystal.
RINSEONLY 1.2 gal., 7 min.
(on some For rinsing partial loads that will be washed later. Do not use detergent with this cycle.
models)
NOTE:Only the SANI WASH cycle has been designed to meet the requirements of Section 6, NSF184
for soil removal and sanitization efficacy.

GEAppliances.com
_t_ Options
The light above the selected pad will be ON to indicate which OPTION has been selected.
STEAM(Prewash) Use this option to improve wash performance with heavy or dried-on soils. This option is available
(on some with all cycles except RINSE ONLY.
models)
HOTWASH/ Use this option to improve wash and dry performance with heavy or dried-on soils.
HI-TEHPWASH/ This option must be selected prior to starting the cycle. It cannot be selected with RINSE ONLY or
ADDED HEAT CHINA/CRYSTAL cycle.
(on some models)
HOT START Use this option to improve wash and dry performance where inlet water temperature is low.
(on some models)
HEATED DRY Shuts off the drying heat option. Dishes air dry without using energy.
Light OFF Forfaster air dry you can prop the door open after the CLEAN light illuminates.
HEATEDDRY Turns the heater on for fast drying. This will extend the total run time between 54 and 45 minutes
Light ON depending on the cycle selected.
NOTE:Cannot be selected with RINSEONLY
CONTROL
LOCK
(on some
models)
DELAY HOURS
You can lock the controls to prevent selections from being made. You can also lock the controls
after you have started u cycle to prevent uninterrupted cycle changes.
Forexample, children cannot accidentally start the dishwasher by touching padswith this option selected.
ToLOCKthedishwashercontrol,touchandholdtheHEATEDDRYpadfor3 seconds.Thelightto theleftofthe
HEATEDDRYpadwillturnon.ToUNLOCKthedishwashercontrol,touchand holdtheHEATEDDRYpadfor3seconds.
TheLOCKlightwillturnoff.
You can delay the start of a wash cycle for 2, 4 or 8hours (delay time options may vary by model)
Touch the DELAYHOURSpad to choose the number of hours you want to delay the start of the
cycle; then touch START/RESETone time. A single beep will confirm DELAYHOURShas been set. The
dishwasher will count down and start automatically at the correct time. Touching START/RESETa
second time will cancel DELAYHOURSand turn off the dishwasher.
NOTE:While DELAYHOURSis active (after the START/RESETpad has been pressed),the dishwasher
will update the remaining count down time on the control panel before the dishwasher starts the
cycle. Forexample, if DELAYHOURS8 isselected, the delay hour indicator will move from 8 to 4 to 2
to off as delay time elapses.
START
RESET
Close and latch the dishwasher door and select the cycle and desired options. Touch the
START/RESETpad one time to begin the cycle. Water begins to fill the dishwasher, and approximately
60 seconds later the wash action begins.
NOTE:The dishwasher remembers your last cycle so you don't have to reprogram each time.
When the dishwasher door is closed and latched, the control panel lights will display the last
settings selected.
If you don't want to change any of the settings, simply touch the START/RESETpad once to begin the cycle.
If the door is closed, the indicator lights will turn off if a pad is not pressed within two minutes.
To activate the display, open and close the door or touch any pad.
If a power failure occurs, NORMAL WASH and HEATEDDRY will automatically be programmed.
To change cycles after washing starts, press the START/RESETpad. This will cancel the currently
running cycle, and begin pump-out. During this time, the LEDsof the currently selected cycle
will flash. Once the pump-out is complete, the dishwasher will turn off.
Pressthe START/RESETpad when the dishwasher is running to cancel the cycle. The dishwasher will
pump out and turn off at the end of pump-out. The LEDsof the currently selected cycle will flash
during pump-out. You can select cycles and options during pump-out. If you press START/RESET
during the pump-out period, the pump-out will stop and a new cycle will begin.

About the dishwasher control panel.
Top Control Models Only. B
Auto
Sanitize
Normal
Light
248
@ @ @ @ @ @ ini--m@
Control Lock
Sanitized
Clean
\ J
TopControlSettings
_ tatus Indicator Lights
TheStatusdisplaytellsyouwhat'shappeningwhilethedishwasherisinoperationandmayflash,indicatinga malfunction.
ThelightswillcomeONindicatingthesequenceofoperationthedishwasherisin.
CONTROL Displayedwhen control islocked.
LOCK
(onsome models)
SANITIZED Displayedat the endof the cyclewhen SANITIZEhas been selected and the dishwasher has
met the requirements for sanitization. SeeSANITIZE,below,for complete cycledescription.
Openingthe door or pressingany keywhile the door isclosedand latched will turn off the light.
CLEAN Displayed when a wash cycle is complete. The light stays ON as a reminder that the
dishes are clean. Openingthe door or pressingany keywhile the door isclosedand latchedwill
turn off the light.
CYCLESTATUS Thecyclestatusindicatorlightislocatedontherightsideofthedishwasher,abovethehandle.This
INDICATOR lightcomesonasamberwhiletheselectedcycleisrunning.Thelightturnstogreenwhentheselected
cycleiscomplete.ThelightstaysONasgreenasa r
reminderthatthedishesarecleanuntilthedooris I _ 2
openedoruntilanothercycleisselected. 1[. I 7
CycleStatusIndicatorLight
Cycles
PresstheSelectCydekeypadforthedesiredwashcycle.
NOTE:Allcycletimesand water usageinformation contained in the following sectionare approximate values
only.Actual resultswilldepend on severalfactors, includingbut not limited to, inlettemperature, householdwater
pressureand dirtinessof the wash water.Thisdishwasher isequippedwith a dirtand temperature sensor.
Thelight nextto the SelectCyclepad will be ONto indicate which WASHCYCLEhas beenselected.
AUTO S.0gal.,67min.
Thiscycleismeantforlightto heavilysoileddishes.
SANITIZE 7.5-8.8gal.,50-1% min.
Thiscycleraisesthewatertemperaturein thefinalrinsetosanitizeyourdishware.Thecyclelengthwill
varydependingonthetemperatureofyourinletwater.
NOTE:TheSANITIZEcycleismonitoredforsanitizationrequirements,ifthecycleisinterruptedduringor
afterthefinalrinseportionorif theincomingwatertemperatureissolowthat adequatewaterheating
cannotbeachieved,thesanitizingconditionsmaynotbemet.tnthesecases,theSanitizedlightwillnot
illuminateattheendofthecycle.
NOTE:NSFcertifiedresidentialdishwashersarenotintendedforlicensedfoodestablishments.
NORMAL 3.3 gal., 54 min.
This cycle is meant for normal every day soil levels and is designed to conserve both water
and energy. NOTE:NORMALwas used to rate the energy efficiency of this dishwasher.
LIGHT 7.6gal.,46 min.
Thiscycleismeantforlightto mediumsoileddishes.
NOTE:Only the SANITIZEcycle has been designed to meet the requirements of Section 6, NSF184 for soil
removal and sanitization efficacy.
8

GEAppliances.com
Options
The light above the selected pad will be ON to indicate which OPTION has been selected.
DELAYHOURS You can delay the start of a wash cycle for 2, 4 or 8hours (delay time options may vary by
model). Touch the DELAY HOURS pad to choose the number of hours you want to delay
the start of the cycle: then touch START/RESET one time. A single beep will confirm DELAY
HOURS has been set. The dishwasher will count down and start automatically at the correct
time. Touching START/RESET a second time will cancel DELAY HOURS and turn off the
dishwasher.
NOTE: While DELAY HOURS is active (after the START/RESET pad has been pressed), the
dishwasher will update the remaining count down time on the control panel before the
dishwasher starts the cycle. For example, ifDELAY HOURS 8 is selected, the delay hour
indicator will move from 8 to 4 to 2 to off as delay time elapses.
HEATEDDRY Shuts off the drying heat option. Dishes air dry without using energy.
Light OFF For faster air dry you can prop the door open after the CLEAN light illuminates.
HEATEDDRY Turns the heater on for fast drying. This will extend the total run time between 34 and 45
Light ON minutes depending on the cycle selected.
ADDED HEAT When selected, the cycle will run with heating element on longer and may increase
cycle times to improve both wash and dry performance.
STEAM(Prewash) Forusewith heavilysoiledand/ordried-on,baked-onsoils.ThisoptionlUST beselectedPRIOR
tostartingthecycle.TheSTEAMoptionadds30minutestothecycletime.
CONTROL
LOCK
(on some
models)
You can lock the controls to prevent selections from being made. You can also lock the
controls after you have started a cycle to prevent uninterrupted cycle changes.
For example, children cannot accidentally start the dishwasher by touching pads with this
option selected.
ToLOCKthedishwashercontrol,touchand holdtheHEATEDDRYpadfor 3seconds.Thecontrollocklight
willturnon.ToUNLOCKthedishwashercontrol,touchandholdtheHEATEDDRYpadfor3seconds.The
controllocklightwillturnoff.
START Door can be open to start the cycle and select desired options. Pressthe START/RESET
pad one time to begin the cycle. Close the door to start the cycle or begin the DELAYHOURS
countdown. Approximately 60 seconds later the wash action begins.
NOTE:The dishwasher remembers your last cycle. You don't have to reprogram each time.
Pressthe START/RESETpad to ready the dishwasher and close the door to begin. If the door
isopen, the illuminated lights will turn off if a pad is not pressed within two minutes. To
activate the display, close and open the door or touch any pad.
On some models, if a power failure occurs, AUTO and HEATEDDRYwill automatically be
programmed. For all other models, if a power failure occurs, NORMAL and HEATEDDRYwill
automatically be programmed.
RESET To change cycles after washing starts, press the START/RESETpad. This will cancel
the currently running cycle, and begin pump-out Once the pump-out is complete, the
dishwasher will turn off.
PresstheSTART/RESETpad when the dishwasher is running to cancel the cycle. The
dishwasher will pump out and turn off at the end of pump-out. You can select cycles
and options during pump-out. If you press START/RESETduring the pump-out period, the
pump-out will stop and a new cycle will begin.

About the unicouple (portable models only).
/
Before Operating the Dishwasher the First Time
Attach the faucet adapter. The special faucet
adapter supplied with your dishwasher must
be assembled to the sink faucet before you can
use your dishwasher.
The faucet adapter is designed to fit standard
spouts having internal or external threads. You
willfind the adapter and two washers in the
faucet adapter packet in your dishwasher.
To install faucet adapter, first remove the old
aerator or trim ring on your faucet spout.
If faucet has external threads: Insert the
thinner ofthe two washers into the faucet
adapter and attach itto the faucet spout.
Tighten with pliers.
If faucet has internal threads: Insert both
of the washersinto the faucet adapterand
attach it to the faucet spout.
Tighten with pliers.
If the faucet adapter threads do not match
your faucet spout, your local hardware
or plumbing supply store normally has
additional fittings to adapt your faucet spout
to the special faucet adapter.
NOTE:A sink spray attachment hose can
burst if it is installed on the same sink with
your dishwasher. We suggest that you
disconnect the sink spray attachment if your
sink has one and plug the hole.
How to Connect the Unicouple
[Z] Run the hot water faucet to purge cold
water from the hot water line.The hot
water must be between 120°F and 150°F
for best wash performance.
[] PullUnicouple and its hoses completely out
from storage compartment located at rear
of dishwasher.
[-_ Attach the Unicouple connector to the
faucet adapter by depressing the collar at
the top of the connector. When Unicouple
is all the way up onto the adapter, release
the collar. Itwillthen snap into position to
lock the Unicouple in place.
%
%
TheUnicouple's small hosecarries water
from the faucet to the dishwasher.Its large
hose curries drain water to the sink.Be
sure Unicouple ispointing toward the sink
bowl drain opening and the sinkdrain is
open for water that will drain from your
dishwasher.
If your dishwasher drains into u disposer,
operate the disposer until it iscompletely
empty before starting the dishwasher.
Turn hot water fully on before starting the
dishwasher.
Plugthe dishwasher power cord into the
outlet.
Pressure releose
button How to Disconnect the Dishwasher
E_ Unplugthe dishwasher.
Pushthe cord buck into its storage locution.
[_ Turn off the hot water.
[] Releasethe water pressure by depressing
the pressure releasebutton.
Releasethe Unicouple from the faucet
% by depressing the collar at the top of the
Unicouple connector.
I-_ Drain excess water from the unicouple
hoses (see below). Pushthe hoses back
into their storage location.
CAUTION TO protectyourseff
and theroom from severesplashing,relieve
waterpressurepriortodisconnectingthe
unicouple.
PRECAUCION Afinde
protegerse usted y la habitaci6n de
salpicaduras severas, alivie la presi6n del
ogua antes de desconectar la manguera de
alimentaci6n.
10
How to Drain Excess Water from Unicouple Hoses
If the sink is 34"or higher from the floor,the
excesswater in Unicouple hoses cannot
be drained directly into the sink.It will be
necessary to drain excesswater from hoses
into a bowl or suitable container that isheld
outside and lower than the sink.

Using the dishwasher. GEAppliances.com
Check the Water Temperature
Theenteringwatershouldbeatleast120°F(49°C)and
notmorethan 150°F(66°C)foreffectivecleaningandto
preventdishdamage.Checkthewatertemperaturewitha
candyormeatthermometer.Turnonthehotwaterfaucet
nearestthedishwasher,placethethermometerinaglass
andletthewaterrun continuouslyintotheglassuntilthe
temperaturestopsrising.
Usea RinseAgent such as Cascade Crystal Clear®
RinseagentssuchasCascadeCrystalClear®removespotsandpreventnewfilmbuilduponyourdishes,glasses,
flatware,cookwareand plastic.
Filling the Dispenser
TherinseagentdispenserholdsS.Soz.(1055ml)of rinseagent.Undernormal
conditions,thiswilllastapproximatelyonemonth.Tryto keepitfull,butdo notoverfill.
[_ Hakesurethedishwasherdoorisfullyopen.
E] Turnthedispensercaptothe leftandliftitout.
[_ Addrinseagentuntiltheindicatorwindowlooksfull.
E] Cleanupanyspilledrinseagentwith a dampcloth.
[] Replacethedispensercap.
in '
window Dispensercap
Rinse Aid Setting
Theamountofrinseagentreleasedintothefinalwashcanbeadjusted.Thefactory
settingisatthemidpoint.Ifthereareringsofcalcium(hardwater)spotsondishes,try a
highersetting,tfyouseefoam inthedishwasher,movetheindicatorto a lowersetting.
Toadjust thesetting
Removethedispensercap;thenturntheadjustercounterclockwisetoincreasethe
amountofrinseagent,clockwiseto reducetheamountof rinseagent.
Rinse
agent
adjuster
Dish Preparation Prior to Loading
[] Nopre-rinsingof normalfoodsoilisrequired.
[] Scrapeoff hardsoils,includingbones,toothpicks,skins
andseeds.
[] Removelargequantitiesof anyremainingfood.
[] Removeleafyvegetables,meattrimmingsand
excessiveamountsofgreaseoroil.
[] Removeacidicfoodsoilsthat candiscolorstainless
steel.
11

Using the dishwasher.
_ Thedetergent dispenserison the upper left hand sideof
_ the dishwasherdoor.It ha two compartments.Usethe
main wash compartment for all loads.Usethe pre-wash
compartment onlywhen yourwater isextremely hard or
whenyou havea heavysoiledload.
Number of
Grains Detergent Cups to Fill
Lessthan 4 Fillcup to soft line (1/3 full)
4 to 8 Fillcup to medium soft line (2/3full)
8 to 12 Fillcup to medium hard line
(completely full)
Greater Fillboth main wash cup and pre
than 12 wash cup
12
Detergent
Dispenser
Youmayusetablet,powder,liquidor gelautomatic
dishwasherdetergent.Makesureyouuseonlydetergents
specificallylabeledforuseinautomaticdishwashers.Never
useliquidhanddisdetergentinan automaticdishwasher.
Sudsingand poorwashperformancewillresultwith theuseof
improperdetergents.
Detergentsshouldbestoredina drylocationand intheir
originalcontainertopreventlossofeffectiveness.Place
detergentin thecupjust priorto startingthedishwasherand
thencloseandlatchthecover.Thecoverwillopenduringthe
washcycle.
Filling the Detergent Dispenser
GErecommendsusingdetergentintabletor packetform.
Independenttestinghasshownthisform ofdetergentisvery
effectiveinthedishwasher.Cascade®Complete2 in 1
Action Packsareanexampleofthistypeofdetergent.Simply
puta tabletor packetintothemainwashcompartmentand
thencloseandlatchthedetergentcupcover.Pleasenotice
thatthetabletor packetmustbeplacedinthemainwash
compartmentofthedetergentcup.ifthetabletor packetis
tossedinthebottomofthedishwasher,thedetergentwillbe
flusheddownthedrainina veryshortperiodoftimeandwill
thusbewasted.Washperformancewillbeverypoorasa
result.
tfyou chooseto usedetergentinpowder,liquidor gelform,
theamountof detergentyouusewillbedeterminedbythe
hardnessofyourwater,thetemperatureofyourwater,
andthefoodsoilloadinsidethedishwasher.Contactyour
watercompanytogetinformationaboutthehardnessof
thewater inyourarea.Youmay purchasea hardwatertest
stripfrom GE.Call1-800-626-2002and askforpartnumber
WD01×10295.
Medium Medium Extremely Hard or
Soft Soft Hard Heavy Soils
Usingtoo muchdetergentwith verysoftand/orvery
hotwatermaycauseaconditioncalledetchingonyour
glassware.Etchingisa permanentcloudinessinyour
glassware.Thisconditionisirreversible.However,usingtoo
littledetergentwillcausepoorwashperformance.
Usethetableasa startingpointandthenadjusttheamount
ofdetergentyouuse.Usejust enoughto getgoodwash
performance.Usingjustthe rightamountofdetergentwill
providegreatwashperformancewithoutwastingdetergent
oretchingofglassware.
DO NOTUSEHANDDISHDETERGENT
m
m
NOTE:Usingadetergentthat isnotspecificallydesigned
fordishwasherswillcausethedishwashertofillwithsuds.
Duringoperation,thesesudswillspilloutofthedishwasher
vents,coveringthekitchenfloorandmakingthefloorwet.
Becausesomanydetergentcontainerslookalike,storethe
dishwasherdetergentina separatespacefrom allother
cleaners.Showanyonewhomayusethedishwasherthe
correctdetergentandwhereitisstored.
Whiletherewillbenolastingdamagetothedishwasher,your
disheswillnotgetcleanusinga dishwashingdetergentthat is
notformulatedtoworkwith automaticdishwashers.

the dishwasher racks. GffAppliances.com
For best dishwashing results, follow these loading guidelines. Features and appearance of racks and silverware
baskets may vary from your model.
Upper Rack
Althoughtheupperrockisprimarilyforglosses,cups
and saucers,potsandpunsconbeplaced
inthisrockforeffectivecleaning.Cupsandglasses
fit bestalongthesides.Thisisalsoa secureplacefor
dishwasher-safeplastics.
Theupperrackisadjustable(onsomemodels
to addflexibilityinloadingyourdishwasher.
Tolower,pushtabsin andlowerrack.Toraise
just pullup onrackuntilitsnaps.
Theutilityshelf(onsomemodels)maybeplaced
intheupor downpositionto oddflexibility.Awine
glassholder(onsomemodels)secureswineglasses
for bestwashability.Becausewineglassescomein
varioussizes,after loading,slowlypush
intherackto makesuretheywillclearthetop
ofthedishwasher.
Theupperrackisgoodfor allkindsofodd-shaped
utensils.Saucepans,mixingbowlsandotheritems
shouldbeplacedfacedown.
Fold-downtines(onsomemodels)provideflexibility
forextra-largeandhard-to-fititems.
Securelargerdishwasher-safeplasticsover2tines
whenpossible.
Makesuresmallplasticitemsaresecuresothey
can'tfallontotheheater.
Besurethat itemsdonotprotrudethroughthe
bottomof therackand blockrotationofthe
middlesprayarm.Thiscouldresultin poorwash
performanceforitemsintheupperrack.
Checkto makesure
that no itemswill block
rotation ofthewash
arms.
Lower Rack
i helowerrackisbestusedfor plates,saucersand
cookware.Largeitemssuchasbroilerpansand
bakingracksshouldgoalongthele_hand side.
Loadplatters,potsandbowlsalongthesides,in
cornersor intheback.Thesoiledsideofitemsshould
facethecenteroftherack.if necessary,oversized
glassesandmugscanbeplacedinthe lowerrackto
maximizeloadingflexibility.
Also,becarefulnottoleta portionofan itemsuch
asa potor dishhandleextendthroughthebottom
rack.Thiscouldblockthewasharmandcausepoor
washingresults.
Fold-downtines(onsomemodels)provideflexibility
for extra-largeand hard-to-fititems.Thetinesmay
beleftintheup positionorfoldeddownto customize
the lowerrack.
Donot letanyitem extend
_7 If f _ I thr°ugh theb°tt°m °f the
silverwarebasket.Items
_ !,:._ couldpreventthesprayarm
romturningandcausepoor
_ _ _!washperformance.
One-piece basket (on some models)
Square basket (on some models)
Silverware Basket
Put flatware inthe removable basket with forkand
knifehandles up to protect your hands. Placespoons
inthe basket with handles down. Hix knives,forks
and spoons so they don't nest together. Distribute
evenly.Smallplasticitems,suchasmeasuring
spoonsandlidsfromsmallcontainersshouldgo
inthebottomofthesilverwarebasketwiththe
silverwareontop.
Thelidsofbothendand middlebaskets
(onsomemodels)canbeclosedto containsmall
items.Longitemscanbeplacedontheutilityshelfin
theupperrack.
Theaccessory basket (onsome models)can
hold small items such as baby bottle nipples,
plastic lids,or corn cob holders.
Accessory basket (on some models)
13

Loading place settings...
Follow these guidelines for loading 10 place settings. Features and appearance of racks and silverware baskets
may vary from your model. NOTE:Silverware should be individually loaded into the slots on the silverware basket lid.
Upper Rack--lO place settings (on some models) Lower Rack--lO place settings (on some models)
Long silverware basket
models Front Control models
with square basket
*Tine finger: Vertical wire that separates and holds plates on the rack.
Front Control models
with square basket Long silverware basket Long silverware basket
models (!2 tine models (!3 tine
fingers* by row) fingers* by row)
Follow these guidelines for loading 12 place settings. Features and appearance of racks and silverware baskets
may vary from your model. NOTE:Silverware should be individually loaded into the slots on the silverware basket lid.
Upper Rack--12 place settings (on some models) Lower Rack--12 place settings (on some models)
Front Control models Long silverware basket
with square basket models
*Tine finger: Vertical wire that separates and holds plates on the rack.
Front Control models
with square basket
! _'i!'!'ii'/' _i"f" '!i'_ii';'"/_"_,'ii'_,i,/ ! !" ' _" ,
l k%!_tll_Itl//)_t
Long silverware basket Long silverware basket
models (!2 tine models (!3 tine
fingers* by row) fingers* by row)
NOTE: Do not place plates smaller than 6" on the back of the lower rack, refer to figures shown above.
Optional accessory.
Non-wood countertop bracket kit-This isfor
installations which have non-wood countertops and
includes side-mounting brackets and instructions for
securing the dishwasher.
II GPF65
This accessory is available at extra cost from GE.
Coil 800.626.2002 to order. Vise, MosterCord or
Discover cords ore accepted.
Specify accessory number when ordering.
14

Caring for the dishwasher. GEAppliances.com
Cleaning the Exterior Door Panel
Beforecleaning the front panel,make sureyou know
what type of panel you have. Referto the last two
lettersof your model number. Youcan locate your
model number on the left-hand tub walljust insidethe
door. Ifyour model number endswith BB,CC,WW,
SAor BG,then you have a painted door panel. Ifyour
model number endswith SS,then you have a Stainless
SteelDoor panel. Ifyour model number ends with CS,
then you have a CleanSteelpanel.
Followthe instructions below for cleaning the door
panel for your specific model.
Painted Door Panel (model numbers ending in BB-
black, CC-bisque, WW-white, SA-silver metallic or BG-
graphite black)
Use a clean, soft, lightly dampened cloth, then dry
thoroughly. Youmay also use a good appliance wax
or polish.
Stainless Steel Door Panel (model numbers ending in
SS)
The stainless steel panels can be cleaned with
Stainless Steel Magic or a similar product using a clean,
soft cloth. Do not use appliance wax, polish, bleach or
products containing chlorine on Stainless Steel doors.
You can order StainlessSteelMagic #WX! 0X!5
through GEPartsby calling 800.626.2002.
CleanSteel Door Panel (modelnumbers ending in CS)
Use a clean, soft, lightly dampened cloth, then dry
thoroughly. Do not use appliance wax, polish or any
chemical agent on CleanSteeldoors.
Do not wipe the dishwasher with a soiled dish cloth
or wet towel. These may leave a residue.
Do not use scouring pads or powdered cleaners
because these products can scratch the finish.
Cleaning the Control Panel
Toclean the control panel,usea lightly dampened
cloth. Thendry thoroughly.
Protect Against Freezing
Ifyour dishwasher is left in an unheated place during
the winter, ask a servicetechnician to:
r_cut off electrical power to the dishwasher.
Removefusesor trip circuit breaker.
E] Turnoff the water supply and disconnect the
water inlet line from the water valve.
r31 Drainwater from the water inletline and water
valve.(Usea pan to catch the water.)
j4-] Reconnectthe water inlet line to the water valve.
Does Your Dishwasher Have an Air Gap?
An air gap protects your dishwasher against water
backing up into it if a drain clogs.Theair gap isnot
a part of the dishwasher. It isnot covered byyour
warranty. Not all plumbing codes require air gaps,
soyou may not have one.
The air gup is easy to clean.
r_ Turn offthe dishwasher and liftoff the cover.
Remove the plastic cup and clean with
E]a toothpick.
Air gap __
Checktheairgapanytimeyour
dishwasherisn'tdrainingwell.
15

Before you call for service...
Troubleshooting Tips
Save time and money! Review the charts on the following pages, or visit GEAppliances.com.
_ln Canada visit www.GEAppfiances.ca. You may not need to call for service.
Problem
START/RESETstatus
indicatorlight flashing
(Frontcontrol only)
DishwasherBEEPS
onceeveryminute
Possible Causes What To Do
Youhave pressedthe
START/RESETpad while the
dishwasher is running. This will
cancel the cycle. Thelight(s)will
stopflashingafter thedishwasher
drains (about 75 seconds).
Powertothe dishwasherwas
turnedoffwhile a cyclewas
runningandpowerhasjust been
restoredto thedishwasher.The
blinkinglights indicatethat the
dishwasherisdrainingthepotential
water inside.
•PresstheSTART/RESETpad onceto startthedishwasher.Pressthe
START/RESETpadasecondtimewhenthedishwasherisrunningonlyifyou
wish to cancelthe cycle.
*Thelightwillstopflashingafterthedishwasherdrains.Anewcyclewill
startautomatically.
This isa reminder that your
dishwasher door hasbeen left
open during operation. It will
continue beepinguntil youclose
the door.
• Closeand latchthedoorafteropeningitmid-cycle.
Beepingat the end This isnormal. Thedishwasher •Toturnoffthedoublebeepindicator(orre-activateitif itwas previously
of thecycle will beeptwice at the end of the turnedoff),pressthe HEATEDDRYpad 5 timeswithin 3seconds.
cycle Atriple beepwill soundto indicatethe end-of-cyclebeepoption
hasbeenturned on or off.
Dishesand flatware Lowinletwater temperature *Makesureinletwatertemperatureiscorrect(seepage11).Turnonthehot
notclean waterfaucetnearestthedishwasher,letrun untilthewatertemperature
stopsrising.Thenstartthedishwasherandturnoff thefaucet.Thisinsures
theenteringwater ishot.SelectHotStart ifavailable.
Water pressureistemporarilylow *Turnona faucet.Iswatercomingout moreslowlythan usual?tfso,wait
untilpressureisnormalbeforeusingyourdishwasher.
Airgapor disposerisclogged • Cleantheairgaporflushthedisposer.
Improperrackloading *Makesurelargedishwaredoesnotblockthedetergentdispenseror the
washarms.SeetheLoadingthedishwasherrackssection.
Noair gap or highdrain loop *Verifythatyouhaveanairgapor a highdrainloop.Refertothe
InstallationInstructions.
Poorperformingdetergent * Usea highlyrateddetergentsuchasCascade®Complete.
Spotsandfilming Extremelyhard water • UserinseagentssuchasCascadeCrystalClear° to removespots
onglassesand andpreventnewfilm buildup.
flatware Lowinletwater temperature • Hakesurewatertemperatureisat least120°F.
Overloadingor improper • LoaddishwasherasshownintheLoadingPlaceSettingssection.
loadingofthe dishwasher
Oldor damppowderdetergent • Hakesuredetergentisfresh.
Rinseagentdispenserempty • tfwaterisextremelyhard,a softenermayberequired.
Toolittle or lowperforming* Hakesureyouusethe properamountofhighlyrateddetergent.
detergent
Cloudinesson Combinationof softwater and * Thisiscalledetchingandispermanent.Topreventthisfrom happening,
glassware too muchdetergent uselessdetergentifyouhavesoftwater.Washglasswareintheshortest
cyclethatwillgetitclean.
Lowperformingphosphate • SeeWhitefilmon insidesurfacepage17
freedetergent
Water temperatureenteringthe *Thiscouldbeetching.Lowerthewaterheatertemperature.
dishwasherexceeds150°F(66°C}
16

GEAppliances.com
Problem Possible Causes What To Do
Sudsin thetub Correctdetergent • Useonlyautomaticdishwasherdetergentsto avoidsudsing.Cascade*
wasn't used AutomaticDishwashingDetergentshavebeenapprovedforuseinall
GEdishwashers.
=_ • Toremovesudsfromthetub,openthedishwasherand letsudsdissipate.
Closeandlatchthedishwasher.Pumpoutwater bytouchingthe
START/RESETpadonce;then30 secondslater,touchthe
START/RESETpadagain.Repeatif necessary.
Rinseagentwasspilled • Alwayswipeuprinseagentspillsimmediately.
Dishesare blocking the • Repositionthe dishes,sothe water fromthe lowerspray armcan
detergent cup flush thedetergent cup.Seethe Loadingthe dishwashersection.
Aluminumutensilshave • Removemarkswith a mild,abrasivecleaner.
rubbedagainst dishes
Lowinletwater temperature
Detergent left in
dispensercups
Blackor gray
marksondishes
Dishesdon'tdry Makesureinletwatertemperatureisatleast120°F.
SelectHEATEDDRY
UseHOTSTART,HOTWASHorADDEDHEAToptions.
• Selecta highercycle,suchasSANIWASH/SANITIZEorPOTS&PANS.
Rinseagentdispenserisempty
ControlpanelrespondedDoorlatch may notbe properly
toinputsbutdishwasherseated
neverfilledwith water
Stainedtub interior
• Checktherinseagentdispenserandfillasrequired.
Hakesurethedoorisfirmlyclosed.
Water valvemay beturnedoff
Sometomato-basedfoodscan
causereddishstains
Teaor coffeestains
• Makesurewatervalve(usuallylocatedunderthesink)isturnedon.
UseoftheRINSEONLYcycleafteraddingthedishto theload
candecreasethelevelofstaining.
Removethestainbyhand,usinga solutionof 1/2cupbleach
and3 cupswarmwater.
Anoverallyellowor brownfilm can •
becausedbyirondepositsin water
White film on insidesurface- •
hardwater minerals
Dishwasherwon't run Fuseisblownorcircuit breaker •
istripped
Poweristurnedoff
Controlpanelislocked
Rebootyourcontrol
AkWARNING
Beforecleaninginterior,wait atleast20minutesafteracycleforthe
heatingelementsto cooldown.Failureto dosocanresultinburns.
AADVERTENCIA
Antesdelimpiarel interior,espereparIomenos20minutosdespu_s
de uncicloparaqueloselementoscalentadoresseenfrfen.Nohacerlo
puedeprovocarquemaduras.
Aspecialfilterinthewatersupplylineistheonlywaytocorrect
thisproblem.Contacta watersoftenercompany.
GErecommendsCascadeCrystalC/ear_tohelppreventhardwater
mineraldepositsfrom forming.
Rundishwasherwithcitricacidto removemineraldeposits.Citricacid
(Partnumber:WD35×151)canbeorderedthroughGEParts.Seeback
coverfororderinginformation.
Replacefuseor resetcircuitbreaker.Removeanyotherappliancesfrom
thecircuit.
tnsomeinstallations,thepowertothedishwasherisprovidedthrougha
wallswitch,oftenlocatednexttothedisposerswitch.Hakesureit ison.
Unlockcontrolpanel.Seepage7or9.
Turnoffpowertothedishwasher(circuitbreakerorwallswitch)for
30seconds;thenturnbackon.
17

Before you call for service...
Problem Possible Causes What ToDo
Control panel lights Time too long between • Eachpadmust betouchedwithin 30 secondsofthe others.
go offwhen you're touching of selectedpads To relight,touch anypad again,or unlockand relatch door (front control)
setting controls or openthe door and unlock(topcontrol).
Water standing in This is normal • Asmall amount of cleanwater around theoutlet onthe tub
the bottom of the tub bottom at the backof thetub keepsthe water seallubricated.
Waterwon't pump Drainisclogged • tfyou haveanairgap,cleanit.Seepage14.
outof thetub • tfthedishwasherdrainsintoa disposer,rundisposerclear.
• Checktoseeifyourkitchensinkisdrainingwell.tfnot,you
mayneeda plumber.
Steam Thisis normal • Warm,moistaircomesthroughtheventbythedoorlatchduringdrying
andwhenwaterisbeingpumpedout.Thisisnecessaryfordrying.
Sanitizedlight does Thedoorwasopenedand the • Donotinterruptthecyclebyopeningthedoorduringthewashcycle.
notilluminate at the cyclewas interruptedduring
endof thecycle final rinse
Theincomingwater • Raisethewaterheatertemperaturetobetween120°Fand140°F.
temperaturewastoo low
Noise Normal operating sounds • Theseareoilnormal.Noactionisrequired.
A white film on
glassware,dishware
andtheinterior
Detergentcupopening
Water enteringdishwasher
Themotor stopsand starts at
varioustimesduringthe cycle
Drainpumpsoundsduring
pumpout
Rattling disheswhen the spray •
arm rotates
This problemcaused by
phosphate4reedishwasher
detergent
Hake suredishesare properlyloaded.Seethe Loadingthe
dishwasherrackssection.
Toremovethewhitefilm,runyourdishesthrougha dishwashercyclewith
citricacid.UseaWD35X15].citricacidkitfoundatthelocalsupermarketor
online.
Pourthecitricacidinthedetergentcupandclosethecover.Placethefilmed
butotherwisecleanglasswareand dishwearinthedishwasher.Leave
silverwareandothermetalitemsoutofthedishwasher.Turnthedishwasher
onand letit runthrougha completecyclewithoutdetergent.Theglassware,
dishware,anddishwashershouldcomeoutfilmfree.Alternativey,
avinegarrinsemaybeused.PourI cupofvinegarintodishwasherjust after
thedetergentcupopensand letthedishwashercompleteitscycle.
Thismayberepeatedseveraltimesayearasneeded
Theuseofa rinseagenasCascadeCrystalClearmayhelpminimizea repeat
buildup offilm. Also,theuseofa highlyrateddetergentsuchasCascade®
CompleteActionPadswillhelppreventfilm build-up.
18

Notes. GEAppliances.com
19

Notes.
20
This manual suits for next models
24
Table of contents
Other GE Dishwasher manuals

GE
GE Tall Tub Dishwashers User manual

GE
GE ZBD4800XBB User manual

GE
GE Monogram ZBD1850NII User manual

GE
GE Profile PDW8100 Series User manual

GE
GE Profile PDW8700N Manual

GE
GE Profile PDW8100 Series User manual

GE
GE Spacemaker GSM2200N User manual

GE
GE PD 715 Series User manual

GE
GE GLD4550VCS Manual

GE
GE GDT535 User manual