GE GLDA696FSS User manual

Dishwashers
Owner’s Manual
49-55087 07-13 GE
Safety Instructions............. 2-7
Operating Instructions
Care and Cleaning ...............13-14
GettingStarted..................... 8-9
LoadingtheDishwasher............. 12
UsingtheDishwasher............10-11
Troubleshooting Tips.........15-17
Consumer Support
Consumer Support.................... 20
Warranty ............................19
GEAppliances.com
Write the model and serial
numbers here:
Model # _________________
Serial # __________________
You can find them on the tub wall,
just inside the door.
Dishwashers
GLDA690
GLDA696

2
IMPORTANT SAFETY INFORMATION
5($'$//,16758&7,216%()25(86,1*³
SAVE THESE INSTRUCTIONS
WARNING!
For your safety, the information in this manual must be followed to minimize the risk of fire,
explosion, electric shock, and to prevent property damage, personal injury, or death.
WATER HEATER SAFETY
PROPER INSTALLATION AND MAINTENANCE
This dishwasher must be properly installed and located in accordance with the Installation Instructions before
it is used. If you did not receive an Installation Instructions sheet with your dishwasher, you can receive one
by visiting our Website at GEAppliances.com. In Canada, visit www.GEAppliances.ca.
Connect the dishwasher/appliance to a grounded
metal, permanent wiring system; or run an equipment-
grounding conductor with the circuit conductors and
connect to the equipment-grounding terminal or lead
of the appliance.
Improper connection of the equipment-grounding
conductor can result in a risk of electric shock. Check
with a qualified electrician or service representative
if you are in doubt whether the appliance is properly
grounded.
Dispose of discarded appliances and shipping
or packing material properly.
Do not attempt to repair or replace any part
of your dishwasher unless it is specifically
recommended in this manual. All other servicing
should be referred to a qualified technician.
To minimize the possibility of electric shock,
disconnect this appliance from the power supply
before attempting any maintenance.
NOTE: Turning the dishwasher off does not disconnect
the appliance from the power supply. We recommend
having a qualified technician service your appliance.
WARNING!
Under certain conditions, hydrogen gas may be produced in a water heater that has not been used for two or more
weeks. HYDROGEN GAS IS EXPLOSIVE.
If the hot water has not been used for two or more weeks, prevent the possibility of damage or injury by turning
on all hot water faucets and allowing them to run for several minutes. Do this before using any electrical appliance
connected to the hot water system. This simple procedure will allow any built-up hydrogen gas to escape. Since
the gas is flammable, do not smoke, use an open flame, or use the appliance during this process.
CAUTION: ELECTRICAL REQUIREMENTS
This appliance must be supplied with 120V, 60 Hz, and
connected to an individual, properly grounded branch
circuit protected by a 15 or 20 amp circuit breaker or
time-delay fuse.
If the electric supply provided does not meet the above
specifications, it is recommended that a licensed
electrician install an approved electrical connection.
Your dishwasher circuit should not be used for
any other appliance while the dishwasher is in
operation as the dishwasher requires the full
capacity of the circuit.
If the wall receptacle you plug the dishwasher’s
power cord into is controlled by a switch, turn on
the switch.
Use this appliance only for its intended purpose
as described in this Owner’s Manual.
Do not operate your dishwasher unless all enclosure
panels are properly in place.
Do not store or use combustible materials including
gasoline or other flammable liquids or vapors in the
vicinity of this or any other appliance.
Do not abuse, sit on, or stand on the door or dish rack
of the dishwasher.
Do not tamper with controls.
Do not wash plastic items unless marked dishwasher
safe or the equivalent. For plastic items not so marked,
check the manufacturer’s recommendations.
WARNING! When using your dishwasher, follow basic precautions,
including the following:
WARNING!

3
IMPORTANT SAFETY INFORMATION
5($'$//,16758&7,216%()25(86,1*³
SAVE THESE INSTRUCTIONS GEAppliances.com
During or after wash cycle, contents may be hot to
the touch. Use care before handling.
Using a detergent that is not specifically
designed for dishwashers will cause
the dishwasher to fill with suds.
Non-Dishware Items: Do not wash
items such as electronic air cleaner filters, furnace
filters and paint brushes in your dishwasher. Damage
to the dishwasher and discoloration or staining of the
dishwasher may result.
Close supervision is necessary if this appliance is
used by or near children. Do not allow children to
play around the dishwasher when closing the door,
closing the upper rack, or while vertically adjusting
the upper rack due to the possibility of small fingers
being pinched.
Load light-weight, plastic items so they do not
become dislodged and drop to the bottom of the
GLVKZDVKHU³WKH\PLJKWFRPHLQWRFRQWDFWZLWKWKH
heating element and be damaged.
Locate sharp items so that they are not likely to
damage the door seal.
Load sharp knives with the handles up to reduce the
risk of cut-type injuries.
Do not touch the heating element during or
immediately after use.
CAUTION: To prevent minor injury and property damage
READ AND FOLLOW THIS SAFETY INFORMATION CAREFULLY.
SAVE THESE INSTRUCTIONS
If your dishwasher is connected to a wall
switch, ensure that the switch is on prior to use.
If you choose to turn the wall switch off
between wash cycles, allow 5-10 seconds after
turning the switch on before touching START to allow
the control to initialize.
Use only powder, Cascade®Platinum Pacs, liquid
detergents or rinse agents recommended for use in a
dishwasher and keep them out of the reach of children.
Cascade®Platinum Pacs Automatic Dishwashing
Detergent, and Cascade®Complete Rinse Aid rinse
agents are recommended for use in all GE dishwashers.
NOTICE
Junked or abandoned dishwashers are dangerous…even if they will sit for “just a few days.” If you are
getting rid of your dishwasher, please follow the instructions below to help prevent accidents.
Do not allow children to play with, on, or inside this or any discarded appliance.
Take off the door of the washing compartment or remove the latch by removing the screw (on some
models) from the latch receiver inside the tub (as shown).
WARNING! RISK OF CHILD ENTRAPMENT
Do not allow children to play with, on, or inside this appliance at any time.
PROPER DISPOSAL OF THE DISHWASHER
Screw
(on some
models)

4
CONSIGNES DE SÉCURITÉ IMPORTANTES
VEUILLEZ LIRE TOUTES LES CONSIGNES AVANT D’UTILISER
/·$33$5(,/³&216(59(=&(6',5(&7,9(6
AVERTISSEMENT!
Pour votre sécurité, veuillez suivre les directives données dans le présent manuel afin de
réduire au minimum les risques d’incendie, d’explosion et de chocs électriques et prévenir tout
dommage et blessure grave ou mortelle.
SÉCURITÉ DU CHAUFFE-EAU
INSTALLATION ET ENTRETIEN APPROPRIÉS
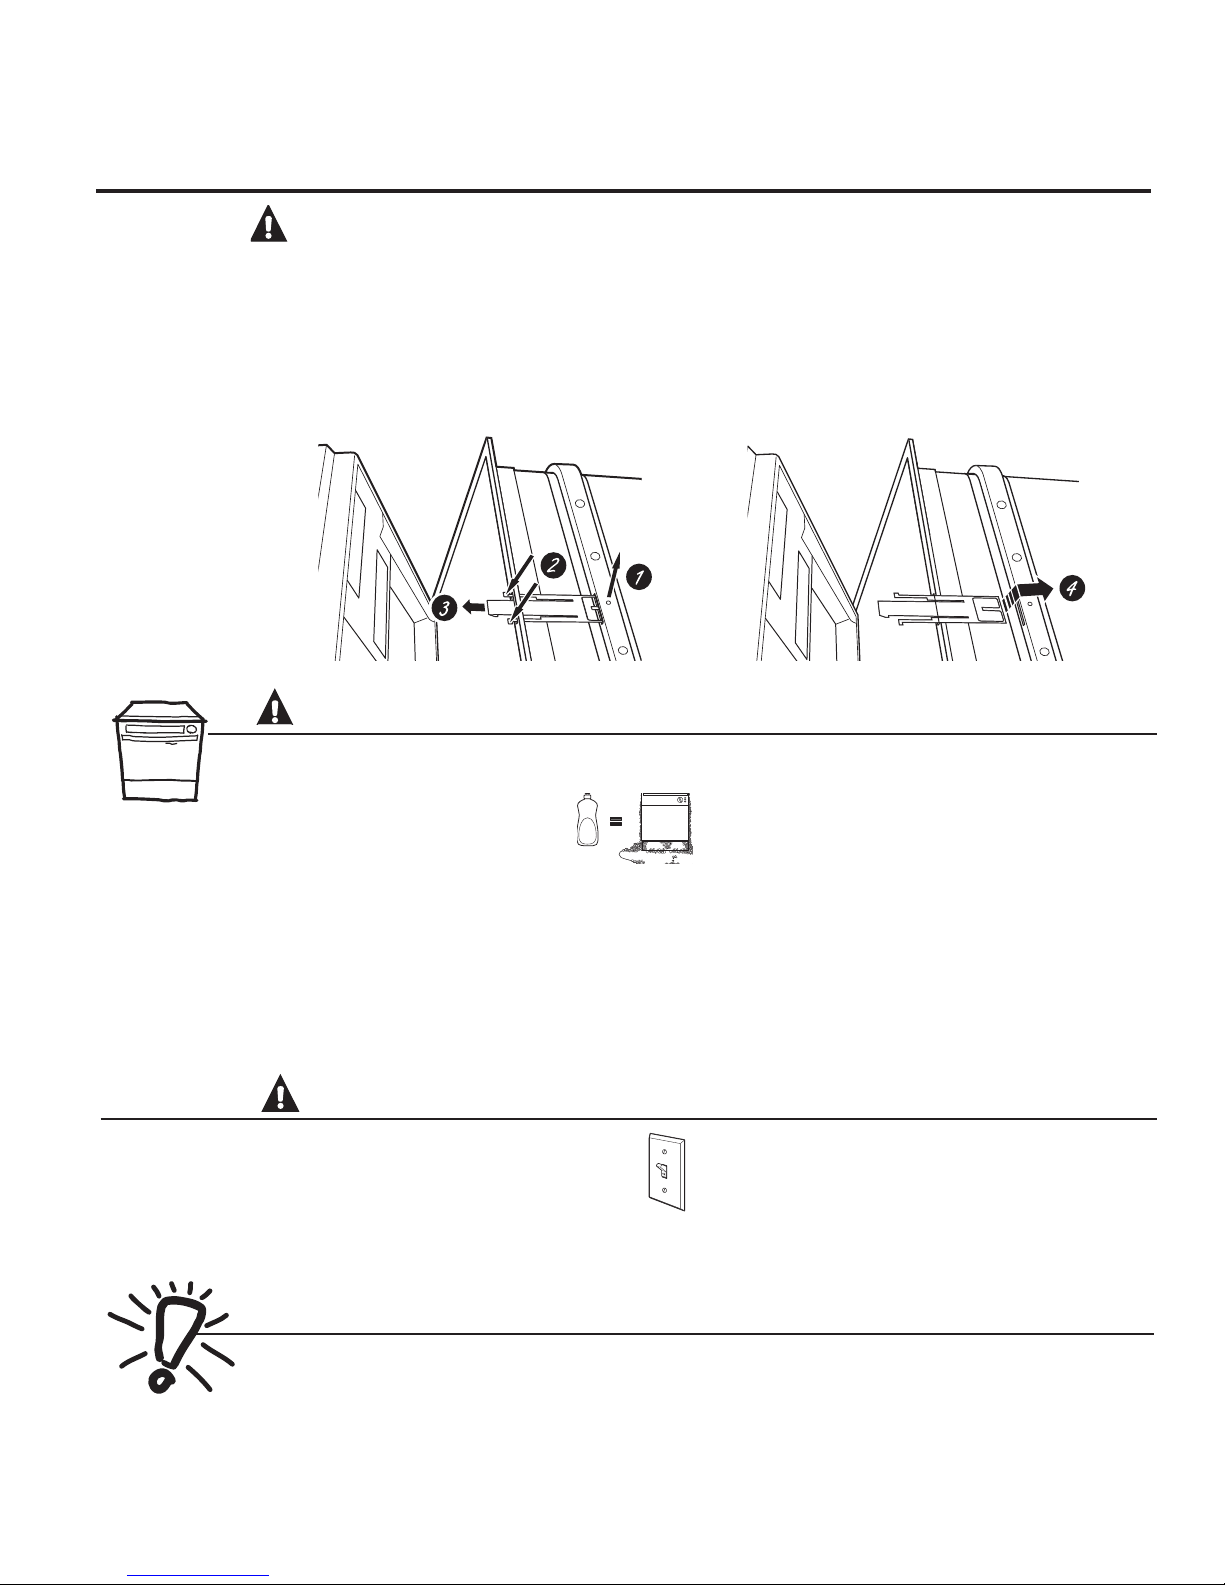
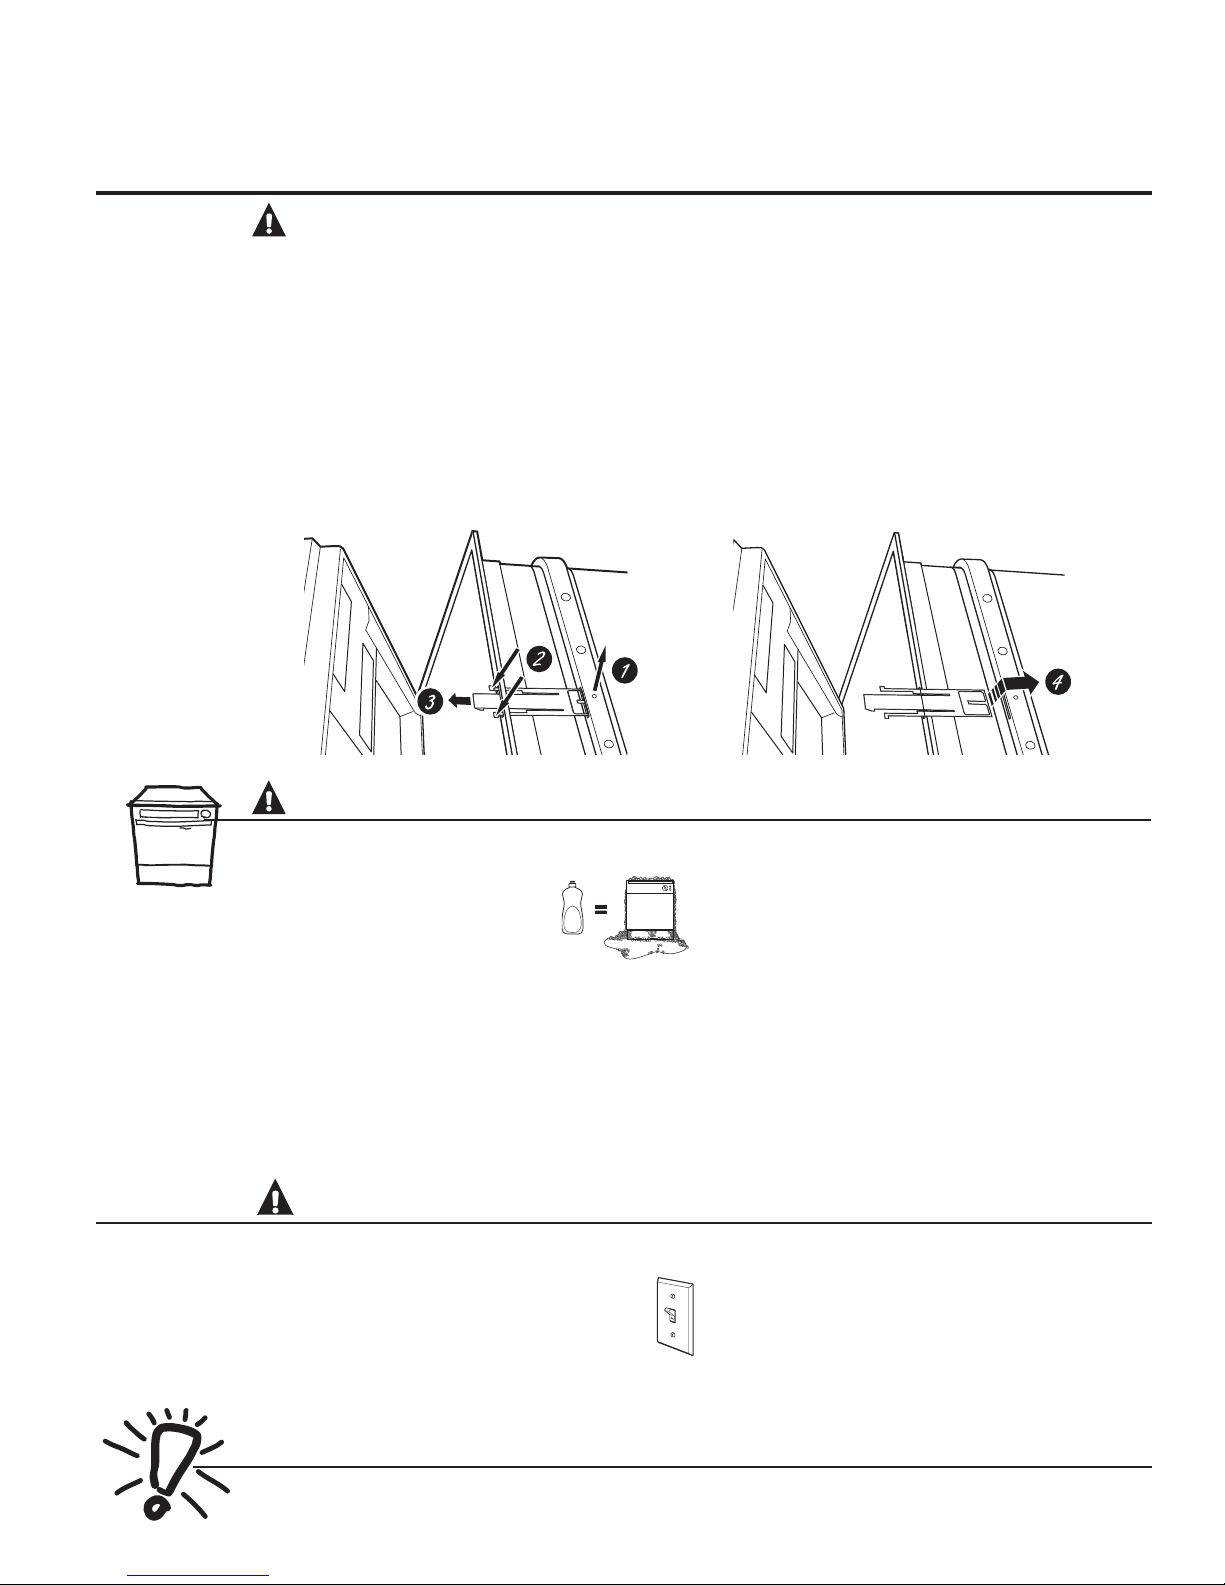
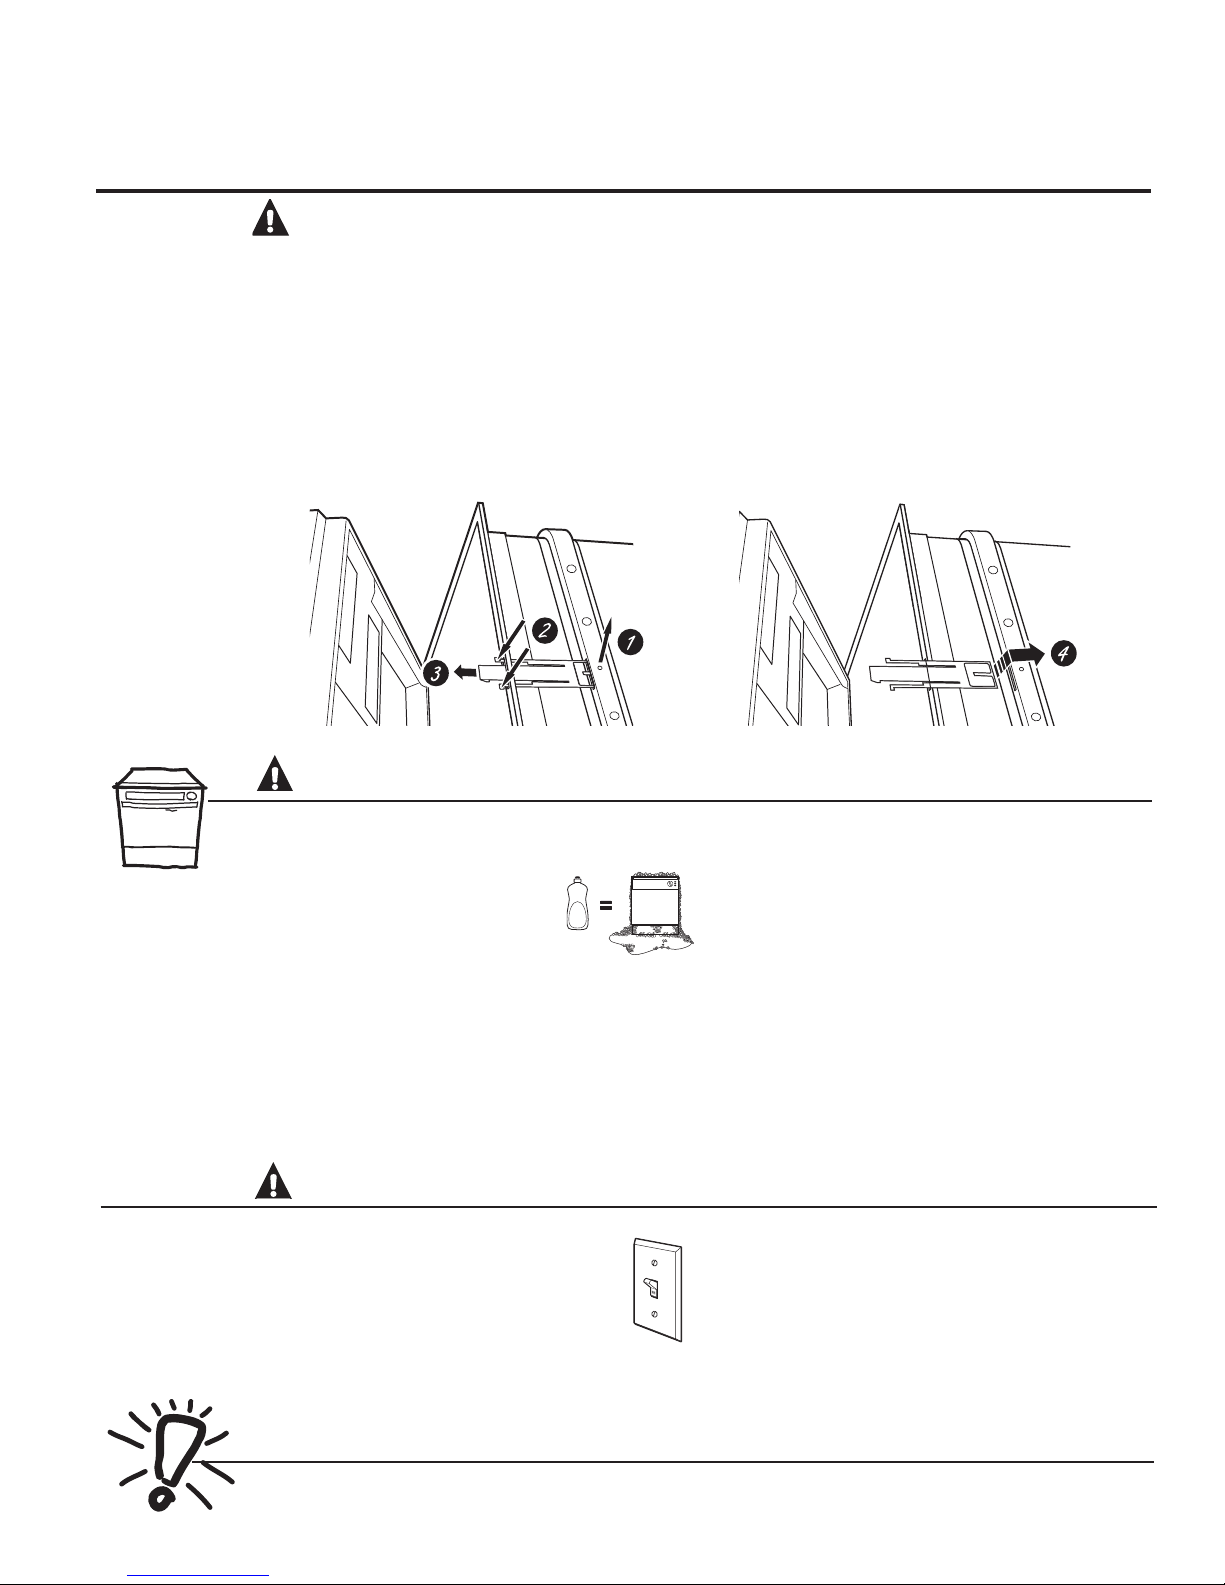
Ce lave-vaisselle doit être correctement installé, en conformitéavec les directives d’installation fournies,
avant d’être utilisé. Si vous n’avez pas reçu les directives d’installation avec votre appareil, vous pouvez vous
les procurer en visitant notre site Web à l’adresse www.electromenagersge.ca.
Cet appareil doit être relié à un système
de câblage électrique permanent en métal, mis
à la terre. Sinon, un fil de mise à la terre pour
appareillage doit être installé et raccordé à la borne
ou au fil de mise à la terre de l’appareil.
Un raccordement incorrect du fil de mise à la terre
peut présenter un risque d’électrocution. Consultez un
électricien ou un technicien qualifié si vous n’êtes pas
certain que l’appareil est correctement mis à la terre.
Veuillez vous débarrasser de la façon appropriée
de vos vieux électroménagers et des matériaux
d’emballage ou d’expédition.
Ne tentez pas de réparer ou de remplacer une pièce
quelconque de votre lave-vaisselle, à moins que cela
ne soit spécifiquement recommandé dans le présent
manuel. Confiez toutes les autres réparations à un
technicien qualifié.
Pour réduire au minimum les risques d’électrocution,
débranchez l’appareil de sa source d’alimentation
avant d’en effectuer l’entretien.
REMARQUE : Le fait d’arrêter le lave-vaisselle
ne coupe l’alimentation électrique de l’appareil. Nous
vous recommandons de confier la réparation
de votre électroménager à un technicien qualifié.
AVERTISSEMENT!
Dans certaines conditions, il peut se former de l’hydrogène dans un chauffe-eau qui n’a pas étéutilisépendant
deux semaines ou plus. L’HYDROGÈNE EST UN GAZ EXPLOSIF.
Si vous n’avez pas utilisé votre chauffe-eau pendant deux semaines ou plus, ouvrez tous les robinets d’eau
chaude et laissez couler l’eau pendant plusieurs minutes afin de réduire les risques de dommages matériels ou
de blessures. Prenez cette précaution avant même d’utiliser un électroménager raccordé au chauffe-eau pour
éliminer l’hydrogène qui pourrait s’y être accumuléé. Puisqu’il s’agit d’un gaz inflammable, ne fumez pas ou
n’utilisez pas une flamme nue ou un électroménager au cours de ce processus.
ATTENTION : EXIGENCES ÉLECTRIQUES
Cet appareil électroménager doit être alimenté par
du courant de 120V, 60 Hz, et branchéà un circuit de
dérivation bien mis à la terre, protégé par un fusible à
retardement ou un disjoncteur de 15 ou 20 ampéres.
Si l’alimentation électrique fournie ne remplit
pas les caractéristiques ci-dessus, nous
vousrecommandons de faire installer par un
électricien qualifié une bonne prise.
Le circuit de votre lave-vaisselle ne doit être
utilisépar aucun autre appareil électroménager
quandle lave-vaisselle fonctionne, car le lave-
vaissellenécessite toute la capacité du circuit.
Si la prise murale dans laquelle vous branchez
le cordon d’alimentation de votre lave-vaisselle
est contrôlé par un interrupteur, mettez
cetinterrupteur en position ON (marche).
N’utilisez cet appareil que pour l’usage pour lequel
il a été conçu, comme expliqué dans le présent
manuel.
Ne faite pas fonctionner le lave-vaisselle si tous
les panneaux de la carrosserie n’ont pas été
correctement réinstallés.
Ne rangez ni n'utilisez des matières combustibles, y
compris de l'essence ou d'autres liquides ou vapeurs
inflammables, à proximité de cet appareil ou de tout autre.
Abstenez-vous de vous asseoir, de vous accrocher ou
de vous tenir sur la porte ou le panier du lave-vaisselle,
ou d’en faire un emploi abusif de toute autre manière.
Ne modifiez pas le fonctionnement des commandes.
Ne lavez pas les articles en plastique à moins qu’ils
ne portent la mention « Lavable au lave-vaisselle »
ou l’équivalent. Si certains articles en plastique
ne portent pas cette mention, reportez-vous aux
recommandations du fabricant.
AVERTISSEMENT! Lors du fonctionnement de votre lave-vaisselle, prenez les
précautions de base, notamment les suivantes :
AVERTISSEMENT!

5
CONSIGNES DE SÉCURITÉ IMPORTANTES
VEUILLEZ LIRE TOUTES LES CONSIGNES AVANT D’UTILISER
/·$33$5(,/³&216(59(=&(6',5(&7,9(6 GEAppliances.com
Pendant ou après le cycle de lavage, le contenu
peut s'avérer très chaud au toucher. Manipulez-le
avec soin.
L’utilisation d’un détergent non
conçu pour les lave-vaisselles peut
provoquer la formation de mousse.
Articles autres que la vaisselle : ne lavez pas
dans le lave-vaisselle des articles comme des
filtres de purificateur d’air, des filtres de systèmes
de chauffage ou des pinceaux. Vous pourriez
endommager le lave-vaisselle et provoquer une
décoloration ou des taches dans l’appareil.
Une surveillance attentive est nécessaire lorsque
cet appareil est utilisé par ou près des enfants.
Ne laissez pas les enfants jouer à proximité du lave-
vaisselle lorsque vous la fermeture de la porte, la
fermeture de la crémaillère supérieure, ou tout réglage
en hauteur du panier supérieur afin d’éviter que leurs
petits doigts se coincent.
Placez les articles légers en plastique de manière
qu’ils ne se déplacent pas ou ne tombent pas au fond
GHO·DSSDUHLO³LOVSRXUUDLHQWHQWUHUHQFRQWDFWDYHF
l’élément chauffant, ce qui pourrait les endommager.
Placez les articles coupants de manière à ce qu’ils
n’endommagent pas le joint d’étanchéité de la porte.
Placez dans le panie r à couverts les couteaux
tranchants le manche vers le haut afin de réduire
les risques de coupures.
Ne touchez pas à l’élément chauffant pendant ou
immédiatement après le fonctionnement de l’appareil.
ATTENTION : Pour éviter les blessures mineures ou les dommages matériels
VEUILLEZ LIRE ET SUIVRE À LA LETTRE CES CONSIGNES DE SÉCURITÉ.
CONSERVEZ CES DIRECTIVES
NOTICE
Si votre lave-vaisselle est branché sur un circuit relié
à un interrupteur mural, assurez-vous d’actionner
celui-ci avant d’utiliser votre appareil.
Si vous fermez l’interrupteur mural entre les
cycles de lavage, attendez de 5 à 10 secondes
après avoir ramené l’interrupteur à ON (Marche)
avant d’appuyer sur la touche Start (Marche) pour
permettre aux commandes de se réinitialiser.
N’utilisez que les détergents et agents de rinçage
liquides, en poudre ou en tablette ou les
Cascade®
Platinum Pacs
recommandés pour les lave-vaisselle et
gardez-les hors de la portée des enfants. Les détergents
pour lave-vaisselle
Cascade®Platinum Pacs
et les
agents de rinçage
Cascade®Complete Rinse Aid
sont
recommandé avec les lave-vaisselle GE.
AVERTISSEMENT! RISQUE DE SUFFOCATION POUR
UN ENFANT COINCÉ À L’INT RIEUR DE L’APPAREIL
Ne laissez jamais les enfants jouer avec, sur, ou à l’intérieur de l’appareil.
ÉLIMINATION APPROPRIÉE DU LAVE-VAISSELLE
Les lave-vaisselle jetés ou abandonnés sont dangereux… même si vous ne les laissez là que pour
quelques jours. Si vous voulez jeter votre lave-vaisselle, veuillez suivre les directives ci-dessous pour
éviter les accidents.
Ne laissez pas les enfants jouer avec, sur, le lave-vaisselle, ou à l’intérieur de celui-ci ou de tout autre
électroménager mis aux rebuts.
Enlevez la porte du compartiment de lavage ou enlevez le verrou en ôtant les deux vis du loquet à
l’intérieur de la cuve (comme illustré).
Screw
(on some
models)
Vis
(sur certains
modèles)

6
INFORMACIÓN IMPORTANTE DE SEGURIDAD
/($72'$6/$6,16758&&,21(6$17(6'(86$5³
GUARDE ESTAS INSTRUCCIONES
¡ADVERTENCIA!
Para su seguridad, siga las instrucciones de este manual a fin de minimizar riesgos de incendio,
explosión, descargas eléctricas, y para evitar daños en su propiedad, lesiones personales o la
muerte.
SEGURIDAD DEL CALENTADOR DE AGUA
INSTALACIÓN Y MANTENIMIENTO ADECUADOS
Esta lavadora se deberá instalar y ubicar de acuerdo con las Instrucciones de Instalación antes de ser usada. Si
no recibió una ficha de Instrucciones de Instalación con su lavavajillas, podrá acceder a una visitando nuestro
sitio web en GEAppliances.com.
Conecte el lavavajillas/ electrodoméstico a un sistema
de cableado de metal permanente con conexión a
tierra o se debe tender un conducto para la conexión
a tierra del equipo con los conductores del circuito
y conectado al terminal de tierra del equipo o al
conductor de suministro del electrodoméstico.
Una conexión inapropiada del conductor de conexión a
tierra del equipo puede provocar riesgos de descargas
eléctricas. Consulte a un electricista calificado o
personal del servicio técnico si tiene dudas de que
el electrodoméstico se encuentre conectado a tierra
apropiadamente.
Deshágase de forma correcta de electrodomésticos y
materiales de envío o embalajes descargados.
No intente reparar o reemplazar ninguna parte de la
cocina, a menos que se lo recomiende específicamente
en este manual. Cualquier otra reparación deberá ser
realizada por un técnico calificado.
A fin de minimizar la posibilidad de descargas eléctricas,
desconecte este electrodoméstico del suministro de
corriente antes de intentar cualquier mantenimiento.
NOTA: Apagar el lavavajillas no desconecta el
electrodoméstico del suministro de corriente.
Le recomendamos que el servicio técnico de su
electrodoméstico sea realizado por un técnico
calificado.
¡ADVERTENCIA!
Bajo ciertas condiciones, se podrá producir gas de hidrógeno en un calentador de agua que no fue usado por dos
semanas o más. EL GAS DE HIDRÓGENO ES UN EXPLOSIVO.
Si el agua caliente no se usó durante dos semanas o más, evite la posibilidad de daño o lesión abriendo todos los
grifos de agua caliente y permitiendo que el agua corra durante varios minutos. Haga esto antes de usar cualquier
artefacto eléctrico que esté conectado al sistema de agua caliente. Este procedimiento simple permitirá el escape de
cualquier gas de hidrógeno acumulado. Debido a que el gas es inflamable, no fume, no use una llama abierta ni use
el electrodoméstico durante este proceso.
PRECAUCIÓN: REQUISITOS ELÉCTRICOS
Este electrodoméstico deberá ser provisto con 120V, 60
Hz, y estar conectado a un circuito individual correcta-
mente conectado a tierra, protegido por un disyuntor o
fusible de retardo de 15 o 20 amp.
Si el suministro de corriente provisto no cumple con
las especificaciones anteriores, se recomienda que
un electricista matriculado instale un conexiones
eléctricas aprobado.
Su circuito del lavavajillas no debería ser usado para
ningún otro electrodoméstico mientras el lavavajil-
las está funcionando, ya que éste requiere toda la
capacidad del circuito.
Si el receptáculo de pared en el cual enchufa el cable
de corriente del lavavajillas es controlado por un
interruptor, encienda este último.
Use este electrodoméstico sólo para su propósito original,
como se describe en el Manual del Propietario.
No use su lavavajillas a menos que todos los paneles de
cercamiento estén correctamente en sus lugares.
No guarde ni use materiales combustibles, incluyendo
gasolina u otros líquidos o vapores inflamables cerca de
éste o de otros electrodomésticos.
No abuse, no se siente, no se sostenga ni se pare sobre
la puerta o la bandeja del plato del lavavajillas.
No manipule indebidamente los controles.
No lave productos de plástico, a menos que contengan
una marca de seguridad en lavavajillas o su
equivalente. Cuando se trate de productos de plástico
que no estén marcados de esta manera, consulte las
recomendaciones del fabricante.
Al usar su lavavajillas, siga las precauciones básicas,
incluyendo lo siguiente:
¡ADVERTENCIA!
¡ADVERTENCIA!

PRECAUCIÓN: A fin de evitar lesiones menores y daños sobre la propiedad
7
INFORMACIÓN IMPORTANTE DE SEGURIDAD
/($72'$6/$6,16758&&,21(6$17(6'(86$5³
GUARDE ESTAS INSTRUCCIONES GEAppliances.com
Durante o después del ciclo de lavado, es posible
que los contenidos estén calientes al tacto. Tenga
cuidado antes de tomar los mismos.
El uso de un detergente que no esté
diseñado específicamente para
lavavajillas hará que este último se
llene de agua con jabón.
Productos que no sean utensilios: no lave artículos
tales como filtros electrónicos de limpieza
con aire, filtros de horno y brochas de pintura
en su lavavajillas. Se podrán producir daños,
descoloración o manchas sobre el lavavajillas.
Se deberá estar especialmente atento si el
electrodoméstico es usado por niños o se encuentra
cerca de los mismos. No permita que los niños
jueguen alrededor del lavavajillas cerrar la puerta,
cerrar la bandeja superior, o mientras verticalmente
ajustando la rejilla superior debido a la posibilidad
de que sus dedos pequeños sean presionados.
Cargue artículos de plástico livianos, de modo
que no sean desplazados ni caigan al fondo del
lavavajillas – es posible que entren en contacto con
el calentador y sean dañados.
Ubique artículos puntiagudos de modo que no
haya posibilidades de daños sobre el sellador de la
puertal.
Cargue los cuchillos puntiagudos con los mangos
hacia arriba, a fin de reducir el riesgo de lesiones
por cortes.
No toque el elemento de calefacción durante o
inmediatamente después del uso.
LEA Y SIGA ESTA INFORMACIÓN DE SEGURIDAD CUIDADOSAMENTE.
GUARDE ESTAS INSTRUCCIONES
Si el lavavajillas está conectado a un
tomacorriente de pared, asegúrese de que
el interruptor esté encendido antes del uso.
Si decide apagar el interruptor entre ciclos
de lavado, espere entre 5 y 10 segundos
luego de encender el interruptor antes de
presionar Start (Iniciar) para permitir que el
control se inicie.
Use sólo polvo, Cascade® Platinum Pacs,
detergentes líquidos o agentes de enjuague
recomendados para uso con un lavavajillas y
mantenga los mismos fuera del alcance de los
niños. El Detergente para Lavavajillas Automáticos
Cascade® Platinum Pacs, y los agentes de
enjuagues Cascade® Complete Rinse Aid se
recomiendan para su uso en todos los lavavajillas
de GE.
AVISO
Los lavavajillas tirados o abandonados son peligrosos…incluso aunque se conserven por “sólo unos
pocos días”. Si se deshará de su lavavajilla, siga las siguientes instrucciones a fin de evitar accidentes.
No permita que los niños jueguen con, en, o dentro de éste o cualquier electrodoméstico que haya
descartado.
Retire la puerta del compartimiento de lavado o quite la traba, retirando los dos tornillos del receptor
de la traba dentro de la tina (como se muestra).
¡ADVERTENCIA! RIESGO DE QUE UN NIÑO QUEDE
ATRAPADO
No permita que los niños jueguen con, en, o dentro de éste o cualquier electrodoméstico que haya descartado.
FORMA ADECUADA DE DESCARTAR EL LAVAVAJILLAS
Screw
(on some
models)
Tornillo
(en algunos
modelos)

8
Getting started!
Load Dishwasher
For best dishwashing results, follow the loading guidelines found in the Loading the dishwasher section. No pre-rinsing of
normal food soil is required. Scrape off hard soils, including bones, toothpicks, skins, and seeds. Remove leafy vegetables,
meat trimmings, and excessive amounts of grease or oil.
Add Detergent
Add needed amount of detergent to the detergent dispenser. Use a detergent such as Cascade
®
Platinum Pacs. See Detergent
Dispenser in the Using the dishwasher section.
Add Rinse Agent
Add rinse agent such as Cascade
®
Complete Rinse Aid to the rinse agent dispenser. See
Use a Rinse Agent
in the Using the
dishwasher section.
Select Cycle
Close and latch the dishwasher door. The control panel lights will display the last settings selected. To change those settings, select the
desired cycle.
POTS & PANS This cycle is meant for heavily soiled dishes or cookware with dried-on or baked-on soils. This cycle
may not remove burned-on foods. Everyday dishes are safe to be used in this cycle.
Time: 1 hour 25 minutes.
NORMAL WASH
This cycle is for medium/heavily soiled dishes and glassware. Time: 1 hour 36 minutes.
LIGHT WASH
This cycle is for lightly soiled dishes and glassware. Time: 33 minutes.
RINSE ONLY This cycle is for rinsing partial loads that will be washed later. DO NOT use detergent or HEATED DRY
Option with this cycle. Time: 7 minutes.
1
2
3
4

GEAppliances.com
Indicator Light
CLEAN
The CLEAN light is illuminated when the selected cycle and enhancements are complete. The light will stay
ON until a pad is pressed or the door is opened and then closed.
7
9
Select Options
The light above the selected pad will be ON to indicate which Option has been selected.
HEATED DRY
Turns the heater on for fast drying. This will extend the total cycle time by approximately 38 minutes for a
Light On NORMAL WASH cycle.
NOTE: Cannot be selected with RINSE ONLY cycle.
HEATED DRY Shuts off the drying heat option. Dishes will air dry naturally to save energy.
Light Off
HOT WASH When selected, the cycle will run a little longer with heating elements on to improve both wash and dry
performance. Adds approximately 15 minutes to the cycle.
NOTE: Cannot be selected with RINSE ONLY cycle.
HOT START For use with heavily soiled and/or dried-on, baked-on soils. This Option MUST be selected PRIOR to starting the
cycle. This option adds approximately 22 minutes to the cycle and two additional rinses to the cycle.
NOTE: Cannot be selected with RINSE ONLY cycle.
LOCK
You can lock the controls to prevent any selections from being made. Or you can lock the controls
after you have started a cycle.
Children cannot accidentally start dishwasher by touching pads with this Option selected.
To unlock the dishwasher controls, press and hold the HEATED DRY pad for 3 seconds. The light
above the lock pad will turn off.
To lock the dishwasher controls, press and hold the HEATED DRY pad for 3 seconds. The light above
the lock pad will turn on
.
DELAY HOURS
You can delay the start of a wash cycle for up to 6 hours. Press the DELAY HOURS pad to choose the
number of hours you want to delay the start of the cycle; then press START/RESET.
The machine will count down and start automatically at the correct time.
NOTE: To cancel the delay start selection before the cycle begins, repeatedly press the DELAY HOURS
pad until the display is blank.
5
Start Dishwasher
START The door must be closed to select the desired Options. Press the START/RESET pad to begin the cycle
within 5 minutes of the door closure or begin the DELAY HOURS countdown. The illuminated lights
will also turn off if more than 30 seconds passes between pressing a pad. To activate the display, open
and close the door or press any pad.
Interrupt To interrupt or pause a dish cycle, slowly open the door. Opening the door will cause the wash cycle
or Pause to pause. The dishwasher will beep every minute to remind you to close the door. To restart or
resume the cycle, press START, and close the door.
Cancel To cancel a wash cycle, touch the START/RESET pad. The START/RESET light will flash while the water
is pumped out, if needed. This takes approximately 2 minutes.
6
Display
Time Remaining
During operation, the display shows 1H if the time remaining is over an hour and will show the
minutes remaining if the time remaining is below an hour. During a delay start, the display will
show hours of time remaining until the cycle starts.
8

Rinse agents, such as Cascade®Complete Rinse Aid are designed for great drying action and to protect
against spots and film build-up on your dishes, glasses, flatware, cookware, and plastic.
Filling the Dispenser
The rinse agent dispenser holds 3.5 oz. (104 ml) of rinse agent. Under normal
conditions, this will last approximately one month.
1
Make sure the dishwasher door is fully open.
2
Turn the dispenser cap counterclockwise and lift out.
3
Slowly add rinse agent until the cup is full. You may need to pause several times to
allow rinse aid to settle.
4
Clean up any spilled rinse agent with a damp cloth to prevent foam from forming
inside the dishwasher.
5
Replace the dispenser cap.
Rinse Aid Setting
The amount of rinse agent released into the final wash can be adjusted.
The factory setting is at the midpoint. If water drops or hard water spots
remain on dishes after the dry cycle,
increase the setting.
To adjust the setting
Remove the dispenser cap;
Turn the adjuster counterclockwise
to increase the amount of rinse agent,
clockwise to reduce the amount of rinse
agent.
Using the dishwasher.
Check the Water Temperature
Use a Rinse Agent
The entering water should be at least 120°F (49°C) and not
more than 150°F (66°C) for effective cleaning and to prevent
dish damage. Check the water temperature with a candy or
meat thermometer.
Turn on the hot water faucet nearest the dishwasher,
place the thermometer in a glass and let the water run
continuously into the glass until the temperature stops rising.
10
M
i
n
M
a
x
M
i
n
M
a
x
Counterclockwise
to reduce water
drops and hard
water spots
Clockwise to reduce
foaming
M
i
n
M
a
x
Indicator
Dispenser cap
Adjustable setting dial

GEAppliances.com
The detergent dispenser has two compartments. To open,
press the button and the cover will flip back. The pre-wash
compartment is on the lid of the detergent dispenser.
Use the pre-wash compartment only when your water is
extremely hard or when you have a heavy soiled load. The
pre-wash compartment is not used when tablet or packet
detergents are used.
You mayuse tablet,packet, powder,liquid orgel automatic
dishwasher detergent. Make sure you use only detergents
specifically labeled for use in automatic dishwashers.
Never use liquid hand dish detergent in an automatic
dishwasher. Sudsing and poor wash performance will
result with the use of improper detergents.
Detergents should be stored in a dry location and in their
original container to prevent loss of effectiveness. Place
detergent in the cup just prior to starting the dishwasher
and then close the cover. The cover will open during the
wash cycle.
Filling the Detergent Dispenser
GE recommends using detergent in tablet or packet form.
Independent testing has shown this form of detergent is
very effective in the dishwasher. Cascade®Platinum
Pacs are an example of this type of detergent. Simply
put a tablet or packet into the main wash compartment
and close the detergent cup cover. Please notice that
the tablet or packet must be placed in the main wash
compartment of the detergent cup. If the tablet or packet
is tossed in the bottom of the dishwasher, the detergent
will be flushed down the drain in a very short period of
time and will thus be wasted. Wash performance will be
very poor as a result.
If you choose to use detergent in powder, liquid or gel
form, the amount of detergent you use will be determined
by the hardness of your water, the temperature of your
water, and the food soil load inside the dishwasher.
Contact your water company to get information about
the hardness of the water in your area. Water hardness is
measured in grains per gallon. Use this information and
the table above to determine the amount of detergent
to use. You may purchase a hard water test strip
from GE. Call 1-877-959-8688 and ask for part number
WD01X10295. In Canada, call 1-800-661-1616.
Using too much detergent with very soft and/or very hot water
may cause a condition called etching on your glassware.
Etching is a permanent cloudiness in your glassware. This
condition is irreversible. However, using too little detergent will
cause poor wash performance.
Use the table as a starting point and then adjust the amount
of detergent you use. Use just enough to get good wash
performance. Using just the right amount of detergent will
provide great wash performance without wasting detergent or
etching glassware.
DO NOT USE HAND DISH DETERGENT
NOTE: Using a detergent that is not specifically designed
for dishwashers will cause the dishwasher to fill with suds.
During operation, these suds will spill out of the dishwasher
vents, covering the kitchen floor and making the floor wet.
Because so many detergent containers look alike, store the
dishwasher detergent in a separate space from all other
cleaners. Show anyone who may use the dishwasher the
correct detergent and where it is stored.
While there will be no lasting damage to the dishwasher, your
dishes will not get clean using a dishwashing detergent that is
not formulated for automatic dishwashers.
Detergent Dispenser
Number of
Grains/Gal. Detergent Cup(s) to Fill
Less than 4 15 cup
4 to 8 25 cup
8 to 12 15 and 25 cup
Greater than 12 15 and 25 cup and the open cup
Open
cup
11
Button

Loading the dishwasher.
For best dishwashing results, follow these loading guidelines.
12
Upper Rack
Although the upper rack is for glasses,
cups and saucers, pots and pans can be
placed in this rack for effective cleaning.
Cups and glasses fit best along the sides.
This is also a secure place for dishwasher-
safe plastics.
The upper rack is good for all kinds of
odd-shaped utensils. Saucepans, mixing
bowls and other items should be placed
face down. Fold-down tines (on some
models) provide flexibility for extra-large
and hard-to-fit items.
Secure larger dishwasher-safe plastics over
2 tines when possible.
Make sure small plastic items are secure so
they can’t fall onto the heater.
Be sure that items do not protrude through
the bottom of the rack and block rotation
of the middle spray arm. This could result
in poor wash performance for items in the
upper rack.
Silverware Basket
To load flatware, simply push the
adjustable handle to either side. Put
flatware in the removable basket with
fork and knife handles up to protect
your hands. Place spoons in the basket
with handles down. Mix knives, forks
and spoons so they don’t nest together.
Distribute evenly. Small plastic items,
such as measuring spoons and lids
from small containers should go in the
bottom of the silverware basket with the
silverware on top.
A variety of options is available regarding
the three-piece silverware basket in
your dishwasher. The complete basket
is designed to fit on the right side of the
lower rack. Additionally, each end of
the basket is removable to add loading
flexibility to accommodate flatware
and lower rack capacity needs.
The lids of both end and middle baskets
(on some models) can be closed to contain
small items. Long items can be placed
on the utility shelf in the upper rack.
Lower Rack
The lower rack is best used for plates,
saucers and cookware. Large items such
as broiler pans and baking racks should
go along the left-hand side. Load platters,
pots and bowls along the sides, in
corners or in the back. The soiled side
of items should face the center of the
rack. If necessary, oversized glasses and
mugs can be placed in the lower rack to
maximize loading flexibility.
Also, be careful not to let a portion of an
item such as a pot or dish handle extend
through the bottom rack. This could block
the wash arm and cause poor washing
results.
Fold-down tines (on some models) provide
flexibility for extra-large and hard-to-fit
items. The tines may be left in the up
position or folded down to customize
the lower rack.
Don’t let any
item extend
through
bottom.
To remove end baskets, grasp
the basket at opposite corners
and slide apart.
Three-piece basket

Care and cleaning. GEAppliances.com
Cleaning the Control Panel
To clean the control panel, use a lightly
dampened cloth. Then dry thoroughly.
Stainless Steel Inner Door and Tub
The stainless steel used to make the dishwasher
tub and inner door provides the highest
reliability available in a GE dishwasher.
If the dishwasher tub or inner door should
be scratched or dented during normal use,
they will not rust or corrode. These surface
blemishes will not affect their function or
durability.
Cleaning the Dishwasher Interior
Cleaning the Exterior Door Panel
Before cleaning the front panel, make sure you
know what type of panel you have. Refer to the
last two letters of your model number. You can
locate your model number on the left-hand tub
wall just inside the door. If your model number
ends with BB, CC or WW then you have a
painted door panel. If your model number ends
with SS, then you have a Stainless Steel Door
panel.
Follow the instructions below for cleaning the
door panel for your specific model.
Painted Door Panel (model numbers ending in
BB–black, CC–bisque or WW–white.
Use a clean, soft, lightly dampened cloth, then
dry thoroughly.
Stainless Steel Door Panel (model numbers
ending in SS)
The stainless steel panels can be cleaned with
Stainless Steel Magic or a similar product using
a clean, soft cloth. Do not use appliance wax,
polish, bleach or products containing chlorine
on Stainless Steel doors.
Do not use scouring pads or powder cleaners
because these products can scratch the finish.
You can order Stainless Steel Magic #WX10X29
through GE Parts by calling 1.877.959.8688 or
visiting GEApplianceparts.com. In Canada, call
1-800-661-1616.
* Lemi Shine® is a registered trademark of Envirocon Technologies, Inc.
To clean and de-odorize your dishwasher,
use citric acid or Lemi Shine®*, a detergent
additive. Lemi Shine will break up mineral
deposits, and remove hard water film
and stains. You can order citric acid GE kit
#WD35X151 through GE Parts by calling 877-
959-8688 or visiting GEApplianceparts.com.
In Canada, call 1-800-661-1616. You can
purchase Lemi Shine at your local grocery
store or by calling GE Parts at the numbers
above and ask for WX10X10019.
13

An air gap protects your dishwasher against water
backing up into it if a drain clogs. The air gap is not
a part of the dishwasher. It is not covered by your
warranty. Not all plumbing codes require air gaps,
so you may not have one.
The air gap is easy to clean.
1Turn off the dishwasher and lift off the air gap
cover.
2Remove the plastic cap under the cover and
clean with a toothpick.
3Replace the cap and cover when the air gap is
clean.
Does Your Dishwasher Have an Air Gap?
If your dishwasher is left in an unheated place
during the winter, ask a service technician to:
1Turn off electrical power to the dishwasher.
Remove fuses or trip circuit breaker.
2Turn off the water supply and disconnect the
water inlet line from the water valve.
3Drain water from the water inlet line and
water valve. (Use a pan to catch the water.)
4Reconnect the water inlet line to the water
valve.
Protect Against Freezing
Check the air gap any
time your dishwasher
isn’t draining well.
Air gap
Main filter
Fine
filter
Cup
Cleaning the Filters
Inspect and clean the filters periodically. This should
be done every month. If there is a decrease in
wash performance or dishes feel gritty, this is
also an indication the filters need to be cleaned.
To clean the filters, remove the bottom rack.
Lift out the main filter and cup assembly. Lift
out the fine filter.
Rinse the main filter, fine filter and cup with
warm soapy water. Scouring pads or brushes
can scratch the filter surface but a soft brush
or sponge may be needed to remove stubborn
soils or calcium deposits caused by hard water.
Once cleaned replace the fine filter followed
by the cup and main filter assembly. Be sure to
press them in place as improper replacement
of the filter may reduce the performance level
of the appliance.
Care and cleaning. GEAppliances.com
14
Cleaning the Spray Arms
Because hard water chemicals will clog the spray
arm jets and bearings, it is necessary to clean the
spray arms regularly. To remove the spray arm,
twist the retaining nut 90 degrees and pull the
spray arm off the shaft.
Wash the arms in soapy, warm water and use a
soft brush to clean the jets. Replace them after
rinsing thoroughly.
Retaining
nut
Washer Retaining nut
Upper rack

15
Before you call for service… GEAppliances.com
Troubleshooting Tips
Save time and money! Review the charts on the following pages, or visit GEAppliances.com.
In Canada visit www.GEAppliances.ca. You may not need to call for service.
Problem
Possible Causes What To Do
Dishes and flatware Main or Fine filter is clogged • See the Care and cleaning section.
not clean Low inlet water temperature • Make sure inlet water temperature is correct (see the Using the dishwasher
section). Turn on the hot water faucet nearest the dishwasher, let run until
the water temperature stops rising. Then start the dishwasher and turn
off the faucet. This ensures the entering water is hot. Select HOT WASH.
Water pressure is temporarily low • Turn on a faucet. Is water coming out more slowly than usual? If so, wait
until pressure is normal before using your dishwasher.
Air gap or disposer is clogged • Clean the air gap or flush the disposer.
No high drain loop • Verify that you have a high drain loop. Refer to the Installation Instructions.
Improper rack loading • Make sure large dishware does not block the detergent dispenser or the
wash arms. See the Loading the dishwasher section.
Poor performing detergent • Use a highly rated detergent such as
Cascade®Platinum Pacs
.
Spots and filming Extremely hard water • Use rinse agents such as Cascade
®
Complete Rinse Aid to prevent spots and
on glasses and prevent new film buildup.
flatware •If water is extremely hard, a softener may be required.
Low inlet water temperature • Make sure water temperature is at least 120°F (49°C).
Overloading or improper • Load dishwasher as shown in the Loading Place Settings section.
loading of the dishwasher
Old or damp powder detergent • Make sure detergent is fresh.
Rinse agent dispenser empty • Refill with rinse agent such as Cascade
®
Complete Rinse Aid.
Too little or low performing • Make sure you use the proper amount of highly rated detergent.
detergent

Problem Possible Causes What To Do
Cloudiness on Combination of soft water and • This is called etching and is permanent. To prevent this from happening,
glassware too much detergent use less detergent if you have soft water. Wash glassware in the shortest
cycle that will get it clean.
Low performing phosphate • See A white film on glassware, dishware and the interior in this
free detergent Troubleshooting section.
Water temperature entering the • This could be etching. Lower the water heater temperature.
dishwasher exceeds 150°F (66°C)
Suds in the tub Wrong detergent • Use only automatic dishwasher detergents to avoid sudsing. Cascade®
Automatic Dishwashing Detergents have been approved for use in all
GE dishwashers.
• To remove suds from the tub, open the dishwasher and let suds dissipate.
Close and latch the dishwasher. Pump out water by touching the START/RESET
pad once; then 30 seconds later, touch the START/RESET pad again. Repeat if
necessary.
Rinse agent was spilled • Always wipe up rinse agent spills immediately.
Detergent left in Dishes or utensils are blocking • Reposition the dishes, so the water from the lower spray arm can flush
dispenser cups the detergent cup the detergent cup. See the Loading the dishwasher section.
• Reposition the tall utensils or heavy silverware that may be keeping the
dispenser cup door from opening. See the Loading the dishwasher
section.
• Don’t place large bowls or pots directly under the detergent dispenser.
Black or gray Aluminum utensils have • Remove marks with a mild, abrasive cleaner.
marks on dishes rubbed against dishes
Dishes don’t dry Low inlet water temperature • Make sure inlet water temperature is at least 120°F.
• Select Heated Dry.
• Use HOT START,HOT WASH or ADDED HEAT options.
• Select a higher cycle, such as POTS & PANS.
Rinse agent dispenser is empty • Check the rinse agent dispenser and fill as required.
Control panel responded Door may not be completely • Make sure the door is firmly closed.
to inputs but dishwasher closed
never filled with water
Water valve may be turned off • Make sure water valve (usually located under the sink) is turned on.
Stained tub interior :KLWHILOPRQLQVLGHVXUIDFH³ • GE recommends Cascade
®
Complete Rinse Aid to help prevent hard water
hard water minerals mineral deposits from forming.
•
Run dishwasher with citric acid to remove mineral deposits. Citric acid
(Part number: WD35X151) can be ordered through GE Parts. See back
cover for ordering information. Alternatively, purchase Lemi Shine
(Part Number: WD10X10019) and follow the directions on the label.
Dishwasher won’t run Fuse is blown or circuit breaker • Replace fuse or reset circuit breaker. Remove any other appliances from
is tripped the circuit.
Power is turned off • In some installations, the power to the dishwasher is provided through a
wall switch, often located next to the disposer switch. Make sure it is on.
Control panel is locked • Unlock control panel. See the Getting started section.
Before you call for service…
16

GEAppliances.com
17
Problem Possible Causes What To Do
Control panel lights Time too long between • Each pad must be touched within 30 seconds of the others.
go off when you’re touching of selected pads To relight, touch any pad again, or unlock and relatch the door.
setting controls
Water standing in Air gap is clogged • Clean the air gap. See the Care and cleaning section.
the bottom of the tub
High drain loop or air • Refer to the Installation Instructions for proper drain line installation.
gap not installed
Water won’t pump Drain is clogged • If you have an air gap, clean it. See the Care and cleaning section.
out of the tub • If the dishwasher drains into a disposer, run disposer clear.
• Check to see if your kitchen sink is draining well. If not, you
may need a plumber.
Steam This is normal • Warm, moist air comes through the vent during drying and when
water is being pumped out. This is necessary for drying.
Sanitized light does The door was opened and the • Do not interrupt the cycle by opening the door during the wash cycle.
not illuminate at the cycle was interrupted during
end of the cycle or after the main wash
The incoming water • Raise the water heater temperature to between 120°F and 150°F.
temperature was too low
Noise Normal operating sounds: • These are all normal. No action is required.
Detergent cup opening
Water entering dishwasher
The motor stops and starts at
various times during the cycle
Spray arms start and stop at
various times
Drain pump sounds during
pump out
Rattling dishes when the spray • Make sure dishes are properly loaded. See the Loading the
arm rotates dishwasher section.
A white film on This problem is likely caused • To remove the white film, run your dishes through a dishwasher cycle with
glassware, dishware by a low quality phosphate-free citric acid. Use a WD35X151 citric acid kit found online. Otherwise, use Lemi
and the interior dishwasher detergent Shine (WX10X10019) found at your local grocery store.
Pour the citric acid in the detergent cup and close the cover. Place the filmed
but otherwise clean glassware and dishware in the dishwasher. Leave
silverware and other metal items out of the dishwasher. Turn the dishwasher
on and let it run through a complete cycle without detergent. The glassware,
dishware, and dishwasher should come out film free. Alternatively,
a vinegar rinse may be used. Pour 1 cup of vinegar into dishwasher just after
the detergent cup opens and let the dishwasher complete its cycle.
This may be repeated several times a year as needed
The use of a rinse agent such as Cascade
®
Complete Rinse Aid may help
minimize a repeat build up of film. Also, the use of a highly rated detergent
such as Cascade
®
Platinum Pacs will help prevent film build-up.

Notes.
18

What Is Not Covered (for customers in Canada):
Service trips to your home to teach you how to use
the product.
Improper installation.
If you have an installation problem, contact your dealer
or installer. You
are responsible for providing adequate
electrical, exhausting and other connecting facilities.
Failure of the product if it is abused, misused, or used for
other than the intended purpose or used commercially.
Replacement of house fuses or resetting of circuit breakers.
Damage to the product caused by accident, fire, floods or
acts of God.
Damage caused after delivery.
For The Period Of: GE Will Replace:
One Year Any part of the dishwasher which fails due to a defect in materials or workmanship. During
From the date of the this limited one-year warranty, GE will also provide, free of charge, all labor and in-home
original purchase service to replace the defective part.
What GE Will Not Cover (for customers in the United States):
Service trips to your home to teach you how to use the
product.
Improper installation, delivery or maintenance.
Failure of the product if it is abused, misused, or used for
other than the intended purpose or used commercially.
Replacement of house fuses or resetting of circuit breakers.
Product not accessible to provide required service.
Damage to the product caused by accident, fire, floods or
acts of God.
Incidental or consequential damage caused by possible
defects with this appliance.
Cleaning or servicing of the air gap device in the drain line.
Damage caused after delivery, including damage from
items dropped on the door.
This warranty is extended to the original purchaser and any succeeding owner for products purchased for home use within the USA.
If the product is located in an area where service by a GE Authorized Servicer is not available, you may be responsible for a trip charge
or you may be required to bring the product to an Authorized GE Service location for service. Proof of original purchase date is needed
to obtain service under the warranty. In Alaska, the warranty excludes the cost of shipping or service calls to your home.
Some states do not allow the exclusion or limitation of incidental or consequential damages. This warranty gives you specific legal
rights, and you may also have other rights which vary from state to state. To know what your legal rights are, consult your local or
state consumer affairs office or your state’s Attorney General.
Warrantor: General Electric Company. Louisville, KY 40225
This warranty is extended to the original purchaser and any succeeding owner for products purchased in Canada for home use within
Canada. In home warranty service will be provided in areas where it is available and deemed reasonable by Mabe to provide.
Staple your receipt here.
Proof of the original purchase
date is needed to obtain service
under the warranty.
GE Dishwasher Warranty. GEAppliances.com
All warranty service provided by our Factory Service Centers, or an
authorized Customer Care®technician. To schedule service, visit us on-line
at GEAppliances.com, or call 800.GE.CARES (800.432.2737) in the United
States. In Canada, call 1.800.561.3344. Please have serial number and
model number available when calling for service.
WARRANTOR IS NOT RESPONSIBLE FOR CONSEQUENTIAL DAMAGES.
(;&/86,212),03/,(':$55$17,(6³<RXUVROHDQGH[FOXVLYHUHPHG\LVSURGXFWUHSDLUDVSURYLGHGLQWKLV/LPLWHG
Warranty. Any implied warranties, including the implied warranties of merchantability or fitness for a particular purpose,
are limited to one year or the shortest period allowed by law.
(;&/86,212),03/,(':$55$17,(6³<RXUVROHDQGH[FOXVLYHUHPHG\LVSURGXFWUHSDLUDVSURYLGHGLQWKLV/LPLWHG
Warranty. Any implied warranties, including the implied warranties of merchantability or fitness for a particular purpose,
are limited to one year or the shortest period allowed by law.
Warrantor: MC Commercial, Burlington, ON, L7R 5B6
Servicing your appliance may require the use of the onboard data port for diagnostics. This gives a GE
Factory Service technician the ability to quickly diagnose any issues with your appliance and helps GE
improve its products by providing GE with information on your appliance. If you do not want your appliance
data to be sent to GE, please advise your technician NOT to submit the data to GE at the time of service.
19

Consumer Support.
GE Appliances Website
Have a question or need assistance with your appliance? Try the GE Appliances Website 24 hours a day,
any day of the year! For greater convenience and faster service, you can now download Owner’s Manuals,
order parts or even schedule service on-line.
Schedule Service
Expert GE repair service is only one step away from your door. Get on-line and schedule your service at your
convenience any day of the year! Or call 800.GE.CARES (800.432.2737) during normal business hours.
In Canada, call 800.561.3344
Real Life Design Studio In the US: GEAppliances.com
*(VXSSRUWVWKH8QLYHUVDO'HVLJQFRQFHSW³SURGXFWVVHUYLFHVDQGHQYLURQPHQWVWKDWFDQEHXVHGE\SHRSOHRI
all ages, sizes and capabilities. We recognize the need to design for a wide range of physical and mental abilities
and impairments. For details of GE’s Universal Design applications, including kitchen design ideas for people with
disabilities, check out our Website today. For the hearing impaired, please call 800.TDD.GEAC (800.833.4322).
In Canada, please write to: Director, Consumer Relations, MC Commercial
1 Factory Lane, Suite 310
Moncton, N.B. E1C 9M3
Extended Warranties
Purchase a GE extended warranty and learn about special discounts that are available while your warranty is still
in effect. You can purchase it on-line anytime, or call 800.626.2224 during normal business hours. GE Consumer
Home Services will still be there after your warranty expires. In Canada, please consult your local listings for your
extended warranty provider.
Parts and Accessories In the US: GEAppliances.com
Individuals qualified to service their own appliances can have parts or accessories sent directly to their homes
(VISA, MasterCard and Discover cards are accepted). Order on-line today, 24 hours every day or by phone at
877.959.8688 during normal business hours.
Instructions contained in this manual cover procedures to be performed by any user. Other servicing generally
should be referred to qualified service personnel. Caution must be exercised, since improper servicing may
cause unsafe operation.
In Canada, call 800.661.1616
Contact Us
If you are not satisfied with the service you receive from GE, contact us on our Website with all the details including
your phone number, or write to: General Manager, Customer Relations
GE Appliances, Appliance Park
Louisville, KY 40225
In Canada, please write to: Director, Consumer Relations, MC Commercial
1 Factory Lane, Suite 310
Moncton, N.B. E1C 9M3
Register Your Appliance
5HJLVWHU\RXUQHZDSSOLDQFHRQOLQH³DW\RXUFRQYHQLHQFHTimely product registration will allow for enhanced
communication and prompt service under the terms of your warranty, should the need arise. You may also
mail in the pre-printed registration card included in the packing material.
In the US: GEAppliances.com
In Canada: GEAppliances.ca
In the US: GEAppliances.com
In Canada: GEAppliances.ca
In the US: GEAppliances.com
In Canada: GEAppliances.ca
In the US: GEAppliances.com
In Canada: GEAppliances.ca
In the US: GEAppliances.com
In Canada: GEAppliances.ca
Printed in China
20
Other manuals for GLDA696FSS
2
This manual suits for next models
4
Table of contents
Other GE Dishwasher manuals

GE
GE Monogram ZBD1800G User manual

GE
GE Monogram ZBD1800GSS User instructions

GE
GE ZBD4800XBB User manual

GE
GE GLDT696D00SS User manual

GE
GE GSD3310 User manual

GE
GE GDT550HGD4WW User manual

GE
GE Profile PDW8700 Series User manual

GE
GE Spacemaker GSM2200V Manual

GE
GE GDT605 Series User manual

GE
GE GLC4000 Series User manual