GE GTD45EBMR User manual

Dryers
GEAppliances.c
a
Owner’s Manual
234D2431P015
GTD45EBMR
GTD45GBMR
You can find them on a label
on the front of the dryer
behind the door.
Write the model and serial
number here:
__________________
___________________
Model #
Serial #
Safety Instructions. . . . . . . . 2–3
Operating Instructions . . . 4-9
Control Panels ........... . . . . . . 5-6
Dryer Features............. . . . . . . 7
Loading and Using the Dryer. . . . . . 8
Venting the Dryer ......... . . . . . . . 9
Troubleshooting Tips . . . 10, 12
Consumer Support
Consumer Support ....... . . . . . . . 13
Warranty ................ . . . . . . . 14
29-6391 01-21 Printed in Mexico

IMPORTANT SAFETY INFORMATION.
READ ALL INSTRUCTIONS BEFORE USING.
2
Indicates a hazardous situation which, if not avoided, will result in death or serious injury.
Indicates a hazardous situation which, if not avoided, could result in death or serious injury.
Indicates a hazardous situation which, if not avoided, could result in minor or moderate injury.
DANGER
WARNING
CAUTION
IMPORTANT SAFETY INSTRUCTIONS
To reduce the risk of fire, explosion, electric shock, or injury to persons when using your appliance, follow basic
precautions, including the following:
Read all instructions before using the appliance.
DO NOT dry articles that have been previously cleaned in, washed in, soaked in or spotted with gasoline, dry-cleaning
solvents, or other flammable or explosive substances, as they give off vapors that could ignite or explode.
DO NOT place items exposed to cooking oils in your dryer. Items contaminated with cooking oils may contribute to a
chemical reaction that could cause a load to catch fire.
DO NOT allow children to play on or in this appliance. Close supervision of children is necessary when this appliance
is used near children. Before the appliance is removed from service or discarded, remove the door to the drying
compartment.
DO NOT reach into the appliance if the drum is moving.
DO NOT install or store this appliance where it will be exposed to the weather.
DO NOT tamper with controls,
repair or replace any part of this appliance or attempt any servicing unless specifically
recommended in the user maintenance instructions or in published user repair instructions that you understand and have
the skills to carry out.
DO NOT use fabric softeners or products to eliminate static unless recommended by the manufacturer of the fabric
softener or product.
DO NOT use heat to dry articles containing foam rubber or similarly textured rubber-like materials.
Clean lint screen before or after each load. DO NOT operate the dryer without the lint filter in place.
Do not store combustible materials, gasoline or other flammable liquids near the dryer.
Keep area around the exhaust opening
and adjacent surrounding areas free from the accumulation of lint, dust and dirt. Keep dryer area clear and free from items
that would obstruct the flow of combustion and ventilation air.
The interior of the appliance and exhaust duct should be cleaned periodically by qualified service personnel.
Unplug the appliance or turn off the circuit breaker before servicing. Pressing the Poweror Start/Pause button DOES NOT
disconnect power.
DO NOT operate this appliance if it is damaged, malfunctioning, partially disassembled, or has missing or broken parts, including a
damaged cord or plug.
DO NOT spray any type of aerosol into, on or near dryer at any time. Do not use any type of spray cleaner when cleaning dryer
interior. Hazardous fumes or electrical shock could occur
.
See “Electrical Connection” located in the Installation Instructions for grounding instructions.
SAVE THESE INSTRUCTIONS
WARNING
This is the safety alert symbol. This symbol alerts you to potential hazards that can kill you or hurt you and
others. All safety messages will follow the safety alert symbol and the word “DANGER”, “WARNING”, or
“CAUTION”. These words are defined as:

GEAppliances.ca
For your safety, the information in this manual must be followed to minimize the risk of fire or explosion or
to prevent damage, personal injury, or death.
WARNING
- DO NOT store or use gasoline or other flammable vapors and liquids in the vicinity of this or any other appliance.
- WHAT TO DO IF YOU SMELL GAS:
• DO NOT try to light any appliance.
• DO NOT touch any electrical switch; DO NOT use any phone in your building.
• Clear the room, building, or area of any occupants.
• Immediately call your gas supplier from a neighbor’s phone. Follow the gas supplier’s instructions.
• If you cannot reach your gas supplier, call the fire department.
- Installation and service must be performed by a qualified installer, service agency, or the gas supplier.
ADDITIONAL GAS DRYER WARNINGS
3

Operating instructions
WARNING!
To reduce the risk of fire, electric shock, or injury to persons, read the IMPORTANT SAFETY INSTRUCTIONS before
operating this appliance.
Explosion Hazard
WARNING
Keep flammable materialsand vapors, such asgasoline,away
from dryer.
DO NOT dry anything that hasever had anything flammable on it
(even after washing).
Failure todo so can result in death,explosion, or fire.
WARNING
Fire Hazard
No washer can completely remove oil.
Do not dry anything that hasever had anytype of oil on it
(including cooking oils).
Itemscontaining foam, rubber, or plastic must be dried on a
clothesline or byusing an air dry cycle.
Failure tofollow these instructions can result in death or fire.
Throughout this manual, features and appearance may vary from your model.
• Clean lint filter • Select drying cycle • Push Start
Step 1 Step 2 Step 3 Step 4
• Add clothes
• Shut door
Quick Start Guide
4

GEAppliances.ca
5
D B EA C
IMPORTANT: Clean the lint filter each time you use the dryer.
Temperature (Not all features are on all models)
CottonsFor regular to heavy cottons.
Regular
Casuals For synthetics, blends, delicates and items labeled permanent press.
Medium
Delicates On some models. For delicates, synthetics and items labeled tumble dry low.
Low
Air FluffFor fluffing items without heat. Use the Time Dry cycle.
No Heat
Drying Cycles (Not all features are on all models)
CottonsFor cottons and most linens. For most loads, select Optimum Dry(on some models).
CasualsFor wrinkle-free, permanent press and delicate items, and knits.
Delicates For delicate items, special-care fabrics and knits.
Time DrySet the Cycle Selector at the desired drying time.
DewrinkleFor removing wrinkles from items that are clean and dry or that are very lightly damp.
This option reduces certain types of bacteria including: Staphylococcus aureus, Pseudomonas aeruginosa
and Klebsiella pneumoniae. The anti-bacterial process occurs when high heat is used during a portion of
the drying cycle.
NOTE: Do not use this cycle on delicate fabrics
SaniFresh
(Not all features
are on all models)
Quick Fluff / For freshening or fluffing up already dry clothing, fabrics, linens and pillows. Use withAir Fluff No Heat.
Provides 10 minutes of no heat tumbling.
Sensor cycles automatically determine fabric dryness. Select Less Dry if you want your clothes slightly damp at the end of the
drying cycle. SelectMore Dry if you want them to feel drier.
Timed cycles run for a selected time.
A
B
Light

Start Start. Opening the door during operation will stop the dryer.
To restart the dryer, close the door and selectStart to complete the cycle.
C
NOTE: Drying times will vary according to the type of heat used (Electric, Natural or LP gas), size of load, types of fabrics,
wetness of clothes and condition of exhaust ducts.
Extended Tumble Option (on some models)
Use this option to minimize the wrinkles in clothes. It provides approximately 15 minutes of no-heat tumbling after the clothes
are dry.
This option can only be used with the Cottons and Casuals/Easy Carecycles.
If you are using the cycle Signalknob and you select the Extended Tumble option, a signal will sound at the end of the drying
time and several times during the Extended Tumble cycle. This will remind you that it is time to remove the clothes.
If Extended Tumble is not on, the dryer will stop once the timer reaches theExtended Tumble mark on the cycle dial.
Cycle Signal Option (on some models)
This signal will sound just before the end of the cycle to remind you to remove the clothes. On some models, the signal sound
level cannot be adjusted.
If you selected the Extended Tumble option, the signal will sound at the end of the drying time and will sound several times
during the Extended Tumblecycle. This will remind you that it is time to remove the clothes.
NOTE:
Remove garments promptly at the sound of the signal. Place clothes on hangers so wrinkles won’t set in.
Use the cycle Signal especially when drying fabrics like polyester knits and permanent press. These fabrics should
be removed so wrinkles won’t set in.
Automatic Cycle Signal (on some models)
At the end of each cycle, there is approximately 15 minutes of no-heat tumbling after the laundry is dry. A reminder signal will
sound periodically during this time to remind you to remove the laundry.
D
E
6

Before replacing the light bulb, be sure to unplug the dryer power cord or disconnect
the dryer at the household distribution panel by removing the fuse or switching off the
circuit breaker. Reach above dryer opening from inside the drum. Remove the bulb and
replace with the same size bulb.
Drum Lamp (Not all features are on all models)
Sensor Dry
(Not all features
are on all models)
Sensor Dry
This feature is active in all cycles except
Timed Dry, Warm Up and Air Fluff.
The Sensor Dry provides greater drying
accuracy than standard machines, resulting
in shorter dry times and better clothes
care. As the clothes tumble, they touch a
moisture sensor. The sensor will stop the
heating cycle as soon as the clothes have
reached the selected dryness.
This dryer will adjust the initial estimated
drying time of the sensor dry cycles as it
“learns” its installation and usage profile.
Please allow several weeks for the dryer to
customize itself to “you”.
Drying Rack (Not all features are on all models)
A handy drying rack may be used for drying
delicate items such as washable sweaters.
Hook the rack over the lint filter so
the rack extends into the dryer drum.
NOTE:
The drying rack must be used with the
Timed Cycle.
Do not use this drying rack when there
are other clothes in the dryer.
Alloy Steel Drum (Not all features are on all models)
The alloy steel used to make the
dryer drum provides the highest reliability
available in a GE dryer. If the dryer drum
should be scratched or dented during normal
use, the drum will not rust or corrode. These
surface blemishes will not affect the function
or durability of the drum.
About the dryer features
7

Sorting and Loading Hints
As a general rule, if clothes are sorted properly for
the washer, they are sorted properly for the dryer.
Do not add fabric softener sheets once the load
has become warm. They may cause fabric
softener stains. Bounce®Fabric Conditioner
Dryer Sheets have been approved for use in all
GE Dryers when used in accordance with the
manufacturer’s instructions.
Do not overload. This wastes energy and causes
wrinkling.
Do not dry the following items: fiberglass items,
woolens, rubber-coated items, plastics, items with
plastic trim and foam-filled items.
Always follow the fabric manufacturer’s care label when laundering
.
.
.
.
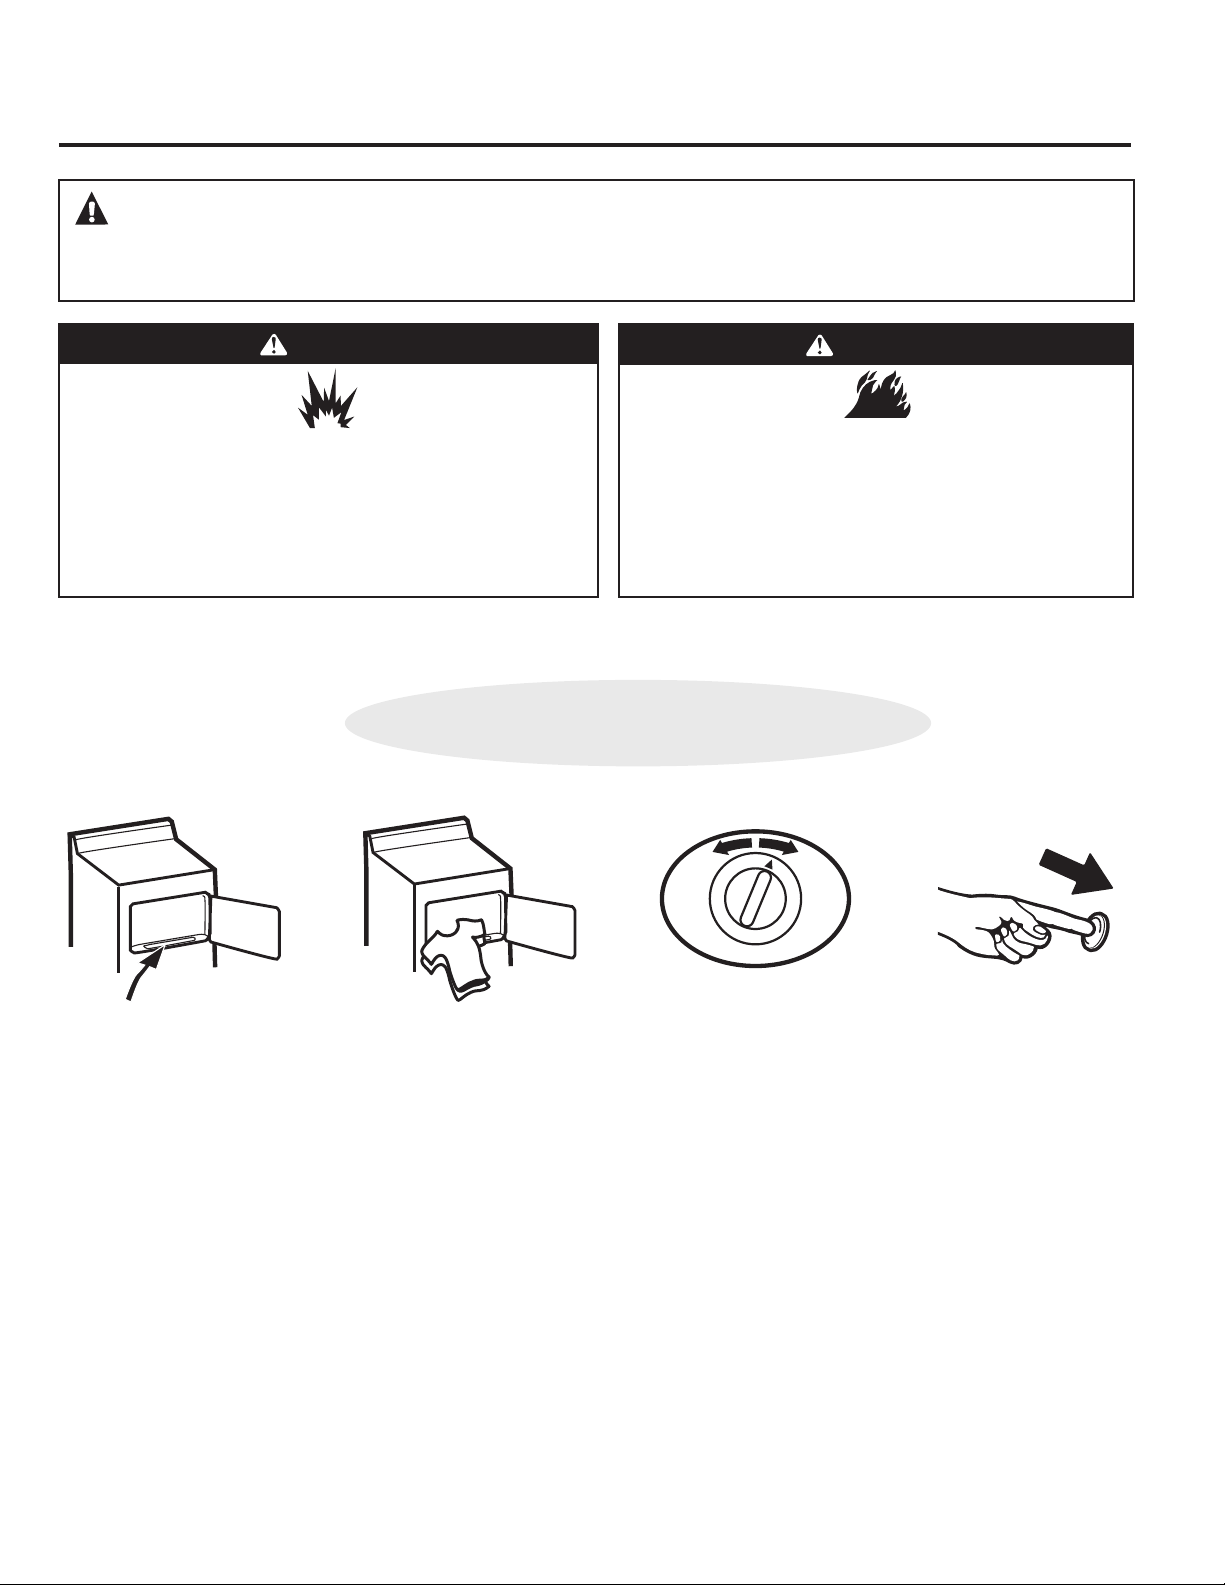
About loading and using the dryer
The Exterior:
compounds with a damp cloth.
panel and finishes may be damaged by some
laundry pretreatment soil and stain remover
products.
dryer
normally
products is not covered by your warranty
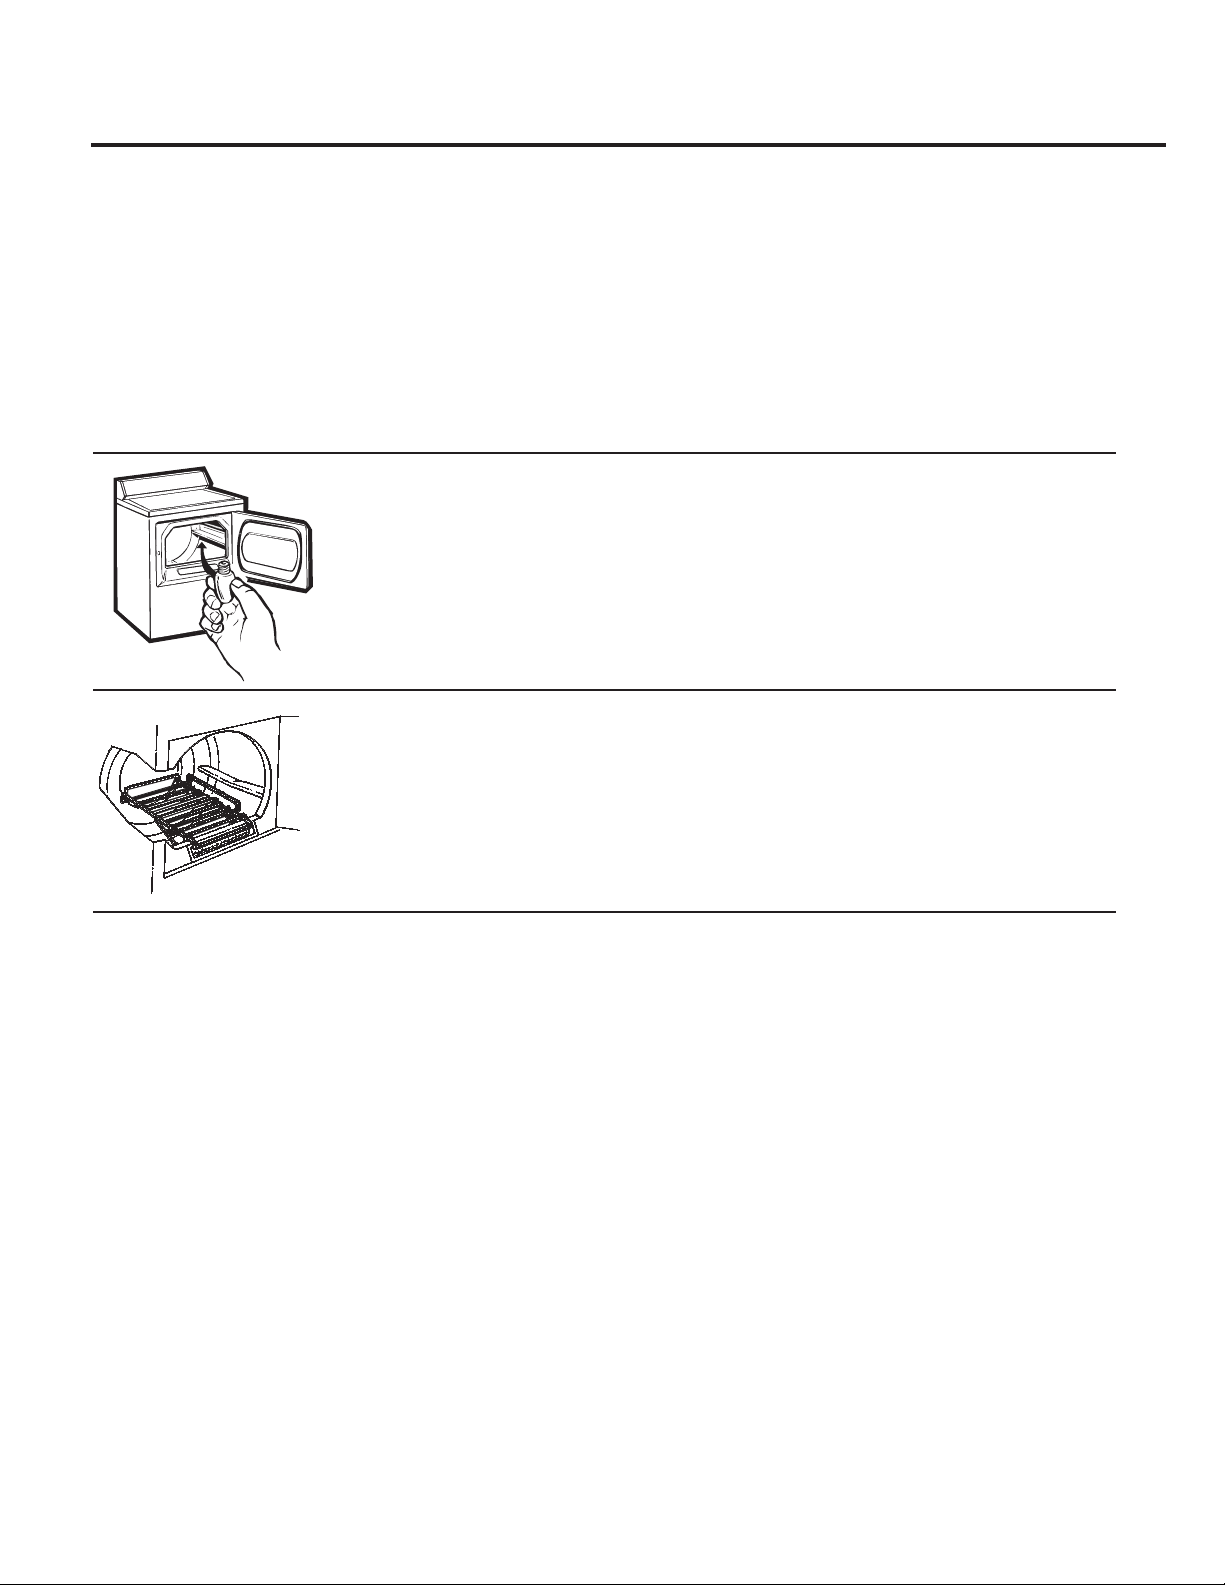
The Lint Filter:
Remove by pulling straight up
across the filter
lint filter from using dryer added fabric softener
sheets.
To remove this buildup, wash the lint screen in
warm, soapy water
Do not operate the dryer without the lint filter in
place.
Vacuum the lint from the dryer lint filter area if you
notice a change in dryer performance.
. A waxy buildup may form on the
. Dry thoroughly and replace
Wipe or dust any spills or washing
Dryer control
Apply these products away from the
. The fabric may then be washed and dried
. Damage to your dryer caused by these
Clean the lint filter before each use
. Run your fingers
Machine
wash
cycle Normal Permanent Press/
wrinkle resistant
Gentle/
delicate Hand wash Do not wash Do not wring
Water
temperature Hot
(50C/120F)
Warm
(40C/105F)
Cold/cool
(30C/85F)
WASH LABELS
Tumble
dry
Dry Normal Permanent Press/
wrinkle resistant Gentle/
delicate Do not tumble
dry
Do not dry
(used with
do not wash)
Heat
setting
High Medium Low No heat/air
Special
instructions Line dry/
hang to dry Drip dry Dry flat In the shade
DRY LABELS
Bleach
symbols Any bleach
(when needed) Only non-chlorine bleach
(when needed) Do not bleach
BLEACH LABELS
Care and Cleaning of the Dryer
Fabric Care Labels
Below are fabric care label “symbols” that affect the clothing you will be laundering.
/
e
g
m
)
Dr
yyt
Stainless Steel: To clean stainless steel surfaces,
use a damp cloth with a mild, non-abrasive cleaner
suitable for stainless steel surfaces. Remove the
cleaner residue, and then dry with a clean cloth.
Dryer Interior and Duct:The interior of the appliance
and exhaust duct should be cleaned once a year by
qualified service personnel.
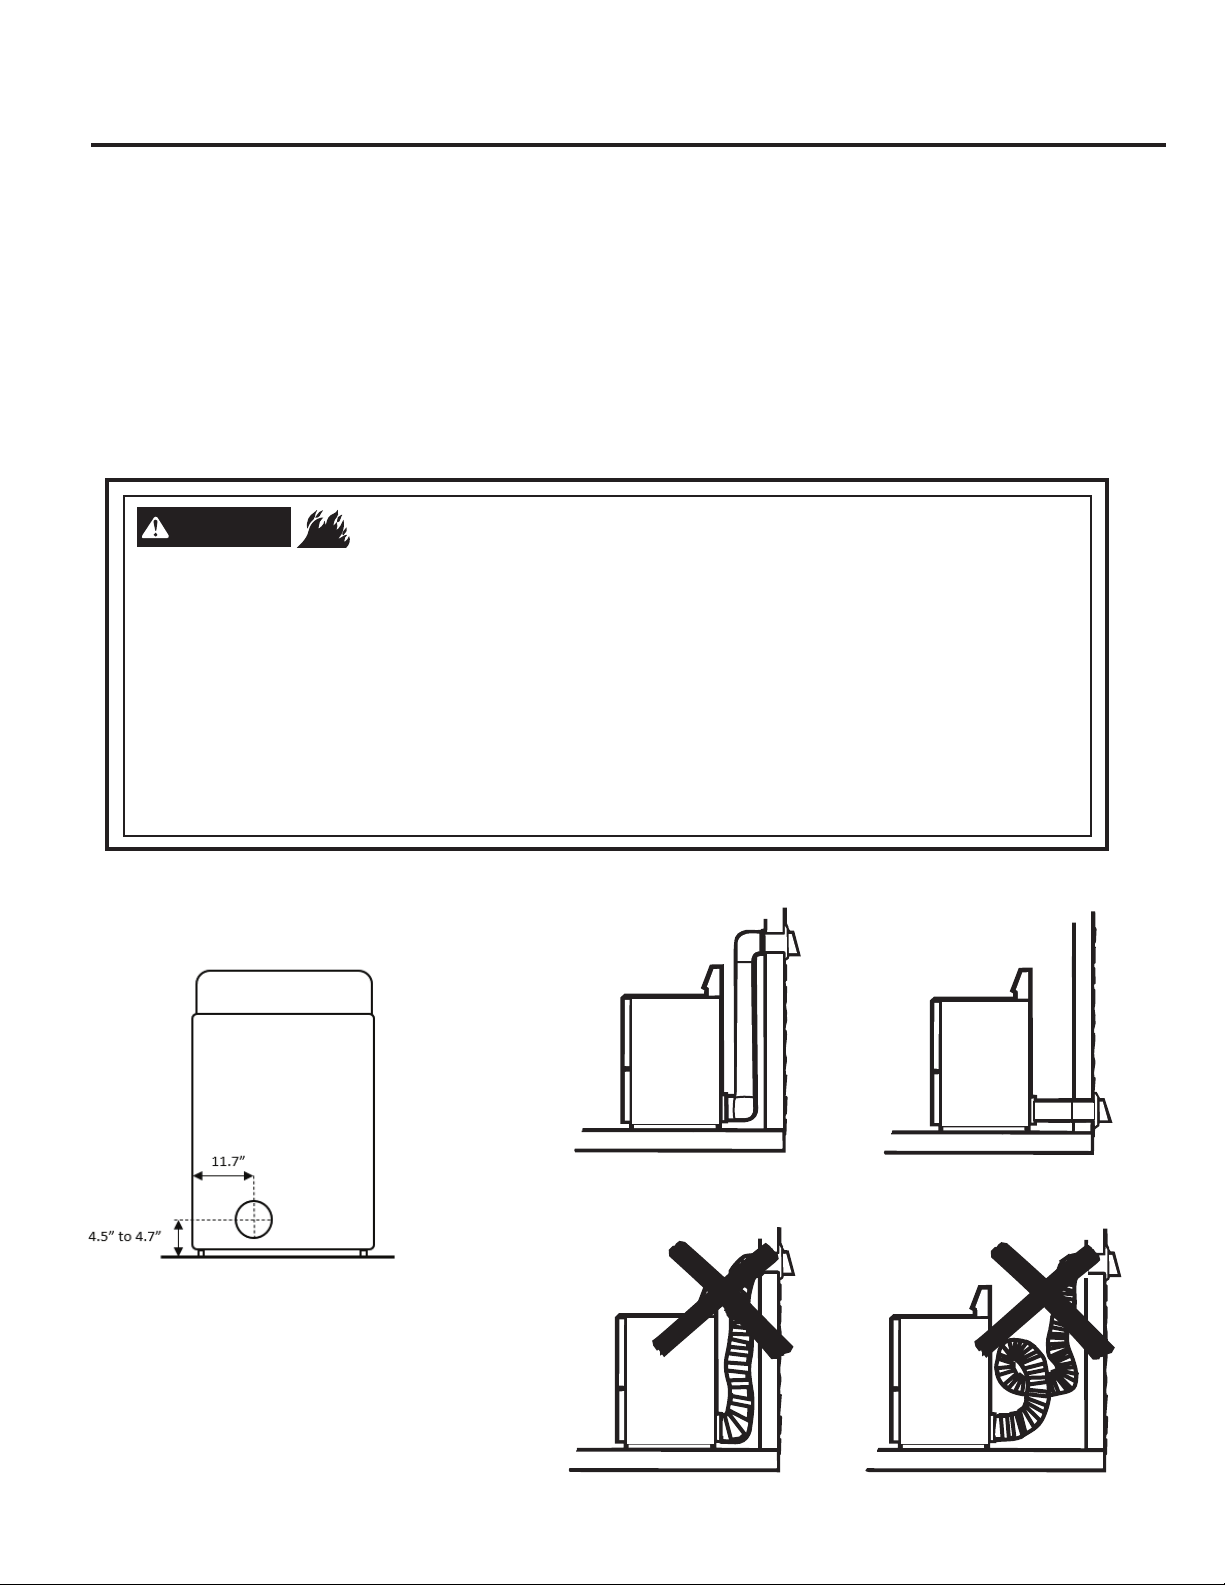
The Exhaust Duct: Inspect and clean the exhaust
ducting at least once a year to prevent clogging
A partially clogged exhaust can lengthen the
drying time.
Follow these steps:
1Turn off electrical supply by disconnecting
the plug from the wall socket.
2Disconnect the duct from the dryer.
3Vacuum the duct with the hose attachment
and reconnect the duct.
The Exhaust Hood: Check from the outside that
the flaps of the hood move freely when operating
Make sure that there is not wildlife (birds, insects,
etc ) nesting inside the duct or hood
.
8

Correct
Venting
Incorrect
Venting
Use only rigid metal 4” diameter ductwork inside the dryer cabinet. Use only rigid metal or
UL listed flexible metal 4” diameter ductwork for exhausting to the outside.
Do not use plastic or other combustible ductwork.
Use the shortest length possible.
Do not crush or collapse.
Avoid resting the duct on sharp objects.
Venting must conform to local building codes.
WARNING
This dryer MUST be exhausted to the outdoors.
Use only 4” rigid metal ducting for the home exhaust duct.
Use only 4” rigid metal or UL-listed dryer transition duct to connect the dryer to the home exhaust.
DO NOT use a plastic vent.
DO NOT exhaust into a chimney, kitchen exhaust, gas vent, wall, ceiling, attic, crawl space, or
concealed space of a building.
DO NOT install a screen in or over the exhaust duct.
DO NOT use duct longer than specified in the exhaust length table.
Failure to follow these instructions can result in death or fire.
About venting the dryer
9
For the best drying performance, the dryer needs to be properly vented. The dryer will use more energy and run longer if it is
not vented to the below specifications. Carefully follow the details on Exhausting in the Installation Instructions.
- Fire Hazard
Venting location

Problem Possible Causes What To Do
Dryer shakes or Some shaking/noise is normal.
makes noise Dryer may be sitting unevenly
Greasy spots on clothes Impreper use of fabric softener
Drying dirty items
with clean oness
Clothes were not
completely clean
Lint on clothes Lint filter is full
Improper sorting
Static electricity can attract lint
Overloading
Paper, tissue, etc, left in pockets
Static occurs No fabric softener was used
Over-drying
Synthetics, permenent press
and blends can cause static
Before you call for service...
10
Troubleshooting Tips
Save time and money! Review the charts on the following pages,
or visit GEAppliances.ca. You may not need to call for service.
Dryer doesn’t start Dryer is unplugged • Make sure the dryer plug is pushed completely into the outlet.
• Move dryer to an even floor space, or adjust leveling legs as
necessary until even.
Inconsistent drying
times
Type of heat • Automatic drying times will vary according to the type of
heat used (electric, natural or LP gas), size of load, types of
fabrics, wetness of clothes and condition of exhaust ducts.
The Dry dryness level
was chosen but load is
still damp
Load consists of a mixture of
heavy and light fabrics
Exhaust system is blocked
• When combining heavy and light fabrics in a load, choose
More Dry if you are using a sensor cycle.
• Inspect and clean exhaust system.
• Follow directions on fabric softener package.
• Use your dryer to dry only clean items. Dirty items can stain
clean items and the dryer.
• Sometimes stains which cannot be seen when the clothes are
wet appear after dryung. Use proper washing procedures
before drying.
• Clean lint screen before each load.
• Sort lint producers (like chenille) from lint conllectors (like
corduroy).
• See suggestions in this section under Static.
• Separate large loads into smaller ones.
• Empty all pockets before laundering clothes.
• Try a fabric softener.
• Bounce®Fabric Conditioner Dryer Sheets have been approved
for use in all GE Dryers when used in accordance with the
manufacturer’s instructions.
• Try a fabric softener.
• Adjust setting to Less Dry ot Damp Dry.
• Try a fabric softener.
Dryer doesn’t heat Fuse is blown/circuit breaker is
tripped; the dryer may tumble
but not heat
Gas service is off
No heat temperature
selected
• Check the house fuse/circuit breaker box and replace both
fuses or reset both breakers. Your dryer may tumble if only
one fuse is blown or one breaker is tripped.
• Make sure gas shutoff at dryer and main shutoff are fully open.
• Select another heat setting.
Fuse is blown/circuit breaker
is tripped • Check the house fuse/circuit breaker box and replace fuse or
reset breaker. NOTE: Most electric dryer use two fuses/breakers.

11
Before you call for service...
Problem Possible Causes What To Do
Clothes take too long to
dry Improper sorting
Large loads of heavy fabrics
(like beach towels)
Controls improperly set
Lint filter is full
Improper or obstructed
ducting
Blown fuses or tripped circuit
breaker
Overloading/combining loads
Under-loading
• Separate heavy items from lightweight items (generally, a
well-sorted washer is a well-sorted dryer load).
• Large, heavy fabrics contain more moisture and take longer to
dry. Separate large, heavy fabrics into smaller loads to speed
drying time.
• Match control setting to the load are drying.
• Clean lint filter before every load.
• Check installation instructions for proper ducting/venting.
• Make sure ducting is clean, free of kinks and unobstructed.
• Check to see if outside wall damper operates easily.
• Check the installation instructions to make sure the dryer
venting is correct.
• Replace fuses or reset circuit breakers. Since most dryers use
2 fuses/breakers, make sure both are operating.
• Do not put more than one washer load in the dryer at a time.
• If you are drying only one or two items, add a few items to
ensure proper tumbling.
Clothes are wrinkled Over-drying
Letting items sit in dryer
after cycles ends
Overloading
• Select a shorter drying time.
• Remove items while they still hold a slight amount of moisture.
Select a Less Dry or Damp Dry setting.
• Remove items when cycle ends and fold or hang immediately.
• Separate large loads into smaller ones.
Clothes shrink Some fabrics will naturally
shrink when washed. Others
can be safely washed, but will
shrink in the dryer
• To avoid shrinkage, follow garment care labels exactly.
• Some items may be pressed back into shape after drying.
• If you are concerned about shrinkage in a particular item, do
not machine wash or tumble dry it.
Water seen on inside of
door and top lint filter
when opening door after
steam cycle
Steam condenses on these
surfaces • This is normal.
Collars and waistbands
still wet at end of cycle The dryness monitor senses
that the body of the clothes
is dry
• Choose Speed Dry or Timed Dry to dry damp collars and
waistbands. In the future, when drying a load with collars and
waistbands, choose More Dry.
Slight variation in
metallic color This is normal • Due to the metallic properties of paint used for this unique
product, slight variations of color may occur due to viewing
angles and lighting conditions.

12
Before you call for service...
Problem Possible Causes What To Do
Small amount of water
on floor in front of dryer Inadequate load size for steam
cycle selected, excess steam
condenses inside cabinet and
leaks out
• If using the Steam Dewrinkle cycle, manually reduce time. If
using the Steam Refresh cycle, add more.
Water drips from door
when opened after a
Steam Cycle
Steam condenses on inner door • This is normal.
Cannot see steam at
beginning of cycle Steam released at different
time in cycle • This is normal.
Cannot see steam at any
time during the cycle The steam nozzle might be
clogged with debris from your
water supply
• Call 1.800.561.3344 to order nozzle replacement kit
WW03A00189 or to request a service technician to replace
this for you.
Garment still wrinkled
after steam cycle (Not all
features are on all models)
Too many garments • Load fewer garments; manuallly icrease time.
Dryer continues to
tumble after display
says complete
Extended/Dewrinkle Tumble
was selected • Ensure Extended/Dewrinkle Tumble option is not selected. For
the Steam Refresh cycle, Extended/Dewrinkle Tumble will
automatically be turned on and cannot be turned off.
No numbers displayed
during cycle, only lights Dryer is continuously
monitoring the amount of
moisture in the clothes
• This is normal. When the dryer senses a low leveñ of
moisture in the load, the dryer will display the dry time
remaining.
Time Reamaining
jumped to a lower
number
The estimated time may change
when a smaller load than usual
is drying
• This is normal.
Dryer is running but 00
is displayed in Time
Reamaining
The Extended/Dewrinkle Tumble
option was chosen • This is normal. During Extended/Dewrinkle Tumble, the time
remaining is not displayed. The extended tumbling option lasts
approximately 60 minutes; dewrinkle 60 minutes.
Clothes are still wet and
dryer shuts off after a
short time
The door was opened mid-cycle.
The load was then removed from
the dryer and a new load put in
without selecting a new cycle
Small load
Load was already dry except for
collars and waistbands
Dryer is not level
• This is normal. During Extended/Dewrinkle Tumble, the time
remaining is not displayed. The extended tumbling option lasts
approximately 60 minutes; dewrinkle 60 minutes.
• When drying 3 items or less, choose Speed Dry (Not all
features are on all models) or Timed Dry.
• Choose Speed Dry or Timed Dry to dry damp collars and
waistbands. In the future, when drying a load with collars
and waistbands, choose More Dry or Sanifresh.
• Move dryer to an even floor space or adjust leveling legs as
necessary until even.
Garments are wet after
Steam cycle (Not all
features are on all models)
Lint filter not clean
Load is children/infant garments
• Clean lint filter.
• Use the Steam Refresh cycle.
Water on floor in back
of dryer Loose water hose connection to
valve
Hose missing rubber washer at
connection with valve • Install rubber washer provided with hose.

For The Period Of: GE Will Replace:
One Year
From the date of the
original purchase
13
All warranty support provided by our authorized service centers. To
schedule service, on-line, 24 hours a day, visit us at GEAppliances.ca
or call 1.800.561.3344 during normal business hours. Please have
serial number and model number available when calling for service.
Staple your receipt here.
Proof of the original purchase
date is needed to obtain
support under the warranty.
Any part of the dryer which fails due to a defect in materials or workmanship. During this
limited one-year warranty, GE will also provide, free of charge, all labor and related service costs
to replace the defective part.
What GE Will Not Cover:
Service trips to your home to teach you how to use
the product.
Improper installation, delivery or maintenance.
Failure of the product if it is abused, misused, or
used for other than the intended purpose or used
commercially.
Replacement of the light bulb.
Replacement of house fuses or resetting of circuit
breakers.
Damage to the product caused by accident, fire,
floods or acts of God.
Incidental or consequential damage caused by
possible defects with this appliance.
Damage caused after delivery.
Product not accessible to provide required service.
Defects or damage due to operation in freezing
temperatures.
Products which are not defective or broken, or which
are working as described in the Owner’s Manual.
EXCLUSION OF IMPLIED WARRANTIES―Your sole and exclusive remedy is product repair as provided in this Limited Warranty.
Any implied warranties, including the implied warranties of merchantability or fitness for a particular purpose, are limited to
one year or the shortest period allowed by law.
WARRANTOR: MC COMMERCIAL INC., BURLINGTON, ON L7R 5B6
GE Dryer Warranty
This warranty is extended to the original purchaser and any succeeding owner for products purchasedinCanada forhome use
within Canada. If the product is located in an areawhere service by a GE Authorized Servicer is not avail-able, you may be
responsible for a trip charge or you may be required to bring the product to an Authorized GE Service location. Some provinces
do not allow the exclusionor limitationof incidental or consequential damages. This warranty gives you specificlegal rights,
and you may also have other rights which vary from province to province. To know what your legal rights are, consult your
local or provincial consumer affairs office.

14
GE Appliances Website GEAppliances.ca
Have a question or need assistance with your appliance? Try the GE Appliances Website 24 hours a day,
any day of the year! For greater convenience and faster service, you can now download Owner’s Manuals,
order parts or even schedule service on-line.
Schedule Service GEAppliances.ca
Expert GE repair service is only one step away from your door. Get on-line and schedule your service at your
convenience 24 hours any day of the year! Or call 1.800.561.3344 during normal business hours..
Real Life Design Studio GEAppliances.ca
GE supports the Universal Design concept―products, services and environments that can be used by
people of all ages, sizes and capabilities. We recognize the need to design for a wide range of physical and
mental abilities and impairments. For details of GE’s Universal Design applications, including kitchen design
ideas for people with disabilities, check out our Website today. Call 1.800.561.3344.
Extended Warranties
Consult your local listings for the nearest extended warranty provider.
Parts andAccessories GEAppliances.ca
Individuals qualified to service their own appliances can have parts or accessories sent directly to their homes.
Visit your local authorized GE partsdistributor or call 1.800.661.1616.
Instructions contained in this manual cover procedures to be performed by any user. Other servicing generally
should be referred to qualified service personnel. Caution must be exercised, since improper servicing may
cause unsafe operation.
Contact Us GEAppliances.ca
If you are not satisfied withthe service you receive from GE, contact us on our Websitewithallthedetails
including your phone number, or write to: Director, Consumer Relations, MC Commercial
Suite 310,1 Factory Lane
Moncton, N.B. E1C9M3
Register Your Appliance GEAppliances.ca
Register your new appliance on-line―at your convenience!Timely product registration will allow for enhanced
communication and prompt service under the terms of your warranty, should the need arise.
You may also mail in the pre-printed registration card included in the packing material.
Consumer Support

Site Web des électroménagers GE electromenagersGE.ca
Vous avez des questions ou besoin d'assistance concernant votre appareil ? Consultez le site Web des
électroménagers GE accessible 24 heures sur 24, tous les jours de l'année! Pour un service pratique encore
plus rapide, vous pouvez maintenant télécharger des manuels, commander des pièces ou même faire une
demande de réparation en ligne.
Demande de réparation electromenagersGE.ca
Pour bénéficier du service de réparation de GE, il suffit de nous contacter. Demandez une réparation en ligne,
24 heures sur 24, tous les jours! C’est pratique! Ou encore, téléphonez au 1 800 561 3344 pendant les heures
normales de bureau.
Centre de conception universelle electromenagersGE.ca
GE soutient la conception universelle : produits, services et environnements à la portée de tous, quels que soient leur
âge, taille ou capacités mentales et physiques. Nous avons conscience qu’il est nécessaire d’adapter nos produits à
toute la variété de capacités et de handicaps physiques et mentaux existants. Pour plus de détails sur les applications
de conception universelle de GE, dont la conception de cuisines pour les personnes atteintes d’un handicap, consultez
notre site Web dès aujourd’hui. Les malentendants peuvent téléphoner au 1 800 561 3344.
Garanties prolongées
Veuillez consulter votre annuaire local pour trouver un fournisseur de garantie prolongée.
Pièces et accessoires electromenagersGE.ca
Veuillez consulter votre annuaire pour trouver un distributeur local de pièces GE. Autrement, appelez-nous au
1.800.661.1616.
Les directives stipulées dans le présent manuel comportent des procédures que n’importe quel utilisateur peut
effectuer. Les autres types de réparation doivent généralement être confiés à un technicien qualifié. Faites preuve
de prudence, car une réparation ou un entretien mal effectué peut rendre l'utilisation de l'appareil dangereuse.
Communiquez avec nous electromenagersGE.ca
Si vous n’êtes pas satisfait du service après-vente de GE, communiquez avec nous sur notre site Web en
fournissant tous les détails et votre numéro
de téléphone, ou écrivez à :
Enregistrez votre appareil electromenagersGE.ca
Enregistrez votre nouvel appareil en ligne au moment qui vous convient le mieux! L'enregistrement de votre
produit dans les délais prescrits permet une meilleure communication et un service rapide, selon les modalités
de votre garantie, si besoin est.
Vous pouvez également envoyer par courrier la carte d'enregistrement préimprimée qui se trouve dans
l'emballage de votre appareil.
Directeur, Relations au consommateur, MC Commercial
Suite 310, 1 Factory Lane
Moncton, N.B. E1C 9M3
14
Service à la clientèle

13
MC COMMERCIAL INC., BURLINGTON, ON L7R 5B6
Garantie de la sécheuse GE
Ce que GE ne couvre pas :
Agrafez votre facture ici. Une
preuve de la date d’achat
d'origine est requise pour
bénéficier du service de
réparation sous garantie.
Pendant une
période de
:
GE remplacera :
Un an
À compter de la date
d’achat d’origine
Toute pièce de la sécheuse qui se révèle défectueuse en raison d’un vice de matériau ou de
fabrication. Au cours de cette garantie limitée d'un an, GE fournira également, sans frais, les pièces
et la main-d’oeuvre d’achat d’origine.
Toute visite à votre domicile pour vous expliquer le
fonctionnement de l’appareil.
L'installation, la livraison ou l'entretien inadéquats de
l'appareil.
Toute défectuosité du produit lorsqu’il a été utilisé de
façon abusive ou inadéquate, employé à toute autre fin
que celle pour laquelle il a été conçu ou utilisé à des fins
commerciales.
Le remplacement de l'ampoule.
Le remplacement des fusibles ou le réenclenchement
des disjoncteurs du panneau de distribution de
votre résidence.
Tout dommage au produit attribuable à un accident, à un
incendie, à une inondation ou à une catastrophe naturelle.
Tout dommage accessoire ou indirect, causé par des
défaillances possibles de l'appareil.
Tout dommage causé après la livraison.
Tout produit auquel il n'est pas possible d'accéder pour
effectuer les réparations nécessaires.
Les défectuosités ou les dommages causés par une
utilisation de l'appareil à des températures situées sous le
point de congélation.
Les produits qui ne sont pas défectueux ou brisés, ou qui
fonctionnent tel que décrit dans le Manuel de l'utilisateur.
EXCLUSION DES GARANTIES IMPLICITES : Votre seul et unique recours est de faire réparer le produit dans le cadre de
cette garantie limitée. Toute garantie implicite, incluant la garantie de qualité marchande ou d’aptitude du produit à un
usage particulier, est limitée à un an ou à la période la plus courte autorisée par la loi.
Toutes les réparations sous garantie sont effectuées par nos centre
de réparation authorisé. Pour une demande de réparation en ligne, 24
heures par jour, visitez le site electromenagersGE.ca ou téléphonez au
1 800 561 3344. Veuillez avoir les numéros de série et de modèle de
votre appareil à portée de main lorsque vous appelez pour une réparation.
Cette garantie estofferte àl’acheteur initial, ainsi qu’à tout propriétaire subséquent d’un produit acheté au Canada en vue
d’une utilisation domestique au Canada. Si le produit se situe dans une zone où aucun réparateur agréé par GE n'est
disponible,vous devrez peut-être assumer les frais de déplacement de celui-ci ou apporter le produit à un atelier de
réparation agréé par GE.
Si vous avez besoin de pièces de rechange, nous vous recommandons de n'utiliser que des pièces d'origine spécifiées de GE.
Ces pièces ont été conçues pour fonctionner avecvotre appareil etont été fabriquées et testées afin de répondre aux
spécifications de GE.
Dans certains États ou province, il estinterdit d’exclure ou de limiter les dommages indirects ou accessoires.Il est alors
possible que les limitations ouexclusions ci-dessus ne s'appliquent pas dans votre cas. La présente garantie vous confère
des droits juridiques spécifiques.
Vous pouvezbénéficier d'autres droits, qui varient d'un État ou d'une province àl'autre.Pour connaître les droits dont
vous bénéficiez, communiquez avecle bureau des Relations avecles consommateurs de votre régionou de votre
province.

Avant de contacter un service de dépannage…
Problème Causes possibles Solutions
Présence d'une petite
quantité d'eau au sol devant
la sécheuse
Présence d'eau au sol
derrière la sécheuse
Raccord d'alimentation en eau
desserré sur le robinet
Rondelle en caoutchouc du tuyau
manquante au raccord avec le robinet
De l'eau s'écoule de la
porte lorsque vous ouvrez
cette dernière après un
programme à la vapeur
La vapeur se condense sur la
contre-porte
Impossible de voir la vapeur
au début du programme De la vapeur est libérée à différents
moments du programme
Taille de la brassée insuffisante
pour le programme à la vapeur
sélectionné; l'excédent de vapeur se
condense à l'intérieur de la sécheuse
et fuit à l'extérieur
• Si vous utilisez le programme Steam Refresh (défroissage à la
vapeur), réduisez manuellement la durée du programme. Si vous
utilisez le programme Steam Refresh (rafraîchissement à la vapeur),
ajoutez des vêtements à la brassée.
• Serrez le raccord.
• Installez la rondelle en caoutchouc fournie avec le tuyau.
• Ceci est normal.
• Ceci est normal.
Impossible de voir de
la vapeur pendant le
programme
La buse à vapeur est peut-être
bouchée par des débris provenant de
votre alimentation en eau
• Téléphonez au 1 800 561 3344 pour commander une buse de
remplacement (n° de pièce WW03A00189)
)
ou pour demander qu'un
technicien qualifié la remplace pour vous.
Les vêtements présentent
des plis après l'utilisation
d'un programme à la vapeur
(Selon le modèle)
Trop de vêtements dans la sécheuse
L'option de culbutage prolongé/
défroissage a été sélectionnée
La sécheuse continue à
fonctionner après que
l'afficheur indique que le
programme est terminé
• Chargez moins de vêtements et augmentez manuellement la durée
du séchage.
• Assurez-vous que l'option Extended/Dewrinkle Tumble(culbutage
prolongé/défroissage) n'a pasété sélectionnée.Si vous utilisez le
programme Steam Refresh (rafraîchissement à la vapeur),l'option
Extended/Dewrinkle Tumblesera automatiquement activée et ne
pourra pas être arrêtée.
Les vêtements sont humides
après un programme à
la vapeur (Selon le modèle) La brassée est composée de
vêtements pour bébé/enfant
Le capteur surveille de façon
continue la quantité d'humidité
dans la brassée
Le temps restant a bondi à
un nombre inférieur Le temps restant estimé peut changer
lorsqu'une brassée plus petite qu'à la
normale est dans la sécheuse
L'option Extended/Dewrinkle Tumble
(culbutage prolongé/défroissage)a été
sélectionnée
Les vêtements sont toujours
humides et la sécheuse
s'arrête après une courte
période
La porte a été ouverte pendant le
programme La brassée a été retirée
de la sécheuse et remplacée par une
nouvelle brassée sans qu'un nouveau
programme ait été sélectionné
Le filtre à charpie n'est pas propre
Aucun chiffre n'est affiché
pendant le programme, seuls
les voyants sont allumés
Le séchage est en cours,
mais 00 est indiqué dans
l'afficheur du temps restant
• Nettoyez le filtre à charpie.
• Utilisez le programme Steam Refresh (rafraîchissement à la vapeur).
• Ceci est normal. Lorsque la sécheuse détecte un faible niveau
d'humidité dans la brassée, la sécheuse affiche la durée de
séchage restante.
• Ceci est normal.
• Ceci est normal. Durant le Extended/Dewrinkle Tumble (culbutage
prolongé/défroissage), le temps restant n'est pas affiché. L'option
de culbutage prolongé prolonge la durée de séchage d'environ
60 minutes; de défroissage de 60 minutes.
• Un programme de séchage doit être sélectionné chaque fois qu'une
nouvelle brassée de vêtements est mise dans la sécheuse.
12
Petite brassée
La brassée a été séchée, sauf les cols
et les ceintures
La sécheuse n'est pas de niveau Déplacez la sécheuse sur une surface plane ou réglez les pieds de mise
à niveau jusqu'à ce qu'elle soit de niveau.
• Lorsque vous séchez trois articles ou moins, sélectionnez l'option
Speed Dry (Selon le modèle) ouTime Dry (séchage minuté).
• Sélectionnez le réglage Speed Dry(séchage rapide) ou Timed Dry
(séchage minuté) pour faire sécher lescols et lesceintureshumides.
À l'avenir,lorsque vous faites sécher une brassée qui comprend des
cols et desceintures, sélectionnez le réglage
ou Sanifresh.
MoreDry(plus sec)

11
Avant de contacter un service de dépannage…
Problème Causes possibles Solutions
Les vêtements mettent trop
de temps à sécher Triage des vêtements inadéquat
Grandes brassées de tissus lourds
(comme des serviettes de plage)
Les commandes sont mal réglées
Le filtre à charpie est plein
Conduit inadéquat ou bouché
Surcharge/combinaison des brassées
Les vêtements présentent
des plis Séchage trop intense
Surcharge
Les vêtements rétrécissent Il est naturel que certains tissus
rétrécissent au lavage. D'autres
peuvent être lavés sans problème,
mais rétrécissent au séchage
La vapeur se condense sur ces
surfaces
Le capteur du niveau de séchage
considère que les principales parties
des vêtements sont secs
Légère variation de la
couleur du métal
Ceci est normal
•Séparez les articles lourds des articles légers (de manièregénérale,
une brassée bien triée pour le lavage l'est aussi pour le séchage).
• Les articles volumineux et au tissu lourd contiennent plus d'humidité et
prennent plus de temps pour sécher. Séparez les articles volumineux et
au tissu lourd en plus petites brassées pour accélérer le séchage.
• Réglez les paramètres de séchage en fonction de la brassée que
vous séchez.
• Nettoyez le filtre à charpie avant chaque séchage.
• Reportez-vous aux instructions d'installation pour vous assurer d'une
bonne évacuation.
• Vérifiez que le conduit est propre, sans pli et n'est pas obstrué.
• Vérifiez que le registre du mur extérieur fonctionne bien.
• Reportez-vous aux instructions d'installation pour vous assurer que
l'évacuation est adéquate.
Fusibles grillés ou disjoncteur
déclenché
Brasséeinsuffisante
• Remplacez le fusible ou réenclenchez le disjoncteur. Comme la
plupart des sécheuses ont 2 fusibles/disjoncteurs, vérifiez qu'ils
fonctionnent tous les deux.
• Ne séchez pas plus d'une brassée à la fois.
•Si vous ne séchez qu'un ou deux articles, ajoutez quelques articles
pour assurer un culbutage adéquat.
Articles laissés dans la sécheuse
après la fin du programme
• Sélectionnez un temps de séchage plus court.
• Retirez les articles pendant qu'ils sont encore un peu humides.
Sélectionnez les réglages Less Dry (moins sec) ou Damp (humide).
• Sortez le linge à la fin du programme et pliez-le ou suspendez-le
immédiatement.
• Divisez les brassées volumineuses en de plus petites.
•Pour éviter le rétrécissement, respectez à la lettre les consignes
d'entretien des vêtements, sur les étiquettes.
• Une foisrepassés, certainsarticles reprennent leur forme après le séchage.
•Si vous craignez qu'un vêtement en particulier rétrécisse, ne le lavez
pas à la machine et ne le séchez pas à la sécheuse.
De l'eau se retrouve à
l'intérieur de la porte et sur
le dessus du filtre à charpie
lorsque la porte est ouverte
après l'utilisation d'un
programme à la vapeur
• Ceci est normal.
Le col et la ceinture des
vêtements sont humides
à la fin du programme
• Sélectionnez le réglage Speed Dry (Selon le modèle) (séchage
rapide) ou Timed Dry(séchage minuté) pour faire sécher les cols et
les ceintures humides.À l'avenir, lorsque vous faites sécher une
brassée qui comprend descols et des ceintures, sélectionnez le
réglage More Dry (plus sec).
• En raison despropriétésmétalliquesde la peinture utilisée pour ce
produit unique, de légères variations de couleur peuvent survenir
selon l’angle de vision et les conditions d’éclairage.

Avant de contacter un service de dépannage…
Conseils de dépannage
Économisez du temps et de l’argent! Vérifiez les tableaux des pages qui suivent, ou
consultez electromenagersGE.ca. Vous pourriez vous éviter un appel de service.
Problème Causes possibles Solutions
La sécheuse ne démarre pas La sécheuse est débranchée
Le fusible est grillé/le disjoncteur
s'est déclenché
• Vérifiez que la fiche de la sécheuse est bien insérée dans la
prise murale.
• Vérifiez la boîte de fusibles ou de disjoncteurs. Remplacez le fusible ou
réenclenchez le disjoncteur. REMARQUE : La plupart des sécheuses
électriques sont équipées de deux fusibles/disjoncteurs.
La sécheuse ne chauffe pas Le fusible est grillé/le disjoncteur
s'est déclenché ; la sécheuse tourne,
mais ne chauffe pas
L'alimentation en gaz est fermée
L'option No Heat (aucune chaleur) a
été sélectionnée
• Vérifiez la boîte de fusibles ou de disjoncteurs. Remplacez les deux
fusibles ou réenclenchez les deux disjoncteurs. Votre sécheuse peut
fonctionner même si un seul fusible est grillé ou un seul disjoncteur
est déclenché.
• Vérifiez que le robinet d'arrêt du gaz de la sécheuse et que le robinet
d'arrêt principal sont complètement ouverts.
• Sélectionnez un autre réglage de chaleur.
Les vêtements n'étaient pas tout à
fait propres
Charpie sur les vêtements Le filtre à charpie est plein
Triage des vêtements inadéquat
• Parfois, les taches invisibles lorsque les vêtements sont humides
apparaissent après le séchage. Utilisez des techniques de lavage
adéquates avant de procéder au séchage.
• Nettoyez le filtre à charpie avant chaque séchage.
• Séparez les vêtements qui produisent beaucoup de charpie
(p. ex., chenille) de ceux qui l'attirent (p. ex., velours côtelé).
La sécheuse tremble ou fait
du bruit
Un certain niveau de tremblement
et/ou de bruit est normal La sécheuse
n'est peut-être pas de niveau
Taches de graisse sur les
vêtements
Utilisation inadéquate d'un
assouplissant
Du linge sale a été séché avec du
linge propre
• Déplacez la sécheuse sur une surface plane ou réglez les pieds
jusqu'à ce qu'ils soient de niveau.
• Suivez le mode d'emploi sur l'emballage de l'assouplissant.
• Utilisez votre sécheuse pour sécher des vêtements propres
seulement. Les vêtements sales peuvent tacher les vêtements
propres, ainsi que la sécheuse.
10
L'électricité statique attire la charpie
Présence d'électricité statique
Aucun assouplissant n'a été utilisé
Séchage trop intense
Le s tissus synthétiques, les tissus
à pressage permanent et les
mélanges de tissus peuvent créer
de l'électricité statique
• Reportez-vous aux suggestions dans la section Présence
d'électricité statique.
• Essayez d'utiliser un assouplissant.
• Les feuilles d'assouplissant Bounce ont été approuvées pour une
utilisation avec toutes les sécheuses GE. Utilisez-les conformément
au mode d'emploi du fabricant.
MD
• Essayez d'utiliser un assouplissant.
• Réglez les paramètres à LessDry (moins sec) ou Damp Dry (humide).
• Essayez d'utiliser un assouplissant.
Surcharge
Papier, mouchoirs, etc. laissés dans
les poches
• Divisez les brassées volumineuses en de plus petites.
• Videz toutes les poches avant de laver les vêtements.
Temps de séchage inégal Type de chaleur
Le niveau de séchage Dry
(sec) a été sélectionné, mais
les articles restent humides
La brassée est composée d'un
mélange de tissus lourds et légers
Le système d'évacuation est obstrué
• Les durées automatiques de séchage varient selon le type de chaleur
(électricité, gaz naturel ou GPL), le volume de linge, les types de tissus,
l'humidité du linge et l'état des conduits d'évacuation.
• Lorsque vous combinez des tissus lourds et légers dans la même
brassée, sélectionnez l'option More Dry (plus sec) si vous utilisez un
programme de séchage par capteur.
• Inspectez et nettoyez le système d'évacuation.

AVERTISSEMENT
À propos de l'évacuation de la sécheuse
9
Pour optimiser le séchage, la sécheuse doit s'évacuer correctement. La sécheuse consommeradavantage d'énergie et fonction-
nera plus longtemps si elle n'est pas ventilée selon les spécifications ci-dessous. Suivez attentivement les instructions
détaillées sur l'évacuation sous « Instructions d'installation ».
Utilisez exclusivement un conduit métallique rigide d'un diamètre de 4 po (10,2 cm) à l'intérieur de l'armoire de la sécheuse. Utilisez unique-
ment un conduit métallique rigide ou flexible de 4 po (10,2 cm) homologué UL pour l'évacuation vers l'extérieur.
N'utilisez pas de conduit en plastique ou en d'autres matériaux combustibles.
Utilisez le conduit le plus court possible.
N'écrasez pas et ne pliez pas le conduit.
Évitez de faire reposer le conduit sur des objets pointus.
L'évacuation doit être conforme aux codes du bâtiment locaux.
- Risque d'incendie
Emplacement Évacuation
Évacuation
adéquate
Évacuation
inadéquate
Cette sécheuse doit être équipée d'une évacuation vers l'extérieur.Utilisez uniquement un conduit
métallique rigide de 4 po (10,2 cm) pour l'évacuation intérieure.
N'utilisez que des conduits de transition en métal rigide de 4 po (10,2 cm) ou homologués UL pour
brancher la sécheuse sur l'évacuation de la maison.
N'UTILISEZ PAS de conduit d'évacuation en plastique.
NE FAITES PAS arriver l'air évacué dans une cheminée, une hotte de cuisine, un conduit d'évacuation
des gaz, un mur, un plafond, un grenier, un vide sanitaire ou dans un espace dissimulé du bâtiment.
N'INSTALLEZ JAMAIS un filtre dans ou par-dessus le conduit d'évacuation.
N'UTILISEZ PAS des conduits plus longs que ceux indiqués dans le tableau des longueurs du système
d'évacuation.
Le non-respect de ces consignes peut engendrer un incendie ou la mort.
This manual suits for next models
1
Table of contents
Other GE Dryer manuals

GE
GE DWSR483GBCC Manual

GE
GE 234D1157P003 User manual

GE
GE GTDL210EDWW User manual

GE
GE DNCD450EGCWC User manual

GE
GE DCVH680EJWW User manual

GE
GE GTDS820GDWS Manual

GE
GE DSKS433 User manual

GE
GE DRSR483EGWW User manual

GE
GE DPGT750ECPL - Profile Harmony 7.3 cu. Ft. Electric... User manual

GE
GE GFDN100 User manual

GE
GE GFDS375 Original instructions

GE
GE DBLR333EGWW - 27" Electric Dryer Manual

GE
GE Profile Harmony PTDN800GM Manual

GE
GE DDC4500S Assembly instructions

GE
GE GTX33EASKWW User manual

GE
GE GTDN500EM Manual

GE
GE PSXH47 User manual

GE
GE DDC4500TWH Manual

GE
GE Profile DPGT650GH How to use

GE
GE DWXR483EBWW Manual