GE GCE21XGYAFWW Safety guide

®
r ge Side-bg-Side
Safety Instructions ........... 2,s
For Australia and New Zealand ..... 34
Operating Instructions
Automatic Icemaker ............... 15
Care and Cleaning ............. 17, 18
Crispers and Pans ................. 14
CustomCool'". .................... 7, 8
Freezer Compartment ............. 13
Ice and Water Dispenser ....... 16, 17
Refrigerator Doors .................. 9
Replacing the Light Bulbs .......... 19
Shelves and Bins ............... 10-12
Temperature Controls ............. 4-6
TurboCooF" ......................... 6
Water Filter ......................... 9
Installation Instructions
For Australia and
New Zealand ................... 35-37
Preparing to Install
the Refrigerator ................ 25-27
Removing and Replacing Doors ..... 24
Trim Kits and Panels ............ 20-23
Water Line Installation ......... 28, 29
Troubleshooting Tips ...... s1-33
NormalOperatingSounds.......... 30
Models 21, 23, 25,27 and 29
Write the model and serial numbers here:
Model #
Serial #
Find these numbers on a label inside
the refrigerator compartment at the
top on the right.
200D2600P058 49-60565-1 02-09 JR

IMPORTANT SAFETY INFORMATION.
READ ALL INSTRUCTIONS BEFORE USING.
WARNING!
Use this appliance only for its intended purpose as described in this Owner's Manual.
SAFETYPRECAUTIONS
When using electrical appliances, basic safety _recautions should be followed, including the following:
_,This refrigerator must be properly installed
and located in accordance with the Installation
Instructions before it is used. Also seethe
How to Connect Electricity section.
_,Do not allow children to climb, stand or hang on
the shelves in the refrigerator. They could damage
the refrigerator and seriously injure themselves.
_,Do not touch the cold surfaces in the freezer
compartment when hands are damp or wet.
Skin may stick to these extremely cold surfaces.
_,Do not store or use gasoline or other flammable
vapors and liquids in the vicinity of this or any
other appliance.
In refrigerators with automatic icemakers, avoid
contact with the moving parts of the ejector
mechanism, or with the heating element located
on the bottom of the icemaker. Do not place fingers
or hands on the automatic icemaking mechanism
while the refrigerator is plugged in.
_, Installation of the icemaker must be done by
a qualified service technician.
_,This appliance isnot intended for use by persons
(including children) with reduced physical, sensory
or mental capabilities, or lack of experience and
knowledge, unless they have been given supervision
or instruction concerning useof the appliance by a
person responsible for their safety.
DANGER!
_,Children should be supervised to ensure that they do
not play with the appliance.
_,Keep fingers out of the "pinch point" areas;
clearances between the doors and between the
doors and cabinet are necessarily small. Be careful
closing doors when children are in the area.
_,Unplug the refrigerator before cleaning and making
repairs.
NOTE:Westrongly recommend that any servicing
be performed by a qualified individual.
_Before replacing a burned-out light bulb, the
refrigerator should be unplugged in order to avoid
contact with a live wire filament. (A burned-out light
bulb may break when being replaced.)
NOTE:Setting either or both controls to 0 (off) does
not remove power to the light circuit.
_,Do not refreeze frozen foods which have
thawed completely.
_,Always clean the CustomCool'" Tray after
thawing food.
RISK OF CHILD ENTRAPMENT
PROPERDISPOSAL OF THE REFRIGERATOR
Child entrapment and suffocation are not problems
of the past. Junked or abandoned refrigerators are
still dangerous...even if they will sit for "just a few
days." If you are getting rid of your old refrigerator,
please follow the instructions below to help prevent
accidents.
Before You Throw Away Your Old
Refrigerator or Freezer:
Take off the doors and discard separately.
Leavethe shelves in place so that children may
not easily climb inside.
Refrigerants
All refrigeration products contain refrigerants,
which under federal law must be removed prior
to product disposal. If you are getting rid of an
old refrigeration product, check with the company
handling the disposal about what to do.
2

WARNING!
HOW TOCONNECTELECTRICITY
The power cord of this appliance is equipped with
an earthing plug which mates with a standard
earthed wall outlet to minimize the possibility
of electric shock hazard from this appliance.
Have the wall outlet and circuit checked by a qualified
electrician to make sure the outlet is properly earthed.
Where an unearthed wall outlet is encountered,
it is your personal responsibility and obligation to
have it replaced with a properly earthed wall outlet.
The refrigerator should
always be plugged into
its own individual
electrical outlet.
This provides the
best performance
and also prevents
overloading house
Insureproperearthing
existsbeforeusing. ]_Xl
Earthingplug_
wiring circuits which could cause a fire hazard from
overheated wires. Please refer to the rating plate on
the refrigerator for the correct voltage, wattage and
frequency. If the product plug does not fit your outlet,
the product should be fitted with a new plug.
IMPORTANT:Therefitting of electric plugs and cables
should be done bbta qualified technician or service
agent. In some countries the refitting of electric plugs
and cables is on!g permitted when the work is
completed bg a qualified technician.
If the power supply cord becomes damaged, it must
be replaced by a qualified service agent in order to
avoid a safety hazard.
Never unplug your refrigerator by pulling on the
power cord. Always grip plug firmly and pull straight
out from the outlet.
Repair or replace immediately all power cords that
have become frayed or otherwise damaged. Do not
use a cord that shows cracks or abrasion damage
along its length or at either end.
When moving the refrigerator away from the wall,
be careful not to roll over or damage the power cord.
Mains lead replacement
If the mains lead on your refrigerator needs replacing
at any time, it must be replaced by a special lead
which is obtainable from your local dealer.A charge
will be made for the replacement of the mains lead
if you have damaged the lead.
The refrigerator must be positioned so that the plug
is accessible.
READAND FOLLOWTHISSAFETYINFORMATIONCAREFULLY.
SAVETHESEINSTRUCTIONS
Containsfluorinated greenhousegases covered by the Kyoto Protocol.
Gas:R154a(HFC-154a),GWP(GlobalWarming Potential)= 1500
Hermetically sealed.
The amount of R134a gas in this product is:
0.127-0.184 kg
3

About the temperature controls -Profile Models. ge.com
Not all features are on all models. Your controls will look like one of the following:
J
I
y........................................................................................._, F _ ..................................\
i i
i ................]
Non-LCD models Non-LCD models LCD models
NOTE:Therefrigeratorhshippedwithprotectivefilmcoveringthetemperaturecontrols.If thisfilmwasnot
removedduringinstallation,removeitnow.
Thetemperaturecontrolsorepresetin thefoctor_lat37°F(3°C)
fortherefrigeratorcompartmentandO°FM8°C)forthefreezer
compartment.Allow24hoursforthetemperaturetostabilize
tothepresetrecommendedsettings.
Refrigeratortemperaturescanbeadjustedbetween34°Fand46°F
(2°Cto8°C),andthefreezertemperaturescanbeadjustedbetween
-6°Fand+8°F(-22°Cto-13°C).
Tochange the Refrigerator temperature:
LCDModels:
Access By: Home > Refrigerator
Activate By: Usingthe arrows to selectthe desired
temperature Youmust pressENTERto set the new
temperature
Tochange the Freezer temperature:
Access By: Home > Freezer
Activate By: Usingthe arrows to selectthe desired
temperature Youmust pressENTERto set the new
temperature
Oncethe desiredtemperature has been set,the displauwill
return to the HOMEscreen and show the set temperatures
underneath the actual temperature display for several
seconds.Severaladjustments may be required. Eachtime you
adjust the controls, allow 24 hours for the refrigerator to reach
the temperature you have set.
Non-LCD Models:
To change the temperature, press and releasethe FREEZER
TEMP/FRIDGETEMPpad.TheSETlight will come on and
the displag will show the set temperature. To change the
temperature, tap either the vor ^ pad until the desired
temperature isdisplaged.
Oncethe desiredtemperature has been set,the temperature
displagwill return to the actual refrigerator and freezer
temperatures after 5 seconds.Severaladjustments mag be
required. Eachtime gou adjust the controls, allow 24 hours
for the refrigerator to reach the temperature gou haveset.
Thetemperaturecontrolscandispla9 boththeSETtemperature
aswellastheactualtemperatureintherefrigeratorandfreezer.
Theactualtemperaturemayvarystightl_tfromtheSETtemperature
basedon usageandoperatingenvironment.
Turning the cooling system off:
LCDmodels:TurningthecoolingsystemOFFstopscoolingin both
thefreezerandrefrigeratorcompartments,butdoesnotshutoff
electricalpowertotherefrigerator.
LCDModels:
AccessBy: Home > Options > Information and Settings>
CoolingSystem Off
Toturn the cooling system back on,pressthe touch screen
and pressthe ONbutton.
Activate By: PressingENTER.
Non-LCD Models:
Pressand releasethe FREEZERTEMP/FRIDGETEMPpad.
Press^ to set freezer temperature to 5.Thedisplay will
show OFF.Toturn the unit back on, pressthe FREEZER
TEMP/FRIDGETEMPpad. PressV to set the freezer and
refrigerator temperatures to the preset points of O°F(-18°C)
for the freezer and 57°F(5°C)for the refrigerator.
When the unit isturned back on, itwill take up to 24 hours
to stabilize.
LCD Models: Units
TheLCDmodels are shippedfrom the factory with default
settings of Englishunits.
Tochange to Metric units, select:
Home>Options>Information and Settings>Settings>Units
Metric/English>Hetric.
Tochange back to Englishunits repeat the above steps and
select Englishat the final step.
NOTE:Thehelp screen has default setting for USand Canada
customers. If you need replacement parts, contact your local
distributor.

About the temperature controls -GE,Monogram Models.
The unit will have one of the temperature controls shown below:
Internal Temperature r
Controls
External Set Point
Controls (0-9)
GE Models Adjust Temperature
_°'deO $e,P_int. CC°]deo
0 is Off/5 is Normal /9 is Coldest
The temperature controls are preset in the factors at 5for both the refrigerator and
freezer compartments.
To adjust the set point temperature, press the WARMER or COLDER button on either the
Freezer or Refrigerator side. The set point light will come on. Press WARMER or COLDER
until the desired setting is reached.
Several adjustments may be required. Each time you adjust controls, allow 2z4 hours
after each adjustment for the refrigerator to reach the setting you have selected.
Setting either or both controls to 0 stops cooling in both the freezer and refrigerator
compartments, but does not shut off electrical power to the refrigerator.
Control settings will vary based on personal preferences, usage and operating
conditions and may require more then one adjustment.
NOTE: The refrigerator is shipped with protective film covering the temperature controls.
If this film was not removed during installation, remove it now.
Ambient temperature limits
This refrigerator is designed to operate in ambient temperatures
specified by its Temperature Class,which is marked on the rating plate.
Temperature Sgmbol Ambient Temperature
Class Maximum Minimum
Extended-
Temperate
Temperate
Subtropical
Tropical
SN
N
ST
T
52°C
52°C
58°C
45 °C
!O°C
!6°C
!6°C
!6°C
NOTE:Internal temperature may be affected by such factors as the location of the refrigerator,
ambient temperature and frequency of door openings. Adjust temperature controls as required
to compensate for these factors.

About SetFeatures.
This pad isusedto selectthe following
featu res:TurboCool,Quick Ice,Door Alarm
and Water Filter.
PressingSETFEATURESrepeatedlg will cgcle
through all of the available features and then
exit the mode. If no keg ispressed,the mode
will exit and return to displagingfeatures
currentlg set.
About TurboCooU"
TurboCool
!6
How it Works
TurboCoolTM rapidlg cools the refrigerator
compartment in order to more quicklg
coolfoods. UseTurboCool when adding
a large amount offood to the refrigerator
compartment, putting awag foods after theg
have been sitting out at room temperature or
when putting awag warm leftovers.It can also
be used ifthe refrigerator has been without
power for an extended period.
Onceactivated, the compressor will turn
on immediatelg and the fans will cgcle on
and off at high speed as neededfor eight
hours.Thecompressor will continue to run
until the refrigerator compartment cools
to approximatelg 34°F(1°C),then it will cgcle
on and off to maintain this setting. After
8 hours, or ifTurboCool ispressedagain,
the refrigerator compartment will return
to the original setting.
How to Use
LCDModels:
Access By: Home > Options >Refrigerator
Options > TurboCool
Activate By: PressingON.
Deactivate By: PressingOFF.
Non-LCD Models:
PressSETFEATURES.The refrigerator
temperature displag will show TurbaCaal
and/or TC.PressON/OFF.
Internal Control Models:
PressTurboCaol.The TurboCool indicator
light will come on.After TurboCool iscomplete,
the TurboCool indicator light will go out.
After TurboCool iscomplete, the refrigerator
compartment will return to the original setting.
NOTES:
Therefrigerator temperature cannot be changed
during TurboCool.
Thefreezertemperature is not affected during
TurboCool.
Whenopening the refrigerator door during
TurboCool,the fans wi!!continue to run if theg
havecgcled on.
About CiimateKeeper2. TM (on some models)
How it Works
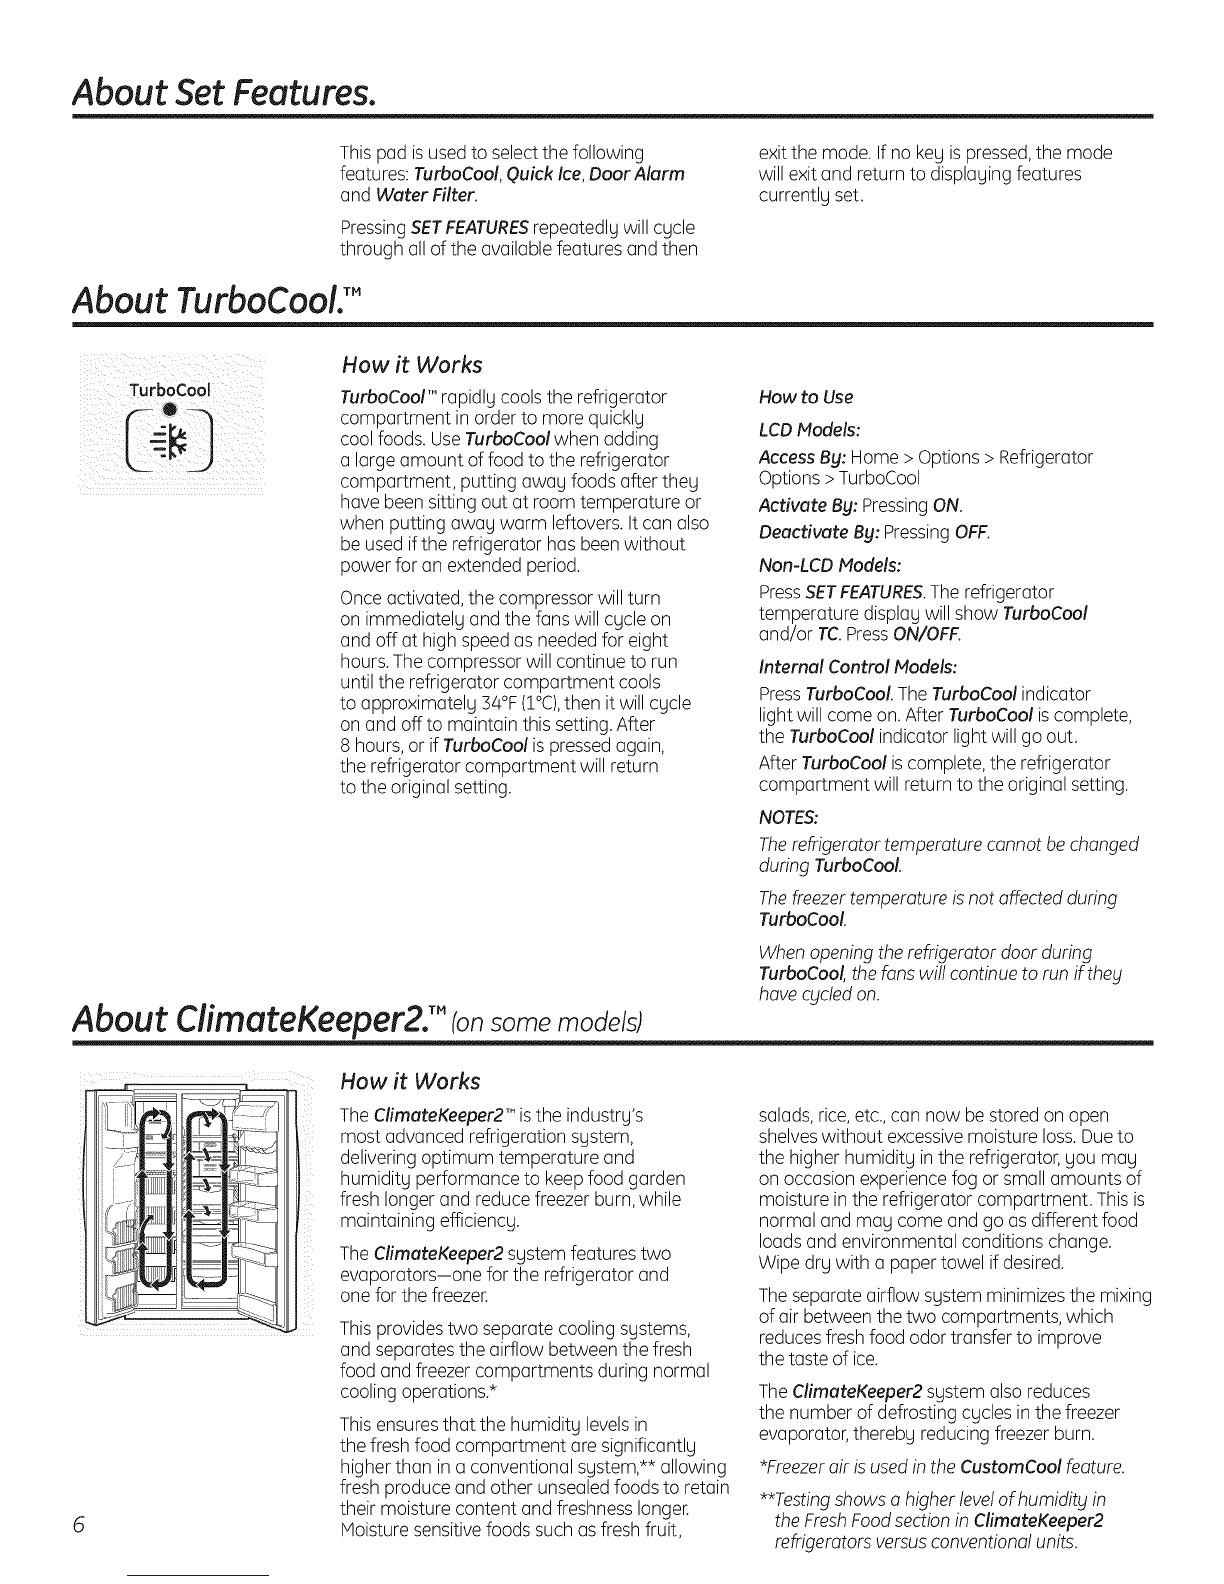
TheCfimateKeeper2TM isthe industrg's
most advanced refrigeration sgstem,
deliveringoptimum temperature and
humiditg performance to keepfood garden
fresh longer and reduce freezer burn,while
maintaining efficiencg.
TheClimateKeeper2 sgstem features two
evaporators-one for the refrigerator and
one for the freezer.
This providestwo separate cooling sgstems,
and separates the airflow between the fresh
food and freezer compartments during normal
coolingoperations.*
This ensuresthat the humiditg levelsin
the fresh food compartment are significantlg
higher than in a conventional sgstem,** allowing
fresh produce and other unsealedfoods to retain
their moisture content and freshnesslonger.
Moisturesensitivefoods such as fresh fruit,
salads,rice,etc.,can now be stored on open
shelveswithout excessivemoisture loss.Dueto
the higher humiditg inthe refrigerator,gou mag
on occasion experience fog or small amounts of
moisture in the refrigerator compartment. This is
normal and mag come and go asdifferent food
loadsand environmental conditions change.
Wipe drg with a paper towel if desired.
The separateairflow sgstem minimizesthe mixing
of air between thetwo compartments, which
reducesfresh food odor transfer to improve
the taste of ice.
The ClimateKeeper2 sgstem also reduces
the number of defrosting cgcles in the freezer
evaporator,therebg reducing freezer burn.
*Freezerair isused in the CustomCool feature.
**Testingshowsa higher leve!of humidity in
the FreshFoodsectionin ClimateKeeper2
refrigeratorsversusconventionalunits.

About: CustomCooL'"(on somemodels)
LCDModels Only
Non-LCD Models Only
How it Works
TheCustomCool'" feature isusedto quickly chill
items,thaw itemsor hold the pan at a specific
temperature. Thisfeature isa system of dampers,
a fan, a temperature thermistor and a heater.
OR LCD Models Only
Thepan istightly sealedto prevent
temperature fluctuations in the rest of
the refrigerator.Thecontrols for this pan
are located on the dispenserwith the
temperature controls.
ii i iii
ExpressThaw TM
ExpressChillTM
How to Use
0 Emptgthe pan. Placethe Chill/Thaw trag
Inthe pan.Placethe items on the trag
and closethe pan completely.
0LCDModels:
Access by: Home > Options > Refrigerator
Options > CustomCool Pan
Non-LCD Models:
Selectthe ExpressThaw'",ExpressChilF
or SelectTemp'" pad.Thedisplag and SETlight
will come on.Tapthe pad until the light
appears next to the desiredsetting.
Usethe following chart to determine the best
setting to use.
ExpressChill can be set to !5, 50 or/45
minutes.Thedefault is!5 minutes.
Tostop a feature before it isfinished:
For LCDModels:
Go into that feature's menu and press
the OFFbutton.
For Non-LCD Models:
Tapthat feature's pad until no options
are selectedand the displag isoff.
During ExpressThaw and ExpressChill,
the displag on the controls will count down
the time in the cgcle (onsome models).
After the ExpressThaw cgcle iscomplete,
the pan will reset to the MEATsetting
(52°F[O°C])to help preservethawed
items until theg are used.
Thedisplagedactual temperature of
the CustomCool pan mag varg slightlg
from the SETtemperature basedon
usage and operating environment.
NOTE:Forfood safety reasons,it isrecommended
thor foods be wrapped in p!ostic wrap when using
ExpressThaw. Thiswi!! help contoin meotjuices
ond improve thowing performance.
How to Remove and Replace the Drawer
Toremove:
Pullthe drawer out to the stop position.
Rotateallfour swing locksto the unlock
position.
Liftthe front of the drawer up and out.
Toreplace:
Makesure all four swing locksare
in the unlock position.
Placethe sidesof the drawer into
the drawer supports, making sure
the swing locksfit on the drawer slots.
Lockall four swing locksbg rotating them
to the lock position.

About CustomCoolY tonsome models)
CustomCool'" Chert
NOTE:Results mag vorg depending on packaging, starting temperature and other food traits.
o.2sk_
Hamburgers (0.25kg)
IndividuallyWrapped
FiletMignon (0.25kg)
0.50 kg (8 hours)
Chicken Breasts(0.5kg)
Minced Beef(0.5kg)
Steak (0.5kg)
1.0kg (10 hours)
Chicken Breasts(!.0 kg)
Minced Beef(1.0kg)
Steak (!.0 kg)
l.SOkg112hours)
Chicken Breasts(1.50kg)
Minced Beef(!.50 kg)
Steak (!.50 kg)
15 Minutes
1 BeverageCan(355ml)
2 SmallJuice Boxes
(175-240 mleach)
30 Minutes
2to 6 BeverageCans(355ml each)
2 Plastic590 ml Bottlesof Beverage
,, 4 to 6 SmallJuice Boxes
(175-240 mleach)
3 FoilJuice Packets
,, Wine (750 ml bottle)
45 Minutes
2 Literof Beverage
1.9Litersof Juice
Gelatin-! package
Citrus Settin_
Oranges, Lemons,Limes,Pineapple,
Cantaloupe
Beans,Cucumbers,Tomatoes, Peppers,
Aubergine,Squash
Produce Setting (l°C)
,, Strawberries, Raspberries,Kiwifruit,
Pears,Cherries,Blackberries,Grapes,
Plums,Nectarines,Apples
Asparagus, Broccoli,Corn, Mushrooms,
Spinach,Cauliflower,Kale,GreenOnion,
Beetroot,Onions
Meat Settin_
Raw Meat, Fishand Poultry
How to Use the Beverage Center (LCDmodels only)
SomeCustomCool models feature a beverage
center.It isdesignedto store beverages at colder
temperatures. Selectthis feature ifyou liketo
keepextra-chilled refreshments on hand.
Access bg: Home > Options > Refrigerator
Options > Beverage Center
Activate bg: Pressing ON.
Deactivate bg: Pressing OFF.
DakyBin
i
// /'
How to Remove end Replace the Beverage Center (LCDmodels onlg)
To remove:
0 Removedairy bin first. Holding
the bottom of the dairy bin,lift the front
straight up,then lift up and out.
0 Holdingleft and right sideof beverage
center,lift straight up and out.
Leaveadapter in place.
To replace:
_! Engagebacksideof beverage center in
molded supports on adapter.Then push
down on the sidesof the beverage center.
Thebeverage center will lock into place.
Replacedairy bin,
Beverage I itll I
Center ]itll I
]i_ ill I
Adz ,ter

About the water filter.
l
II
RESETWATERFILTER
HOLD3 SECS
,L
Place the top of the cartridge up
inside the cartridge holder and
slowly turn it to the right.
Water FilterCartridge
Thewater filtercartridge islocated inthe back upper
rightcorneroftherefrigeratorcompartment.
When to Replace the Filter
LCDModels:
Apop-up screen will appear on the LCDscreen
to remind gou to replace the water filter. Youcan
check the status ofthe water filter manuallU.
Access By: Home > Options> DispenserOptions >
ResetWater Filter
Non-LCD Models/External Controls:
Thereisa replacementindicatorlightforthewater
filtercartridgeonthedispenser.Thislightwillturn
orangetotellgouthat Uouneedto replace
thefiltersoon.
Thefiltercartridgeshouldbereplacedwhenthe
replacementindicatorlightturnsredor iftheflow
ofwaterto thedispenseror icemakerdecreases.
Removing the Filter Cartridge
Ifgou are replacingthe cartridge,firstremove the old
one bg slowlgturning itto the left.Do not pulldown on
the cartridge. Asmall amount ofwater mag dripdown.
/nsta//ing the Filter Cartridge
0 Thereisanadapterattachedto thetop
ofthenewfiltercartridge.
Theadaptermustberemovedbeforeinstalling
thecartridge.Toremovetheadapter,turnitto
theleftabout1//4turn.
0 Fillthereplacementcartridgewithwater
fromthetapto allowforbetterflowfrom
thedispenserimmediatelgafterinstallation.
@
O
Lineupthearrowonthecartridgeand
thecartridgeholder.Placethetopofthenew
cartridgeupinsidetheholder.Donotpush
it upintotheholder.
Slowlgturnittothe rightuntilthefiltercartridge
stops.DONOTOVERTIGHTEN.As£touturn
thecartridge,itwillautomaticallUraiseitselfinto
position.Thecartridgewillrotateabout1/2turn.
Runwater from the dispenserfor 5 minutes
to clearthe sustem and prevent sputtering.
OLCDModels:
PressFILTERREPLACEDbutton to confirm
replacement.
Non-LCD Models:
Pressthe SETFEATURESpad until REPLACE
WATERFILTERislit. Pressand hold the ON/OFF
pad far 5seconds. WATERFILTERISRESETwill
show in the window.
NOTE:Anewlyinstalledwaterfiltercartridgemay
cause water to spurt fromthe dispenser.
Filter Bypass Plug
Youmustusethefilterbgpassplugwhena
replacementfiltercartridgeisnotavailable.
Thedispenserandtheicemakerwillnotoperate
withoutthefilterorfilter bupassplug.
Replacement Filters:
Toorderadditionalfilter cartridges,contactyour
localdistributor.
About the refrigerator doors.
Refrigerator Doors
The refrigerator doors mag feel different than
the ones gou are usedto. Thespecial door
opening/closing feature makes surethe doors
close all the wag and are securelusealed.
When opening and closingthe door you will
notice a stop position.If the door isopened
past this stop point, the door will remain open
to allow you to load and unload food more easily.
When the door isonly partially open,it will
automatically close.
The resistance you feel atthe stop position will
be reduced as the door isloaded with food.
When the door is onlg partiallg
open it will automaticallg close.
Begond this stop the door will
stag open.

About the shelves and bins.
Not all features are on all models.
Refrigerator bin
Freezer tilt-out bin
Refrigerator Door Bins and Freezer Door Tilt-Out Bins
Large Bins
The larger refrigerator door bins and freezer
tilt-out door binsare adjustable.
Toremove: Lift the front of the bin straight up,
then lift up and out.
Toreplace or relocate: Engagethe back side
of the bin in the molded supports of the door.
Then push down on the front of the bin.
Binwill lock in place.
Small Bins
Thesnugger helps prevent tipping, spillingor
slidingof small items stored on the door shelf.
Placea finger on either sideof the snugger
near the rear and move it back and forth
to fit your needs.
Toremove: Lift the front of the bin straight up
then out.
Toreplace: Positionthe bin above the
rectangular molded supports on the door.
Then slidethe bin down onto the support
to lock it in place.
Bottle
retainer
Bottle Retainer
The bottle retainers are adjustable and keeptall
itemsfrom tipping over.
Toremove: Lift the front of the retainer straight
up,then lift it up.
Toreplace or relocate: Engagethe back
of the bottle retainer in the molded supports
on the door.Thenpush down on the front
of the bottle retainer.
10

ii; i:iiiiii¸i! i
ii ili i!i
Presstab and pull shelf
forward to remove
Slide-Out Spillproof Shelf
The slide-out spillproof shelf allows you to reach
items stored behind others.Thespecial edges
are designedto help prevent spillsfrom dripping
to lower shelves.
Toremove:
Slidethe shelf out until it reachesthe stop,
then pressdown on the tab and slidethe shelf
straight out.
Toreplece or relocute:
Linethe shelf up with the supports and slide it
into place.Theshelf can be repositioned when
the door isat 90°or more.To repositionthe shelf,
slidethe shelf past the stops and angle
downward. Slideshelf down to the desired
position,line up with the supports and slide
into place.
Make sure _jou push the shelves a!! the wag
back in before gou close the door.
QuickSpece T"Shelf
This shelf splitsin half and slides under itself
for storage of tall items on the shelf below.
This shelf can be removed and replaced or
relocatedjust likeSlide-OutSpillproofShelves.
On some models,this shelf can not be used
in the lowest position.
Removable Beverage Rack
The beverage rack isdesignedto hold
a bottle on its side.It can be attached
to any slide-out shelf.
Toinstull:
0 Lineup the large part of the slotson
the top of the rack with the tabs under
the shelf.
Thenslidethe rack back to lock it
in place.
Door Beverage Reck Ion some models)
This rack holds up to 5 cans.
The rack hangs from the sidesof the
dairy bin.
Toremove:
Empty the wine/beverage rack.
Holdingthe bottom of the dairy bin,
lift the front straight up,then lift up
and out.
@Todetach the rack from the dairy bin,
pull the rack's sidewires out of the holes
on each side ofthe dairy bin.
Torepluce:
Reattachthe rack to the sidesof the bin.
Engagethe back sideof the bin in the
molded supports on the door.Then push
down on the front of the bin.The bin will
lock into place.
11

About the shelves and bins.
Not all features are on all models.
Divide[ Deep Freezer Baskets
Toremove, push the basket all the wag to the
back of the freezer.Lift up until the back pinsare
disengaged. Liftthe entire basket up and pull out.
The divider can be used to organize food
packages. Forlarge packages, simply fold
down the divider.
Hake sure you push the baskets a!! the wag
back in before Sou close the door.
WARNING: Poor performance may occur
if freezer baskets are not used. Storage of
items in the freezer without using baskets
mag result in poor temperature performance
due to restrictions of air flow within the
freezer compartment.
iii ii
i i
!_i_i_iiii__i
Freezer Baskets
To remove, slide outto the stop position, liftthe
front past the stop position and slide out.
Hake sure you push the baskets a!! the way
back in before Sou close the door.
WARNING: Poor performance may occur
if freezer baskets are not used. Storage of
items in the freezer without using baskets
mog result in poor temperature performance
due to restrictions of air flow within the
freezer compartment.
;¸¸¸:i : :: / j iSlide-Out Freezer Shelves
To remove, slide out to the stop position, liftthe
front past the stop position and slide out. Hake sure gou push the shelves a!! the way
back in before Sou close the door.
Fixed Freezer Shelves
Thereare two tgpes offixed freezer shelves.
Toremove this type of shelf:
Lift the shelf up at the left side.
Bring the shelf out.
Toremove this type of shelfi
Lift up the left sideof the shelf and slide it
left intothe center ofthe shelf supports.
Rotatethe right sideof the shelf up and
out of the shelfsupports.
12

About the freezer compartment.
Loading the Freezer Compartment
Load so that at least 15 mm of space remains
clear between stacks of packages and 15 mm
to 25 mm of space between the top of ang
stack and any shelf or basket above it.
Packages mag hang over the front of shelves
but must remain 15 mm from doors.
Foodto be frozen must not be placed
in direct contact with food in storage.
If food is to be frozen everg dag, it mag
be necessarg to reduce the quantitg to
be frozen.
If a quantitg of food needs to be frozen,
set the freezer control to its coldest setting.
After the food is frozen, reset the freezer
control to its initial position.
Food is most quicklg frozen on the middle
three shelves of the freezer compartment
and most slowlg in the freezer door shelves.
Do not store commerciallg quick-frozen
food longer than the time recommended
bg the food manufacturers.
If the power to the appliance is shut off
for an extended time or if the refrigerating
sgstem fails, do not open the doors unless
absolutelg necessarg. When it is necessarg,
close them as quicklg as possible so the
frozen food will stag frozen as long as
possible.
,,The freezer door storage shelves marked
with a two-star label are onlg appropriate
for the storage of previouslg frozen food.
Effervescent drinks should not be stored
in the freezer compartment.
Freezer Performance
This Refrigerator/Freezer has an overall "Four Star" _ rating.
Freezer performance is classified bg star ratings defined bg ISO15502 STANDARDAND
SUMMARYBELOW:
CODE
®
FREEZING-LOAD TEMR
(FOODTEMPERATURE)
Below -ro°C.
Below -12°C.
Below -18°C.
13

About the crispers and pans.
Not all features are on all models.
Fruit and Vegetable Crispers
Excesswater that mag accumulate inthe bottom
of the drawers should be wiped drg.
On some models the bottom drawer has
a cover that slides back asthe drawer isopened.
Thisallows full accessto the drawer.Asthe
drawer isclosed,the cover will slideforward
into itsoriginal position.
HUMIIDNTYCONTROL
Adjustable Humidity Crispers
Slidethe control all the wag to the J
(high)setting to provide high humiditg
recommended for mostvegetables.
Slidethe control all the wag to the _ (low)
setting to provide lower humidity levels
recommended for most fruits.
Convertible Meet Pun
The convertible meat pan has its own cold air
duct to allow a stream of coldair from the freezer
compartment to flow to the pan.
Thevariable temperature control regulates
the air flow from the Climate Keeper.TM
Setthe control to the _ (coldest)setting
to store fresh meats.
Setthe control to Q_ (cold)to convert
the pan to normal refrigerator temperature
and provide extra vegetable storage space.
Thecold air duct isturned off.Variable settings
between these extremes can be selected.
About crisper removal.
Not all features are on all models.
14
Crisper Removal
Thetop crispers can easilgbe removed bg pulling
the drawer straight out and lifting the drawer
up and over the stop location.
If the door prevents gou from taking out the
drawers,first trg to remove the door bins.
If this doesnot offer enough clearance,the
refrigerator will need to be rolled forward until
the door opens enough to slidethe drawers out.
In some cases,when gou roll the refrigerator out,
gou will need to move the refrigerator to the left
or right as gou roll itout.
Toremove the bottom crisper:
0 Pullthe drawer out to the stop position.
0 Rotateall four swing locksto the unlock
position.
0 Liftthe front of the drawer up and out.
Toreplace the bottom crisper:
Makesure all four swing locksare
in the unlock position.
Placethe sides of the drawer into the drawer
supports, making surethe swing locksfit
on the drawer slots.
Lockall four swing locksbg rotating them
to the lock position.

About the automatic icemaker.
A newlg-installed refrigerator may take 12 to 24 hours to begin making ice.
Power
switch Icemaker
Automatic Icemaker
The icemakerwill produce sevencubes
per cycle-approximately 100-!30 cubes
in a 24-hour period,depending on freezer
compartment temperature, room temperature,
number of door openings and other use
conditions.
Toaccess the icemaker: Pullthe shelf above
Green, the icedrawer straight out. Always be sure
PowerLight _rArm to replacethe shelf.
If the refrigerator isoperated before the water
.... connection ismade to the icemaker,set the
power switch inthe Oposition.
When the refrigerator has been connected
to the water supply,set the power switch
to the I position.
Youwill hear a buzzingsoundeach time
the icemakerfillswith water.
Pull the upper freezer shelf straight
out to access the icemaker. Always
be sure to replace the shelf The
shelf can be used for storage.
-& WARNING:Connectto potable
water supply only. Installation of the icemaker
must be done bg a qualified service technician.
Theicemakerwillfillwith water when it cools
to - 10°C.A newly-installedrefrigeratormay take
12to 2/4hoursto begin making icecubes.
Special note about ClimateKeeper2 T"dispenser
models:
Dispenser models have a tilt-out ice bin.
The bin can be tilted out asshown in
the illustrations, and it will hold itself up while
you take ice out or turn the icemaker power
switch on and off. Besure to put the bin back
in place before closing the door.
_To restoreyour icelevelfrom an empty bucket
stage,thefollowing stepsare recommended:
O 12 hours after the first batch of icehasfallen
intothe bin, dispense 3 to 4 cubes.
O After an additional 6 hours, dispense3 to/4
cubes again.
These stepswill restore your ice level
in the shortest amount of time.
On dispenser models with a tilt-out ice bin, to
access ice or reach the power switch:
Throw away the first few batches of iceto allow
the water line to clear.
Besure nothing interfereswith the sweep
of the feelerarm.
When the bin fills to the levelofthe feelerarm,
the icemaker will stop producing ice. It isnormal
for several cubes to bejoined together. If ice is
not usedfrequently, old icecubes will become
cloudy,taste stale and shrink.
If icecubes get stuck in the icemaker,the green
power lightwill blink.Tocorrect this,set the
power switch to Oand remove the cubes.
Setthe power switch to I to restart the icemaker.
After the icemaker hasbeen turned on again,
there will be a delay of about/45 minutes before
the icemaker resumesoperation.
NOTE:Inhomes with !ower-than-avemge water
pressure,gou mag hear the icemakercgcle
multiple times when making one batch of ice.
oLift the bin, then pull it forward until the bin stops.
oower the bin to access ice or reach the power
switch.
NOTE: In order to take full advantage of the tilt-out ice bin,
onlg store items on the shelf below the ice bin that are no
taller than the lowest point on the bin.
ii
Ice Storage Drawer
Toaccess ice, pull the drawer forward.
Toremove:
Setthe icemaker power switch to the O (off]
position.Pullthe drawer straight out and
then lift past the stop position.
Toreplace:
When replacing the drawer, be sureto press
itfirmly into place. If it does not go all the way
back,remove it and rotate the drive mechanism
1//4turn. Then pushthe drawer back again.
Drive
Mechanism
15

About the ice and water dispenser, tonsome models)
............ ,,,.
SpillShelf
To Use the Dispenser
SelectCUBED,CRUSHEDor WATER.
Presstheglassgentlgagainstthetop
ofthedispensercradle.
Thespillshelfisnotself-draining.Toreducewater
spotting,theshelfanditsgrilleshouldbecleaned
regularlg.
Ifnowaterisdispensedwhentherefrigeratorisfirst
installed,therema_tbeairinthewaterlines_tstem.
Pressthedispenserarmforatleasttwo minutesto
removetrappedair fromthewaterlineandtofillthe
watersystem.Toflushoutimpuritiesin thewaterline,
throwawaitthefirstsixglassfulsofwater.
CAUTION:Neverputfingersor anyotherobjectsinto
theicecrusherdischargeopening.
Locking the Dispenser
PresstheLOCKorLOCK
CONTROLS pad for5 seconds
toIockthedispenserandcontrol
panelTounlock,pressandhold
the pad again for5seconds.
LOCKCONTROL
HOLD3 SECS
DispenserLight
TheLIGHTpadturnsthenight
, _ light inthedispenseronandoff.
Thelightalsocomeson whenthe
d spensercradlepressedOn
somemodels,ifthislightburns
LIGHT out, itshouldbereplacedwitha
6watt 12Vmaximumbulb.
Door Alarm UseDoorAlarmtosoundif
eitherdoorisopenformore
!O0_RA)L)A)R! than3minutes.Thealarmwill
stoponcethedoorisclosed.
ForLCDmodels,a popupscreen
willappear.Thealarmcanbe
silencedbUtouchingtheLCD
screen.
LCDModels:
Access By: Home >Options > Information and Settings
>Settings > Door Alarm
Access By: PressingON.
Deactivate By: PressingOFF.
Non-LCDModels:
PresstheSETFEATURESpadonceandDOORALARM
willblink.PressON/OFFandthedooralarmwillbeset
andtheiconwillturn solid.PressON/OFFagaintoturn
thealarmoff.
Quick Ice Whengouneedtospeedupice
• production,usetheQuickIce
_ feature.Whilethisfeatureis
turnedon,thefreezerfanruns
continuouslUfor48hours,oruntil
QUICK ICE thefeatureisturnedOFF.During
thisperiod,iceproductionwill
increaseupto/40%.Hodelswith
theintegratedicefeaturesgstemrequireatFIRSTUSE
at leasthalfan8oz.glassoficeto bedispensedeverU
6to 12hours.Thiswillhelptheicemakerfillthebucket
properlUsothatdispensingisbetter.
Howto Use
LCDModels:
Accessby: Home>Options> FreezerOptions>
QuickIce
Activateby: PressingON.
Deactivateby: PressingOFF.
Non-LCDModels:
PresstheSETFEATURESpadtwiceand QUICKICEwill
blink.PressON/OFFtoturnthefeatureon,thenagain
to turnitoff.
J6

Precise Fill (on some models)
Thiswaterdispenserisequippedwitha featurecalled
"precisefill;'Thisfeatureallowsyouto choosea precise
amountofwater(cupsorounces)thatyouwouldlike
dispensed.Pintsand LitersarealsoavailableforLCD
models.
LCDModels
Access By: Home >Options > DispenserOptions >
PreciseFill> SetAmount
Activate By: Usingthe arrow buttons to select
the desired amount. PressMOREUNITSto select
between CUPS,OUNCES,PINTSor LITERS.
Non-LCDNodels
0 PressthePRECISEFILLCUPS/OZpad.TheWATER
padwilllightandtheCRUSHEDand CUBEDice
padswillturnoff.Thelastunitusedwillbe
displaged.
PressthePRECISEFILLpadagaintotoggle
betweencupsandounces.
Ifyou selectedOUNCES,presstheA or V padto
selectthenumberof ouncesyouwouldliketohave
dispensedbetween2-99ounces.Thedefaultis
8 ounces.
Ifyou selectedCUPS,presstheA or V padto select
theamountyouwouldliketo havedispensed.They
aredisplauedas0.25,0.3&0.5,0.66and0.75,withthe
highestamountbeing9.75cups.Thedefaultis1cup.
Forliters,theamountsaredisplauedas0.05to 2.25
inincrementsof0.05.
Pressthecupagainstthecradleandwaterwill
begindispensing.ItwillautomaticallUstopwhen
theamountsethasbeendispensed.Thedisplay
willshowtheamountofwaterdispensed,beep,
thenresetafter5seconds.
NOTE:Donotleavethedispenserunattendedwhen
waterisbeingdispensed.
If youwouldliketo stopdispensingwater
beforethespecifiedamounthasbeendispensed,
just removethecupfromthecradle.ThedisplaU
willshowtheamountthat hasbeendispensed
for5seconds.Ifthecupswitchispressedagain
withinthat time,thedispenserwillcontinueup
tothesetamount.Ifnot,thedisplaUwillreturn
tothesetamount.
Important Facts About Your Dispenser
, Donot add icefrom traus or bagsto the storage
drawer.It maUnot crushor dispensewell.
Avoidoverfillingglasswith iceand useof narrow
glasses.Backed-upicecanjam the chute or
causethe door in the chuteto freezeshut.
If iceisblockingthe chute,pokeit through
with a woodenspoon.
, Beveragesandfoods shouldnot bequick-chilled
inthe icestorage drawer.Cans,bottlesor food
packagesinthe storagedrawer maUcause
the icemakeror augertojam.
Care and cleaning of the refrigerator.
, Tokeepdispensedicefrom missingthe glass,
putthe glasscloseto, but nottouching,
the dispenseropening.
, Somecrushedice may be dispensedeven
though you selectedCUBED.Thishappens
occasionallywhena few cubesaccidentallU
getdirectedto the crusher.
, Aftercrushedice isdispensed,somewater maU
dripfrom thechute.
, Sometimesa small moundof snowwill form on
the door in the icechute.Thiscondition isnormal
and usuallyoccurswhen Uouhavedispensed
crushedicerepeatedlU.Thesnowwill eventuallU
evaporate.
Dispenser drip area.
Cleaning the Outside
Thedispenserdrip area,beneaththegrille,shouldbe
wipeddry.Waterleftinthisareamayleavedeposits.
Removethedepositsbyaddingundilutedvinegarto
thewell.Soakuntilthedepositsdisappearor become
looseenoughtorinseaway.
Thedispensercradle.Beforecleaning,lockthe
dispenserbg pressingandholdingtheLOCKor LOCK
CONTROLSpadfor5 seconds.Cleanwith warmwater
and bakingsodasolution-abouta tablespoon(15ml)
of bakingsodato aquart(1liter)ofwater.Rinse
thoroughlyandwipedry.
Thedoorhandlesandtrim. Cleanwitha cloth
dampenedwithsoapywater.Drywitha softcloth.
Thestainlesssteelpanelsanddoor handles
(onsomemodels)canbecleanedwith a commercially
availablestainlesssteelcleaner.Aspray-onstainless
steelcleanerworksbest.
Donotuseappliancewax orpolishonthestainless
steel.
Keeptheoutsideclean.Wipewith a cleanclothlightly
dampenedwithkitchenappliancewaxor mildliquid
dishdetergent.Dryandpolishwitha clean,softcloth.
Donotwipethe refrigeratorwith a soileddish
clothor wet towel.Thesemabtleavea residue
that canerodethepaint. Donotusescouringpads,
powderedcleaners,bleachor cleanerscontaining
bleachbecausetheseproductsconscratch and
weakenthepoint finish. "17

Care and cleaning of the refrigerator.
Cleaning the Inside
Tohelp prevent odors, leavean open box
of baking soda in the fresh food and freezer
compartments.
Unplug the refrigerator before cleaning.
If this is not practical, wring excessmoisture out
of sponge or cloth when cleaning around
switches, lights or controls.
Usewarm water and baking sodasolution-
about a tablespoon (15ml)of baking soda
to a quart (1 liter)of water.This both cleans
and neutralizesodors. Rinseand wipe drg.
Useof ang cleaning solution other than that
which is recommended, especiallg those that
contain petroleum distillates, can crack or
damage the interior of the refrigerator.
Avoid cleaning cold glass shelves with hot
water because the extreme temperature
difference mag cause them to break. Handle
glass shelves careful!_j.Bumping tempered
glass can cause it to shatter.
Do not wash an_j plastic refrigerator parts
in the dishwasher.
Thechi!!/thaw trag is dishwasher safe.
Behind the Refrigerator
Becareful when moving the refrigerator away
from the wall. Alltupes of floor coverings can be
damaged, particularly cushioned coveringsand
those with embossedsurfaces.
Pullthe refrigerator straight out and return
it to position by pushing it straight in. Moving
the refrigerator in a sidedirection may result
in damage to the floor covering or refrigerator.
When pushing the refrigerator back, make sure
you don't rol! over the power cord or icemaker
supplg line.
Preparing for Vacation
Forlong vacations or absences,remove food
and unplug the refrigerator.Cleanthe interior
with a baking soda solution of 15 ml of baking
soda to I literof water. Leavethe doors open.
Setthe icemaker power switch to the 0position
and shut offthe water supply to the refrigerator.
If the temperature can drop below freezing,
have a qualified servicerdrain the water supply
system to prevent serious property damage
due to flooding.
Preparing to Move
Secureall looseitems such as shelvesand
drawers by taping them securely in place
to prevent damage.
When using a hand truck to move
the refrigerator,do not restthe front or back
of the refrigerator against the hand truck.
This could damage the refrigerator. Handle
only from the sidesof the refrigerator.
Be sure the refrigerator stags in an upright
position during moving.
if8

Replacing the light bulbs.
Setting the controls to 0 (off) does not remove power to the light circuit.
Yourlightshield willlook like Refrigerator Compartment--Upper Light
one of the following:
OR
Pocket
0
@
@
Unplug the refrigerator.
Thebulbs are located at the top of
the compartment, insidethe light shield.
On some models,a screw at the front of
the light shieldwill haveto be removed.
On other models,the screw islocated in the
pocket located at the back of the light shield.
Toremove the light shield,on some models,
press in on the tabs on the sides ofthe shield
and slideforward and out. Onother models,
just slidethe shieldforward and out.
@After replacing the bulb with an appliance
bulb of the same or lowerwattage, replace
the light shieldand screws (onsome models).
When replacingthe light shield,make sure
that the tabs at the back of the shieldfit
intothe slotsat the back of the light shield
housing.
0 Plugthe refrigerator back in.
Refrigerator Compartment--Lower Light
This fight is located above the top drawer.
Unplugthe refrigerator.
Removethe convertible meat drawer control
knob bg pulling straight out.
After replacing the bulb with an appliance
bulb of the same or lowerwattage, replace
the shieldand the knob.
Plug the refrigerator back in.
Liftthe light shieldup and pull it out.
Freezer Compartment
Unplugthe refrigerator.
Removethe shelfjust above the light shield.
(Theshelf will be easierto remove if it is
emptied first.) On some models,a screw
at the top of the light shieldwill needto
be removed.
Toremove the light shield,press in
on the sides,and lift up and out.
@Replace the bulb with an appliance bulb
of the same or lower wattage, and reinstall
the light shield. When reinstalling the light
shield, make sure the top tabs snap
securelg into place. Replace the screw
(on some models).
Reinstall the shelf and plug the refrigerator
back in.
Dispenser
Unplugthe refrigerator.
Thebulb islocated on the dispenser under
the control panel.Removethe light bulb
bg turning it counterclockwise.
Replace the bulb with a bulb of the same
size and wattage.
Plug the refrigerator back in.
19

Trim kits and decorator panels.
For Built-In Stgle models
Read these instructions completely and carefullg.
Before You Begin
Some models are equipped with trim kits that allow you to install door panels.
Panels less then 6mm thick
When installing wood pQnelslessthQn6 mm thick, gODneed to creQtea filler pQnel,such as 3 mm cQrdboQrd,thQt
will fit between the face of the door and the wood pQnel.Ifyou ore installing the pre-cut decorator pQnels,pre-cut
filler pQnelsare included in the kit.Thecombined thickness of the decorator or wood pQneland the filler pQnelshould
be 6 mm.
Panels6mmthickorless
6mmmax
19 mm or Raised Panel
A raised pQneldesign screwed or glued to a 6 mm thick bQcking,or a 19 mm routed boQrdcan be used.
The raisedportion ofthe pQnelmust be fabricated to permit cleQrancesof at leQst5.1cm from the hQndle
sidefor fingertip cleQrance.
PQnelsthicker thQn6mm, up to 19 mm max,will require thQt the outer 8 mm of pQnelperimeter be no thicker
thQn6 mm.
Weightlimitations for custom panels:
RefrigeratorDoor 17 kg max.
FreezerDoor !5 kg max.
Panelsthickerthan6 rnrn 6 mmThick
Racking
6 mmmax
19mm
J
5.1cm
Clearance
HandleSide
Appearance
Panel
19mm
Refrigerator
Door
20
This manual suits for next models
2
Other GE Refrigerator manuals