GE PVW7361 User manual

(991.0365.017 rev 1) 29-6066 03-16 MCC
GEAppliances.ca
Safety Information ..........2, 3
Warranty........................4
Assistance / Accessories ......5
Using The Hood
Controls ...........................6
Filters............................7, 8
Care and Cleaning
Surfaces ...........................9
Lights.......................... 9, 10
Product Registration..........11
Troubleshooting Tips .........14
Write the model and serial
numbers here:
Model # ______________________
Serial # _______________________
You can find them on a label on the
inside of the hood.
Owner’s Manual
JVW5301
(30"/76.2 cm Pyramid)
JVW5361
(36"/91.4 cm Pyramid)
PVW7301
(30"/76.2 cm Glass)
PVW7361
(36"/91.4 cm Glass)
Wall Chimney
Vent Hoods

229-6066
WARNING: TO REDUCE THE RISK OF
FIRE, ELECTRIC SHOCK OR INJURY TO
PERSONS, OBSERVE THE FOLLOWING:
A. Use this unit only in the manner intended by the
manufacturer. If you have questions, contact the
manufacturer.
B. Before servicing or cleaning unit, switch
power off at service panel and lock the service
disconnecting means to prevent power from
being switched on accidentally. When the service
disconnecting means cannot be locked, securely
fasten a prominent warning device, such as a
tag, to the service panel.
C. Do not use this unit with any solid-state speed
control device.
D. This unit must be grounded.
CAUTION: FOR GENERAL
VENTILATING USE ONLY. DO NOT USE TO
EXHAUST HAZARDOUS OR EXPLOSIVE
MATERIALS AND VAPORS.
CAUTION: TO REDUCE RISK OF FIRE
AND TO PROPERLY EXHAUST AIR, BE SURE
TO DUCT AIR OUTSIDE. DO NOT VENT
EXHAUST AIR INTO SPACES WITHIN WALLS
OR CEILINGS OR INTO ATTICS, CRAWL
SPACES OR GARAGES.
WARNING: TO REDUCE THE RISK OF
INJURY TO PERSONS IN THE EVENT OF A
RANGE TOP GREASE FIRE, OBSERVE THE
FOLLOWING*:
A. SMOTHER FLAMES with a close-fitting
lid, cookie sheet or metal tray, then turn off
the burner. BE CAREFUL TO PREVENT
BURNS. If the flames do not go out
immediately, EVACUATE AND CALL THE FIRE
DEPARTMENT.
B. NEVER PICK UP A FLAMING PAN—You may
be burned.
C. DO NOT USE WATER, including wet dishcloths
or towels—a violent steam explosion will result.
D. Use an extinguisher ONLY if:
1. You know you have a Class ABC extinguisher,
and you already know how to operate it.
2. The fire is small and contained in the area
where it started.
3. The fire department is being called.
4. You can fight the fire with your back to an exit.
*Based on “Kitchen Fire Safety” published by NFPA.
READ AND SAVE THESE INSTRUCTIONS
SAFETY PRECAUTIONS
IMPORTANT SAFETY INFORMATION.
READ ALL INSTRUCTIONS BEFORE USING.
SAFETY INFORMATION

29-6066 3
WARNING: TO REDUCE THE RISK OF
A RANGE TOP GREASE FIRE:
A. Never leave surface units unattended at high
settings. Boilovers cause smoking and greasy
spillovers may ignite. Heat oils slowly on low or
medium settings.
B. Always turn hood ON when cooking on high heat
or when flambéing food (i.e. Crepes Suzette, etc.
C. Clean ventilating fans frequently. Grease should
not be allowed to accumulate on fan or filter.
D. Use proper pan size. Always use cookware
appropriate for the size of the surface element.
WARNING: TO REDUCE THE RISK OF
FIRE, ELECTRIC SHOCK OR INJURY TO
PERSONS, OBSERVE THE FOLLOWING:
A. Installation work and electrical wiring must be
done by qualified person(s) in accordance with
all applicable codes and standards, including
fire-rated construction.
B. Sufficient air is needed for proper combustion
and exhausting of gases through the flue
(chimney) of fuel burning equipment to prevent
back drafting. Follow the heating equipment
manufacturer’s guidelines and safety standards
such as those published by the National Fire
Protection Association (NFPA), the American
Society for Heating, Refrigeration and Air
Conditioning Engineers (ASHRAE) and the local
code authorities.
C. When cutting or drilling into wall or ceiling, do
not damage electrical wiring and other hidden
utilities.
D. Ducted fans must always be vented to the
outdoors.
E. When applicable, install any makeup
(replacement) air system in accordance with
local building code requirements.
F. Turn off breaker to adjacent rooms while working.
WARNING: TO REDUCE THE RISK OF
FIRE, USE ONLY METAL DUCTWORK.
■Do not attempt to repair or replace any part of
your hood unless it is specifically recommended
in this manual. All other servicing should be
referred to a qualified technician.
READ AND SAVE THESE INSTRUCTIONS
SAFETY PRECAUTIONS
SAFETY INFORMATION

429-6066
GE Warranty
GEAppliances.ca
All warranty service is provided by our authorized technicians. To schedule service, on-line, visit us at
prodsupport.mabe.ca/crm/Services/ServiceRequest.aspx, or call 800.561.3344. Please have serial number
and model number available when calling for service.
For the period of one year from the date of the original purchase. GE will provide any part of the range which fails due
to a defect in materials or workmanship. During this limited one-year warranty, GE will also provide, free of charge, all
labor and in-home service to replace the defective part.
What GE will not cover:
■ Service trips to your home to teach you how to use
the product.
■ Improper installation, delivery or maintenance.
■ Failure of the product if it is abused, misused,
modified or used for other than the intended
purpose or used commercially.
■ Replacement of house fuses or resetting of circuit
breakers.
■ Damage to the product caused by accident, fire,
floods or acts of God.
■Damage to finish, such as surface rust, tarnish,
or small blemishes not reported within 48 hours
of delivery.
■ Incidental or consequential damage caused by
possible defects with this appliance.
■ Damage caused after delivery.
■ Product not accessible to provide required service.
■ Service to repair or replace light bulbs, except for
LED lamps.
EXCLUSION OF IMPLIED WARRANTIES
Your sole and exclusive remedy is product repair as provided in this Limited Warranty. Any implied warranties,
including the implied warranties of merchantability or fitness for a particular purpose, are limited to one year
or the shortest period allowed by law.
This warranty is extended to the original purchaser and any succeeding owner for products purchased in Canada
for home use within Canada. In home warranty service will be provided in areas where it is available and deemed
reasonable by Mabe to provide.
Warrantor: MC Commercial Inc, Burlington, ON, L7R 5B6
Register Your Appliance: Register your new appliance on-line at your convenience!
www.geappliances.ca/en/support/register-your-appliance
Timely product registration will allow for enhanced communication and prompt service under the terms of your warranty,
should the need arise. You may also mail in the pre-printed registration card included in the packing material.
Staple your receipt here. Proof of the original purchase
date is needed to obtain service under the warranty. WARRANTY
Thank You! ... for your purchase of a GE Brand appliance.

29-6066 5
Schedule Service: Expert GE repair service is only
one step away from your door. Get on-line and
schedule your service at prodsupport.mabe.ca/crm/
Services/ServiceRequest.aspx or call 800.561.3344
during normal business hours.
Parts and Accessories: Consult your local listings for
the nearest authorized GE parts distributor.
Instructions contained in this manual cover procedures
to be performed by any user. Other servicing generally
should be referred to qualified service personnel. Caution
must be exercised, since improper servicing may cause
unsafe operation.
Real Life Design Studio: GE supports the Universal
Design concept of products, services and environments
that can be used by people of all ages, sizes and
capabilities. We recognize the need to design for a wide
range of physical and mental abilities and impairments.
In Canada, please write to:
Director, Consumer Relations, MC Commercial
1 Factory Lane, Suite 310
Moncton, N.B. E1C 9M3
Contact Us: If you are not satisfied with the service you
receive from GE, please write to:
Director, Consumer Relations, MC Commercial
1 Factory Lane, Suite 310
Moncton, N.B. E1C 9M3
Call us at 800.561.3344 during normal business hours. For greater convenience and faster service, you can now
download Owner’s Manuals, order parts or even schedule service on-line.
Accessories
Looking For Something More?
GE offers a variety of accessories to improve your cooking and maintenance experiences!
Please contact your local GE Appliances dealer.
The following products and more are available:
How to Remove Protective Shipping Film and Packaging Tape
Carefully grasp a corner of the protective shipping film
with your fingers and slowly peel it from the appliance
surface. Do not use any sharp items to remove the film.
Remove all of the film before using the appliance for the
first time.
To assure no damage is done to the finish of the product,
the safest way to remove the adhesive from packaging
tape on new appliances is an application of a household
liquid dishwashing detergent. Apply with a soft cloth and
allow to soak.
NOTE: The adhesive must be removed from all parts.
Parts
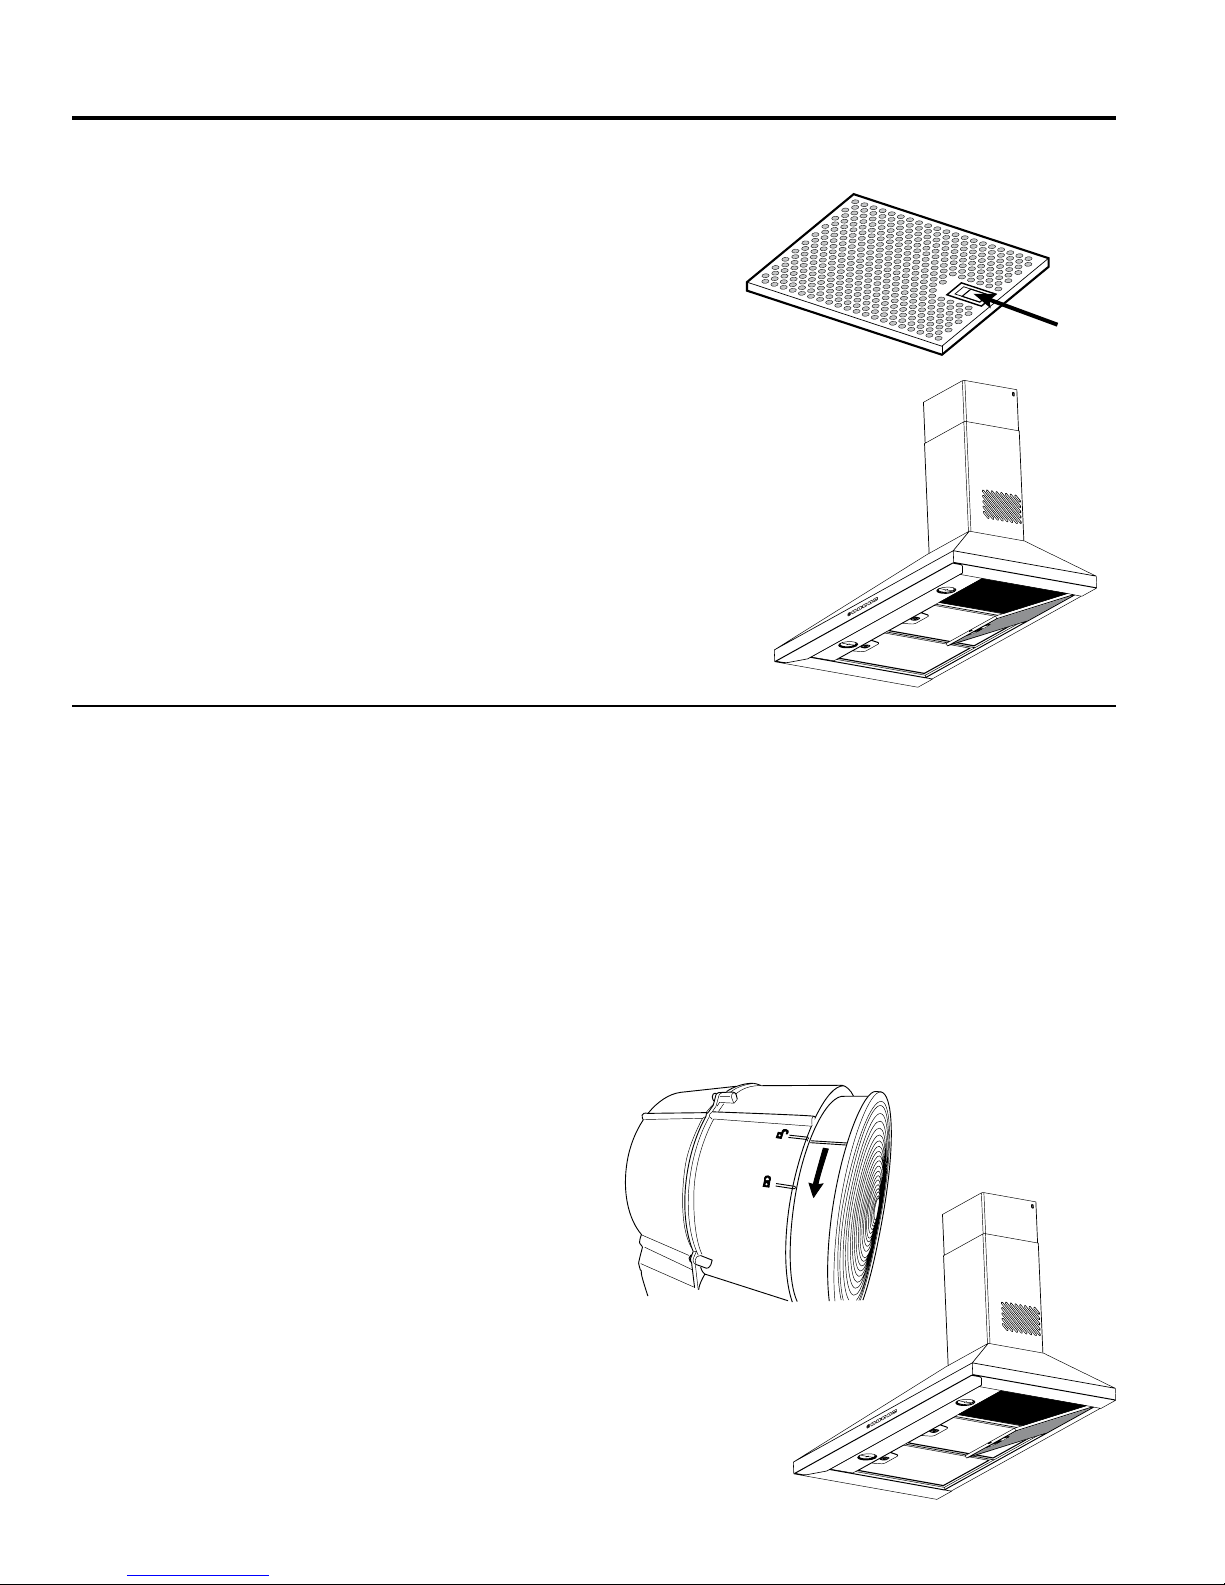
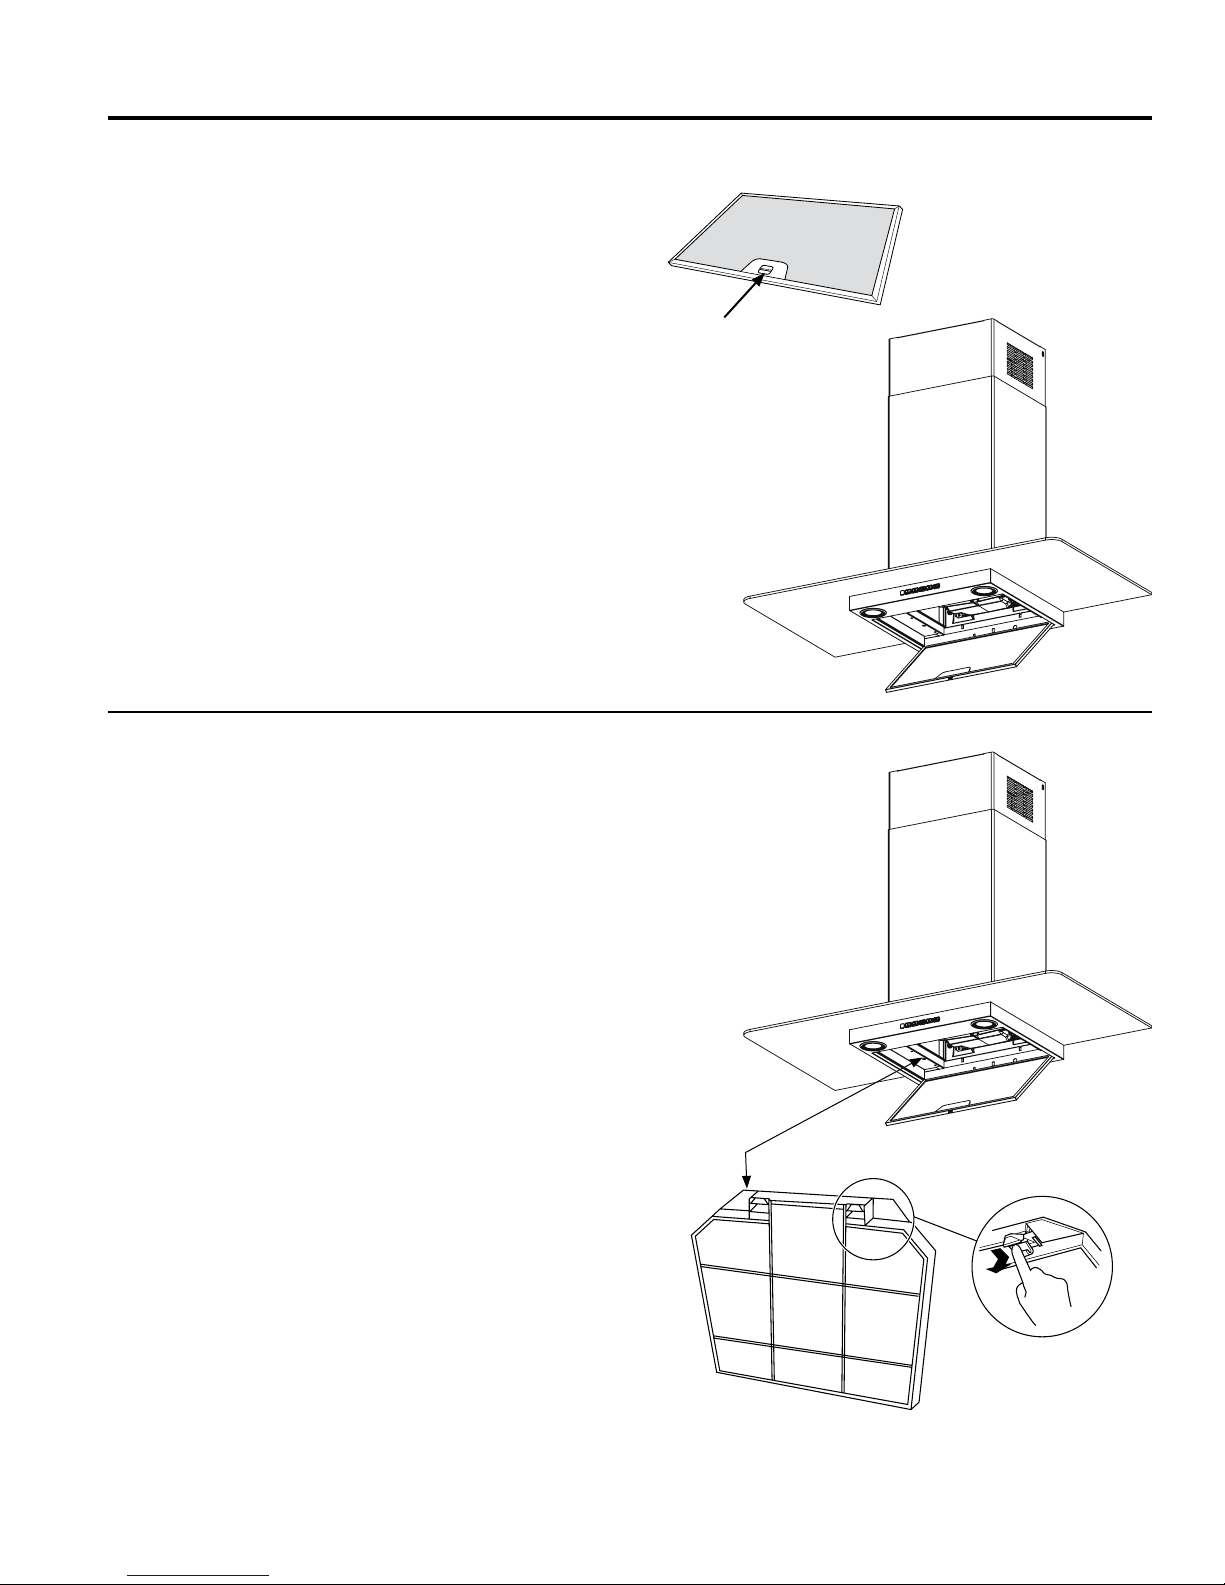
Charcoal Filter JXCF71 (Glass)
JXCF72 (Pyramid)
High Ceiling Duct Cover Kit JXDC71SS (SS Glass)
JXDC72SS (SS Pyramid)
JXDC71ES (Slate Glass)
JXDC72ES (Slate Pyramid)
Remote Control JXRC70
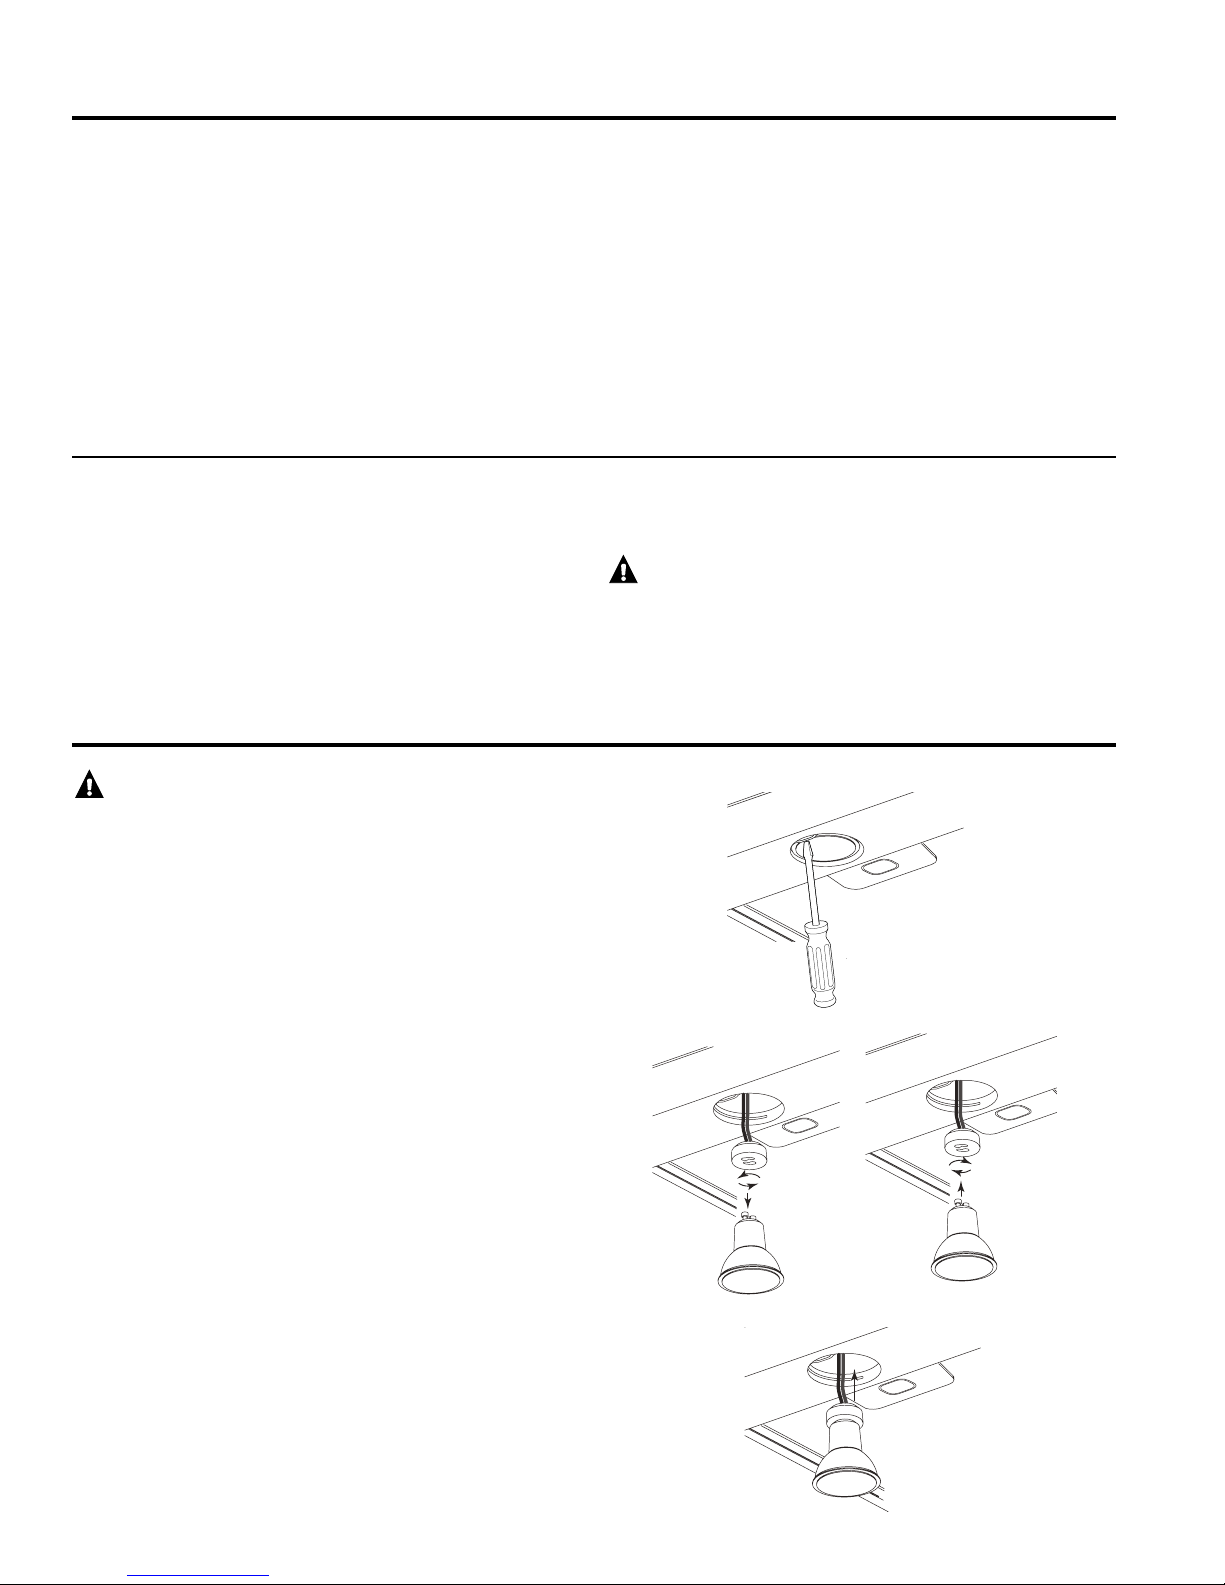
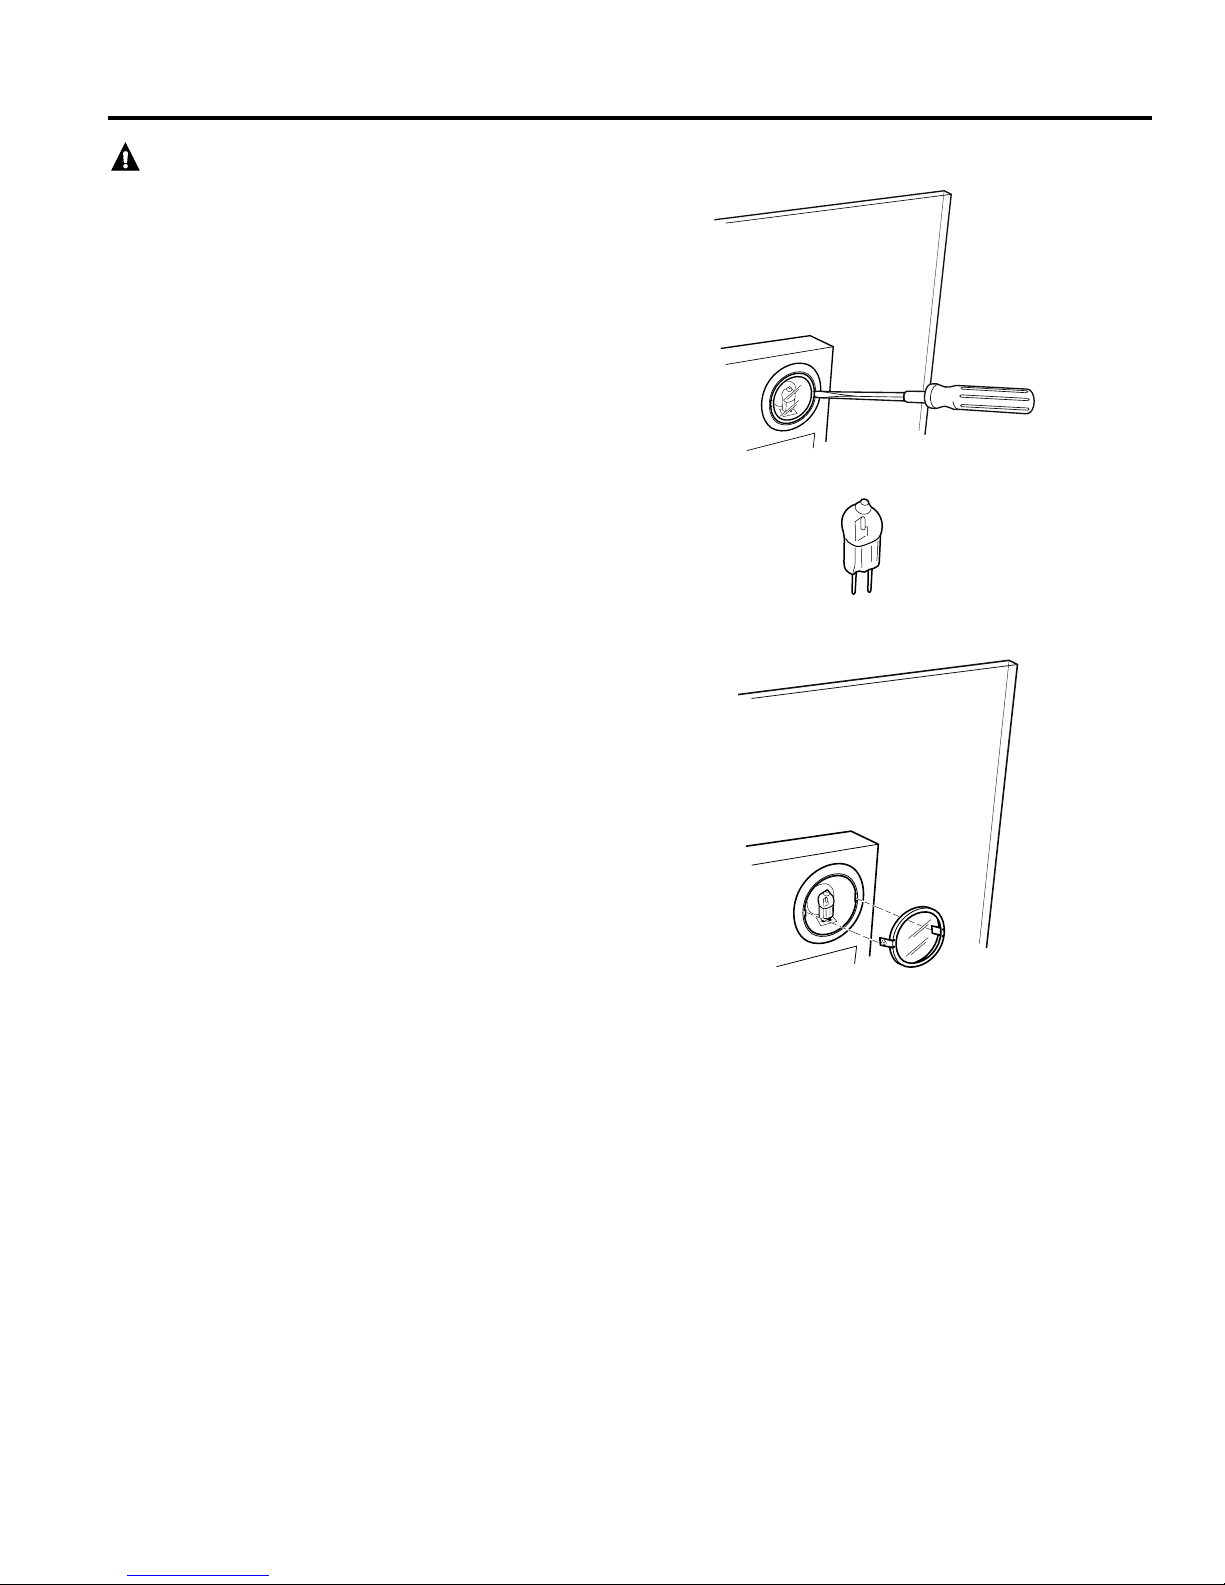
Replacement Lights Please contact your local listings for your nearest
GE appliances accessories retailer.
Have a question or need assistance with your appliance?
ASSISTANCE / ACCESSORIES

629-6066
Hold 2 Sec
for Auto Off
Hold 2 Sec
to Boost
Fan Settings
1. Rangehood Control Panel: The control panel
is located on the front of the canopy. The position
and function of each control button are noted below.
2. Light Button: On/Night/Off switch for the halogen
lights. Press the button to turn the lights on, again
to set the lights to night setting, and again to turn off.
3. Fan Off Button: Off switch for the fan. The fan
can be operated by pressing any of the fan setting
buttons.Hold for 2 seconds to activate auto off after
15 minutes.
4. Fan Settings Buttons: Speed control for
fan. Press the switch for LOW speed, for
MEDIUM speed and for HIGH speed. Hold
down the button for 2 seconds to activate the
BOOST SPEED that will run for 10 minutes.
41
USING THE HOOD: Controls
Controls
23

29-6066 7
CARE AND CLEANING: Filters
Filters (Pyramid Models JVW5301, JVW5361)
Be sure the circuit breaker is off and all surfaces are cool before cleaning or servicing any part of the vent hood.
Metal Grease Filter
The metal filters trap grease during cooking.
The filter must ALWAYS be in place when the hood is in
use. The grease filter is dishwasher-safe and should be
cleaned every 6 months, or as needed.
To remove:
Pull downward on the filter lock to release the filter.
To replace:
Fit the tabs at the bottom of the filter into the slots in the
back of the filter opening. Lift up the front side of the filter
and push gently until the filter locks into place. Make sure
the filter lock is in the closed position to secure the filter.
To clean,swish the filter in hot soapy water and rinse
in clean water or wash it in the dishwasher. Do not use
abrasive cleansers.
NOTE: Some discoloration may occur in the dishwasher.
For Recirculation Installation Only
Charcoal Filter (Not Included)
If the model is not vented to the outside, the air needs to
be recirculated through a disposable charcoal filter that
helps remove smoke and odors.
NOTE: DO NOT rinse, or put charcoal filter in an
automatic dishwasher.
The charcoal filter cannot be cleaned. It must be
replaced. It is recommended that the charcoal filter
be replaced every 6-12 months or if it is noticeably
dirty or discolored.
Order Charcoal Filter JXCF72.
To inquire about purchasing replacement charcoal filters,
contact your local GE Appliances dealer or authorized
GE parts distributor.
To install:
1. Remove the metal filters—see Metal grease filter
section.
2. Place the side of the charcoal filter with the tabs
against the side of the blower.
3. Align the double lines on the charcoal filter with the
"unlocked" symbol on the blower.
4. Push and twist the charcoal filter downward until the
double lines align with the "locked" symbol on the
blower.
5. Repeat with second filter on the other side of the
blower.
6. Replace the metal filters—see Metal grease filter
section.
To remove:
1. Remove the metal filters—see Metal grease filter
section.
2. Twist the charcoal filters upward on both sides of the
motor to align the double lines with the "unlocked"
symbol. The locks are now disengaged and the
charcoal filters can be removed.
NOTE: The 30"
(76.2 cm) models
have 2 grease filters.
The 36" (91.4 cm)
models have 3 grease
filters.

829-6066
CARE AND CLEANING: Filters
Filters (Glass Models PVW7301, PVW7361)
Be sure the circuit breaker is off and all surfaces are cool before cleaning or servicing any part of the vent hood.
Metal Grease Filter
The metal filter traps grease released by foods from
cooking.
The filter must ALWAYS be in place when the hood is in
use. The grease filter is dishwasher-safe and should be
cleaned every 6 months, or as needed.
To remove:
Pull downward on the filter lock to release the filter.
To replace:
Fit the tabs at the bottom of the filter behind the ledge of
the filter opening. Lift up the front side of the filter, push
downward on the filter lock, and push gently until the filter
is in place. Release the filter lock to secure the filter in
place.
To clean,swish the filter in hot soapy water and rinse
in clean water or wash it in the dishwasher. Do not use
abrasive cleansers.
NOTE: Some discoloration may occur in the dishwasher.
For Recirculation Installation Only
Charcoal Filter (Not Included)
If the model is not vented to the outside, the air needs to
be recirculated through a disposable charcoal filter that
helps remove smoke and odors.
NOTE: DO NOT rinse, or put charcoal filter in an
automatic dishwasher.
The charcoal filter cannot be cleaned. It must be
replaced. It is recommended that the charcoal filter
be replaced every 6-12 months or if it is noticeably
dirty or discolored.
Order Charcoal Filter JXCF71.
To inquire about purchasing replacement charcoal filters,
contact your local GE Appliances dealer or authorized
GE parts distributor.
To install:
1. Insert the bottom tabs of the charcoal filter into the two
slots at the back of the unit. Pivot filter upward into
place while depressing the locking tabs.
2. Replace the metal filter—see Metal grease filter
section.
To remove:
1. Remove the metal filter—see Metal grease filter
section.
2. Press on the two tabs on the charcoal filter to
disengage the lock and pivot to remove.
Filter Lock

29-6066 9
Surfaces
Lights (Pyramid Models JVW5301, JVW5361)
Stainless Steel Surfaces (on some models)
Do not use a steel wool pad; it will scratch the
surface.
To clean the stainless steel surface, use warm sudsy
water or a stainless steel cleaner or polish. Always wipe
the surface in the direction of the brush line. Follow
the cleaner instructions for cleaning the stainless steel
surface.
Cleaners with oxalic acid such as Bar Keepers
Friend Soft Cleanser™ will remove surface rust,
tarnish, and small blemishes. Use only a liquid cleanser
free of grit and rub in the direction of the brush lines with
a damp soft sponge.
To inquire about purchasing stainless steel appliance
cleaner or polish, contact your local GE Appliances
dealer or authorized GE parts distributor.
Painted Surfaces (on some models)
Do not use a steel wool pads or other abrasive
cleaners; they will scratch the surface.
Clean grease-laden surfaces of the hood frequently. To clean
the hood surface, use a hot, damp cloth with a mild detergent
suitable for painted surfaces. About one tablespoon of ammonia
may be added to the water. Use a clean, hot, damp cloth to
remove soap. Dry with a dry, clean cloth.
NOTE: When cleaning, take care not to come in contact with
filters and other non-enameled surfaces.
CAUTION: When cleaning the hood
surfaces, be certain that you do not touch the light
with moist hands or cloth. A warm or hot light may
break if touched with a moist surface. Always let the
light cool completely before cleaning around it.
CAUTION: Allow lights to cool before
touching.
To change the lights:
1. Before attempting to replace the lights, make sure that
the light switch is turned off.
2. Using a flathead screwdriver, unclip the wire lighting
support and gently pull the support down from the
hood.
3. While holding the socket, twist the light counter-
clockwise to remove. Replace it with a new GU-10
35W light. Make sure the new light is locked in the
socket.
4. Replace the new light and socket into the hood and
engage into the light support.
CARE AND CLEANING: Surfaces/Lights

10 29-6066
CARE AND CLEANING: Lights
Lights (Glass Models PVW7301, PVW7361)
CAUTION: Allow lights to cool before
touching.
To change the lights:
1. Before attempting to replace the lights, make sure that
the light switch is turned off.
2. Wear gloves. Do not touch the light with your bare
fingers. Skin oils can cause early light failure. Wear
clean gloves or use a paper towel to handle the light.
3. Using a flathead screwdriver, unclip the metal trim ring
from the lighting support.
4. Remove the light by pulling towards the front of the
hood. Replace it with a new G4 20W Clear Halogen
Capsule light by inserting the two stakes into the holes
and pushing towards the back of the hood to secure
the light.
5. Reinsert the metal trim ring by lining up the two side
holes on the lighting support with the two tabs on the
trim ring, and push upward.

29-6066 11
OWNERSHIP REGISTRATION
P.O. BOX 1780
MISSISSAUGA, ONTARIO
L4Y 4G1
(FOR CANADIAN CONSUMERS ONLY)
Please place in envelope and mail to:
Veuillez mettre dans une enveloppe et envoyez à :

12 29-6066
RAC NRUTER DNA ENIL SIHT GNOLA TUC D SKNAHT—
For Canadian
Customers
Pour les
Consommateurs
Canadiens
OWNERSHIP REGISTRATION CERTIFICATE – FICHE D’INSCRIPTION DU PROPRIÉTAIRE
Please register your product to enable us to contact you in
the remote event a safety notice is issued for this product
and to allow for efficient communication under the terms of
your warranty, should the need arise.
Veuillez enregistrer votre produit afin de nous permettre de
communiquer avec vous si jamais un avis de sécurité concernant
ce produit était émis et de communiquer facilement avec vous en
vertu de votre garantie, si le besoin s’en fait sentir.
REGISTER ON-LINE:
www.geappliances.ca
ENREGISTREMENT SUR INTERNET À :
www.electromenagersge.ca
MAIL TO: P.O. BOX 1780, MISSISSAUGA
POSTER À : ONTARIO, L4Y 4G1
MR. / M MRS. / MME.
MISS/MLLE. MS.
FIRST NAME / PRÉNOM
LAST NAME / NOM
STREET NO / NORUE STREET NAME / RUE
APT.NO/APP./RR#
CITY / VILLE
PROVINCE
POSTAL CODE POSTAL
AREA CODE/
IND. RÉG.
TELEPHONE
E-MAIL
DID YOU PURCHASE A SERVICE CONTRACT FOR THIS APPLIANCE?
AVEZ-VOUS ACHETÉ UN CONTRAT DE SERVICE POUR CET APPAREIL ? YES/OUI
NO/NON
IF YES/SI OUI : EXPIRATION
Y/A M D/J
NAME OF SELLING DEALER / NOM DU MARCHAND
INSTALLATION DATE / DATE D’INSTALLATION
Y/A M D/J
CORRESPONDENCE
ENGLISH
CORRESPONDANCE
FRANÇAIS
I do not wish to receive any promotional offers regarding this product.
Je ne désire pas recevoir d’offres promotionnelles concernant ce produit
.
MODEL / MODÈLE
SERIAL / SÉRIE

29-6066 13
Notes

14 29-6066
Troubleshooting tips ... Before you call for service
Save time and money! Review the charts on the following pages first and you may not need to call for service.
Problem Possible Cause What To Do
Fan/Light does not operate
when either button is
pressed
A house fuse may be blown or
a circuit breaker tripped.
Replace fuse or reset circuit breaker.
Fan does not operate when
fan Lo, Med, Hight buttons
are pressed
The blower connector is loose
or not plugged into its mating
connector.
Disconnect power to the unit. Remove the filters and look
up at the blower. If the blower connector plug is loose
or you see the connector dangling, the installer failed
to plug it in securely. See the mini manual for the plug
location and how to plug in the connector.
Loud or abnormal airflow
noise
Wrong duct size used in
installation.
This hood requires 6” (15.2 cm) ducting to perform
optimally. Using smaller duct pipe will cause reduced
venting.Minimize the duct run length and number of
transitions and elbows. GE service technicians cannot
correct this issue if installed improperly.
Fan fails to circulate
air or moves air slower
than normal and/or fan is
making loud or abnormal
airflow noise
Obstructions in duct work. Make sure nothing is blocking the vent. Make sure your
wall or roof cap has a blade or door.
Damper blade on wall or roof
cap may not be open.
Make sure damper swings freely. Damper blades may flip
over and will not fully open when this happens. Adjust to
original position.
Metal grease filter and charcoal
filter (if present) may be dirty.
Clean the metal grease filter and replace charcoal filter (if
present). See Care and Cleaning of the Vent Hood.
Insufficient makeup
(replacement) air
Sufficient makeup (replacement) air is required for
exhausting appliances to operate to rating. Check with
local building codes, which may require or strongly advise
the use of makeup air.
The hood controls are not
operating correctly
Control logic confused. Disconnect power to the hood by resetting the circuit
breaker. Wait 30 seconds to allow controls to reset.
Early light failure Replacing lights with bare
hands.
Replace lights while wearing gloves to keep skin oils off
lights.
Light wattage is too high. Replace with correct wattage.
TROUBLESHOOTING TIPS
Other manuals for PVW7361
3
This manual suits for next models
3
Table of contents
Other GE Ventilation Hood manuals

GE
GE JV367HWW Service manual

GE
GE Monogram ZV30RS How to use

GE
GE Monogram ZV800 User manual

GE
GE JV376 Training manual

GE
GE Monogram ZVC30LSS User manual

GE
GE 30" Vented Hood Training manual

GE
GE Monogram ZV850 User manual

GE
GE Monogram 49-80565 User manual

GE
GE UVC9420 Original instructions

GE
GE UVW7241SNSS Original instructions