GE Appliances WSKP2060 User manual

GEAppliances
WSKP2060
WSKS2060
PartNo. 175D1807P259
3967365
Pub, No, 49-9988 72-98c(;

m
w
m
m
w
m
w
B_
m
w
SafetyInformation ............ 3
Operating Instructions
WasherConnections................. 4
ControlPaneSandSettings............ 5
Features........................... 6
LoadingandUsingtheWasher....... Z8
Troubleshooting Tips
BeforeYouCallForService.......... 9- l l
Customer Service
WarrantyforUnitedStates,.......... 12
WarrantyforCanada................ 13
ServiceTelephoneNumbers, ......... 14
Congratulations!
YouAre Now Part ofthe GEFamily.
Welcome to the GE fimlily. We're proud of our qualib, products and we are
committed to pro_4ding dependable ser_4ce. You'll see it in this easy-to-use Owner's
Manual and you'll hear it in tt_efriendly voices of our customer sel_4ce department.
Best of all, you'll experience these values each dme you use your washer. That's
important, because your new washer will be part of your fitmily for many years. And
we hope you will be part of ours fbr a long rime to come.
We thank you ff_rbuying GE. We appreciate your purchase, and hope you will
condnue to rely on us whenever you need qualit7 appliances fbr your home.
AService Partnership.
,, _'_.4,b_ IMPORTANT!
_Staple sales slip or cancelled check here.
_ Proof of the original purchase date is needed to obtain sewice
under tt_ewa_Tant7.
FORYOURRECORDS
Write themodel and serial numbershere:
#
#
You can find them on a label under the lid near the hinge.
(_ READTHISMANUAL
Inside you Mll find many helpful hinks on how to use and maintain
your washer properly.Just a little preventive care on your part can
save you a ,_'eat deal of time and money over the life of your washer.
IFYOUNEEDSERVICE
You'll find many answers to common problems in fl_e Before You
Call For Service section. If you re'dew our chm't of Troubleshooting
77psfirst, you may not need to call R_r seFvice at all.
If you do need selvice, you can relax l_lowing help is only a phone
call mvay.A list of toll-flee customer se_Mcenumbers is included
in the back section. Or, in the llnited States, you can always call tlle
GE Answer Center_ at 800.626.2000, 24 hours a day, 7days a
week. In Canada, call 1-800-361-3400.
2

IMPORTANTSAFETYINFORMATION.
READALLINSTRUCTIONSBEFOREUSING.
or explosion, electric shock, or toprevent property damage, personal injury, or loss of life.
WATERHEATERSAFETY
Undercertain conditionshydrogengasmaybe producedin a water heater thathasnot beenusedfor two weeks
or more.Hydrogengas can beexplosiveunderthesecircumstances.
If the hot water has not been used %r two weeks or more, prevent die possibili b"of damage or injmy by turning on
all hotwater fhucets and allowing diem to run fbr several minums. Do tllis befbre using any electrical appliance
which is connected to the hot water system. This simple procedure _dll allow an?,buih-up hydrogen gas to escape.
Since the gas is flammable, do not smoke or use an open flame or appliance during this process.
PROPERINSTALLATION
Thiswashermustbeproperly installedandlocated in accordance with theInstallationInstructions beforeitis used.If
you did notreceive an InstallationInstructionssheet,you canreceive oneby calling,toll-flee, in the UnitedStatesthe
GEAnswerCenter<,800.626.2000.InCanada,call, 1-800-361-3400.
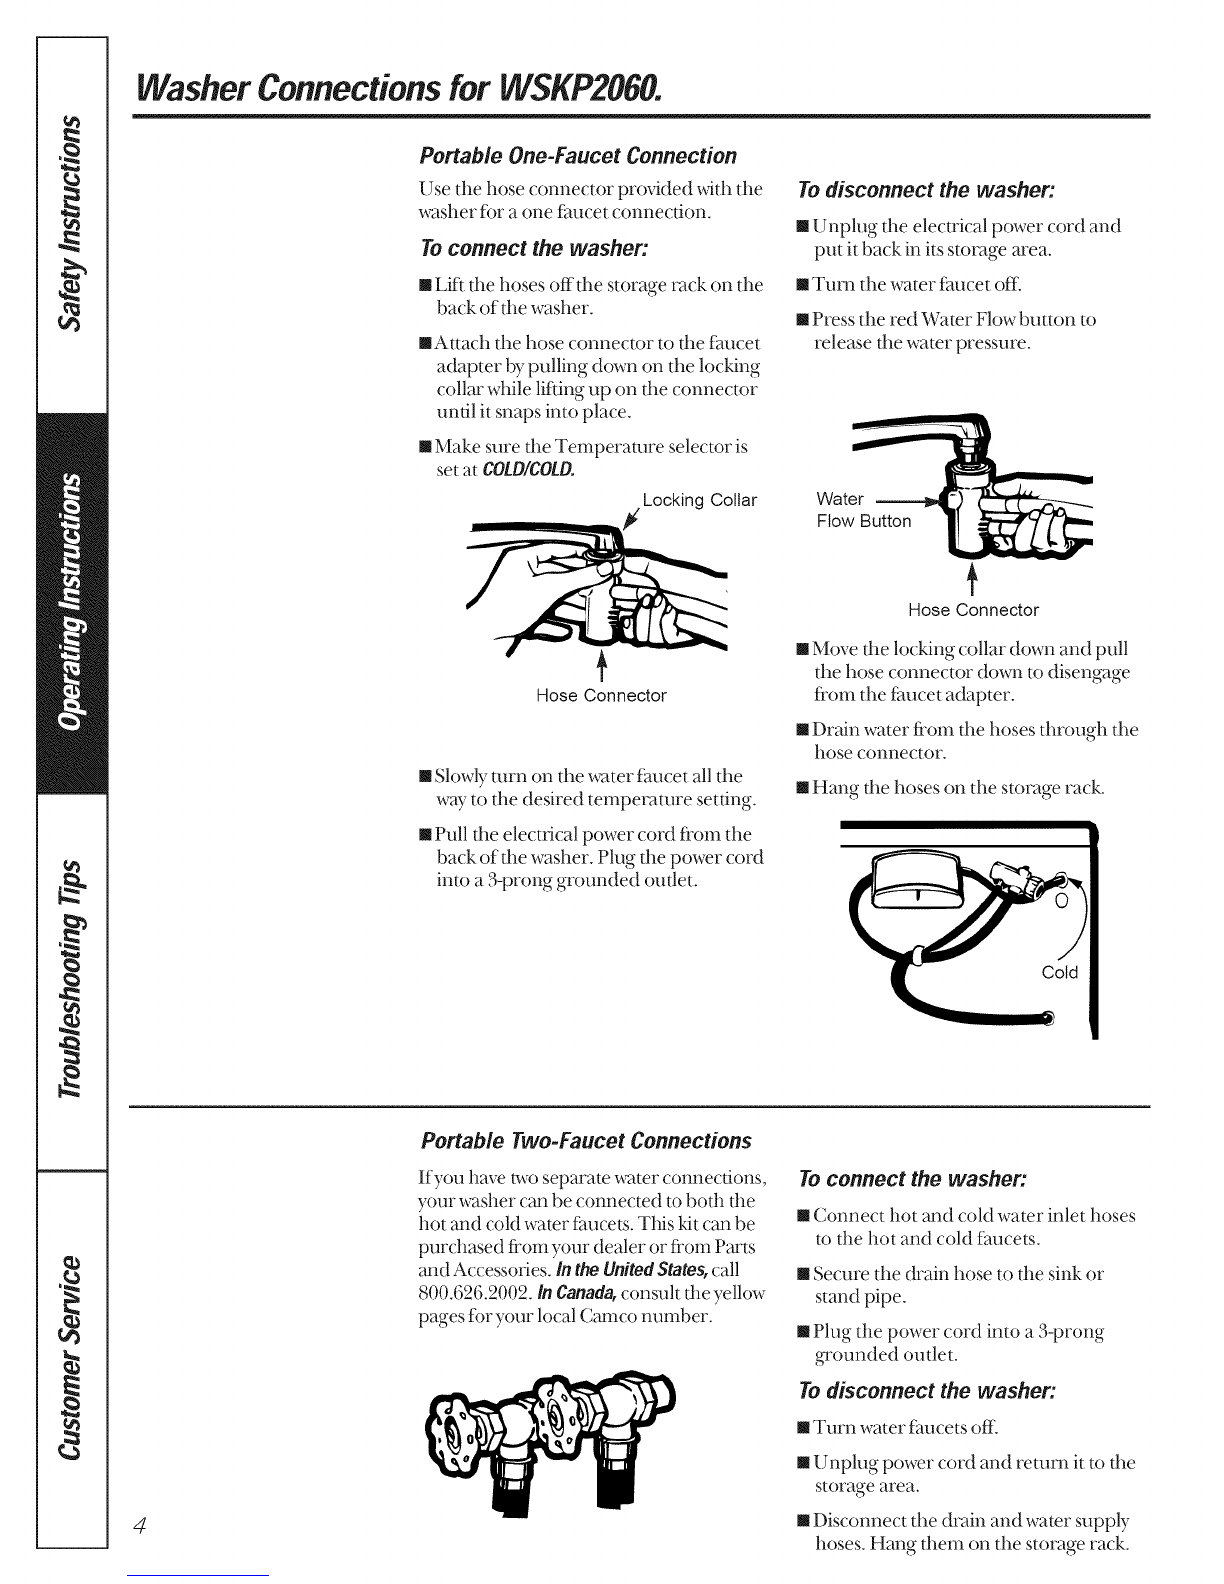
[] Install or store where it _dllnot be exposed to [] Properly ground washer to conform wkh all governing
temperatures below freezing or exposed to tile weather, codes and ordinances. Folk)w details in Installation
Instructions.
Use this
appliance
only for its
intended
purpose as
described in
this Owner's
Manual.
YOURLAUNDRYAREA
mKeep the area underneath and around yore"
appliances fl'ee of combustible materials such as
lint, paper, rags, chemicals, etc.
mClose supei_dsion is necessmy if this appliance isused
by or near chiMren. Do not allow chiMren to play on,
_,_dth,or inside this or any other appliance.
WHENUSINGTHEWASHER
mNever reach into washer while it is moxdng. Wait until
tt_emachine has completely stopped befbre opening
the lid.
mDo not mix chlorine bleach _@h ammonia or acids
such as _dnegar and/or rust remover. Mixing
different chemicals can produce a toxic gas which
may cause (tead_.
[] Do not wash or dly articles that have been cleaned in,
washed in, soaked in, or spotted _dth combustible or
explosive substances (such aswax, oil, paint, gasoline,
degreasers, dr_<leaning solvents, kerosene, etc.) which
may ignite or explode. Do not add these substances to
tile wash water. Do not use or place these substances
around your washer or dryer during operation.
[] The laun(hy process can reduce file flame retardancy
of fabrics. To retold such a result, carefully follow the
gammnt manut_acturer's wash and care instructions.
[] To minimize the possibilib7 of elecuic shock, unplug
this appliance fi'om the power supply or disconnect
the washer at the househoM distribution panel t)77
remo_dng the time or switching off the circuit breaker
befbre attempting any maintenance or cleaning.
NOTE:Turning the Cycle Selector knob m an off
position does NOTdisconnect the appliance from
the power supply.
[]Never attempt to operate this appliance ifit is damaged,
malfimctioning, partially disassembled, or has missing
or broken parts, including a damaged cord or plug.
WHENNOTIN USE
[] Turn offwater f:aucetsto relieve pressure on hoses
and valvesand to minimize leakage if a break or
rapture shouM occur. Check the condidon of the
fill hoses; they may need replacement _6_er5years.
[] Before discarding a washer, or remo_dng it fi'om
set,rice, remove tt_e washer lid to prevent chiMren
fl'om hiding inside.
[] Do not attempt to repair or replace any part of fl_is
appliance unless specifically recommended in this
O_,_ler's Manual, or in published user-repair
instnlctions that you understand and have the skills
to carD7 out.
[] Do not tamper wid_ controls.
Readandfollow thisSafetyInformationcarefully.
SAVETHESEINSTRUCTIONS 3

WasherConnectionsfor WSKP2060.
Portable One-Faucet Connection
Use the hose connector provided with the
washer for a one fimcet connection.
To connect the washer:
mLfft fl_ehoses dUffle storage rack on the
back of fl_ewasher.
mAttach the hose connector to d_e fimcet
adapter by pulling down on the locking
collar while lifting up on the connector
until it snaps into place.
mMake sure fl_eTemperature selector is
set at COLD/COLD.
Locking Collar
Todisconnect the washer:
mUnplug the electrical power cord and
put it back in its storage area.
mTm-n the water fimcet off..
mPress the red Water Flow button to
release the wamr pressure.
Water
Flow Button
+
Hose Connector
mSlowly turn on the water f:aucet all the
way to d_e desired temperature setting.
mPull fl_eelectrical power cord from the
back of fl_ewasher. Plug fl_epower cord
into a 3-prong grounded outlet.
t
Hose Connector
m Move the locking collar down and pull
the hose connector down to disengage
from the fmlcet adapter.
m Drain water from fl_e hoses through the
hose connector.
m Hang d_e hoses on the storage rack.
4
Portable Two-Faucet Connections
Ifyou have two separate water connections,
your washer can be connected to both tlle
hot and cold water faucets. This kit can be
purchased from your dealer or from Parts
and Accessories. in the United States, call
800.626.2002./n Canada,consult the yellow
pages for your local Camco number.
To connect the washer:
mConnect hot and cold water inlet hoses
to the hot and cold faucets.
mSecure the (kain hose to t|_e sink or
stand pipe.
mPlug tlle power cord into a 3-prong
,_'ounded outlet.
Todisconnect the washer:
mTurn water fimcets off:
mUnplug power cord and remm it m t|_e
storage area.
mDisconnect the drain and water supply
hoses. Hang fl_em on the storage rack.

Findyour washer controlpanel.
Youcan locate your model number behind the top edge of the control panel.
LOADSIZE
SMALL MEDIUM
EXTRA @LARGE
SMALL
m
CYCLES
TEMPERATURE RESET
OFF
REGULAR _PERMPRESS
++,°o yo,°o+
CO[o cHgLTD WASH 0 REGULAR__)PERMPRESS
RINSE OHEAVYSOIL LIGHTSOIL
SPIN ODELICATE _SPIN ONLY
OFF *PORTABLE SETTING
RESET
N D
Aboutthecontrolsettings.
_ Load Size
The water level should just cover the clothes. Adjust the load size accordingly. Loosely load clothes no
higher than the top row of holes in the washer tub.
_Temperature
Select the water temperature ff)r the wash and rinse Q_cles.NOTE:%qmnusing a one-fTmcet
connecdon, adjust the water flow mix and water temperature at the fTmcet. Always follow f:abric
manuf_mmrer's care label or instrucdons when laundering.
Cycle Lights
These cTcle lights show the operation being perfbtmed in the selected cTcle. When the cTcle is
complete, all the lights will be ore
Wash Cycle
The wash (.ycle controls the length of the washing process. NOTE:The (.ycle knob will NOTrotate as
t|_e (.Tcleprogresses. The chart below will help you match t|_e wash (.Tclesetting with your clothing.
REGULARForheavytolightlysoiledcottons,householdlinens,workandplayclothes.
PERM Foreasycareandwrinkle-resistantitems.
PRESS
DELICATEForlingerieanddelicatefabricswith lightto normalsoil,
SPINONLY Forhandwashitemsthatyoudon'twanttodripdry,Excesswaterwill bespunout,
RESET/OFFTochangethewashcyclesettingafterstarting,turnthedialtoRESET/OFFtoendthecycle.Selectyour
newcycleandpushtheSTART/PAUSEbuttontostart.
_Start/Pause button
Press the START/PAUSEbutton to start the wash q_cle.Also see the description ff)r RESET/OFE
5

About washer features.
FabricSoftener
Dispenser _b,-
LintFilter
Lint Filter
Clean the lint filter at the bottom ofthe a_tator _d_erevely load for the best filtering results.
Toclean:
E_Lifi off fabric softener dispenser fi'om agitator.
Clean out the lint filter with your finger.
Push the fabric softener dispenser firmly back into the agitator.
Fabric Softener Dispenser
Thefabricsoftenerdispenserautomatically
releases liquid fabric softener at the proper
time during the Q_cle.
Do not stop the washer during the first spin.
This will cause the dispenser to empty too
SOOn.
Touse,follow thesesteps:
[_ Make sure dispenser is securely attached
to agitator.
[_Use only liquid fabric softener.
Pour into dispenser, using amount
recommended on package.
Neverpour fabricsoftener directly on
clothes. It may stain them.
[_Add water to dispenser until it reaches
tl_emaximum fill line.
Donot pouranything into theagitator if the
agitator cap or dispenseris removed
Cleaning Fabric Softener Dispenser
E_ Lift offthe fhbric softener dispenser
fl'om the agitator.
[_Pour hot water into the fabric softener
dispenser to clean it.
[_Push the fabric softener dispenser firmly
back into the agitator.
FabricSoftener
Dispenser
6

""J: --LOaUINyand USHly:-- the washer, Always follow fabric manufacturer's care label when laundering,
SortingWashLoads
Colors Soil Fabric Lint
Whites Heavy Delicates LintProducers
Lights Normal EasyCare Lint Collectors
Darks Light Sturdy Cottons
ProperUseof Detergent
Add detergent and start tt_ewasher before adding
clothes so dmt the detergent can work effectively.
Using too liule or too much demrgent is a common
cause of laun(h T problems.
You can use less detergent ifyou hm_esoft water, a
smaller load, or a lighdy soiled load.
LoadingtheWasher
Load (hT items loosely, no higher than the top []
row of holes in the washer tub. When loading wet
items make sure you set the load/water level high []
enough to allow the items to move fl'eely. Water
level should just cover the clothes. To add items
after washer has started, open the lid and add the []
additional items. (;lose the lid and the washer
will conunue washing.
Do not wrap large items like sheets around the
agitator.
Do not wash fabrics containing flammable
materials (waxes, cleaning fluids, etc.).
When the lid is up, the washer will not agitate and
the tub will not fill with water.
CareandCleaningof the Washer
Wash Basket: Leave the lid open _dter washing to
allow moisture to evaporate. If you want to clean the
basket use a clean soft cloth dampened _4th liquid
detergent, then rinse. (Do not use harsh or gritb_
cleaners.)
FillHoses: Hoses connecting washer t()fmlcet should
be replaced every 5years.
Lint Filten The lint filter is located at the bottom of
the agitator. It should be cleaned after every load
for the best filtering resuhs.
Exterionhnmediately wipe off any spills. Wipe with
damp cloth. Try not to hit surface with sharp objects.
Moving and Storage: Ask tt_e service technician to
remove water fl'om drain pump and hoses. Do not
store tt_ewasher where it will be exposed to the
weather. In the UnitedStates call the (;E Answer
Center_ 800.626.2000 for information on how m
keep the mb stafionm 7 when moxing the washer. In
Canada _,_ite to Manager, Consumer Relations,
Cmnco Inc., 1 Factoi 7 Lane, Suite 310, Moncmn,
N.B. El(; 9M3.
Long Vacations: Be sure water supply is shut off at
f:aucets. Drain all water from hoses if weather will
be below fl'eezing.
7

Loading and using the washer. Always follow fabric manufacturer's care label when laundering.
FabricCareLabels
Bellow are f_lbric care ilabeil"symboils" that affect the cilothing you wiililbe ilaundering.
WASH LABELS
Machine__
wash
cycle Normal Permanent Press/
wrinkle resistant Gentle/ Do not wash Do not wring
delicate Hand wash
Water •• •
tempera ture Hot
(50°C/120°F)
00 •
Warm Cold/cool
(40°C/105°F) (30°C/85°F)
DRYLABELS
Tumble r_F_
dry Dry Normal Permanent Press/
wrinkle resistant
Do not dry
Gentle/ Do not tumble dry (used with
delicate do not wash)
setting High Medium Low No heat/air
instructions Line dry/ Drip dry
hang to dry Dry flat Pq
In the shade
BLEACH LABELS
symuols Any bleach Only non-chlorine bleach Do not bleach
(when needed) (when needed)
PermanentInstallationfor modelWSKP2060
This washer can be comTerted fi'om portabile to permanent. Insmmdons _)r permanent installadon come
_,_th the washer.
You wiililneed two fillilhoses, one drain hose and fbur ileveilingilegs.These can be purchased from your dealer
or fi'om Parts and Accessories. In the United States, caili1800.626.2002. In Canada, consuilt the yeililowpages for
your local Cmnco mmfl)er.
8

Before you carl forservice...
Troubleshooting
Save time and money! Review the charts on the
following pages first andyou may not need to call for
service.
WATER Possible Causes WhatToDo
Toomanysuds Type of detergent •Switch to a lower sudsing detergent brand and fbllow
insu'ucuons on package.
Very soft water . TtT less detergent.
Too much detergent. • Measure your detergent carefi.flly. Use less soap ifyou
have soft wamr, a smaller load, or a lighdy soiled load.
Waterleaks Fill hoses or drain hose is "Make sure hose connecuons are fight at fm.lcets and the
improperly connected washing machine. Make sure the end of the drain hose
is coITectly inserted in and secured to the drain.
Household drain may * Check household plumbing. You m Wneed m call a
be clogged plumber.
Constant water pressure * Tighten hoses at the framers and mm the water offafter
to the fill hoses at the each use.
water source * Check condition of the fill hoses; they may need
replacement _6ter 5years.
Using too much detergent *Use less detergent. Use less soap ifyou have soft wamr, a
in washer smaller load, or a lightly soiled load.
Watertemperature Control is not set properly *(]heck wamr mmperamre control and a(ljust.
is incorrect
Water supply is turned off "Turn both hot and cold fm.lcets fblly on and make sure
or improperly connected hoses are connecmd m cotr'ect f:aucets.
Water valve screens are * Turn off the water source and remove the water connection
stopped up hoses from the upper back of the washer. Use a brush or
toothpick to clean the screens in the machine. Reconnect
the hoses and turn the water back on.
House water heater is *Make sure house water heater is delivering water
not set properly at 120 °F.- 140 °F. (48 °C.-60 °C.).
Waterwon't drain Drain hose is kinked or *Straighten drain hose and make sure washer is not sitdng
improperly connected on it.
• Top of &ain outlet should be less than 8 f_.above floor.
9

Before you call forservice...
OPERATION Possible Causes WhatToDo
Washerpauses in cycle The washer normally pauses
between washing steps
Washer won't operate Washer is unplugged *Make sure cord is plugged securely into a working outlet.
Water supply is turned off • Turn both hot and cold f:aucets fitly on.
Controls are not set properly *Check controls and make sure START/PAUSEispressed.
Lid is open • Close lid and press START/PAUSE.
Circuit breaker/fuse is • Check house circuit breakers/fllses. Replace filses or
tripped/blown reset breaker. Washer should have separate outlet.
Waterdoesnotfillin the Inlet valve is not hooked up *Pormble water hose must be hooked to C and the
portable unit properly on the unit Temperature selector must be set to COLD/COLO.
•Lid must be closed.
PERFORMANCE Possible Causes WhatToDo
Clothes too wet Incorrect spin cycle *Make sure the spin (%<:leselected matches the load you
selected are washing. Some fitbfics will feel wetter when rinsed
with cold water.
Colored spots Incorrect use of fabric *Check fabric softener package f_r instructions and follow
softener directions f_r using dispenser.
• Pretreat stain and rewash.
Dye transfer * Sort whites or lightly colored items fi'om clark colors.
Grayedoryellowed Not enough detergent " Use more demrgent (especially _dth larger loads).
clothes Hard water *Use a water conditioner like Calgon brand or install
a water softener.
Water is not hot enough *Make sure wamr heater is delivering wamr at
120°F-140°F. (48°C -60°C.).
Washer is overloaded * Select load size m match clothes load.
Detergent is not *Add detergent aswash basket fills with wamr before
dissoMng you load clothes.
Dye transfer * Sort clothes by color. If fhbric label stows wash separately,
unstable dyes may be indicamd.
Lintorresidue on Clothes are air or fine dried *Ifyou do not (hyyour clothes with a clothes (hyer, your
clothes clothes may retain more lint.
Incorrect sorting *Separate lint producers fi'om lint collectors.
Washing too long *Wash small loads for a shorter time than larger loads.
Detergent not dissolving *Add detergent aswash basket fills with water, bef_re you
load clothes.
Overloading
• TUa liquid demrgent.
• Use warmer water temperature.
• Load clothes no higher than the top row of holes in the
washer rob.
*Make sure load size selector matches clothes load size.
Incorrect use of fabric softener * Check fitbric softener package f_r instructions and fbllow
directions fbr using dispenser.
10

(con)PERFORMANCE Possible Causes What ToDo
Pilling Result of normal wear on *While this is not caused by the washer, you can slow the
puly-cotton blends and pilling process 1))7washing garments inside out.
fuzzy fabrics
* Fasmn snaps, hooks, buttons, and zippers.
* Remove loose items like pins, objects in pockets
and shmp buttons.
* Turn knits (which snag easily) inside out.
Undiluted chlorine bleach * Check bleach package insmmtions for proper amount.
* Never add undih.lted bleach m wash or allow clothes
m come in contact with undiluted bleach.
Chemicals fike hair bleach * Rinse items that may have chemicals on them before
or dye, permanent wave washing.
solution
Wrinkling Improper sorting *Avoid mixing heaxT items (like work clothes) with
light items (like blouses).
* TUa fabric softener.
Overloading or • Load your washer so clothes have enough room
incorrect water level m move fi'eely.
Incorrect wash and * Match Cycle selecuon to the v}qoeof fabric you are
dry cycles washing (especially fbr easy care loads).
Repeated washing in • Wash in warm or cold wamr.
water that is too hot
NOISE PossibleCauses WhatToDo
Washer is noisy Washer is uneven * To level the washer, adjust the leveling legs 1)77rotating
the indMdual legs in the proper direction fbr up or down.
Washer load is . Press the START/PAUSEbutton to stop the washer, open
unbalanced the lid and redistribute the load evenly. (;lose the lid and
restart.
Shipping foam is still assembled * Remove fbam blocks fl'om the bouom of the washer.
in unit
Washer is sitting too close * Pull washer away fl'om the wall; about 4" is needed.
to wall (causes knocking
during cycle)
OTHER Possible Causes What ToDo
Labels on theexterior Occasionally the adhesive * Use a hair (hyer set at the lowest heat setting, directing
of thewasherwill not used on the labels does the air at the label for a short amount of time. This will
peel o#cleanly not release cleanly release tt_e adhesive easily, without damaging the surf_me
of the washer.
Snags,holes,tears,rips
or excessive wear Pins, snaps, hooks, sharp
buttons, belt buckles,
zippers, and sharp objects
left in pockets
11

GE Washer WaffaHty (For customers in the United States.)
All warranty service provided by our Factory Service Centers or an authorized Customer Care_
technician. For service, call 1-800-GE-CARES.
For The Period Of." We Will Replace:
One Year Anypart of the washer which fi_ilsdue to a defect in materials or workmanship. During this full
Fromthe date of the one-year warranty, GE will also provide, free ofcharge, all labor and in-home service to replace the
originalpurchase (tefective part.
Five Years The transmission, ifit should fail due to a defect in mamrials or workmanship. During this
Fromthe date of the five-year limited warranty, you will be responsible fbr aW labor or in-home sel_ice costs.
originalpurchase
What is Not Covered:
m Service trips to your home to teach you howto use
the product.
m Improper installation.
m Failure of the product if it is abused, misused, or used for
other than the intended purpose or used commercially.
mReplacement of house fuses or resetting of circuit
breakers.
mDamage to the product caused by accident, fire, floods or
acts of God.
mIncidental or consequential damage to personal property
caused by possible defects with this appliance.
ThiswarrantyisextendedtotheoriginalpurchaserandanysucceedingownerforproductspurchasedforhomeusewithintheUSA,InAlaska,the
warrantyexcludesthecostofsiTippingorsdviceca/istoyourhome,
Somestatesdonotallowtheexclusionorlimitationofincidentalorconsequentialdamages,Thiswarrantygivesyouspecificlegalrights,andyou
mayalsohaveotherrightswhichvaryfromstatetostate,Toknowwhatyourlegalrightsare,consultyourlocalorstateconsumeraffairsofficeor
yourstate'sAttorneyGeneral,
Warrantor: General Electric Company. Louisville, KY 40225
12

GE Washe£ WaiT"a#Tty (For customers in Canada,)
_._ II warranty service provided by our Factory Service Centers or an authorized technician.
For service, call 1-800-361-3400.
For The Period Of: We Will Replace:
One Year Anypart ofthe w_sher which fhils due to a (teDct in materials or workananship. During this furl
Fromthe date of the one-year warran_ GE _s411also provide, free of charge, all labor and in-home service m replace
originaIpurchase the (teDctive part.
Five Years The transmission, ifit should fhil (ff_eto a (teloct in materials or workmanship. Dining d_is
Fromthe date of the five-year limited warranty,you will be responsible for any labor or in-home sewice costs.
originalpurchase
What Is Not Covered:
m Se_ice u'ips to your home to teach you how to use the m hnproper inst:4tll_Jttion.
product. If you have an installation problem, contact your
Readyour Owner's Manual. If you then have any questions dealer or installer. You are responsible for providing
about operating the product, please contact your dealer adequate electrical, exhausting and other connecting
or our Consumer Relations office at: faciliues.
Manager, Consumer Relations m
Camco Inc.
1Facto_)_ Lane, Suite 310 m
Moncton, N.B.
E1C 9M3 m
Replacement of house fl_ses or resetting of circuit
breakers.
Failure of the product if it is misused, or used for other
than the intended purpose or used commercially.
Damage to product caused by accident, fire, floods or
acts of God.
WARRANTOR IS NOT RESPONSIBLE FOR CONSEQUENTIAL DAMAGES. i
_AM _ ]
Warrantor: C CO INC.
13

Service TelephoneNumbers.
GE Answer Center _ /n the U.S.: 800-626-2000
The GE Answer Center ®is open 24 hours a day, 7days a week.
In Canada, contact: Manager, Consumer Relations, Camco In(:., 1Facto ULane, Suite 310,
Moncton, N.B., E 1C 9M3.
/n-HomeRepairService/nthevs.:800-432-2737
Expert GE repair ser_dceisonly aphone call away.
In Canada,call 1-800-361-3400.
SpecialNeedsService!, theu.s.:800-626-2000
GE offers, fl'ee of charge, a brochure to assist in planning a barfier-fl'ee kitchen ff)r persons
wM_limited mobility. IntheU.&,call 800-TDD-GEAC(800-833-4322).
ServiceContractsinmet/.s.:800-626-2224
Purchase a GE sei_4ce contract while your warranty is still in effect and you'll receive a
substantial discount. GE Consumer Sel_dce will still be there _d_eryour warranty expires.
In Canada,call 1-800-461-3636.
PartsandAccessoriesI, theU.S.:800-626-2002
IndMduals qualified to sewice their o_,mappliances can have part_sor accessories sent directly
to their homes (VISA, MasterCard and Discover cards are accepted).
/nstructionscontainedin thismanualcoverprocedures tobeperformedbyanyuser.Otherservicing
generallyshouldbereferredtoqualifiedservicepersonnel. Cautionmustbeexercised,since
improperservicing maycause unsafeoperation.
/n Canada,please consult theyellow pagesforyour localCamconumber.
ServiceSatisfaction
Ifyou are not satisfied with tim sel_ice you receive fl'om GE:
First,contact the people who sel_iced your appliance.
Next, ifyou are still not pleased, in the U.&,BTim all the details-including your phone number-to:
Manager, Consumer Reladons. GE Appliances, Appliance Park, Louisville, KY 40225; or,
in Canada, to Director, Consumer Relations, Camco Inc., 1Facto_y Lane, Suite 310, Mona(m, N.B.,
E1C 9M3.
Fina//_ifyour problem is still not resolved, _Tite Major Appliance Consumer Action Program,
20 North Wacker Drive, Chicago, IL 60606 (U.S. only).
14 Printed in Mexico

Electromenagers GE
WSKP2060
WSKS2060
Part No. 175D1807P259 Pub.No. 49-9978 72-98c(;

w
i
,_;aa
m
, ,lm_
Mesures de securite ............ 3
Directives de fonctionnement
Raccordementspour la laveuse......... 4
Lestableouxde commande ........... 5
Lescaracteristiques ................... 6
Chargementet utilismtion
de la laveuse ...................... 7,8
Conseils de deffannage
Awmtd_ppeler
unr@amteur..................... 9-11
Service ala clientele
Garantie........................... 13
Numerosdesdvice .................. 74
Felicitations!
Desormaisvousfaitespattie dela familleGE.
Bienvenue &ms la fmnille GE. Nous sommes tiers de la qualitd de nos produits
et de la fiabilit(_ de nou'e selaice apr_s-vente. Vous le consmmrez dans le prdsent
manuel, f:acile 5miliser, et dans lavoix amicale de notre personnel (hi sel_ice 5 la
clientele.
Mais, surtout, vous le constaterez chaque lois que vous Drez votre lessh_e.C'est
important, car votre nouvelle lm_euse Dra parde de vou'e famille pendant des
anndes. Et nous espdrons que vous ferez parde de la n6tre pendant longtemps
aussi.
Nous vous remercions de votre achat GE, et espdrons qu'a l'm_enir vous penserez fi
nous chaque lois que vous aurez besoin d'un dlectromdnager de qualitd.
Unpartenariat de service.
,,,,__,2_ IMPORTANT!
__ _ Agrafez ici votre facture ou une copie de votre cheque.
_i _ Pour b(maficier de r@arations sous garantie, il f:aut fournir une
preuve de la date d'achat d'origine.
_A CONSERVER !GNEUSEMENT
Transcrivez losnumeres demodele et de serie icL
N°
No
Vous les trouverez sur une (_tiquette simde sous le couvercle,
5 proximitd tie la charniere.
(_ LISEZVOTREMANUELVous y trouverez de nombreux conseils pour l'utilisation et
l'entreden de votre lm_euse. Ces quelques mesures prdventives vous
pennettront d'dconomiser du temps et de l'argent, et, ainsi, de
prolonger lavie de votre lm_euse.
SI VOUSAVEZBESOINDESERVICE
Vous trouverez des solutions aux probl&mes courants que vous
pourfiez rencontrer dans la section Avant d'appelor un reparatour.
Et, en consultant d'abord nos Consoils de dopannago, vous pomTez
peut-atre &iter de faire appel 5 un rdparateur.
Sivous avez besoin de se_ice, vous savez que vous n'avez qu'_'_nous
d_l@honer. Vous u'ouverez fila fin du prdsent manuel les num(_ros
sans fl'ais du sen_ice fila client&le. Aux gtats-UnN vous pouvez appeler
24 heures parjour, 7jours par semaine m.1GE Answer Center_
800.626.2000. Au Canada, appelez le 1-800-361-3400.
2

MESURESDESECUR/T£/MPORTANTES.
USEZD'ABORDTOUTESLESDIRECTIVES.
minimiser les risques d'incendie, d'expIosion et de chocs electriques et prevenir
des deg_ts materiels et des blessures graves ou mortelles.
iDUCHAUFFE-EAU
Danscertainescirconstances,de I'hydregOnepeut seformer en omTant tom lesrobinets d'eau chaude et en laissant
clansle chauffe-eaus'il n'apas eteutilisependantdeux
semainesou plus.L'hydrogenepeut etreexpIosifclansces
conditions.
Si l'eau chaude n'a pas dtd utilisde depuis deux semaines
ou plus, r&iuisez les fisques tie dommages ou tie blessures
couler l'eau pendant plusieurs mimttes avant d'ufiliser
un appareil dlectfique raccordd m.l syst_me d'eau
chaude. L'hytkog_ne sera ainsi lib4rd dans
l'atmosph_re. Comme c'est un gaz inflammable, ne
flmmz pas ou n'utilisez pas une flamme nue ou un
appareil m4nager ou tours tie ce processus.
.J UNE/NSTALLAflONADEQUATE
Avantd'utiliser votre laveuse,assurez-vousqu'elle a eteadequatementinstallee,conformementauxDirectivesd'installation.
Si vousn'avez_asregu de Directivesd'installation,vouspouvezlesobteniren appelantsansfraisauxEtats-Unisau GE
Answer Center_;800.626.2000.Au Canada,appelezsansfrais au 1-800-361-3400.
mInstallez ou entreposez la ¿m_euse_'tl'abri ties
tempdramres infdrieures au point tie congalation et
ties intemp4ries.
m Mettez la laveuse 5 la terre confbrmdment 5 tons les
codes et reglements en vigueur. Consultez les
Directives d'insmllation.
N'utilisez
cet
appareil
que pour
I'usage
auquel il
est destine,
comme
expliquo
dans le
present
manuel.
AUTOURDEVOTRELAVEUSE
ml_Mteztome accumulation tie matdrimlx combustibles
(charpie, papiers, chiffons, produits chimiques, etc.) 5
proximitd tie vos 41ectromanagers.
m I1t:aut exercer une dtroim sm_,eillance lorsque
l'appareil fonctionne en prdsence d'enfhnts. Ne les
laissez pasjouer sur, avec ou fi l'intdrieur tie cet
appareil ni aucun autre (_lectrom4nager.
LORSQUEVOUSUTII_ISEZLALAVEUSE
mNe mettezjamais la main dans la laveuse pendant
qu'elle fbncdonne. Attendez que l'appareil se soit
compl_tement atTat4 m_ant d'ouvfir le couvercle.
mLa lessive peut attdnuer les propridtds igniflNeantes
ties tissus. Pour 4viter cette situation, suivez les
direcuves donndes par le fabricant du vatement.
mNe mdlangez pas dejavellisant avec tie l'ammoniaque
ou ties acides (vinai_'es ou ddcapant pour la rouille).
Ce mOlange peut produire un gaz toxique et mortel.
mNe lavez pas et ne sdchez pas ties arucles qui ont dtd
lavds ou trempds dans ties pro&fits combustibles ou
explosifg (tire, huile, peinun_e, essence, ddgraissants,
solvants de neuoyage _'tsec, kerosene, etc.). Ne versez
pasces substances dans l'eau de lavage. N'utilisez pas
ces substances _'_proximitd de vou'e laveuse ou
sdcheuse pendant qu'elle fonctionne.
mPour rdduire les risques tie chocs 4¿ectfiques,
ddbrandmz toujours l'appareil ou ddbranchez la
laveuse au panneau de disuibution en enlevant le
fl.mible ou en ddclenchant le disjoncmur avant de la
rdparer ou de la nettoyer. REMAROUE:Le fait de rdgler
le sdlecmur de progrmnme sur une position d'arr_t ne
coupe PASl'alimentation 41ecuique de l'appareil.
mN'essayezjamais tie faire fbnctionner ¿'appareil s'il est
endornmag4, d4fbcmeux, partiellement ddmont4, si
ties pi&ces sont manquantes ou ddDcmetmes ou si le
cordon d'alimentadon ou la fiche est endommag4.
LORSQUELALAVEUSEN'ESTPASUTILISEE
mFennez les robinets afin tie rdduire ¿a pression et les
thites sijamais un boyau ou l'dlecu'ovanne se brise ou
se rompt. Vdrifiez l'dtat des boym.lx de remplissage; il
fhutka peut-_?tre les remplacer ml bout tie 5 ans.
mAvant dejeter ou d'entreposer une lm_euse, enlevez le
couvercle de l'appareil _ffind'emp4cher les enfhnts de
se cachet 5l'intOrieur.
Ne rdparez et ne remplacez m.mune pi&ce tie cet
appareil, a moins que cela soit spdcifiquement
recommandd dans le prdsent manuel ou dans ties
directives de rdparadon que vous comprenez et que
vous _?tesen nlesure tie suM'e.
Ne trafiquez pas ¿escommandes tie l'appareil.
Veuillez/ireetsuivreattentivementcesmesuresdesecurite.
CONSERVEZCESDIRECTIVES 3

Raccordementspourla laveuseWSKP2060.
Raccordement a un seul=robinet
Dans le cas d'tm raccoMemem _'_tm seul
robinet, utilisez le raccord tie boyau fburni
avec la laveuse.
Pour raccorder la laveuse :
m Ddgagez les bwaux th.1 support tie
rangement 5 l'arribre tie la laveuse.
m Fixez le raccord tie bwau '_l'adapteur du
robinet en abaissant la bague tie blocage
tout en insdrant l'adaptateur dans le
raccordjusqu'5 ce qu'il bloque en place.
[]Assurezwous que le sdlecteur tie
temperature est rdgld _'_COLD/COLD
(ffoide/fi'oide).
Pour debrancher la laveuse :
[] Ddbranchez le cordon d'alimentation
et remettez-le en place dans son
compartiment tie rangement.
[] Fermez le robinet.
[] Appuyez sur le bouton rouge th.l
ddtendeur pour re&fire la pression
de l'eau.
Boutondu
detendeur
_/. Baguedeblocage
Raccorddeboyau
t
Raccorddeboyau
[] OmTez lentement le robinetjusqu'5
l'obtenfion tie la mmpdramre desirde.
[] Tirez le cordon d'alimentation _'_l'mTiere
de la laveuse. Branchez-le dans une prise
tie courant 5trois alvdoles mise 5 la torte.
[] Abaissez la bagale tie blocage et firez vers
le bas sur le raccord tie boyau pour le
ddgager tie l'adapmmur thl robinet.
[] Faites sortir l'eau ties boyaux par le
raccord tie boyau.
[] Suspendez les bwmlx sur le support tie
rangement.
Froide
4
Raccordement i_ deux-robinets
Sivous disposez tie deux robinets distincts,
vous pouvez raccorder votre laveuse
simulmndment aux robinets d'eau chaude
et d'eau ffoide. Vous pouvez vous procurer
cet ensemble aupr_s de votre marchand ou
au Service ties pi_ces et accessoires. Aux
Etats-Unis,composez le 800.626.2002.
Au Canada,consultez les PagesJaunes tie
vou'e annuaire t(_ldphonique pour conmfftre
le numdro de la succursale Cmnco de vou'e
rd_on.
Pour raccordor la lavouse :
[] Raccordez les boyaux d'eau chaude et
d'eml fl'oide aux robinets d'eau chaude
et d'eml ffoide.
[] Fixez le boyau tie vklange dans l'dvier ou
le renvoi.
[] Branchez le cordon d'alimenmtion dans
une prise 5 trois alvdoles mise 5 la terre.
Pour debrancher la laveuse :
[] Fermez les robinets.
[] Ddbranchez le cordon d'alimentation et
remettez-le en place dans son
compartiment de rangement.
[] Ddbranchez le boyau tie vklange et les
boyaux tie remplissage. Suspendez-les
sur le support de rangement.

Lescommandesde votrelaveuse.
VOUSpouvez tFouver /eFlumeFode VOtFemode/e SUFuFleotiquette situ(_esous /e couveFc/e, DpFoximit(_de/8 chsFnieFe.
LOADSIZE
SMALL MEDIUM
EXTRA OLARGE
SMALL
ill
CYCLES
TEMPERATURE RESET
OFF
MED, %y L
... @
SPIN 0DELICATE "_" SPIN ONLY
OFF *PORTABLE SETTING
RESET
Ig ! n D--
Reglagedescommandes.
_ Load Size (taille de brassee)
Le nNeau d'em.l doic _?tresuf{isanc pour coma'ir le linge. Rdglez donc la mille de votre brassde en
consdquence. Assurez-vous que losv_temencs on[ suf_isamment de place pour bouger librement et
ne ddpassent pas la r_mg_Tesupdrieure de trous de la cure.
_remperature (temperature)
S(_lectionnez une tempdr_m.H'e d'emi pour les pro_'mnmes de lav_lgeet de stDchage.
REI!/#AROUE:Lorsque l'appareil escraccordd _'_tin seul-robinec, rdglez le ddbic ec la cempdracure de
l'eml mi robineL Lors de la lessive, obsel_,ez cot_ours los directives donndes stir l'(_tiquecm d'entretien
du v_?tement.
Cycle Lights (voyants des programmes)
|
Cos voyan_s indiquent l'opdration en cours dans le programme choisi. Lorsque le programme est
termind, tous los voyants s'dtei<_ent.
Wash Cycle (programme de lavage)
Le progrmnme de lav_lgeddtermine la (turde du lavage. REMAROUE:Le bouton du s_lecteur de
pro_'amme ne toume PASpendant le ddroulement (ttl pro_'mnme. Le tableau ci-dessous vous
aidera _'_choisir le programme de lavage qui convient _'_votre brassde.
REGULAR(regulier} Pourlescotonslegerementoutressales,leIJngedemaisonet lesvetementsdetravailoudejeu,
PERMA PRESSPourlesarticlesa entretienFacileetceuxquiresistentauxFaux-plis,
(sansrepassage)
DELICATEPourlalingeriefineet lestlssusdelJcatslegerementounormalementsales,
(tissusdelicats)
SPINONLY PourlesarticlesdelicatsquevousnevoulezpasFairesecherparegouttement,
(seulement L'excesd'eauseraelimineparessorage,
essorage)
RESET/OFFSivousdesirezmodifierle programmeapresquela laveusesesoit miseen marche,tournezle
(reinitialisation/ selecteurdeprogrammea RESET/OFF(reinitialisation/arret)pourterminerleprogramme,
art€t) Tournez-leensuiteau nouveauprogramme,Appuyezsurle boutonSTART/PAUSE(miseen
marche/pause)pourmettrela laveuseen marche,
_Statt/Pause button (mise en marche/pause)
Appuyez sur le boucon START/PAUSE(raiseen marche/pause)pour d_buter le pro<_'amme de lavage.
Voir (_galement la desclipdon du boumn RESET/OFF(reinitialisation/arret), 5

tes caracteristiquesde la laveuse.
Distributeur
d'assouplissant
Filtre_
charpie
Filtre a charpie
Pour un fihrage a(ldquat, nettoyez apr_s chaque brassde le filtre 5 charpie situd au fbnd de
l'agitateur.
Pour le nettoyer :
[-_Enlevez le distfibuteur d'assouplissant de l'agitateur.
_ettoyez le filtre de la conduite avec votre doigt.
Remettez le distributeur d'assouplissant en place sur l'agitateur.
Distributeur d'asseuplissaut
Ce distributeur verse automafiquemem
l'assouplissam liquide au moment
approprid pendam le progrmnme.
N'arr_tezpas lalaveuseaucoursdu
premier essorage,t'assouplissant sera
distribuetrop tot.
Pour I'utiliser, suivez les otapes ci-dessous '
ElAssurez-vous que le (tistfibmeur est bien
install(? sur l'agitateur.
[_vN'Ufilisez que de l'assouplissant liquide.
ersez dans le distribmeur la quanfitd
d'assouplissant liquide recommandde
sur l'emballage.
Ne versezjamais d'assouplissant liquide
directement sur le tinge. Los v_temeuts
seront taches.
Ajomez de l'eau dans le distributeur
usqu'au rep_re de remplissage
rnaxillIHlll.
Nettoyage du distributeur d'assouplissant
Enlevez le distributeur d'assouplissam
de l'agimteur.
ersez de l'eau tr_s chaude dans le
stributeur d'assouplissant pour le
nettoyer.
Remettez le distributeur d'assouplissant
en place sur l'agitateur.
Ne versez aucun produit dans fagitateur
Iorsque le distributeur est enleve.
Distributeur
d'assouplissant
6
Other manuals for Appliances WSKP2060
1
This manual suits for next models
2
Table of contents
Languages:
Other GE Washer manuals