GEAppliances GWS04 Original instructions

Write the model and serial
numbers here:
Model #_________________
Serial # _________________
Find these numbers inside the
beverage center/wine chiller
on the left side.
GE is a trademark of the General Electric Company. Manufactured under trademark license.
OWNER’S MANUAL
& INSTALLATION
INSTRUCTIONS
WINE CENTER/BEVERAGE
AND WINE CENTER
245D1821P001 49-60734-2 03-17 GEA
SAFETY INFORMATION .........3
USING THE APPLIANCE
Controls ..............................5
GVS04 Beverage and Wine Center.......6
GWS04 Wine Center ...................7
CARE AND CLEANING .............8
Replacing the Light Bulb ...............9
INSTALLATION INSTRUCTIONS . . 10
GVS04 Models Only................... 11
TROUBLESHOOTING TIPS......12
WARRANTY......................15
CONSUMER SUPPORT ..........16
GWS04 Wine Center
GVS04 Beverage
and Wine Center
ENGLISH / FRANÇAIS /
ESPAÑOL

249-60734-2
THANK YOU FOR MAKING GE APPLIANCES A PART OF YOUR HOME.
Whether you grew up with GE Appliances, or this is your first, we’re happy to have you in the family.
We take pride in the craftsmanship, innovation and design that goes into every
GE Appliances product, and we think you will too.

49-60734-2 3
STATE OF CALIFORNIA PROPOSITION 65 WARNINGS
WARNING This product contains one or more chemicals known to the State of California to cause
cancer, and birth defects or other reproductive harm.
CAUTION To reduce the risk of injury when using your Wine Center/Beverage and Wine Center,
follow these basic safety precautions.
Ŷ 'RQRWFOHDQJODVVVKHOYHVRUFRYHUVZLWKZDUP
water when they are cold. Glass shelves and
covers may break if exposed to sudden temperature
changes or impact, such as bumping or dropping.
Tempered glass is designed to shatter into many
small pieces if it breaks.
Ŷ .HHSILQJHUVRXWRIWKH³SLQFKSRLQW´DUHDV
clearances between the doors and between the
doors and cabinet are necessarily small. Be careful
closing doors when children are in the area.
Ŷ 'RQRWUHIUHH]HIUR]HQIRRGVZKLFKKDYHWKDZHG
completely.
Ŷ ,Q:LQH&HQWHU%HYHUDJHDQG:LQH&HQWHUVZLWK
automatic ice makers, avoid contact with the
moving parts of the ejector mechanism, or with the
KHDWLQJHOHPHQWWKDWUHOHDVHVWKHFXEHV'RQRW
place fingers or hands on the automatic ice making
mechanism while the refrigerator is plugged in.
READ AND SAVE THESE INSTRUCTIONS
WARNING To reduce the risk of fire, explosion, electric shock, or injury when using your Wine
Center/Beverage and Wine Center, follow these basic safety precautions:
Ŷ 7KLV:LQH&HQWHU%HYHUDJHDQG:LQH&HQWHUPXVW
be properly installed and located in accordance with
WKH,QVWDOODWLRQ,QVWUXFWLRQVEHIRUHLWLVXVHG
Ŷ 8QSOXJWKHDSSOLDQFHEHIRUHPDNLQJUHSDLUV
replacing a light bulb, or cleaning.
NOTE: Power to the appliance cannot be
disconnected by any setting on the control panel.
NOTE: Repairs must be performed by a qualified
Service Professional.
Ŷ 5HSODFHDOOSDUWVDQGSDQHOVEHIRUHRSHUDWLQJ
Ŷ 'RQRWVWRUHRUXVHJDVROLQHRURWKHUIODPPDEOH
vapors and liquids in the vicinity of this or any other
appliance.
Ŷ %HFDXVHRISRWHQWLDOVDIHW\KD]DUGVXQGHUFHUWDLQ
conditions, we strongly recommend against the use
of an extension cord. However, if you must use an
extension cord, it is absolutely necessary that it be a
8/OLVWHGLQWKH8QLWHG6WDWHVZLUHJURXQGLQJW\SH
appliance extension cord having a grounding type
plug and outlet and that the electrical rating of the
FRUGEHDPSHUHVPLQLPXPDQGYROWV
Ŷ 7RSUHYHQWVXIIRFDWLRQDQGHQWUDSPHQWKD]DUGV
to children, remove the doors from any appliance
before disposing of it or discontinuing its use.
Ŷ 'RQRWDOORZFKLOGUHQWRFOLPEVWDQGRUKDQJRQWKH
door handles or the shelves in the Wine Center/
Beverage and Wine Center. They could seriously
injure themselves.
IMPORTANT SAFETY INFORMATION
READ ALL INSTRUCTIONS BEFORE USING THE APPLIANCE
INSTALLATION
WARNING EXPLOSION HAZARD
.HHSIODPPDEOHPDWHULDOVDQGYDSRUVVXFKDVJDVROLQHDZD\IURP:LQH&HQWHU%HYHUDJHDQG:LQH&HQWHU
Failure to do so can result in fire, explosion, or death.
SAFETY INFORMATION

449-60734-2
SAFETY INFORMATION
WARNING SUFFOCATION AND CHILD ENTRAPMENT HAZARD
Remove door from the wine center/beverage and wine center prior to disposal. Failure to do so can result in child
entrapment which can lead to death or brain damage.
IMPORTANT: Child entrapment and suffocation are not
problems of the past. Junked or abandoned appliances
DUHVWLOOGDQJHURXVHYHQLIWKH\ZLOOVLWIRU³MXVWDIHZ
GD\V´,I\RXDUHJHWWLQJULGRI\RXUROGDSSOLDQFH
please follow the instructions below to help prevent
accidents.
Before You Throw Away Your Old Wine Center/
Beverage and Wine Center
ŶTake off the appliance door.
Ŷ/HDYHWKHVKHOYHVLQSODFHVRWKDWFKLOGUHQPD\QRW
easily climb inside.
Refrigerants
All refrigeration products contain refrigerants, which
under federal law must be removed prior to product
GLVSRVDO,I\RXDUHJHWWLQJULGRIDQROGUHIULJHUDWLRQ
product, check with the company handling the disposal
about what to do.
PROPER DISPOSAL OF YOUR OLD APPLIANCE
Do not, under any circumstances, cut or remove the third (ground) prong from the power cord. For
personal safety, this appliance must be properly grounded.
The power cord of this appliance is equipped with a
SURQJJURXQGLQJSOXJZKLFKPDWHVZLWKDVWDQGDUG
SURQJJURXQGLQJZDOORXWOHWWRPLQLPL]HWKH
SRVVLELOLW\RIHOHFWULFVKRFNKD]DUGIURPWKLVDSSOLDQFH
Have the wall outlet and circuit checked by a qualified
electrician to make sure the outlet is properly
grounded.
:KHUHDVWDQGDUGSURQJZDOORXWOHWLVHQFRXQWHUHGLW
is your personal responsibility and obligation to have it
UHSODFHGZLWKDSURSHUO\JURXQGHGSURQJZDOORXWOHW
'RQRWXVHDQDGDSWHU
The Wine Center/Beverage and Wine Center should
always be plugged into its own individual electrical
outlet which has a voltage rating that matches the
rating plate.
$9ROW$&+]RUDPSIXVHGJURXQGHG
electrical supply is required. This provides the best
performance and also prevents overloading house
ZLULQJFLUFXLWVZKLFKFRXOGFDXVHDILUHKD]DUGIURP
overheated wires.
Never unplug your appliance by pulling on the power
cord. Always grip plug firmly and pull straight out from
the outlet.
Repair or replace immediately all power cords that
KDYHEHFRPHIUD\HGRURWKHUZLVHGDPDJHG'RQRW
use a cord that shows cracks or abrasion damage
along its length or at either end.
When moving the appliance away from the wall, be
careful not to roll over or damage the power cord.
CONNECTING ELECTRICITY
WARNING ELECTRICAL SHOCK HAZARD
3OXJLQWRDJURXQGHGSURQJRXWOHW
'RQRWUHPRYHWKHJURXQGSURQJ
'RQRWXVHDQDGDSWHU
Failure to follow these instructions can result in death, fire, or electrical shock.
IMPORTANT SAFETY INFORMATION
READ ALL INSTRUCTIONS BEFORE USING THE APPLIANCE
READ AND SAVE THESE INSTRUCTIONS

49-60734-2 5
Control Settings
The temperature range of the wine center/beverage and
ZLQHFHQWHULVLQWHQGHGIRU)&WR)&
The display shows the average temperature of the
DSSOLDQFH,WLVQRUPDOIRUWKHDFWXDOWHPSHUDWXUHWRYDU\
slightly during operation.
Auto Temperature Setting
:KHQWKHDSSOLDQFHLVSOXJJHGLQRUWKH³´SDGLV
SUHVVHGWKHDSSOLDQFHUXQVRQWKH³$XWR%HY´VHWWLQJ
RI)&DQGWKH³$XWR%HY´LQGLFDWRUOLJKWLQWKH
upper left corner stays lit.
1RWH'LVSOD\ZLOOIODVKZKHQWKH³´SDGLVSUHVVHG
Normal Temperature Setting
The temperature of the appliance can be set anywhere
EHWZHHQ)&WR)&E\WKH³´DQG³±´
pads.
1. Press and hold the SET pad. You will hear a series of
2 beeps.
$IWHUWKHVHFRQGEHHSSUHVVWKH³´DQG³±´SDGV
to increase or decrease the desired temperature in
LQFUHPHQWVRIRQHGHJUHH'XULQJWKLVWLPHWKHGLVSOD\
will flash.
3. Press SET to confirm your choice. The display
ZLOOVWRSIODVKLQJ,IQRFRQILUPDWLRQLVPDGHLQWHQ
seconds, the unit will automatically accept your
change.
NOTE: When you change the temperature setting, there
PD\EHDPLQXWHGHOD\XQWLOWKHFRPSUHVVRUVWDUWVWR
run.
Fahrenheit and Celsius
The temperature display can be changed between
)DKUHQKHLWDQG&HOVLXVE\SUHVVLQJDQGKROGLQJWKH³´
pad for approximately 5 seconds.
Indicator Light
The indicator is lit when the compressor is running to
FRRO\RXUXQLW,WZLOOQRWEHOLWZKHQWKHFRPSUHVVRULV
idle.
Interior Light
To switch the interior light on/off, simply press the
pad.
When the Wine Center/Beverage and Wine Center is Plugged In
After plugging in the wine center/beverage and wine
center and setting the desired temperature, allow the
appliance to reach the set temperature before loading
your wine. The temperature may take up to 12 hours to
FRPSOHWHO\VWDELOL]H
After loading the wine and/or beverages, you may notice
the actual temperature rise. This is normal. The actual
temperature will continue to change as the wine and/
or beverages are cooled to the set temperature. The
temperature may take up to 12 hours to completely
VWDELOL]H
A guide with wine serving
temperature suggestions is
located on the inside right
SRUWLRQRIWKHXQLW,WJLYHV
recommended temperatures
for different wines, as well
as instructions on adjusting
the temperature of the wine
center/beverage and wine
center
NOTE: The exterior of the
cabinet may get warm. This
is normal.
Interior Light
You can turn the light ON or OFF by pushing the light
switch located on the right side of the control panel
KRXVLQJ,IWKHLQWHULRUOLJKWLVOHIWRQLWZLOOUDLVHWKH
inside temperature.
Controls
USING THE APPLIANCE: Controls
Auto Bev
,QGLFDWRU/LJKW

649-60734-2
GVS04 Beverage and Wine Center Only
USING THE APPLIANCE: *96%HYHUDJHDQG:LQH&HQWHU
Wooden Shelves
Wooden shelves in the beverage and wine center are
removable for easy cleaning and for storing larger items.
To remove a shelf, open the door completely to avoid
SRWHQWLDOGDPDJHWRWKHVKHOI/LIWVOLJKWO\DQGSXOOWKH
shelf forward. The shelf may fit tightly in the track.
To replace a shelf, open the door completely to avoid
potential damage to the shelf. Slide the shelf into the
tracks along the sides of the cabinet until it stops.
Wine and Beverage Loading
As with any refrigeration product, there is a slight
temperature variance at different locations within the
cabinet.
Suggested bottle
DUUDQJHPHQWIRUZLQH±
IXOOORDGKROGVZLQH
ERWWOHV
Suggested arrangement
IRURWKHUEHYHUDJHV±
IXOOORDGKROGV
EHYHUDJHV

49-60734-2
Wine Racks
Wine racks in the wine center are removable for easy
cleaning and for storing larger items.
To remove a shelf, open the door completely to avoid
SRWHQWLDOGDPDJHWRWKHVKHOI/LIWVOLJKWO\DQGSXOOWKH
shelf forward. The shelf may fit tightly in the track.
To replace a shelf, open the door completely to avoid
potential damage to the shelf. Slide the shelf into the
tracks along the sides of the cabinet until it stops.
Wine Loading
As with any refrigeration product, there is a slight
temperature variance at different locations within the
cabinet.
7KLVZLQHFHQWHUKROGVERWWOHVDWIXOOFDSDFLW\7KH
second wine rack is designed with extra height. This
allows the storage of larger magnum bottles or the
VWDFNLQJRIW\SLFDOVL]HGERWWOHV
GWS04 Wine Center Only
USING THE APPLIANCE: *:6:LQH&HQWHU
Suggested
bottle
arrangement
for wine.

849-60734-2
Care and Cleaning
Cleaning the Outside
IMPORTANT: 8QSOXJWKHZLQHFHQWHUEHYHUDJHDQG
wine center before cleaning.
Keep the outside clean. The cabinet can be washed
with mild soap and water. Clean with a damp cloth.
Never use abrasive scouring powders.
8VHDJODVVFOHDQHURUPLOGVRDSDQGZDWHUDQGDVRIW
FORWKWRFOHDQWKHJODVVGRRU'RQRWXVHDQ\DEUDVLYH
powders.
'RQRWZLSHWKHDSSOLDQFHZLWKDVRLOHGGLVKFORWKRU
towel. These may leave a residue that can erode the
SDLQW'RQRWXVHVFRXULQJSDGVSRZGHUHGFOHDQHUV
bleach or cleaners containing bleach because these
products can scratch and weaken the paint finish.
The stainless steel door frame and door handles
*:6PRGHOVFDQEHFOHDQHGZLWKDFRPPHUFLDOO\
available stainless steel cleaner. Cleaners with oxalic
DFLGVXFKDV%DU.HHSHUV)ULHQG6RIW&OHDQVHUZLOO
UHPRYHVXUIDFHUXVWWDUQLVKDQGVPDOOEOHPLVKHV8VH
only a liquid cleanser free of grit and rub in the direction
RIWKHEUXVKOLQHVZLWKDGDPSVRIWVSRQJH'RQRWXVH
appliance wax or polish on the stainless steel.
Protect the paint finish. The finish on the outside of
WKHZLQHFHQWHUEHYHUDJHDQGZLQHFHQWHULVDKLJK
TXDOLW\EDNHGRQSDLQWILQLVK:LWKSURSHUFDUHLWZLOO
VWD\QHZORRNLQJDQGUXVWIUHHIRU\HDUV$SSO\DFRDWRI
kitchen/appliance wax when the wine chiller is new, and
then at least twice a year.
Cleaning the Inside
IMPORTANT: 8QSOXJWKHZLQHFHQWHUEHYHUDJHDQG
wine center before cleaning.
To clean the inner liner and racks, use a warm water
DQGEDNLQJVRGDVROXWLRQ²DERXWRQHWDEOHVSRRQ
PORIEDNLQJVRGDWRDTXDUWOLWHURIZDWHU7KLVERWK
FOHDQVDQGQHXWUDOL]HVRGRUV&OHDQZLWKDGDPSFORWK
The vinyl door gasket may be cleaned with mild soap
and water or a baking soda solution.
'RQRWXVHGHWHUJHQWVVFRXULQJSRZGHUVVSUD\
cleaners or other harsh chemicals to clean the interior.
For GVS04 Models: To avoid water stains on the wood
shelves, clean up and dry any liquid spills immediately.
:LSHWKHFRQWUROSDQHOZLWKDGDPSFORWK'U\
WKRURXJKO\'RQRWXVHFOHDQLQJVSUD\VODUJHDPRXQWV
of soap and water, abrasives or sharp objects on the
panel—they can damage it. Some paper towels can also
scratch the control panel.
Automatic Defrosting
The model uses the compressor on/off cycling to defrost
DXWRPDWLFDOO\FRPSUHVVRUVWRSWHPSHUDWXUHULVHV
Never use a heater of any kind, scraper or sharp
instrument to remove frost as it may damage the wine
center/beverage and wine center.
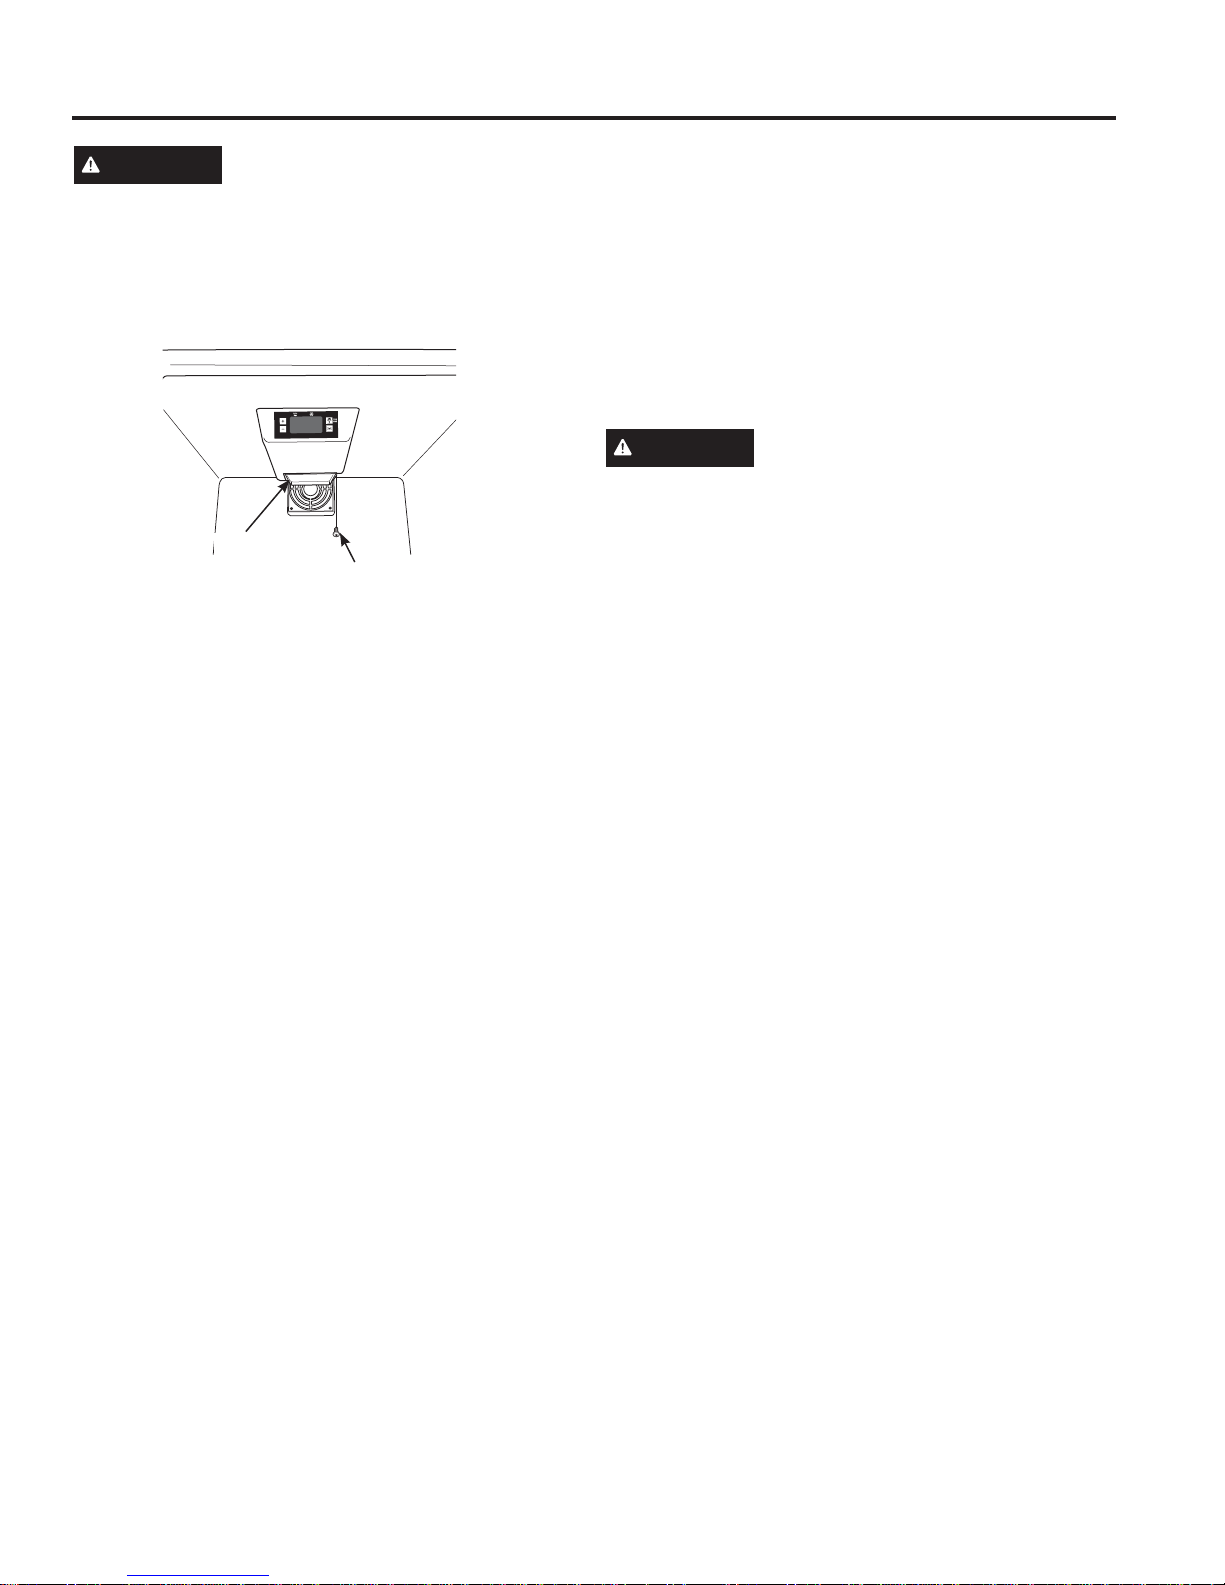
NOTE: The drain pan above the compressor may be
full following defrost. Check to make sure no water spills
when moving the unit.
In the Event of a Power Failure
,IWKHSRZHUIDLOVRSHQWKHGRRUDVLQIUHTXHQWO\DV
possible to maintain the temperature. A gradual rise in
temperature should not have any adverse effect on the
wine.
,ILWLVH[WUHPHO\KRW\RXPD\ZDQWWRXQORDGWKHZLQH
from the beverage center/wine chiller and move the wine
to a cooler location until power is restored.
The controls may maintain your temperature settings
ZKHQWKHSRZHUKDVEHHQUHVWRUHG,I\RXUVHWWLQJV
are not correct, reset according to the Control Settings
section.
Preparing to Move
8QORDGWKHZLQHWKHQVHFXUHWKHUDFNVE\WDSLQJWKHP
in place to prevent damage. Be sure the beverage center/wine chiller stays in an
upright position during the move.
CARE AND CLEANING

49-60734-2
CARE AND CLEANING
Replacing the Light Bulb
WARNING %HIRUHUHSODFLQJDEXUQHGRXWOLJKW
bulb, the refrigerator should be unplugged in order to
DYRLGFRQWDFWZLWKDOLYHZLUHILODPHQW$EXUQHGRXW
OLJKWEXOEPD\EUHDNZKHQEHLQJUHSODFHG
Turning the control to the OFF position does not remove
power to the light circuit.
8QSOXJWKHZLQHFHQWHUEHYHUDJHDQGZLQHFHQWHU
2. Remove any beverages and shelves as needed for
access.
3. The light bulb is located behind a light shield in the
ceiling of the wine center/beverage and wine center
near the back. To remove the light shield, remove the
screw on the right side of the light shield.
4. Pull down on the back of the light shield to release
the two front tabs.
8QVFUHZWKHOLJKWEXOEIURPWKHVRFNHW
5HSODFHZLWKDZDWWYROWEXOE7KLVW\SHRI
bulb is available at most hardware and automotive
parts stores.
WARNING 8VLQJDEXOEUDWHGKLJKHUWKDQZDWWV
may damage the electronic controls on the wine center/
beverage and wine center.
5HLQVWDOOWKHOLJKWVKLHOG
8. Replace the top shelf and beverages.
3OXJLQWKHZLQHFHQWHUEHYHUDJHDQGZLQHFHQWHU
/LJKW6KLHOG
Screw

49-60734-2
Installation
Instructions Models GVS04 and GWS04
Questions? Call 800.GE.CARES (800.432.2737) or visit our Website at: GEAppliances.com
In Canada, call 1.800.561.3344 or visit our Website at: www.GEAppliances.ca
REMOVING THE PACKAGING
Before using the Wine Center/Beverage and Wine
Center, be sure all packing materials and tape have
been removed, including the protective film covering
the control and any film protecting the cabinet.
,I\RXDUHGLVFDUGLQJDQROGUHIULJHUDWLRQSURGXFW
remove the doors to reduce the danger of children
being trapped inside.
LEVELING LEGS
Adjustable legs at the front corners of the Wine
Center/Beverage and Wine Center
should be set so the Wine Center/
Beverage and Wine Center is firmly
SRVLWLRQHGRQWKHIORRUZLWKD´WLOW
to the back to help the door closure.
To adjust the leveling legs, turn the
legs counterclockwise to raise the
beverage center/wine chiller, clockwise
to lower it.
BUILT-IN INSTALLATION
The cutout dimension shown, allows for door swing
DQGDFFHVVWRWKHSXOORXWVKHOYHVZKHQLQVWDOOHGDV
DEXLOWLQDSSOLDQFH,ILQVWDOOLQJEHWZHHQIUDPHOHVV
FDELQHWVDò´ZLGHILOOHUVWULSRUVLGHSDQHOPD\EH
needed on hinge side. The filler strip will act as a
spacer between the appliance case and adjacent
cabinet door swing. The width of the opening must
include the filler strip.
NOTE: 7KHGRRUVKRXOGSURWUXGH´EH\RQGWKH
surrounding cabints.
INSTALLATION GUIDELINES
Ŷ7KH:LQH&HQWHU%HYHUDJHDQG:LQH&HQWHUU
can be freestanding or can be installed under the
counter, with proper clearances.
Ŷ$OORZWKHIROORZLQJFOHDUDQFHVIRUHDVHRI
installation, proper air circulation and electrical
connections:
(DFKVLGH ´
7RS ´
%DFN ´
Ŷ%HIRUHFRQQHFWLQJWKHDSSOLDQFHWRWKHSRZHU
source, let it stand upright for approximately
2 hours. This will reduce the possibility of a
malfunction in the cooling system from handling
during transportation.
Ŷ'RQRWLQVWDOOWKH:LQH&HQWHU%HYHUDJHDQG
Wine Center where the temperature will go below
)&RUDERYH)&,IWKHURRP
temperature is below the temperature setting,
the Wine Center/Beverage and Wine Center will
QRWRSHUDWHIRULQVWDQFHLIWKHURRPLVDW)
&DQGWKHVHWWLQJLV)&WKHXQLW
ZLOOQRWUXQ
ŶQVWDOOLWRQDOHYHOIORRU
Ŷ'RQRWLQVWDOOWKH:LQH&HQWHU%HYHUDJHDQG:LQH
Center where it will be subject to direct sunlight,
heat or moisture.
Ŷ'RQRWVWRUHRULQVWDOOWKLVDSSOLDQFHRXWGRRUV
19"
482.6 mm19-1/2" Min.
495.3 mm Min.
22-1/2"
569 mm
including door
19"
495.3 mm
6" Max.
152 mm Max.
33-1/2" Min.
851 mm Min.
23-1/2" Min
597mm Min.
33"
838 mm
Locate Outlet
To raise the
appliance
INSTALLATION INSTRUCTIONS

49-60734-2 11
INSTALLATION INSTRUCTIONS
Installation Instructions
DOOR HANDLE
The door handle and screws
are shipped in a hardware
bag attached to one of the
shelves inside the cabinet.
/RFDWHWKHGRRUKDQGOHDQG
two screws. Secure the door
handle to the side of the
door as shown.
REVERSING THE DOOR
8QSOXJWKHEHYHUDJHDQGZLQHFHQWHU
2. Tape the door shut with masking tape to secure
alignment.
3. Remove the top hinge cover by removing the screw.
4. Remove the 2 screws securing the top hinge to the
frame.
/HDQWKHEHYHUDJHFHQWHUEDFNZDUGWRDFFHVVWKH
bottom hinge.
6. Remove the 2 screws securing the bottom hinge
assembly to the frame.
NOTE: ,I\RXOD\WKHXQLWRQLWVEDFNEHVXUH
to let it stand upright for at least 2 hours before
FRQQHFWLQJWRWKHSRZHUVRXUFHWKLVZLOOUHGXFHWKH
possibility of a malfunction in the cooling system.
5HPRYHWKH3OXJ%XWWRQIURPWKHWRSOHIWVLGHRIWKH
door.
,QVWDOOWKH3OXJ%XWWRQLQWRWKHKLQJHKROHRQWKH
right side. Press firmly to secure.
,IWKHKDQGOHKDVEHHQLQVWDOOHGUHPRYHLWDQG
LQVWDOOLWRQWKHRSSRVLWHVLGH5HIHUWR'RRU+DQGOH
section for instructions.
+ROGWKHGRRUVHFXUHO\LQSODFHDQGLQVWDOOWKH
bottom hinge on the opposite side.
,QVWDOOWKHWRSKLQJHDQGFRYHURQWKHRSSRVLWH
side. Make sure the door is aligned with the cabinet
before tightening the screws.
12.Remove the tape. Open and close the door to check
DOLJQPHQWZLWKWKHFDELQHW,IQHFHVVDU\ORRVHQWKH
screws on the bottom hinge, realign the door, and
retighten the screws.
13.Plug in the beverage and wine center.
NOTE:,I\RXKDGWROD\WKHXQLWRQLWVEDFNEH
sure to let it stand upright for at least 2 hours before
FRQQHFWLQJLWWRWKHSRZHUVRXUFHWKLVZLOOUHGXFH
the possibility of a malfunction in the cooling system.
14.Set the temperature controls to the desired setting.
DOOR LOCK
To secure the door lock,
push the key in and
URWDWHFORFNZLVH
To unlock, push the
NH\LQDQGURWDWH
FRXQWHUFORFNZLVH
GVS04 Models Only
Screw
'RRU
Handle
.H\
/RFN
Hinge
cover
Top
Hinge
Bottom
Hinge
Plug
Button
Screw
Bottom
Hinge
/HYHOLQJ/HJ

12 49-60734-2
Troubleshooting Tips... Before you call for service
6DYHWLPHDQGPRQH\5HYLHZWKHFKDUWVRQWKHIROORZLQJSDJHVILUVWDQG\RXPD\QRWQHHGWRFDOOIRUVHUYLFH,I
QHHGHGVHUYLFHFDQEHVFKHGXOHGE\YLVLWLQJXVRQOLQH*($SSOLDQFHVFRPRUFDOOLQJ*(&$5(6
,Q&DQDGDYLVLW*($SSOLDQFHVFDRUFDOO
Problem Possible Causes What to Do
Appliance does not
operate and the
display is blank
Appliance is unplugged. Push the plug completely into the outlet.
The home circuit breaker is
tripped/the fuse is blown. Replace fuse or reset the breaker.
Vibration or rattling
(slight vibration is
normal)
Appliance is on an uneven
surface. See the Leveling Legs section.
Motor operates for
long periods or cycles Normal when appliance is first
plugged in. Wait 12 hours for the appliance to completely
cool down.
Often occurs when large
amounts of wine are placed in
appliance.
This is normal.
Door left open. 'RRULVQRWVHOIFORVLQJ$OZD\VPDNHVXUHWKDW
the door is closed after opening.
Check to see if a bottle is holding door open.
Hot weather or frequent door
openings. This is normal.
Temperature control set at the
coldest setting. See About the control and settings.
Appliance is too close to the
wall. See the Installation Guidelines section for the
correct clearances.
Appliance too warm Normal when appliance is first
plugged in. Wait 12 hours for the appliance to completely
cool down.
Often occurs when large
amounts of wine are placed in
appliance.
This is normal.
Temperature control not set cold
enough. See About the control and settings.
Warm weather or frequent door
openings. Set the temperature control one step colder.
See About the control and settings.
Appliance is too close to the
wall. See the Installation Guidelines section for the
correct clearances.
Door left open. 'RRULVQRWVHOIFORVLQJ$OZD\VPDNHVXUHWKDW
the door is closed after opening.
Check to see if a bottle is holding door open.
Appliance does
not operate, but
the display is lit
and functioning
temperature.
Setting is above room
temperature. 7KLVLVQRUPDO,IZLQHDQGRUEHYHUDJHVDUH
too warm, change the temperature setting to a
lower.
TROUBLESHOOTING TIPS

49-60734-2 13
TROUBLESHOOTING TIPS
Troubleshooting Tips... Before you call for service
Problem Possible Causes What To Do
Appliance has odor Interior needs cleaning. See Care and cleaning.
Moisture forms on
outside of appliance Not unusual during
periods of high
humidity.
Wipe surface dry.
Moisture collects inside
(in humid weather, air
carries moisture into
appliance when door is
opened)
Too frequent or too
long door openings.
Wine bottles touching
the back wall. Reposition bottles.
Frost forms on interior
surfaces of appliance This is normal. See the Defrosting section.
Door left open. Excessive frost may form if the door is left open. See the
Defrosting section.
'RRULVQRWVHOIFORVLQJ$OZD\VPDNHVXUHWKDWWKHGRRU
is closed after opening.
Check to see if a bottle is holding door open.
Appliance too cold Temperature control is
set too cold. See About the control and settings.
The room temperature
wherethe appliance is
located is too cold.
For proper operation, the room temperature should
be equal to or greater than the set temperature of the
appliance.
Temperature in the
display is not the
temperature that was
just set.
This is normal. After you set the temperature, the display will go back to
showing the actual temperature.
Condensation on front
of door Appliance is located
in a high humidity
environment.
Wipe off the condensation with a clean, dry cloth.
/RFDWHWKHDSSOLDQFHLQDORZHUKXPLGLW\HQYLURQPHQW
Water on floor behind
appliance Door left open. 'RRULVQRWVHOIFORVLQJ$OZD\VPDNHVXUHWKDWWKHGRRU
is closed after opening.
Check to see if a bottle is holding door open.
Tilting unit when
moving. This is normal. The drain pan above the compressor may
be full following defrost. Check to make sure no water
spills when moving the unit.
GWS04 Wine Center Only
Rust, tarnish, or grime
on stainless steel doors Moist environment or
salt air. Clean stainless steel with cleaners containing oxalic acid
HJ%DU.HHSHUV)ULHQG6RIW&OHDQVHUZLOOUHPRYHUXVW
lime, DQGRWKHUWDUQLVK'RQRWZLSHWKHappliance with a
VRLOHGGLVKFORWKRUZHWWRZHO'RQRWXVHVFRXULQJSDGV
powdered cleaners, bleach or cleaners containing bleach
because these products can scratch and ruin the brush
¿QLVKRIWKHVWDLQOHVVVWHHO

14 49-60734-2
Notes
NOTES

49-60734-2 15
WARRANTY Staple your receipt here. Proof of the original purchase
date is needed to obtain service under the warranty.
Wine Center/Beverage and Wine Center Warranty
GEAppliances.com
$OOZDUUDQW\VHUYLFHLVSURYLGHGE\RXU)DFWRU\6HUYLFH&HQWHUVRUDQDXWKRUL]HG&XVWRPHU&DUH®technician. To schedule
service online, visit us at www.geappliances.com/service_and_support/RUFDOO*($SSOLDQFHVDW*(&$5(6
3OHDVHKDYH\RXUVHULDOQXPEHUDQG\RXUPRGHOQXPEHUDYDLODEOHZKHQFDOOLQJIRUVHUYLFH
In Canada, FDOO
ŶService trips to your home to teach you how to
use the product.
ŶImproper installation, delivery or maintenance.
ŶFailure of the product if it is abused, misused, or
used for other than the intended purpose or used
commercially.
ŶLoss of beverages due to spoilage.
ŶReplacement of house fuses or resetting of circuit
breakers.
ŶDamage caused after delivery.
ŶReplacement of the light bulbs, if included, or
water filter cartridge, if included, other than as
noted above.
ŶDamage to the product caused by accident, fire,
floods or acts of God.
ŶIncidental or consequential damage caused by
possible defects with this appliance.
ŶProduct not accessible to provide required service.
ŶDamage to finish, such as surface rust, tarnish, or
small blemishes not reported within 48 hours of
delivery..
What GE Appliances Will Not Cover:
For US Customers: This warranty is extended to the original purchaser and any succeeding owner for products
SXUFKDVHGIRUKRPHXVHZLWKLQWKH86$,IWKHSURGXFWLVORFDWHGLQDQDUHDZKHUHVHUYLFHE\D*($XWKRUL]HG
Servicer is not available, you may be responsible for a trip charge or you may be required to bring the product to an
$XWKRUL]HG*(6HUYLFHORFDWLRQIRUVHUYLFH,Q$ODVNDWKHZDUUDQW\H[FOXGHVWKHFRVWRIVKLSSLQJRUVHUYLFHFDOOVWR
your home.
Some states do not allow the exclusion or limitation of incidental or consequential damages. This warranty gives
you specific legal rights, and you may also have other rights which vary from state to state. To know what your legal
rights are, consult your local or state consumer affairs office or your state’s Attorney General.
Warrantor US: GE Appliances
EXCLUSION OF IMPLIED WARRANTIES—Your sole and exclusive remedy is product repair as provided
in this Limited Warranty. Any implied warranties, including the implied warranties of merchantability or
fitness for a particular purpose, are limited to one year or the shortest period allowed by law.
For the Period of: GE Appliances Will Replace
One Year
From the date of the
original purchase
Any part of the refrigerator which fails due to a defect in materials or workmanship.
'XULQJWKHlimited one-year warranty, GE Appliances will also provide, free of
charge, all labor and related service to replace the defective part.
For Customers in Canada: This warranty is extended to the original purchaser and any succeeding owner for
SURGXFWVSXUFKDVHGLQ&DQDGDIRUKRPHXVHZLWKLQ&DQDGD,QKRPHZDUUDQWVHUYLFHZLOOEHSURYLGHGLQDUHDVZKHUH
it is available and deemed reasonable by Mabe to provide.
Warrantor Canada: MC Commercial, Burlington, Ontario, L7R 5B6

16 49-60734-2
GE Appliances Website
Have a question or need assistance with your appliance? Try the GE Appliances Website 24 hours a day, any day
RIWKH\HDU<RXFDQDOVRVKRSIRUPRUHJUHDW*($SSOLDQFHVSURGXFWVDQGWDNHDGYDQWDJHRIDOORXURQOLQHVXSSRUW
VHUYLFHVGHVLJQHGIRU\RXUFRQYHQLHQFH,QWKH86GEAppliances.com,Q&DQDGDGEAppliances.ca
Register Your Appliance
5HJLVWHU\RXUQHZDSSOLDQFHRQOLQHDW\RXUFRQYHQLHQFH7LPHO\SURGXFWUHJLVWUDWLRQZLOODOORZIRUHQKDQFHG
communication and prompt service under the terms of your warranty, should the need arise. You may also mail in
WKHSUHSULQWHGUHJLVWUDWLRQFDUGLQFOXGHGLQWKHSDFNLQJPDWHULDO
,QWKH86GEAppliances.com/register
,Q&DQDGDProdsupport.mabe.ca/crm/Products/ProductRegistration.aspx
Schedule Service
([SHUW*($SSOLDQFHVUHSDLUVHUYLFHLVRQO\RQHVWHSDZD\IURP\RXUGRRU*HWRQOLQHDQGVFKHGXOH\RXUVHUYLFHDW
\RXUFRQYHQLHQFHDQ\GD\RIWKH\HDU,QWKH86GEAppliances.com/ge/service-and-support/service.htm
RUFDOOGXULQJQRUPDOEXVLQHVVKRXUV
,Q&DQDGDGEAppliances.ca/en/support/service-requestRUFDOO
Extended Warranties
Purchase a GE Appliances extended warranty and learn about special discounts that are available while your
ZDUUDQW\LVVWLOOLQHIIHFW<RXFDQSXUFKDVHLWRQOLQHDQ\WLPH*($SSOLDQFHV6HUYLFHVZLOOVWLOOEHWKHUHDIWHU\RXU
warranty expires.
,QWKH86GEAppliances.com/ge/service-and-support/shop-for-extended-service-plans.htm
RUFDOOGXULQJQRUPDOEXVLQHVVKRXUV
,Q&DQDGDGEAppliances.ca/en/support/purchase-extended-warrantyRUFDOO
Remote Connectivity
)RUDVVLVWDQFHZLWKZLUHOHVVQHWZRUNFRQQHFWLYLW\IRUPRGHOVZLWKUHPRWHHQDEOH
visit our website at GEAppliances.com/ge/connected-appliances/RUFDOOLQWKH86RQO\
Parts and Accessories
,QGLYLGXDOVTXDOLILHGWRVHUYLFHWKHLURZQDSSOLDQFHVFDQKDYHSDUWVRUDFFHVVRULHVVHQWGLUHFWO\WRWKHLUKRPHV
9,6$0DVWHU&DUGDQG'LVFRYHUFDUGVDUHDFFHSWHG2UGHURQOLQHWRGD\KRXUVHYHU\GD\
,QWKH86GEApplianceparts.comRUE\SKRQHDWGXULQJQRUPDOEXVLQHVVKRXUV
Instructions contained in this manual cover procedures to be performed by any user. Other servicing
generally should be referred to qualified service personnel. Caution must be exercised, since improper
servicing may cause unsafe operation.
Customers in Canada should consult the yellow pages for the nearest Mabe service center, visit our website at
GEAppliances.ca/en/products/parts-filters-accessoriesRUFDOO
Contact Us
,I\RXDUHQRWVDWLVILHGZLWKWKHVHUYLFH\RXUHFHLYHIURP*($SSOLDQFHVFRQWDFWXVRQRXU:HEVLWHZLWKDOOWKH
details including your phone number, or write to:
,QWKH86*HQHUDO0DQDJHU&XVWRPHU5HODWLRQV_*($SSOLDQFHV$SSOLDQFH3DUN_/RXLVYLOOH.<
GEAppliances.com/ge/service-and-support/contact.htm
,Q&DQDGD'LUHFWRU&RQVXPHU5HODWLRQV0DEH&DQDGD,QF_6XLWH)DFWRU\/DQH_0RQFWRQ1%(&0
GEAppliances.ca/en/contact-us
CONSUMER SUPPORT
Consumer Support

Notez ici les numéros de modèle et
de série :
Numéro de modèle : ___________
Numéro de série : _____________
Vous trouverez ces numéros à
l'intérieur du refroidisseur à vins/à
boissons sur le côté gauche.
GE est une marque déposée de General Electric Company. Fabriqué sous licence de marque.
MANUEL
D’UTILISATION ET
D’INSTALLATION
REFROIDISSEUR À VINS /
REFROIDISSEUR À VINS ET À
BOISSONS
245D1821P001 49-60734-2 03-17 GEA
CONSIGNES DE SÉCURITÉ ......3
UTILISATION DE L’APPAREIL
Commandes ..........................5
Refroidisseur à vins et à boissons
GVS04 ...........................6
Refroidisseur à vins GWS04.............7
ENTRETIEN ET NETTOYAGE. . . . . . .8
Entretien et nettoyage .................9
INSTRUCTIONS
D’INSTALLATION .............10
Modèles GVS04 uniquement ........... 11
CONSEILS DE DÉPANNAGE ...12
GARANTIE........................15
SOUTIEN
AU CONSOMMATEUR ......16
Refroidisseur à vins GWS04
Refroidisseur à vins et à boissons
GVS04
FRANÇAIS
.

249-60734-2
NOUS VOUS REMERCIONS D’ACCUEILLIR GE APPLIANCES CHEZ VOUS
Que vous ayez grandi avec GE Appliances ou qu’il s’agisse de votre première acquisition, nous
sommes heureux de vous accueillir dans notre famille.
Nous sommes fiers du savoir-faire, de l’innovation et de l’esthétique qui composent chaque appareil
GE Appliances, et nous pensons que vous le serez aussi.

49-60734-2 3
AVERTISSEMENT RELATIF À LA PROPOSITION 65 DE LA CALIFORNIE :
AVERTISSEMENT Ce produit contient une ou plusieurs substances chimiques reconnues par l'État de la
Californie comme cancérigènes, tératogènes ou ayant des effets nuisibles sur le système
reproductif.
ATTENTION Pour réduire le risque de blessures lorsque vous utilisez votre Refroidisseur à vins/Refroidisseur
à vins et à boissons, veuillez suivre ces consignes de sécurité :
Ŷ 1HQHWWR\H]SDVOHVFOD\HWWHVRXOHVFRXYHUFOHVHQYHUUH
avec de l'eau tiède quand ceux-ci sont froids. Les étagères
et couvercles en verre peuvent se casser s'ils sont
exposés à des changements soudains de température ou
si vous les cognez ou les faites tomber. Le verre trempé
est conçu pour se briser en petits morceaux en cas de
casse.
Ŷ eORLJQH]OHVGRLJWVGHVSDUWLHVRO¶RQSHXWIDFLOHPHQWVH
pincer : les espaces entre les portes, et entre les portes et
les placards sont toujours étroits. Soyez prudent lorsque
vous fermez les portes du refroidisseur en présence
d’enfants.
Ŷ 1HUHFRQJHOH]SDVOHVDOLPHQWVVXUJHOpVTXLRQW
complètement dégelés.
Ŷ 6LYRWUH5HIURLGLVVHXUjYLQV5HIURLGLVVHXUjYLQVHWj
boissons est doté d’une machine à glaçons automatique,
évitez le contact avec les pièces mobiles du mécanisme
éjecteur, ou avec l’élément chauffant qui libère les
glaçons. Ne posez pas les doigts ou les mains sur le
mécanisme de la machine à glaçons automatique pendant
que le refroidisseur est branché.
LISEZ ET CONSERVEZ CES INSTRUCTIONS
AVERTISSEMENT Pour réduire le risque d’incendie, d’explosion, de choc électrique ou de blessures lorsque
vous utilisez votre Refroidisseur à vins/Refroidisseur à vins et à boissons, veuillez suivre
ces consignes de sécurité :
Ŷ &H5HIURLGLVVHXU¬9LQV5HIURLGLVVHXUjYLQVHWjERLVVRQV
doit être correctement installé et positionné conformément
aux Instructions d’Installation avant toute utilisation.
Ŷ 'pEUDQFKH]O¶DSSDUHLODYDQWG¶HIIHFWXHUXQHUpSDUDWLRQGH
remplacer une ampoule ou de le nettoyer. REMARQUE:
L'alimentation de l’appareil ne peut être déconnectée
par aucune des fonctions sur le panneau de commande.
REMARQUE : Les réparations doivent être effectuées par
un professionnel qualifié.
Ŷ 5HPHWWH]WRXWHVOHVSLqFHVHWSDQQHDX[HQSODFHDYDQW
d’utiliser l’appareil.
Ŷ 1HVWRFNH]SDVRXQ¶XWLOLVH]SDVGHVVHQFHRXGDXWUHV
vapeurs et liquides inflammables à proximité de cet
appareil ou de tout autre appareil électroménager.
Ŷ 1RXVGpFRQVHLOORQVIRUWHPHQWO¶XWLOLVDWLRQG¶XQH
rallonge électrique à cause des risques potentiels dans
certaines conditions. Cependant, si l’utilisation d’une
rallonge électrique est nécessaire, cette dernière doit
obligatoirement être homologuée UL (aux USA), à trois
brins avec mise à la terre pour appareil électroménager
et doit être équipée d'une fiche et d'une prise femelle
avec terre. Les caractéristiques électriques de la rallonge
doivent être de 15 ampères (minimum) et de 120 volts.
Ŷ 3RXUpYLWHUWRXWULVTXHGHVXIIRFDWLRQRXG¶HQIHUPHPHQW
retirez les portes de tout appareil électroménager avant de
le mettre au rebut ou si vous arrêtez de l’utiliser.
Ŷ 1HODLVVH]SDVOHVHQIDQWVJULPSHUVHPHWWUHGHERXWRX
se suspendre aux poignées de portes ou les clayettes du
Refroidisseur à vins/Refroidisseur à vins et à boissons. Ils
pourraient se blesser gravement.
IMPORTANTES CONSIGNES DE SÉCURITÉ
LISEZ TOUTES LES CONSIGNES AVANT D’UTILISER CET APPAREIL
INSTALLATION
AVERTISSEMENT RISQUE D'EXPLOSION
Garder les matériaux et les vapeurs inflammables, tels que l'essence, à l’écart du Refroidisseur à vins / Refroidisseur à vins et
à boissons. Une explosion, un incendie voire la mort pourrait en résulter.
SAFETY INFORMATION

449-60734-2
CONSIGNES DE SÉCURITÉ
AVERTISSEMENT RISQUE DE SUFFOCATION OU D'ENFERMEMENT D’UN ENFANT
Retirez la porte du refroidisseur à vins / refroidisseur à vins et à boissons avant de le mettre au rebut. Le non-respect de cette
recommandation peut entraîner l’enfermement d’un enfant qui peut entraîner la mort ou des lésions cérébrales.
IMPORTAN : Les enfants pris au piège ou morts
d’asphyxie sont toujours d’actualité. Les appareils jetés
ou abandonnés restent dangereux même si vous ne les
laissez au rebut que pour « quelques jours ». Si vous
voulez jeter votre ancien appareil, suivez les instructions
suivantes pour empêcher les accidents.
Avant de mettre votre ancien Refroidisseur à vins /
Refroidisseur à vins et à boissons au rebut
ŶRetirez la porte de l'appareil.
ŶLaissez les clayettes en place afin d’empêcher les enfants
de grimper à l’intérieur.
Fluides frigorigènes
Les appareils réfrigérants contiennent des fluides frigorigènes
qui conformément à la législation fédérale doivent être retirés
avant la mise au rebut de l'appareil. Si vous mettez au rebut
un ancien appareil contenant des fluides frigorigènes, vérifiez
la procédure à suivre auprès de la compagnie responsable de
l’élimination.
ÉLIMINATION APPROPRIÉE DE VOTRE ANCIEN APPAREIL
Ne coupez pas ou n’enlevez pas, sous aucun prétexte, la troisième broche de mise à la terre du cordon
d’alimentation. Pour des raisons de sécurité, cet appareil doit être correctement mis à la terre.
Le cordon d’alimentation de cet appareil est équipé d’une
fiche à trois broches (pour une mise à la terre) qui s’adapte à
la prise de courant standard à 3 broches (pour une mise à la
terre) pour minimiser les risques de chocs électriques par cet
appareil.
Faites vérifier la prise murale et le circuit électrique par
un électricien qualifié pour s’assurer que le système est
correctement mis à la terre.
'DQVOHFDVG¶XQHSULVHELSKDVpHO¶LQVWDOODWHXUDOD
responsabilité et l’obligation de la remplacer par une prise
triphasée correctement mise à la terre. N’utilisez pas
d’adaptateur.
Le Refroidisseur à vins / Refroidisseur à vins et à boissons
doit toujours être branché à sa propre prise électrique d’une
tension nominale correspondant à celle indiquée sur sa
plaque signalétique.
Une alimentation électrique à 115 volts CA, 60 Hz, avec
un fusible de 15 ou 20 ampères et une mise à la terre est
nécessaire. Ceci permet d’obtenir un meilleur rendement et
évite de surcharger les circuits électriques du domicile qui
risque d’occasionner un incendie en surchauffant.
Ne débranchez jamais l’appareil en tirant sur le cordon
d’alimentation. Prenez toujours fermement la fiche en main et
tirez pour la sortir de la prise.
Réparez ou remplacez immédiatement tout cordon électrique
usé ou endommagé. N’utilisez pas un cordon fissuré ou
présentant des dommages dus aux frottements soit sur sa
longueur ou aux extrémités.
Lorsque vous éloignez l’appareil du mur, faites attention à ne
pas le faire rouler sur le cordon d’alimentation afin de ne pas
l’endommager.
BRANCHEMENTS ÉLECTRIQUES
AVERTISSEMENT RISQUE DE CHOC ÉLECTRIQUE
Branchez l’appareil dans une prise triple avec terre.
Ne retirez pas la broche de terre.
N’utilisez pas d’adaptateur.
Le non-respect de ces règles peut entraîner des risques d’incendies, des chocs électriques ou la mort.
LISEZ ET CONSERVEZ CES INSTRUCTIONS
IMPORTANTES CONSIGNES DE SÉCURITÉ
LISEZ TOUTES LES CONSIGNES AVANT D’UTILISER CET APPAREIL
This manual suits for next models
1
Table of contents
Languages:
Other GEAppliances Wine Cooler manuals
Popular Wine Cooler manuals by other brands

Frigidaire
Frigidaire FWW083XBLB instruction manual

Vintage Keeper
Vintage Keeper INTERKOOL 300 Installation & operation manual

Sub-Zero
Sub-Zero Designer Series Use and care guide

Salton
Salton WC-2070 Instruction booklet

Tecfrigo
Tecfrigo GROTTA 600 5TV Assembly, Installation and Use

Haier
Haier HVFM20A user manual