manuals.online logo
Brands
  1. Home
  2. •
  3. Brands
  4. •
  5. Gear Light
  6. •
  7. Headlamp
  8. •
  9. Gear Light X500 User manual

Gear Light X500 User manual

Operation Guide
FOR YOUR SAFETY, READ BEFORE OPERATING
Package Contents:
WARRANTY AND LIMITATION OF LIABILITY
MAINTENANCE
Inspect the headlamp monthly and carefully remove any damaged batteries and
clean any corrosion. If the headlamp is used less than once a month, remove the
batteries between uses.
Limited One-Year Warranty
GearLight warrants this product for one year from the date of purchase
against any defects in material or workmanship. This warranty does not cover
normal wear and tear, nor damage resulting from misuse or neglect. We will,
at our discretion, repair, replace, or refund the purchase price of this product
should we determine it to be defective.
Limitation Of Liability
Liability limited to the purchase price of this product. GearLight shall not be
liable for any incidental or consequential damages or any implied warranty on
this product. Some states do not allow the exclusion or limitation of
incidental or consequential damages, so the above limitation or exclusion
may not apply to you.
If the problem persists, possible LED Failure. Contact GearLight for a replacement.
Replace the batteries.
TROUBLESHOOTING
If the headlamp does not turn on, or works intermittently:
Replace the batteries.
Ensure the AAA batteries are inserted correctly according to the polarity (-,+)
marked on the battery compartment.
Make sure the battery compartment is closed tightly and securely.
Firmly press the power button on and o several times.
If the light appears dim or faded:
Irvine, California | USA | www.GearLight.com
X500 LED HEADLAMP
2x GearLight X500 LED Headlamps
1x Operation Guide
1x Warranty Card
v1
OPERATION
CAUTION: The headlamp may become warm or hot after extended periods of
use at the highest setting. Select a lower setting when the headlamp is hot.
GETTING STARTED
Note: To access the battery compartment, tilt the headlamp down and lift the latch.
AAA Battery Installation
1. Insert 3 AAA batteries following the correct
polarity (+,-) marked on the battery holder.
2. Close the battery compartment until the
latch clicks into place.
WARNING: Always follow the battery manufacturer’s instructions as to the proper
usage, handling, storage, and disposal of batteries. Use only batteries from a
reputable manufacturer. Do not mix dierent brands or types of batteries in the same
flashlight. Replace all batteries at the same time. Failure to follow safety instructions
may result in personal injury and damage to property.
WARNING:To avoid eye injury, do not stare directly into the light beam or shine the beam directly into
anyone’s eyes. Not to be used by children except under adult supervision.
Fig. 1
Adjustable Light Angle (Fig. 1)
• Tilt the headlamp down to adjust the beam angle and aim the light where it
is needed.
• To activate the color side light modes, press down firmly on the left side of the
power button . Press the side light power button again to cycle through the
3 color modes.
• There are 6 dierent lighting modes:
White Spot Light Modes: High, Medium, Strobe
Side Light Modes: White, Red, Green
• To activate the white spot light modes, press down firmly on the right side of the
power button . Press the spot light power button again to cycle through the
3 modes.
WHITE RED GREEN
PRESS 3xPRESS 2xPRESS 1x
HIGH MEDIUM STROBE
PRESS 3xPRESS 2xPRESS 1x
Switching Modes
• To turn the headlamp on, press down firmly on one of the power buttons
located on the top of the headlamp until you hear a click.
• To turn the headlamp o, press the same power button again to cycle through
the dierent modes until the headlamp turns o.
On/O
• Adjust the length of the head strap to fit your head comfortably.
• To loosen or tighten the head strap, simply slide the strap adjusters forward or
backward.
TIP: For a more comfortable fit, adjust both sides of the head straps evenly.
HEAD STRAP ADJUSTMENT
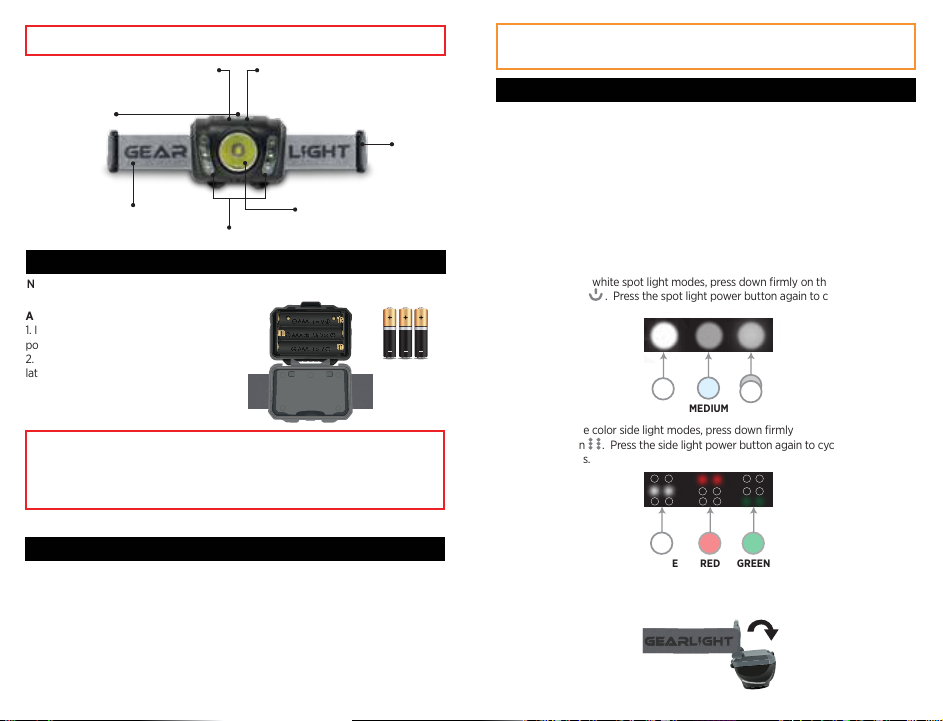
WHITE LED
COLOR LEDS
BATTERY
COMPARTMENT
LATCH
ELASTIC
HEAD STRAP
STRAP
ADJUSTERS
SPOT LIGHT
POWER BUTTON SIDE LIGHT
POWER BUTTON

Other Gear Light Headlamp manuals

Gear Light S1000 User manual

Gear Light

Gear Light S1000 User manual

Gear Light Operation Guide User manual

Gear Light

Gear Light Operation Guide User manual

Gear Light S500 User manual

Gear Light

Gear Light S500 User manual

Gear Light V500 User manual

Gear Light

Gear Light V500 User manual

Popular Headlamp manuals by other brands

GP CHR41 instruction manual

GP

GP CHR41 instruction manual

Sealey HT102R quick start guide

Sealey

Sealey HT102R quick start guide

Petzl DUO Z2 manual

Petzl

Petzl DUO Z2 manual

Night Stick XPP-5422G manual

Night Stick

Night Stick XPP-5422G manual

ledlenser SEO 7R operating instructions

ledlenser

ledlenser SEO 7R operating instructions

Night Stick USB-4510 instruction manual

Night Stick

Night Stick USB-4510 instruction manual

Ferei HL40AAII user manual

Ferei

Ferei HL40AAII user manual

HybridLight NAV manual

HybridLight

HybridLight NAV manual

Asaklitt MF-H09 instruction manual

Asaklitt

Asaklitt MF-H09 instruction manual

Petzl TIKKA manual

Petzl

Petzl TIKKA manual

FME Fanton 62569 user manual

FME

FME Fanton 62569 user manual

Milwaukee HL2-LED Original instructions

Milwaukee

Milwaukee HL2-LED Original instructions

Nitecore HC35 user manual

Nitecore

Nitecore HC35 user manual

Underwater Kinetics Vizion Z3 3AAA eLED user manual

Underwater Kinetics

Underwater Kinetics Vizion Z3 3AAA eLED user manual

Coast FL75 instructions

Coast

Coast FL75 instructions

DÖRR KL-15 instruction manual

DÖRR

DÖRR KL-15 instruction manual

Coleman CHT7 3AAA Instruction card

Coleman

Coleman CHT7 3AAA Instruction card

Forch 3885 60 manual

Forch

Forch 3885 60 manual

manuals.online logo
manuals.online logoBrands
  • About & Mission
  • Contact us
  • Privacy Policy
  • Terms and Conditions

Copyright 2025 Manuals.Online. All Rights Reserved.