Gefen Pro GEF-HDCAT5-ELRPOL2 User manual

1080P
Extender for HDMI ELR
with PoL 2 over CAT
5
G
EF-HD
C
AT
5
-ELRP
O
L
2
U
ser
M
anua
l
www.
g
efenpro.co
m

ASKING FOR ASSISTANC
E
R
ev
A1
T
echnical Su
pp
or
t
:
Telephone
(
818
)
772-910
0
(
800
)
545-690
0
Fax
(
818
)
772-912
0
T
echnical Su
pp
ort Hours
:
8
:00 AM to 5:00 PM Monda
y
thru Frida
y
, Paci
fi
c Tim
e
For 24
/
7 support, see the back o
f
the product
f
or the support number
Write To
:
G
e
f
en, LL
C
.
c/
o
C
ustomer
S
ervic
e
2
0600
Nordho
ff
S
t
C
hatsworth,
C
A 9131
1
s
upport
@g
e
f
enpro.com
www.
g
e
f
enpro.com
Notic
e
G
e
f
en, LL
C
reserves the ri
g
ht to make chan
g
es in the hardware, packa
g
in
g
and
an
y
accompan
y
in
g
documentation without prior written notice.
E
xtender for HDMI ELR with PoL 2 over CAT5
is a trademark o
f
G
e
f
en, LL
C
H
DMI, the HDMI lo
g
o, and
H
i
g
h-De
fi
nition Multimedia Inter
f
ac
e
a
r
e
tr
ade
m
a
rk
s
or re
g
istered trademarks o
f
HDMI Licensin
g
in the United
S
tates and other
cou
ntri
es
.
©
2011
G
e
f
en, LL
C
. All ri
g
hts reserved.
All trademarks are the propert
y
o
f
their respective owners.

CONTENT
S
1
Intr
oduc
ti
on
2
O
peration Notes
3
F
ea
t
u
r
es
4
S
ender Unit La
y
ou
t
5
S
ender Unit Descriptions
6
Receiver Unit La
y
ou
t
7 Receiver Unit Descriptions
8
IR Remote
C
ontrol Descriptio
n
9
IR Remote
C
ontrol Installatio
n
10 IR Remote
C
ontrol
C
on
f
i
g
uratio
n
11
C
onnectin
g
the Extender
f
or HDMI ELR PoL 2 over
C
AT
5
12 Wirin
g
Dia
g
ram
13 DIP
S
witch
C
on
f
i
g
uratio
n
1
3
S
ender
U
ni
t
1
5
Receiver
U
ni
t
1
8
Network
C
able Wirin
g
Dia
g
ram
19 Troubleshootin
g
2
0
S
peci
fi
cations
21 Warrant
y

1
C
on
g
ratulations on
y
our purchase o
f
the Extender
f
or HDMI ELR PoL2 over
C
AT5.
Your complete satis
f
action is ver
y
important to us.
G
efenPRO
In the realm o
f
video distribution, certain
f
eatures are invaluable in a commercial
or broadcast environment. Accommodations such as a build-in power suppl
y
and
fl
at black rack-mount enclosures set
G
e
f
enPR
O
apart
f
rom our traditional
p
roducts.
C
omplex distribution units allow
f
or pro
f
essional DVI, 3
G
-
S
DI, and
H
DMI si
g
nals to be routed and converted easil
y
and seamlessl
y
, while bein
g
backed up b
y
a renowned and dependable technical support team.
G
e
f
en invites
y
ou to explore the
G
e
f
enPR
O
product line and hopes that
y
ou
fi
nd the solution
that
fi
ts
y
our needs.
T
he GefenPRO Extender for HDMI ELR with PoL 2 over CAT5
The
G
e
f
enPR
O
Extender
f
or HDMI ELR PoL 2 over
C
AT5 does ever
y
thin
g
that
the
G
e
f
enPR
O
Extender
f
or HDMI ELR with PoL over
C
AT5 does, but adds
active source switchin
g
, with an additional Hi-De
f
input on the Receiver Unit.
This
f
eature provides the capabilit
y
to switch between the
(
remote
)
Hi-De
f
source
c
onnected to the
S
ender
U
nit and a local source connected to the Receiver
U
nit.
I
f
a new source is connected to the Receiver unit and turned on, the Receiver
u
nit will automaticall
y
switch to the local input. The Receiver unit will revert to the
r
emote input once the local device is turned o
ff
or disconnected. The
S
elec
t
button on the Receiver unit can be used to manuall
y
switch between the remote
and local inputs. An optional IR Remote
C
ontrol Unit
(G
e
f
en part no. RMT-2IR
)
c
an also be purchased to switch between the remote input and the local input
on the Receiver unit. The
G
e
f
enPR
O
Extender
f
or HDMI ELR PoL 2 over
C
AT
5
e
xtends a Hi-De
f
source with multichannel di
g
ital audio at resolutions o
f
up to
1080p Full HD to 330
f
eet
(
100 meters
)
, usin
g
one
C
AT-5 cable.
The Extender
f
or HDMI ELR PoL 2 over
C
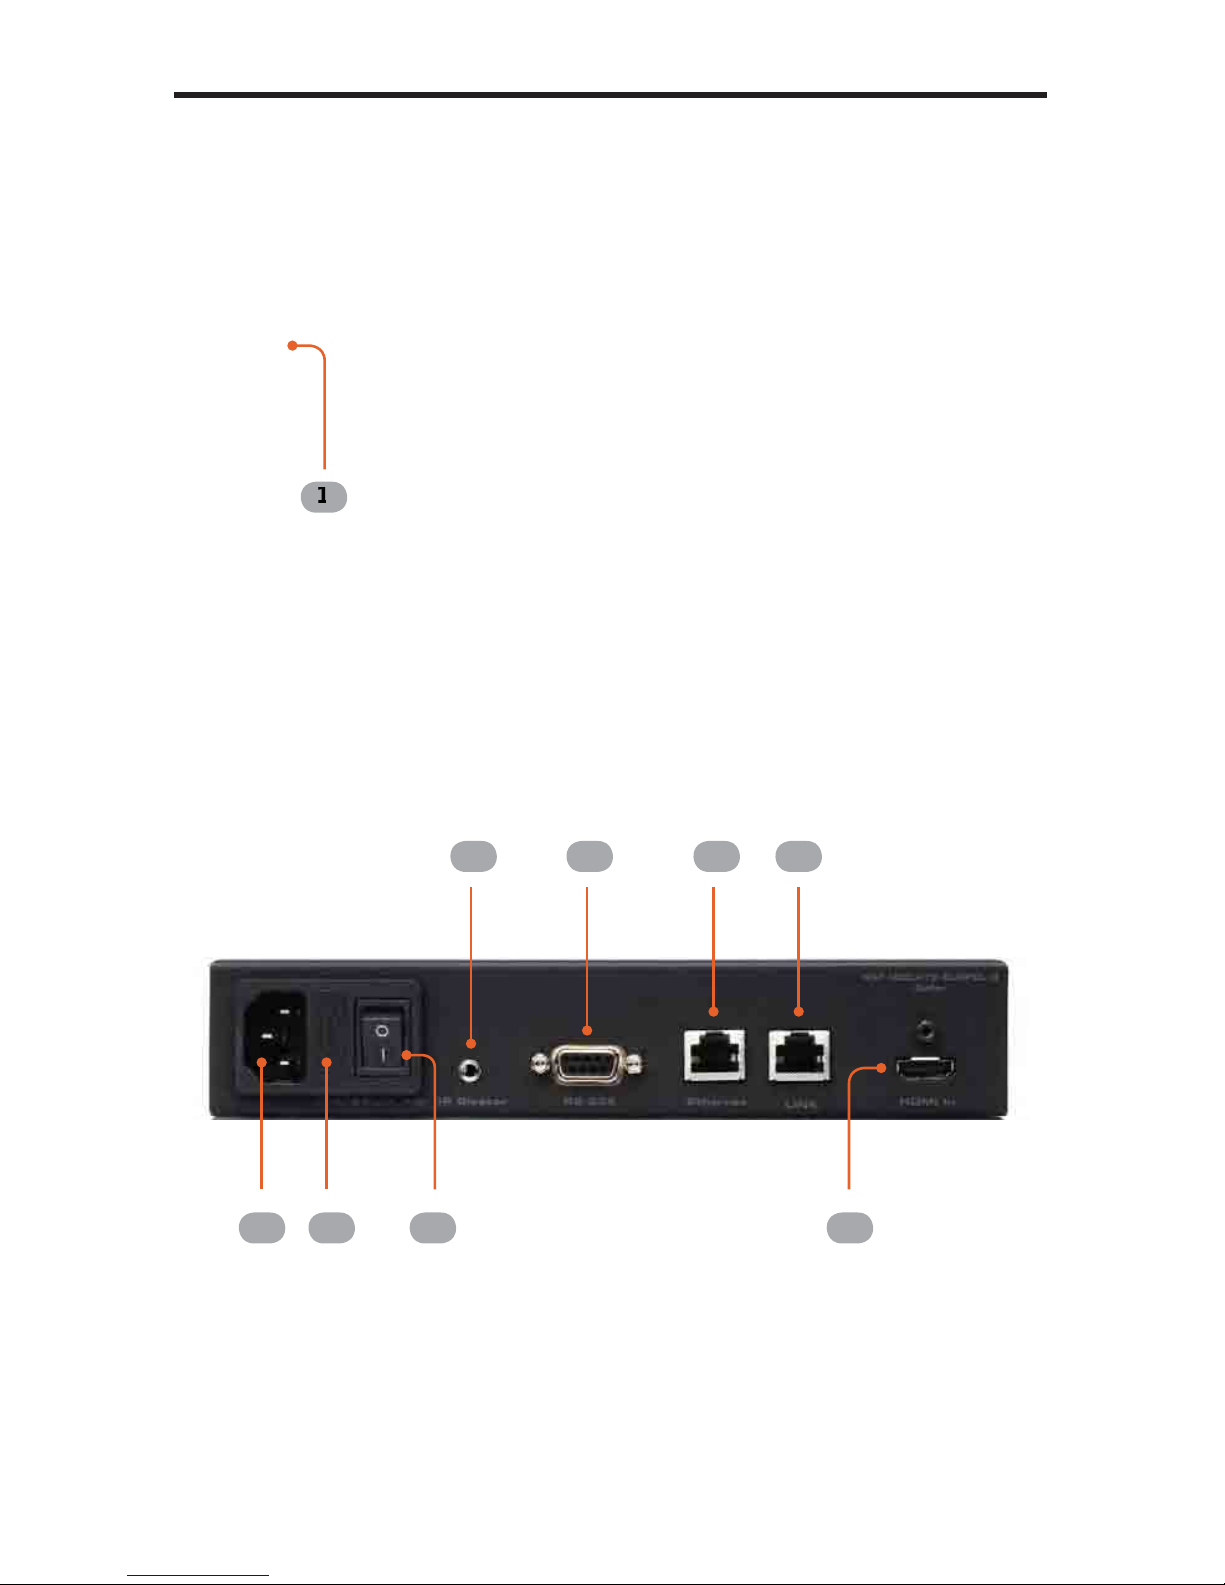
AT5 extends Ethernet and provides
an R
S
-232 and IR back channel to control A
/
V sources usin
g
the same
C
AT-5
c
able extension. The built-in IR Blaster allows
y
ou to point the IR remote
(
s
)
at the
displa
y
to control the Hi-De
f
sources as i
f
the
y
were located in the same room.
How It Works
The
G
e
f
enPR
O
Extender
f
or HDMI ELR PoL 2 over
C
AT
5
S
ender unit is located
n
ext to a set-top box or DVD pla
y
er source. Use the supplied HDMI cable t
o
c
onnect an HDMI source to the
S
ender unit. The
G
e
f
enPR
O
Extender
f
or HDMI
ELR PoL 2 over
C
AT5 Receiver unit is located up to 330
f
eet awa
y
, near th
e
displa
y
.
C
onnect the HDTV displa
y
and another Hi-De
f
source to the Receiver
U
nit.
O
ne
C
AT-
5
cable connects the
S
ender and Receiver units to each other. The
Ethernet ports on both the
S
ender and Receiver units are connected to standard
n
etwork devices, such as 100Base-T routers and hubs. Multichannel di
g
ital audio
is embedded in the HDMI si
g
nal
(
Dolb
y®
TrueHD
/
DT
S
-HD Master Audio™
)
.
INTRODUCTIO
N

READ THESE NOTES BEFORE INSTALLING OR
OPERATING THE EXTENDER FOR HDMI ELR WITH POL 2 OVER CAT5
• The Extender
f
or HDMI ELR with PoL 2 over
C
AT
5
units are housed in a
m
etal box
f
or better RF shieldin
g
.
•
C
AT-
5
cables should not exceed
330
f
eet.
•
S
hielded
C
AT-6 with metal RJ-45 connectors are recommended to sa
f
e
g
uard
a
g
ainst random video
fl
ashes caused b
y
electroma
g
netic inter
f
erence
(
EMI
)
.
• The Extender
f
or HDMI ELR with PoL 2 over
C
AT5
f
eatures the abilit
y
to
g
enerate compatible EDID and Hot Plu
g
si
g
nals
f
or troubleshootin
g
p
urposes when dealin
g
with di
ffi
cult inter
f
acin
g
issues between
S
ource
devices and Displa
y
s. Re
f
er to pa
g
e 13
f
or details.
•
H
D
C
P content is not supported when the unit is in DVI mode.
S
ee pa
g
e 16
fo
r
de
t
a
il
s
.
• Ethernet works as a Full Duplex s
y
stem.
2
OPERATION NOTE
S

3
HDMI Features
• 225 MHz
(
up to 12-bit YUV 444
@
1080p
)
• Deep
C
olor
• x.v.
C
olor
• Dolb
y®
TrueHD and DT
S
-HD Master Audio™
• Lip
Sy
nc
•
3
DT
V
Features
• Extends HDMI at 1080p Full HD and 1920x1200 up to 330
f
ee
t
• Extends R
S
-232 up to 330
f
eet over a sin
g
le
C
AT
5
•
S
upports hi
g
h bit-rate audio
f
ormats
(
Dolb
y®
TrueHD and DT
S
-HD Master
Audio™
)
•
S
upports 3DT
V
• Lockin
g
HDMI input port on Receiver Unit allows the connection o
f
a
s
econdar
y
Hi-De
f
source.
•
S
ource-switchin
g
between
S
ender Unit source and Receiver Unit source.
• Full
y
HDMI and HD
C
P complian
t
• EDID mana
g
ement
f
or rapid inte
g
ration o
f
source and displa
y
devices
• B
u
ilt-in IR Bl
as
t
e
r
a
ll
o
w
s
IR r
e
m
o
t
e
co
ntr
o
l
of
sou
r
ce
de
vi
ces
f
r
o
m r
e
m
o
t
e
viewin
g
locatio
n
• Internal 110
/
220 V A
C
Power
S
uppl
y
•
5
V D
C
, 3 A Lockin
g
Power
S
uppl
y
output connector on Receiver uni
t
•
R
ack-mountable
(
with optional
G
e
f
en EXT-RA
C
K-1U Rack
S
hel
f)
P
acka
g
e Includes
(
1
)
Extender
f
or HDMI ELR with PoL 2 over
C
AT5 -
S
ender Uni
t
(
1
)
Extender
f
or HDMI ELR with PoL 2 over
C
AT5 - Receiver Uni
t
(
1
)
6
f
t. HDMI lockin
g
cable
(
M-M
)
(
2
)
S
ets o
f
Rack Ears
(
1
)
A
C
power cor
d
(
1
)
Q
uick-
S
tart
G
uid
e
FEATURE
S

4
SENDER UNIT LAYOU
T
Back
Fron
t
1
2
3
5
6
6
7
8
4

5
SENDER UNIT DESCRIPTION
S
1
P
owe
r
This 2-color LED indicator will
g
low bri
g
ht RED when there is no HDMI source
c
onnected and will
g
low bri
g
ht
G
REEN when an HDMI source is present.
2
1
10 / 220 V A
C
C
onnect the includedA
C
power cord to this power receptacle.
3
Fuse Drawe
r
Each power receptacle houses a
f
use drawer. The
f
use drawer contains an
active
f
use and a spare
f
use. Both
f
uses are 250 V.
4 Power Switch
Turn the power
O
N or
O
FF usin
g
this switch.
5 IR Blaste
r
C
onnect an IR Blaster cable
(G
e
f
en part no. EXT-2IREMIT
)
f
rom this port to the
H
i-De
f
source to control the source
f
rom the viewin
g
location.
6 RS-232
This R
S
-232 serial port is used to update the Receiver Unit
fi
rmware.
7 Etherne
t
C
onnects the
S
ender Unit to the network usin
g
Ethernet cablin
g
.
8
Lin
k
C
onnects the
S
ender Unit to the Receiver Unit usin
g
C
AT-5 cablin
g
.
9 HDMI In
C
onnect a Hi-De
f
source to this lockin
g
HDMI port, usin
g
the included HDMI
cab
l
e
.

6
RECEIVER UNIT LAYOU
T
Back
Fron
t
1
2
3
4
5
6
7
8
9
10 1
1

7
RECEIVER UNIT DESCRIPTION
S
1
L
ocal
This LED indicator will
g
low bri
g
ht
g
reen when the Receiver Unit is switched to
u
se the Local HDMI input.
2
S
elec
t
S
witches between the HDMI input on the
S
ender Unit and the Local HDMI In
p
ort on the Receiver Unit.
3
IR
This IR window receives si
g
nals
f
rom the Hi-De
f
source IR remote control. The
IR si
g
nals are sent back to the source device, when usin
g
an IR Blaster on the
S
ender.
4
P
owe
r
This 2-color LED indicator will
g
low bri
g
ht RED when there is no HDMI source
c
onnected and will
g
low bri
g
ht
G
REEN when an HDMI source is present.
5
5V DC Ou
t
C
onnect an optional lockin
g
(G
e
f
en part no.
C
AB-PWR-06LL
)
or non-lockin
g
(G
e
f
en Part no.
C
AB-PWR-06NL
)
power cord to this the included 5 V D
C
l
ockin
g
power suppl
y
connector to power additional devices.
6
Ext I
R
C
onnect an IR Extender
(G
e
f
en part no. EXT-RMT-EXTIR
)
cable
f
rom this port
t
o
th
e
Hi-D
ef
sou
r
ce
t
o
e
xt
e
n
d
th
e
IR
co
ntr
o
l.
7
R
S-232
This R
S
-232 serial port is used to update the Receiver Unit
fi
rmware.
8
Etherne
t
C
onnects the Receiver
U
nit to the network device.
9
L
in
k
C
onnects the Receiver Unit to the
S
ender Unit usin
g
C
AT-5 cablin
g
.
10
HDMI Ou
t
C
onnect an HDTV displa
y
or other output device to this lockin
g
HDMI port.
11
L
ocal HDMI In
C
onnect a secondar
y
Hi-De
f
source device to this lockin
g
HDMI port.

8
IR REMOTE CONTROL DESCRIPTIO
N
RMT-2IR Remote Control
(
not included
)
1
Activity Indicato
r
This LED will be activated momentaril
y
each time a button is pressed.
2
I
nput Source Selection Buttons
(
1 - 2
)
These buttons
f
unction the same as the
S
elect button on the Receiver unit.
Press button 1 to switch to the remote input
(
source connected to the
S
ender
u
nit
)
. Press button 2 to switch to the local input
(
source connected to the
R
eceiver unit
)
.
IR Codes
A
SC
II
C
orrespondin
g
R
MT-2I
R
B
u
tt
on
Binar
y
1
1
00
11
0001
2
2
00
11
00
1
0
1
2

9
IR REMOTE CONTROL INSTALLATIO
N
Installin
g
the Batter
y
1.
R
emove the batter
y
cover on the back o
f
the IR Remote
C
ontrol Unit.
2. Insert the included batter
y
into the open batter
y
slot. The positive
(
+
)
side o
f
the batter
y
should be
f
acin
g
up.
3
.
R
eplace the batter
y
cover.
The Remote
C
ontrol unit ships with two batteries.
O
ne batter
y
is required
f
or
operation and the other batter
y
is a spare.
WARNING
:
Risk o
f
explosion i
f
batter
y
is replaced b
y
an incorrect t
y
pe.
Dispose o
f
used batteries accordin
g
to the instructions.
Batter
y
S
lo
t
(
shown with batter
y)

10
IR REMOTE CONTROL CONFIGURATIO
N
Settin
g
the IR Channel on the IR Remote Contro
l
In order
f
or the IR Remote
C
ontrol to work with the Receiver unit, both DIP
s
witches must be in the
O
FF position, as shown below.
C
hannel
1
1 2
ON
e
ft: Pi
c
t
u
r
e
of
th
e
p
ened rear batter
y
o
mpartment o
f
the IR
m
ote showin
g
the
x
posed DIP
S
witch
a
nk
be
tw
ee
n th
e
a
tter
y
chambers.
IR
1
Le
op
co
r
e
m
ex
ba
b
a

1.
C
onnect the Hi-De
f
source to the
S
ender Unit usin
g
the included HDMI cable.
2.
O
ptionall
y
connect a secondar
y
Hi-De
f
source to the Receiver Unit.
C
onnectin
g
a secondar
y
Hi-De
f
source to the Receiver Unit provides the abilit
y
to switch between the a Hi-De
f
source connected to the
S
ender
U
nit and the Hi-
De
f
source connected to the Receiver Unit. In this wa
y
, the Extender
f
or HDMI
ELR with PoL 2 over
C
AT
5
f
unctions as both a 2x1
S
witcher and an Extender.
3
.
U
se an HDMI cable to connect the HDTV displa
y
to the Receiver Unit.
4.
C
onnect the Ethernet device
/
router to the Ethernet input port on the
S
ender
u
nit usin
g
a
C
AT-5,
C
AT-5e or
C
AT-6 cable.
C
onnect the Ethernet output port
on the Receiver Unit to the remote device
/
router with a
C
AT-5,
C
AT-5e or
C
AT-
6
cable.
5
.
U
se a
C
AT-5 or
C
AT-6 cable up to 330
f
eet
(
100 meters
)
to connect the Link
p
orts on both the
S
ender Unit and Receiver Unit.
NOTE
:
I
f
terminatin
g
network cables in the
fi
eld, please adhere to th
e
TIA
/
EIA568B speci
fi
cation.
S
ee pa
g
e 18
f
or details.
6
.
C
onnect the includedA
C
power cord to the
S
ender Unit Plu
g
the power cord
int
o
a
n
a
v
a
il
ab
l
e
e
l
ec
tri
ca
l
ou
tl
e
t.
NOTE
:
C
onnect an optional power cable
(C
AB-PWR-06LL or
C
AB-PWR-06NL
)
to the Receiver Unit. The Receiver Unit supplies 5 V D
C
(@
3A
)
to power an additional device.
7. Power on the HDTV displa
y
and the Hi-De
f
source
(
s
)
connected to the
S
ender
U
nit and the Receiver
U
nit.
1
1
CONNECTING THE
E
XTENDER
FOR HDMI ELR WITH POL 2 OVER CAT5

12
CONNECTING THE
EXTENDER
FOR HDMI ELR WITH POL 2 OVER CAT5
Wirin
g
Dia
g
ram for the Extender for HDMI ELR with PoL 2 over CAT5
GEF-HDCAT5-ELRPOL2
CAT-5 LINK CABLE
(Up to 330 ft)
ETHERNET CABLE
HDMI CABLE
Sender
100BASE-T Router
HDMI Display
Receiver
5 V DC POWER
120 V AC POWER
RS-232 Controller
RS-232 CABLE
Set Top Box
120 V AC Device
Digital Signage Creator
(or other local source)
ATTENTION: This product should alwa
y
s be connected to a
g
rounded
e
l
ec
tri
ca
l
soc
k
e
t.

1
3
D
IP SWITCH CONFIGURATIO
N
Sender Uni
t
The
G
e
f
enPR
O
Extender
f
or HDMI ELR with PoL 2 over
C
AT
5
co
nt
a
in
s
DIP
s
witches on the bottom o
f
the
S
ender Unit. Each DIP switch per
f
orms a di
ff
erent
fu
n
c
ti
o
n.
DIP Switch 1 - Green Mode
(
Default = OFF
)
•
ON
- Disable
G
reen Mod
e
N
I
f
DIP switch 1 is set to the
O
N position, then the
S
ender Unit is alwa
y
s
p
owered.
•
OFF
- Enable
G
reen Mod
e
F
When DIP switch 1 on the
S
ender Unt is set to the
O
FF position, the
S
ender
U
nit is placed in
G
reen Mode. In this mode, the unit is not powered unless
+
5V is detected on pin 18 o
f
the HDMI cable.
G
reen Mode consumes less
than 1 Watt o
f
power.
Tw
o
DIP
s
wit
c
h
es
l
oca
t
ed
o
n
the bottom o
f
the
S
ender
U
nit.
•
•
•
•
•
•
•
•
•
•
•
•
•
•
•
•
•
•
•
•
•
•
•
•
•
•
•
•
•
•
•
•
•
•
•
•
•
•
•
•
•
•
•
•
•
•
•
•
•
•
•
•
•
•
•
•
•
•
•
•
•
•
•
•
•
•
•
•
•
•
•
•
•
•
•
•
•
•
•
•
•
•
•
•
•
•
•
•
•
•
•
•
•
•
•
•
•
•
•
•
•
•
•
•
•
•
•
•
•
NOTE
:
Both the
S
ender Unit and Receiver Unit must be placed in
G
reen
M
ode in order to use the
G
reen Mode
f
eature.

1
4
D
IP SWITCH CONFIGURATIO
N
Sender Uni
t
DIP Switch 2 - External Boot Loader Enable
(
Default = OFF
)
•
ON
- En
ab
l
e
N
S
et DIP switch 1 to the
O
N position when usin
g
the bootloader to update the
fi
rmware on the
S
ender Unit. In this mode, the
S
ender Unit will not
f
unction
as
a
n Ext
e
n
de
r.
•
OFF
- Di
sab
l
e
F
S
ettin
g
DIP switch 1 to the
O
FF position disables the boot loader an
d
RS
-232 is passed throu
g
h.

15
D
IP SWITCH CONFIGURATIO
N
Receiver Uni
t
The
G
e
f
enPR
O
Extender
f
or HDMI ELR with PoL 2 over
C
AT
5
co
nt
a
in
s
DIP
s
witches on the bottom o
f
the Receiver Unit. Each o
f
these DIP switch per
f
orms
a different function.
diffe
r
e
n
t
fu
n
ctio
n.
DIP Switch 1 - EDID Mode
(
Default = OFF
)
•
ON
- Pass-Through Mode
N
DD
C
and HPD are passed throu
g
h. Both the connection status and the
f
ull
video capabilities o
f
the monitor are used b
y
the source devic
e
.
•
OFF
- L
oca
l EDID M
ode
F
Local EDID is used instead o
f
the EDID
f
rom the displa
y
devic
e
.
EDID
f
eatures newer than HDMI 1.3 are removed when the displa
y
is read. This
p
rovides a
g
eneral EDID which is compatible with more displa
y
s.
S
ix DIP switches located on
th
e
bo
tt
o
m
of
th
e
R
ece
iv
e
r
U
nit.

1
6
D
IP SWITCH CONFIGURATIO
N
Receiver Uni
t
DIP Switch 2 - Hot Plug Detect (Default = OFF)
*
•
ON
-
N
H
PD Pass-Throu
gh
H
PD
f
ollows upstream HPD towards the source. The HPD si
g
nal will re
fl
ect
the connection status between the displa
y
device and the source device. I
f
the source or monitor is temporaril
y
disconnected then reconnected, there
will be a dela
y
o
f
20 - 30 seconds be
f
ore the content is restored to the
mo
nit
o
r.
•
OFF
-
F
H
PD Alwa
y
s Hi
gh
The HPD si
g
nal remains hi
g
h re
g
ardless o
f
the downstream HPD state.
I
f
the source or monitor does not properl
y
handle HPD
(
no picture a
f
ter
c
onnectin
g
/
reconnectin
g
source or displa
y)
, set this DIP switch to the
O
FF
p
osition.
DIP Switch 3 - Su
pp
orts DVI Connections
(
Default = OFF
)*
•
ON
- Disable HD
C
P
N
I
f
a DVI connection is used, set DIP 3 to the
O
N position. DVI is supported
b
y
disablin
g
HD
C
P pass-throu
g
h.
•
OFF
- Enable HD
C
P
F
I
f
an HDMI device is connected, set DIP 3 in the
O
FF position.
DIP Switch 4 - Not Used
•
R
eserved
f
or
f
uture expansion.
DIP Switch 5 - Not Used
•
R
eserved
f
or
f
uture expansion.
*
DIP switch is onl
y
operational when usin
g
Local EDID
(
DIP 1 =
O
FF
)
.

17
D
IP SWITCH CONFIGURATIO
N
DIP Switch 6 - External Boot Loader Enable
(
Cortex chip
)
(
Default = OFF
)
•
ON
- En
ab
l
e
N
S
et DIP switch 1 to the
O
N position when usin
g
the bootloader to update the
fi
rmw
a
r
e
o
n th
e
R
ece
iv
e
r
u
nit.
•
OFF
- Di
sab
l
e
F
S
ettin
g
DIP switch 1 to the
O
FF position disables the boot loader an
d
RS
-232 is passed throu
g
h.
DIP Switch 7 - External Boot Loader Enable
(
Valens chip
)
(
Default = OFF
)
•
ON
- En
ab
l
e
N
S
et DIP switch 1 to the
O
N position when usin
g
the bootloader to update the
fi
rmw
a
r
e
o
n th
e
R
ece
iv
e
r
u
nit.
•
OFF
- Di
sab
l
e
F
S
ettin
g
DIP switch 1 to the
O
FF position disables the boot loader an
d
RS
-232 is passed throu
g
h.
DIP Switch 8 - Green Mode
(
Default = OFF
)
•
ON
- Disable
G
reen Mod
e
N
I
f
DIP switch 1 is set to the
O
N position, then the
S
ender Unit is alwa
y
s
p
owered.
•
OFF
- Enable
G
reen Mod
e
F
When DIP switch 1 on the Receiver Unit is set to the
O
FF position, the
R
eceiver Unit is placed in
G
reen Mode. The power state o
f
the Receiver unit
is dependent on the power state o
f
the
S
ender unit.
NOTE
:
Both the
S
ender Unit and Receiver Unit must be placed in
G
reen
M
ode in order to use the
G
reen Mode
f
eature.
Other manuals for GEF-HDCAT5-ELRPOL2
2
Table of contents
Other Gefen Pro Extender manuals