Gemini TABLE TOP SYSTEM CDMP-6000 User manual

TABLE TOP SYSTEM w/MP3 AND LOOP
CDMP-6000
OPERATIONS MANUAL
MANUAL DE INSTRUCCIONES
MANUEL D’INSTRUCTIONS
BEDIENUNGSHANDBUCH
FOR ENGLISH READERS Page 2 ~ Page 6
PARA LECTORES EN ESPAÑOL Página 7~ Página 11
UTILISATEURS FRANCAIS Page 12 ~ Page 16
FÜR DEUTSCHE LESER Seite 17 ~ Seite 22

CAUTION: This product satisfies FCC regulations when shielded cables and connectors are used to connect the unit to other equipment. To prevent electromagnetic interfer-
ence with electric appliances such as radios and televisions, use shielded cables and connectors for connections.
The exclamation point within an equilateral triangle is intended to alert the user to the presence of important operating and maintenance (servicing) instructions in the liter-
ature accompanying the appliance.
The lightening flash with arrowhead symbol, within an equilateral triangle, is intended to alert the user to the presence of uninsulated “dangerous voltage” within the prod-
uct’s enclosure that may be of sufficient magnitude to constitute a risk of electric shock to persons.
READ INSTRUCTIONS: All the safety and operating instructions should be read before the product is operated.
RETAIN INSTRUCTIONS: The safety and operating instructions should be retained for future reference.
HEED WARNINGS: All warnings on the product and in the operating instructions should be adhered to.
FOLLOW INSTRUCTIONS: All operating and use instructions should be followed.
CLEANING: The product should be cleaned only with a polishing cloth or a soft dry cloth. Never clean with furniture wax, benzine, insecticides or other volatile liquids since
they may corrode the cabinet.
ATTACHMENTS: Do not use attachments not recommended by the product manufacturer as they may cause hazards.
WATER AND MOISTURE: Do not use this product near water, for example, near a bathtub, wash bowl, kitchen sink, or laundry tub; in a wet basement; or near a swimming
pool; and the like.
ACCESSORIES: Do not place this product on an unstable cart, stand, tripod, bracket, or table. The product may fall, causing serious injury to a child or adult, and serious dam-
age to the product. Use only with a cart, stand, tripod, bracket, or table recommended by the manufacturer, or sold with the product. Any mounting of the product should fol-
low the manufacturer’s instructions, and should use a mounting accessory recommended by the manufacturer.
CART: A product and cart combination should be moved with care. Quick stops, excessive force, and uneven surfaces may cause the product and cart combination to over-
turn. See Figure A.
VENTILATION: Slots and openings in the cabinet are provided for ventilation and to ensure reliable operation of the product and to protect it from overheating, and these open-
ings must not be blocked or covered. The openings should never be blocked by placing the product on a bed, sofa, rug, or other similar surface. This product should not be
placed in a built-in installation such as a bookcase or rack unless proper ventilation is provided or the manufacturer’s instructions have been adhered to.
POWER SOURCES: This product should be operated only from the type of power source indicated on the marking label. If you are not sure of the type of power supply to your
home, consult your product dealer or local power company.
LOCATION: The appliance should be installed in a stable location.
NON-USE PERIODS: The power cord of the appliance should be unplugged from the outlet when left unused for a long period of time.
GROUNDING OR POLARIZATION:
• If this product is equipped with a polarized alternating current line plug (a plug having one blade wider than the other), it will fit into the out-
let only one way. This is a safety feature. If you are unable to insert the plug fully into the outlet, try reversing the plug. If the plug should still
fail to fit, contact your electrician to replace your obsolete outlet. Do not defeat the safety purpose of the polarized plug.
• If this product is equipped with a three-wire grounding type plug, a plug having a third (grounding) pin, it will only fit into a grounding type
power outlet. This is a safety feature. If you are unable to insert the plug into the outlet, contact your electrician to replace your obsolete out-
let. Do not defeat the safety purpose of the grounding type plug.
POWER-CORD PROTECTION: Power-supply cords should be routed so that they are not likely to be walked on or pinched by items placed upon or against them, paying par-
ticular attention to cords at plugs, convenience receptacles, and the point where they exit from the product.
OUTDOOR ANTENNA GROUNDING: If an outside antenna or cable system is connected to the product, be sure the antenna or cable system is grounded so as to provide
some protection against voltage surges and built-up static charges. Article 810 of the National Electrical Code, ANSI/NFPA 70, provides information with regard to proper
grounding of the mast and supporting structure, grounding of the lead-in wire to an antenna discharge unit, size of grounding conductors, location of antenna-discharge unit,
connection to grounding electrodes, and requirements for the grounding electrode. See Figure B.
LIGHTNING: For added protection for this product during a lightening storm, or when it is left unattended and unused for long periods of time, unplug it from the wall outlet and
disconnect the antenna or cable system. This will prevent damage to the product due to lightening and power-line surges.
POWER LINES: An outside antenna system should not be located in the vicinity of overhead power lines or other electric light or power circuits,
or where it can fall into such power lines or circuits. When installing an outside antenna system, extreme care should be taken to keep from
touching such power lines or circuits as contact with them might be fatal.
OVERLOADING: Do not overload wall outlets, extension cords, or integral convenience receptacles as this can result in a risk of fire or electric
shock.
OBJECT AND LIQUID ENTRY: Never push objects of any kind into this product through openings as they may touch dangerous voltage points
or short-out parts that could result in a fire or electric shock. Never spill liquid of any kind on the product.
SERVICING: Do not attempt to service this product yourself as opening or removing covers may expose you to dangerous voltage or other haz-
ards. Refer all servicing to qualified service personnel.
DAMAGE REQUIRING SERVICE: Unplug this product from the wall outlet and refer servicing to qualified service personnel under the following conditions:
• When the power-supply cord or plug is damaged.
• If liquid has been spilled, or objects have fallen into the product.
• If the product has been exposed to rain or water.
• If the product does not operate normally by following the operating instructions. Adjust only those controls that are covered by the operating instructions as an improper
adjustment of other controls may result in damage and will often require extensive work by a qualified technician to restore the product to its normal operation.
• If the product has been dropped or damaged in any way.
• When the product exhibits a distinct change in performance, this indicates a need for service.
REPLACEMENT PARTS: When replacement parts are required, be sure the service technician has used replacement parts specified by the manufacturer or have the same
characteristics as the original part. Unauthorized substitutions may result in fire, electric shock, or other hazards.
SAFETY CHECK: Upon completion of any service or repairs to this product, ask the service technician to perform safety checks to determine that the product is in proper op-
erating condition.
WALL OR CEILING MOUNTING: The product should not be mounted to a wall or ceiling.
HEAT: The product should be situated away from heat sources such as radiators, heat registers, stoves, or other products (including amplifiers) that produce heat.
PLEASE READ BEFORE USING APPLIANCE
IMPORTANT WARNING AND SAFETY INSTRUCTIONS!
CAUTION RISK OF ELECTRIC
SHOCK DO NOT
OPEN!
Fig. A
Fig. B
2

BACK
CDMP-6000
3
FRONT
FRONT
10
11
12
13
14
15
16 19
20
22
23
24
26
25
27
SAME
FEATURES
ON BOTH
SIDES
21
28
29
30
31
32
33
34
35
36
37
38
39
17
18
8
9
742
40
1
7
6
2
4
3
5

Congratulations on purchasing the Gemini CDMP-6000 CD Player.
This state of the art professional table top CD player is backed by a 1 year
warranty*. Prior to use, we suggest that you carefully read all the instructions.
- Audio CD,CD-R, Mp3 compatible
- Plays mp3 files from USB storage device*
- BPM (TAP) Read Out
- Anti-shock using RAM buffer memory
- 2 Selectable Jog modes Pitch Bend/Search
- Multifunction scroll knob for Mp3 folder navigation
- Fader-Start capability
- One seamless loop per side with reloop
- Variable pitch control with three settings +/- 8,16 & 24%
- Fully programmable with repeat function
- 3-band EQ w/ Gain Control
-1/4” headphone output
- XLR and 1/4” mic input
- Auxiliary Inputs for Phono or Line devices
Laser Diode Properties
Material: Ga - Al - As
Wavelength: 755 - 815 nm (25° C)
Laser Output: Continuous Wave, max. 0.5 mW
INTRODUCTION:
CDMP-6000
4
FEATURES:
SAFETY SPECIFICATIONS:
PRECAUTIONS:
CONNECTIONS:
1MAIN POWER RECEPTACLE: This is a Standard 2-prong IEC power
connector. Connect the detachable linecord (included in the box with
your CDMP-6000) to the power receptacle, and plug the other end of
the linecord into an AC outlet. The CDMP-6000 has a universal power
supply that can accept any AC voltage from 100 VAC to 240 VAC.
No need for voltage select switches. It will work virtually anywhere in
the world. It is less susceptable to voltage sags or spikes than conven-
tional power supplies, providing greater electro magnetic isolation and
better protection against AC line noise
GROUNDING SCREW When using (a) turntable(s), you will need to
ground the RCA cable(s) by screwing in the grounding fork(s) to the
GROUNDING SCREW located on the rear panel of the CDMP-6000
mixer. Attach a PHONO (Turntable) ground line to the silver GROUND
THUMB SCREW that is situated at the bottom middle of the rear panel.
2
MASTER XLR OUTPUT (BALANCED): Allows you to connect bal-
anced XLR cables to MASTER OUTPUT of the CDMP-6000 both the
RCA and XLR outputs can be used at the same time but are both
controlled via the same MASTER OUTPUT.
MASTER RCA OUTPUT: The MASTER RCA output connects the
mixer to your main amplifier using standard audio cables with RCA-
type connectors.
The RECORD RCA OUTPUT output jacks can be used to connect the
mixer to the record input of your recording unit, thus enabling you to
record your mix with RCA cables.
CONVERTIBLE PHONO/LINE INPUTS: The CDMP-6000 has 2 CON-
VERTIBLE (Switched) PHONO/LINE (PH/LN) RCA INPUTS. The
switches which are located to the right and left of the RCA inputs for
channels 1 and 2 allow you to choose between a PHONO
(Turntable) input or a LINE level (Mp3, CD, Tape player etc..).and
require the proper switching. When switched to the PH position you
may use any Turntable with a magnetic cartridge, remember to con-
nect your ground wire (see GROUNDING SCREW) or there may be
a system hum.
MIC (MICROPHONE) INPUTS: The main MIC or Microphone inputs
are located at the back right hand corner and front middle of the
CDMP-6000 and will accept any balanced and unbalanced XLR as
well a standard 1/4” connector. You can control the gain for the mic
(See MICROPHONE VOLUME ABOVE ) above.CUE/PGM MIX RO-
TARY KNOB: The CUE/PGM MIX ROTARY KNOB adjusts the mix
between the CUE signal and the main output signal in your HEAD-
PHONE MONITOR OUTPUT.
POWER SWITCH: Once you have connected all your cables and
made sure that the VOLTAGE SELECTION SWITCH is set correctly,
you can turn the CDMP-6000 on by pressing the POWER button IN
to the ON position.
3
4
FUNCTIONS:
7
8
9
10
11
12
1. Do not use this CD player at temperatures below 41°F/5°C or
higher than 95°F/35°C.
2. The apparatus should not be exposed to dripping or splashing,
and no objects filled with liquids such as vases should be
placed on the apparatus.
3. Place the unit in a clean and dry location.
4. Do not place the unit in an unstable location.
5. When disconnecting the power cord from the AC outlet,
always grasp it by the plug. Never pull the power cord.
6. To prevent electric shock, do not remove the cover or the bottom screws.
7. There are NO USER SERVICEABLE PARTS INSIDE. Please
refer to a qualified technician.
8. Do not use chemical solvents to clean the unit.
9. Keep the laser pickup clean by keeping the tray closed.
10. Keep this manual in a safe place for future reference.
5
6
DISC TRAY: The DISC TRAY is where the CD is held during loading,
unloading and playback, and holds both 12 cm and 8cm CD’s.
(DO NOT FORCE THE CD TRAY TO CLOSE EXCESSIVE FORCE WILL
DAMAGE THE CD MECHANISM, USE THE OPEN AND CLOSE
BUTTONS)
EJECT BUTTON: Pressing the EJECT BUTTON will open or close the
DISC TRAY, unless the CDMP-6000 is in play mode, then you must
first stop the side you which to eject.
NOTE: To eject a CD you must be in CD mode,
simply press the USB/CD button and then press EJECT.
JOG WHEEL : In SEARCH MODE the JOG WHEEL can be used to
search forward or backwards in the music track, as well as for fine
adjustments to a CUE point in PAUSE mode. In PITCH BEND mode
the JOG WHEEL will function the same as the PITCH BEND allowing
you to speed up (FORWARD) or slow down (REWIND) the music
clockwise being (FORWARD) and counter clockwise being (REWIND).
JOG MODE BUTTON: When the JOG MODE BUTTON is illuminated
it indicates the the JOG WHEEL is in SEARCH MODE, and when not
illuminated it indicates that the JOG WHEEL is in PITCH BEND
MODE.
IN THE USA ~ IF YOU EXPERIENCE PROBLEMS WITH THIS UNIT CALL GEMINI CUSTOMER SERVICE AT:
1 (732) 346-0061. DO NOT ATTEMPT TO RETURN THIS EQUIPMENT TO YOUR DEALER.

CDMP-6000
FUNCTIONS: (CONTINUED)
DISPLAY: The DISPLAY shows the track number, pitch value, pitch
bend, single, continue (for continuous play), play/pause modes, fast
forward/reverse modes, loop mode, reloop mode, PGM, repeat
modes, the playback display bar, and three different time displays.
These times displays are TIME ELAPSED on the track,
TIME REMAINING on the disc and and TIME REMAINING on the
track. Time is measured in minutes, seconds and frames.
TIME: The TIME BUTTON switches the time display between three
available sources, these three are TIME ELAPSED on the track, TIME
REMAINING on the disc and and TIME REMAINING on the track.
TIME ELAPSED indicates how much time has currently gone by since
the play button was pressed, TIME REMAINING ON DISC will count
down the time remaining on the entire disc and TIME REMAINING ON
TRACK counts down the time that is left before the end of the track.
SINGLE: Pressing the SINGLE button engages SINGLE mode, in this
mode the CDMP-6000 will play one song and then stop. Pressing the
SINGLE button again will then activate CONTINUOUS mode causing
the unit to play continuously.
BPM: Press and hold the BPM button to turn on the BPM read out, once
on you may TAP the button to the beat of the music, after a few TAPS
the display will read out the average BEATS PER MINUTE of the
track.
PGM: Allows you to create a set playlist. To program a set list into the
CDMP-6000 memory, begin by stopping the unit from play and
pressing PGM to begin the set list. Select a track by using the track
selection button to scan to the first track to be placed in the set list.
When you have selected the proper track press PGM and the
CDMP-6000 will be ready to set your next selection. Repeat the
previous steps until you have completed your playlist, then press play
to begin the set list.
PITCH: Pushing the PITCH button activates the PITCH CONTROL SLIDE.
The PITCH button has three settings 8%, 12% and 24% and can be
toggled by pressing the PITCH button once for each setting . Push the
PITCH button again to deactivate this mode.
PITCH CONTROL SLIDE: Moving the PITCH CONTROL SLIDE
up or down will lower or raise the pitch percentage up to + or - 24%
depending on the PITCH BUTTON setting.
PITCH BEND: Pushing the PITCH BEND BUTTONS will automatically
bend the pitch up to +24% or bend the pitch down to -24% depending
on the setting of the PITCH BUTTON. Releasing the buttons will return
the pitch to the original pitch setting. You can use this function to match
the beat when mixing from one song to another.
LOOP SECTION: A LOOP repeats the section between the entry point
(IN) and the exit point (OUT). To set a loop while the unit is playing,
start by pressing the IN BUTTON (it’s LED will light up) and when you
reach the desired end loop point press the OUT BUTTON (it’s LED will
also light up). The loop will continue playing until you press the OUT
BUTTON again allowing the music to continue from that point on, to
re-engage the loop you must press the RELOOP BUTTON. When you
have released your loop the OUT BUTTON will turn OFF and the IN
BUTTON will remain lit to indicate that your loop is stored in the
CDMP-6000 memory.
13
14
15
16
17
19
20
21
5
Pressing the IN BUTTON again while the unit is playing will erase
the previously saved loop while saving your new loop entry point.
Press OUT to exit the loop and save a new complete loop.Press
RELOOP to return to the beginning of the previously saved loop
from normal play. Press RELOOP repeatedly to cause the loop to
stutter.
NOTE: THE FIRST LOOP WILL HAVE A PAUSE AT
THE EXIT POINT, WHILE ALL OTHERS WILL BE SEAMLESS.
PLAY/PAUSE: Each press of the PLAY/PAUSE BUTTON
causes the operation to change from PLAY to PAUSE or from
PAUSE back to PLAY. The PLAY/PAUSE BUTTON remains lit when
in PLAY mode, while it blinks in PAUSE mode.
CUE: While the unit is playing and after the cue point has been
programmed, pressing CUE will cause the CD player to enter the
PAUSE mode (PLAY/PAUSE BUTTON blinks) at the programmed
cue point (the CUE LED is lit). Holding down the CUE button
changes the function to preview , and allows you to stutter start or
play from the programmed CUE POINT Releasing the CUE button
will return the CD to the preset CUE point.
REPEAT: Press the repeat button once to engage 1or repeat the
selected track. Press REPEAT again to engage ALL setting which
will repeat all the tracks on the CD. Press REPEAT again to disen-
gage the repeat function.
USB PORT The USB port allows the connection of any USB mass
storage device*.
USB/CD SELECT BUTTON The USB/CD select button allows you to
toggle from the CDMP-6000 internal CD drive and the mass stor-
age device connected to the USB port.
TRACK SELECTION ROTARY: The TRACK SELECTION ROTARY
allows you to navigate through folders or search through tracks
depending on weather you are in USB mode or CD mode.
In CD mode the rotary can search through cd tracks, turning the
rotary to the right or clock-wise advances the selection, and turning
the rotary to the left or counter clock-wise decreases the selection.
Once you have found your selection you can load it for play by
pressing the ROTARY knob to confirm your selection.
In USB mode the ROTARY knob allows you to search through fold-
ers and navigate through music libraries on your USB device, Simply
rotate the rotary until you find the desired folder and push the ro-
tary in to choose that folder, continue to search in this manner until
you find the desired track, then just like in CD mode press the rotary
again to load and play the desired track.
NOTE : ONCE YOU HAVE SKIPPED TO ANOTHER TRACK, YOU
MAY NOT GO BACK TO YOUR PROGRAMMED CUE POINT.
YOU MUST BEGIN YOUR CUE SELECTION OVER AGAIN, THE
CUE WILL BE PRESET TO THE BEGINNING OF THE NEWLY SE-
LECTED TRACK.
We recommend that you use a MASS STORAGE DEVICE that is no
larger than 2 gb and that only has less than 100 folders with less
than 1000 songs in any one folder. larger drives will work but they
will greatly affect the time in which it takes to search and or load a
song.
26
27
*
24
25
18
22
23

CHANNEL ROTARY GAIN: The CHANNEL ROTARY GAIN allows you
to boost the signal of each individual channel depending on how low
or high its input level is.
3 BAND EQUALIZER: The 3 BAND EQUALIZER adjusts the tone of
each CHANNEL by giving you a choice 3frequencies (BANDS) to
adjust , from LOW, MIDRANGE (MID) and HIGH’s ,you can use the
adjustment knobs to higher or lower the 3 separate frequencies till the
sound of the music program is appropriate for your listening
environment.
CHANNEL INPUT SELECTOR: The CHANNEL INPUT SELECTOR
switches allow you to choose which input will be controlled by that
channels corresponding volume FADER.
For example on CHANNEL (1) the INPUT SELECTOR allows you to
choose between CD 1 and PHONO 1/LINE 1, and also on
CHANNEL (2) the INPUT SELECTOR SWITCH will let you choose
between PHONO 2/LINE 4 and CD 2 .
CHANNEL VOLUME FADER: After you have chosen which input you will
use with the INPUT SELECTOR the corresponding CHANNEL FADER
will allow you to adjust the volume for that particular CHANNEL.
MICROPHONE VOLUME: Allows you to adjust the volume of the
microphone signal. Both MIC inputs are controlled by the same rotary.
MASTER OUTPUT ROTARY KNOB: The MASTER OUTPUT rotary knob
adjust the volume of the MAIN MASTER output.
CUE/PGM MIX ROTARY KNOB: The CUE/PGM MIX ROTARY KNOB
adjusts the mix between the CUE signal and the main output signal in
your HEADPHONE MONITOR OUTPUT.
CUE VOLUME ROTARY KNOB: The CUE VOLUME ROTARY KNOB
adjusts your HEADPHONE MONITOR OUTPUT’S volume.
CHANNEL CUE SELECTOR: The CHANNEL CUE SELECTOR allows you
to choose which channel you wish to monitor in your headphones, to the
left is CHANNEL (1) to the right is CHANNEL (2).
VU METER: The CDMP-6000 has a stereo VU METER that allows you to
monitor the decibel levels of the LEFT and RIGHT MASTER output.
VU MASTER/CUE SWITCH: This switch controls what output the VU
METER will display, in the master position the VU will display the
MASTER output of the CDMP-6000 and in the CUE position the left VU
will display the channel (1)‘s CUE output and the right VU will display
channel (2)‘s CUE output.
CROSS FADER: The CROSS FADER allows you to mix evenly from one
source to another. The CROSS FADER on the CDMP-6000 is also re-
movable and if the need arises can be replaced.The RG-45 (RAIL-
GLIDE™)DUAL-RAIL CROSS FADER, which has internal dual stainless
steel rails that allow the slider to ride smoothly and accurately from
end to end can be purchased from your local GEMINI dealer.
NOTE: WHEN USING THE CROSS FADER LIGHTLY GLIDE THE FADER
BACK AND FORTH. PRESSING DOWN ON THE CONTROLS CAN
BEND CONTACTS AND CAUSE A LOSS OF SOUND.
GENERAL:
Type................................................................................Compact Disc Player
Disc Type...................................Standard Compact discs (12 cm & 8 cm)
Time Display......................Track Elapsed, Track Remain, or Total remain
Variable Pitch.......................................± 24% Slider with Resume Switch
Pitch Bend............................................................................± 24% Maximum
Instant Start....................................................................Within 0.03 seconds
Installation...........................................................................................19" each
Dimensions........................... 19" x 3.5" x 10" (482.6 x 88.9 x 254 mm)
Weight..........................................................Main unit: 11.35 lbs. (5.14 kg)
AUDIO SECTION:
Quantization......................................1 Bit Linear/Channel, 3 Beam Laser
Oversampling Rate..............................................................................8 Times
Sampling Frequency..........................................................................44.1 kHz
Frequency Response............................................................20 Hz to 20 kHz
Total Harmonic Distortion...................................................Less Than 0.05%
Signal to Noise Ratio..............................................................................85 dB
Dynamic Range........................................................................................85 dB
Channel Separation.................................................................85 dB (1 KHz)
Output Level...................................................................2.0 +/- 0.2V R.M.S.
Power Supply.......................................................AC 115/230V, 60/50 Hz
INPUTS:
Phono.............................................................................3mV,47 KOhm
Line..........................................................................150 mV, 27 KOhm
MIC...................................................................1.5 mV, 1 KO balanced
OUTPUTS:
Max..........................................................................20V Peak-to Peak
Rec.............................................................................225 mV, 5 KOhm
SPECIFICATIONS AND DESIGN ARE SUBJECT TO CHANGE WITHOUT NOTICE FOR PURPOSE OF IMPROVEMENT.
32
33
34
35
36
37
1. UNSCREW THE FADER (B) SCREWS. DO NOT TOUCH INSIDE SCREWS (C) CARE-
FULLY
REMOVE OLD CROSS FADER AND UN-
PLUG CABLE (D)
2. PLUG IN THE NEW CROSS FADER INTO
CABLE (D) AND PLACE BACK INTO MIXER.
3. SCREW THE CROSS FADER TO MIXER
WITH THE FADER PLATE SCREWS (B)
4. REPLACE THE FACE OF THE MIXER AND
SCREW THE FOUR SCREWS BACK IN AND REPLACE THE FADER KNOBS.
CDMP-6000
31
MIXER SECTION:
38
FADER REPLACEMENT
39
41
SPECIFICATIONS
6
The CURVE selector lets you choose between two fader
CURVE settings, positioning the switch to the left will give
you a gradual CROSSFADE and positioning the switch to the
right will give you a quick CROSSFADE.
HEADPHONE OUTPUT: The HEADPHONE OUTPUT located at the
front of the CDMP-6000 will accept any headphone with a standard
1/4” connector and or adapter and will allow you to CUE your music
program before you play it, you can adjust the volume and PGM mix
of the HEADPHONE (see CONTROLS)
28
29
30
40

7
ATENCIÓN: Este producto cumple con la normativa legal si se utilizan cables y conectores blindados para conectar la unidad a otro equipo. Para evitar interferen-
cias electromagnéticas con otros aparatos eléctricos, como radios y televisores, deben emplearse cables y conectores blindados.
Los signos de exclamación dentro de un triángulo que puedan aparecer en la documentación que acompaña a la unidad pretenden alertar al usuario de instruc-
ciones de operación o mantenimiento importantes.
El signo de un rayo dentro de un triángulo pretende alertar al usuario de la presencia de "voltaje peligroso" no aislado en el inte-rior de la unidad, que podría ser
de suficiente intensidad como para constituir riesgo de descarga eléctrica.
LEA LAS INSTRUCCIONES: Deben leerse todas las indicaciones de uso y seguridad antes de usar este producto.
CONSERVE LAS INSTRUCCIONES: Las instrucciones de uso y seguridad deben conservarse para referencias futuras.
ATIENDA A LAS ADVERTENCIAS: Deben seguirse todas las advertencias sobre este producto que figuran en el manual de instrucciones.
SIGA LAS INSTRUCCIONES: Deben seguirse todas las instrucciones del manual.
LIMPIEZA: Este producto debe limpiarse con una mopa suave o con un paño seco. Nunca utilice cera para muebles, gasolina, insecticidas u otros líquidos
volátiles, ya que podrían corroer la carcasa.
COMPLEMENTOS: No utilice accesorios que no estén recomendados por el fabricante, pues podrían dañar la unidad.
AGUA Y HUMEDAD: No use este producto cerca de medios acuáticos, como una bañera, un cubo de agua, un fregadero o un
lavadero; tampoco en un sótano húmedo, ni cerca de una piscina o similar.
ACCESORIOS: No coloque el producto sobre un carrito, soporte, trípode, brazo o mesa. Podría caer y causar graves daños a un
niño o adulto, así como a la propia unidad. Úsese sólo con un carrito, soporte, trípode, brazo o mesa recomendado por el fabri-
cante. Al montar la unidad deben seguirse siempre las instrucciones y emplearse accesorios recomendados por el fabricante.
CARRITO: Si el producto va sobre un carrito, debe moverse el conjunto con cuidado. Detenciones bruscas, una fuerza excesiva o
superficies inadecuadas pueden provocar la caída de todo el conjunto. Véase Figura A.
VENTILACIÓN: Las aperturas y ranuras de la carcasa están diseñadas para la ventilación, aseguran un manejo fiable y lo protegen
de cualquier sobrecalentamiento, por tanto, nunca deben cubrirse ni bloquearse. Estas aperturas no deben taparse colocando el
producto sobre un sofá, una cama, una alfombra o superficies similares. Nunca debe colocarse en una estructura prefabricada, como una caja o un rack, a
menos que tengan la ventilación adecuada o lo permitan las instrucciones del fabricante.
FUENTES DE ALIMENTACIÓN: Esta unidad debe utilizarse exclusivamente con el tipo de suministro eléctrico indicado en la etiqueta correspondiente. Consúl-
telo antes de enchufar el producto si no está seguro del tipo de suministro del lugar donde lo va a usar.
UBICACIÓN: Este aparato debe colocarse en una ubicación estable.
PERIODOS SIN USARLO: Si no se va a usar la unidad durante un tiempo prolongado, desenchúfelo de la corriente eléctrica.
TOMA DE TIERRA O POLARIZACIÓN:
- Si este producto lleva una clavija de corriente alterna polarizada (con un pivote más grueso que otro, tipo inglés), sólo entrará en una posición. Es una medida
de seguridad. Si no puede introducir la cla-vija en el enchufe, gírela. En ningún caso debe forzarse. Si sigue sin entrar, un electricista debería cambiar el enchufe.
- Si la unidad lleva una clavija con tres pivotes (el tercero corres-ponde a la toma de tierra), sólo entrará en un tipo de enchufe. Se trata de una medida de se-
guridad. Si el enchufe y la clavija no son compatibles, un electricista deberá cambiar el enchufe. En ningún caso deberá forzarse.
PROTECCIÓN DEL CABLE DE CORRIENTE: Los cables de corriente deben protegerse para que nadie los pise ni corran el riesgo
de pinzarse por elementos colocados encima o que los aprisionen. Debe prestarse especial atención al cable, al enchufe, a los ex-
tensores de cable y al punto por donde el cable sale de la unidad.
TIERRA DE LA ANTENA EXTERIOR: Si el producto lleva conectada una antena exterior o sistema de cables, asegúrese de que
cuenta con la toma de tierra correspondiente, a fin de proteger la unidad de variaciones de voltaje y cargas de electricidad estática.
Existe documentación oficial acerca de la correcta utilización de la toma de tierra y de las medidas de seguridad pertinentes, conex-
ión de los electrodos de descarga y sus requisitos. Véase Figura B.
RAYOS: Como protección adicional del producto durante una tormenta eléctrica, o durante periodos prolongados sin usarlo, des-
enchúfelo de la corriente y desconecte la antena o sistema de cables. De este modo se protegerá el producto de los daños que
pueda producir la caída de un rayo o las fluctuaciones de la red eléctrica.
LÍNEAS ELÉCTRICAS: Nunca debe situarse un sistema de antena cerca de líneas eléctricas u otros circuitos de corriente. Tam-
poco debe colocarse en lugares donde pueda caer sobre dichos circuitos eléctricos. Al instalar un sistema de antenización exterior, debe tomarse la extrema
precaución de no tocar dichas líneas eléctricas, pues el mas minimo contacto puede ser fatal.
SOBRECARGA: No sobrecargue los enchufes de la pared con ladrones o instalando enchufes múltiples, pues correría el riesgo de electrocución o incendio.
ENTRADA DE OBJETOS O LÍQUIDOS: Nunca introduzca objetos de ningún tipo en el interior del producto, pues podrían tocar una parte eléctrica y cortocir-
cuitar el aparato, lo que resultaría en un incendio o descarga eléctrica. No verter nunca ningún líquido sobre el producto.
REPARACIÓN: No intente reparar el producto por cuenta propia, ya que abrir o retirar la carcasa le expondría a un voltaje peligroso u otros peligros. Diríjase
siempre a un centro de servicio técnico autorizado.
DAÑOS QUE REQUIEREN REPARACIÓN: Desenchufe el aparato de la corriente y diríjase a un servicio técnico autorizado si se da alguna de las siguientes
situaciones:
- El cable de alimentación o la clavija están dañados.
- Se ha vertido líquido o ha caído algún objeto sobre la unidad.
- El aparato se ha expuesto a la lluvia o a salpicaduras.
- La unidad se ha caído al suelo o dañado de algún modo.
- El aparato no funciona con normalidad, ni aun siguiendo las instrucciones. Ajuste sólo los mandos que se indican en las instrucciones, ja que la manipulación
inadecuada de otros controles podría dañar la unidad y requeriría un mayor trabajo de un técnico para restablecer su funcionamiento normal.
- Si el producto muestra anomalías en su funcionamiento, necesita revisión por parte de un servicio técnico autorizado.
RECAMBIOS: Cuando se necesite alguna pieza de recambio, asegúrese de que el servicio técnico utilice piezas originales autori-zadas o que tengan las mismas
características que las originales. Los reemplazos no autorizados pueden causar descargas eléctricas, incendios u otros daños.
COMPROBACIÓN DE SEGURIDAD: Tras la reparación, solicite al técnico que efectúe las comprobaciones de seguridad necesarias para determinar que el pro-
ducto se encuentra en las condiciones adecuadas para su funcionamiento.
MONTAJE EN UNA PARED O TECHO: Este producto nunca debe montarse en una pared o en el techo.
CALOR: Este producto debe alejarse de fuentes de calor, como radiadores, estufas u otros aparatos que irradien calor, incluyendo amplificadores.
POR FAVOR LEA ANTES DE UTILIZAR,
INSTRUCCIONES IMPORTANTES DE SEGURIDAD
Fig. B
Fig. A
PRECAUCIÓN RIESGO DE SHOCK
ELECTRICO - NO
ABRIR!

PANEL TRASERO
CDMP-6000
8
PANEL FRONTAL
PANEL FRONTAL
10
11
12
13
14
15
16 19
20
22
23
24
26
25
27
SAME
FEATURES
ON BOTH
SIDES
21
28
29
30
31
32
33
34
35
36
37
38
39
1
7
6
2
4
3
5
8
9
742
40
17
18

Felicidades por la compra de su Gemini CDMP-6000 CD Player.
Este reproductor de CD profesional está amparado por 1 año de garantía*.
Antes de usar le rogamos lea detenidamente estas instrucciones
- CD de audio, CD-R, Mp3 compatible
- Reproduce ficheros mp3 del dispositivo de almacenamiento USB*
- Salida de lectura BPM (TAP)
- Anti-shock mediante buffer de memoria RAM
- 2 modos Jog Seleccionables Pitch Bend/Search
- Control de multifunction para navegación por directorios Mp3
- Habilidad Fader-Start
- Seamless loop por el lado con reloop
- Pitch control variable con tres rangos +/- 8,16 & 24%
- Totalmente programable con función de repetición
- 3-bandas EQ w/ Control Ganancia
- 1/4” salida de cascos
- XLR entrada de microfono de 1/4”
- Entradas auxiliaries para tocadiscos o linea de audio
Propiedades del Diodo Laser
Material: Ga - Al - As
Longitud de onda: 755 - 815 nm (25° C)
Salida Laser: Onda Continua, máx. 0.5 mW
INTRODUCCION
CDMP-6000
9
CARACTERISTICAS:
ESPECIFICACIONES DE SEGURIDAD:
PRECAUCIONES
CONEXIONES
1Receptáculo Fuente Alimentación: Conector de 3 terminales Standard
IEC. Conecte el cable de alimentación (incluido en la caja con el
CDMP-6000) hacia el conector de toma de corriente del aparato, y
conecte el otro extremo en la toma de corriente de la pared. El
CDMP-6000 tiene una fuente de alimentación universal que acepta
cualquier voltaje AC desde 100 a 240 V AC. Sin necesidad de selec-
tores de voltaje. Funcionará en cualquier parte del mundo. Es menos
susceptible a cambios bruscos de tensión o picos de corriente que las
fuentes de alimentación convencionales, provisto de un aislamiento
electromagnético mayor y mejor protección a los ruidos en la linea AC.
TORNILLO TOMA DE TIERRA Cuando se use con giradiscos, necesitará
conectar el cable de tierra del RCA y atornillarlo a la toma de tierra
de la parte trasera del CDMP-6000. Junte la línea de tierra de
PHONO (giradiscos) al tornillo posterior de toma de tierra que está
situada en la parte central trasera del equipo.
SALIDA XLR MASTER (BALANCEADA): permite conectar cables
XLR balanceados desde la SALIDA MASTER del CDMP-6000,
ambas salidas RCA yXLR pueden utilizarse al mismo tiempo con-
troladas por la misma SALIDA MASTER.
SALIDA MASTER Y DE GRABACION RCA (NO BALANCEADAS):
Conecta el mezclador al amplificador principal usando cables
estándar de conectores RCA.
La SALIDA DE GRABACION puede usarse para conectar el
mezclador a una grabadora, permitiendo grabar su mezcla con
cables RCA.
ENTRADAS CONVERTIBLE PH/LINEA El CDMP-6000 tiene 2
ENTRADAS CONVERTIBLE PHONO/LINEA (PH/LN) POR RCA
Los interruptores emplazados a la derecha de las entradas RCA de
canales 1 y 2 permiten elegir entre PHONO (Giradiscos) o LINEA
(Mp3, CD, cassette etc..).y deben situarse en su correcta
posición.Cuando están en posición PH puede conectar cualquier gi-
radiscos con cápsula magnética, acordandose de conectar la masa
(ver conexión de TOMA DE TIERRA) o podría haber zumbidos
Y cuando está en posición LN puede conectar cualquier unidad de
nivel de línea como Mp3, CD, cassette etc).
MIC (MICRÓFONO): La entrada de MIC esta alojada en la esquina
Trasera y en el panel frontal del CDMP-6000 y permite cualquier
jack XLR y 1/4” balanceado o no balanceado. Puede controlar la
ganancia e incluso graves y agudos de esta entrada.
(Vea VOLUMEN MICRÓFONO).
ALIMENTACION: Una vez haya conectado todos los cables , puede
encender el CDMP-6000 pulsando el botón POWER, Pulsándolo de
nuevo el CDMP-6000 POWER se apagará.
3
4
FUNCIONES:
5
6
7
8
9
10
11
12
1. No utilice este CD a temperaturas por debajo 41°F/5°C
o superiores a 95°F/35°C.
2. Este aparato no debe exponerse a chorros o salpicaduras, y no deben
colocarse objetos con líquidos como por ejemplo jarrones, encima del
aparato.
3. Coloque la unidad en lugar limpio y seco.
4. No colocar la unidad en una superficie inestable.
5. Al desconectar el cable de corriente de la toma de pared, siempre co
jalo por el conector. Nunca tire del cable.
6. Para evitar shock eléctrico, no quite la tapa ni los tornillos inferiores.
7. NO HAY PARTES REEMPLAZABLES POR EL USUARIO en el interior. Por
favor acuda a un técnico cualificado si es necesario.
8. No use disolventes químicos para limpiar la unidad.
9. Mantenga el lector laser limpio manteniendo la bandeja cerrada.
10. Guarde este manual en lugar seguro para futuras referencias.
2
IN THE USA ~ IF YOU EXPERIENCE PROBLEMS WITH THIS UNIT CALL GEMINI CUSTOMER SERVICE AT:
1 (732) 346-0061. DO NOT ATTEMPT TO RETURN THIS EQUIPMENT TO YOUR DEALER.
BANDEJA DE DISCO: La BANDEJA DE DISCO es donde el CD va
alojado durante la carga, descarga y reproducción, y permite dis-
cos de 12 cm y 8cm. (NO FUERCE LA BANDEJA PARA CERRARLA
YA QUE UNA FUERZA EXCESIVA DAÑARA EL MAECANISMO
DEL CD, USE SIEMPRE EL BOTON DE ABRIR / CERRAR)
BOTON EJECT: Pulsando este BOTON EJECT se abrirá o cerrará la
BANDEJA DE DISCO, a no ser que el CDMP-6000 esté en repro-
ducción, en ese caso deberá primero pulsar stop.
NOTA: Para expulsar un CD debe estar en Modo CD, simplemente pulse el
botón USB/CD y luego pulse EJECT.
JOG WHEEL : En MODO BUSQUEDA el JOG WHEEL puede usarse
para avanzar o retroceder en la pista, así como hacer ajustes finos
de CUE en modo PAUSE En modo PITCH BEND el JOG WHEEL fun-
cionará como PITCH BEND permitiendo incrementar la velocidad
(ADELANTE) o disminuirla (ATRÁS) de la música moviendo la rueda
en el sentido del reloj (ADELANTE) o a la inversa (ATRÁS).
BOTON MODO JOG: Cuando el BOTON MODO JOG está ilumi-
nado indica que el JOG WHEEL está en MODO BUSQUEDA, y
cuando no está iluminado indica que el JOG WHEEL está en
MODO PITCH BEND MODE.

CDMP-6000
FUNCIONES: (CONTINUACIÓN)
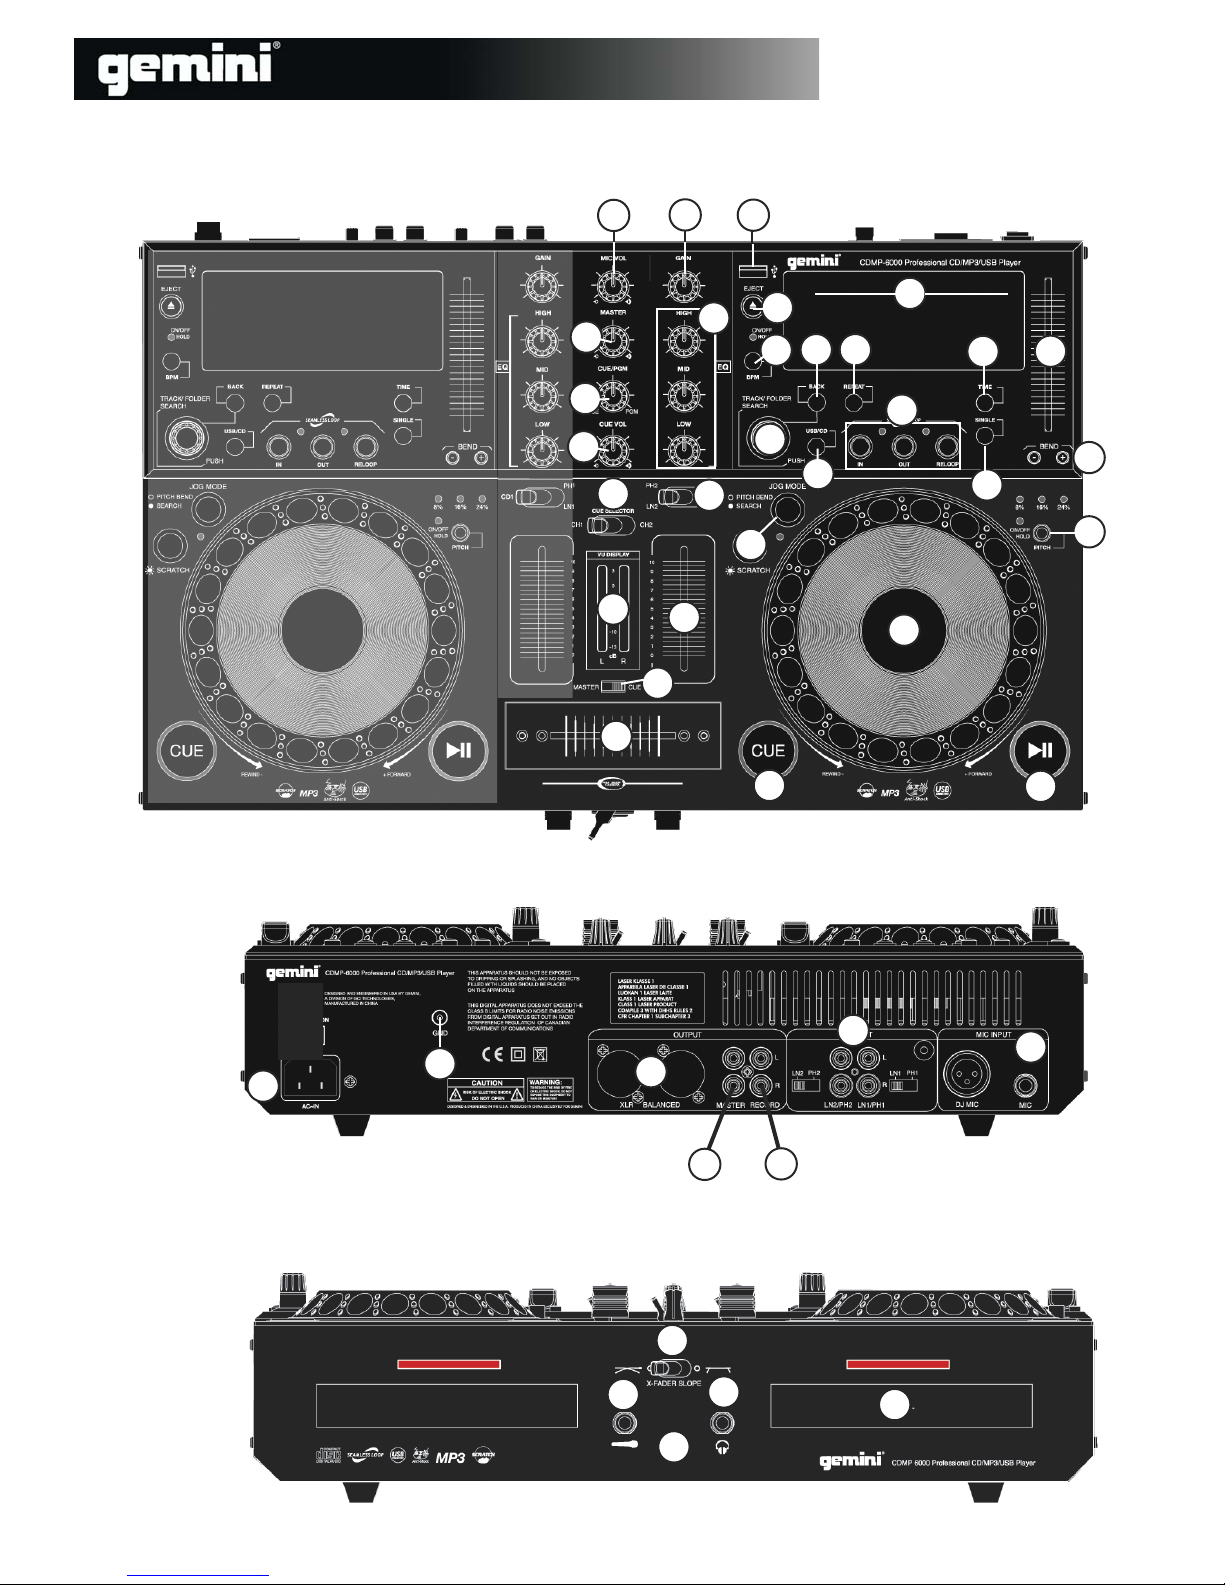
DISPLAY: El DISPLAY muestra el número de pista, valor del pitch,
pitch bend, single, continue (en continuos play), play/pausa, rápido
adelante/modo reverse, modo loop, reloop, PGM, modo repetición, la
barra de reproducción, y tres modos distintos de tiempo. Estos modos
de tiempo son TIEMPO TRANSCURRIDO de pista, TIEMPO
RESTANTE en el disco y TiEMPO RESTANTE en la pista. El tiempo se
mide en minutos, segundos y fragmento.
TIEMPO: El BOTON TIEMPO conmuta el display de tiempo entre tres
posibilidades, estas tres son TIEMPO TRANSCURRIDO de pista,
TIEMPO RESTANTE en el disco y TIEMPO RESTANTE en la pista.
TIEMPO TRANSCURRIDO indica cuanto tiempo lleva esta canción
desde que se pulso play, TIEMPO RESTANTE EN DISCO mostrará el
tiempo que queda de todo el disco y TIEMPO RESTANTE EN PISTA
cuenta el tiempo que falta para finalizar la pista que suena.
SINGLE: Pulsando el botón SINGLE se activa el modo SINGLE en este
modo el CDMP-6000 reproducirá una canción y luego se para. Pul-
sando el botón SINGLE de nuevo se activará el modo
CONTINUOUS provocando que la unidad reproduzca de forma con-
tinua (después de la última canción, la unidad vuelve a la pista
primera y sigue reproducción).
BPM: Pulsar y mantener el botón BPM para activar la lectura de
BPM, una vez se haya hecho un TAP para seleccionar el beat de la
música, después de varios TAPS el display mostrará la media de
BPM’s de la canción.
PGM: Permite crear una lista de reproducción. Para programar una
lista en la memoria del CDMP-6000, primero pare la reproducción y
PGM para iniciar la lista. Seleccione una pista usando el selector de
pistas para buscar la primera pista de la lista. Cuando haya selec-
cionado la pista correcta pulse PGM y el CDMP-6000 estará listo
para la próxima selección. Repita los pasos anteriores para comple-
tar la lista, luego pulse play para iniciar la reproducción de la lista fi-
jada.
PITCH: Apretando el botón de PITCH se active el control deslizante
de PITCH . El botón de PITCH tiene tres ajustes 8%, 12% y 24% y
pueden ser seleccionados apretando el botón de PITCH una vez para
cada ajuste. Apriete el botón de PITCH nuevamente para desactivar
este modo.
CONTROL DESLIZANTE DE PITCH: Moviendo el CONTROL DE
PITCH arriba o abajo se disminuye o aumenta el porcentaje + o -
24% dependiendo del ajuste del botón de PITCH.
PITCH BEND: Pulsando los botones PITCH BEND se aumentará au-
tomáticamente +24% o se disminuirá el pitch en -24% desde el ajuste
existente. Soltando los botones se vuelve al nivel de pitch original. Se
puede utilizar esta función para cuadrar el beat cuando se mezcla de
una canción con otra.
SECCION LOOP: Un LOOP repite la sección entre el punto de entrada
(IN) y el de salida (OUT). Para fijar un loop mientras la unidad esta
reproduciendo, pulse el BOTÓN IN (se ilumina) y cuando llegue al
punto que desea finalizar el loop pulse el BOTÓN OUT (también se
ilumina). El loop seguirá reproduciéndose hasta que pulse el BOTÓN
OUT ade nuevo permitiendo que la música continúe desde ese punto,
para re-enganchar el loop debe pulsar el BOTÓN RELOOP.
13
14
15
16
17
18
19
20
10
Cuando abandona el loop el BOTÓN OUT se apagará OFF y el
BOTÓN IN seguirá iluminado para indicar que su loop está
guardado en la memoria del CDMP-6000. Pulsando el BOTÓN IN
de nuevo mientras la unidad reproduce, se borrará el loop previo
guardado y se guardará el nuevo punto de entrada. Pulse OUT
para salir del loop y guardar un nuevo loop completo. Pulse
RELOOP para volver al principio del loop guardado para reproduc-
ción normal. Pulse RELOOP repetidamente para tartamudeo.
NOTA: EL PRIMER LOOP TENDRA UNA PAUSA EN EL PUNTO DE
SALIDA, MIENTRAS QUE TODOS LOS DEMAS SERAN SIN CORTE.
PLAY/PAUSE: Cada pulsación de BOTÓN PLAY/PAUSE
causa el cambio de función de PLAY a PAUSE o de PAUSE
de nuevo a PLAY. El BOTÓN PLAY/PAUSE rqueda iluminado
cuando es PLAY ,mientras que parpadea durante PAUSE.
CUE: Cuando la unidad esta reproduciendo y después de haber pro-
gramado un punto cue, pulsando CUE el reproductor de CD entrará
en modo PAUSE (BOTÓN PLAY/PAUSE parpadea) en el punto cue
programado (el CUE LED se enciende). Manteniendo el botón CUE la
función cambia a pre-escucha, y permite hacer tartamudeo del punto
cue o reproducir desde ese punto CUE POINT. Al soltar el botón de
CUE la unidad vuelve al punto CUE prefijado.
REPEAT: Apriete el botón de REPEAT una vez para ajustar 1o
repetir la canción seleccionada. Apriete REPEAT de nuevo para se-
leccionar TODO lo que se va a repetir en las canciones. Presione
REPEAT de nuevo para desactivar la función REPEAT.
PUERTO USB El Puerto USB permite la conexión de cualquier dis-
positivo USB*.
BOTÓN DE SELECCIÓN USB/CD El botón de selección USB/CD per-
mite seleccionar entre el CD que se reproduce en el CDMP-6000 y
cualquier dispositivo de memoria conectado al Puerto USB .
CONTROL ROTATIVO SELECCIÓN DE CANCIÓN : El CONTROL
ROTATIVO SELECCIÓN DE CANCIÓN permite navegar a través de
las carpetas o buscar a través de las canciones dependiendo si se
encuentra en modo USB o modo CD.
En modo CD el control rotativo puede buscar a través de canciones
del CD, moviendo hacia la derecha o sentido horario avanzas la se-
lección, girando el control hacia la izquierda o en sentido anti-ho-
rario retrasa la selección.
Una vez que se haya encontrado la selección puede cargarla para
reproducirla apretando el control ROTATIVO para confirmar la se-
lección. En modo USB el control le permite buscar a través de
ficheros y navegar a través de las librerías de música de su disposi-
tivo USB. Simplemente rote el control hasta que encuentre la carpeta
deseada y apriete el control para escoger dicha carpeta, continúe
para buscar de esta manera hasta encontrar la canción deseada,
entonces como en modo CD presione el control de Nuevo para car-
gar y reproducir la canción deseada.
NOTA : UNA VEZ HAYA PASADO A OTRA CANCIÓN, NO PODRÁ VOLVER HACIA SU PUNTO
CUE PROGRAMADO. DEBE COMENZAR SU SELECCIÓN DE CUE DE NUEVO, EL PUNTO CUE SERÁ
AJUSTADO AL PRINCIPIO DE LA NUEVA CANCIÓN SELECCIONADA
Recomendamos que use dispositivos USB no mayores de 2 Gb y con
menos de 100 carpetas con menos de 1000 canciones en cada car-
peta. Dispositivos de más capacidad funcionarán pero afectará en el
tiempo de acceso para cargar o buscar una canción.
22
23
*
21
26
27
24
25

GENERAL:
Tipo.................................................................................Compact Disc Player
Tipo de Disco...............................Standard Compact discs (12cm & 8cm)
Display Timepo...Transcurrido, Remanente de canción o remanente
total
Pitch.........................................................± 24% con botón de ajuste Pitch
Bend........................................................................................± 24% Máximo
Comienzo instantane..........................................menos de 0.03 segundos
Instalación......................................................................................19" each Di-
mensiones......................... 19" x 3.5" x 10" (482.6 x 88.9 x 254 mm)
Peso....................................................Unidad principal: 11.35 lbs. (5.14 kg)
SECCIÓN AUDIO :
Quantización..........................................1 Bit Linear/Canal, 3 Beam Laser
Oversampling ......................................................................................8 veces
Frecuencia de muestreo...................................................................44.1 kHz
Respuesta en Frecuencia....................................................20 Hz to 20 kHz
THD........................................................................................Less Than 0.05%
Relación Señal/Ruido............................................................................85 dB
Rango Dinámico......................................................................................85 dB
Separación de Canales.........................................................85 dB (1 KHz)
Nivel de salida..............................................................2.0 +/- 0.2V R.M.S.
Alimentación .......................................................AC 115/230V, 60/50 Hz
INPUTS:
Phono.............................................................................3mV,47 KOhm
Línea..........................................................................150 mV, 27 KOhm
Micrófono............................................................1.5 mV, 1 KO balanced
OUTPUTS:
Max..........................................................................20V Peak-to Peak
Grabación.....................................................................225 mV, 5 KOhm
ESPECIFICACIONES Y DISEÑO ESTAN SUJETAS
A CAMBIOS SIN PREVIO AVISO POR RAZONES DE MEJORA.
31
32
33
34
35
1. DESATORNILLE LOS TORNILLOS DEL FADER (B). NO TOQUE LOS TORNILLOS INTE-
RIORES (C) CON CUIDADO QUITE EL VIEJO
CROSS FADER Y DESCONECTE EL CABLE
(D)
2. CONECTE EL NUEVO CROSS FADER
EN EL CABLE (D) Y INSERTELO EN SU
LUGAR.
3. ATORNILLE EL CROSS FADER AL MEZ-
CLADOR CON LOS TORNILLOS DE LA
CARATULA (B)
4. COLOQUE LA CARATULA DEL MEZ-
CLADOR Y ATORNILLE LOS CUATRO
TORNILLOS. COLOQUE DE NUEVO LOS BOTONES DE LOS FADERS.
CDMP-6000
30
REPLAZO DEL FADER
ESPECIFICACIONES:
11
SECCIÓN MIXER:
GANACIA ROTATIVA DE CANAL: La GANACIA ROTATIVA DE
CANAL permite aumentar la señal de cada canal individual depen-
diendo de que nivel de entrada sea.
ECUALIZADOR DE 3 BANDAS: El ECUALIZADOR DE 3 BANDAS
ajusta el tono de cada CHANNEL dando la opción de 3frecuencias
(BANDAS) para ajustar, GRAVES, MEDIOS (MID) y AGUDOS
puede usar este ajuste para aumentar o disminuir las 3 frecuencias
por separado hasta que el tono del programa musical sea el
apropiado para la escucha.
SELECTOR DE ENTRADA DE CANAL: El SELECTOR DE ENTRADA
DE CANAL le permite elegir que entrada va a ser controlada por
el correspondiente FADER.
Por ejemplo en el CANAL (1) el selector de ENTRADA permite
escoger entre CD 1 y PHONO 1/LÍNEA 1 y también en el
CANAL (2) el selector de ENTRADA permitirá escoger entre
PHONO 2/LÍNEA y CD 2.
VOLUMEN DE CANAL: Después de elegir que entrada desea con el
SELECTOR DE ENTRADA ,el correspondiente FADER DE CANAL le
permitirá ajustar el volumen de ese CANAL en particular.
VOLUMEN MICRÓFONO Permite ajustar el volumen del micrófono .
Ambas entradas de micrófono están controladas por el mismo con-
trol rotativo.
SALIDA MASTER: El control rotativo de SALIDA MASTER ajusta el
volumen de salida de la señal MASTER
CONTROL CUE/PGM MIX : Ajusta la mezcla entre la señal de
CUE y la salida master en la salida de monitor para auriculares.
VOLUMEN DE CUE: El CONTROL ROTATIVO DE VOLUMEN DE
CUE ajusta el volumen de salida de sus AURICULARES MONITOR
SELECTOR CUE DE CANAL: El SELECTOR CUE DE CANAL aper-
mite elegir que canal va a monitorizar por los auriculares, a la
izquierda es CANAL (1) a la derecha es CANAL (2).
VU METER: CDMP-6000 tiene un VU METER estéreo que permite
monitorizar el nivel de decibelios de las salidas IZQUIERDA y
DERECHA MASTER
SELECTOR VU MASTER/CUE: Este selector controla qué salida se va
a visualizar en el VU MASTER, en la posición master se visualizará
la salida master del CDMP-6000 y en la posición CUE la parte
izquierda mostrará la salida CUE del CANAL (1) y la derecha la
salida CUE del CANAL (2).
CROSS FADER: El CROSS FADER permite mezclar de una fuente a
otra. El CROSS FADER del CDMP-6000 es reemplazable en caso de
que fuera necesario. El CROSS FADER RG-45 (RAILGLIDE™) DE
DOBLE RAIL, que tiene internamente dos guias de acero que per-
miten un desplazamiento suave y preciso de fin a fin puede com-
prarse como accesorio en cualquier distribuidor GEMINI.
NOTA: AL USAR EL CROSS FADER DESPLACE SUAVEMENTE EL FADER. SI PRE-
SIONA HACIA ABAJO PUEDE DOBLAR LOS CONTACTOS INTERNOS Y CREAR
PERDIDAS DE SONIDO.
28
29
36
37
38
39
El selector de CURVA permite elegir entre dos tipos de CURVA, si
el interruptor esta a la derecha el CROSSFADER seré gradual y si
está a la derecha se producira un rápido corte del CROSSFADER.
SALIDA de AURICULARES: La SALIDA de AURICULARES
localizada en la parte frontal de la CDMP-6000 acepta cualquier
auricular con un conector standard 1/4” o adaptador y permite
escuchar la mezcla, puede ajustar el volumen de pre-escucha de la
mezcla en los AURICULARES (Vea CONTROLES).
40
41

ATTENTION: Cet appareil répond aux certifications FCC lorsqu'il est connecté à d'autres appareils à l'aide de cordons blindés. Afin de prévenir tout risque de parasites élec-
tromagnétiques avec un poste radio ou TV, veuillez utiliser des cordons blindés.
Le point d'exclamation situé dans un triangle est destiné à attirer votre attention durant l'utilisation de votre appareil ou d'un entretien périodique de ce dernier. Vous en trou-
verez plusieurs dans le mode d'emploi de l'appareil.
LIRE LES INSTRUCTIONS: Toutes les instructions et consignes d'utilisation doivent être lues avant l'utilisation de l'appareil.
CONSERVEZ LES INSTRUCTIONS: Nous vous recommandons de conserver les instructions et consignes d'utilisation en cas de nécessité ultérieure.
RESPECT DES CONDITIONS D'UTILISATION: Nous vous recommandons de respecter les instructions d'utilisation.
SUIVRE LES INSTRUCTIONS D'UTILISATION: Nous vous recommandons de respecter la chronologie des instructions d'utilisation.
NETTOYAGE: L'appareil doit être nettoyé avec un chiffon légèrement humide. Ne pas utiliser de produits chimiques corrosifs & volatiles (cire, essence, insecticide…) afin de
ne pas endommager l'appareil.
CORDON: Ne pas utiliser de cordons non préconisés par le fabricant afin de ne pas endommager l'appareil.
EAU & HUMIDITE: Ne pas utiliser l'appareil à proximité d'une source d'eau (cuisine, salle de bain, lavabo…), ni dans un endroit sujet à l'humidité (piscine…).
ACCESSOIRES: Ne pas installer cet appareil sur un support ou dans un endroit instable. L'appareil pourrait tomber au risque de blesser une personne et être endommagé.
Veiller à utiliser des accessoires (Pied, support, crochet..) recommandés par le fournisseur ou vendu avec l'appareil. Tout montage ou installation doit respecter les instruc-
tions du fabricant et utiliser des accessoires d'installation recommandés par le fabricant.
TRANSPORT SUR CHARIOT: Tout produit installé sur un chariot doit être manipulé avec précaution. Un déplacement brusque ou trop rapide sur une surface non plane
pourrait entraîner la chute de l'ensemble et endommager l'appareil. Voir Figure A.
VENTILATION: Les ouvertures et ouïes d'aération situées sur l'appareil permettent une ventilation optimale de ce dernier afin d'éviter toute surchauffe. Ces ouvertures ne
doivent jamais être obstruées. Ne pas placer l'appareil sur un support souple risquant de bloquer les ouïes d'aération (Lit, sofa, canapé…). Si l'appareil est intégré dans une
installation ou dans un rack, veillez à la ventilation et consultez le fabricant pour toute information complémentaire.
ALIMENTATION: Veillez à respecter la tension d'alimentation située au dos de l'appareil. Si vous n'êtes pas certain de la tension d'utilisation dans votre pays, contactez
votre revendeur.
EMPLACEMENT: Veillez à installer l'appareil sur un support stable.
PERIODE DE NON UTILISATION: Débranchez le cordon d'alimentation de l'appareil en cas de non utilisation prolongée.
MISE A LA TERRE:
- Si l'appareil est équipé d'une alimentation à courant alternatif (Prise possédant un contact plus large que l'autre), celle-ci se connectera
correctement à la prise uniquement si vous respectez le sens de branchement. Il s'agit là d'une mesure de sécurité. Si vous n'arrivez pas à
insérer la fiche dans la prise, inversez la fiche. Si vous ne pouvez toujours pas insérer cette dernière, contactez un électricien afin de rem-
placer votre prise électrique qui est obsolète. Veillez à respecter cette consigne.
- Si l'appareil est équipé d'une fiche d'alimentation avec terre, veillez à la connecter à une prise électrique équipée d'une connexion à la
terre. Il s'agit d'une mesure de sécurité. Si vous ne pouvez insérer la fiche dans la prise électrique, contactez un électricien afin de remplacer
votre prise électrique qui est obsolète. Il est important de respecter cette mesure de sécurité.
INSTALLATION DU CORDON D'ALIMENTATION: Les cordons d'alimentation doivent être déroulés et rangés proprement afin d'éviter de se
prendre les pieds dedans, en particulier les cordons reliés aux prises électriques.
ANTENNE EXTERIEURE: Si vous reliez votre appareil à une antenne ou un câble extérieur, assurez-vous de la présence d'une connexion à la terre afin d'éviter les surten-
sions et les décharges d'électricité statique. L'article 810 du National Electrical Code, ANSI/NFPAS 70, précise toutes les informations nécessaires afin d'effectuer correcte-
ment le branchement à la terre du pylône ou de la structure porteuse, la connexion du câble à l'antenne de décharge, dimensions des connecteurs de mise à la terre,
connexions des électrodes, consignes de mise à la terre des électrodes. Voir Schéma B.
ORAGE/FOUDRE: En cas d'orage et de non utilisation prolongée, débranchez le cordon d'alimentation, le câble d'antenne et les cordons audio. Ceci afin d'éviter les dégâts
occasionnés par la foudre et les surcharges électriques.
LIGNES ELECTRIQUES: Une antenne extérieure ne doit pas être située à proximité immédiate de lignes électriques et/ou d'un transformateur électrique, afin de ne pas
tomber dessus en cas de chute. Lors de l'installation d'une antenne extérieure, veillez à éviter tout contact avec des lignes électriques : tout contact peut être fatal.
SURCHARGE: Ne surchargez pas les prises électriques, blocs multiprises & rallonges en y connectant trop d'appareils. Ceci afin d'éviter tout
risque de surcharge électrique ou d'incendie (Surchauffe).
INSERTION D'OBJET & DE LIQUIDE: N'insérez pas d'objets dans les fentes ou ouvertures de l'appareil afin d'éviter tout risque de choc
électrique et d'incendie. Ne jamais renverser de liquide sur l'appareil.
SERVICE APRES VENTE: N'essayez pas de réparer cet appareil ; en l'ouvrant ou en le démontant afin d'éviter tout risque de choc élec-
trique. En cas de problème, veuillez prendre contact avec votre revendeur.
PANNE/SITUATION NECESSITANT UN RETOUR EN SAV: Débranchez l'appareil de la prise électrique, remettez le dans son emballage
d'origine et contactez votre revendeur en tenant compte des situations suivantes :
- Lorsque le cordon d'alimentation est endommagé.
- Si un liquide a été renversé dessus.
- Si l'appareil a été exposé à la pluie.
- Si l'appareil ne fonctionne pas correctement malgré le respect des instructions d'utilisation. Ajustez uniquement les réglages préconisés dans le mode d'emploi, toute ma-
nipulation ou réglage non conseillés dans ce dernier peut endommager l'appareil et procurer plus de travail en cas d'intervention SAV afin de remettre l'appareil en état de
marche.
PIECES DE RECHANGE: Lorsque vous avez besoin de remplacer des pièces de l'appareil, veillez à utiliser des pièces d'origine ou possédant des caractéristiques iden-
tiques. L'utilisation de pièces non autorisées peut endommager l'appareil : surchauffe, court-circuit, choc électrique…
CONTROLE DE SECURITE: Avant de récupérer votre appareil, assurez vous que le SAV a effectué tous les contrôles de sécurité nécessaires afin de vous restituer un ap-
pareil en état de marche.
INSTALLATION AU PLAFOND OU SUR UN MUR: Ce type d'installation est déconseillé.
CHALEUR: Veillez à installer l'appareil loin de toute source de chaleur telle que radiateur, réchaud ou tout autre appareil produisant de la chaleur.
recyclage: Cet appareil ne doit pas être considéré comme un déchet domestique à usage unique. Vous devez le déposer dans un point de collecte destiné au recyclage des
appareils électroniques et électroménagers. AInsi vous préserverez l'environnement et éviterez les problêmes de santé publique vis à vis de conséquences négatives; liées à
leur dépôt dans un endroit non approprié. Le recyclage contribue à préserver les ressources naturelles. Pour plus d'informations sur les conditions de recyclage de l'appareil,
veuillez contacter les autorités de votre pays, les institutions locales ou votre revendeur.
AVANT TOUTE UTILISATION DE L'APPAREIL, MERCI DE PRENDRE CONNAISSANCE DES INSTRUCTIONS
D'UTILISATION & DE SECURITE! RISQUE DE CHOC ELECTRIQUE, NE PAS OUVRIR!
ATTENTION RISQUE DE CHOC
ELECTRIQUE
NE PAS OUVRIR!
Fig. A
Fig. B
12

FACE ARRIERE
CDMP-6000
13
FACE SUPERIEURE
FACE AVANT
10
11
12
13
14
15
16 19
20
22
23
24
26
25
27
LES 2 COTES
POSSEDENT LES
MEMES FONCTIONS
21
28
29
30
31
32
33
34
35
36
37
38
39
17
18
1
7
6
2
4
3
5
8
9
742
40

Félicitations concernant votre achat du Lecteur Gemini Combo CDMP-6000.
Cet Ensemble CD/MP3 Professionnel avec console de mixage intégrée
est couvert par une garantie durant 1 an. Nous vous recommandons de pren-
dre connaissance des instructions qui suivent avant toute utilisation.
- Compatible CD-Audio, CD-R & CD MP3
- Permet la lecture de fichiers MP3 stockés sur périphérique USB*
- Affichage du BPM (Beat Per Minute) (TAP)
- Mémoire anti-choc (RAM)
- Larges molettes permettant la recherche et le calage
- Sélection du mode Jog (Pitch Bend/Search - Calage/Recherche)
- Molettes multifonction pour navigation dans les dossiers MP3
- Démarrage de lecture instantané & pré-écoute du point CUE
- Boucle parfaite avec fonction de retour instantané à la boucle (Reloop)
- Lecture Simple, Continue & mode Répétition (Repeat)
- Pitch bend via touches +/- & Molette +/- 24%
- Vitesse de lecture réglable +/- 8,16 & 24%
- Console de mixage 2 voies commutables Phono/ligne, 2 entrées Micro
- Gain & Triple Correction par voie
- Sortie Master Symétrique XLR/Asymétrique RCA & Crossfader Rail-Glide
Propriétés Diode Laser
Gaz: Ga - Al - As
Longueur d’Onde: 755 - 815 nm (25° C)
Niveau de Sortie: Signal Continu, max. 0.5 mW
INTRODUCTION:
CDMP-6000
14
CARACTERISTIQUES:
SPECIFICATIONS LASER:
CONNEXIONS:
1EMBASE POUR CORDON D’ALIMENTATION :
L’appareil est équipé d’une embase standard IEC 3 POLES (2P + T).
Branchez dessus le cordon d’alimentation livré dans l’emballage de l’ap-
pareil et reliez l’autre extrémité de celui-ci à une prise électrique. Le
CDMP-6000 possède une alimentation universelle à découpage com-
patible avec toute tension électrique de 100 à 240V AC. Il n’est plus
nécessaire de commuter la tension d’alimentation au dos de l’appareil.
Celui-ci est donc à même de fonctionner partout dans le monde. Cette
technologie est moins sensible aux pics de tension et sous-tension. De
plus, elle possède une meilleure isolation électro magnétique & protec-
tion contre les bruits électriques.
2BRANCHEMENT DE LA MASSE: Une vis de masse permettant la mise
à la masse de toute platine vinyle connectée au CDMP-6000 est située
en face arrière de l’appareil. Ce branchement est obligatoire lors de
toute utilisation de platine(s) vinyle(s). Ne pas connecter la masse
provoquera un bourdonnement désagréable lors de l’écoute.
SORTIE PRINCIPAL (MASTER) XLR (SYMETRIQUE): Cette sortie per-
met une connexion symétrique entre votre amplificateur et le
CDMP-6000 via un cordon audio XLR. Veuillez noter que les SORTIES
SYMETRIQUE (XLR) & ASYMETRIQUE (RCA) sont contrôlées par le
potentiomètre rotatif MASTER.
SORTIE PRINCIPAL (MASTER): La sortie RCA MASTER permet de
relier votre CDMP-6000 à votre amplificateur via un cordon audio
RCA.
ENREGISTREMENT (RECORD): La sortie RCA RECORD permet de
relier votre CDMP-6000 à un enregistreur de votre choix via un cor-
don audio RCA, afin d’enregistrer votre mix.Entrées sélectionnables
PHONO/LINE INPUTS
ENTREES SELECTIONNABLES PHONO/LINE INPUTS: La CDMP-6000 dispose
de 2 entrées sélectionnables PHONO/LINE (PH/LN) RCA INPUTS : Ces petits
commutateurs placés à droite des entrées RCA pour les canaux 1 & 2 vous
permettent de choisir le niveau d’entrée. Soit PHONO (Pour platine vinyle
équipée de cellule magnétique), soit LIGNE (Pour tous les autres types de
source: MP3, CD, K7...). Si vous avez sélectionné la position PH (Phono) pour
utiliser une platine vinyle, n’oubliez pas de connecter le fil de masse
(GROUNDING SCREW).
ENTREES MICROPHONE: Vous trouverez en face arrière/face avant
du CDMP-6000 (En bas à droite) une embase Jack 6.35mm
(Asymétrique) & une embase XLR (Symétrique) permettant le
branchement du MICROPHONE. Une embase Jack 6.35mm en face
avant est aussi disponible. Le volume du MICROPHONE se régle par
le potentiomètre rotatif VOLUME MICROPHONE (Voir Section VOL-
UME MICROPHONE ci-dessus).
ALIMENTATION (POWER): Lorsque vous avez effectué tous les
branchements et sélectionné la TENSION D’ALIMENTATION ADE-
QUATE, mettez le CDMP-6000 sous tension en appuyant sur la touche
POWER, pour éteindre l’appareil, appuyez sur la touche POWER une
seconde fois.
3
4
FONCTIONS:
5
6
7
8
9
10
11
1. Ne pas utiliser ce lecteur CD à des températures inférieures à 41°F/5°C
et supérieures à 95°F/35°C.
2. L’appareil ne doit pas être positionné à proximité de tout objet contenant
un liquide (Exemple: vase...).
3. Placez l’appareil dans un endroit propre, sec & ventilé.
4. Placez l’appareil sur un support stable.
5. Lorsque vous débranchez l’appareil de la prise électrique, utilisez la prise.
Ne tirez jamais sur le cordon.
6. Afin de prévenir tout accident électrique éventuel, veuillez ne pas démon-
ter l’appareil.
7. Il n’y a pas DE PIECES DETACHEES ACCESSIBLES A TOUT UTILISATEUR
A L’INTERIEUR DE L’APPAREIL. En cas de problème, veuillez contacter votre
revendeur ou un technicien qualifié.
8. Veillez à ne pas utiliser de solvants chimiques pour nettoyer l’appareil.
9. Veillez à conserver le tiroir de chargement en position fermée afin d’éviter
toute intrusion de poussière dans le mécanisme de lecture.
10. Conservez ce mode d’emploi dans un endroit sûr pour tout usage futur.
MISES EN GARDE:
IN THE USA ~ IF YOU EXPERIENCE PROBLEMS WITH THIS UNIT CALL GEMINI CUSTOMER SERVICE AT:
1 (732) 346-0061. DO NOT ATTEMPT TO RETURN THISE EQUIPMENT TO YOUR DEALER.
TIROIR POUR CD: Permet le chargement, la lecture et le décharge-
ment de tout CD (Compatible 12cm/8cm). Vous devez arrêter la lec-
ture afin d’effectuer cette opération. AFIN DE NE PAS
ENDOMMAGER TIROIRS ET MECANISMES, UTILISEZ SYSTEMA-
TIQUEMENT LES TOUCHES OPEN/CLOSE.
TOUCHE EJECTION (EJECT): En appuyant sur les touches EJECT, vous
ouvrez & fermez les TIROIRS POUR CD. En cours de lecture, le CDMP-
6000 est équipé d’une protection permettant d’éviter une ouverture
accidentelle des TIROIRS POUR CD.
NOTE : Pour éjecter le CD, vous devez être en mode CD (Pressez –
si nécessaire – la touche USB/CD), puis appuyez sur la touche EJECT.
MOLETTE (JOG WHEEL): En MODE SEARCH (RECHERCHE) les MO-
LETTES permettent une recherche rapide avant & arrière, ainsi qu’une
recherche précise afin de caler un point CUE en mode PAUSE. En
MODE PITCH BEND les MOLETTES permettent un ajustement tempo-
raire de la vitesse durant un calage. Dans le sens des aiguilles d’une
montre (FORWARD) vous accélérez la vitesse, à l’inverse (REWIND),
vous réduisez la vitesse de lecture.

CDMP-6000
FONCTIONS: (SUITE)
13
14
15
16
17
18
19
20
15
Une nouvelle pression sur la touche IN permet d’effacer la boucle
précédente & marque le début d’une nouvelle boucle. Appuyez sur la
touche OUT afin de finaliser le point de sortie & créer une nouvelle
boucle. Appuyez sur la touche RELOOP pour revenir au début de la
boucle durant la lecture. Appuyez de façon répétée sur la touche
RELOOP afin de créer un effet stutter.
NOTE: LA PREMIERE BOUCLE MARQUERA UN TEMPS D’ARRET AU
NIVEAU DU POINT DE SORTIE, ALORS QUE LES AUTRES SERONT
PARFAITES (SEAMLESS).
PLAY/PAUSE: Chaque pression sur la touche PLAY/PAUSE permet de
démarrer ou de mettre en mode pause la LECTURE. La touche
PLAY/PAUSE reste allumée durant la LECTURE et clignote en mode
PAUSE.
CUE: Lorsque l’appareil est en mode lecture & après avoir enregistré
un point cue, le fait d’appuyer sur la touche CUE mettra le lecteur CD
en mode PAUSE (La touche PLAY/PAUSE clignote) au niveau du point
cue mémorisé (La led CUE est alors allumée). Maintenez la touche CUE
enfoncée afin de pré-écouter le point cue & créer un effet stutter per-
mettant de démarrer la lecture à partir de ce point CUE. Relachez la
touche CUE afin de revenir au point CUE enregistré.
REPETITION (REPEAT): Pressez la touche afin de lire une seconde
fois la plage en cours de lecture . Appuyez une seconde fois sur la
touche REPEAT afin de re-lire complètement le CD. Appuyez une nou-
velle fois sur la touche REPEAT afin de désactiver la fonction repeat.
PORT USB: Le port USB permet le branchement de tout périphérique
de stockage USB*.
TOUCHE DE SELECTION USB/CD: La touche USB/CD permet de sélec-
tionner la lecture d’un morceau à partir d’un CD-Audio/CD-R/CD-MP3
ou à partir d’un périphérique connecté au port USB.
POTENTIOMETRE DE SELECTION DE PLAGE (TRACK SELECTION RO-
TARY): Le POTENTIOMETRE DE SELECTION DE PLAGE permet une
navigation dans les dossiers ou la sélection d’une plage sur un CD. Ceci
dépend de la sélection du mode USB ou du mode CD.
En mode CD, le potentiomètre permet la sélection d’une plage. Tournez
celui-ci dans le sens des aiguilles d’une montre (Vers la droite) afin d’a-
vancer dans la sélection. Tournez à l’inverse du sens des aiguilles d’une
montre (Vers la gauche) afin de reculer dans la sélection.
Lorsque vous avez atteint la plage souhaitée, validez la en appuyant
sur le POTENTIOMETRE ROTATIF afin d’en démarrer la lecture.
En mode USB le POTENTIOMETRE ROTATIF permet une navigation
dans les différents fichiers & dossiers situés sur votre périphérique USB.
Utilisez simplement le POTENTIOMETRE ROTATIF afin de sélectionner
le dossier auquel vous souhaitez accéder. Puis pressez sur le POTEN-
TIOMETRE ROTATIF afin d’ouvrir ce dernier. Maintenant sélectionnez
le fichier désiré, puis comme si vous sélectionniez une plage sur un CD,
démarrez la lecture en appuyant sur le POTENTIOMETRE ROTATIF.
NOTE : LORSQUE VOUS CHANGEZ DE PLAGE/MORCEAU, VOUS PERDEZ VOTRE POINT CUE. VOUS
DEVEZ ALORS EN ENREGISTRER UN NOUVEAU EN RESPECTANT LA PROCEDURE. TOUT POINT CUE
EST PROPRE A CHAQUE PLAGE/MORCEAU.
Nous vous recommandons de ne pas utiliser de PERIPHERIQUE DE
STOCKAGE USB dont la capacité excéderait 2Go, comprenant moins
de 100 dossiers incluant eux mêmes moins de 1.000 morceaux. Des
périphériques plus volumineux seraient lus mais nécessiteraient un délai
de chargement et d’accès relativement lent.song.
22
23
*
21
24
12 TOUCHE JOG MODE: Lorsque la TOUCHE JOG MODE est illuminée,
la MOLETTE est en MODE SEARCH (RECHERCHE), à l’inverse (Touche
éteinte), la MOLETTE est en MODE PITCH BEND.
ECRAN HAUTE VISIBILITE (VFD): L’ECRAN permet l’affichage du
nombre de plages, la réglage de vitesse (Pitch), fonction pitch bend,
lecture simple ou continue, mode play/pause, mode recherche
avant/arrière, boucle (Loop), retour à la boucle (Reloop), PGM, mode
répétition (Repeat), barre de progression & 3 modes affichages temps
(TEMPS ECOULE, TEMPS RESTANT & TEMPS TOTAL RESTANT). L’af-
fichage du temps s’effectue en minutes - secondes - frames.
TEMPS (TIME): La touche TIME permet de modifier l’affichage temps.
3 types d’affichage sont disponibles:
- TEMPS ECOULE sur le morceau en cours de lecture.
- TEMPS RESTANT sur le morceau en cours de lecture.
- TEMPS TOTAL RESTANT sur le CD inséré dans l’appareil.
LECTURE SIMPLE (SINGLE): Appuyez sur la touche SINGLE afin d’ac-
tiver le mode SINGLE, le CDMP-6000 lira alors la plage une fois, puis
s’arrêtera. Appuyez une seconde fois sur la touche SINGLE afin d’ac-
tiver le mode CONTINUOUS (LECTURE CONTINUE): lorsque la
dernière plage sera lue, l’appareil reprendra la lecture à partir de la
première plage du disque.
BPM : Maintenez enfoncée la touche BPM afin d’activer la fonction
affichage du BPM. Vous pouvez aussi rentrer manuellement le BPM en
tapant plusieurs fois celui-ci sur la touche, la valeur moyenne du
morceau s’affichera alors à l’écran.
PROGRAMME (PGM): Permet la création d’une playlist (Programme
de lecture). Mettez le CDMP-6000 à l’arrêt (Pas de lecture en cours),
pressez la touche PGM afin de démarrer la création d’une playlist.
Sélectionnez les morceaux à l’aide du potentiomètre rotatif de
recherche. Lorsque vous avez atteint le morceau souhaité, pressez la
touche PGM & ainsi de suite. A l’issue de la sélection, appuyez sur la
touche play (Lecture) afin de démarrer la lecture de votre playlist.
REGLAGE DE VITESSE (PITCH): Appuyez sur la touche PITCH afin
d’activer la fonction permettant de modifier la vitesse de lecture. Vous
pouvez modifier celle-ci à concurrence de +/- 8% - 12% - 24%. Pour
désactiver la fonction PITCH, appuyez une nouvelle fois sur cette
touche.
POTENTIOMETRE DE REGLAGE DE VITESSE (PITCH CONTROL SLIDE):
Permet de modifier la vitesse de lecture à concurrence de +/- 24%
TOUCHES DE RATTRAPAGE (PITCH BEND): Les touches PITCH BEND
permettent de modifier de façon instantanée & temporaire la vitesse
de lecture de +/- 24% en fonction du réglage de vitesse en cours. Le
fait de relâcher ces touches permet de revenir à la vitesse de lecture
en cours. Cette fonction permet de caler 2 morceaux lors d’un mix.
FONCTION BOUCLE (LOOP): La BOUCLE permet la répétition d’un
passage sélectionné entre un point d’entrée (IN) & un point de sortie
(OUT). Pour créer une boucle durant la lecture d’une plage, appuyez
sur la touche IN (La touche s’allume) & lorsque vous avez atteint le point
de sortie désiré, appuyez sur la touche OUT (La touche s’allume aussi).
La boucle sera lue jusqu’à ce que vous appuyez sur la touche OUT afin
de reprendre la lecture normale, pour activer de nouveau la boucle,
appuyez sur la touche RELOOP. Lorsque vous sortez de la boucle, la
touche OUT s’éteindra & la touche IN restera allumée indiquant la mé-
morisation d’une boucle dans la mémoire du CDMP-6000.
25
26
27

REGLAGE DE GAIN PAR VOIE: Le REGLAGE DE GAIN permet de cor-
riger, à la baisse ou à la hausse, le niveau de chaque voie en fonction de
la sensibilité de la source utilisée.
CORRECTIONS PARAMETRIQUES 3 BANDES: Les CORRECTIONS
PARAMETRIQUES 3 BANDES permettent une correction précise de la
tonalité sur chaque VOIE. La correction s’effectue sur 3fréquences
(BANDS): GRAVE (LOW), MEDIUM (MID) & AIGU (HIGH).
SELECTEUR DE SOURCE: Les SELECTEURS DE SOURCE vous permettent
de choisir la source assignée au réglage de volume (FADER). Par exem-
ple, le SELECTEUR DE SOURCE de la VOIE 1 vous permet de choisir entre
le CD interne, Ligne 1 (Entrée ligne sur embase RCA) ou PHONO 1 (Si
le commutateur situé en face arrière est en position PH1). Fonction iden-
tique pour la Voie 2.
FADER DE VOIE: Après avoir sélectionné la source de votre choix, ré-
glez le niveau à l’aide du FADER DE VOIE.
VOLUME MICROPHONE: Le potentiomètre rotatif VOLUME MICRO-
PHONE permet de régler le niveau de votre MICROPHONE.
VOLUME SORTIE MASTER (SORTIE PRINCIPALE): Le potentiomètre ro-
tatif VOLUME SORTIE MASTER permet de régler le niveau de la SOR-
TIE MASTER.
POTENTIOMETRE ROTATIF CUE/PGM: Permet de régler le signal dans
le casque entre la SORTIE MASTER (PGM) & la voie en cours de PRE-
ECOUTE (1 ou 2).
VOLUME CASQUE: Le potentiomètre rotatif VOLUME CASQUE permet
de régler le niveau de votre CASQUE.
SELECTION DE PRE-ECOUTE (CUE): La touche de SELECTION DE PRE-
ECOUTE (CUE) permet de choisir la voie que vous souhaitez pré-écouter
dans votre casque. Le côté gauche concerne la VOIE 1 & le côté droit
concerne la VOIE 2.
VU-METRE: Le CDMP-6000 possède un VU-METRE permettant de visu-
aliser les niveaux de sortie GAUCHE & DROIT de la SORTIE MASTER.
COMMUTATEUR VU MASTER/CUE: Ce commutateur permet de sélec-
tionner l’information affichée par le VU-METRE. En position MASTER, le
VU-METRE affiche le niveau de sortie principal (MASTER) du CDMP-
6000. En position CUE, le VU-METRE affiche à gauche le niveau de pré-
écoute de la VOIE 1 & à droite le niveau de pré-écoute de la VOIE 2.
CROSSFADER: Le CROSSFADER permet de passer d’une source à une
autre. Le CROSSFADER du CDMP-6000 est un modèle remplaçable par
l’utilisateur et ne nécessite pas l’intervention d’un technicien qualifié. Le
CROSSFADER DUAL RAIL RG-45 (RAILGLIDE™), disponible auprès de
tout revendeur GEMINI, possède 2 rails en acier inxydable et procure un
toucher & une précision incomparable.
NOTE: Veuillez manipuler le cross fader de gauche à droite sans exercer de pres-
sions inutiles sur celui-ci. Une utilisation trop brutale du cross fader entrainerait des
problèmes de contact électronique provoquant des coupures de son.
Le commutateur CURVE (COURBE) permet de choisir une courbe de
coupure standard (Souple / Mix Electro) ou courte (Rapide / Scratch).
GENERALES:
Type.............Lecteur CD/CD MP3 Professionnel & Périphérique USB MP3
Disques Lus........................................................CD Standards (12 cm & 8 cm)
Affichage Temps.........Temps écoulé, Temps restant & Temps total restant
Réglage de vitesse (Potentiomètre linéaire).............................± 8-12-24%
Pitch Bend................................................................................± 24% Maximum
Départ de Lecture.......................................................................<0.03 seconde
Installation..........................................................................................................19’
Dimensions................................ 19" x 3.5" x 10" (482.6 x 88.9 x 254 mm)
Poids..................................................................................: 11.35 lbs. (5.14kgs)
SECTION AUDIO:
Quantification.................................1 Bit Linéaire/Canal, 3 Faisceaux Laser
Echantillonnage..................................................................................................x8
Fréquence d’Echantillonnage...............................................................44.1 kHz
Bande Passante..........................................................................20 Hz - 20 kHz
Distortion Harmonique Totale...............................................................<0.05%
Rapport Signal/Bruit..................................................................................85 dB
Dynamique....................................................................................................85 dB
Diaphonie.......................................................................................85 dB (1 KHz)
Niveau de Sortie................................................................2.0 +/- 0.2V R.M.S.
Alimentation Electrique..........................................AC 115/230V, 60/50 Hz
ENTREES:
Phono..........................................................................................3mV,47 KOhms
Ligne...................................................................................150 mV, 27 KOhms
Microphone.......................................................1.5 mV, 1 KOhms symétrique
SORTIES:
Max..........................................................................................20V Crête-Crête
Enregistrement...................................................................225 mV - 5 KOhms
LES SPECIFICATIONS TECHNIQUES ET LA CONCEPTION PEUVENT ETRE MODIFIEES
SANS PREAVIS DANS LE CADRE D’UN SOUCI CONSTANT D’AMELIORATION DU
PRODUIT.
31
32
33
34
35
36
1. DEVISSEZ LES VIS DU CROSSFADER (B). NE PAS TOUCHER AUX VIS INTERIEURES (C).
DEMONTEZ SOIGNEUSEMENT LE CROSS-
FADER USAGE & DEBRANCHEZ LE CON-
NECTEUR (D).
2. BRANCHEZ LE NOUVEAU CROSSFADER
VIA LE CONNECTEUR (D)& REMETTEZ
L’ENSEMBLE EN PLACE DANS LA CONSOLE
DE MIXAGE.
3. REMETTEZ LES VIS EN PLACE (B).
4. REMETTEZ EN PLACE L’ENSEMBLE, VISSEZ LES 4 VIS, PUIS REMETTEZ LE BOUTON DU
CROSSFADER EN PLACE.
CDMP-6000
30
SECTION CONSOLE DE MIXAGE:
37
REMPLACEMENT DU CROSSFADER:
38
39
CARACTERISTIQUES TECHNIQUES:
16
28
29
.SORTIE CASQUE (HEADPHONE OUTPUT) La sortie casque
HEADPHONE OUTPUT (9) est située en face avant de votre
CDMP-6000. En branchant votre casque (JACK 6,35mm), vous
pouvez écouter le canal 1, le canal 2 ou le canal 3 et ainsi préparer
votre morceau musical avant de le jouer. Le volume de la sortie
casque est réglable, ainsi que la sélection du mélange des sources
(CUE/PGM). Vous reportez à la section REGLAGES pour de plus
amples détails.
40
41

VORSICHT: Dieses Produkt erfüllt die FCC-Regeln, wenn Sie zum Anschluss abgeschirmte Kabel und Stecker verwenden, um es mit anderen Geräten zu verbinden. Auch um elektromagnetische Störun-
gen anderer elektrischer Geräte wie Radios oder Fernseher zu vermeiden, benutzen Sie abgeschirmte Kabel und Stecker für die Verbindungen.
Das Ausrufezeichen im gleichseitigen Dreieck weißt Sie in der Bedienungsanleitung auf wichtige Bedienungsanweisungen und Wartungs-/Serviceanweisungen hin.
Das Blitzsymbol im gleichseitigen Dreieck dient dazu, den Benutzer vor gefährlichen Spannungen an nicht isolierten Stellen im Gehäuse zu warnen, die so groß sind, dass sie eine Gefahr für den Be-
nutzer darstellen.
ANWEISUNGEN LESEN: Lesen Sie alle Sicherheits- und Bedienungsanweisungen, bevor Sie mit dem Produkt arbeiten.
AUFBEWAHRUNGSHINWEIS: Bewahren Sie alle Sicherheits- und Bedienungsanweisungen gut auf.
WARNHINWEISE: Alle Warnhinweise für das Produkt und die Bedienungsanweisungen müssen genau eingehalten werden.
ANWEISUNGEN BEFOLGEN: Alle Anweisungen zum Betrieb des Produkts sollten befolgt werden.
REINIGUNG: Das Produkt sollte nur mit einem Polier- oder einem weichen trockenen Tuch gereinigt werden. Benutzen Sie dazu niemals Möbelwachs, Benzine, Insektenmittel oder andere flüchtige Reini-
gungsmittel, denn Sie könnten zur Korrosion des Gehäuses führen.
ERWEITERUNGEN: Benutzen Sie keine Erweiterungen, die nicht vom Hersteller empfohlen sind, da sie zu Risiken führen könnten.
WASSER&FEUCHTIGKEIT: Benutzen Sie dieses Produkt nicht in der Nähe von Wasser, z. B. in der Nähe einer Badewanne, einer Waschschüssel, eines Küchenspülbeckens, eines Waschbeckens, in
einem feuchten Keller, in der Nähe eines Schwimmbeckens oder an ähnlichen Orten.
ZUBEHÖR: Stellen Sie das Produkt nicht auf eine wackelige oder labile Unterlage. Das Produkt könnte herunterfallen und dabei Kinder oder Erwachsene verletzen, wie auch selber beschädigt werden.
Stellen Sie das Produkt nur auf vom Hersteller empfohlene oder verkaufte Unterlagen. Jede Befestigung und Montage des Produkts sollte nach den Anweisungen des Herstellers ausgeführt werden.
Nutzen Sie dazu ein vom Hersteller empfohlenes Montageset.
MOBILE UNTERLAGEN: Bewegen Sie eine Kombination aus dem Produkt und einer mobilen Unterlage mit Vorsicht. Schnelles Anhalten, zu viel Schub oder unebene Böden können dazu führen, dass
sich Produkt und mobile Unterlage überschlagen (SIEHE FIG. A).
BELÜFTUNG: Schlitze und Öffnungen im Gehäuse sind für die Belüftung vorgesehen. Sie stellen den zuverlässigen Betrieb des Produkts sicher und schützen es vor Überhitzung. Diese Öffnungen dürfen
nicht verschlossen, blockiert oder bedeckt werden.Stellen Sie deswegen das Produkt niemals auf ein Bett, ein Sofa, einen Teppich oder Stellen mit ähnlicher Oberfläche. Wenn Sie dieses Produkt in
einer festen Installation wie z. B. in einem Regal oder einem Rack einbauen, sorgen Sie für ausreichende Belüftung oder sorgen Sie dafür, dass die Bestimmungen des Herstellers genau ein gehalten
werden.
STROMANSCHLUSS: Dieses Produkt darf nur mit dem auf dem Gerät angegebenen Strom betrieben werden. Wenn Sie sich nicht sicher sind, welche Stromart Sie bei sich zu Hause haben, fragen Sie
den Verkäufer des Geräts oder Ihren Stromversorger.
AUFSTELLUNGSORT: Stellen Sie das Gerät an einem festen Ort auf.
ZEITEN DES NICHTGEBRAUCHS: Ziehen Sie das Stromkabel aus dem Gerät heraus, wenn Sie es für eine längere Zeit nicht gebrauchen.
ERDUNG ODER POLUNG: Wenn dieses Produkt mit einem gepolten Wechselstromstecker (ein Stecker mit einem Kontakt mehr als andere Stecker) ausgestattet ist,
passt dieser nur in einer bestimmten Richtung in die Steckdose und ist ein besonderes Sicherheitsmerkmal. Sollten Sie den Stecker nicht komplett in die Steckdose
stecken können, versuchen Sie ihn andersherum einzustecken. Sollte der Stecker auch dann noch nicht in die Steckdose passen, beauftragen Sie einen Elektriker,
um diese veraltete Steckdose auszutauschen.
Wenn dieses Produkt mit einem geerdeten dreipoligen Stecker ausgestattet ist, hat der Stecker einen dritten (Erdungs-)Kontakt und passt nur in eine Steckdose mit
entsprechender Erdung. Auch das ist ein Sicherheitsmerkmal. Sollte der Stecker nicht in die Steckdose passen, beauftragen Sie einen Elektriker, um diese veraltete
Steckdose auszutauschen.
SCHUTZ DES STROMKABELS: Stromkabel sollten so verlegt werden, dass man nicht auf sie treten kann, noch dass sie von darauf stehenden oder gegen sie stoßenden Gegenständen gequetscht wer-
den. Achten Sie besonders auf Kanten, Sicherung, Stecker und Buchsen.
AUSSENANTENNENERDUNG: Wenn Sie eine Außenantenne oder ein Radio-/Fernsehkabelsignal an das Produkt anschließen, achten Sie darauf, dass die Antenne oder das Kabel geerdet sind, um
dafür zu sorgen, dass Überspannungen und elektrostatische Aufladungen nicht auftreten können. Im Artikel 810 des National Electrical Code, ANSI/NFPA 70, finden Sie Informationen über die richtige
Erdung des Antennenmasts und weitere Informationen zu diesem Thema. (SIEHE AUCH FIG. B).
GEWITTER: Trennen Sie das Produkt während eines Gewitters oder wenn es unbeaufsichtigt ist oder wenn es für eine lange Zeit nicht benutzt wird, durch herausziehen des Stromkabels aus der Netz-
dose. Trennen Sie auch die Verbindung zu einer Antenne oder Radio-/Fernsehkabeln. Dadurch vermeiden Sie Beschädigungen des Produkts durch Blitze oder Überspannungen.
STROM- UND ÜBERLANDLEITUNGEN: Stellen Sie eine Außenantenne nicht in der Nähe von Überlandleitungen, elektrischen Licht- oder Stromkreisen oder an Stellen, wo sie in eine solche Leitung
fallen könnte, auf. Wenn Sie eine Außenantenne aufstellen, achten Sie besonders darauf, dass Sie auf keinen Fall irgendwelche Stromleitungen berührt. Das kann zu gefährlichen Auswirkungen
führen.
ÜBERLASTUNG: Überlasten Sie keine Steckdosen, Verlängerungskabel oder Sicherungen. Das kann zu Bränden oder elektrischen Schlägen führen.
EINDRINGEN VON GEGENSTÄNDEN ODER FLÜSSIGKEIT: Führen Sie niemals irgendwelche Gegenstände durch Öffnungen in das Produkt ein. Sie könnten mit
Strom führenden Stellen in Verbindung kommen oder Kurzschlüsse verursachen, die zu Bränden oder elektrischen Schlägen führen können. Gießen Sie niemals
irgendwelche Flüssigkeiten auf oder in das Produkt.
SERVICE: Versuchen Sie nicht, das Produkt selber zu reparieren. Durch das Öffnen des Gehäuses oder Entfernen von Schrauben können Sie mit gefährlichen Span-
nungen oder anderen Risiken in Kontakt kommen. Beauftragen Sie im Reparaturfall nur qualifiziertes Servicepersonal.
WANN SERVICE NÖTIG IST: Unter den folgenden Bedingungen ziehen Sie auf jeden Fall das Stromkabel aus der Steckdose und beauftragen Sie für eine Reparatur
nur qualifiziertes Servicepersonal:
- Wenn das Stromkabel defekt ist.
- Wenn Flüssigkeit auf oder in das Produkt gelaufen ist oder Gegenstände in das Produkt gefallen sind.
- Wenn das Produkt Regen oder Wasser ausgesetzt war.
- Wenn das Produkt trotz Befolgen der Bedienungsanweisungen nicht normal arbeitet. Stellen Sie dabei das Produkt nur nach den Anweisungen der Bedienungsanleitung ein, andere Einstellungen
können das Produkt beschädigen und den aufwändigen Einsatz von Technikern für die Wiederherstellung erfordern.
- Wenn das Produkt hingefallen oder auf andere Art und Weise beschädigt ist.
- Wenn das Produkt eine eindeutige Veränderung im Betrieb zeigt.
ERSATZTEILE: Wenn Ihr Produkt Ersatzteile benötigt, achten Sie darauf, dass der Servicetechniker nur vom Hersteller erlaubte Ersatzteile oder Ersatzteile, die die gleichen Eigenschaften wie die origi-
nalen Teile aufweisen, einsetzt. Falsche Ersatzteile können zu Bränden, elektrischen Schlägen oder anderen Risiken führen.
SICHERHEITSTEST: Bevor der Service oder eine Reparatur für dieses Produkt beendet sind, beauftragen Sie den Servicetechniker, einen Servicetest durchzuführen, um sicher zu stellen, dass das Pro-
dukt einwandfrei funktioniert.
WAND- ODER DECKENMONTAGE: Das Produkt sollte nicht an einer Wand oder der Decke montiert werden.
HITZE: Stellen Sie das Produkt nicht in die Nähe von Wärmequellen wie Radiatoren, Wärmespeichern, Öfen oder anderen Produkten (auch Verstärker), die Hitze erzeugen.
VERWERTEN SIE WIEDER: Dieses Produkt sollte nicht als Haushaltsmüll entsorgt werden. Entsorgen Sie das Produkt im Bedarfsfall bei einer zuständigen Entsorgungsstelle, die das Recycling der elek-
trischen und elektronischen Bauteile übernimmt. Wenn Sie das Produkt dem gemäß entsorgen, schützen Sie die Umwelt und die menschliche Gesundheit. Bei nicht sachgemäßer Entsorgung
gefährden Sie die Umwelt und die menschliche Gesundheit. Das Recycling verschiedener Materialien hilft, die Natur und ihre Ressourcen zu schonen. Für nähere Informationen bezüglich der
Entsorgung dieses Produkts nehmen Sie Kontakt auf mit Ihrer lokalen Stadtverwaltung, dem zuständigen Entsorgungsunternehmen oder dem Händler, bei dem Sie das Produkt gekauft haben.
VOR BENUTZUNG DES GERATS LESEN. WICHTIGE HINWEISE&SICHERHEITSBESTIMMUNGEN
WARNUNG STROMSCHLAGGE-
FAHR, nicht öffnen!
Abb. A
Abb. B
17

RÜCKSEITE
CDMP-6000
18
OBEN
1
2
4
5
VORNE
36
37 39
38
36 40
40
3
6
7
8
9
10
11
12 13
14
15
16
18
19
20
22
21
23
17
24
25
26
27
28
29
30
31
32
33
34
35
Derselbe als
anDere Seite

VORGEHEN IM FALLE EINER BEANSTANDUNG:
BITTE SETZEN SIE SICH MIT IHREM GEMINI VERTRAGSHANDLER IN VERBINDUNG.
Glückwunsch zum Kauf des Gemini CDMP-6000 CD-Players. Diese profes-
sionelle State of the art Table Top Workstation ist mit einer 1 Jahres Her-
stellergarantie* versehen. Bitte lesen Sie diese Anleitung sorgfältig durch,
bevor Sie den Player verwenden.
- Spielt Audio-/MP3-CDs/CDRs und MP3 Titel von USB Speichermedien*
- BPM Counter & - Antishock RAM-Speicher
- Jog Wheel mit Doppelfunktion(Pitch Bend, Suche)
- Sofortstart & Cue mit Vorhören, Single & Continous Play Modi
- Ein Seamless Loop mit Reloop pro Seite
- Pitch Bend über Jog Wheel oder Tasten,
- 3 wählbare Zeitanzeigemodi, Frame genaues Suchen
- Variabler Pitch Fader mit 8,16 oder 24% Bereich
- Großes blaues Display mit Hintergrundbeleuchtung
- Voll programmierbar und Repeat Funktion
- 3-Band EQ mit Gain, Kopfhörerausgang mit 6,3 mm Klinke
- Mikrofoneingang mit XLR und 6,3 mm Klinke
- Aux Eingänge für Phono- oder Line-Quellen
Laser Dioden Eigenschaften
Material: Ga - Al - As
Wellenlänge: 755 - 815 nm (bei 25°C)
Laserausgang: konstanter Strahl, max. 0,5 mW
EINLEITUNG
CDMP-6000
19
FEATURES:
SICHERHEITSINFORMATIONEN:
VORSICHTSMASSNAHMEN:
ANSCHLÜSSE:
1SPANNUNGSWAHLSCHALTER Bevor Sie den CDMP-6000 mit Ihrer
Netzsteckdose verbinden überprüfen Sie, dass der
SPANNUNGSWAHLSCHALTER auf der korrekten Spannung steht.
Um diese Einstellung zu ändern benutzen Sie einen Schraubendreher, um
die Plastikabdeckung zu lösen. Mit einem Schlitzschraubendreher kön-
nen Sie zw. 110 oder 230 Volt umschalten. Wenden Sie keine Gewalt
an, denn sonst können Sie den Schalter beschädigen. Wenden Sie sich
an einen qualifizierten Techniker falls der Schalter sich nicht leicht be-
wegen lässt.
NETZEINGANG Nachdem Sie den SPANNUNGSWAHLSCHALTER
korrekt überprüft haben können Sie das Netzkabel an den
CDMP-6000 anschliessen.
SICHERUNGSHALTER: Zum Schutz vor Spannungsspitzen ist der
CDMP-6000 mit einer austauschbaren Sicherung ausgestattet.
Stellen Sie sicher, dass Sie nur eine 250 V 1Al Sicherung zum Aus-
tausch verwenden.
NETZSCHALTER: Nachdem Sie die korrekte Einstellung des SPANN-
UNGSWAHLSCHALTERS geprüft haben und alle Kabel verbunden
wurden schalten Sie den CDMP-6000 ein indem Sie die POWER
Taste drücken. Erneutes Drücken der Taste schaltet den Player
wieder aus.
3
4
1. Setzen Sie diesen CD-Player keinen Temperaturen unterhalb 41°F/5°C
und oberhalb von 95°F/35°C aus.
2. Das Produkt darf keinem Spritzwasser ausgesetzt werden und es dürfen
keine Objekte gefüllt mit Flüssigkeit (etwa Vasen) auf dem Produkt
platziert werden.
3. Stellen Sie das Produkt an einem sauberen und trockenen Ort auf.
4. Stellen Sie das Produkt nicht auf wackelige Oberflächen.
5. Wenn Sie das Netzkabel ziehen, halten Sie es stets am Stecker selbst
und nicht am Kabel fest.
6. Um einem elektrischen Schock vorzubeugen öffnen Sie niemals das
Gehäuse des Gerätes.
7. Im Gerät befinden sich KEINE VOM BENUTZER AUSZUTAUSCHENDEN
TEILE. Bitte wenden Sie sich an einen qualifizierten Techniker.
8. Keine Sprühreiniger oder Schmieröl an Reglern, Oberfläche oder Schal-
tern benutzen.
9. Lassen Sie die CD-Schublade geschlossen, damit der Laser sauber bleibt
10. Verwahren Sie diese Anleitung gut auf für die Zukunft.
4
FUNKTIONEN:
NETZSCHALTER: Nachdem Sie die korrekte Einstellung des SPANN-
UNGSWAHLSCHALTERS geprüft haben und alle Kabel verbunden
wurden schalten Sie den CDMP-6000 ein indem Sie die POWER
Taste drücken. Erneutes Drücken der Taste schaltet den Player
wieder aus.
CD-SCHUBLADE: Im Laufwerk wird die CD während der Wieder-
gabe gehalten. Es werden 12 cm und 8 cm CDs unterstützt.
(SCHLIESSEN SIE DIE SCHUBLADE NICHT MIT GEWALT, SONST
KÖNNEN SIE DIE MECHANIK DES PLAYERS BESCHÄDIGEN, VER-
WENDEN SIE DIE OPEN/CLOSE TASTE)
CD-AUSWURF TASTE: Drücken Sie die EJECT TASTE um das Lauf-
werk zu öffnen. Im Wiedergabemodus müssen Sie zunächst mit STOP
die Wiedergabe beenden.
WICHTIG: Um eine CD auszuwerfen, muss das Gerät im CD Modus
sein. Drücken Sie einfach die USB/CD Taste und dann EJECT.
JOG WHEEL: Im SUCHMODUS kann das JogWheel zur Suche vor-
wärts oder rückwärts genutzt werden und zum genauen Einstellen
des CUE-Punktes im Pause-Modus. Im PITCH BEND Modus übt das
JogWheel dieselbe Funktion aus wie die PITCH BEND Tasten und Sie
können die Wiedergabe kurz beschleunigen oder abbremsen.
JOG MODUS TASTE: Wenn die Anzeige JOG MODUS leuchtet
zeigt dies an, dass das JogWheel im SUCH MODUS ist und wenn Sie
nicht leuchtet, ist das Jog Wheel im PITCH BEND Modus.
DISPLAY: Das DISPLAY zeigt neben Titelnummer und -name, Pitchw-
ert, Pitchbend, Wiedergabemodus, Play/Pause, Vor- und Rück-
spulmodi, Loop/Reloop, Programmierung, BPM und Repeat auch die
Zeitanzeigeleiste und die drei Zeitanzeigemodi an. Diese sind
ABGELAUFENE ZEIT, VERBLEIBENDE ZEIT des Titels und
VERBLEIBENDE ZEIT der CD. Die Zeit wird in Minuten, Sekunden und
Frames angezeigt.
ZEITMODUSAUSWAHL: Mit der Taste TIME wechseln Sie zwischen
den 3 Zeitanzeigemodi ABGELAUFENE ZEIT des Titels,
VERBLEIBENDE ZEIT auf der CD und VERBLEIBENDE ZEIT des
Titels. ABGELAUFENE ZEIT zeigt die Zeit an, die ab Beginn des
Titel verstrichen ist, VERBLEIBENDE ZEIT der CD zeigt die übrige
Spielzeit auf der gesamten CD und VERBLEIBENDE ZEIT des Titels
zeigt die verbleibende Dauer des aktuellen Titels an.
SINGLE: Mit Druck auf die SINGLE Taste wechseln Sie in den SINGLE
Modus, in welchem der Player einen Titel spielt und dann stoppt. Mit
erneutem Druck auf die Taste aktivieren Sie den CONTINUE Modus,
in welchem der Player kontinuierlich die CD wiederholt (nach dem
letzten Song beginnt die Wiedergabe erneut beim ersten Song).
5
6
7
8
9
10
11
2

CDMP-6000
FUNKTIONEN: (FORTSETZUNG)
Halten Sie die BPM Taste gedrückt, damit die BPM ausgelsen werden.
Wenn Sie die Taste mehrfach im Takt der Musik drücken, ermittelt das
Gerät das durchschnittliche Tempo des Songs in BPM (Beats per
minute).
PGM: Erlaubt, eigene Wiedergabelisten zu programmieren. Um eine
Liste zu erstellen, halten Sie die Wiedergabe des Players an und
drücken die PGM Taste. Mittels Track Selection wählen Sie den ersten
Titel für die Wiedergabe und drücken die Taste PGM erneut. Nun ist
der CDMP-6000 bereit für Ihre nächste Auswahl. Wiederholen Sie dies
solange, bis Ihre Auswahl abgeschlossen ist. Dann drücken Sie die
PLAY-Taste, um die Wiedergabe dieser Liste zu starten.
PITCH: Drücken der Taste PITCH aktiviert den PITCHFADER. Die
Wiedergabegeschwindigkeit kann mittels Regler um 8, 12 oder 24 %
schneller oder langsamer gestellt werden. Erneutes Drücken der Taste
schaltet den Regelbereich um und dann die Pitch-Funktion aus.
PITCHFADER: Bewegen Sie den PITCHFADER nach oben oder unten,
um die Wiedergabegeschwindigkeit um +/- 24 % zu erhöhen oder
vermindern.
PITCH BEND: Drücken der PITCH BEND Tasten erhöht automatisch die
Wiedergabegeschwindigkeit auf bis zu 24 % oder vermindert diese
auf bis zu -24 % in Abhängigkeit von der Einstellung der Pitch Taste.
Dies dient dazu, zwei Titel aneinander anzugleichen. Beim Loslassen
kehrt der Player zum alten Pitch zurück.
LOOP SEKTION: Ein LOOP wiederholt einen Teil des Titels zwischen
Anfangspunkt (IN) und Endpunkt (OUT). Um eine Schleife zu setzen,
während der Player wiedergibt, drücken Sie auf die IN Taste (leuchtet
auf) und die OUT Taste (leuchtet auch auf), wenn Sie den gewünschten
Endpunkt erreicht haben. Bis Sie erneut die OUT Taste drücken wird die
Schleife dauernd wiedergegeben. Um die Schleife erneut aufzurufen
drücken Sie die Taste RELOOP. Während der normalen Wiedergabe
zeigt Ihnen nun die IN-Leuchte an, dass eine Schleife programmiert
wurde. Mit Druck auf die Loop IN Taste können Sie jederzeit eine neue
Schleife starten und die alte löschen. Schnelles mehrfaches Drücken auf
die RELOOP Taste kann als Stottereffekt verwendet werden.
BEACHTEN SIE, DASS DIE ERSTE SCHLEIFE EINE KURZE PAUSE
AUFWEIST, DIE FOLGENDEN WIEDERHOLUNGEN SIND NAHTLOS.
PLAY/PAUSE: Jeder Druck auf diese Taste wechselt zwischen dem Play
und Pause Modus. Im Wiedergabemodus ist die Play-Taste beleuchtet,
im Pause Modus blinkt diese.
CUE: Wenn der Player spielt und ein CUE Punkt gespeichert ist, wird
der Player mit Druck auf CUE in den Pausemodus wechseln
(PLAY/PAUSE TASTE blinkt) und am definierten CUE Punkt auf Sie
warten (CUE LED leuchtet). Halten der CUE Taste bewirkt das Vorhören
des Titels ab dem CUE Punkt und erlaubt Ihnen, den CUE Punkt zu stut-
tern oder von dort die Wiedergabe zu starten. Lassen Sie die Taste los,
um zum CUE Punkt zurückzuspringen.
REPEAT: Mit Druck auf die Taste REPEAT wechseln Sie in den Wieder-
holmodus, der den aktuellen Titel wiederholt. Drücken Sie erneut auf
REPEAT, um den Modus ALLE WIEDERHOLEN (REPEAT ALL) zu ak-
tivieren. Erneutes Drücken der Taste schaltet die Funktion aus.
USB ANSCHLUSS An den USB Anschluss können Massenspeichermedien
angeschlossen werden.*
13
14
15
16
17
18
19
20
21
USB/CD WAHLTASTE Mit der USB/CD Wahltaste schalten Sie zwis-
chen dem internen CD-Laufwerk des CDMP-6000 und einem am USB
Anschluss angeschlossenen Speichermedium um.
TRACKWAHLREGLER: Mit dem TRACKWAHLREGLER können Sie
durch die Ordner und Songs navigieren, abhängig davon, ob Sie sich
im USB- oder CD Modus befinden.
Im CD Modus können Sie mit dem Regler die Tracks einer CD durch-
laufen. Drehen Sie den Regler nach rechts im Uhrzeigersinn und die
nächsten Tracks werden angewählt, Drehen nach links gegen den
Uhrzeigersinn ruft die vorherigen Song auf.
Haben Sie den gewünschten Track gefunden, können Sie diesen durch
drücken des REGLERS zum Abspielen laden.
Im USB Modus dient der REGLER zum Durchsuchen von Ordnern und
zum Navigieren durch Musikbibliotheken auf Ihrem USB Speicher-
medium. Drehen Sie den Regler einfach so lange, bis Sie den gewün-
schten Ordner gefunden haben. Drücken Sie auf den Regler, um in
den Ordner zu gelangen. Hier können Sie durch Drehen den gewün-
schten Track suchen, den Sie - wie im CD Modus - durch Drücken des
REGLERS zur Wiedergabe laden.
ACHTUNG: WENN SIE DEN TITEL WECHSELN KÖNNEN SIE NICHT MEHR ZU DEM VORHER VERWENDE-
TEN CUE-PUNKT ZURÜCKKEHREN. SIE MÜSSEN EINEN NEUEN CUE-PUNKT ERSTELLEN. DER CUE-PUNKT
WIRD STANDARDMÄSSIG AN DEN ANFANG DES GEWÄHLTEN TITELS GESETZT.
Wir empfehlen, keine SPEICHERMEDIEN mit mehr als 2 GB Kapa
zität zu verwenden und die weniger als 100 Ordner mit weniger als
1.000 Songs enthalten. Größere Speichermedien arbeiten zwar am
CDMP-6000, aber die Zeit zum Suchen und Laden eines Songs ver-
längert sich stark. Bitte benutzen Sie nur FAT32 formartierte Medien.
22
23
*
21
MIXER SEKTION:
GAIN REGLER: Mit dem GAIN Regler stellen Sie die richtige Vorverstärkung
eines Kanals ein, abhängig davon, wie laut oder leise das anliegende Sig-
nal ist.
3 BAND EQUALIZER: Mit dem 3 BAND EQUALIZER können Sie die Klang-
farbe jedes KANALS in 3Frequenzen (BÄNDER) einstellen. Mit den
entsprechenden Reglern LOW (tiefe Frequenzen), MID (mittlere Frequenzen)
und HIGH (hohe Frequenzen) können Sie das jeweilige Frequenzband unab-
hängig von den anderen anheben oder absenken, bis Ihnen der Klang der
Musik gefällt und optimal für die jeweilige Hörumgebung ist.
KANAL EINGANGSWAHLSCHALTER: Mit dem EINGANGSWAHLSCHALTER
wählen Sie aus, welcher Eingang einem Kanal zugewiesen und von diesem
gesteuert wird.
Sie können damit entweder die jeweilige Playerseite oder den Auxeingang
dem Kanal zuweisen.
KANALLAUTSTÄRKE: Nachdem Sie mit dem EINGANGSWAHLSCHALTER
den gewünschten Eingang festgelegt haben, können Sie mit dem zugehörigen
KANALFADER die Lautstärke dieses Kanals einstellen.
MIKROFON LAUTSTÄRKE REGLER: Hier können Sie die Lautstärke des
Mikrofonsignals für die beiden Mikrofoneingänge gemeinsam einstellen.
MASTER AUSGANG REGLER: Der MASTER Regler stellt die Lautstärke des
MASTER Ausgangs ein.
24
25
26
27
28
29
12
Other manuals for TABLE TOP SYSTEM CDMP-6000
2
Table of contents
Languages:
Other Gemini Music Mixer manuals

Gemini
Gemini EX-26 User manual

Gemini
Gemini PS4 User manual

Gemini
Gemini PS-828EFX User manual

Gemini
Gemini PS-01 User manual

Gemini
Gemini PMX-20 User manual

Gemini
Gemini FX-7000 User manual

Gemini
Gemini PMX-04 User manual

Gemini
Gemini PS-626 User manual

Gemini
Gemini PMX-140 User manual

Gemini
Gemini PS-540i User manual

Gemini
Gemini PMX-1100 User manual

Gemini
Gemini PMX-01 User manual

Gemini
Gemini MM-3000 User manual

Gemini
Gemini PS-626USB User manual

Gemini
Gemini MM-3000 User manual

Gemini
Gemini PMX-350 User manual

Gemini
Gemini CS-02 User manual

Gemini
Gemini MM-4000 User manual

Gemini
Gemini PDM-01 User manual

Gemini
Gemini GEM-5USB User manual