IMPORTANT SAFETY
INSTRUCTIONS
BASIC PRECAUTIONS SHOULD ALWAYS BE
FOLLOWED WHEN USING ELECTRICAL PRODUCTS,
INCLUDING THE FOLLOWING:
READ AND FOLLOW ALL
SAFETY INSTRUCTIONS.
• This is an electrical product - not a toy! To avoid risk of
fire, burns, personal injury, and electric shock, it should
not be played with or placed where small children can
reach it.
• Do not use seasonal products outdoors unless marked
suitable for indoor and outdoor use. When products are
used in outdoor applications, connect the product to a
Ground Fault Circuit Interrupting (GFCI) outlet. If one is
not provided, contact a qualified electrician for proper
installation.
• This seasonal use product is not intended for permanent
installation or use.
• Do not mount or place near gas or electric heaters,
replaces, candles, or other similar sources of heat.
• Do not secure product wiring with staples or nails or place
on sharp hooks or nails.
• Do not let lamps rest on the supply cord or on any wire.
• Unplug the product when leaving the house, when retiring
for the night, or if left unattended.
• Do not use this product for other than its intended
purpose.
• Do not hang ornaments or other objects from cord, wire,
or light string.
• Do not close doors or windows on the product, or
extension cords, as this may damage the wire insulation.
• Do not cover the product with a cloth, paper, or any
material not part of the product when in use.
• Do not place the product against carpeting, furniture, or
any other fabric when in use.
• This product has a polarized plug (one blade is wider
than the other) as a feature to reduce the risk of electric
shock. This plug will t in a polarized outlet only one way.
If the plug does not t fully in the outlet, reverse the plug.
If the plug still does not t, contact a qualied electrician.
Do not use an extension cord unless the plug can be fully
inserted. Do not alter or replace the plug.
• This product employs overload protection (fuse). A blown
fuse indicates an overload or a short-circuit condition. If
the fuse blows, unplug the product from the outlet. Also
Safety Information
AB-6-CE unplug any additional string or products that may be
attached to the product. Replace the fuse as per the user
servicing instructions (follow product markings for proper
fuse rating) and check the product. If replacement fuse
blows, a short-circuit may be present and the product
should be discarded.
• Read and follow all instructions that are on the product or
provided with the product.
SAVE THESE
INSTRUCTIONS
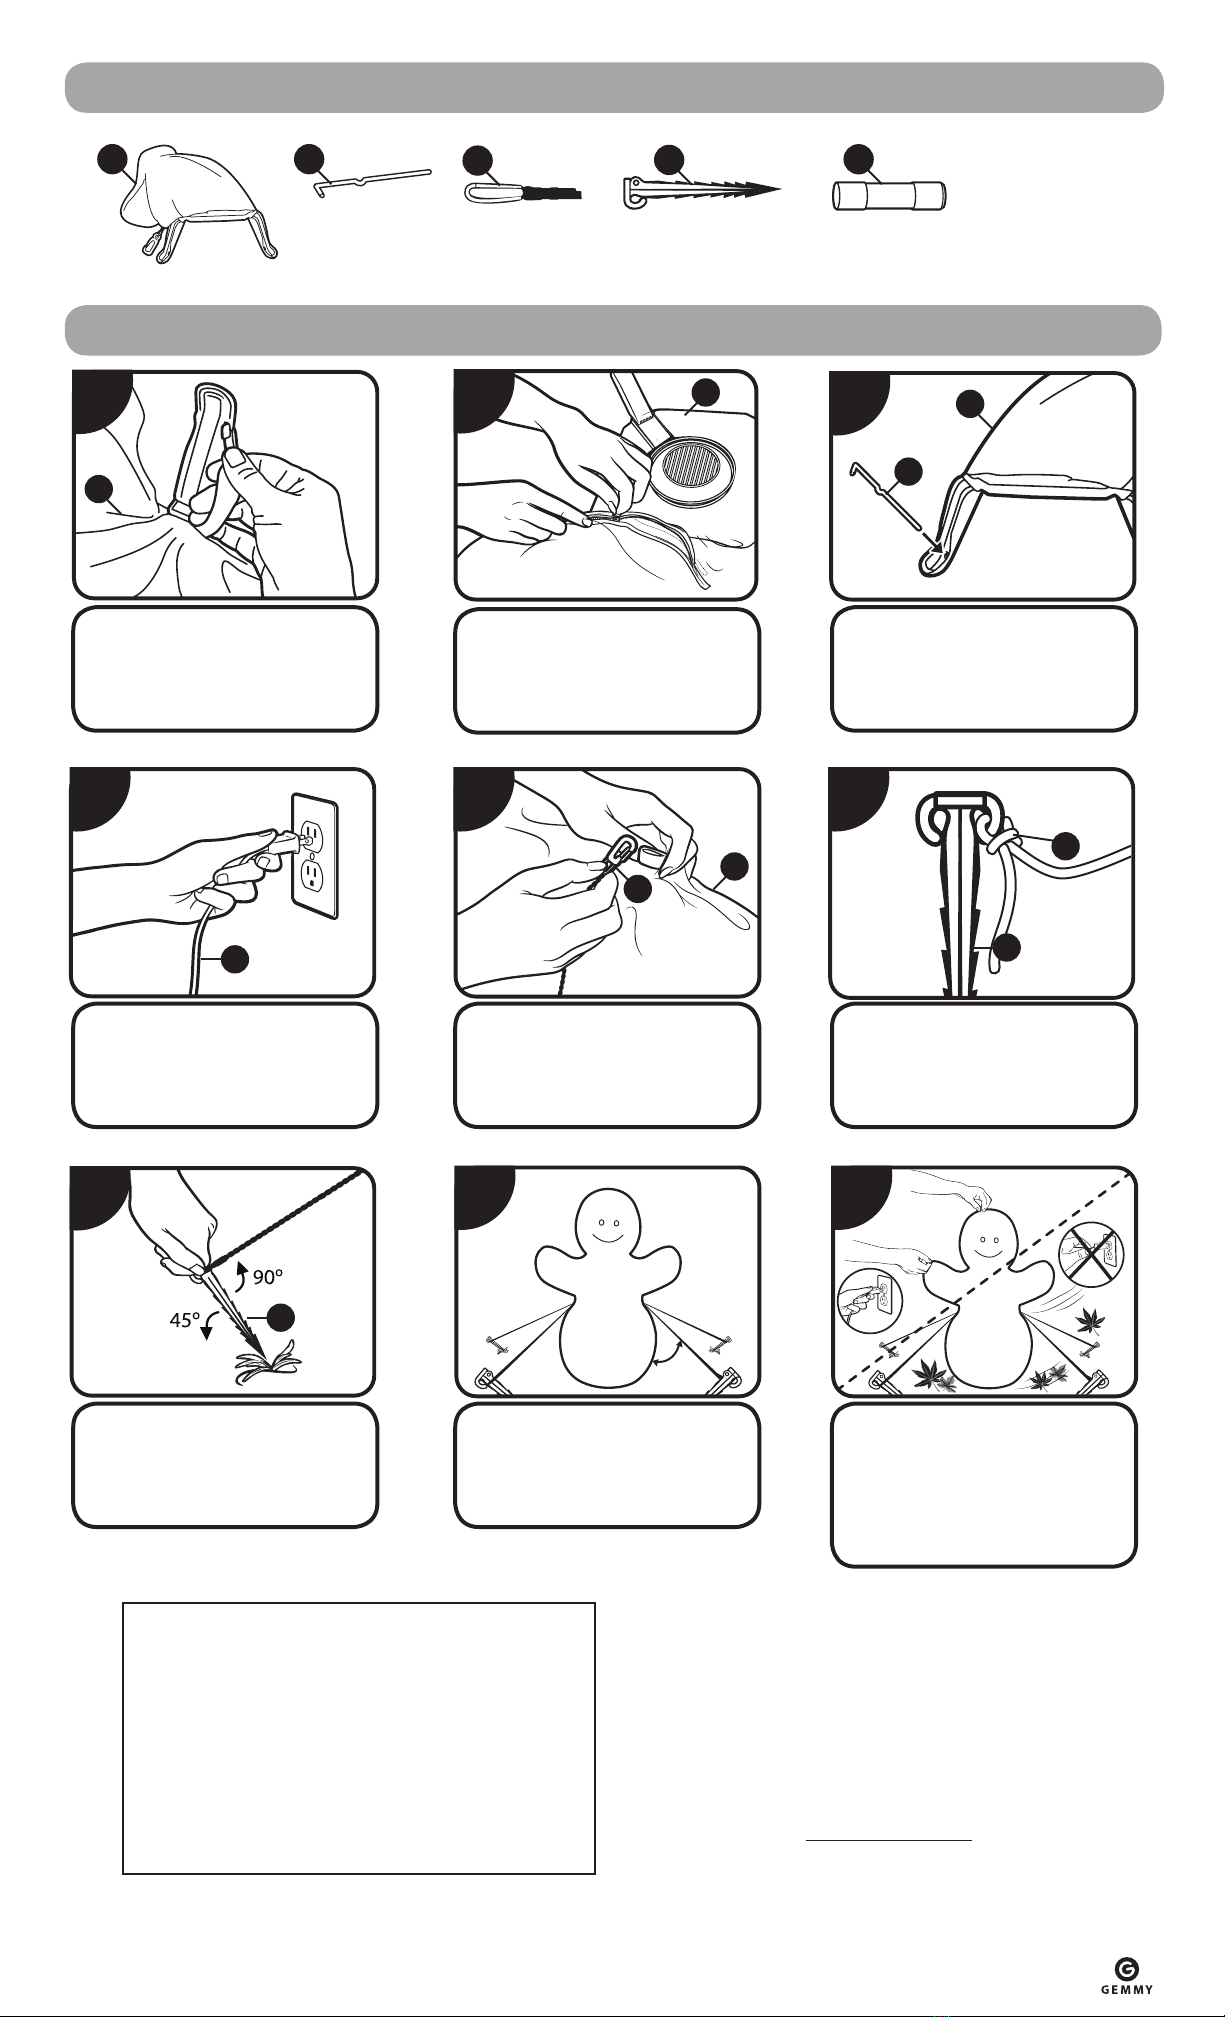
USE AND CARE
INSTRUCTION
1. When the product is placed on a live tree, the tree should
be well maintained and fresh. Do not place on live trees
in which the needles are brown or break off easily. Keep
the tree holder lled with water.
2. If the product is placed on a tree, the tree should be well
secured and stable.
3. Before using and reusing, inspect the product carefully.
Discard any products that have cut, damaged or frayed
wire insulation cords, cracks, lamp holders or enclosures,
loose connections, or exposed copper wire.
4. When storing the product, carefully remove the product
from wherever it is placed, including trees, branches,
or bushes, to avoid any undue strain or stress on the
product conductors, connections and wires.
5. When not in use, store neatly in a cool, dry location
protected from sunlight.
To reduce the risk of re and electric shock:
1. Do not install on trees having needles, leaves or branch
coverings of metal or materials which look like metal and.
2. Do not mount or support wires in a manner that can cut
or damage wire insulation.
CAUTION: Do not attempt to inflate this unit
during unusually strong winds. If it becomes too windy for
safe operation, allow the unit to deate and wait for safer
conditions.
CAUTION: Do not connect to another lighting
string, decorative outfit, or seasonal product. Do not at-
tempt to inate your AirblownTM Inatable during unusually
strong winds. If it becomes too windy for safe operation,
simply allow your AirblownTM Inatable to deate and wait
for better conditions before re-inating.
Protect the electric fan and power cord from direct expo-
sure to water. This precaution will reduce the risk of elec-
trical shock. When the temperature is below 14° F (-10°
C), the motor may temporarily stop running. The motor will
begin functioning again higher temperatures.
WARNING
Remove all plastic fasteners and tags. These are part of
the packaging and should be discarded.
This item is not a toy and should be used for decorative
purposes only.
For indoor and outdoor use.
120 V 60 Hz.
CAUTION
1. For temporary (90 days max) installation and use only.
2. To prevent electric shock, match wide blade of plug to
wide slot, fully insert.
3. Disconnect power before replacing the fuse.
4. To reduce the risk of fire or electric shock, do not at-
tempt to replace lamps or modify wiring or product.
5 Do not place near standing areas of water, such as
ponds and pools.
6. To reduce the likelihood of excessive heat and possible
damage, use only decorative lamp accessories pac-
kaged with this product or marked for use with this pro-
duct.
WARNING: READ AND
UNDERSTAND ALL
INSTRUCTIONS.
Failure to follow all instructions listed below, may result in
electric shock, re and/or serious personal injury.
WARNING:
ELECTRIC PRODUCT. Keep away from children. As with
all electrical products, precautions should be observed du-
ring handling and use to reduce the risk of electric shock. If
the supply cord is damaged, it must be replaced by the ma-
nufacturer, its service agent or similarly qualified persons
in order to avoid a hazard. To avoid the risk of electrical
shock, always make sure the figure is unplugged from the
electrical outlet before assembling, disassembling, or relo-
cating.
This product is to be assembled by adults only.
TM