Genee World Pebble User manual

GENEE TECHNOLOGIES
INDIA PRIVATE LIMITED
An ISO 9001:2008 certied company
Classroom for the Future
Quick Start Guide
Using the Pebble pad learning response
system with ClassComm software
WWW
@
Tel: 0124-4934500
Fax: 0124-4934521
Email: [email protected]
Website: www.genee-india.com, www.geneeworld.com
Plot No. 698, Udyog Vihar, Phase V, Gurgaon, Harana-122016, India
Classroom for the Future

What’s in the case
Batteries
Pebble pad Learning
Response System
Student handsets
These are used by students
to send responses
Teacher handset
Used by the teacher
to control the
presentation
ReceiverUSB cable Software CD with
Quick Set Up Guide
3
Step 1
2
Minimum system requirements:
• Processor: Pentium III 450 MHz processor (1 gigahertz (GHz) Pentium
processor recommended)
• Memory: 256 MB (512 MB or above recommended)
• Display: 800 x 600, 256 colours (Recommended: 1024 x 768 high colour,
32-bit)
• CDROM Drive: 4x or faster
• HDD: 300MB free hard drive space for basic installation – 500 MB hard
drive space required for curriculum sample content
• Microsoft.Net Framework 2.0 (included in installer)
• Microsoft® PowerPoint 2003 or above
• Adobe Flash player version 9 (included in installer)
• Operating System: Windows XP, Windows Vista and Windows 7 Compatible
Quick set up guide for
Pebble pad learning
response systems using
ClassComm software

ClassComm software installation
5
Please ensure that the receiver is disconnected before you insert the Class-
Comm Installation CD.
• If the CD does not auto-run, you will need to manually run “ClassComm.exe”
by exploring the CD contents (Fig 1)
Fig. 1 – ClassComm CD Contents
The ClassComm Installation Menu Screen will open as shown below.
• Select ClassComm Installation from the options.
• Follow the onscreen wizard instructions to install the software.
• During installation the following screen will appear (over the page).
ClassComm
Installation
Menu Screen
Step 3
Prepare the handsets
4
2. Batteries being inserted
1. Pebble pad battery cover being removed
3. Battery cover being screwed on
Step 2
Pebble pads use AA batteries (see image 2).

Sample content installation (continued)
7
• There is some optional sample content that can be installed for use with the
ClassComm system.
This step will add complete, mapped educational content for use with the
ClassComm system.
• From the ClassComm Installation Menu Screen, select the Sample Content
button.
• Follow the on-screen wizard instructions to install the required sample con-
tent.
• When the main ClassComm software is launched, the sample content will be
installed into the Resources area.
Step 4
ClassComm software installation (continued)
6
ClassComm can be installed in EDUCATIONAL mode or CORPORATE mode.
The core difference between the two modes of installation is the terminology
used throughout the application.
Educational mode uses STUDENT, TEACHER, CLASS and TEST. Corporate
mode uses PARTICIPANT, PRESENTER, GROUP and EVENT. The mode
selected from this screen can be changed later from within the ClassComm
software.
Also, ClassComm has an Interface Editor that can be used to further customise
the ClassComm software with your organisations preferred terminology – See
ClassComm Help > Advanced Functionalities > Interface Editor for details.
For the purpose of this Quick Setup Guide, educational mode terminology will
be used.
The main ClassComm software installation is now complete.
Note – Do not launch the software at this stage. Follow through this
guide to completion.

Install the Powerpoint plug-in (slide mapper)
8
Note – You will need Microsoft® Powerpoint® 2003 or above installed on
your PC before you install the plug-in
• The PowerPoint Plug-in or Slide Mapper
is a utility that is added directly into your
Microsoft® PowerPoint® application. It
allows for the mapping of your presenta-
tions within PowerPoint. The mapping proc-
ess assigns question data to your slides
(Example: True/False, Multiple Choice,
Numeric and so on)
• From ClassComm Installation Menu
Screen, select the PowerPoint Plug-in
button.
• Follow the on screen instructions to install
the Power Point Plug-in (Slide Mapper)
module.
• The Slide Mapper will appear as shown
below within Microsoft PowerPoint®
Slide Mapper
within PowerPoint
Step 5 Connect the receiver and test handset
communication within ClassComm
9
• At this stage, the PC will automatically detect the receiver and configure
the drivers accordingly.
NOTE – The receiver drivers are installed during the ClassComm software
installation described in STEP 3 – CLASSCOMM SOFTWARE INSTALLA-
TION of this guide. It is important to install ClassComm software before
attaching the receiver.
• Launch the ClassComm software by clicking the
icon from the desktop or from Start > All Pro-
grams > ClassComm.
• A message in the bottom-left area of the
ClassComm Software will appear stating that the
receiver has connected successfully.
Step 6
Connect the ClassComm
receiver to an available USB
port on the PC. A red LED will
light up in the receiver.

Creating a presentation
10
For more information on the different question types and Slide
Mapper, consult the ClassComm User Guide (See section on
Adding and mapping a PowerPoint Presentation)
• Open a blank PowerPoint Presentation and add a question with 4 choices as
shown in the example below
• Select the following options from the Slide Mapper to match the information
on the slide
• Slide Type: Multiple Choice
• Response Type: Text
• Answer : Select the correct answer choice
• Answer Colour: Green
• Question: Cut and paste the question text from the slide here
• Text Answers: From the slide, highlight the correct answer and click the Add
button.
Say “Yes” to the confirmation message that appears.
That’s it! The basic slide functionality has been set as multiple choice with 4
text label choices (A-D) and the correct answer to be highlighted in green
when the teacher reveals the answer during a presentation. Repeat the above
steps as necessary and save the presentation.
Step 7
Connect the receiver and test handset
communication within ClassComm (continued)
9
• Click on the Communication tab within ClassComm. This will display the
communication grid as shown. If pressing any keys on the Pebble Pad
handsets show a red LED, then that handset is not MAPPED to the receiver
and will not communicate.
Press any keys on the handsets and a cell will light up in the Communica-
tion grid.
A non-mapped handset will show a
red light when any key is pressed.
Press and hold the -/? key within
5-10cm of the connected receiver.
The communication LED will blink
GREEN 3 times when mapping is
complete.
The software is now installed and the hardware is configured
correctly and has been tested in the communication area of
ClassComm.

Add the presentation into ClassComm resources
11
• From within the ClassComm RESOURCES area, go to File > New > New
Activity > New PowerPoint Activity.
• From the New Activity window, click the Browse button to navigate to the
presentation created in STEP 7 and click OK.
• The presentation will now appear in the RESOURCES tree structure with
thumbnail views of all the question slides
Step 8
Run the presentation
Step 9
12
1. Enter the PRESENTATION area of ClassComm
2. Check the Existing Class Presentation option
3. Check the Record Assessment option
4. Check the Anonymous login option
5. Enter a Class Name (other details are optional)
6. Press the Save button
7. Ask students to switch ON the handsets. The Handset area
will show a count of Active Handsets.
8. Click once on the resource to present with
9. Click on Present Activity.
At this point, ClassComm will minimise and the PowerPoint activity will open
ready for responses. Use the Teacher handset or Presentation Toolbar to
control the presentation. The Response bar shows the Question type, number
and number of responses. Navigate through the presentation and when com-
pleted, the slide show will automatically end and the results saved.
1
2
3
4
5
6
7
8
9

Reports
Step 10
Once a presentation has been fully completed and stopped, the ClassComm system
allows you to view reports and charts for assessment purposes.
14
1
2
3
4
5
1. Click on the REPORTS
button
2. Select the type of
presentation that you
wish to view reports
for (In this case it is
“Anonymous”)
3. Select the Report Type
from the available
options
4. Enter the Report
Settings from the
drop-down options that
match the class and
presentation that you
presented and saved.
5. Click the Generate
Report button (enables
when report settings
have been correctly
entered) to display the
selected report in the
right-pane.
For more information on running a presentation, consult the
ClassComm User Guide (See section on Running a Presentation)
Run the presentation (continued)
13
Replay question
Increase response bar opacity
Decrease response bar
opacity
Reset opacity
Previous question
Next question
Play game
Pick student
No attached functionality
Start recording of handset
responses
Stop recording of handset
responses
End presentation
Show/hide answer
Show results charts
Hide/show presentation
toolbar
Hide/show response bar
Go to slide in review mode
Toggle instant charts

Conference settings
Response system set-up example 1:
‘We have three professional conferences coming up with 40 delegates at each. I have a
set of Genee Pads and a short series of pre-prepared, mainly multiple-choice, questions
from which I want to gather data to analyse feedback. What is the best way to set up?’
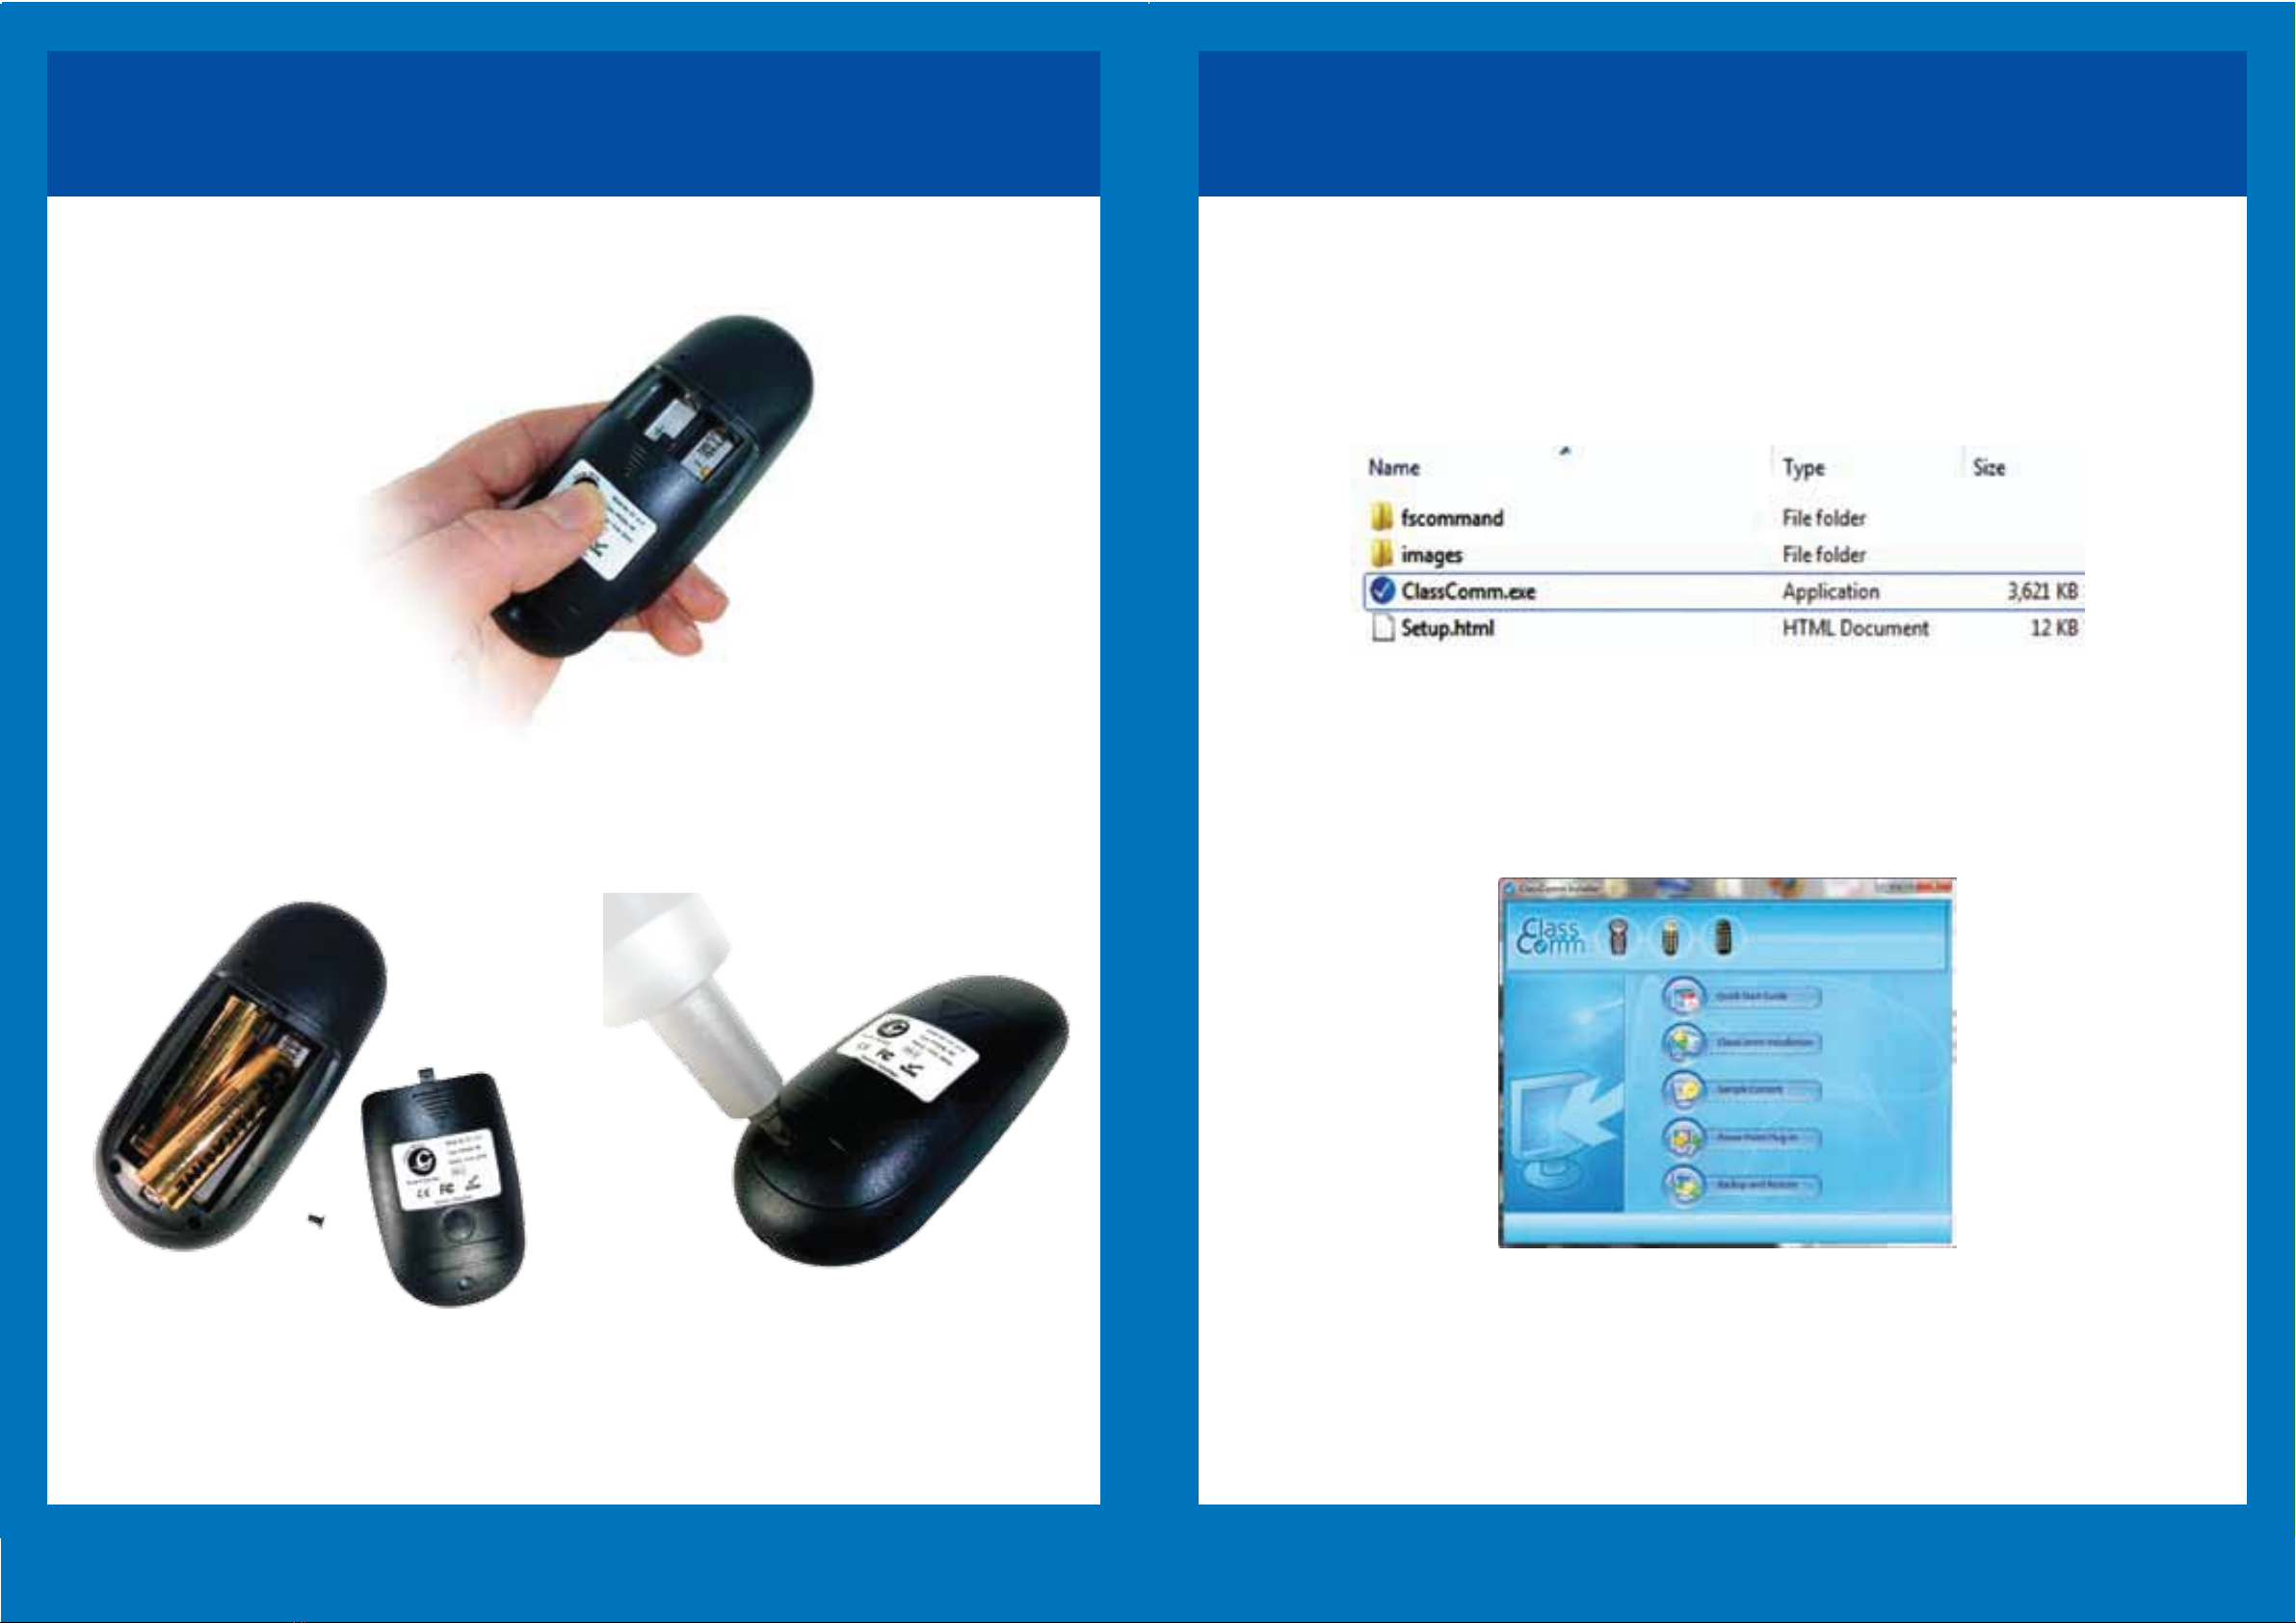
1. Check that ClassComm is in ‘Corporate’
mode by going to Settings > Application
mode (you will have to restart ClassComm
to activate this setting).
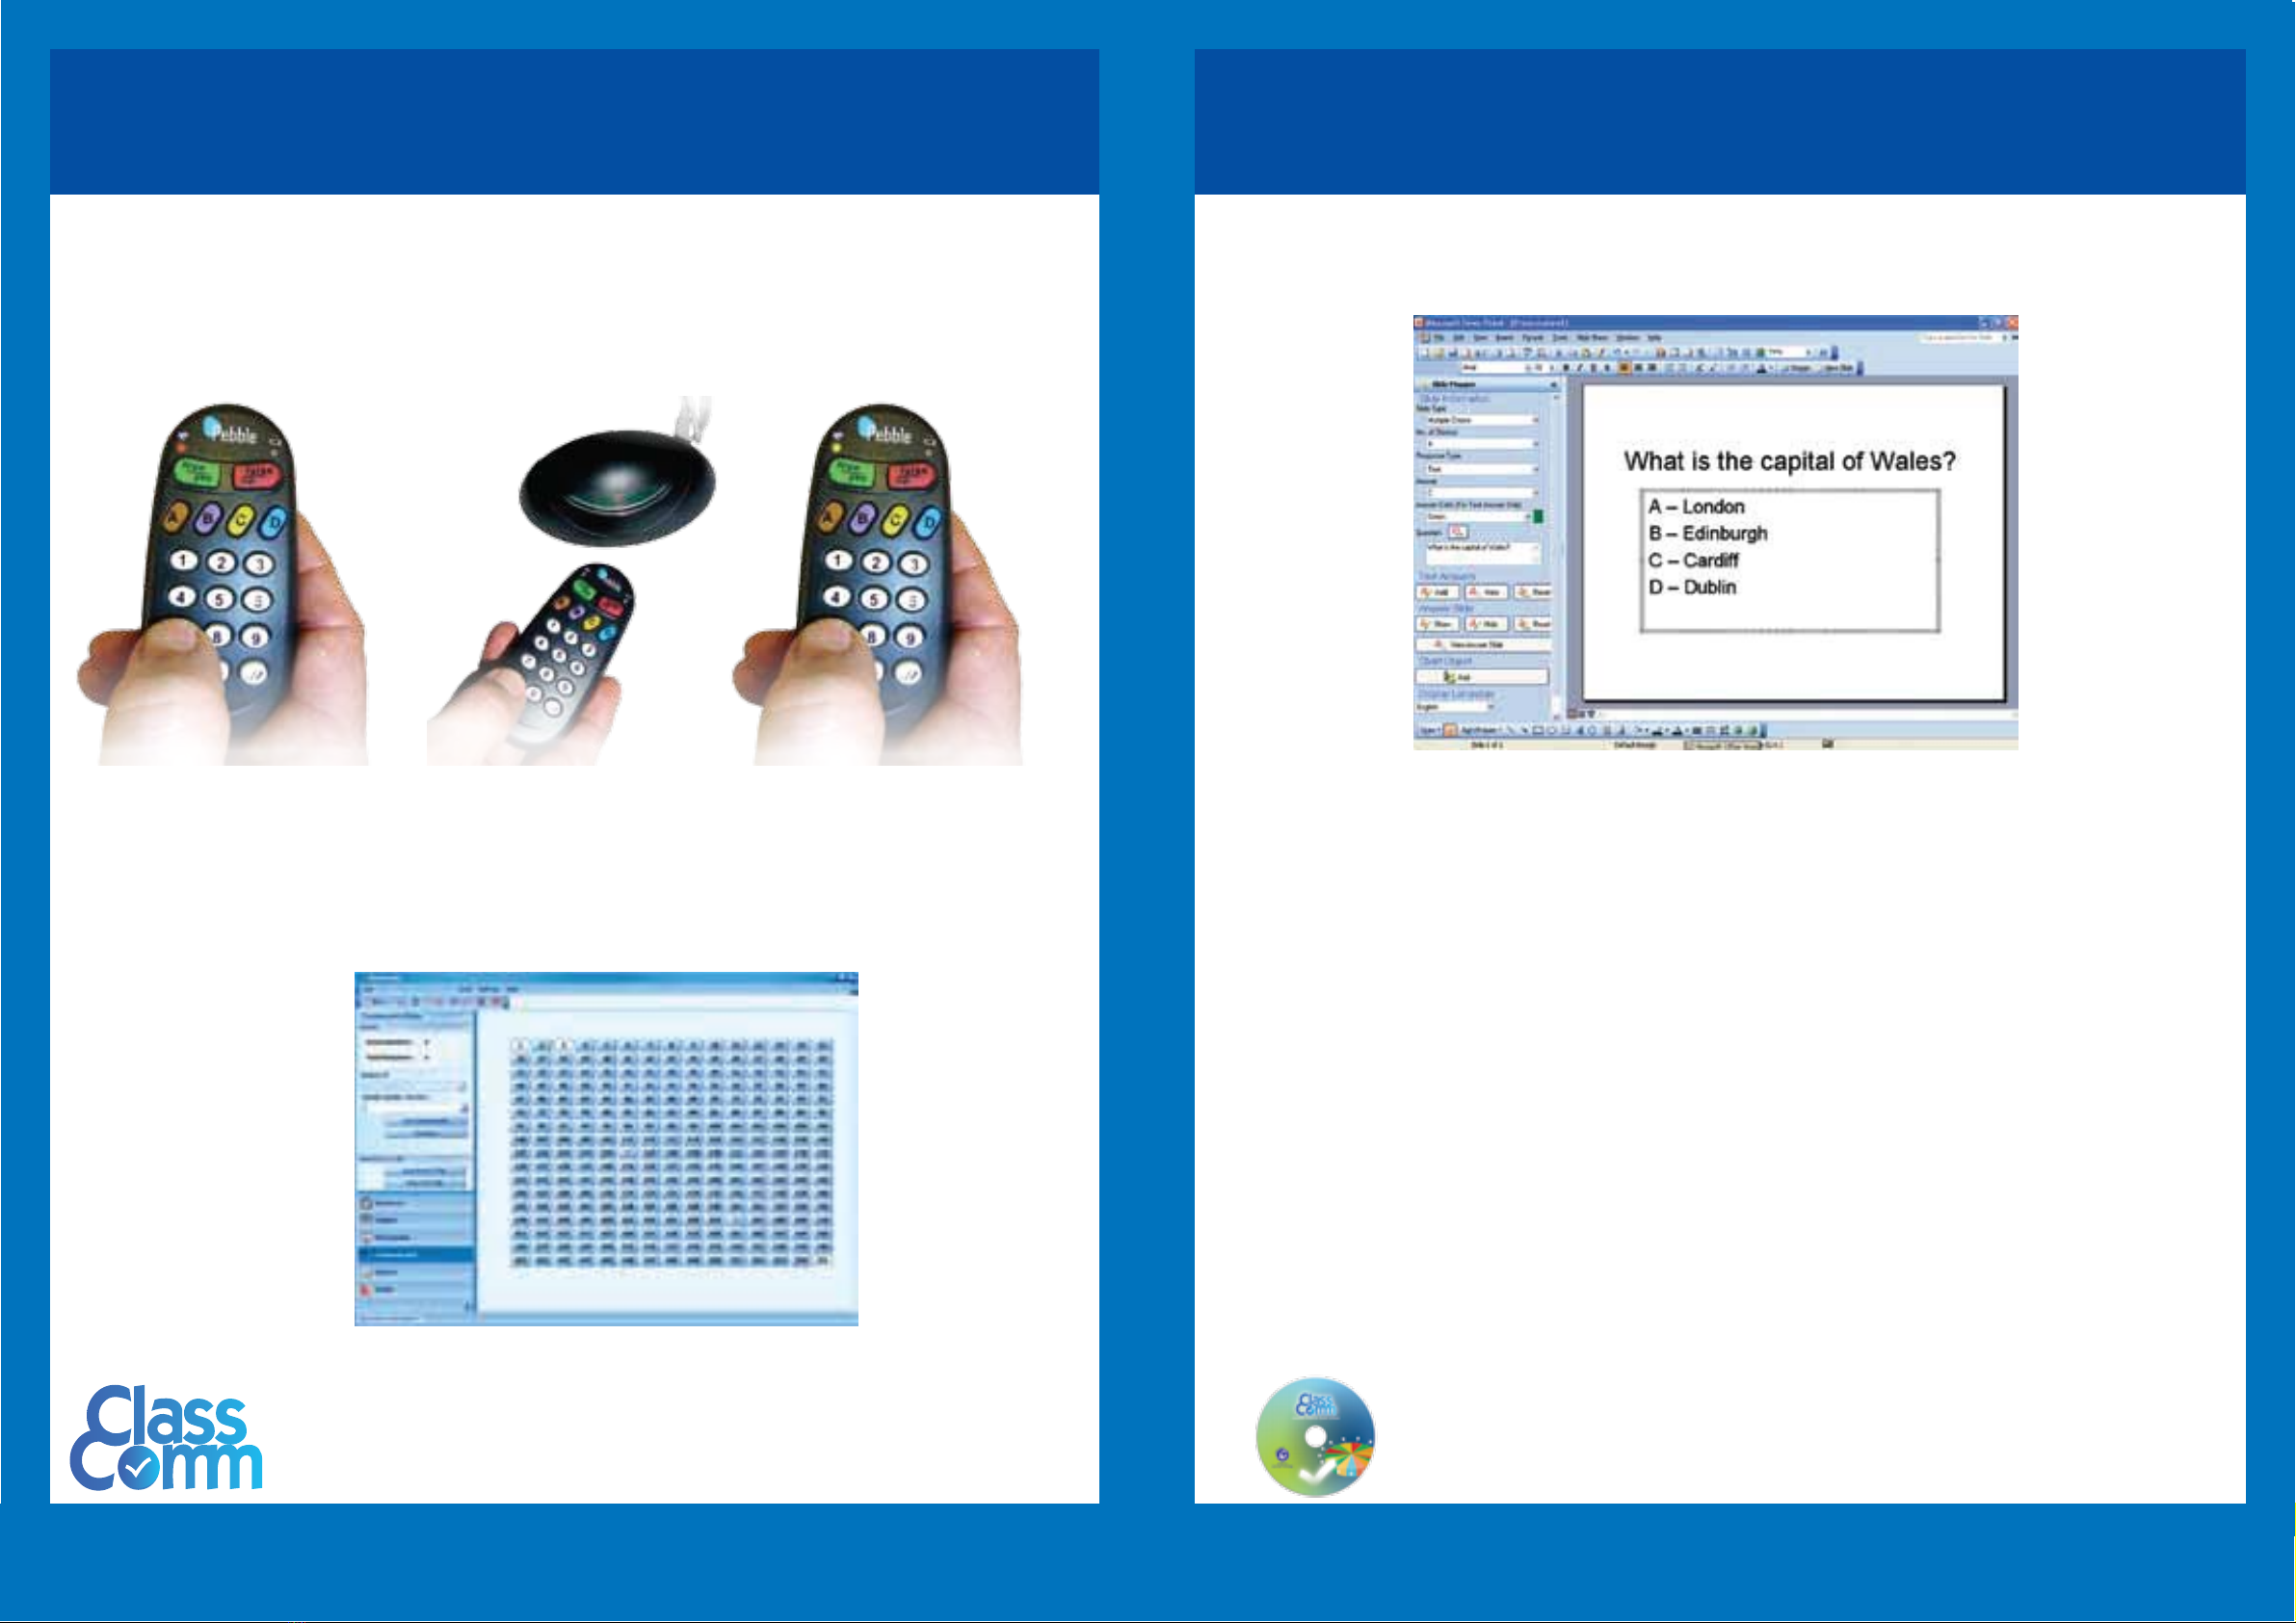
2. After you have chosen your resource
slides, go to the Presentation window
3. Select Record Assessment to keep
results and publish data
15
1
2
3
4
5
6
78
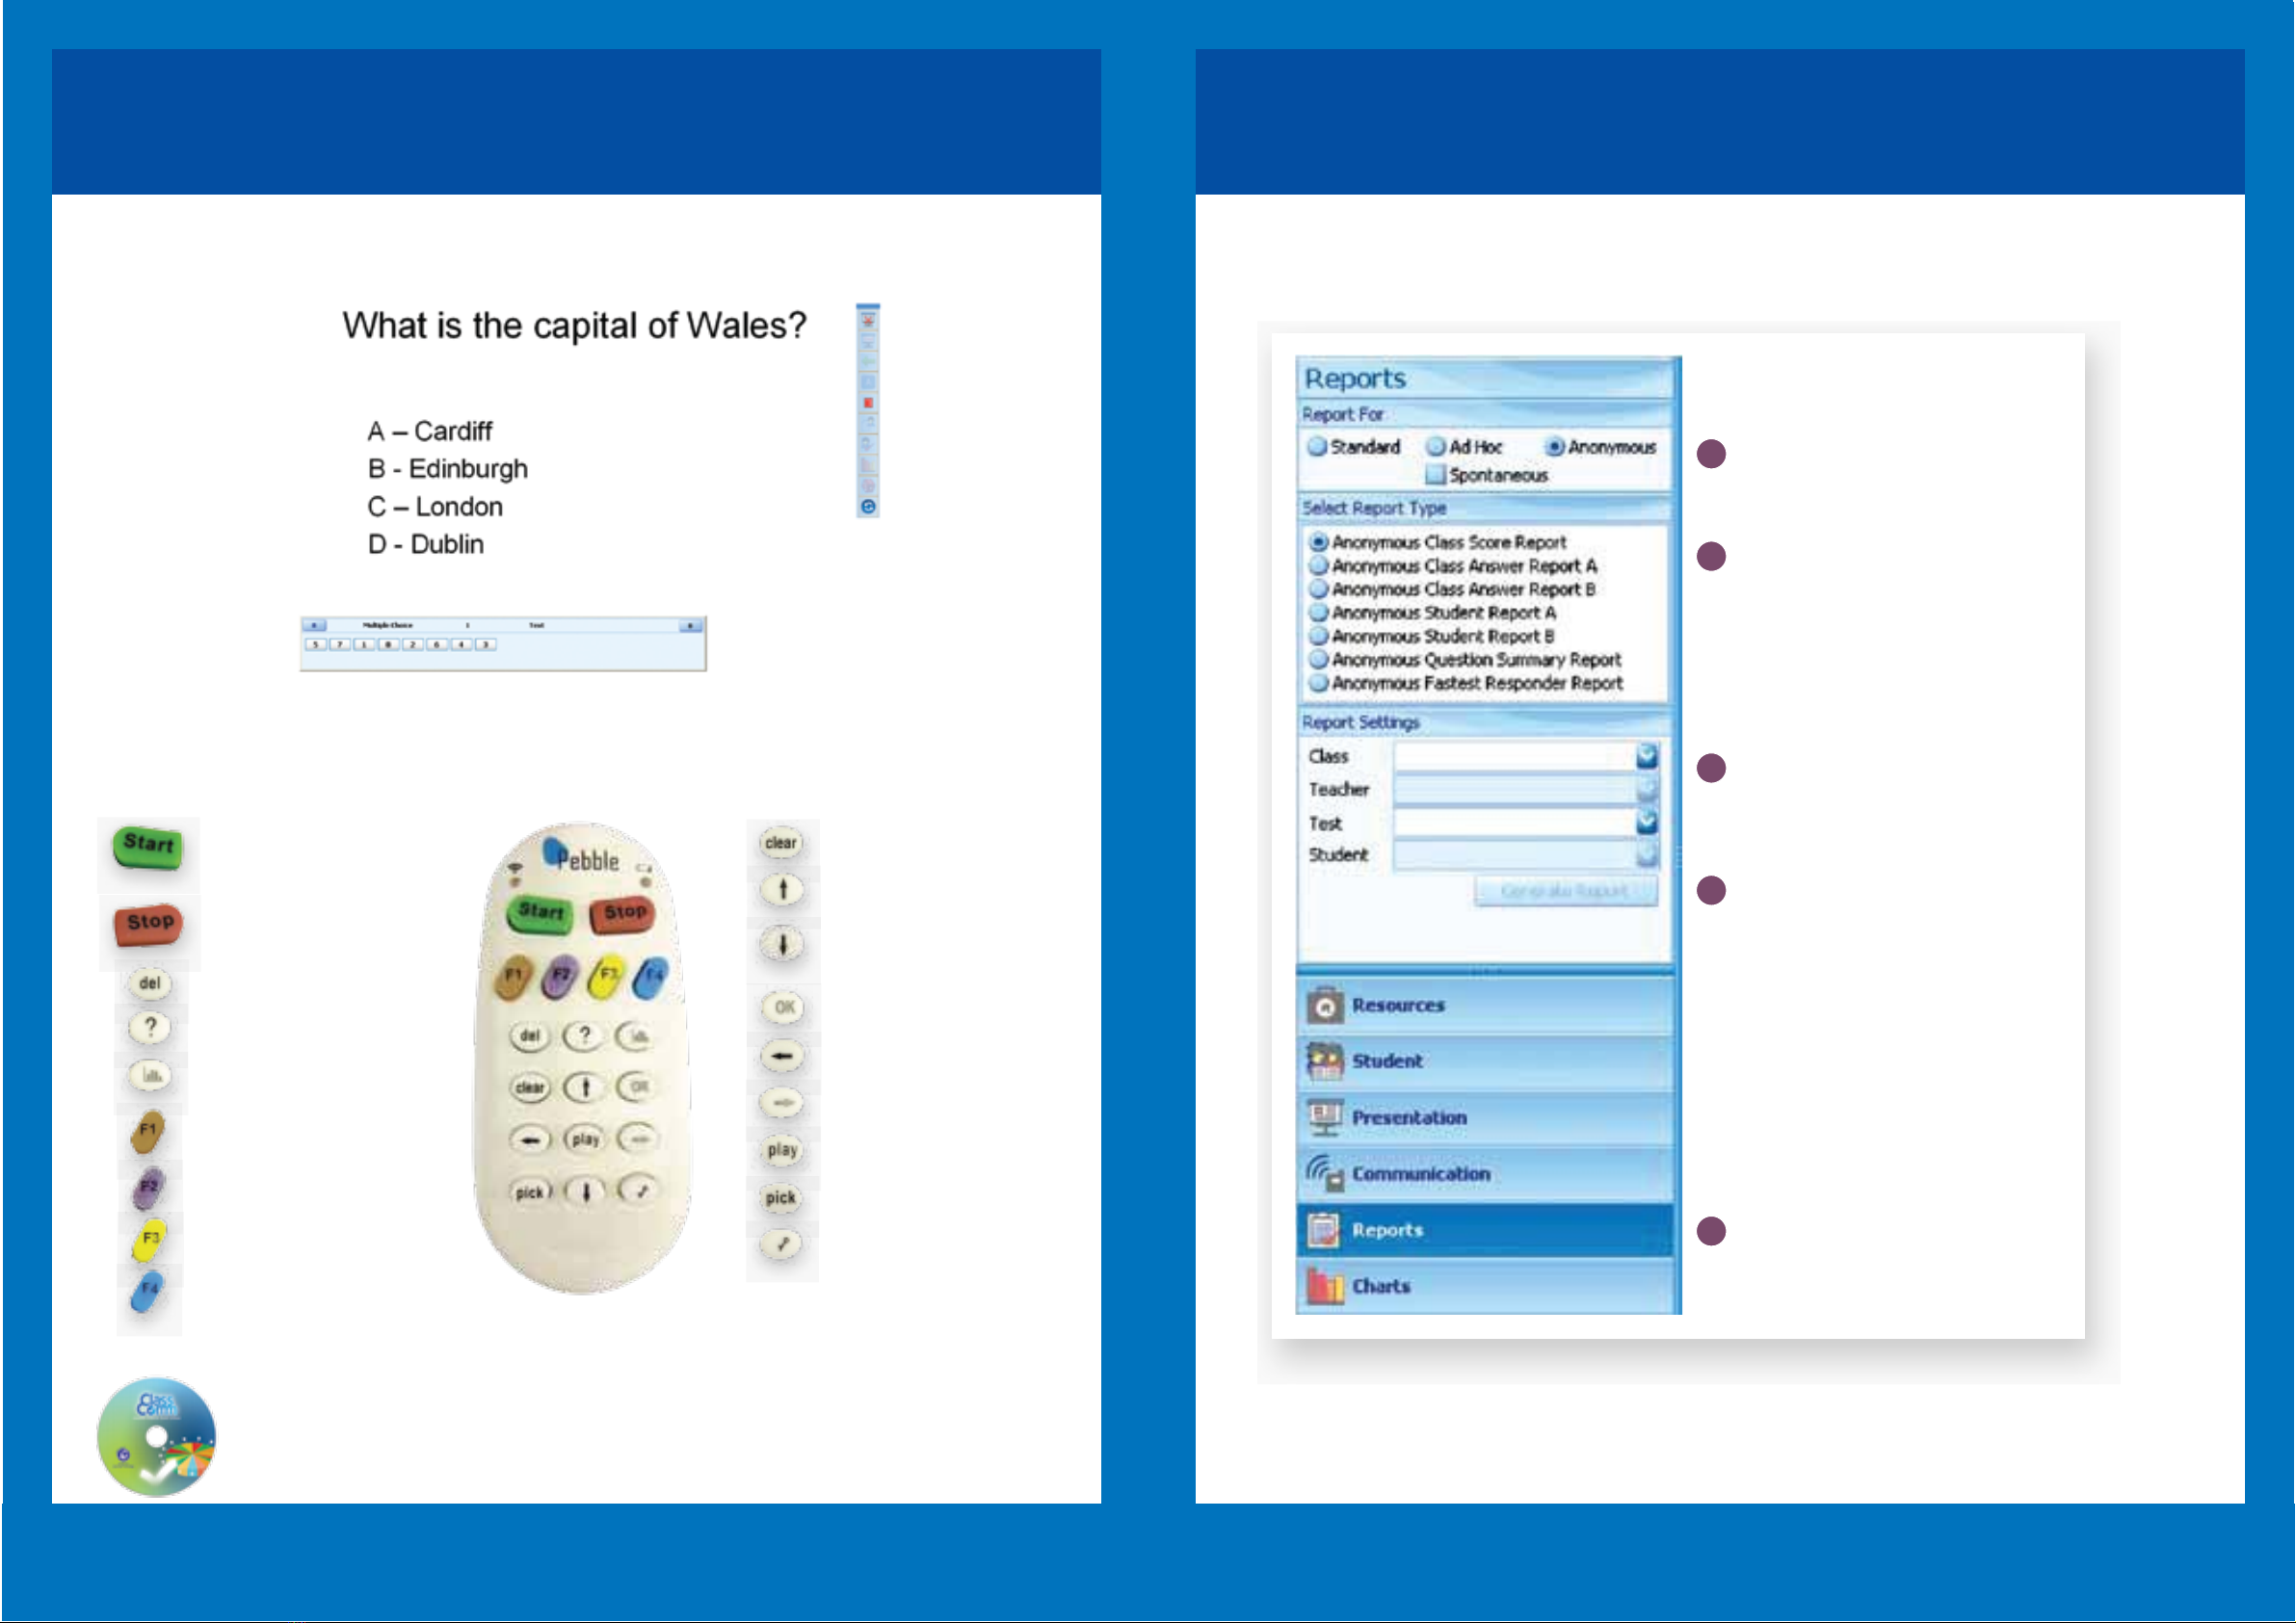
4. Select Anonymous Login to gather
overall responses without identifying
individual handsets
5. Enter a Group Name and click on
Save
6. Save these as your Default Setting
ready for the repeat conferences
7. Click on Present Activity to start the
presentation
Company group training programme
Response system set-up example 2:
‘We are carrying out Health & Safety training with groups of our employees. It is impor-
tant that we have records of individual attainment so that we know who will be compe-
tent in particular work situations. What is the best way to set up?’
16
1
2
3
4
5
9
10 11
Type Participant
names here and
press Enter on
your keyboard.
A Mapping Key
will automatically
be associated with
each participant.
Continue until all
names have been
entered.
6
7
8
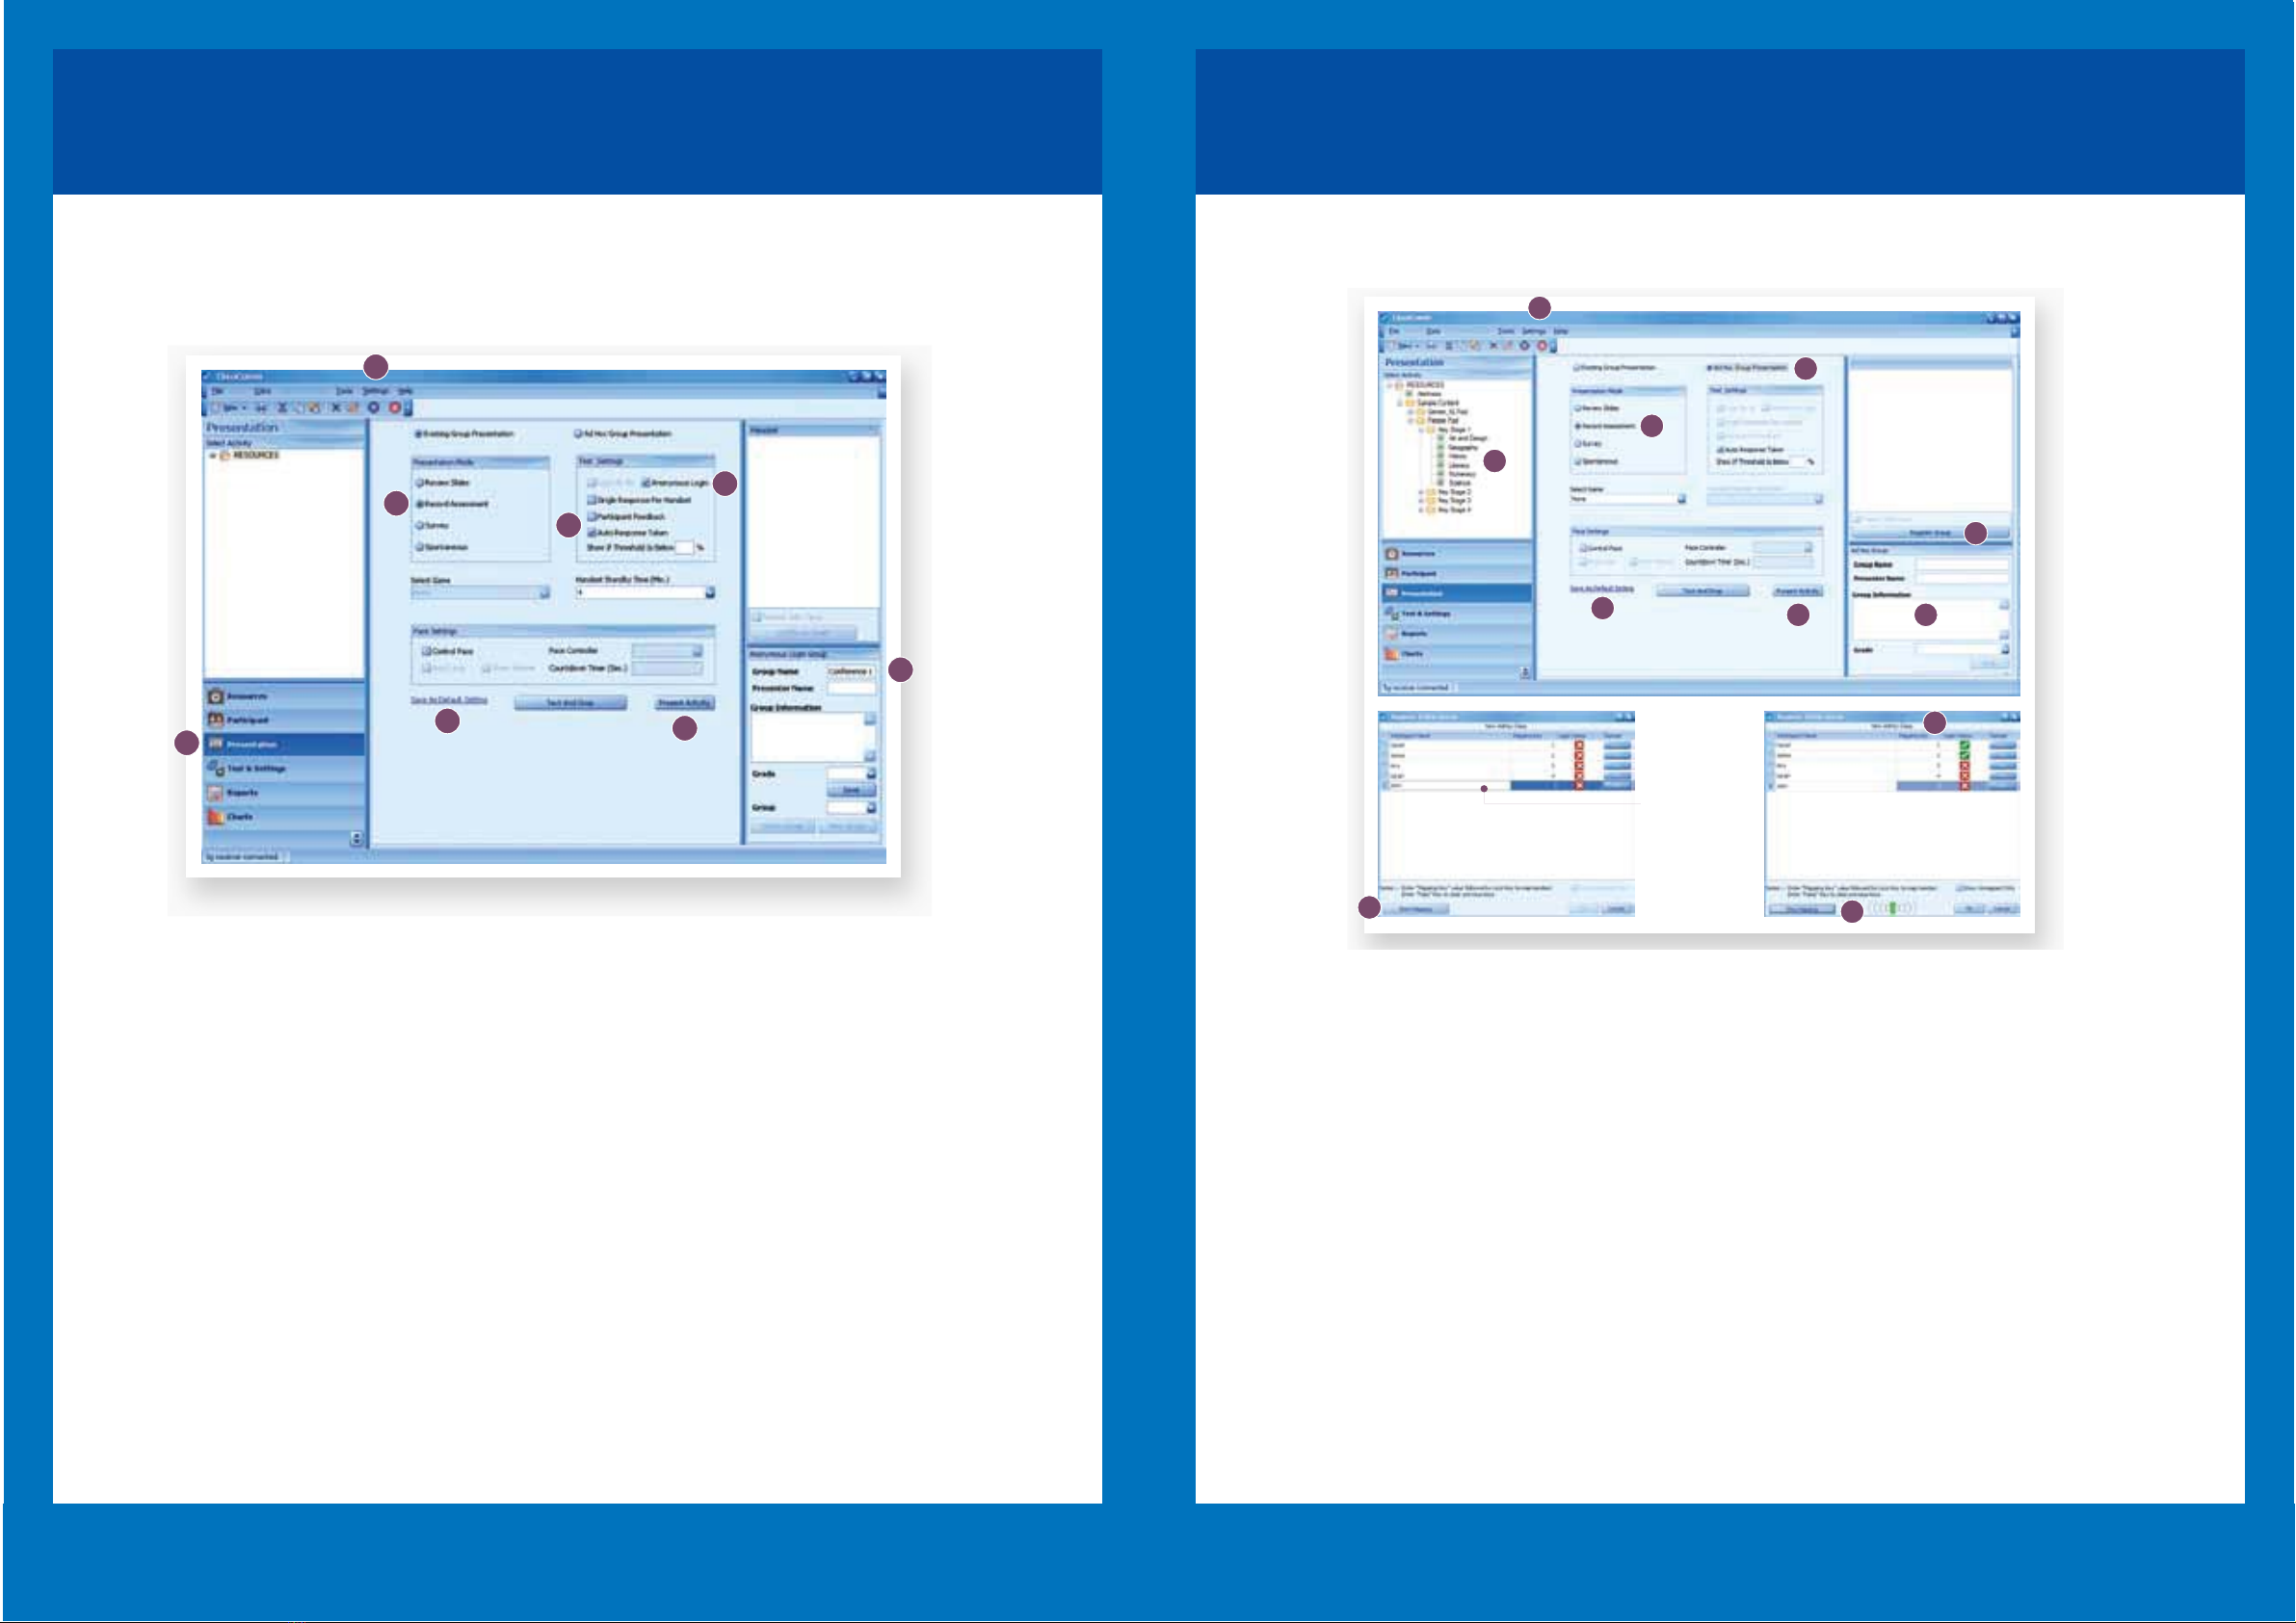
1. Check that ClassComm is in Corporate
mode by going to Settings > Application
mode (you will have to restart ClassComm to
activate this setting).
2. Enter to the Presentation window and select
the resource that you will be presenting.
3. Select Record Assessment to keep results
and publish data.
4. Select Ad Hoc Presentation.
5. Click the Register Group button to build the
group participant list.
6. Type in the Participant names and click Start
Mapping from the Register AdHoc Group
window.
7. Participants must now press the Mapping
Key next to their name followed by the key
symbol button. The Login status column will
change from a cross to a tick when a partici-
pant has successfully mapped their handset to
their name.
8. After all participants have successfully
mapped their handset to their name, click Stop
Mapping followed by OK.
9. Enter a Group Name and click on Save. (If
this group stays the same, you can recall it for
further assessments to be added to the partici-
pants’ data).
10. Save these as your ‘Default Setting’
ready for repeat sessions.
11. Click on ‘Present Activity’ to start the
presentation.

FAQ
17
1. How do I reset the handsets?
Use a sharp, pointed object to press the small button located on the back of the hand-
set. Use this when handset will not map correctly, freezes or with charging problems.
2. How do I map handsets to different receivers?
Each receiver has a unique ID. All handsets are locked into communicating with the
receiver when you receive a new set. If you want to lock or map a handset to work with
a different/new receiver you must press and hold down the “-/?” key until the communi-
cation LED blinks green 3 times. If it blinks red, please repeat the process until the
green light blinks 3 times. Please note that when mapping handsets, the distance
between handset and receiver should only be a few inches.
3. What technology does the response system use and what is the
range?
The system uses RF with operating frequency bands 2405 MHz to 2485 MHz (2.4
GHz). The maximum transmission range is 40m for Pebble Pads.
4. How many handsets can be used per receiver?
Currently 253 per receiver.
5. How do I transfer a mapped presentation between computers without
re-mapping?
When you map a PowerPoint Presentation and save it, an associated XML file will also
be created and saved to the same location as the original PowerPoint file. The XML file
contains all the mapping data. When transferring mapped presentations, both the Pow-
erPoint file and the XML must be transferred together to retain mapping data.
A quick way to transfer mapped, PowerPoint activities is to use ClassComm’s built in
Import/Export Feature. Within the resources area of ClassComm, select the
presentation/s or yellow folder you wish to export and go to Import/Export from the top
menu bar. Select the presentation to export from the new window that opens and
choose the location to save the exported file to. The file will export in a zipped file
format. This zipped file can then be imported into ClassComm on other computers.
6. Can I install and run ClassComm from a Server across a network?
Currently, ClassComm is a desktop application designed to be installed and run from a
Teacher/presenter PC. It cannot be run centrally from a server. An MSI version of
ClassComm is available for easy deployment across a network. Please contact
[email protected] for further details.
7. The handsets are not talking to the receiver. What do I do?
• Ensure that the receiver is connected via USB cable to an available USB port and has
a red LED showing.
• Open the ClassComm software and ensure that it states “5g receiver connected” in the
bottom-left of the application
• Ensure that the handsets have the batteries inserted the correct way -
• Pressing any key should show a green communication LED. If it is red then re-map to
the receiver by pressing and holding the -/? Key until it blinks green.
• Reset the handset from the reset switch on the back and re-map to the receiver.
Support
19
Free technical helpline
Tel: 0124-4934500
Fax: 0124-4934521
Email: [email protected],
Website: www.genee-india.com,
www.geneeworld.com
FAQ
Other manuals for Pebble
1
Table of contents
Other Genee World Toy manuals