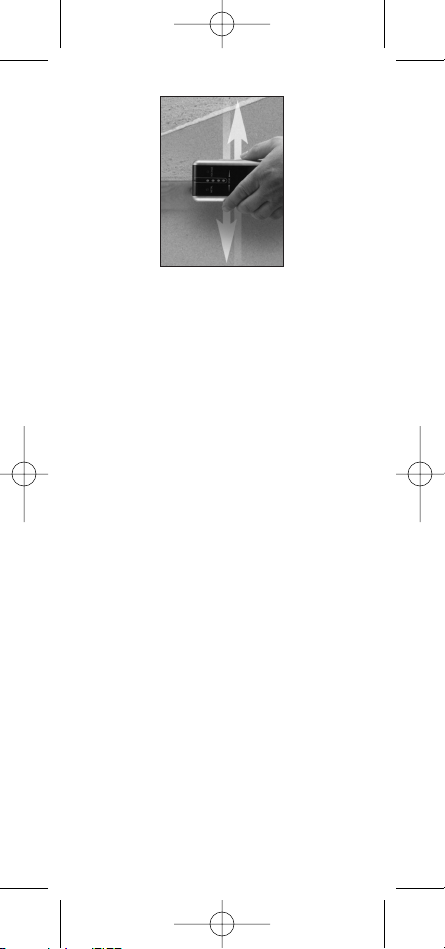
General MSV250 User manual

MSV250
USER’S MANUAL
LED
STUD/VOLT/METAL
DETECTOR
This 3-in-1 Stud/Volt/Metal Detector is an
unique instrument combinin 3 tools in one unit.
It detects wood studs, metal studs, objects
carryin volta e, alon with metal pipes and
conduits behind walls, floors and ceilin s.
By employin the latest CPU technolo y, it will
ive an accurate visual readin shown on the
LCD screen alon with an audio si nal. Ideal
for the Professional Technician, Handyman,
Homeowner, and Hobbyist.
MSV250 -FINAL1A- 032709:Layout 1 3/27/09 3:35 PM Pa e 1

1
3
2
2
4
5
6
9
METAL VOLTAGE
STUD
8
7
FRONT
BACK
2
1. Indicator Arrow
2. etal/Voltage Sensors Location
3. etal/Voltage Indicator
4. Stud Edge Indicator
5. ON/OFF + Sensitivity Adjustment Knob for
etal/Voltage Detector
6. etal/Voltage Selector Switch
7. Push Button for Stud Seeking
8. Battery Cover
9. Stud Sensor Location
MSV250 -FINAL1A- 032709:Layout 1 3/27/09 3:35 PM Pa e 2

3
OPERATING INSTRUCTIONS
BATTERY INSTALLATION
This unit is operated by one “9V” battery which is
not included.
• Slide open the battery cover on the back of the
instrument
• Attach the battery to the battery connector and
insert it into the battery compartment.
• Slide the battery cover back into place.
POWER
Power on the instrument using the thumb switch
on the right side of the unit.
SET UP
Hold the unit against the wall surface in a
vertical position (Figure 1). Press in and hold
down the button “STUD” which is located on the
left side of main body to calibrate the normal
density of the wall. A short beep will sound, and
the top red LED will light momentarily and then
go off. Do not move the unit until the top LED as
well as the beep sound goes off. Continue
holding down the button during all of the
following steps. (See “Notes for Stud Seeking”)
Steps for locating a vertical batten or wall stud:
Place the instrument against the wall in a
vertical orientation (Figure 2). ove the unit
horizontally across the wall. As the unit moves
towards a stud, the bottom red LED will light up.
As it moves closer, the upper LED will light up to
indicate the stud is nearby. When it detects the
edge of the stud, the top red LED lights up and
the beep sounds continuously. ark the first spot
Figure 1
Hold down the
button “STUD”
MSV250 -FINAL1A- 032709:Layout 1 3/27/09 3:35 PM Pa e 3

Figure 2
4
at the marking position at the head of the
instrument. Continue moving the unit in the same
horizontal direction until the top LED and the
beep sound just goes out. ark the other edge of
the stud. The stud is now located and the middle
of stud is at the center between the two marks.
Steps for locating a horizontal batten or wall
stud:
Place the instrument against the wall in a
horizontal position (Figure 2). Repeat the same
procedure for locating a vertical wall stud but
move the instrument in a vertical (top to bottom)
direction.
NOTES FOR STUD SEEKING
• In case the instrument is placed over a dense
wall surface material, such as concrete wall,
during calibration procedure; the reading only
shows difference of wall density on the
surface. It is actually not a stud.
• If by chance the instrument is placed over the
wall batten or stud during calibration, the other
studs may be hard to detect. It is suggested
that you frequently re-calibrate on various
place on the same wall to avoid the false
readings. To do so, press Scan button once and
repeat the above procedures.
• The stud detection can be carried out normally
on wallpapered walls. However, it may not
function on some types of foil-backed or
metallic fabric surfaces.
• A double width of stud will be detected around
door or window frames as a double batten or
double stud is encountered.
Hold down
the button
“STUD”
MSV250 -FINAL1A- 032709:Layout 1 3/27/09 3:35 PM Pa e 4

5
• A solid wood header may exist in some doors.
The stud location will not be found if the
instrument is calibrated over the header.
However, if the unit is calibrated on a normal
wall first and then moved to the header area, it
will indicate the presence of the header.
• If the wall material is especially dense or thick,
the top arrow bar icon may not appear. Instead,
the other scanning bars might appear which
will actually be the “PEAK”.
• It is recommended to perform metal/voltage
detection to make sure the detected wood stud
or batten is not a metal pipe or energized
cable. Please note that some small securing
screws or nails may be detected.
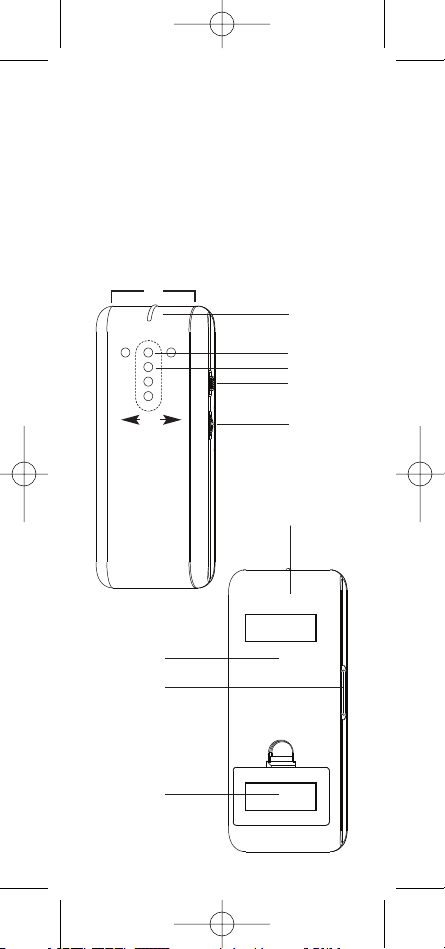
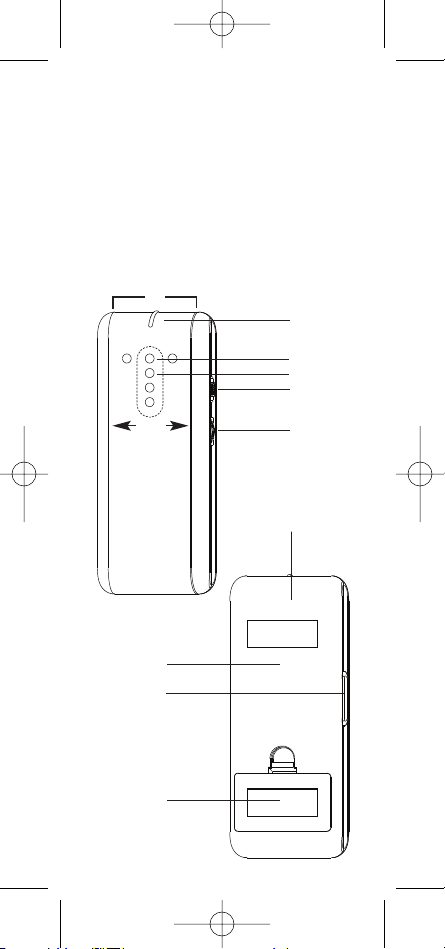
METAL DETECTION
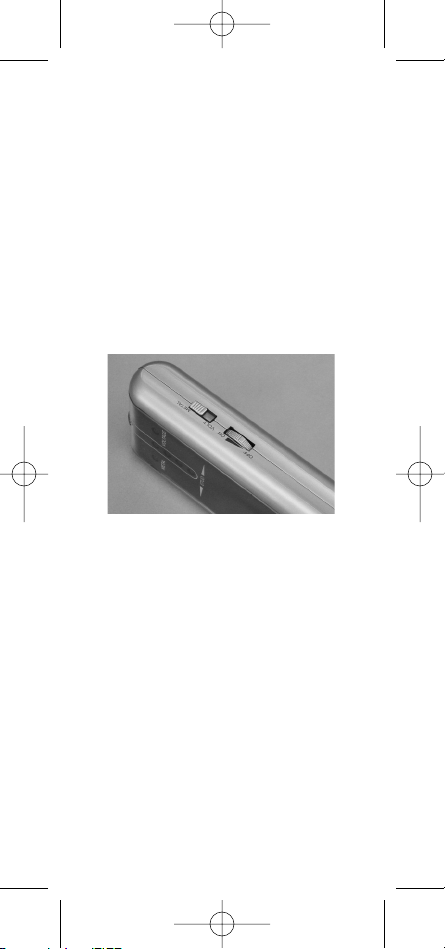
Slide the selector switch, which is located on the
right side of main body, to the “ ETAL” position.
Check that there is no metal in the immediate
vicinity and then turn on the detector by rotating
the sensitivity control towards the ‘ON’ position.
A short beep will sound and the red LED on the
left will flash momentarily. Continue to rotate the
sensitivity control towards to the ‘ON’ position at
the right side of the unit until the beeps sound
continuously, and the LED stays on all the time.
Then, gradually turn the sensitivity control back
towards the ‘OFF’ position until the beep stops
and the LED goes out.
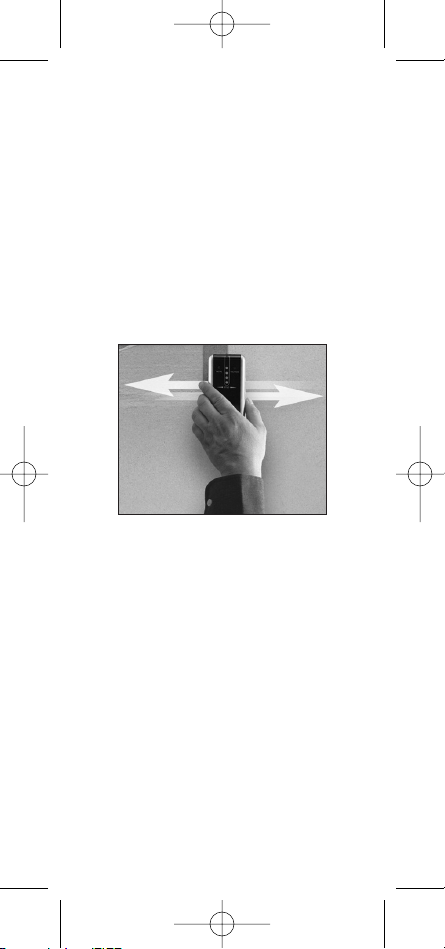
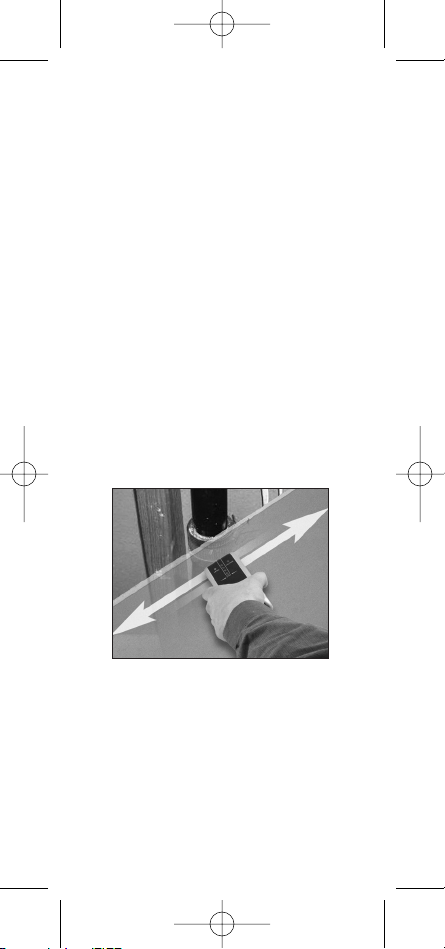
METAL SCANNING
Hold the instrument horizontally with the sensor
head pointing towards the wall (Figure 3) and
sweep systematically over the required area.
If a metal object is detected, the unit will beep
MSV250 -FINAL1A- 032709:Layout 1 3/27/09 3:35 PM Pa e 5

Water Pipe
Figure 3
Electrical
Wire
Figure 4
6
continuously and the LED will light up. To
pinpoint the exact position after the metal has
been located, gradually rotate the sensitivity
control toward the ‘OFF’ position to reduce the
sensitivity and sweep over the area again.
VOLTAGE DETECTION
Slide the selector switch which is located on the
right side of main body to the “VOLTAGE”
position. Check that there is no source of
electricity in the immediate vicinity then adjust
the sensitivity control in the same way for
metal detection.
Steps for Voltage Scanning
Hold the detector horizontally with the marking
position pointing towards the wall (Figure 4) and
sweep systematically over the required area. If a
source of voltage is detected, the unit will beep
on and off and the red LED will flash. If the
source of the voltage is very close to the
detector, the beep will sound continuously and
the red LED will light up. Pinpointing the exact
position of the voltage source is done by
MSV250 -FINAL1A- 032709:Layout 1 3/27/09 3:35 PM Pa e 6

Figure 5
Water Pipe
and Stud
7
gradually rotating the sensitivity control towards
the ‘OFF’ position to reduce the sensitivity and
sweeping over the area again.
NOTES FOR VOLTAGE DETECTION
• Some walls may contain metallic fiber for
fireproofing; this will spread the area of voltage
pick-up. Placing your free hand on the wall
may cancel the effect.
• Rubbing or banging the instrument on the wall
may generate static electricity and cause a
false reading.
• Only a small amount of electricity will trigger
the detector and can cause false readings,
such as a badly insulated cable touching a
damp wall.
• When the instrument gives a “No Voltage”
reading, check the unit on a known voltage
source before touching any conductor.
• It will not detect shielded conductors (i.e. those
in metal conduct, the unit only shows presence
of ETAL).
• Never take risks! If unsure, consult a qualified
electrician.
• The instrument can operate in both etal
Detecting and Stud Seeking models
simultaneously. Since plumbing may exist at
same location inside the wall (Figure 5), etal
as well as Stud Indicators will come on
together. If the wiring that is carrying voltage is
located at the wall batten or stud inside the
wall (Figure 5), Voltage as well as Stud
indicators will come on together. In case of
abnormal performance when operating the
unit, replace with a fresh battery.
MSV250 -FINAL1A- 032709:Layout 1 3/27/09 3:35 PM Pa e 7

MSV250
MANUAL DEL USUARIO
DETECTOR DIGITAL
3 EN 1 DE VIGAS,
METALES Y VOLTAJE
El detector digital 3 en 1 para Vigas/Voltaje y
etal es un instrumento único que combina
3 herramientas en una sola. Detecta vigas de
madera o metal, objetos con voltaje y tuberías o
conductos metálicos dentro de paredes, pisos
o cielo rasos. Gracias al empleo de la última
tecnología CPU, ofrece lecturas visuales precisas
sobre la pantalla LCD en simultaneidad con
señales acústicas. Ideal para el técnico
profesional, aficionados, propietarios
y operarios.
8
MSV250 -FINAL1A- 032709:Layout 1 3/27/09 3:35 PM Pa e 8

DESCRIPCIÓN
1. Flecha indicadora
2. Ubicación de los sensores de etal/Voltaje
3. Indicador de etal/Voltaje
4. Indicador de ‘Borde de viga’
5. ENCENDIDO/APAGADO + perilla de ajuste de
sensibilidad del detector de etal/Voltaje
6. Llave selectora de etal/Voltaje
7. Botón para la búsqueda de vigas
8. Tapa del receptáculo de la batería
9. Ubicación del sensor de vigas
9
1
3
2
2
4
5
6
9
METAL VOLTAJE
VIGA
8
7
FRENTE
ESPALDA
MSV250 -FINAL1A- 032709:Layout 1 3/27/09 3:35 PM Pa e 9

INSTRUCCIONES DE OPERATIÓN
INSTALACIÓN DE LA BATERÍA
Esta unidad funciona con una batería de “9V”
no provista con el dispositivo.
• Deslice la tapa del receptáculo de batería, en
la parte de atrás del instrumento, para abrirlo.
• Conecte la batería al respectivo conector e
insértela dentro del receptáculo.
• Vuela a cerrar la tapa del receptáculo
de la batería.
ENCENDIDO
Encienda el instrumento empleando la perilla
localizada en el lado derecho de la unidad.
PREPARADA
Sostenga la unidad en posición vertical y contra
la superficie de la pared (ver Figura 1). Presione
y mantenga presionado el botón “STUD” (Viga),
ubicado en el costado izquierdo del cuerpo del
aparato, para calibrar la densidad normal de la
pared a explorar. Se escuchará un breve pitido y
destellará por un momento el LED superior de la
escala, para luego apagarse. No mueva la unidad
hasta que se extinga la indicación sonora y se
apague dicho LED. Continúe presionando el botón
durante los pasos siguientes. (Refiérase
“Comentarios Sobre La Búsqueda de Vigas”)
Para localizar un listón o una viga vertical
en la pared:
Coloque el instrumento contra la pared en
posición vertical (ver Figura 1). Desplace la
unidad horizontalmente a lo ancho de la pared.
A medida que la unidad se mueva hacia la viga
se encenderá el LED inferior. A medida que siga
acercándose, se encenderá el siguiente LED,
10
Presione y
mantenga
presionado
el botón
“STUD”
Figura 1
MSV250 -FINAL1A- 032709:Layout 1 3/27/09 3:35 PM Pa e 10

indicando que la viga está próxima. Cuando se
detecte el borde de la viga se iluminará el LED
superior y el zumbador sonará continuamente.
arque el primer punto de localización a través
del orificio que se encuentra a tal efecto en la
parte superior del instrumento. Continúe
desplazando la unidad horizontalmente y con la
misma dirección hasta que se extinga el pitido y
se apague el LED superior. arque el otro borde
de la viga. Se habrá localizado la viga y su centro
estará en el punto intermedio entre las dos
marcas realizadas.
Para localizar un listón o viga horizontal
en la pared:
Coloque el instrumento contra la pared en posición
horizontal (ver Figura 2). Repita el mismo
procedimiento que para encontrar una viga vertical
en la pared, pero ahora moviendo el instrumento
de arriba hacia abajo en dirección vertical.
COMENTARIOS SOBRE LA BÚS UEDA DE VIGAS
• En caso de que durante el procedimiento de
calibración el instrumento haya estado
apoyado sobre un sector de la pared de
material denso, tal como concreto, las lecturas
serán representativas de las diferencias de
densidad de dicha pared. Y no se estará
indicando realmente la presencia de una viga.
• Si por casualidad el instrumento estaba
posicionado sobre un listón o una viga en el
momento de la calibración, podría ser difícil
detectar las otras vigas. Se sugiere que
recalibre frecuentemente el instrumento en
otras partes de la pared para evitar falsas
lecturas. Para hacerlo, presione el botón ‘Scan’
una vez y repita los procedimientos indicados
más arriba. 11
Figura 2
Presione y
mantenga
presionado el
botón “STUD”
MSV250 -FINAL1A- 032709:Layout 1 3/27/09 3:35 PM Pa e 11

• La detección de vigas se puede realizar con
absoluta normalidad en paredes empapeladas.
Sin embargo, podría no funcionar sobre
algunos tipos de superficies con respaldos
de film o tejido metalizado.
• Se pueden detectar vigas del doble de ancho
alrededor de puertas y ventanas ya que allí se
suelen emplear listones o vigas dobles.
• En algunas puertas puede haber un travesaño
o dintel de madera maciza. No se detectará la
posición de las vigas si se calibró el
instrumento sobre dicho dintel. Sin embargo, si
la unidad se calibró primero en un sector
normal de la pared y luego se lo desplazó a la
zona del dintel, el mismo indicará la presencia
de dicho dintel con total normalidad.
• Si el material de la pared es particularmente
denso o grueso, podría no encenderse jamás
el segmento superior del icono. En su lugar,
solo se encenderán los segmentos restantes,
lo que pasará a constituirse en la indicación
‘pico’ de la exploración.
• Se recomienda realizar la detección
metal/voltaje para asegurarse de que la viga o
listón detectado no es en realidad una tubería
metálica o un cable con energía eléctrica. Por
favor note que podrían detectarse algunos
clavos o tornillos de fijación.
DETECCIÓN DE METALES
Deslice el selector localizado sobre el lado
derecho del cuerpo principal del aparato a la
posición “ ETAL”. Verifique que no existan
metales en las cercanías del detector y
enciéndalo girando el control de sensibilidad
hacia la posición “ON” (Encendido). Se escuchará
un breve pitido y destellará por un momento el
12
MSV250 -FINAL1A- 032709:Layout 1 3/27/09 3:35 PM Pa e 12

LED rojo de la izquierda. Continúe girando el
control de sensibilidad ubicado a la derecha de
la unidad hacia la posición ‘ON’ hasta que el
zumbador suene continuamente y el LED
permanezca encendido todo el tiempo. Entonces
disminuya la sensibilidad girando el control hacia
la posición ‘OFF’ (Apagado) hasta que se silencie
el zumbador y se apague el LED.
BÚS UEDA DE METALES
( antenga el instrumento horizontal, con su
cabeza apuntando hacia la pared (ver Figura 3)
y barra sistemáticamente sobre el área
seleccionada. Si se detecta un objeto metálico,
la unidad emitirá una señal sonora continua y
se encenderá el LED. Para localizar la posición
exacta donde se encuentra el metal, disminuya
paulatinamente la sensibilidad (hacia la posición
‘OFF’) y vuelva a barrer la zona.
DETECCIÓN DE VOLTAJE
Deslice el selector localizado sobre el lado
derecho del cuerpo principal de aparato a la
posición “VOLTAGE”. Verifique que no haya
ningún dispositivo o conductor eléctrico en la
13
Pipa de aqua
Figura 3
Alambre
Eléctrico
Figura 4
MSV250 -FINAL1A- 032709:Layout 1 3/27/09 3:35 PM Pa e 13

vecindad y ajuste el control de sensibilidad de la
misma manera en que lo hizo para la detección
de metales.
Exploración de voltajes
antenga el detector horizontal, con la posición
de marcado apuntando hacia la pared (ver
Figura 4) y barra sistemáticamente sobre el
área seleccionada. Si se detecta una superficie
con voltaje, la unidad emitirá una señal sonora
intermitente y destellará el LED rojo. Si la fuente
de voltaje está demasiado cerca del detector,
dicha señal sonora será continua y el LED rojo
permanecerá encendido. Para localizar la
posición exacta donde se encuentra el objeto
con voltaje, disminuya paulatinamente la
sensibilidad (hacia la posición ‘OFF’) y vuelva
a barrer la zona.
COMENTARIOS SOBRE LA DETECCIÓN
DE VOLTAJE
• Algunas paredes, para hacerlas a prueba de
incendios, pueden contener fibras metálicas.
Esto agrandará las áreas donde se indique
voltaje. El colocar su mano libre sobre la pared
puede ayudar a cancelar dicho efecto.
• Frotar o golpear el cabezal del instrumento
contra la pared puede generar electricidad
estática y provocar una falsa lectura.
• Apenas una pequeña cantidad de electricidad
disparará el detector, pudiendo provocar falsas
lecturas, como en el caso de que exista un
cable con problemas de aislamiento tocando la
pared húmeda.
• Cuando el instrumento dé una lectura de ‘No
voltaje’, antes de tocar ningún conductor
pruebe la unidad sobre una fuente de voltaje
conocida.
• No se detectarán conductores blindados (p. ej.
Aquellos dentro de un conducto metálico, en
cuyo caso la unidad solo reportará la presencia
de ETAL).
• ¡Nunca tome riesgos! Si está inseguro,
consulte con un electricista calificado.
• El instrumento puede operar simultáneamente
detectando metales y buscando vigas. Desde el
momento en que puede haber cañerías dentro
14
MSV250 -FINAL1A- 032709:Layout 1 3/27/09 3:35 PM Pa e 14

de la pared (ver la Figura 5), pueden
encenderse simultáneamente los indicadores
de Viga y de etal. Si el cableado que tiene
voltaje aplicado está junto a un listón o viga
dentro de la pared (ver la Figura 5), pueden
encenderse simultáneamente los indicadores
de Viga y de Voltaje. En caso de que note un
desempeño anormal del instrumento durante
su operación, colóquele una batería nueva.
15
Figura 5
Pipa de aqua
y Viga
MSV250 -FINAL1A- 032709:Layout 1 3/27/09 3:35 PM Pa e 15

MSV250
MANUEL DE L’UTILISATEUR
DÉTECTEUR DE
MONTANT/
TENSION/METAUX
3 en 1
Le détecteur de montant/tension/ métaux 3 en 1
est un instrument unique qui combine 3 outils
dans un même appareil. Il détecte des montants
en bois, en métal, les objets portant de la
tension, et même les tuyaux en métal et les
conduits derrière les murs, les planchers et les
plafonds. En utilisant la dernière technolo ie de
CPU, il donnera une lecture visuelle précise
affichée sur l’écran à cristaux liquides avec un
avertisseur sonore. Idéal pour les Techniciens,
les Bricoleurs, les Propriétaires et les Amateurs
professionnels.
16
MSV250 -FINAL1A- 032709:Layout 1 3/27/09 3:35 PM Pa e 16

DESCRIPTION
1. Flèche d’indication
2. Détecteurs de tension/métal
3. Indicateur tension/métal
4. Indicateur des bords des montants
5. arche/Arrêt (ON/OFF) + Bouton d’ajustement
de la sensitivité pour le détecteur de
tension/métal
6. Interrupteur sélecteur de tension/métal
7. Bouton-pression pour recherche de montants
8. Couvercle de pile
9. Détecteur de montant
17
1
3
2
2
4
5
6
9
MÉTAL TENSION
MONTANT
8
7
DEVANT
DOS
MSV250 -FINAL1A- 032709:Layout 1 3/27/09 3:35 PM Pa e 17

CONSIGNES D'UTILISATION
MISE EN PLACE DES PILES
Cet appareil fonctionne avec une pile de 9 volts
qui n’est pas incluse.
• Ouvrez en glissant le couvercle de la pile à
l’arrière de l’instrument
• Attachez la pile au connecteur et insérez-la
dans le compartiment de la pile.
• ettez la couverture de la pile en place.
PUISSANCE
ettez l’instrument en marche en appuyant sur
l’interrupteur d’alimentation sur le côté gauche
de l’appareil.
PRÉPARATION
Tenez l’appareil contre la surface murale en
position verticale (voir Figure 1). Appuyez et
tenez le bouton « STUD » (montant) qui se trouve
sur le côté gauche de l’appareil afin de calibrer
la densité normale du mur. Un court bip
s’entendra, et le voyant DEL rouge supérieur
s’allumera momentanément puis s’éteindra.
Ne déplacez pas l’appareil jusqu’à ce que le
voyant DEL supérieur et le bip s’éteignent.
Continuez à appuyez sur le bouton pendant
toutes les étapes suivantes. (Référez-vous
“Remarques Pour Rechercher un ontant”)
Pour localiser une plinthe verticale ou un
poteau de cloison :
Placez l’instrument contre la surface murale en
position verticale (voir Figure 1). Déplacez
l’appareil de manière horizontale sur le mur.
Lorsque l’appareil se déplace vers un montant, le
voyant DEL rouge inférieur s’allumera. Lorsqu’il
18
Appuyez et
tenez le
bouton
« STUD »
(montant)
Figure 1
MSV250 -FINAL1A- 032709:Layout 1 3/27/09 3:35 PM Pa e 18

se rapproche, le voyant DEL supérieur s’allumera
pour indiquer que le montant se trouve à
proximité. Lorsqu’il détecte le bord du montant,
le voyant DEL rouge supérieur s’allume et le bip
sonne sans arrêt. arquez le premier endroit sur
les endroits déterminés dans le coin supérieur de
l’instrument. Continuez à déplacer l’appareil dans
la même direction horizontale jusqu’à ce que le
voyant DEL supérieur et le son bip s’éteignent.
arquez l’autre bout du montant. Le montant est
maintenant localisé et le milieu du montant est
au centre entre les deux marques.
Pour localiser une plinthe horizontale
ou un poteau de cloison :
Placez l’instrument contre la surface murale en
position horizontale (voir Figure 2). Suivez la
même procédure pour localiser un poteau de
cloison vertical, mais déplacez l’instrument en
position verticale (du haut vers le bas).
REMAR UES POUR RECHERCHER UN MONTANT
• Dans le cas où l’instrument est placé sur un
matériel dense de la surface murale, comme
un mur de béton, au cours d'une procédure
de calibrage, la lecture ne montrera que la
différence de densité du mur dans la surface.
Ce n’est pas exactement un montant.
• Si par hasard l’instrument est placé sur une
plinthe de mur ou un poteau de cloison lors
du calibrage, il peut être difficile de trouver
les autres montants. Il est suggéré que vous
recalibriez souvent dans les différents endroits
sur le même mur pour éviter les fausses
lectures. Pour le faire, appuyez sur le bouton
Scan (balayer) une fois et suivez les
instructions ci-dessus.
19
Figure 2
Appuyez et tenez
le bouton
« STUD »
(montant)
MSV250 -FINAL1A- 032709:Layout 1 3/27/09 3:35 PM Pa e 19

• La détection de montant peut se faire
normalement sur les murs avec du papier
peint. Cependant, il ne fonctionnera pas sur
certains types de surfaces métalliques ou
recouvertes de feuilles d'aluminium à l'endos.
• Une largeur double de montant sera détectée
autour de la porte ou des cadres de la fenêtre
lorsque vous rencontrez une double plinthe ou
un double montant.
• Un en-tête en bois solide peut exister sur
certaines portes. L’emplacement du montant
ne sera pas trouvé si l'instrument est réglé sur
l’en-tête. Toutefois, si l’appareil est réglé sur
un mur normal d’abord et ensuite déplacé vers
la zone d’en-tête, il indiquera la présence de
l’en-tête.
• Si le matériel du mur est particulièrement
dense ou épais, la barre de la flèche vers le
haut pourrait ne pas apparaître. À sa place,
les autres barres de balayage pourraient
apparaître, qui seront effectivement le sommet.
• Il est suggéré de faire une détection de
tension/métal pour vous assurer que le
montant ou la plinthe en bois détecté ne
soit pas un tuyau de métal ou un câble sous
tension. Veuillez remarquer que certains
petits clous ou vis peuvent être détectés.
DÉTECTION DE MÉTAUX
Glissez l’interrupteur sélecteur, qui se trouve sur
le côté droit du corps principal, vers la position
« ETAL ». Vérifiez qu'il n'y ait pas de métal dans
les environs immédiats puis mettez en marche le
détecteur en tournant le contrôle de sensitivité
vers la position « ON » (marche). Un court bip
sonnera et le voyant DEL rouge à gauche
clignotera momentanément. Continuez à tourner
20
MSV250 -FINAL1A- 032709:Layout 1 3/27/09 3:35 PM Pa e 20
Table of contents
Languages:
Other General Metal Detector manuals
Popular Metal Detector manuals by other brands

Teknetics
Teknetics Alpha 2000 owner's manual

Minelab
Minelab X-TERRA 705 Gold Pack quick start guide

Nokta MAKRO
Nokta MAKRO Mini Hoard quick guide

Explore Your World
Explore Your World Discovery Channel instruction manual

Radio Shack
Radio Shack 63-3013 owner's manual

Teknetics
Teknetics DigiTek owner's manual