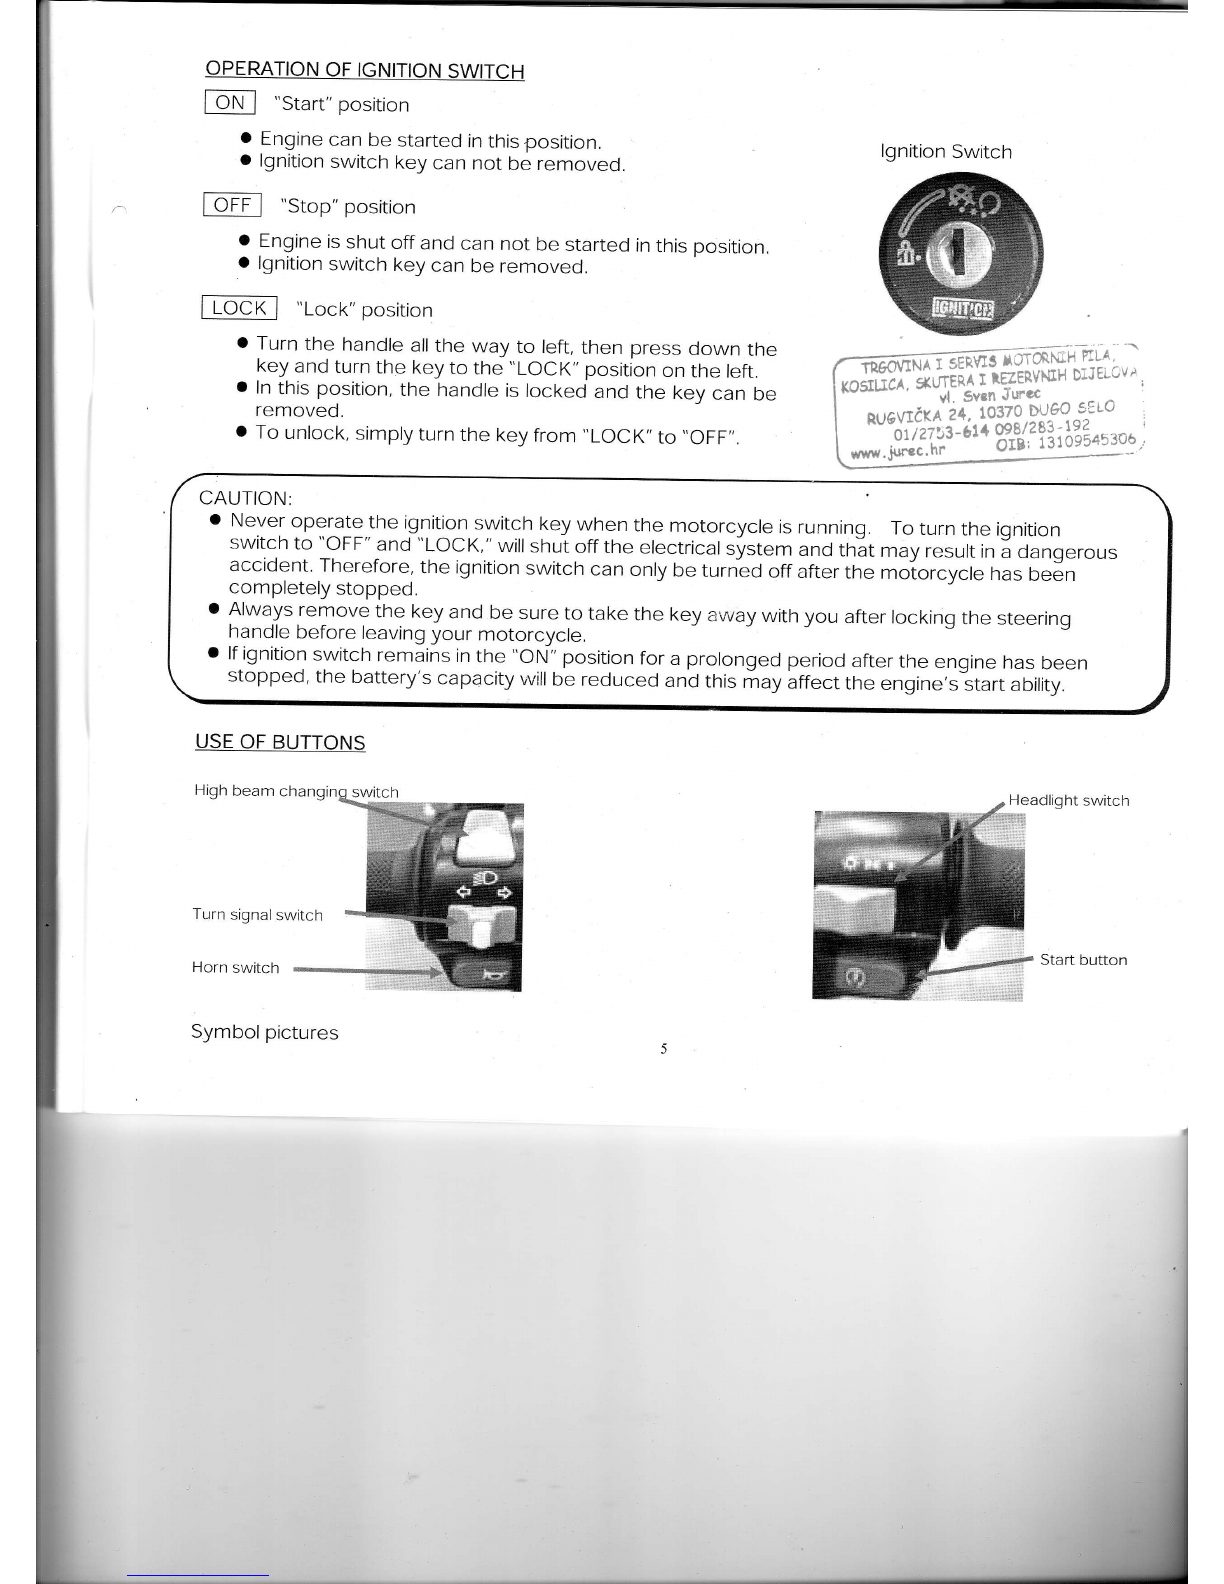
Generic XOR User manual

USER
MANUAL
EHTHaE-
h---

CONTENTS
Operation
of lgnition
Switch....... ,................5
6. lmportantPointsand Cautions
for Starting
Engine .........
9
TheControlof ThrottleValveHandle.,,.,. ..................,,1O
B. lnspection
and Maintenance
beforeRiding..,..... .....,.......1O
Inspectionand Replenishmentof Engine
Oil
.............. ............,,....11
Inspectionof FuelLeve|......... .,...............,..
11
TransmissionOillnspection. ................,......12
lnspection
andAdjustment
of BrakeFreePlay ..........12
DiscBrakeInspection
[Depending
on Models].......,.,,.,.. ..,........'13
ThrottleValveHandle
ClearanceAdjustment.,.....,.,........ ..,..........14
Inspection
and Maintenance
of Battery. ......,...........,..14
SteeringHandleFront
Shock
Absorberslnspection ..,.,...,...,., .....................,16
Checkingand ChangingFuses ..............16
Checkingthe Turn
Signal
Lights
and Horn ................17
Checkingthe Front
and RearLights .............,,.,........17
Checkingthe BrakeLight ........ .................11
Checkingfor FuelLeakage ,..,.,...,,.,..........17
Checkingthe Lubricationof Body'sVariousMechanisms .....,.,,,,.,,. ...........11
Checkingthe SparkPlug ,,....18
Checkingthe Air
Cleaner ..,...18
9. Whenthere isanAbnormal
Conditionor a Trouble ..................,.19
Diagnosiswhen Engine
does notStart ........ ............'19
10,PeriodicalMaintenance
Schedule ......... ...............,..
.....2O

1, BEFORE
RIDING
Thismanual
describes
the correct usage of this motorcycle
including
safetyriding,
simpleinspection
methodsandso on
For
a more comfortable
andsafetyriding,please
read
thismanual
carefully.
Thank
you very much foryour trust inour product
In order to maximize
your motorcycle's performance,
a periodical
inspection
and maintenance
should
be completely
carriedout.We recommend thatafterriding
youf new motorcycle
forthe first
5OOkilometres,you should take your motorcycle to the originaldealerfor an initialinspection,
Please
notice
that
you loose
the warrantyrightsifyou miss
the inspections.
a Incase the motorcycle's specifications
and constructionare modifiedand differentfrom the photos
and diagrams
on the owner's manual/catalogues,
the specifications
and constructionof the actual
motorcycle
shall
prevail.
2, SAFE RIDING
Itisvery important to be relaxed and clothe properlywhen driving,
observe traffic
rush,
alwaysdrive
carefullyand relaxed,
Usually,most peoplewould ride
theirnewlybought motorcycle
verycarefully,
but
familiarwith
theirmotorcycles,
they
tendedto become reckless
whichmay resultin
regulations,
do not
afterthey became
anaccident,
d* Toremindyou:
o Pleasewear a safetyhelmet,
and properly
tighten
the chin
belt
when riding
a motorcycle.
o Clotheswithopen or loose
cuffsmay be blown bywind andcause
the cuffsto get caughton the
steeringhandle
andthus
affectsridingsafety So,
puton clotheswithtight
sleeves.
o Hold
the steering
handleby both handswhen riding.
Never
ridewithonly
one hand.
o Observethe soeedlimit.
o Perform periodical
maintenanceand inspectionin
accordance with the schedule,
WARNINGII
o To avoid
getting
burnedby exhaust
put his/her
feet
on the pedals.
. After running,
the exhaust pipe is
pipe
when
taking
a passenger.
Makesure
your
passenger
has
veryhot, be careful
not to get burnedwhen conductingan
inspection
or maintenance.
a After running,
the exhaust pipe is very hot; select a suitablelocation
to park your motorcycleto
avoidothers getting burned bythe exhaust pipe. ,/" ::;_._f
. .":..,1e
. .;;" .. - --:
; K$:'i;al-i. :.:fi*i-iFiltr'| : ' i-"":'!rt:r:ri": il': i':i''l '"' L
I '-":- y1. ii;;;1..1,;"1r l
t ' tlt-'€ "-:ii:''l : 4 ' ':'i')i- !: ti -j '-{i: '3 I
i ':':l?-
::i-ti{ i:'"ri:rLf
L:-lia ,' '.-. I
.-:'r:*":* ---*-:_ ::L-:tl
l1*r

CAUTION:
Modified motorcycle willaffect its structure or performance, anc cause poor engrne operation or
exhaust noise,
which willresult
in shortening
the motorcycle's
service
life.
Besides,
modification
rs
illegal
and does not conform to the oriqinal
design
and specifications.
A modified
motorcycle
will
not
be covered by warranty,
Therefore,
do-not modifyyour motorcycte at will
3. RIDING
TIPS
o Keep
the related
parts
ofyour body such as arms,
palms,
lumbar,
andtoes relax
and ride
with
the mostcomfortableposture
in
order
to be able
to reactquickly
whenever
itisnecessary,
. Rider'spostufes
will
great influent
riding
safety.
As for the ridingposition,
please
alwayd
keep
your body'sgravity
onthe centre
of seat,
lfyour body'sgravity
is
placed
onthe rear
of seat,
the
front
wheel load
will
be reduced;
this
can cause steering
handles
shaking.
Riding
in
thisway is
cangerous.
r ltwill
be much easier
to make a turnifrider
inclines
his
body inward
when iurning.
Onthe other
hand,
the rider
willfeel
unstable
if
his
body and
the motorcycle
do notincline,
. On bumpy, unlevelled
and slope road,the road condition
may change very often. Driving
on
these roads may become very unstable.
To drive safely and smoothly, rcnowyour road
condition
before
hand,
slow
down,and hold
the handle
firmly
with
aid
of
yourshoulder
o Suggestion:
Do not load
objects
on the frontpedals
unnecessarily,
to avoid
affecting
the riding
safety
andthe operation
of steerinq
handle.
CAUTION:
Feeling
on the handle
is
different
when the vehicle
is
with load
or without
load.
Overload
willmake
steering
handle
swing
and
then influent
riding
safety.
Thus,please
beware of load
weight,
CAUTION:
o Please
do not load cargo or luggage
on places
where are not designed
for loading
to prevent
danger
anddamage.
a Do not place rags or similar
objects between ihe storage compartment and engineto avoid
engine
seizure
because
ofinadequate
engine
oil
supply.
SUGGESTION
To maximize
the motorcycle's
performance
andprolong
its
service
life:
The flrst
month or first
5OOkm
is
the wear- in period
foi ttreengine
and components.
Avoidrapid
acceleration
andtop speed on a long
distance.

4. USE
GENUINE
SPARE
PARTS
Inorder to maintain
the motorcycle's
best performance,
each part'squality,
material,
and machined
precision
must conform to the design requirements.
"GENERIC
Spare parts" were made from the
same highquality
materials
usedfor
the original
motorcycle.
No parts
would be sold
to the market
until
they could meet the designedspecifications
through sophisticated
engineering
and stringent
quality
control,
Therefore,
it is necessary
to purchase "GENERIC
Spare Parts"from iGENERIC
Authorized
Dealers"
when replacing
spare parts.
lf
you buy cheap or fake substitute
parts
from the marker,no
guarantee
can be provided
either
forthe quality
or durabllity,
Also,
itmay result
in
unexpected
troubles
andlower
the motorcycle'sperformance.
o Always use GENERIC
Spare Parts
to keep your motorcycles pure blood and to ensure its long
service
life.
5, USE
OFEACH
COMPONENT
Gauqes Turn
signalindicaaor
(yellow)
Odometer
Snoarinm ator Fuelgauge
High
Sssrn
signallamp(blue) Oil
warninq
liqht
(red)
Symbol
picture
ofinstrumentsl
.1. FuelGauge
Thepointer
in
this
gaugeshows how much fuel
remains
in
thetank.
Thepointer
staysin
"E"
position
when keyswitchis
turned
to "OFF,"
When key switchisturnedto "ON" position
and the "pointer"
alsoin"E"position
reflll
the fueltank
immediately.
CAUTION:
Do not wipe plastic
components, e.g,
gasoline.,.etc
to avoid
damaging
these !nstrument
panel,
components. headlight,
with organicsolvents
such as

2. TurnSignallndicator
The left or right Indicatorwill be flashingaccording to the operated directions of turn signallight
switchwhen itis
turned on.
3. HighBeamIndicator
This
indicator
comes onwith highbeam headlightisturnedon.
4. EngineOilWarningLight
Turn the main switch to the "ON" position, if the oil warning light comes on continuously,this
indicatesthe engineoil
levelis
too low,add oilasrequired.
WARNING:
. To continuedrivethe vehicleunderlow oillevelcondition
willresultin
enginedamage due to lack
of lubricationof engine parts.lt istherefore very important to bringyour vehicleto your dealerfor
oil
replenishmentimmediatelywhenever
the warninglight
comes on continuously.
o Use only 4-cycle engine oil with the required specifications of manufacturer. Otherwise, this
company will
not assume any responsibilityfor damages resultedfrom usingsubstandard engine
oil.
Recommended oil:ShellAdvance Ultra
4
CAUTION:
Observethe speed limitto ensure
drive
safetv.
5. Speedometer
This shows your speed in kilometres per hour and
miles
perhour.(km/hand mph).
6. Odometer
This
odometer shows the total kilometresthis vehicle
hasbeendriven.
*l
&.,

OPERATION
OFIGNITION
SWITCH
toN l "srart"
posilion
o Fngine
can be started
in
this
position
o lgnition
switch
key
can not be removed.
foFF-l "Srop"
position
o Engine
is
shut
off
andcan not be started
in
this
position
o lgnition
switch
key
can be removed.
o Turn
the handle
all
the way to left,
then press
down the
key
and
turn
the key
to the "LOCK"
position
onthe left.
o In
thisposition,
the handle
islocked
and the kev can be
removed.
I To unlock,
simply
turn
the keyfrom "LOCK"
to ',OFF,,.
CAUTION:
o Never
operate
the ignition
switch
key
when the motorcycle
isrunning. Toturn
the ignition
switch
io "OFF"
and"LOCK,"
will
shut
off
the electrical
system
and
thit mayresult
in
i dangerous
accident.
Therefore,
the ignition
switch can onlybe turn"ed
offafier the moiorcycte has been
completely
stopped.
' Alwaysremove the key and be sureto take the key avuay
withyou afterlocking
the steering
handle
before
leaving
your motorcycle.
t lfignition
switch
remains
in
the "O
N
"position
for
a prolonged
period
after
the engine
has
been
stopped,
the battery's
capacity
will
be reduced
and
this
mayaffect
the engine'sltart ability.
[OCn "Lock"
posirion
USE
OF
BUTTONS
High
beam ch
Turn
signal
switch
Horn
switch
Symbolpictures
Headlight
switch
Startbutton
lgnition
Switch

J
*
LightSwitches
m When the switch is turned to this position,
headlight,
rear light,instrument panel light,and
position
lightwill
go on.
W When the switch isturned to this position,
rearlight,instrument
panel
light,
and positionlight
willgo on.
When the switchisturnedto this
position,
all
lights
will
go off.
(Depending
on Models)
o Electrical
starter
Button
Thisistheelectricalstarterbutton.
ltis
used
for
startinctheenaine.
When the ignitionswitch key turnsto "ON" and brake leverhold,
and then pressthis
button down to startengine.
Thismechanismis
designed
for safety,Thus,the front or
rearbrake
levermust be holdbeforeusinqthisbuttonso that enqinecan be started.
CAUTION:
a Releasethisbuttonimmediatelyafterenginehasbeen started.
Never
press
the buttonagain
duringthe engineisrunning.
This
couldleadto seriouslydefectson the engine.
a Donot use lightsystem duringstartingthe engine.
Turn
headlightandturn signallightsto the
"OFF"
position
when the engineisbeingstarted,
o High/LowBeam Switch
Thisis the high and low beam of headlightswitching
switch, Pressthis switch to switch between
hiohand low beams.
l!Dlrnis isfor hichbeam.
@]rhi= isfor loir beam. (Please
turnto low beam when ridingincity)
o Turn
Signal
Switch
Turnsignallightsareusedwhen turning
left/right
or changing
lane.
Turnignitionswitchto "ON",
and slidethe turn signalswitchto left
or right.Then,the turn signal
lights
willflash.lf
you press
the middleof the switchthe indicator
willturnoff.
1*]Right-sideturnsignal
lightflashingmeansyou intendto make a rightturn.
l{?lleft-siOeturnsignal
lightflashingmeansyou intend
to make a leftturn,
o HornSwitch
lffilPress
thisbuttondown when ignitionswitchis
in
the "ON"position,
the hornwillsound.
oCAUTION;
Donot
press
thisbutton
whenyou
are
in
the
nohorn
area.
m
t*--

SADDLE
LOCK
o unlock:
Insertignitionswitch key into the lock on the lower left
of the saddle,
and turn the key to the right.Then,the
saddlecan be lifteduo.
o Lock:
Press the saddle down and it will be loeked
automatically.
CAUTION:
o Please do not put the key into the
storage compartment after saddle is
unlocked to prevent the key from
being locked inside and can not be
removedwhen the saddle
islocked.
o Be sure to remove the key after the
saddle
has
beenlocked,
STORAGE
BOX
a This
box islocatedunder
the saddle,
o Maximum
load
capacity:
5kg.
o Donotstorevaluables
inthe box.
o Please
makesurethatseat
cushion
hadbeen
locked completelyafterit
was down.
o Takeoutvaluablesbefore
washing
to avoid
wetting these objects,
a Donot place
thermal
sensitive
objects
inthe
box because
of engine's
heatand high
temperature
inside.
FUELTANKCAP
1. Insertignition
switchkeyintothe
cao can be removed. lock
on the fueltank cap,and lurn the keyto the right,then the
2. Donotfillabove
thefuelupper
limitwhen refuelling.
3 To lockthe fueltank please
specially
take carethatthe mark on the cap fitsto the mark on the
vehicleand pressdown the cap in parallel
untila "click"
sound is heard.That means the cap is
locked
(the
ignitionkeynow turnsback
to the left
slightly).
To removethe ignition
key,
simply
turn
the keyto the leftand then remove it.
WARNING:
o Mainstand
shouldbe put down on the ground,
engine
should
be shutoffand flames
should
be
strictly
prohibited
to ensuresafety
when refueling.
o Donotfillabove
fuelupper
limitwhen refueling.Otherwise,
fuelwill
flowout through
a holeon the
nanr-har-ma' r'rarp6ge
the body'S
painfing,
inSeriOUSCaSeS,
itmay CaUSe
a fire
to burndown the
L-dP LrrdL | | rdy udl
motorcycle.
. Makesure
the cap hasbeen
tightened
properly.

BRAKE
a Use front and rear wheel brakes simultaneously
when braking.
a Avoidunnecessary sudden braking.
a Using only the front brake or the rear brake
increases the risk of falling because the
motorcycle is
tend to pulled
to one side.
a Avoid brake continuously for a long period of
time because that may overheat the brakes and
reduce its braking efficiency.
o Slow down and brake early when riding in rainy
days on slipperyroads. Never apply the brakes
suddenlyto prevent skidding
and falling.
PARKING
METHOD
o When approachingthe parking
lot:
1.Turn on the turn signal
light
early,
and pay attention
FTont
BRAKE
to the vehicles in front, from rear.left and right,
(Brake
then take the inner
lane
and approach slowly,
2. Return
the throttlevalve handle back to itsoriginal
position,
and apply brakes in advance.
light
comes on when braking
to warn drivers
of vehicles
behind.)
. when stop completely:
1.Pressthe turn signal
switch back to its originalposition,
and turn the ignition
switch key to "OFF"
position
to shut offthe engine.
2' Get off the motorcycle from left side after the engine has been stopped, and select a parking
place where the motorcycle will not interfure with traffic and the ground is level:Afterwards pu-t
down motorcycle's main parking
stand.
3. Hold the steering handle with your left hand, and hold down the front end of saddle or hold the
parking
handleon the lower-left
sideof saddlewith vour riqhthand.
4. Press
the main parkingstand with your right
foot, put odwn the main parking
stand firmly
on the
ground.
& Loct the steering handle and remove the key after parking to prevent the motorcycle from being
stolen,
CAUTION:
o Parkyour motorcycle at a safe place where itwillnot interfere with traffic.
"iI
t_
Rear
BRAKF

CAUTION:
o please
check
iftheengine
oil
and
fuel
volume
are
adequate
or
not,
before
saarting
engine.
o Tostart
engine
the miin parkingstand
mustbefirmly
onthegroundand
thebrake
isapplied
on
the rearwheelto preventthe motorcycle from movingforward suddenly'
1.
Turn
ignition
switch
keyto the "ON"
position
2.
Apply
hand
rear
wheelbrake,
3.Donotaccelerate,
press
starter
button
when the brake
isapplied.
CAUTION:
o lf enginecan not be startedafterstartermotor running-for
3-5 seconds,
turn the throttle
valve
handle
1/B-1/4
turns,
and
then press
starter
button
again
foranease
start,
o lnorder to avoiddamaging the startermotor, do not pressthe starterbutton continuously
over 15
seconds.
o lt is harderto get the engine started afterthe motorcycle has been leftidle
for a long time or after
refuelingontyifter the iuel has been depleted. Then, it is necessary to press starting lever or
starter button several
times, and keep the throttle valve handle at the close positionto start tne
englne,
r ltmay need several
minutes
to warm up engine ifitisa cold start.
o Exhaust
contains
harmful
gases(CO),
therefore
pleasestart
the engine
atawell
ventilated
place.
When starting engine with starting lever
o Turn
the mainswitct,
to Otrt,
pr5.s the starting
leverforcefully
byfoot with the throttle
valve
handle
at
the close position
o lf engine isdifficult
to startwith the startinglever
when the engine is cold, rotatingthe throttlevalve
1/B-1/4
turns
will
makethe start
easier'
o put the starting
lever
back to itsoriginal
positionafter
the engine has been started.
II
CAUTION:
o Firmly
support the motorcycle with the main parking stand before startingthe engine with the
starting
lever,
a start e"ngine
with the startingleveroccasionally
to prevent it from loosingitsfunction because of
unused
fora lonq
time.
9

7. THEBESTWAYTO DRIVEOFF
o Turn on the turn signal
lightbefore moving,and make
sureno vehicleiscomingfrom behind.
Then,
driveoff.
o Duringdriving,attention
shouldbe paid
to vehicles
ahead
and behindand keep highlyalertatalltimes.
THF
CONTROLOF
THROTTLEVALVEHANDLE
Deceleration Acceleration
B. INSPECTIONANDMAINTENANCEBEFORERIDING
ROUTINEINSPECTION
CAUTION:
lfanyproblem
foundduringfoutineinspection,correctthe problem
beforeusingthe motorcycleagain,
have
your
motorcyclechecked and repaired
bythe "GENERIC
dealer
or authorized
service
personnel"
ifnecessary.
Checkltems Check KevPoints
Encine
Oil lsthere
enouohencineoil"
r, ,^l
I UEI ls
it
enouch?ls
itOctane95 orabove
Brake Front Brakinccondtion? IBrake
leverfree
olav:
1O-2Omml
Rear Brakinc
condtion? [Brake
leverfree
olav:
1O-2Omml
0res Front ls
tireoressure
normal?
Standard:1.-/5kcs/cm'
Rear lstire
pressure
normal?
[Standard:2.Okglcm'for
1person,2.25kg/cm'for 2
oeonlel
Steerinq
Handle Does
the handlevibrates
abnormallvor is
difficultto turn?
Speedometer,
lights,
and
rearviewmirror is it operated properly?Do lightscome on? Can it be seen clearly
from
behind?
Tightness
of Main
Components Are screws or nutsloose?
AbnormalPoints Dothe Drevious
troublesstillexist?

utper limit
ldwe.limlt
WARNING:
' To continue drive the vehicle under low oil level condition will result in engine damage due to lack of
lubricationof engine parts lt is therefore very important to bring your vehicle to your clealerfor oil
replenishment
immediately
whenever the warninglight
comes on continuously.
o use only 4-cycle engine oil meeting the speciiicJtions.
otherwise, this company will not assume any
responsibility
for damages resulted
from using
substandard
engine
oil,
Recommended oil:
ShellAdvance Ultra4
INSPECTIONAND REPLENISHMENT OF ENGINE OIL
INSPECTION:
o Turnthe main switch.to the "oN" position,
if
the oilwarning light
comes on continuousty,
thisindicates
the engine
oir
lever
is
too row,
add oir
as recuir6d.-
o lf the oillevel
istoo low use the main stand for parkingthe motorcycle and remove the
dipstickafter engine stopped 3-5 minutes.
Wipe oilofi the dipstick"and
insert
it into the
guide
tube again.
(Donot screw itinto)
o Remove the dipstick and check weather oil level is in between tne upper and lower
marks.
' Add oil
to upper limitif
oilisnear
the lowerlimit
and check oil
tank and oillines
for leakaqe.
Replenishment:
1.
Using
the main
stand
to support
the vehicle
on a
2.Add oiluntil
reaches
to the standard
level,
3.Fix
the oil
tank cap untilproperly
tightened,
then
until
locked.
level
ground,lift
up the saddle,
and remove the oil
tank cover.
relnstall
the tank cover and lowerthe saddleand pressitdown
Add oil
note:
o use only 4-cycle engine oil form a GENERIG
dealer. otherwise, this company will not assume any
responsibility
for damages resulted
from using
substandard
engine
oil.
' when adding oil,
do not letforeign materials,
dust,dirtenter into the oilsystem, do not use different
brands
mixedoil,
becausethis
will
affect
the engine,sperformance.
' Do not add oil
above the standard
level.-clean
spilled
oilaroundthe oil
tank cap.
o Be sureto tighten
the oiltank cap properly
after
addingoil,
INSPECTION
OFFUEL
LEVEL
o Firmly support the motorcycle with its main stand on a levelled ground, turn the main switch to .,oN,,
position,
check if
the fuelmeter needle moves.
' Fuel gauge may be defective or electric circuit disconnected if there is some fuel in the tank, but the
needle does not move. Please drive slowly to an authorized service station to have your motorcycle
checked.
Note:ltisnot necessary
to start engineto check the fuellevel.
11

-
TRANSMISSION
OIL
INSPECTION
AND CHANGE
INSPECTION:
a Thetransmission
oil
levelcanonly
be checked by an authorized
Dealer'
. lfthe Oil
willbe chanqed O,1L
must be filled
inthe transmission.
OIL
CHANGE:
o Neverchange the Oil
by your own. Letyour dealer
do each modification
and service.
lf
you do any
change byyour own you will
loose
allyour
assurance
Recommended Oil:ShellAdvance
Transmission
BOW
90
INSPECTION
ANDADJUSTMENT
OF BRAKE
FREE
PLAY
INSPECTION:
(Brake
lever
free play
must be checked withthe engine
shutoff
)
o Brakelever
free play
for front and rearwheels
When checking the hand-braking lever for front and rear
wheels,
itsfree play
(thestroke of hand-braking
lever
from no
braking
to initialbraking)
should
be 1O-2omm.
It is abnormal if the feel is spongy when holding the
hand
-
bra
king
lever
forcefullY.
Adjustment:
o Theindentation
of brakeadjustment
nut must be aligned
with
the pin.
(see
right
figure)
CAUTION:
o When free play is between 1O-2O mm, check brake
indicatorsof front and rear wheels. lf the arrow on the
brake arm aligned with the marked on the brake disk,
which means the brake lining
has been excessively
worn,
and must be replaced
immediatelY'
WW
Adjustmentnut C
X

a
a
Turn
the adjustment nut on brakearm of front and rear
wheels to adiust
tever,
Hold
the hand-brakelevers
afteradjustingwith both hands untilthereis
Measure the free playwith a rule.
the free play
of hand-brake
effective brake feeling.
To decrease free play
Adjustment nut
To increase
free play
DrsK
BRAKETNSPECTION
[Applicable
formodel
equippedwith
dlscbrake.]
leakage or damage. lf
your motorcycle to
Dealer for a check or
o Park the motorcycle on a level
if fluld level is under the
Recommended Brake Fluid:
DISKBRAKEFLUID
DOT4.
ground, and check
"LOWER" mark.
CASTROL SUPER
W"ose connecti""
,/ 7
\Y
o Visual Inspection for
there is any, take
GENERIC Authorized
repair,
Brakeoad wears limitorooves
L-.-.-i Brakedisk
Brakecaliper
o Check the brake from behind the brake
caliper,The brake pad must be replaced with
new lining when the brake pad wear limit
reachesthe brakedisk,
@N:
t
d.:l

CAUTION;
Never
change
the brake
fluid
byyour own Brake
fluid
to a badfunction
ofthe brake
system
and could
occurisa dangerous
substance.
Wrong service
anaccident.
Adjust
nut Lock
nut
leads
a correct clearance
allows
throttle
vale
handle
to rotate
2-6mm.
o To adjust,
firstloosen the fixingnut,then turn the adjustingnut
to the proper
positionand securely
tighten
thefixing
nut'
Checkltems:
1.Check the throttle valve cable to see if it can be moved
smoothly
from a closed
position
to a wide open position'
2.Rotate steering handle from side to side to check if the
throttlevalve
cableisinterfered.
3.Checkto see if
the throttle
valve
cableisobstructed by otner
cables
preventing
itfrom being
operated
smoothly'
r This
motorcycle
isequipped
witha maintenance-free
type battery'
andadd ele-trolyte,
' Have
yourmotorcycle
checked by GENERIC
Dealer
should
anyabnormality
isfound
Remove the battery terminals
corrosion
onthem,
so it
isunnecessary
to check
Authorized
Dealer
or Franchised
and clean if there are dirt and
Batteryremoval procedures areasfollows:
Turn
ignition
switch
"oFF,"
and remove negatlve
cable
screwfirstly
and disconnectthe negative
cable.
Then,femove positive
cable
screw and Positive
cable.
CAUTION:
oclean
the
battery
postswith
warm
water
ifthepostsare
eroded
and
have
some
white
powders
on
tnem.
alfthere
is
obvious
erosion
on theterminals,
disconnect
the cables,
then cleanthe erosion
off
witha steel
brush
or a pieceof sandpaper'
a lnstall
batterv
cable
after
cleaning
and apply
athin
coat ofgreaseon the terminals'
o Install
battery
in
reverse
order
of removal
{r

CAUTION:
a Thisisa closed type battery.Neverremove the caps.
o Inorder to prevent electric
leakageand self-discharge
when the batterysits
idle
for long periods
Remove battery from motorcycle, store it in a well- ventilatedand dimly lighted place after the
battery has been fullycharged, Disconnect battery's negativecable ifthe battery is still
kept on
the motorcycle.
o lf the battery needs to be replaced, replace with a same closed-type battery
(Maintena
nce
-Free)
TIRE
INSPECTION
oTiresshould
be checked andinflated
with
the engine
shut
off'
a lfatire's
groundcontacting
curve
isabnormal,
check it
withan air
pressure
gaugeand inflate
itto
specifiedpressure,
oTires
pressure
mustbe checked withanair
pressure
gaugewhen cold.
PLEASE
REFER
TOSPECIFICATIONS
FORSTANDARD
TIRE
the
Foreianmaterials
(nails
or small
stones)
Crack and
Tread wear
indicator
a
visualcheck tires for frontal and lateral
sidewalls
for crack or
damage.
Visual
check tiresfor any nailsor smallstones wedged in the
tread,
Check the "treadwear indicator"
condition
to see if
tread groove
depth isinsufficient,
A tire with a wear bar showing is worn out and should be
replaced
immediately.
CAUTION:
Abnormal tire pressure,
wear, or crack is the most important
cause
thatresults
in
the loss
control
of the steering
handle
and a
punctured
tire(s).
t5

o
o
STEERING
HANDLE
FRONTSHOCK
ABSORBERS
INSPECTION
t Performthischeck
withengine
shutoffand
ignitionswitch
key
removed.
Visualcheck front shock absorbers for damage,
Operate steering handle up and down, and check front shock
absorbersfor noises
due to bends.
Check the bolts and nuts of front shock absorbers with
wrenches for tightness,
o Shake steeringhandle up & down, left
to check if it is loosen, has too much
one side.
o Check steeringhandleif
itisbeing pulled
too tight by the brake
cables.
. Take your motorcycle to GENERIC Authorized Dealer for a
check or adjustment ifany abnormal conditions
arefound.
Figureson the right are for operation checks only
CHECKING
AND CHANGING FUSES
Turn off ignition
switch, and check fuses if they are intact. Replace the blown fuse with a new or
havingthe same specifled
amperage rating (7A),
Usinga fuse of more than 7 amperes, a brass or z
ironwre to replace a blown fuse isstrictly
prohibited
to avoid damaging the electrical
system and ti
circuit.
a Remove the battery cover screws, and open the battery cover. Fuses are installed
inlhe fuse bc
located by the battery
a Fusesmust be firmly
secured with wire connectors when replacing'
a Use only parts having the specified specification
to replace electrical
components such as lig
bulbs. Using parts not having the specified specifications
for replacement may cause the fuse
blow and over-dischargethe battery,
a Avoidspraying
water directly
on or around fuse box when washing the motorcycle,
o Take your motorcycle to your dealer
for an inspection
if
a fuse isblown by unknown causes.
INSTALLATION
Pressinfrom above
Fuseconnectors
o
& right,and front & rear
resistance and pulls
to
REMOVE

CHECKINGTHETURN
SIGNALLIGHTSANDHORN
. Turn
the ignition
switchkeyto "ON"
position.
a Turn
on the turn signallightswitch,and make surethatthe front & rearand left
& rightsignallights
flashesandalso
checkif
thewarning
buzzersounds.
. Checklurnsignallightcoversif
theyaredirty,crack,or loosen,
o Press
hornbuttonto check ifitworks
CAUTION:
o Specified
specification
bulbsshouldbe usedforturn
signal
lights.
Otherwise,the normaloperation
ol
turn
signallightswillbe affected,
o Turnon theturnsignallightbeforeturningor switchinglane
to warndriverofvehicles
behind.
o Turn off the lurn signallightimmediatelyby pressing
its button down after using.Otherwise,
the
flashing
oftwinsignallightsmay confusethe drivers
ofvehicles
behind.
CHECKINGTHEFRONTANDREAR
LIGHTS
. Turnthe ignitionswitchkey
to "ON"position,
Checkiffrontandrearlights
come on,
o Check the brightnessand directionof front
startthe engineand then turnon the frontlightswitch.
light.by projecting the light on the wall to see if it is
correct.
o Checkthefrontlight
cover,if
itis
dirty,crack,or loosen.
CHECKING
THE
BRAKELIGHT
a Turn
the ignition
switchkeyto "ON"
position,
holdthe hand-brakingleversfor front
and rearwheels.
Checkifthe brake
lights
come on.
o Check
the brake
light
cover,
ifitis
dirty,crack,or loosen.
CAUTION:
. Useonlyspecifiedbulbs,do not use bulbswithdifferent
specificationsto avoiddamagingelectrical
system,burningout bulbs,and discharging
the battery.
a Do not modify
or add other elec[ricalcomponents to prevent
over loador shortcircuitwhich may
resultin
afire
and burndown the motorcvcleinserious
cases.
CHECKING
FORFUEL
LEAKAGT
o Check
fueltank,fuel
hoses,andcarburettor..,etc.forleakage.
CHECING
THTLUBRICATIONOFBODY'SVARIOUSMECHANISM
o Check
the body'spivot
points
ifthey haveenoughlubrication.
(For
example,the pivotpoints
on the mainstand,the sidestand,
andthe brake
lever,.,etc.)
1'7

CHECKINGTHE
SPARK
PLUG
a Remove the cap of high
tensioncable.
(Use
a plug
wrench intool box to remove the spark plug
turningitcounterclockwise,)
a Check the electrodeifitis
dirtyor fouled
by carbon deposits.
o Remove the carbon deposits on the electrode with steel wire, and clean the spark plug w
gasoline,
then,wipe dry with a rag.
o Check the electrode,
and adjustits
gap to O,6-0.7mm.
(Check
itwith afeeler
gauge)
o Handtight
the sparkplug
asfar
as it
can go andthen tightenit
another
1/2-3/4 turns
witha wrencl
WARNING:
Theengineisvery hot afterrunning,Pay
attentionnotto get burned,
Useonly
sparkplugs
suitableforthe engine
specificationsof this motorcyclerecommended by tl
manufacturer.
(Refer
to specifications.)
CHECKINGTHEAIR
CLEANER
DISASSEMBLE
PRCEDURE
1. Removethe screw of aircleaner
cover.
2, Removethe aircleaner
cover and then the.cleaner's
element.
3. Cleanor replace
the element.
(For
checkinginterval
please
referto maintenance
schedule,)
4, Refer to figures shown on the right for air cleaner element
cleaningsteps.
ASSEMBLE
PRCEDURT
o Assemble
the air
cleaner
inreverse
orderof disassemble.
CAUTION;
o Dust deposit is one of the major causes of reducing outpui
horsepowerand increasingfuel
consumption.
o Change the aircleanerelement more frequently
to prolongthe
engine's service lifeif the motorcycle is driven on dusty roads
very often,
o lf air cleaner is installedimproperly,
dust will be absorbed into
cylinders,which may cause a premature wear and reducing
output power and engine
life.
o Be careful not to soak the air cleaner when washinq the
motorcycle.
Otherwise,
it
willcauseenginehard
to start,
Procedures for cleaninq
cleaner element:
4_\.
i\ \
-! l" - *-r
ci> \'ir"' t
- \pF.-L
rF
tl
tt
2.
Squeeze
1.
CIean
{
3.Soakinengineoil. 4. Squeez
l8
Table of contents
Languages:
Other Generic Motorcycle manuals