Genesis B1F13 AU000 User manual

Genuine Accessories
Glasses Gloves
Mask Hearing Protection
Part Weight (Gross) FMVSS 110 Compliance Information
1) Dealer must clearly advise customer of installation method.
2)
Before installing, verify and identify all parts.
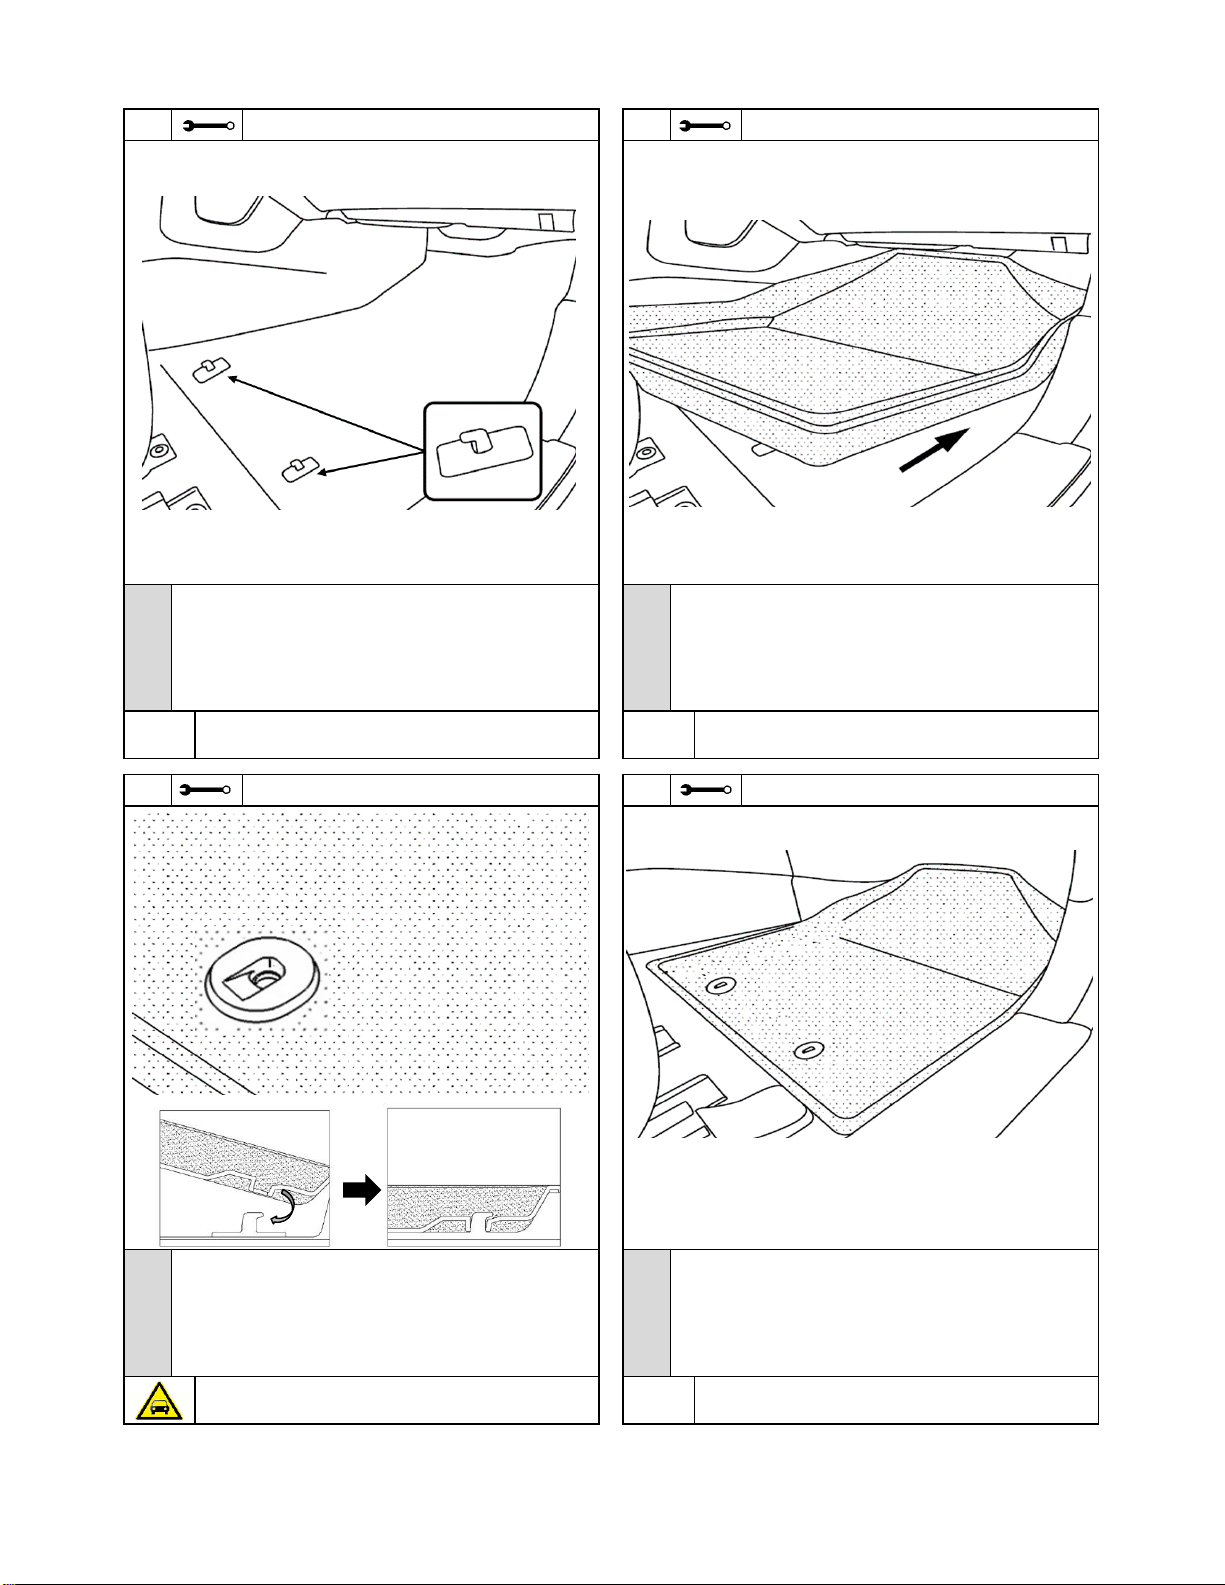
3) Remove vinyl factory covering from carpeted areas before installation.
4) Sliding driver and passenger seats to furthest rearward position provides better access to install front All-Season Fitted Liners properly.
5) When removing mats or liners, pull rearward to unhook.
Denotes quality processes to be checked
prior to moving to the next step
Denotes personal protective equipment (PPEs) that
may be required for a step. Examples of safety
equipment icons noted below:
Part No.
Notes to the installer:
kg
lbs
Denotes cautions to be taken to avoid
vehicle and component damage
Denotes cautions to be taken to avoid
physical injury or electronic component
damage
3.32
All dealers must determine if the Net weight they have added in the form of all options or accessories, when added to the weight of all Port/Dealer Installed
options or accessories, exceeds the lesser of 1.5% of GVWR or 100 lbs. If the additional weight does exceed the lesser of the indicated thresholds, a “Load
Carrying Capacity Reduced” label must be installed. A black, fine-point, indelible marker must be used to write by hand onto the label, the reduced carrying
capacity in kilograms or pounds, which is the total weight of all added options and accessories.
Load Label Part Number: NP070 - 09003
N
O
T
E
Denotes important information to be
reviewed during the step
Denotes specific tools that are necessary
to complete a step
Basic Required Tools
Language
English
7/11/2018
All-Season Fitted Liners
(A) Customer
Denotes warnings that may lead to
serious physical injury or vehicle damage
Vehicle Model:
B1F13 AU100 (AWD)
Difficulty stated above reflects the minimum level of
expertise required to install the accessory:
( A )
Model Year
Copy OEM Logo Here (→)
2018~
B1F13 AU000 (RWD)
Difficulty:
Note:
Rev. Date
Accessory:
G80
(C) Master Technician or Specialist
(B) Dealer Technician
Instructional Symbols / Definitions
Note:
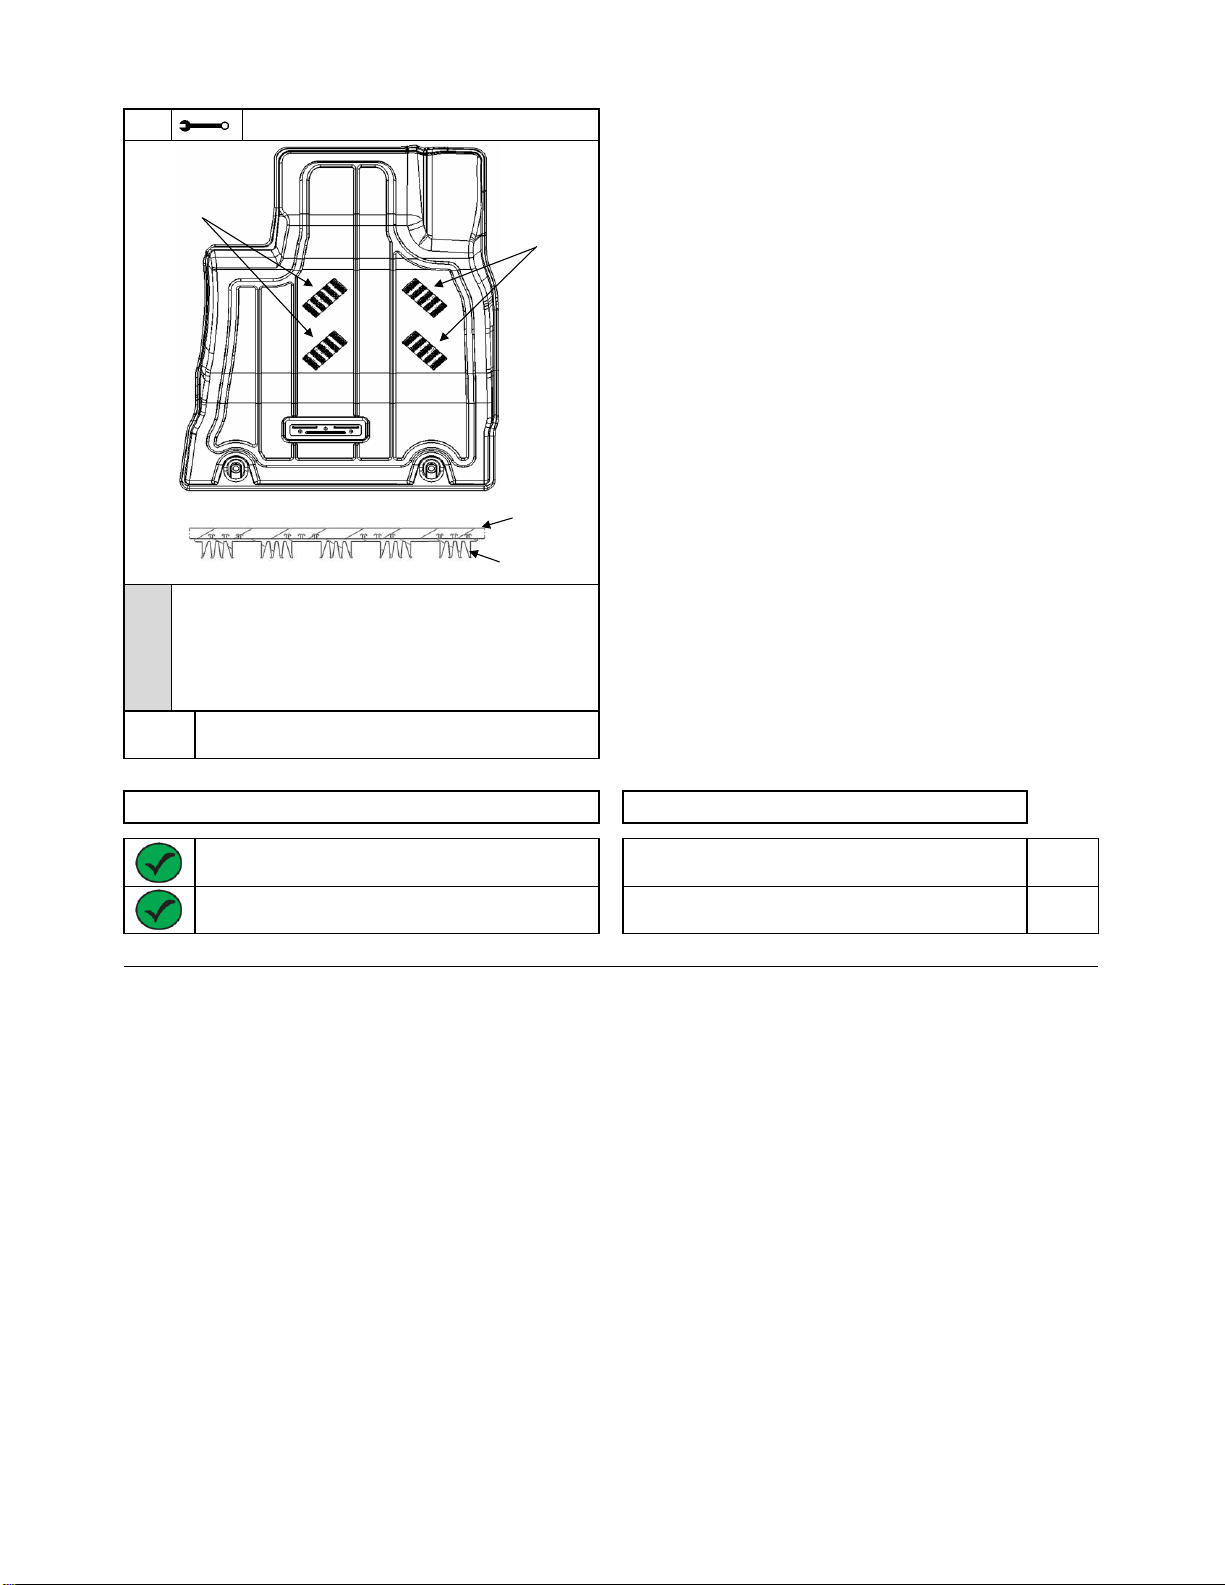
The underside of the Front Left (Driver) All-Season Fitted Liner is equipped with Hook Pads to aid in preventing Liner movement.
The Hook Pads are not to be removed from the Liner.
If a Pad is removed, replace in the original position prior to installation and driving.
7.32
Warning!
To prevent the All-Season Fitted Liner from interfering with the operation of accelerator, brake, and/or clutch (if applicable) pedals,
you must follow these instructions. Failure to do so may cause severe personal injury or death.
- Never install an All-Season Fitted Liner in combination with any other mats (Carpeted or All Weather).
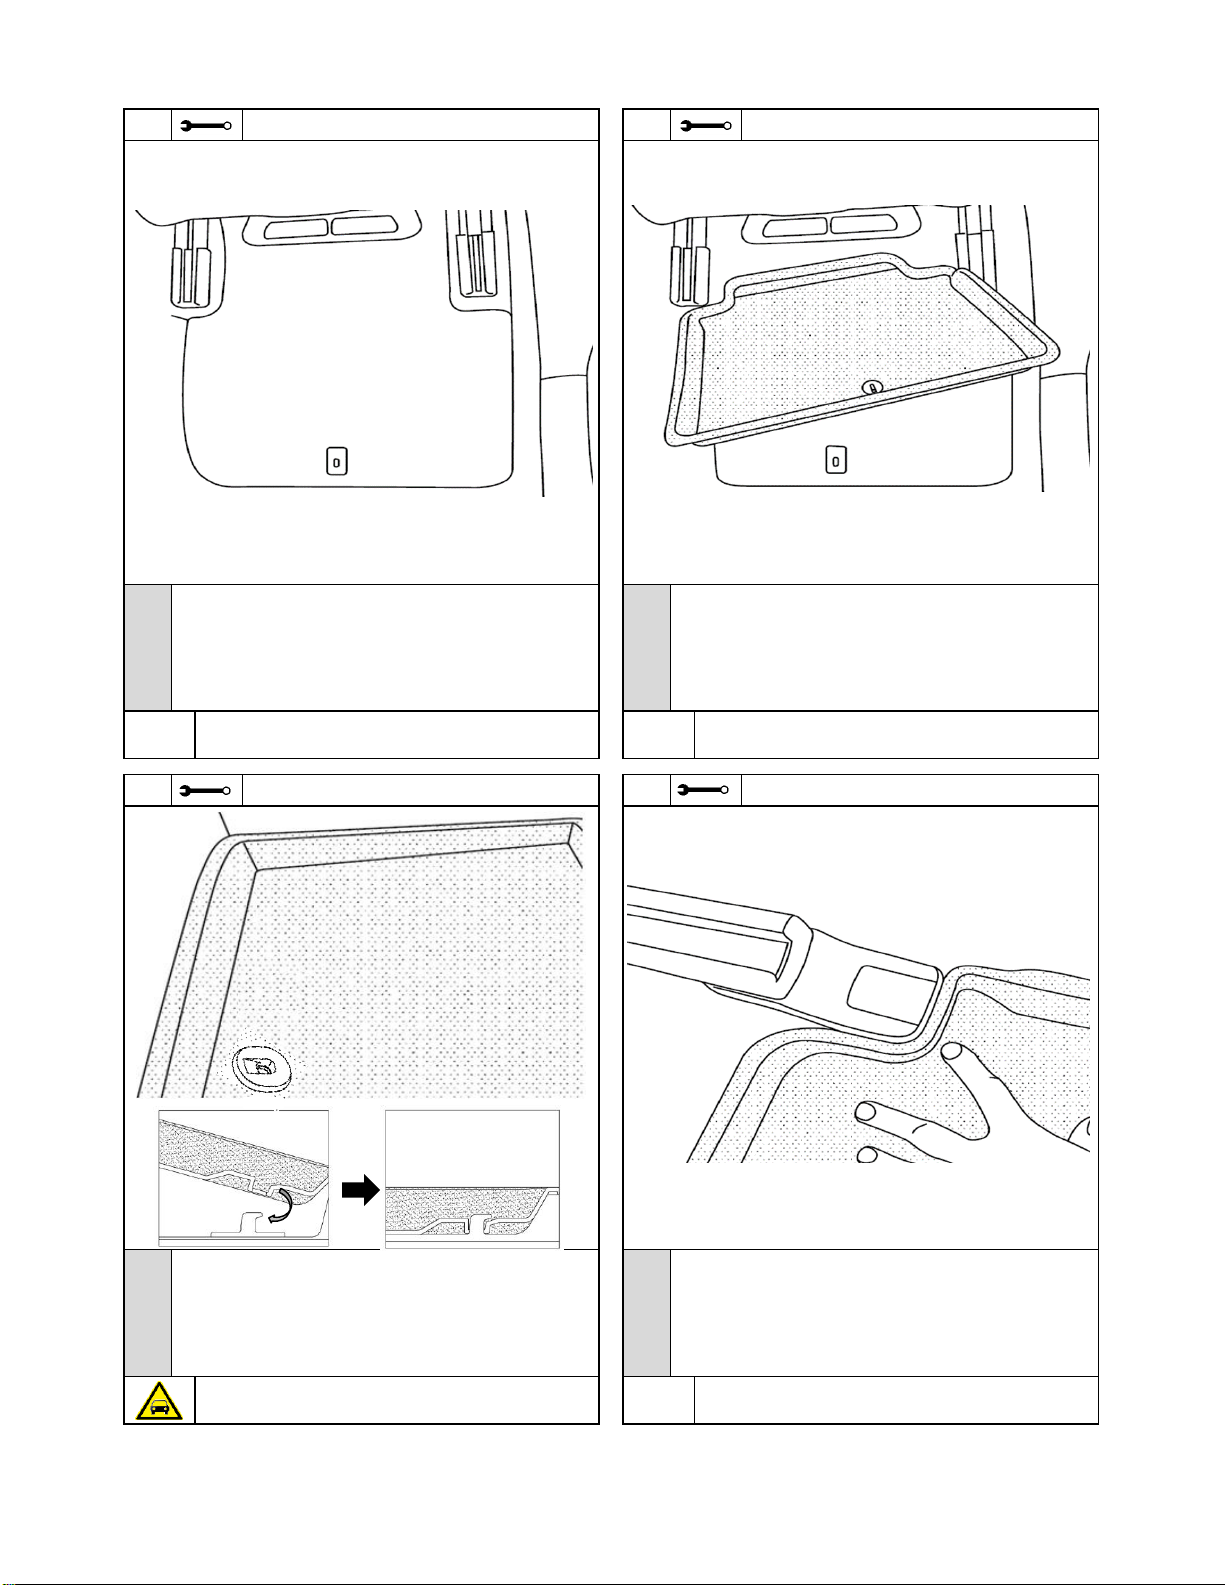
- Front All-Season Fitted Liner must be secured to the vehicle carpet by the hook(s) attached to the floor to prevent the All-Season
Fitted Liner from sliding.
- The mounting hole on the All-Season Fitted Liner must go over the hook on the floor. Confirm the All-Season Liner is secured to
the hook.
None
ISGE001
Revision Date
07/11/2018
Page 1 of 6

Genuine Accessories
No.
1
2
3
4
1
Right Rear Liner
Description
Left Rear Liner
Kit Overview
Qty
1
Right (Passenger) Front All-Season Fitted Liner
Left (Driver) Front All-Season Fitted Liner
1
1
1
2
3
4
ISGE001
Revision Date
07/11/2018
Page 2 of 6

Genuine Accessories
A. Before installation, remove all floor mats from the front and rear of
the vehicle.
B. Starting with the left front driver's side floor area, make sure it is clean
and that the retention hooks are properly attached to the floor carpet.
3
A. Align the holes in the Liner with the retention hooks protruding from the
vehicle floor. Position inboard Liner hole ion the hook at an angle as
shown above. Repeat for outboard Liner hole ii.
N
O
T
E
1
N
O
T
E
4
A. After the drivers side All-Season Fitted Liner is installed, make sure it does
not interfere with the accelerator or brake pedals and that the edges are
pushed down against the floor.
N
O
T
E
2
A. Install the Left (Driver) Front All-Season Fitted Liner by placing the front
portion under the brake pedal area and allow the liner to gently fall into
place.
Caution! Incorrect installation of the liner can lead to part damage.
N
O
T
E
i
ii
ISGE001
Revision Date
07/11/2018
Page 3 of 6

Genuine Accessories
N
O
T
E
6
A. Install the Right (Passenger) Front All-Season Fitted Liner by placing the
front portion under the lower dash area and allow the liner to gently fall
into place.
7
8
Caution! Incorrect installation of the liner can lead to part damage.
A. Align the holes in the Liner with the retention hooks protruding from the
vehicle floor. Position Liner holes on the hooks at an angle as shown
above.
N
O
T
E
5
A. At the right front passenger's side floor area, make sure it is clean and
that the retention hooks are properly attached to the floor carpet.
N
O
T
E
N
O
T
E
A. After the Right (Passenger) Front All-Season Fitted Liner is installed, make
sure that the there is no interference and that the edges are pushed down
against the floor.
ISGE001
Revision Date
07/11/2018
Page 4 of 6

Genuine Accessories
N
O
T
E
A. At the left rear passenger's side floor area, make sure it is clean and
that the retention hook is properly attached to the floor carpet.
12
11
N
O
T
E
Caution! Incorrect installation of the liner can lead to part damage.
A. Align the hole in the Liner with the retention hook protruding from the
vehicle floor. Position Liner hole on the hook at an angle as shown above.
N
O
T
E
A. After the Left Rear All-Season Fitted Liner is installed, make sure that the
liner is flush against the front seat rail covers, there is no interference,
and that the edges are pushed down against the floor.
B. Repeat steps 9-12 for the Right Rear All-Season Fitted Liner.
C. Installation is complete.
9
10
N
O
T
E
A. Install the Left Rear All-Season Fitted Liner by placing the front portion
between the front seat rails and allowthe liner to gently fall into place.
ISGE001
Revision Date
07/11/2018
Page 5 of 6

Genuine Accessories
Cleaning Instructions for:
Do not place the liner on the ground where it is in direct contact with the sun, or the liner could deform
from high temperatures.
Item to be Checked
G80
Result
Make sure each floor liner is securely fastened to the vehicle floor with each
retention hook.
Make sure the accelerator and brake pedals are not interfering with floor liner.
Each liner properly attached to each retention hook.
No interference with accelerator and brake pedals.
A
All-Season Fitted Liners
N
O
T
E
- The Left (Driver) Front Liner has hook pads attached to the bottom of it.
- If the hook pads come loose from the liner, place them back on in the
orientation shown above.
Each All-Season Fitted Liner can easily be cleaned using a vacuum, soft cloth, or soft brush.
To remove excess dirt, use water with a mild detergent to clean the liner. Do not use bleach or alcohol
to clean the liner or the liner may become damaged or discolored.
Dry the liner with a soft cloth or place the liner in a well ventilated area to dry before reinstalling. If the
liner is installed before it is completely dry, it could become moldy or emit an abnormal smell.
Do not use a washing machine or automatic mat cleaner to clean the liner. The liner could become
damaged and/or deformed.
Care & Cleaning
Visual Check
UNDERSIDE OF LINER SHOWN
Liner Side
Carpet Side
HOOK PAD ORIENTATION
HOOK PADS
HOOK PADS
ISGE001
Revision Date
07/11/2018
Page 6 of 6
This manual suits for next models
1
Other Genesis Automobile Accessories manuals
Popular Automobile Accessories manuals by other brands

LSD-Doors
LSD-Doors LamboStyleDoors installation instructions

Schumacher Electric
Schumacher Electric SC1575 owner's manual

ClearSpan
ClearSpan NorthStar Garage instruction manual

Volvo
Volvo S60 - ANNEXE 931 installation instructions

Warrior Products
Warrior Products 4525 installation instructions

Britax
Britax Romer KING plus elisa Instructions for use