geratech EGE-HDMV-441SL User manual

EGE-HDMV-441SL
4×1 HDMI Seamless Quad Switcher


EGE-HDMV-441SL
4×1 HDMI Seamless Quad Switcher
DISCLAIMERS
The information in this manual has been carefully checked and is believed to be accurate.
Geratech Technology assumes no responsibility for any infringements of patents or other
rights of third parties which may result from its use.
Geratech Technology assumes no responsibility for any inaccuracies that may be
contained in this document. Geratech also makes no commitment to update or to keep
current the information contained in this document.
Geratech Technology reserves the right to make improvements to this document and/or
product at any time and without notice.
COPYRIGHT NOTICE
No part of this document may be reproduced, transmitted, transcribed, stored in a retrieval
system, or any of its part translated into any language or computer le, in any form or by
any means—electronic, mechanical, magnetic, optical, chemical, manual, or otherwise—
without express written permission and consent from Geratech Technology.
© Copyright 2016 by Geratech Technology.
All Rights Reserved.
TRADEMARK ACKNOWLEDGMENTS
All products or service names mentioned in this document may be trademarks of the
companies with which they are associated.

EGE-HDMV-441SL
4×1 HDMI Seamless Quad Switcher
SAFETY PRECAUTIONS
Please read all instructions before attempting to unpack, install or operate this equipment
and before connecting the power supply.
Please keep the following in mind as you unpack and install this equipment:
• Always follow basic safety precautions to reduce the risk of re, electrical shock and
injury to persons.
• To prevent re or shock hazard, do not expose the unit to rain, moisture or install this
product near water.
• Never spill liquid of any kind on or into this product.
• Never push an object of any kind into this product through any openings or empty slots
in the unit, as you may damage parts inside the unit.
• Do not attach the power supply cabling to building surfaces.
• Use only the supplied power supply unit (PSU). Do not use the PSU if it is damaged.
• Do not allow anything to rest on the power cabling or allow any weight to be placed
upon it or any person walk on it.
• To protect the unit from overheating, do not block any vents or openings in the unit
housing that provide ventilation and allow for sufcient space for air to circulate around
the unit.
REVISION HISTORY
VERSION NO. DATE (DD/MM/YY) SUMMARY OF CHANGE
VR0 07/03/16 Preliminary release
VS1 20/02/17 Updated text and diagrams

EGE-HDMV-441SL
4×1 HDMI Seamless Quad Switcher
CONTENTS
1. Introduction.........................................................................1
2. Applications ........................................................................1
3. Package Contents ..............................................................1
4. System Requirements........................................................1
5. Features...............................................................................2
6. Operation Controls and Functions ...................................2
6.1 Front Panel......................................................................2
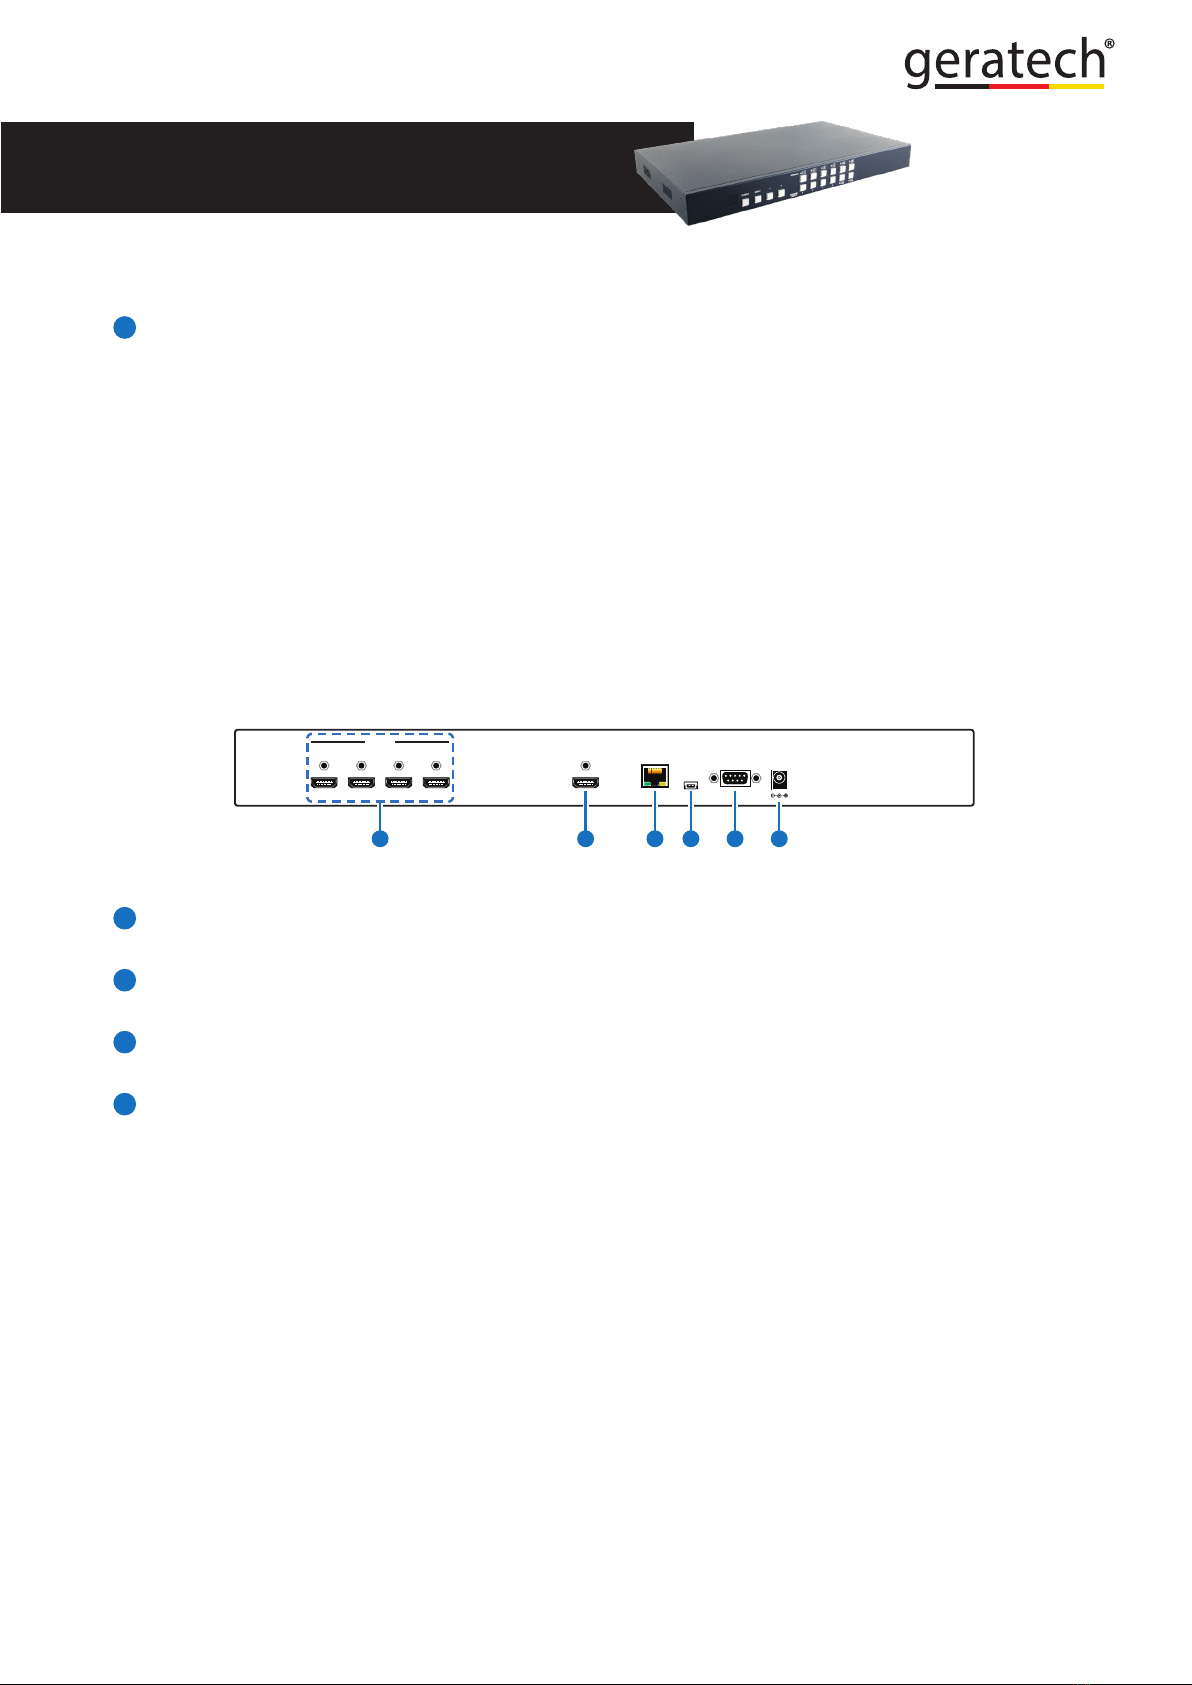
6.2 Rear Panel.......................................................................3
6.3 Remote Control ...............................................................4
6.4 OSD Menu.......................................................................5
6.5 RS-232 Protocol ............................................................ 11
6.6 RS-232 and Telnet Commands .....................................12
6.7 Telnet Control ................................................................20
6.8 WebGUI Control ............................................................22
6.8.1 Image Adjust ..........................................................23
6.8.2 Image Swap...........................................................23
6.8.3 Output Resolution ..................................................24
6.8.4 Windows Setup......................................................24
6.8.5 OSD/LOGO Settings..............................................25
6.8.6 Window Convert ....................................................26
6.8.7 Chromakey Setup ..................................................26
6.8.8 Ethernet .................................................................27
7. Connection Diagram ........................................................28
8. Specications ...................................................................29
8.1 Technical Specications ................................................29
8.2 Video Specications ......................................................30
9. Acronyms .......................................................................32

EGE-HDMV-441SL
4×1 HDMI Seamless Quad Switcher
1
1. INTRODUCTION
This HDMI Switcher is a high performance, low latency, multi-windowing system that can
be easily congured for a variety of professional video processing tasks. Up to 4 different
input sources may be freely selected and arranged and output to a single display. When
switched into single window mode the unit can be a seamless switcher with cross-fade
support, or two sources can be combined with the use of chroma keying. 90-degree
rotation is also supported when outputting a single full screen window. Additionally, the
unit supports the option of uploading a graphic logo for display over the top of the output
video. Video resolutions up to 1080p60 and PC resolutions up to WUXGA are supported
along with audio up to 192kHz, 7.1 channel, LPCM for both inputs and output. The unit can
be controlled in a wide variety of ways, including via front panel buttons with OSD menu,
WebGUI, Telnet, RS-232, and IR remote.
2. APPLICATIONS
• Broadcasting control rooms
• Surveillance rooms
• Public commercial displays
• Video conference and digital presentation boardrooms
3. PACKAGE CONTENTS
• 1×4 by 1 HDMI Switcher with PiP/PoP & Multi-Window Display
• 1×Remote Control (CR-124)
• 1×12A/3A Power Adaptor
• 1×Rack Mount Ears (Set of 2)
• 1×Operation Manual
4. SYSTEM REQUIREMENTS
• HDMI source equipment such as media players, video game consoles or set-top boxes.
• HDMI receiving equipment such as HDTVs, monitors or audio ampliers.

EGE-HDMV-441SL
4×1 HDMI Seamless Quad Switcher
2
5. FEATURES
• Seamless switching between sources and windows
• Supports PiP, PoP, and multi-window display
• Easy individual window size and position and layer priority adjustment
• Enlarge or shrink up to 4 input windows
• Crossfade, chroma key, mirror, and rotation (90˚ left/right and 180˚) functions
• Supports the uploading of a user customizable graphic for display over the top of video
output
• 8 hot keys dedicated to window and source selection, 4 customizable window layout hot
keys, and 4 software-only hot keys for additional stored window layout congurations
• Control via front panel with OSD menu, WebGUI, Telnet, RS-232, and IR remote
6. OPERATION CONTROLS AND FUNCTIONS
6.1 Front Panel
1234
4
1
2
3
1
POWERMENU
CHANNEL
INPUT
WINDOW 23 4
21
34
ABCDE
GH
F
234
1
34
12
-
+
1 2 3 4 65
1IR WINDOW: Accepts IR signals from the included IR remote for control of this unit only.
2POWER: Press this button to power the unit on or place it into stand-by mode. In stand-
by mode the button will be lit RED.
3MENU: Press this button to enter the OSD menu, or to back out from menu items.
4-/+: Press these buttons to move up and down or adjust selections within menus.
5CHANNEL INPUT 1~4: Press these buttons to sequentially switch through the available
inputs for each associated window channel

EGE-HDMV-441SL
4×1 HDMI Seamless Quad Switcher
3
(1~4). It is possible for a single input to be displayed in multiple windows simultaneously.
6WINDOW A~H: Press buttons A~D will put the unit into full screen single window
mode and display the associated channel’s currently selected source (1~4). Switching
between windows A~D is seamless, and if the “Fade” option has been turned on a
crossfade will occur during the switch.
Press buttons E~H will put the unit into multi-window mode, allowing it to display up to 4
channels simultaneously, and display the associated pre-saved channel window layout.
The individual channel window positions, sizes and depth priority can be fully congured
via OSD menu, WebGUI, etc. Any changes made to channel position, size or depth will
be automatically applied and saved to the current Window. By default the channel depth
priority is (top to bottom): CH4 > CH3 > CH2 > CH1.
6.2 Rear Panel
RS232 DC 12V
USB
SERVICE
ONLY
CONTROL
HDMI OUT
4321
HDMI IN
2 3 4 651
1HDMI IN 1~4: Connect to HDMI source equipment such as media players, game
consoles or set-top boxes.
2HDMI OUT: Connect to an HDMI TV, monitor or amplier for digital video and audio
output.
3CONTROL: Connect directly, or through a network switch, to your PC/laptop to control
the unit via Telnet/WebGUI.
4USB SERVICE ONLY: This slot is reserved for rmware update, logo le upload, and
factory use only.
Logo le requirements: A 256 color bitmap (.bmp) le with a maximum resolution of
512×512 pixels.
Upload procedure: Enter the OSD menu and activate the Load New Logo function (I/
O Setup→LOGO Settings→Load New LOGO→Yes) to activate the mini-USB port. The
Window A and CH1 button LEDs will illuminate to indicate it has entered logo update
mode. You may now connect the unit to your PC via a mini-USB to

EGE-HDMV-441SL
4×1 HDMI Seamless Quad Switcher
4
USB cable. The unit should appear as an empty USB drive on your PC named “USB
UPDATE”.
Drag or copy the logo le into the new “USB UPDATE” drive on your PC and the upload
will automatically proceed. All Window and Channel buttons will be illuminated while the
upload is in process. After 1~2 minutes the device will automatically reboot and the logo
will be available for use.
5RS-232: Connect directly to your PC/laptop to send RS-232 commands to control the
unit.
6DC 12V: Plug the 12V DC power adapter into the unit and connect it to an AC wall outlet
for power.
6.3 Remote Control
1Power: Press to power the unit on or place it into
stand-by mode.
2Info: Press to show the unit’s rmware version.
3CH 1~CH 4: Press to sequentially switch through
the available inputs for each associated window
channel (1~4).
4WA~WH: Press these buttons to select the desired
window arrangement for output. WA~WD are for
full screen, single window, video output. WE~WH
are for multi-window pre-saved channel layouts.
5Mute: Press to mute the audio from the HDMI
output.
6
▲/▼/◄/► & OK: Press the arrows to navigate
the OSD menu and press OK to conrm selections.
7Menu: Press to enter the OSD menu.
8Exit: Press to back out from menu items, or to exit
the OSD menus.
9Audio 1~Audio 4: Press to select the active audio
source from HDMI input source 1~4.
10 FAV. 1~FAV. 4: Press to activate one of the 4
additional pre-saved channel layouts.
11 Fade-In-Out*: Press to toggle the Fade-in-out
function on/off.

EGE-HDMV-441SL
4×1 HDMI Seamless Quad Switcher
5
Chroma Key*: Press to toggle the Chroma Key function on/off.
Note: Channel 1 is always the background and channel 2 is always the keyed
foreground image.
Mirror*:
Press to display current channel mirrored (left/right).
Rotation*:
Press to rotate the image 90˚ left, 90˚ right or 180˚.
Note: For functions with asterisks (*) only work on Windows A~D. The unit will
automatically switch to Window A if they are activated while displaying Windows E~H.
6.4 OSD Menu
LEVEL 1 LEVEL 2 LEVEL 3 LEVEL 4
I/O Setup Output
Resolution
480p
576p
720p50
720p60
1080p24
1080p25
1080p30
1080p50
1080p60
1024×768
1280×800
1280×1024
1366×768
1440×900
1600×900
1600×1200
1680×1050
1920×1200
Native
Menu Exit

EGE-HDMV-441SL
4×1 HDMI Seamless Quad Switcher
6
LEVEL 1 LEVEL 2 LEVEL 3 LEVEL 4
I/O Setup
(cont.)
Output Windows Window A
Window B
Window C
Window D
Window E
Window F
Window G
Window H
Output Windows Win Fav 1
Win Fav 2
Win Fav 3
Win Fav 4
Menu Exit
OSD Settings Info Display On/Off
H Offset 0~20 (5)
V Offset 0~20 (5)
Timeout Off~50 (10)
Transparent 0~10 (2)
Menu Exit
Logo Settings Logo Display On/Off
Logo H-Pos 0~74 (73)
Logo V-Pos 0~68 (6)
Load Def Logo On/Off
Load New Logo On/Off
Menu Exit
Menu Exit

EGE-HDMV-441SL
4×1 HDMI Seamless Quad Switcher
7
LEVEL 1 LEVEL 2 LEVEL 3 LEVEL 4
Image Adjust Brightness
Adjust
CH1 0~100 (50)
CH2 0~100 (50)
CH3 0~100 (50)
CH4 0~100 (50)
Value Reset
Menu Exit
Contrast Adjust CH1 0~100 (50)
CH2 0~100 (50)
CH3 0~100 (50)
CH4 0~100 (50)
Value Reset
Menu Exit
Hue Adjust CH1 0~100 (50)
CH2 0~100 (50)
CH3 0~100 (50)
CH4 0~100 (50)
Value Reset
Menu Exit
Saturation CH1 0~100 (50)
CH2 0~100 (50)
CH3 0~100 (50)
CH4 0~100 (50)
Value Reset
Menu Exit
Image Still
Adjust
CH1 On/Off
CH2 On/Off
CH3 On/Off
CH4 On/Off
Value Reset
Menu Exit
Image Adjust
(cont.)
Image Swap CH 1 CH 2 Swap
CH 1 CH 3 Swap
CH 1 CH 4 Swap
CH 2 CH 3 Swap
CH 2 CH 4 Swap
CH 3 CH 4 Swap

EGE-HDMV-441SL
4×1 HDMI Seamless Quad Switcher
8
LEVEL 1 LEVEL 2 LEVEL 3 LEVEL 4
Window
Setup
Channel 1~4
Select
Size Width Unit
Width Ten
Width Hundred
Height Unit
Height Ten
Height Hundred
Value Rest
Menu Exit
Position Width Unit
Width Ten
Width Hundred
Height Unit
Height Ten
Height Hundred
Value Rest
Menu Exit
Image Output On/Off
Priority 1/2/3/4
Window Reset
Menu Exit
Window
Setup (cont.)
Label Select Video 1
Video 2
Video 3
Video 4
Menu Exit
Fav. Store FAV 1 Store On/Off
FAV 2 Store On/Off
FAV 3 Store On/Off
FAV 4 Store On/Off
Menu Exit
Menu Exit
Window
Convert
Channel 1~4
Convert
Mirror On/Off
Fade In-Out Off/1.0/1.1/1.2/1.3/1.4/1.5/1.6/1.7/1.8/1.9
/2.0/2.1/2.2/2.3/2.4/2.5/2.6/2.7/2.8/2.9/3.0
Rotation L90/R90/180/Off
Window Reset
Menu Exit
Menu Exit

EGE-HDMV-441SL
4×1 HDMI Seamless Quad Switcher
9
LEVEL 1 LEVEL 2 LEVEL 3 LEVEL 4
Chromakey
Setup
User 1 Minimum for R/G/B 000~255 (0)
Maximum for R/G/B 222~255 (255)
User 2 Minimum for R/G/B 000~255 (0)
Maximum for R/G/B 222~255 (255)
White Minimum for R/G/B 000~255 (233)
Maximum for R/G/B 222~255 (255)
Yellow Minimum for R/G/B 000~255 (233/233/0)
Maximum for R/G/B 222~255 (255/255/16)
Cyan Minimum for R/G/B 000~255 (233/0/233)
Maximum for R/G/B 222~255 (255/16/255)
Chromakey
Setup
(cont.)
Green Minimum for R/G/B 000~255 (233/0/0)
Maximum for R/G/B 222~255 (255/16/16)
Magenta Minimum for R/G/B 000~255 (0/233/233)
Maximum for R/G/B 222~255 (16/255/255)
Red Minimum for R/G/B 000~255 (0/233/0)
Maximum for R/G/B 222~255 (0/233/0)
Blue Minimum for R/G/B 000~255 (0/0/232)
Maximum for R/G/B 222~255 (16/16/255)
Black Minimum for R/G/B 000~255 (0)
Maximum for R/G/B 222~255 (16)
Chromakey On/Off
Menu Exit
Ethernet
Setup
IP Mode Static/DHCP
Static Set IP/Mask/Gate
Byte1 High 192 (192)
Byte2 168 (168)
Byte3 1 (1)
Byte4 Low 50 (50)
Time Out Off/10/20/30/40/50/
60min
Re-Link No/Yes
Menu Exit
Audio Setup Audio Source Mute/CH1~CH4
Sys Reset On/Off
Information Screen HDMI
Native
F/W Version
F/W Upgrade
Menu Exit
Menu Exit

EGE-HDMV-441SL
4×1 HDMI Seamless Quad Switcher
10
Note:
• Values in bold or ( ) are factory default settings.
• The “Chromakey Setup” feature only works with Inputs 1 & 2. Input 1 is always the
background video and Input 2 is always the top layer with the key applied to it. The
part of Input 2 that is to be keyed out (removed) should, ideally, be a single color that
is not used anywhere else in the source signal. Typically this is accomplished by using
a special blue or green screen behind the recorded video subject. The Red, Green,
and Blue key values should be set with as small a range between the minimum and
maximum as possible while still maintaining a clean key to help avoid accidental removal
of normal video content. When Input 1 or 2 has no live source a warning message will
appear on the OSD.
• Consult the OSD (“Ethernet Steup” menu) to view the current IP settings if necessary.
An Ethernet re-link is required after every IP change.

EGE-HDMV-441SL
4×1 HDMI Seamless Quad Switcher
11
6.5 RS-232 Protocol
SWITCHER
►
◄
REMOTE CONTROLLER
Pin Assignment Pin Assignment
1 NC 1 NC
2 Tx 2 Rx
3 Rx 3 Tx
4 NC 4 NC
5 GND 5 GND
6 NC 6 NC
7 NC 7 NC
8 NC 8 NC
9 NC 9 NC
Baud Rate: 115200bps
Data Bits: 8
Parity: None
Flow Control: None
Stop Bits: 1

EGE-HDMV-441SL
4×1 HDMI Seamless Quad Switcher
12
6.6 RS-232 and Telnet Commands
COMMAND DESCRIPTION
HELP/? Displays all available commands.
SPOW M Turn the unit’s power on or off (stand-by).
M = 0 [off], 1 [on]
RPOW Display the current power state.
SRES M Set the output resolution.
Available values for M:
0 [480p@60Hz]
1 [576p@50Hz]
2 [720p@50Hz]
3 [720p@60Hz]
4 [1080p@24Hz]
5 [1080p@25Hz]
6 [1080p@30Hz]
7 [1080p@50Hz]
8 [1080p@60Hz]
9 [1024×768@60Hz]
10 [1280×800@60Hz]
11 [1280×1024@60Hz]
12 [1366×768@60Hz]
13 [1440×900@60Hz]
14 [1600×900@60Hz]
15 [1600×1200@60Hz]
16 [1680×1050@60Hz]
17 [1920×1200@60Hz]
18 [Native] (Default = Native)
RRES Display the current output resolution.
SIOSDD M Enable/Disable on-screen information display.
M = 0 [off], 1 [on] (Default = 0)
RIOSDD Display the current state of the on-screen
information display.
SOSDH M Set the OSD’s horizontal position.
M = 0~20 (Default = 5)
ROSDH Display the OSD’s current horizontal position.
SOSDV M Set the OSD’s vertical position.
M = 0~20 (Default = 5)
ROSDV Display the OSD’s current vertical position.
SOSDT M Set the OSD’s visibility duration.
M = 0 [OSD off], 5~50 [5~50 seconds] (Default =
10)
ROSDT Display the current OSD visibility duration.

EGE-HDMV-441SL
4×1 HDMI Seamless Quad Switcher
13
COMMAND DESCRIPTION
SOSDG M Set the transparency level of the OSD.
M = 0~10 (Default = 5)
ROSDG Display the current OSD transparency value.
SBRI N M Set the brightness value for a channel.
N = 0 [all channels], 1~4 [single channel]
M = 0~100 (Default = 50)
RBRI N Display the current brightness value for the
specied channel.
N = 0 [all channels], 1~4 [single channel]
SCON N M Set the contrast value for a channel.
N = 0 [all channels], 1~4 [single channel]
M = 0~100 (Default = 50)
RCON N Display the current contrast value for the
specied channel.
N = 0 [all channels], 1~4 [single channel]
SSAT N M Set the saturation value for a channel.
N = 0 [all channels], 1~4 [single channel]
M = 0~100 (Default = 50)
RSAT N Display the current saturation value for the
specied channel.
N = 0 [all channels], 1~4 [single channel]
SHUE N M Set the hue value for a channel.
N = 0 [all channels], 1~4 [single channel]
M = 0~100 (Default = 50)
RHUE N Display the current hue value for the specied
channel.
N = 0 [all channels], 1~4 [single channel]
SSTILL N M Set the image freeze state for a channel.
N = 0 [all channels], 1~4 [single channel]
M = 0 [off], 1 [on] (Default = 0)
RSTILL N Display the current image freeze state for a
channel.
N = 0 [all channels], 1~4 [single channel]

EGE-HDMV-441SL
4×1 HDMI Seamless Quad Switcher
14
COMMAND DESCRIPTION
SSWAP M Activate the image swap feature between the
specied channels.
Available values for M:
0 [Swap CH1 & CH2]
1 [Swap CH1 & CH3]
2 [Swap CH1 & CH4]
3 [Swap CH2 & CH3]
4 [Swap CH2 & CH4]
5 [Swap CH3 & CH4]
RSWAP M Display current image swap settings for the
specied channel pairs.
Available values for M:
0 [CH1 & CH2 current sources]
1 [CH1 & CH3 current sources]
2 [CH1 & CH4 current sources]
3 [CH2 & CH3 current sources]
4 [CH2 & CH4 current sources]
5 [CH3 & CH4 current sources]
SPIRE Reset the brightness, contrast, saturation and
hue values for all channels to their defaults.
SIMRE M Reset the brightness, contrast, saturation or hue
value for all channels to its default.
Available values for M:
1 [brightness]
2 [contrast]
3 [saturation]
4 [hue]
SHSIZE N M Set the horizontal size (in pixels) of the specied
channel.
N = 1~4 [channel]
M = 0~X (Max value of X depends on the
current resolution.)
RHSIZE N Display the current horizontal size of the
specied channel.
N = 1~4 [channel]
SVSIZE N M Set the vertical size (in pixels) of the specied
channel.
N = 1~4 [channel]
M = 0~X (Max value of X depends on the
current resolution.)

EGE-HDMV-441SL
4×1 HDMI Seamless Quad Switcher
15
COMMAND DESCRIPTION
RVSIZE Display the current vertical size of the specied
channel.
N = 1~4 [channel]
SHPOS N M Set the horizontal position (in pixels) of the top-
left pixel of the specied channel.
N = 1~4 [channel]
M = 0~X (Max value of X depends on the
current resolution.)
RHPOS Display the current horizontal position of the
specied channel.
N = 1~4 [channel]
SVPOS N M Set the vertical position (in pixels) of the top-left
pixel of the specied channel.
N = 1~4 [channel]
M = 0~X (Max value of X depends on the
current resolution.)
RVPOS Display the current vertical position of the
specied channel.
N = 1~4 [channel]
SIMAGE N M Enable or disable the display of the specied
channel.
N = 1~4 [channel]
M = 0 [disable], 1 [enable]
RIMAGE N Display the current display status of a channel.
N = 0 [all channels], 1~4 [single channel]
SPRI N M Set channel window layer priority (1 = top, 4 =
bottom).
N = 1~4 [channel]
M = 1~4 [priority]
RPRI N Show the selected channel’s window layer
priority.
N = 0 [all channels], 1~4 [single channel]
SLABEL N “Name” Assign a name to a channel.
N = 1~4 [channel]
“Name” = Up to 9 alphanumeric characters.
RLABEL Display the selected channel’s name.
N = 0 [all channels], 1~4 [single channel]
SSTORE M Save the current channel window arrangement
to a user Favorite (FAV) slot.
M = 1~4 [FAV 1~FAV 4]
Table of contents
Other geratech Switch manuals
Popular Switch manuals by other brands

HP
HP HP ProCurve series 2500 Management and configuration guide

GESTRA
GESTRA NRS 1-56 Original Installation & Operating Manual

Pfeiffer Vacuum
Pfeiffer Vacuum OHA 200 operating instructions

Alpha Arsenal
Alpha Arsenal polus gsm operating manual

Dell
Dell Z9000 Configuration guide

CAMDEN
CAMDEN CM-9800 installation instructions