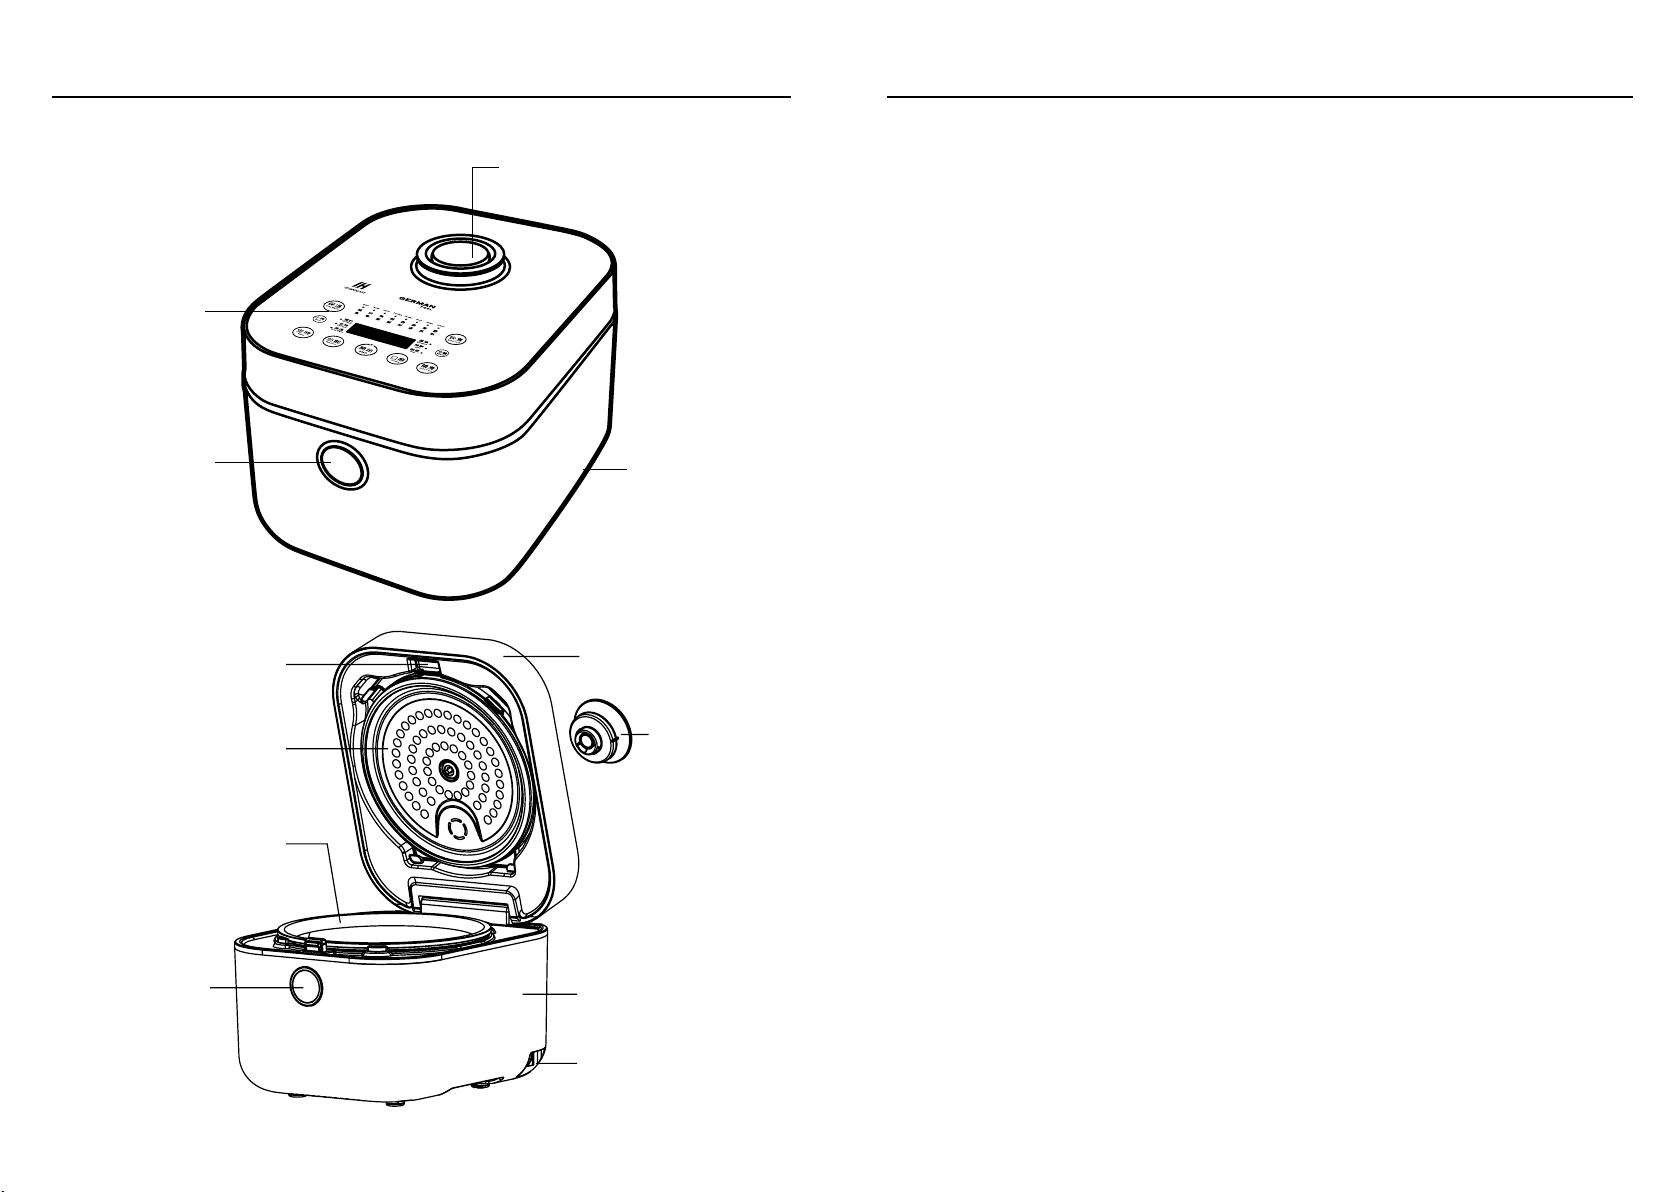
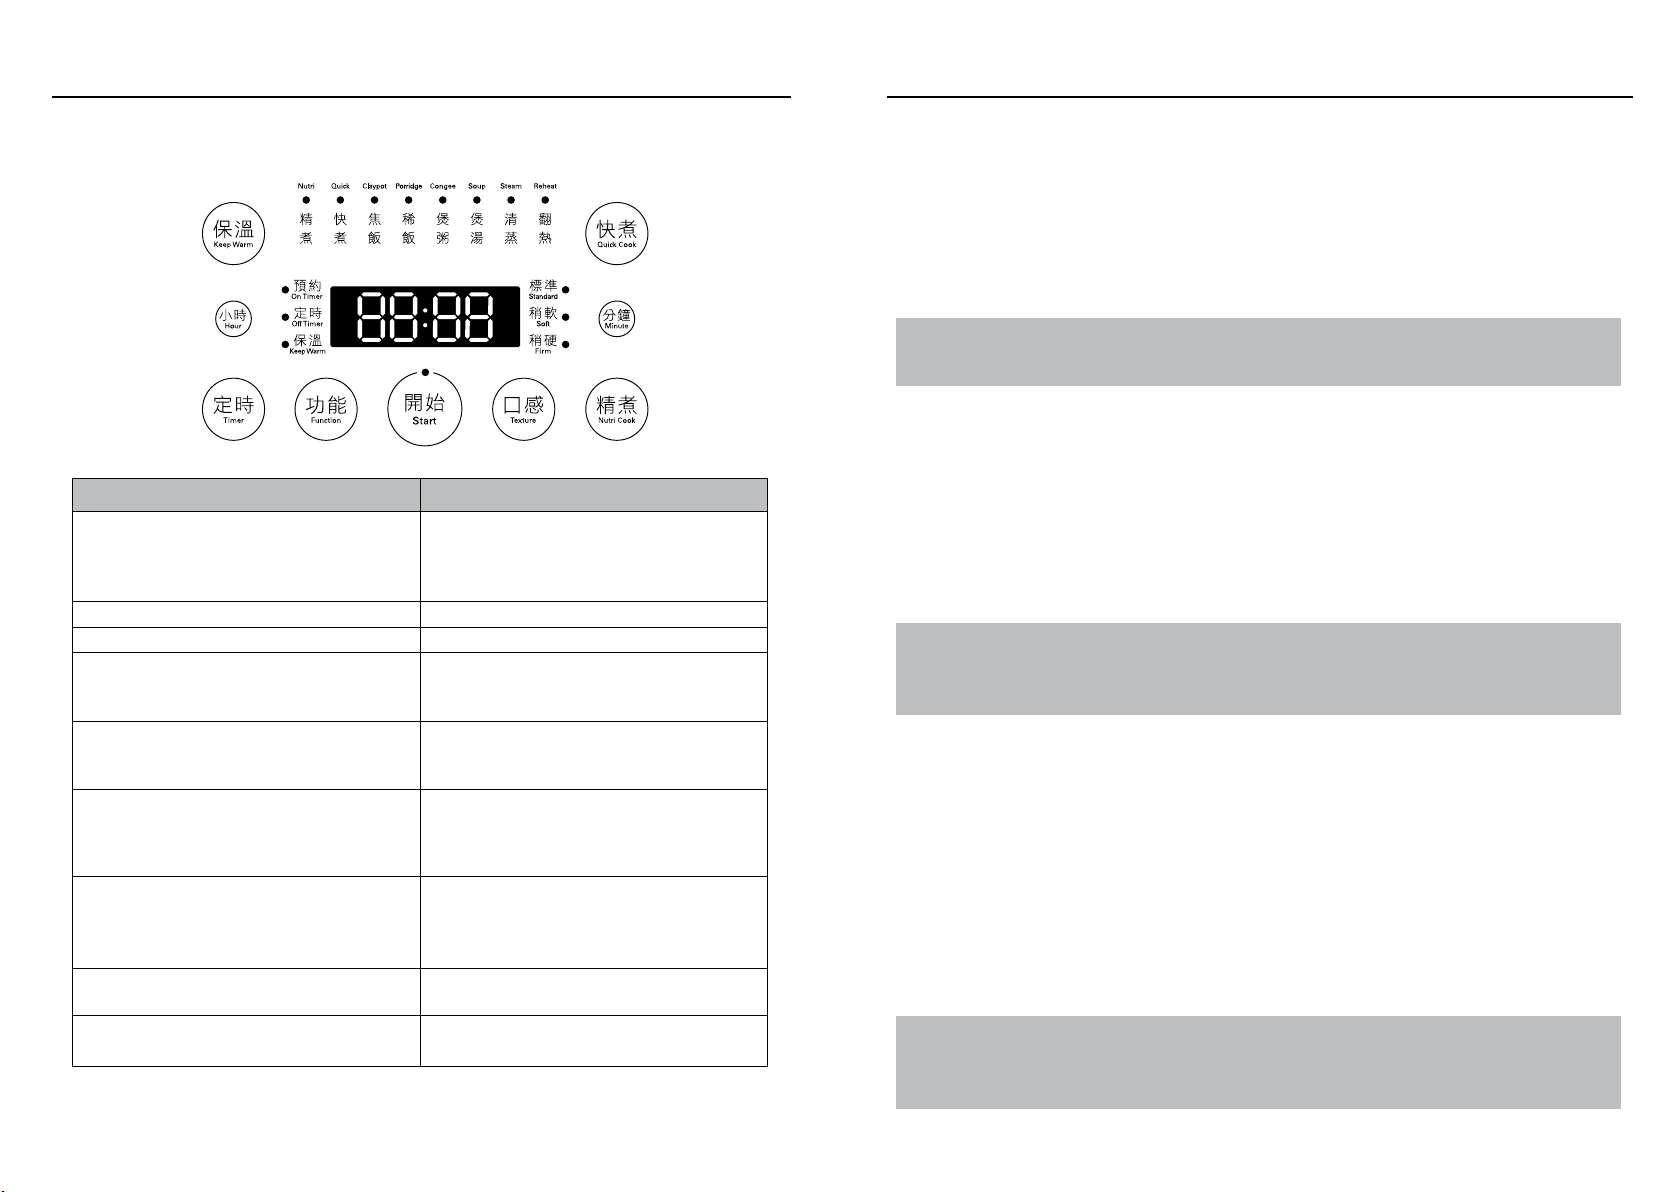
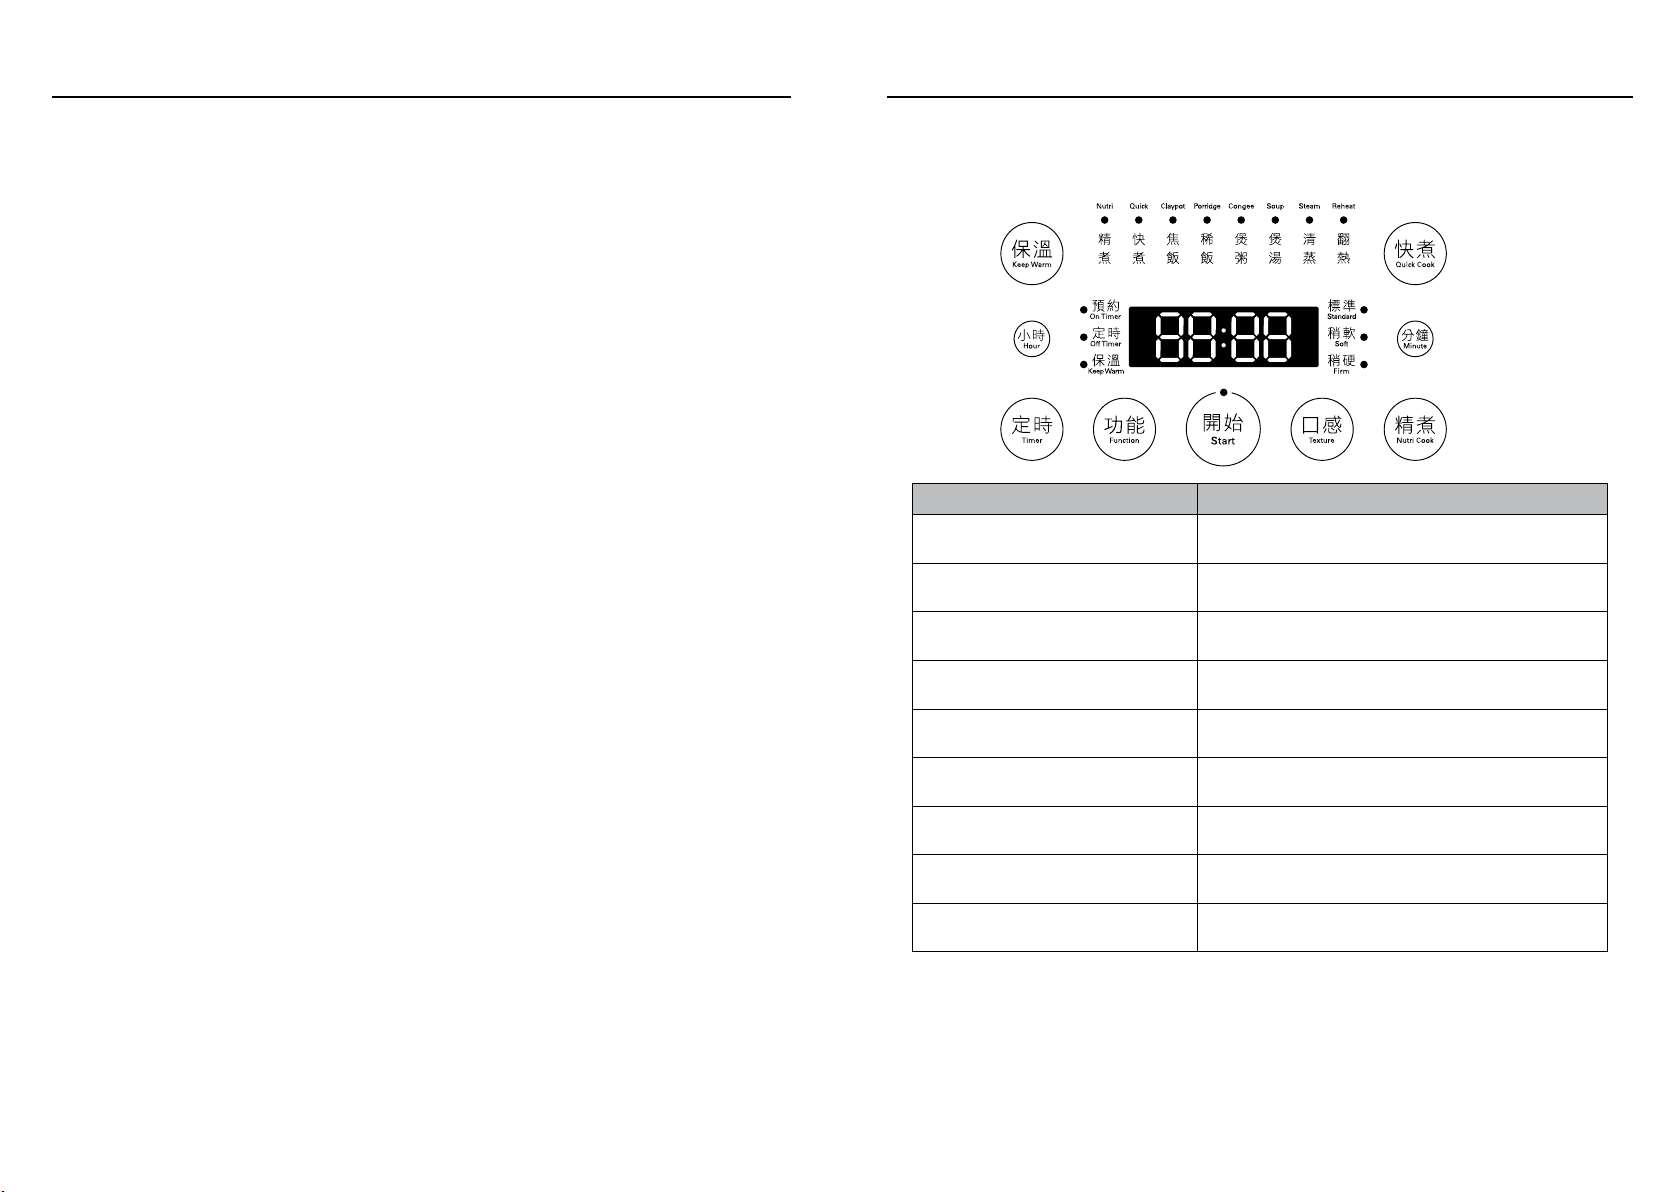
German pool IRC-150 User manual

P.1
360° Multi-Oscillation Fan RHS-126
Please read these instructions and warranty information carefully
before use and keep them handy for future reference.
Online Warranty Registration
USER MANUAL
IH Multifunctional Rice Cooker IRC-150

P.3P.2
Table of Contents
Warnings & Safety Precautions
Product Structure
Operating Instructions
Cleaning & Maintenance
Troubleshooting
Technical Specication
Warranty Terms & Conditions
03
04
05
10
11
12
23
Warnings & Safety Precautions
1. Read all instructions before using, and keep this manual for future reference.
2. This product is only intended for home use only, not suitable to use in other contexts.
3. This appliance has been incorporated with a grounded plug. Please ensure the wall outlet in your
house is well earthed; do not use with adaptors or share socket with other appliances.
4. Do not use with adaptors or share socket with other appliances.
5. Do not place this product in a humid location, on unstable surfaces or near re or heat source.
6. Do not heat the inner pot directly on the gas stove.
7. Place the product out of reach of children. Accidental trigger of the control buttons can lead to
malfunction.
8. When the product is in use, keep face and hands away from the lid or steam vent as they can be
very hot.
9. Do not pour water on the product or immerse the product in water to avoid damaging the safety
features of the product.
10. When product is in use, do not cover the steam vent with cloth to avoid causing the lid to deform
or discolor.
11. Please use the power cord with care, do not overly pull or bend the cord, and do not pull on the
cord when unplugging. Grip the plug rmly by hand to unplug.
12. Do not use this product to cook acidic or alkaline foods to avoid causing corrosion to the inner pot.
13. To avoid scratching the pot coating, do not use rice scoops other than the original one included
with the product, and only use soft cloth or sponge to clean the inner pot. After prolonged use, the
pot coating may come off, but it will not affect the hygiene and usage of the pot.
14. Persons with cardiac pacemakers must consult with their doctor before using this product, as this
product may affect the functioning of pacemakers.
15. Please clean the aluminum lid, silicone ring and steam vent promptly after cooking to avoid odor
forming and affecting future cooking.
16. When is use, should the product malfunction or control panel displays any of the error codes,
immediately stop using the product, unplug from the power source and contact German Pool
Customer Service and Repair Centre. Do not replace with non-original parts or disassemble and
repair by yourself.
17. DO NOT operate this product with an external timer or remote control system.
18. Use only power cord from original manufacturer for this product. If power cord is damaged, please
contact Customer Service & Repair Centre to have it replaced.

P.5P.4
Product Structure
Steam Vent
Power Cord
Interface
Control Panel
Lid Lock Release
Button
Aluminum Inner
Lid Release Lock
Detachable
Aluminum Inner Lid
Inner Pot
Lid Lock Release
Button MainBody
Detachable Air
Valve
Outer Lid
Power Cord
Interface
Before Initial Use
1. Remove the product and all accessories from the packing.
2. Press Lid Lock Release Button and open the outer lid.
3. Take out the inner pot and detachable aluminum inner lid, wash with sponge or cloth moistened with
detergent.
4. Rinse clean, wipe dry all accessories and place them back properly.
Adding Ingredients
• The measuring cup included holds approximately 150gm.
• When using Nutri Cook, Quick Cook, Claypot, Porridge or Congee functions, place suitable amount of
rice and water into the inner pot.
• When using Steam function, place suitable amount of water in the inner pot, place on steamer (not
included), then place food inside the steamer.
• When using Claypot function, place suitable amount of food ingredients in the inner pot (on top of the
rice) when the buzzer beeps.
• When using Reheat function, place suitable amount of leftover food into the inner pot and add in a
suitable amount of water. It is recommended that the amount of leftover food not exceed 1/2 of the
inner pot capacity.
Adding Water
• Water marks in the inner pot are reference water levels for cooking rice and congee.
• Cooking rice: Scoop desired amount of raw rice with the measuring cup, put into inner pot and add the
corresponding amount of water (refer to water marks). The total amount of rice and water should not
exceed the maximum water mark.
• Adjust the amount of water according to your personal preference or different types of rice.
• Due to unstable voltage uctuation in certain areas, occasionally a small amount of rice water may
spill out, this is a normal phenomenon.
Installing the Inner Pot
• Make sure to wipe dry the outside of the inner pot, then gently place the pot into the cooker. Slightly
turn it left and right to make sure the pot is level.
• Close the outer lid lightly but rmly. When you hear a “click” it means the lid is properly closed.
Operation Instructions

P.7P.6
Control Panel
Key Description
Press once to enter function selection; press
repeatedly to cycle among Nutri Cook, Quick
Cook, Claypot, Porridge, Congee, Soup, Steam,
Reheat functions.
• Adjust On Timer and Off Timer.
• Each press will increase time by 5 minutes.
Adjustable range is 5-55 min.
• Adjust On Timer and Off Timer.
• Each press will increase time by 1 hour.
Adjustable range is 1-24 hr.
• In Cooking or Keep Warm status, press this
key to revert to Standby status.
• In Standby status, press to activate Keep
Warm mode.
• Texture setting is only available in Nutri
Cook mode.
• Press key to cycle among Standard, Soft or
Firm modes.
In Standby status or Function Selection status,
press this key to directly activate Quick Cook mode.
In Standby status or Function Selection status,
press this key to directly activate Nutri Cook mode.
Press to set On Timer or Off Timer.
Press to start selected function.
Nutri Cook
Quick Cook
Texture
Keep Warm/Cancel
Minute
Hour
Start
Timer
Function
Operation Instructions Operation Instructions
On Timer (On Delay Timer)
Use the On Timer to set the rice cooker to start cooking at a later time. For example, it is 1pm now;
if you want to eat at 6pm, set the On Timer to 5.0 hours. The rice cooker will start automatically and
nish cooking at 6pm.
1. Select cooking function, press Timer key until On Timer indicator lights up, and product enters
On Timer setting status.
Note:
On Timer cannot be used with Nutri Cook function.
2. Press Hour or Minute key to set timer.
3. Press Start key to conrm, Control Panel displays On Timer countdown.
4. When countdown is completed, cooking is also completed.
Off Timer (Off Delay Timer)
Use the Off Timer to set the cooking time of your selected function. For example, if you want your soup
to cook for 4 hours, set the Off Timer to 4.0 hours, and the rice cooker will nish cooking after 4 hours.
1. Select cooking function, press Timer key until Off Timer indicator lights up, and product enters Off
Timer setting status.
Note:
Off Timer can be used with Porridge, Congee, Soup, Steam and Reheat functions. Nutri Cook, Quick
Cook and Claypot functions all have preset durations and cannot be used with Off Timer.
2. Press Hour or Minute key to set timer.
3. Press Start key to start cooking, Control Panel displays Off Timer countdown.
4. When countdown is completed, cooking is also completed.
Nutri Cook Function
1. Press Function key to select Nutri Cook function, Nutri Cook indicator ashes.
2. Default texture is Standard. User may press Texture key to select desired texture.
3. Press Timer key to set On Timer if needed (for details, please see “On Timer” section).
4. Press Start key to start cooking. Panel will display a running LED light.
5. When the water in the inner pot is cooked dry, rice cooker enters rice-braising stage. Panel displays
rice-braising time.
6. When rice-braising is completed, buzzer will beep and cooker enters Keep Warm status, Keep Warm
indicator lights up, panel displays keep warm time.
Note:
In Standby status or Function Selection status, user may press Nutri Cook to directly start cooking.
Default texture is Standard and not adjustable if using the Nutri Cook key.

P.9P.8
Operation Instructions Operation Instructions
Quick Cook Function
1. Press Function key to select Quick Cook function, Quick Cook indicator ashes.
2. Press Start key to start cooking. Panel will display a running LED light.
3. When the water in the inner pot is cooked dry, rice cooker enters rice-braising stage. Panel displays
rice-braising time.
4. When rice-braising is completed, buzzer will beep and cooker enters Keep Warm status, Keep Warm
indicator lights up, panel displays keep warm time.
Note:
In Standby status or Function Selection status, user may press Quick Cook key to directly start cooking.
Claypot Function
1. Press Function key to select Claypot function, Claypot indicator ashes.
2. Press Timer key to set On Timer if needed (for details, please see “On Timer” section).
3. Press Start key to start cooking. Panel will display a running LED light.
4. After cooking for a while, buzzer will beep, please open the lid and put in the rest of your claypot rice
ingredients, then close lid and press Start key to continue cooking.
Note:
If there are no other ingredients to put in, simply press Start key to continue cooking when the buzzer beeps.
5. After cooking for a while, rice cooker enters rice-braising stage. Panel displays rice-braising time.
6. When rice-braising is completed, buzzer will beep and cooker enters Keep Warm status, Keep Warm
indicator lights up, panel displays keep warm time.
Porridge/Congee/Soup Functions
1. Press Function key to select Porridge/Congee/Soup functions, the corresponding indicator will ash,
and panel displays default cooking time (porridge is 1:00/congee is 2:00/soup is 2:00).
2. Press Timer key to set On Timer or adjust Off Timer duration if needed (for details, please see “On
Timer” and “Off Timer” sections).
3. Press Start key to start cooking, panel displays timer countdown.
4. When cooking is completed, buzzer will beep and cooker enters Keep Warm status, keep Warm
indicator lights up, panel displays keep warm time.
Steam Function
1. Press Function key to select Steam function, Steam indicator ashes, panel displays default cooking
time (0:20).
2. Press Timer key to set On Timer or adjust Off Timer duration if needed (for details, please see “On
Timer” and “Off Timer” sections).
3. Press Start key to start cooking, panel displays timer countdown.
4. When cooking is completed, buzzer will beep and cooker enters Keep Warm status, Keep Warm
indicator lights up, panel displays keep warm time.
Reheat Function
1. Press Function key to select Reheat function, Reheat indicator flashes, panel displays default
cooking time (0:20).
2. Press Timer key to set On Timer or adjust Off Timer duration if needed (for details, please see “On
Timer” and “Off Timer” sections).
3. Press Start key to start cooking, panel displays timer countdown.
4. When cooking is completed, buzzer will beep and cooker enters Keep Warm status, Keep Warm
indicator lights up, panel displays keep warm time.

P.11P.10
Cleaning and Maintenance
WARNING!
Unplug from the power source and allow the product to cool down completely before cleaning.
• Clean the inner walls of the cooker by wiping with a wringed out damp cloth. Make sure food
residuals adhering to the rice cooker are completely cleaned off.
• Wipe off any rice or soup stain that may have adhered to the coil disk with a dry or wringed out
damp cloth.
• Outer walls of the cooker may be wiped with damp cloth moistened with soap. Use only dry cloth
to wipe the Control Panel.
• Rice scoop, soup ladle, inner pot, measuring cup and detachable aluminum lid can be soaked in
hot water, then washed with soft sponge.
Troubleshooting
Occasionally, you may encounter some problems that are of a minor nature and a service call may not
be necessary. Use this troubleshooting guide to identify possible problems you may be experiencing. If
problems cannot be resolved by this guide, please contact our Customer Service and Repair Centre.
Problem Solutions
Possible Causes
Indicator Lights do not
light up, and inner pot
doesn’t heat
Indicator Lights do not
light up, but inner pot
heats up
Indicator Lights light
up, but inner pot
doesn’t heat
• Rice gets burnt,
or cooker won’t
auto keep warm
• Congee boils over
and spills out
• Water doesn’t
boil when
cooking rice/
congee
Rice is under-cooked
or cooking time is too
long
The circuit board power is not
connected
• Power board damaged
• Power circuit connection
malfunction
• Main circuit control board
damaged
• Main sensor malfunction
• Coil ring damaged
• Circuitry board connection
failure
• Power board damaged
• Control Panel damaged
• Sensor malfunction
Rice hasn’t been allowed to braise
long enough
Inner pot has not been inserted
properly, and the bottom is un-level
There is foreign debris between the
inner pot and coil ring
• Inner pot has deformed
• Control Panel damaged
• Sensor malfunction
Let the rice braise longer in the pot
Wipe off debris with cloth
Turn inner pot slightly until it sits
level with the coil ring
Contact Customer Service & Repair
Centre
Main circuit control board damaged
Check that the product has been
turned on, and that the plug, fuse
and power cord are intact, and the
plug has been inserted completely
into the power socket
Contact Customer Service & Repair
Centre
Contact Customer Service & Repair
Centre
Contact Customer Service & Repair
Centre
Contact Customer Service & Repair
Centre

P.13P.12
Technical Specication
Troubleshooting
Error Code Solutions
Problem
E0
E1
E2
E3
E4
E5
E6
E7
E8
E9
E10
E11
EU
Inner circuitry malfunction,
product does not operate
properly
IGBT temperature too high
Grid voltage too low
Upper sensor open circuit
Upper sensor short circuit
Lower sensor open circuit
Lower sensor short circuit
IGBT open circuit
IGBT short circuit
Lower sensor overheated
Cooker detects there is no inner pot,
or that the pot material/size is not
appropriate
Upper sensor overheated
Insert the proper inner pot. If error
persists, contact Customer Service
& Repair Centre
Grid voltage too high
Contact Customer Service & Repair
Centre
Unplug and replug the power plug.
If error persists, contact Customer
Service & Repair Centre
After the voltage is restored, the
cooker will automatically return to
normal. If error persists, contact
Customer Service & Repair Centre
Unplug and replug the power plug.
If error persists, contact Customer
Service & Repair Centre
IRC-150
220 V ~ 50 Hz
1100 W
3.0 L
(H) 121 mm (Ø) 210.5 mm
(H) 230 mm (W) 248 mm (D) 302 mm
4.7 kg
Model
Voltage/Frequency
Power
Capacity
Inner Pot Dimensions
Dimensions
Net Weight
目錄
警告及注意事項
產品結構
使用說明
清潔與保養
故障檢修
技術規格
保用條款
14
15
16
20
21
22
23
Specications are subject to change without prior notice.
If there is any inconsistency or ambiguity between the English version and the Chinese version,
the Chinese version shall prevail.
Refer to www.germanpool.com for the most up-to-date version of the Operating Instructions.

P.15P.14
警告及注意事項
1. 使用前請詳細閱讀本說明書,並請妥善保存。
2. 本產品僅做為家庭使用,不適用於其他場所。
3. 必須使用帶有接地的牆式插座,插頭要插緊;切勿用萬用插座與其他電器同時使用。
4. 請勿與其他電器共用同一多孔插座。
5. 請勿將本產品放在潮濕、不穩定或靠近其他火源、熱源的地方。
6. 請不要將內鍋直接放於明火上加熱。
7. 請將本產品放在兒童手觸不到的地方,因為可能會觸動控制按鈕而造成故障。
8. 使用時,蒸氣口非常灼熱,請勿使臉或手貼近外蓋或蒸氣口。
9. 請勿浸水或淋洗本產品,以免影響電器的安全性能。
10. 使用時,請勿用布蓋住蒸氣口,以免鍋蓋變形或變色。
11. 請細心使用電源線,請勿過分用力拉扯或扭曲電線,拔下插頭時,需用手拿好插頭拔出。
12. 請勿使用本產品煮酸、鹼類食物,以免腐蝕內鍋。
13. 請勿用附件飯勺以外的物件盛飯,清洗內鍋時使用海棉類軟性物件清洗,以免劃傷內膽塗層。
內鍋在長時間使用後,塗層可能會脫落,對衛生和使用方面不會帶來不良影響。
14. 正在使用植入型起搏器的顧客,在使用本產品前,請先咨詢醫師。因為本產品的工作,起搏器
可能會受到影響。
15. 膠圈鋁蓋及蒸氣閥在使用後請盡快進行清洗,以免下次烹飪時有異味產生。
16. 使用過程中若有故障或顯示屏顯示故障代碼時,請先將插頭從插座拔出,切勿繼續使用,並與
本公司客戶服務及維修中心聯繫,切勿自行更換非原廠零件或自行拆卸維修。
17. 本產品不能在外接定時器或獨立的遙控控制系統的方式下運行。
18. 如果電源軟線損壞,必須用軟線或從其製造商或維修部買到的專用組件來更換。
產品結構
控制面板
蒸氣排氣口
電源線接口
面蓋
可拆卸排氣閥
拆卸鋁蓋按鈕
可拆卸鋁蓋
內鍋
開蓋按鈕 機身
電源線接口
開蓋按鈕

P.17P.16
使用說明
初次使用
1.從包裝盒中取出本產品及所有配件。
2.按下開蓋按鈕,打開鍋蓋。
3.取出內鍋、可拆卸鋁蓋,用海綿或乾布沾上洗潔精進行清潔。
4.清潔後小心擦乾各個部件並將其正常裝回原處。
加入食材
• 1量杯約為150克。
• 如使用「精煮」、「快煮」、「焦飯」、「稀飯」或「煲粥」功能,將適量的米和水放入內
鍋。
• 如使用「蒸煮」功能,將蒸籠(自備)放在已加入適量水的內鍋裡,再將適量的食物放入蒸籠
內。
• 如使用「焦飯」功能,請在飯煲提示後將適量的食材放入內鍋。
• 如使用「翻熱」功能,將適量冷飯放入內鍋後加入適量水。建議冷飯份量不超過內鍋容量的
1/2。
加水份量
• 內鍋內的水位線分別為煮飯、煮粥時的參考水位線。
• 煮飯前,先用量杯量取適量米,按內鍋水位線加水到相應水位,但加水均不要超過最高水位
線。
• 使用者可根據不同的米種以及對米飯軟硬程或的喜好來適當增減水量。
• 由於各地方電壓的不穩定性,如有輕微米湯溢出現象,屬於正常情況。
裝上內鍋
• 將內鍋外表面擦乾後放入機身,輕輕將內鍋左右旋轉,使內鍋放置平穩。
• 蓋好煲蓋,煲蓋要壓到位,壓下蓋時會發出「咔嚓」一聲。
使用說明
控制面板
按鍵 功能
進入功能選擇狀態,重複按鍵可循環選擇精煮、快煮、
焦飯、稀飯、煲粥、煲湯、蒸煮、翻熱功能。
• 調整預約及定時時間。
• 按鍵增加時間5分鐘,可調節範圍為5-55分鐘。
• 調整預約及定時時間。
• 按鍵增加時間1小時,可調節範圍為1-24小時。
• 烹調狀態或保溫狀態下,按鍵返回待機狀態。
• 待機狀態下,按鍵進入保溫狀態。
• 口感設定只適用於精煮功能。
• 按鍵循環選擇標準、稍軟、稍硬模式。
待機狀態或功能選擇狀態下,按鍵直接啟動快煮功能。
待機狀態或功能選擇狀態下,按鍵直接啟動精煮功能。
按鍵設定預約或定時功能。
按鍵開始所設定的工作狀態。
功能鍵
定時鍵
開始鍵
小時鍵
分鐘鍵
保溫/取消鍵
口感鍵
快煮鍵
精煮鍵

P.19P.18
預約功能
使用預約功能,設定電飯煲自動延時工作。例如現在是下午13:00,想在下午18:00吃飯,只需設定
預約時間為5.0小時,電飯煲會自動啟動,在18:00完成烹調。
1.選擇好所需烹調功能後,按「定時鍵」直至預約指示燈常亮,進入預約時間調整狀態。
注意:
快煮功能無預約功能。
2.按「小時鍵」或「分鐘鍵」調整預約時間。
3.按「開始鍵」確認,顯示屏顯示預約時間倒數。
4.倒數完成後,完成烹調。
定時功能
使用定時功能,設定烹調功能工作時間。例如想煲湯4小時,只需設定定時時間為4.0小時,電飯煲
會在4小時後完成烹調。
1.選擇好所需烹調功能後,按「定時鍵」直至定時指示燈常亮,進入定時時間調整狀態。
注意:
稀飯、煲粥、煲湯、清蒸及翻熱功能可設定定時時間,精煮、快煮及焦飯功能為預設時間,不可調整。
2.按「小時鍵」或「分鐘鍵」調整定時時間。
3.按「開始鍵」開始烹調,顯示屏顯示定時時間倒數。
4.倒數完成後,完成烹調。
精煮功能
1.按「功能鍵」選擇精煮功能,對應指示燈閃爍。
2.預設口感為標準,可按「口感鍵」選擇所需口感。
3.按「定時鍵」設定預約時間(如需要,詳見預約功能欄目)。
4.按「開始鍵」開始烹調,顯示屏顯示旋轉線框。
5.內鍋水乾後,進入燜飯階段,顯示屏顯示燜飯時間。
6.燜飯完成後,蜂鳴器發出提示聲,並進入保溫狀態,保溫指示燈常亮,顯示屏顯示保溫時間。
注意:
在待機狀態或功能選擇狀態下,可按「精煮鍵」直接開始烹調,預設口感為標準,不可調整。
使用說明
快煮功能
1.按「功能鍵」選擇快煮功能,對應指示燈閃爍。
2.按「開始鍵」開始烹調,顯示屏顯示旋轉線框。
3.內鍋水乾後,進入燜飯階段,顯示屏顯示燜飯時間。
4.燜飯完成後,蜂鳴器發出提示聲,並進入保溫狀態,保溫指示燈常亮,顯示屏顯示保溫時間。
注意:
在待機狀態或功能選擇狀態下,可按「快煮鍵」直接開始烹調。
焦飯功能
1.按「功能鍵」選擇焦飯功能,對應指示燈閃爍。
2.按「定時鍵」設定預約時間(如需要,詳見預約功能欄目)。
3.按「開始鍵」開始烹調,顯示屏顯示旋轉線框。
4.烹調一段時間後,蜂鳴器發出提示聲,此時請打開煲蓋放入食材,按「開始鍵」繼續烹調。
注意:
如無需加入食材,可直接按「開始鍵」繼續烹調。
5.烹調一段時間後,進入燜飯階段,顯示屏顯示燜飯時間。
6.燜飯完成後,蜂鳴器發出提示聲,並進入保溫狀態,保溫指示燈常亮,顯示屏顯示保溫時間。
稀飯/煲粥/煲湯功能
1.按「功能鍵」選擇稀飯/煲粥/煲湯功能,對應指示燈閃爍,顯示屏顯示預設定時時間(稀飯為
1:00/煲粥為2:00/煲湯為2:00)。
2.按「定時鍵」設定預約時間或調整定時時間(如需要,詳見預約功能/定時功能欄目)。
3.按「開始鍵」開始烹調,顯示屏顯示定時時間倒數。
4.烹調完成後,蜂鳴器發出提示聲,並進入保溫狀態,保溫指示燈常亮,顯示屏顯示保溫時間。
清蒸功能
1.按「功能鍵」選擇清蒸功能,對應指示燈閃爍,顯示屏顯示預設定時時間(0:20)。
2.按「定時鍵」設定預約時間或調整定時時間(如需要,詳見預約功能/定時功能欄目)。
3.按「開始鍵」開始烹調,顯示屏顯示定時時間倒數。
4.烹調完成後,蜂鳴器發出提示聲,並進入保溫狀態,保溫指示燈常亮,顯示屏顯示保溫時間。
翻熱功能
1.按「功能鍵」選擇翻熱功能,對應指示燈閃爍,顯示屏顯示預設定時時間(0:20)。
2.按「定時鍵」設定預約時間或調整定時時間(如需要,詳見預約功能/定時功能欄目)。
3.按「開始鍵」開始烹調,顯示屏顯示定時時間倒數。
4.烹調完成後,蜂鳴器發出提示聲,並進入保溫狀態,保溫指示燈常亮,顯示屏顯示保溫時間。
使用說明

P.21P.20
清潔與保養
警告!
清潔前必須拔出電源線插頭,待電飯煲完全冷卻後再開始清潔。
.煲身內側可使用擰乾的濕布擦拭,確保清除黏在電飯煲上的所有食物殘渣。
.飯粒、湯漬可能會附在線圈盤上,可用乾軟布或擰乾的濕布擦拭。
.煲身外側可用沾有肥皂水的濕布擦拭,並用乾軟布擦拭控制面板。
.飯勺、湯勺、內鍋、量杯、可拆卸鋁蓋可放入熱水浸泡,再用海綿清潔。
故障檢修
故障現象 解決方案
可能原因
指示燈不亮且內鍋不熱
指示燈不亮而內鍋發熱
指示燈亮而內鍋不熱
.飯煮焦或不能自動保溫
.煲粥時大量溢出
.煮飯/煲粥不沸騰
飯不熟或煮飯時間過長
電路板電源沒有接通
.電源板損壞
.電路板連線斷開
.主電路控制板損壞
.主傳感器故障
.線圈盤元件燒壞
.電路板連線部份斷開
.電源板損壞
.控制面板損壞
.傳感器異常
燜飯時間不夠
內鍋偏斜,一邊懸空
內鍋與線圈盤之間有異物
.內鍋變形
.控制面板損壞
.傳感器異常
按要求燜飯
內鍋輕輕轉動使其恢復正常
用抹布擦除乾淨
聯絡客戶服務及維修中心
主電路控制板損壞
檢查開關、插座、保險絲、電源線
是否完好,並插到位
聯絡客戶服務及維修中心
聯絡客戶服務及維修中心
聯絡客戶服務及維修中心
聯絡客戶服務及維修中心
在使用本產品時如遇到問題,請檢查以下事項。如問題無法解決,請聯絡客戶服務及維修中心。

P.23P.22
故障檢修
故障代碼 解決方案故障原因
E0
E1
E2
E3
E4
E5
E6
E7
E8
E9
E10
E11
EU
內部電路出現故障,無法正常工作
IGBT溫度過高
電網電壓過高
電網電壓過低
上傳感器開路
上傳感器短路
下傳感器開路
下傳感器短路
IGBT開路
IGBT短路
下傳感器超溫
上傳感器超溫
聯絡客戶服務及維修中心
拔除電源插頭再重新插上。如仍出
現故障,聯絡客戶服務及維修中心
電網電壓恢復後可自行恢復。如
仍出現故障,聯絡客戶服務及維
修中心
拔除電源插頭再重新插上。如仍出
現故障,聯絡客戶服務及維修中心
放入內鍋。如仍出現故障,聯絡客
戶服務及維修中心
電飯煲在工作狀態時檢測到無內
鍋、鍋具材質或尺寸不合適
IRC-150
220 V ~ 50 Hz
1100 W
3.0 L
(H) 121 mm (Ø) 210.5 mm
(H) 230 mm (W) 248 mm (D) 302 mm
4.7 kg
型號
電壓/頻率
功率
容量
內鍋尺寸
機身尺寸
淨重
技術規格
產品規格及設計如有變更,恕不另行通知。
中英文版本如有出入,一概以中文版為準。
本產品使用說明書以www.germanpool.com網上版為最新版本。
Unit B, G/F, Sunshine Kowloon Bay
Cargo Centre, 59 Tai Yip Street.
九龍大業街59號
三湘九龍灣貨運中心地下B室
IRC-150

P.24 IRC-150 -M-21(1)
G e rman Pool (Hong Kong) Limi t e d
www.germanpool.com
Hong Kong
Room 113. Newport Centre Phase II. 116 Ma Tau
Kok Road. Tokwawan. Kowloon. Hong Kong.
Tel: +852 2773 2888
Fax:+852 2765 8215
China
Tel:+86 757 2980 8308
Fax:+86 757 2980 8318
8th, Xinxiang Road, Wusha Industrial Park,
Daliang, Shunde, Foshan, Guangdong
3/F, Edificio Industrial Pou Fung,
145 Rua de Francisco Xavier Pereira, Macau
Tel:+853 2875 2699
Fax:+853 2875 2661
Macau
© All rights reserved. Copying, reproducing or using the contents of this manual is not allowed without prior authorization from German Pool, violators will be prosecuted.
HONG KONG TOP BRAND TEN YEAR
ACHIEVEMENT AWARD
Table of contents
Other German pool Rice Cooker manuals

German pool
German pool Ultimate URC-24 User manual

German pool
German pool MRC-105 User manual

German pool
German pool URC-8 User manual

German pool
German pool SRC-103 User manual

German pool
German pool URC-14R User manual

German pool
German pool MRC-205 User manual

German pool
German pool SRC-204 User manual

German pool
German pool URC-14 User manual

German pool
German pool IRC-501 User manual

German pool
German pool URC-6 User manual