German pool MKC-112 User manual

3-in-1 Anti-Mite UV Sterilising Cleaner
3合1除蟎殺菌吸塵機
MKC-112
Please read these instructions and warranty information carefully
before use and keep them handy for future reference.
在使用之前請詳細閱讀「使用說明書」及「保用條款」,並妥為保存。
即時網上登記保用
Online Warranty Registration
使 用 說 明 書US E R M A N U A L

P.3
目錄
安全注意事項
警告 4
注意 5
安全說明 5
操作說明
部件名稱 6
首次使用 7
使用方法 7
如何儲存 8
清潔與保養
清潔吸入口 9
清潔集塵桶 9
清潔集塵桶濾網 9
清潔紫外線殺菌燈管 10
如何清潔過濾海綿 10
常見問題及解決方案 11
技術規格 12
保用條款 23
請即進行保用登記﹗
有關保用條款細則,請看本說明書最後一頁。
Please register your warranty information now!
For Warranty Terms & Conditions,
please refer to the last page of this user manual.

P.4 P.5
安全注意事項
為安全起見,初次使用產品前請先細閱本說明書,並妥善保存,以便作參考之用。
本產品只供家居使用。請必須依照說明書內的指示安裝及操作。
警告:為降低失火、觸電或受傷的危險,使用吸塵機前,請遵照以下基本注意事項。
• 若插頭電線損壞,切勿使用,若機器無法正常工作,或發生摔落、損壞、放置於室外或掉
入水中等情況時,請將機器送回售後服務及維修中心。
• 清潔設備之前,請先拔下插頭,並使用乾毛巾擦拭,切勿直接使用水及揮發性液體清潔,
如酒精或乙醚等。
• 該產品適用於殺滅床單、被褥、梳化,地氈等各種棉製品上的細菌以及清除塵埃。
• 該產品是家用型吸塵機,請勿用於商業或工業用途以及吸塵機以外的其它用途。
• 身體、智力或者感官有缺陷的人,或者沒有經驗和能力的人以及兒童不能使用本產品。
• 切勿將多個電器設備的插頭接在同一個電源插座上。
• 拔下插頭前,請關閉本產品電源開關,請握住插頭,切勿直接拉拽電源線。
• 請勿用濕手接觸插頭或吸塵機。
• 清洗後,請勿使用濕的過濾網,務必等其完全乾燥,以免損壞吸塵機。
• 請勿吸入易燃或易爆物,也請勿在存在易燃易爆的區域內使用。
• 請勿吸入熱的灰塵,餘燼或巨大尖銳的物體。
• 請勿吸水或其他液體。
• 請將此吸塵機遠離熱源,如散熱器、火等,避免陽光直射。
• 每次使用UV除蟎吸塵器後,請給UV燈足夠的時間冷卻,在未冷卻前請勿觸摸,以免燙傷。
• 切勿將本產品用於表面破損的物品上。切勿將本產品用於可能褪色的物品。
注意
• 請按照銘牌上規定的電源正確使用本產品。
• 本產品不得在室外或潮濕表面上使用,僅供家庭使用。
• 請勿將任何物品置於開口上,切勿在開口阻塞的情況下使用,開口上不得有灰塵,毛線,
頭髮或任何會降低空氣流量的雜物,並應避免頭髮、鬆散衣物、手指及身體各部位接近開
口及活動零件。
• 本產品移至他處時,請先關閉本產品。
• 切勿將插頭一直插在插座上,不使用時或在維修前,請從電源插座上拔下插頭。切勿以拉
扯電線的方式拔下插頭,拔出時,應握住插頭而非電線。
• 確保集塵盒及濾網均正確安裝於產品上,若未正確安裝,可能會造成損壞或降低效果,且
應在確保濾網已乾燥後再裝入產品中。
• 若有異味、雜音、氣味或冒煙,請立即停止操作並聯繫售後服務及維修中心。
• 請勿在暖氣機等加熱設備以及易燃噴劑或可燃物品附近使用或放置本產品。
安全說明
紫外線殺菌燈管、PTC發熱器安全感應器與微動開關
本產品共有兩組光電感測器,燈管與PTC發熱器會在本產品的兩組光電感測器離開清潔面距離
80mm時自動關閉,以確保安全。
本產品同時還有一個機械微動開關進行強制的安全保護,燈管會在本產品離開清潔面距離
5-10mm時自動關閉,以確保安全。
燈管與PTC發熱器會在本產品的兩組光電感測器再放回該清潔面時即可重新自動打開。
注意:本產品的光電感測器對黑色的表面沒有反應。
安全注意事項

P.6 P.7
使用方法
A. 除蟎殺菌系統:
• 適用於床鋪/被子/梳化等地方的除蟎、殺菌及吸塵。
• 安裝:如圖1所示,將手持主機插入除蟎吸塵器,聽到“咔”聲即表示
安裝好。
• 拆卸:按下圖2所示鎖扣按鈕,將吸塵器向後取出即可分離手持主機與
除吸塵器。
• 啟動:按主機上的電源鍵啟動吸塵,按下除蟎吸塵頭後部的“拍打”
鍵開啟震動拍打功能,按下“UV加熱殺菌”鍵開啟UV燈殺菌及PTC加熱功能(如圖2)。
部件名稱 首次使用
• 外包裝袋要遠離兒童,以防引發窒息的危險!
• 打開包裝取出產品和零配件。請根據部件圖來確認零配件是否齊全。
B. 細縫吸塵系統:
• 用於細小縫隙、裂縫、角落等地方的吸塵。
• 安裝:如圖3所示,將細縫吸頭插入手持主機的進氣孔即可。
• 啟動:按主機上的電源鍵啟動吸塵。
操作說明 操作說明
1 電源線
2 手持主機
3 集塵桶
4 細縫吸頭
5 電源開關按鈕
6 集塵桶開關按鈕
7 除蟎吸塵器
8 LED燈
9 震動拍打頭
10 UV殺菌燈管
11 PTC發熱出風口
15
6
7
14
15a 15b16
17
19
18
20
8
910 11
12
13
2
3
4
HEPA過濾網
圖3
圖1
觀看操作視頻
圖2
拍打鍵
UV加熱
殺菌鍵
鎖扣按鈕
1 2 觀看操作視頻
12 後輪
13 前滾輪
14 出風蓋板
15a 拍打鍵
15b UV加熱殺菌鍵
16 分離按鈕
17 地面吸塵頭
18 伸縮管鎖定鍵
19 伸縮管
20 伸縮管釋放按鈕

P.8 P.9
清空集塵桶:
• 如圖5所示,按下集塵桶開關按鈕可拆出集塵桶,將HEPA 13濾網拿掉再倒出灰塵。
• 如果集塵桶很髒,可以進行沖洗。然後用乾布擦淨集塵桶。濾網很髒時,建議更換。
如何儲存
存放前,請拔下電源線。
• 請將本產品存放在兒童無法取得之處。
• 使用過後,需要將集塵桶及濾網清潔乾淨才能存放,以免集塵桶與濾網中的殘留物滋生
細菌。
操作說明 清潔與保養
清潔吸入口:
• 若吸入口阻塞,可能會造成異常雜音、吸力變小或過熱,進而導致功能故障。
• 若吸入口有灰塵及異物阻塞,請徹底清除灰塵及異物。
清潔集塵桶濾網 :
注意:切勿用水浸泡清洗濾網,也不要用熱吹風機吹乾濾網。
將集塵桶取下,將濾網從集塵桶中抽出,清空集塵桶內及過濾網上的碎
屑灰塵。
濾網很髒時,建議更換;灰塵較少時可用清潔刷掃走濾網上的灰塵。
建議用戶在每一次使用後,清潔集塵桶濾網。
頻繁使用時,建議用戶每個季度更換一次集塵桶濾網,以保持最佳效果。
濾網用太久,要更換?
另購HEPA濾網替換裝,配備2件HEPA濾網。頻繁使用時,為
保持高效淨化能力,建議每個季度更換一次(不常使用時最
少每年更換一次),以達到更好的清潔效果。
圖5
使用該款吸塵器的頻率取於家中床墊及室內陳設的實際狀況。為獲得最佳效果,建議應例行清
潔的最少次數為:
• 新床墊:每月清潔一次。
• 舊床墊:每週清潔一次。
1
1
C. 地面吸塵系統:
• 適用於清潔房間地面。
• 安裝:如圖4所示,將地面吸塵頭和伸縮管插入手持主機即可。
• 啟動:按主機上的電源鍵啟動吸塵。
圖4 按掣拆卸伸縮管
1 2 觀看操作視頻
觀看操作視頻
觀看操作視頻
立即上網購買
2
2

P.10 P.11
清潔與保養
如何清潔過濾海綿:
1. 打開過濾海綿蓋子。
2. 取出過濾海綿用自來水清洗。
3. 曬乾或晾乾過濾海綿。
4. 將過濾海綿安裝好。
5. 安裝好蓋子。
常見問題及解決方案
吸塵機為何無法工作?
• 檢查電線插頭是否已完全插上。可將其它家電用品插入插座,檢查電源插座功能是否
正常。
• 請確保本產品已平放在表面上。
• 由於紫外線殺菌燈管功能會自動關閉,當本產品離開待清潔物體的表面時,紫外線殺
菌燈管功能將停止工作。
在使用期間,紫外線殺菌燈管為何會關閉?
提示:紫外線殺菌燈管工作30分鐘後會自動關閉,關閉後需重新打開開關。
• 由於紫外線殺菌燈管保護功能會自動關閉,當本產品離開待清潔物體的表面時,紫外
線殺菌燈管功能將停止工作。
• 只要將除蟎吸塵頭再放回待清潔物體的表面上,燈管就會自動開啟。燈管在本產品離
開表面時會自動關閉,以確保安全。
其他資訊
• 排氣出口熱氣,是安全、正常的現象。
• 新機購買回家的前三個月,產品中有全新橡膠元件會使吸塵機發出少許氣味,此為正
常現象,若該氣味是因過濾網的微塵或過敏原過量而產生時,請立即更換過濾網。
• 由於紫外線殺菌燈管強力的殺菌效果所致,本產品的紫外線殺菌燈管玻璃罩可能會隨
著時間變色,此為正常現象。
• 本產品屬第二類(Class ll)電器,可為您提供雙重絕緣保護。無需接地線。
• 如果電源線損壞,為了避免觸電危險,必須由製造商、其維修或類似部門的專業人員
更換。
• 身體、智力或者感官有缺陷的人,或者沒有經驗和能力的人(包括小孩),在沒有負
責他們安全的人員的監督和指導的情況下,不能使用本產品。
注意:當發現啟動UV殺菌燈後,燈管不亮。請檢查UV燈糟中光電感測器孔是否被灰塵掩蓋,
如果是,可使用家中的清潔刷進行清潔。
將除蟎吸塵頭翻器轉後,使用清潔刷左右往復刷掉光電感應孔內的灰塵。清潔時,請小心不要損壞光電感
應器。
清潔紫外線殺菌燈管 :
警告:確保除蟎吸塵器已從電源插座上拔下。
1. 用螺絲批擰下燈管護架上的固定螺絲。
2. 使用除塵刷清潔並刷亮紫外線殺菌燈管玻璃罩。
3. 裝回蓋子至定位,然後擰緊固定螺絲。
提示:紫外線殺菌燈管玻璃罩若太髒,可能會降低除蟎吸塵器的殺菌功效。清潔時,請小心
不要弄破燈管玻璃罩。
觀看操作視頻
觀看操作視頻
1 2
光電感測器孔
固定螺絲

P.12 P.13
技術規格
型號 MKC-112
電壓 220V 50Hz
功率 約475W
殺菌燈管 6W
PTC功率 90W
淨重 2.9kg
電源線長度 4米
產品尺寸 D380/W265/H280mm
技術標準 GB4706.7-2014 GB4706.1-2005
GB4343.1-2009 GB17625.1-2012
Content
Safety precautions
Warning 14
Attention 15
Safety Instructions 15
Operating Instructions
Product Structure 16
First Time Usage 17
Application 17
Storage 18
Care and Maintenance
Cleaning the Suction Nozzle 19
Cleaning the Dust Container 19
Cleaning the Dust Filter 19
Cleaning the UV Sterilisation Tube 20
Cleaning the Foam Filter 20
Troubleshooting 21
Technical Specications 22
Terms & Warranty 23
產品規格及設計如有變更,恕不另行通知。
中英文版本如有出入,一概以中文版為准。
本產品使用說明書以 www.germanpool.com 網上版為最新版本。

P.14 P.15
Safety Precautions
• For safety reasons, carefully read the user manual before using the product.
• This product is intended for household use only. Follow the instructions in this manual to set up and
operate the product properly.
Warning! To reduce the risk of re, electric shock or injuries, follow the basic instructions below, before
using the vacuum cleaner.
• Never use the device if the cord is damaged or worn. If the machine stops functioning, or is dropped,
damaged, placed outdoors or immersed in water, take it to the nearest authorized service center for
examination and repair.
• Unplug the appliance before cleaning. Use dry towel to rub softly, never use water and volatile liquid for
cleaning, such as alcohol and ethers.
• The appliance is designed for disinfecting and removing dust on various cotton products, such as bed
linens, comforters, sofas and carpets.
• The appliance is intended for household use only, never use it for commercial or industrial purposes. Do
not use the appliance for other than intended use.
• Disabled and handicapped personnel, inexperienced users and children are advised not to use the
appliance.
• Never insert multiple plugs into a single socket.
• Turn off the appliance before unplugging it. Hold the plug instead of the cord.
• Never touch the plug or hold the device with wet hands.
• Thoroughly dry the dust lter after cleaning. A wet lter may damage the cleaner.
• Do not vacuum ammable materials or use it in hazardous area.
• Do not vacuum heated dust, ashes or sharp objects.
• Do not suck in water or other liquids.
• Keep the appliance away from heat source, such as a heat sink and re. Do not store it under direct
sunlight.
• After using the UV sterilisation function, give sufcient time for the UV tube to cool down. To prevent
scald, do not touch the tube before they are cooled down.
• Do not operate the machine on surfaces where the material and colour can easily fall off.
Attention
• Choose the correct AC socket outlet.
• The appliance should not be operated outdoors or on wet surface, it is intended for household use only.
• Do not place any objects on the suction nozzle. Do not use the device when the suction nozzle is
blocked by dust, threads, hair or any objects that will impede aeration. Keep hair, loose clothing, ngers
and other parts of the body away from the suction nozzle and movable parts.
• Switch off the machine before relocating it to somewhere else.
• Unplug the appliance before repair or when it is not in use. Do not pull the cable to unplug the device.
• Properly install the dust container and lter. Otherwise, it may damage or hamper the effectiveness of
vacuuming. Ensure that the dust lter is thoroughly dried before re-inserting into the machine.
• If there is any foul smell, abnormal noise or fumes, immediately stop using the appliance and contact
authorized service center for examination and repair.
• Do not store or use the device near heat source, volatile or inammable materials, such as a heater or
aerosol spray.
Safety Instructions
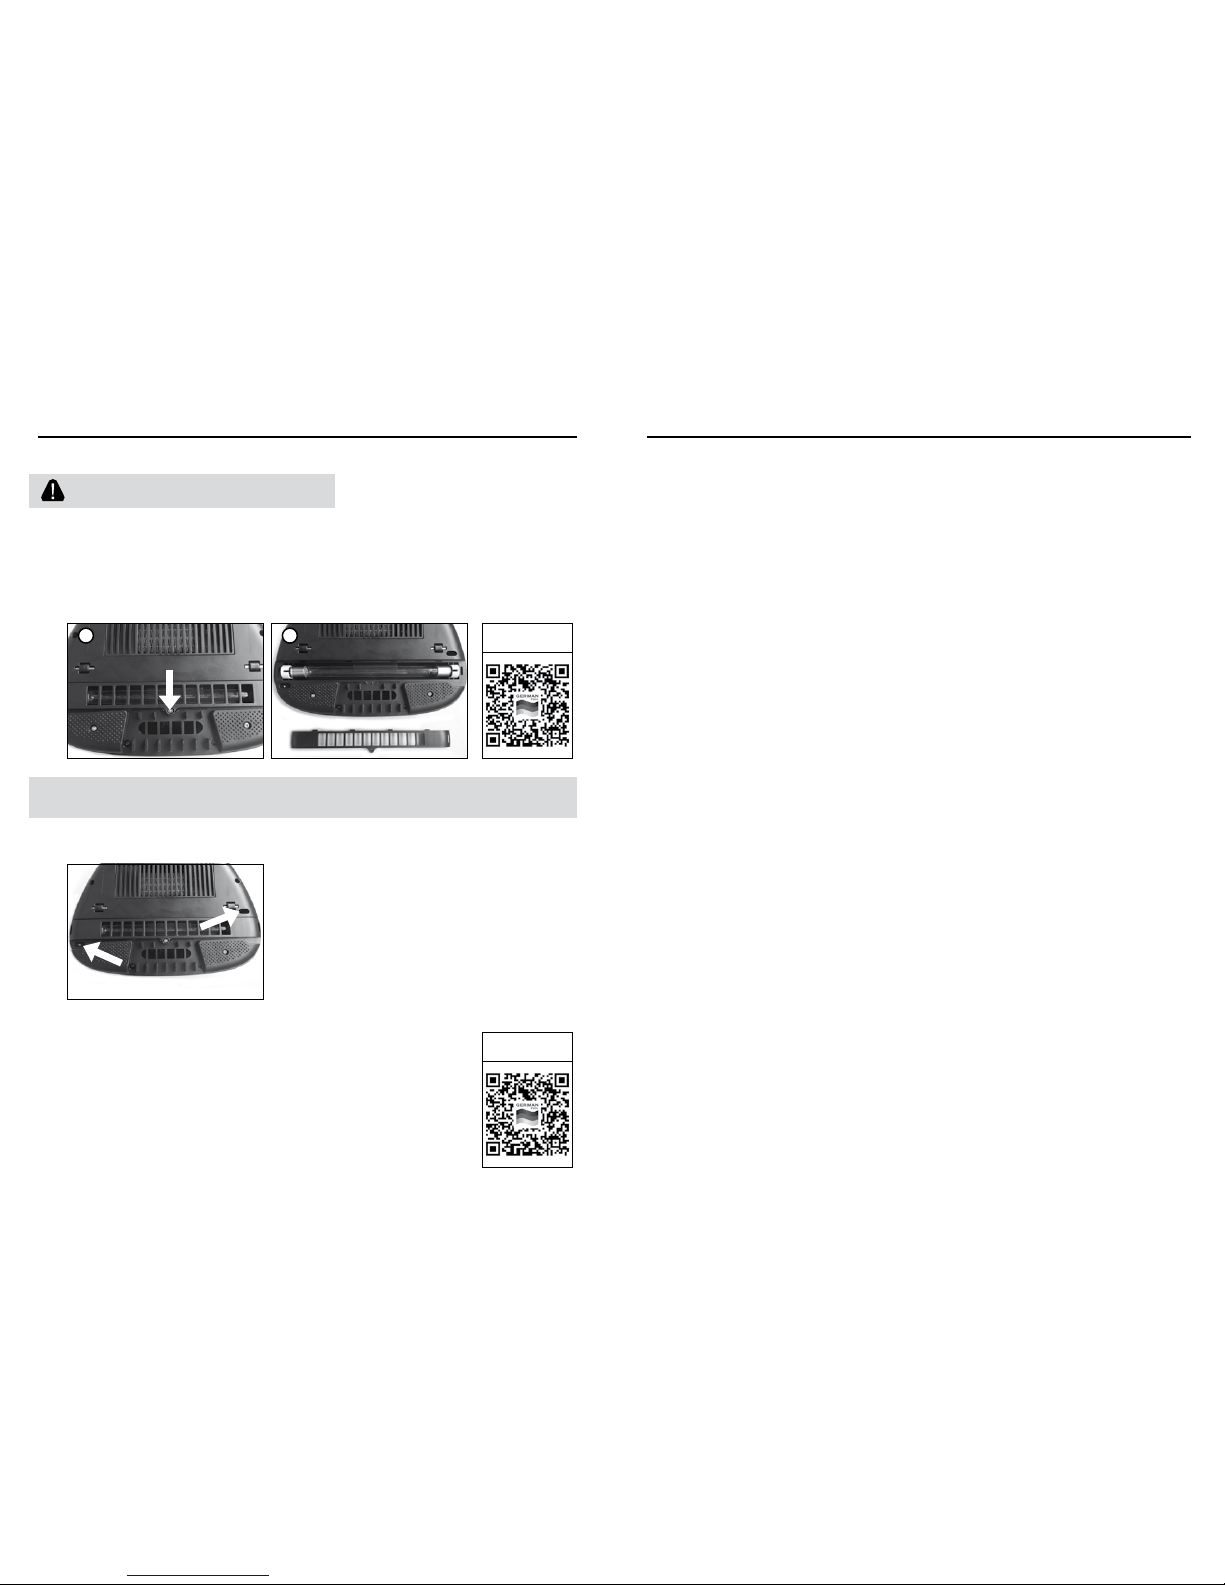
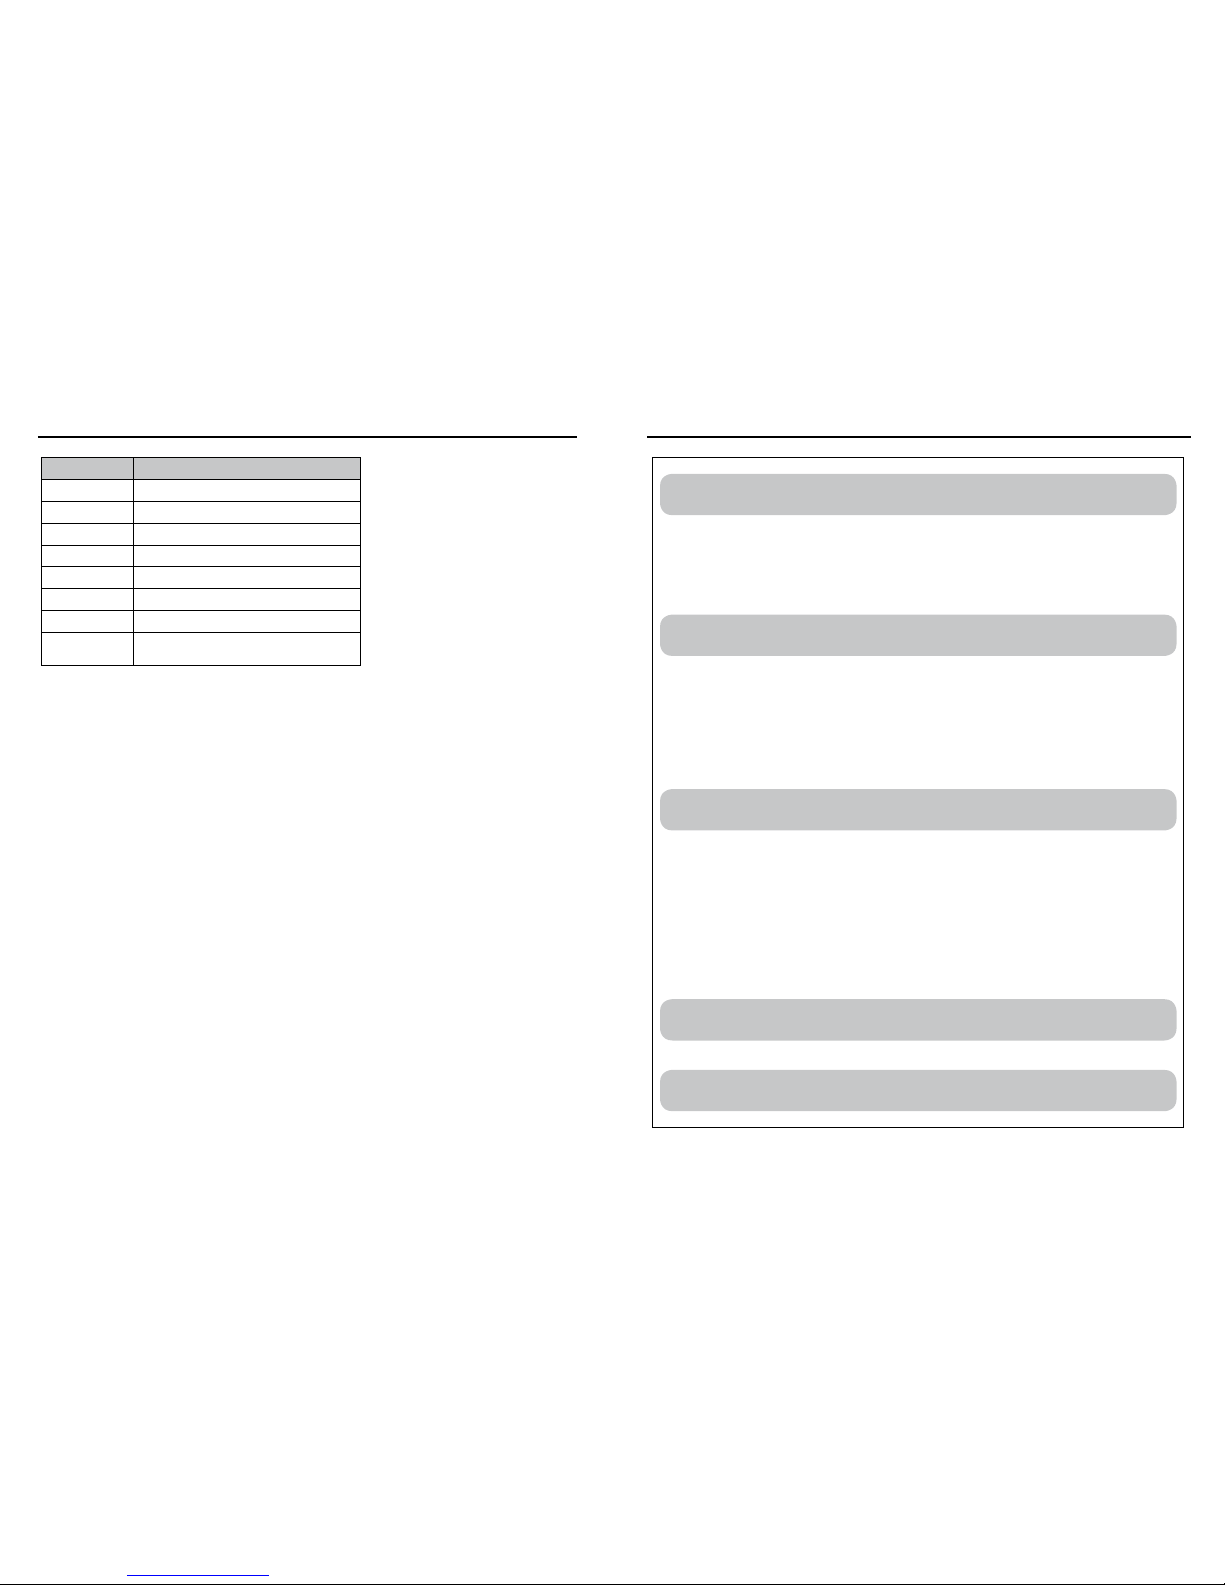
UV Sterilisation Tube, PTC Heater Temperature Sensor and Micro Switch
For safety reasons, the appliance has 2 photo sensors to ensure that sterilisation tubes and PTC heater will
automatically switch off when the distance between the device and the target surface exceeds 80mm.
The appliance also has a micro switch to ensure that the UV Sterilisation Tube automatically switches off
when the distance between the device and the target surface is 5-10mm.
The sterilisation tube and PTC heater will be switched on again when the appliance is placed on the target
surface.
Attention: The photo sensors will not respond to black surface.
Safety Precautions

P.16 P.17
1 2
First Time Usage
• Risk of suffocation: keep children away from plastic packaging.
• Unpack to retrieve the appliance and its accessories. Check whether all the accessories are present.
Operating Instructions Operating Instructions
Product Structure
Application
A. Anti-mite Sterilisation Mode:
• Suitable for bed linens, comforters and sofa. Disinfect and remove mite and dust.
• Installation: As shown in Figure 1, insert the dust mite exterminator into the
portable main body, secure it until a “click” sound is heard.
• Removal: As shown in Figure 2, press the release button and drag the main body
to separate it from the dust mite exterminator .
• Start up: Press the on/off button to switch on the cleaner. Press the “Patting
button” at the back of the exterminator to initiate the vibration function and
press the “UV Thermal sterilisation” button to activate the sterilisation and PTC heating function.
B. Small Nozzle Attachment Function:
• Suitable for cleaning corners, crevice or small gaps.
• Installation: As shown in Figure 3, simply insert the small nozzle into the portable
main body.
• Start up: Press the on/off button to switch on the cleaner.
Figure 3
Figure 1 Figure 2
1. Cable
2. Portable Main Body
3. Dust Container
4. Small Nozzle Attachment
5. On/Off Button
6. Dust Container Release Button
7. Dust Mite Exterminator
8. LED Light
9. Vibration Pads
10. UV Sterilisation Tube
11. PTC Hot Air Heater
15
6
7
17
19
18
20
8
910 11
12
13
2
3
4
HEPA Filter
12. Back Wheel
13. Front Wheel
14. Air Vent
15a. Patting Button
15b. UV Thermal Sterilisation button
16. Release Button
17. Flat Nozzle Attachment
18. Length Adjustment Knob
19. Extensible Tube
20. Extensible Tube Release Button
Watch the video clip
Patting
button
UV Thermal
Sterilisation
button
Release button
14
15a 15b16

P.18 P.19
Frequency of usage depends on the condition of the mattress and the actual indoor environment.
To achieve the best result, it is recommended to clean:
• New mattress: once per month.
• Old mattress: once per week.
Storage:
Unplug the device prior to storage
• Store it in areas not accessible to children.
• Clean the dust container and lter properly prior to storage to prevent the breeding of germs.
Operating Instructions Care and Maintenance
Cleaning the suction nozzle
• If the nozzle is blocked, it may create abnormal noise, impede vacuuming effectiveness or lead to
overheating, causing malfunctioning.
• Remove any dust or objects that may obstruct the suction nozzle.
Cleaning the Dust Filter
Attention: Never merge the dust lter into water to clean, or dry it with a dryer.
Detach the dust container, remove the lter from the dust container, clear any
scrap or fragment that is present in the container and lter.
Replace the lter when it gets dirty. Use a brush to clean the lter if needed.
• It is recommended to clean the dust lter every time after usage.
• When using frequently, it is recommended to replace the lter every 3 months to
achieve the best vacuuming result.
Clearing the Dust Container :
• As shown in Figure 5, press the Dust Container Release Button to detach the dust container. Remove
the HEPA lter net and clear the dust.
• The dust container can be rinsed with water if it is heavily soiled. Rub and dry properly before re-
inserting into the machine. Replace the lter when it gets dirty.
C. Flat Nozzle Attachment Function:
• Suitable for oor cleaning
• Installation: As shown in Figure 4, simply insert the Flat Nozzle Attachment into
the portable main body.
• Start up: Press the on/off button to switch on the cleaner.
Press to release Flat
Nozzle Attachment
Figure 5
Want to change your old lter net?
The optional HEPA lter package includes 2 lter nets that will help
you purify air and clear dust in seconds. When using frequently, it is
recommended that the lter be replaced every 3 months. At least
replace every year if it is not used frequently.
Figure 4
1
1
2
2
Watch the video clip
Make your online
purchase now
1 2

P.20 P.21
Care and Maintenance
Cleaning the Foam Filter
1. Open the lid that covers the foam lter.
2. Take out the foam lter and rinse it with water.
3. Sun-dry or air-dry the foam lter.
4. Re-install the foam lter.
5. Place the lid back to the main body.
Troubleshooting
Why does the cleaner fail to start up or stop functioning?
• Check whether the device is appropriately plugged to an AC socket. Check if the socket functions
properly by connecting it to another household appliance.
• Ensure the machine lies on a at surface.
• The UV tube will automatically switch off when the device leaves the target surface. Therefore, the
sterilisation function will also be deactivated.
Why does the UV tube switch off when the appliance is in use?
Reminder: The UV tube will automatically switch off after running for 30 minutes and has to be reactivated.
• The UV tube will automatically switch off when the device leaves the target surface. Therefore, the
sterilisation function will also be deactivated.
• When the nozzle is placed back into the target surface, the UV tube will instantly be reactivated. To
ensure safety, the tube will switch off when it leaves the target surface.
Other Information
• Air vent discharging hot exhaust is a normal phenomenon.
• During the rst 3 months of operation, it is normal that the plastic parts emits a certain smell. If the
smell is caused by the accumulation of dust or allergen in the dust lter, replace it immediately.
• Under normal circumstances, due to the strength of UV sterilisation effect, the colour of the glass cover
protecting the UV tube may change over time.
• The vacuum cleaner is a Class II electrical appliance, which is a double insulated device that does not
require an earth wire.
• If the cable is damaged, it has to be replaced by a technician authorised by the manufacturer or
maintenance department to prevent the risk of electric shock.
• Disabled, handicapped and inexperienced users (including children) are advised to only use the product
under the supervision of qualied personnel.
Attention: If the LED indicator for UV disinfection fails to light up when the sterilisation mode is activated,
check whether the photo sensor aperture inside the UV light trough is blocked by dust. Should that be the
case, clean it with a brush.
Invert the appliance and use a brush to clean the cavity.
Clean it carefully to avoid damaging the photo sensor.
Cleaning the UV Sterilisation Tube
Warning: Ensure the Dust Mite Exterminator is unplugged.
1. Unscrew the protective frame using a screw driver.
2. Use a brush to clean and polish the glass cover protecting the sterilisation tube.
3. Screw the protective frame back to the original position.
Reminder: If the glass cover is heavily soiled, it may impact the sterilisation function. Clean it carefully so
that the glass cover remains intact.
Watch the video clip
1 2
Watch the video clip
Photo sensor aperture
Unscrew this screw

P.22 P.23
Technical Specications
Model No. MKC-112
Voltage 220V 50Hz
Power Output Approx. 475W
UV Tubes Power
Output 6W
PTC Power Output 90W
Net Weight 2.9kg
Length of Cable 4 Metres
Product Dimension D380/W265/H280mm
Safety Standards GB4706.7-2014 GB4706.1-2005
GB4343.1-2009 GB17625.1-2012
保用條款
此保用提供德國寶產品之機件在正常使用下壹年保用
(自購買日起計算)。
Warranty Terms & Conditions
Under normal operations, the product will gurantee a 1-year full
warranty provided by German Pool (effective from the date of
purchase).
1. Customer who fails to present original purchase invoice will
not be eligible for free warranty service.
2. Customer should always follow the operating
instructions. This warranty does not apply to:
- labour costs for on-site installation, check-up, repair,
replacement of parts and other transportation costs;
- damages caused by accidents of any kind (including
material transfer and others);
- operating failures resulting from applying incorrect voltage,
improper usage, and unauthorized installations
or repairs.
3. This warranty is invalid if:
- the purchase invoice is modified by an unauthorized party;
- the product is used for any commercial or industrial purposes;
- the product is repaired or modified by unauthorized
personnel, or unauthorized parts are installed;
- the serial number is modified, damaged or removed from
the product.
4. German Pool will, at its discretion, repair or replace any
defective part.
5. This warranty will be void if there is any transfer of
ownership from the original purchaser.
1. 未能出示購買發票正本者,將不獲免費維修服務。
2. 用戶應依照說明書的指示操作。本保用並不包括﹕
- 上門安裝、檢驗、維修或更換零件之人工以及
一切運輸費用﹔
- 因天然與人為意外造成的損壞 (包括運輸及其他)﹔
- 電源接合不當、不依說明書而錯誤或疏忽使用本
機所引致之損壞。
3. 於下列情況下,用戶之保用資格將被取消﹕
- 購買發票有任何非認可之刪改;
- 產品被用作商業或工業用途;
- 產品經非認可之技術人員改裝或加裝任何配件;
- 機身編號被擅自塗改、破壞或刪除。
4. 總代理有權選擇維修或更換配件或其損壞部份。
5. 產品一經被轉讓,其保用即被視作無效。
機身號碼 Serial No. :
購買商號 Purchased From :
發票號碼 Invoice No. :
購買日期 Purchase Date :
型號 Model No. :
另請填妥以下表格並與正本發票一併保存,以便維修時核對資料。用戶提供之所有資料必須正確無誤,否則免費保用將會無效。
Please fill out the form below. This information and the original purchase invoice will be required for any repairs. Warranty will be
invalidated if information provided is found to be inaccurate.
此保用只適用於香港及澳門 This warranty is valid only in Hong Kong and Macau
MKC-112
客戶服務及維修中心 Customer Service & Repair Centre
Hong Kong
10/F, Kowloon Godown
1-3 Kai Hing Road, Kowloon Bay,
Kowloon, Hong Kong
Tel : +852 2333 6249
Fax : +852 2356 9798
Macau
3/F, Edificio Industrial Pou Fung,
145 Rua de Francisco Xavier Pereira,
Macau
Tel : +853 2875 2699
Fax : +853 2875 2661
香港
九龍灣啟興道1-3號
九龍貨倉10樓
電話:+852 2333 6249
傳真:+852 2356 9798
澳門
澳門俾利喇街145號
寶豐工業大廈3樓
電話:+853 2875 2699
傳真:+853 2875 2661
*
貴戶須在購機十天內,以下列其中一種方式向本公司
登記資料,保用手續方正式生效﹕
1)
填妥本公司網頁內之
保用登記表格
www.germanpool.com/
warranty
2)
填妥保用登記卡,
郵寄至本公司。
* This warranty is not valid until customer registration information
is received by our Service Centre within 10 days of purchase
via one of the following means:
1) Visit our website and register
online:
www.germanpool.com/
warranty
2)
Complete all the fields on the
attached Warranty Card and
mail it back to our Customer
Service Centre.
Specications are subject to change without prior notice.
If there is any inconsistency or ambiguity between the English version and the Chinese version, the Chinese version shall prevail.
Refer to www.germanpool.com for the most up-to-date version of the Operating Instructions.

© 版權所有。未獲德國寶授權,不得翻印、複製或使用本說明書作任何商業用途,違者必究。 © 版權所有。未獲德國寶授權,不得翻印、複製或使用本說明書作任何商業用途,違者必究。
© All rights reserved. Copying, reproducing or using the contents of this manual is not allowed without prior authorization from German Pool, violators will be prosecuted.
德國寶(香港)有限公司 德國寶(香港)有限公司
German Pool (Hong Kong) Limited
Room 113.Newport Centre PhaseII. 116 Ma Tau
Kok Road. Tokwawan. Kowloon. Hong Kong.
電話
傳真
電話
傳真
3/F, Takshun Plaza, Nanguo East Road,
Shunde, Foshan, Guangdong
3/F, Edificio Industrial Pou Fung,
145 Rua de Francisco Xavier Pereira, Macau
電話
傳真
電話 Tel: +852 2773 2888
傳真 Fax:+852 2765 8215
電話 Tel:+86 757 2980 8308
傳真 Fax:+86 757 2980 8318
電話 Tel:+853 2875 2699
傳真 Fax:+853 2875 2661
香港九龍土瓜灣馬頭角道116號
新寶工商中心2期113號室
廣東省佛山市順德區
大良南國東路德順廣場三層
澳門俾利喇街145號
寶豐工業大廈3樓
香港
Hong Kong
香港九龍土瓜灣馬頭角道116號
新寶工商中心2期113號室
中國
China
廣東省佛山市順德區
大良南國東路德順廣場三層
澳門
香港 中國 澳門
澳門俾利喇街145號
寶豐工業大廈3樓
Macau
HONG KONG TOP BRAND TEN YEAR
ACHIEVEMENT AWARD
MKC-112-M-16(2)
Table of contents
Other German pool Ultrasonic Jewelry Cleaner manuals