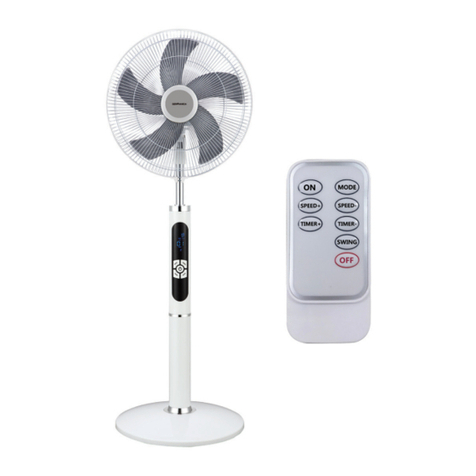
GERMANICA KF16WG User manual

INSTRUCTION
MANUAL
Please read this manual carefully before using, and keep it for future reference.
40CM
PEDESTAL WI-FI FAN
KF16WG


General Safety 4
Before first use 6
Product Overview
Pedestal Fan 7
Control Panel 8
Remote Control 8
Getting Started
Remote Control 9
Fan Parts 10
Assembling the Fan 11
Modes 12
Swing / Timer 12
App / Wi-Fi Control 13
Add to Google Home App 18
Add to Amazon Alexa App 18
FAQs 19
Specifcations 20
Customer Support 20
CONTENTS

4
GENERAL SAFETY
Read this manual thoroughly before you start using the Fan.
Store this manual, the completed warranty card, your receipt and the product
packaging.
The safety precautions instructions reduces the risk of fire, electric shock and
injury when correctly complied to.
Please follow all instructions and take notice of all warnings.
• Do not expose this product to rain or moisture as it may result in fire.
• Do not temper or change or modify the product in any way.
• Only use Accessories outlined and recommended by the manufacturer.
• Please do not expose the product to splashing or water contact
IMPORTANT INFORMATION
• The apparatus shall not be exposed to dripping or splashing and no objects
filled with liquids, such as vases, shall be placed on the product. Dry location
use only.
• No naked flame source, such as candles, should be placed on the product.
• Do not operate the fan while power cord is coiled up, please completely
unwind the power cord before using.
• Do not allow power cord to hang over edge of table of bench.
• Never move the fan by the power cord.
• Move the power cord away from pathways of persons so they do not trip.
• Do not run power cord under carpeting or cover it with rugs. Must have quick
access to unplug the fan.
• Do not use this fan with an extension cord, power adaptors or external timers.
• This product is not designed for commercial, industrial or outdoor use.
• Do not leave the fan unattended during use. Always switch o and unplug.
• Children must be supervised at all times while in use. This fan is not a toy.
Make sure children do not go near or attempt to play with this fan.
• AIRFLOW - Make sure nothing is obstructing or blocking the airflow outlet at
the front of the fan, and the airflow intake which is the back of the fan.
• Do not insert an foreign objects into the fan grill opening as this may cause
damage to the appliance and lead to electric shock and/or a fire hazard.

5
GENERAL SAFETY (CONT.)
• If you notice any unusual odors or smoke around the unit, immediately
disconnect the unit from the outlet and contact the service center. Failure to do
so may result in fire or electric shock.
• When not using the unit for long periods of time or when you are
moving the unit. Please disconnect the product from main power.
• Please beware that Dust could accumulate over time on the unit and cause it
to generate heat and or deteriorate insulation, which in turn may result in an
electrical fire.
• The product is not intended for use by persons (including children) with
reduced physical, sensory or mental capabilities, or young children of any age,
They must be supervised product by a person responsible for their safety.
• To maintain the product do not use any chemical or cleaning agent or wet
cloth, please only ensure to utilize a dry cloth to wipe it down from marks or
dust and only after unplugging the product from the power socket.
• Please ensure to contact our call center for any repair or service required for
the products.
Please make sure upon positioning this product, the place is:
• Not wet or damp and Well ventilated.
• Placed on a stable surface to avoid product from tipping over.
• Away from direct sunlight or heaters.
• Away from splashes or food.
• Protected from excessive dust or grease.
• Do not place this equipment in a confined space such as a bookcase or similar
unit. Allow 20cm above and 5cm spacing on both sides for proper ventilation.
• Do not place the Product near heat sources such as radiators, stoves or other
audio visual equipment that produce heat.
• Do not place small metallic objects near the unit.
• Do not use or store flammable or combustible materials near the unit. Doing so
may result in fire or explosion. Do not place any naked flame sources, such as lit
candles, cigarettes or incense sticks on top of the product.

6
GENERAL SAFETY (CONT.)
Before first use
• Unpack the fan and accessories and ensure all parts of
the product are undamaged and in good working order.
• Plastic wrapping can be a suocation hazard for babies and young
children, so ensure all packaging materials are out of their reach and
disposed of safely.
• Unwind the power cord to its full length and inspect it for damage
before each use. Do not use the product if it or its cord has been damaged
or is not working properly. In case of damage, contact our after sales sup
port line for advice on examination, repair or return of the damaged product.
• Ensure the fan is not exposed to direct sunlight or placed near a
heater or other heat source.
• Placed on a flat and dry surface.
• Do not place in areas of high humidity such as bathrooms, laundry area,
near a sink, washer or pool (any source of water).

7
PRODUCT OVERVIEW
1 of 3
Pedestal Fan
1. Front/Rear Grill
2. Motor (back)
3. Fan Blade
4. Control Panel
5. Extension Pole
6. Height Adjustment Ring
7. Base Tube
8. Base
1
2
3
4
5
6
7
8

8
PRODUCT OVERVIEW (Cont.)
2 of 3
Control Panel
3 of 3
Remote Contorl
1. Swing indicator
2. Mode Indicators
3. Speed Indicators
4. Time Indicators
5. Power O
6. Timer
7. Power On / Speed
8. Swing
1. Mode button
2. Timer button
3. ON/Speed button
4. Power OFF button
5. Swing button
6. Lamp -
Turn on Control Display LED
1
5
1
2
6
7
8
3
5
6
4
2 3 4

9
Getting Started
Remote Control
• The fan comes with a remote control, which is powered by two AAA
batteries (not supplied). Removing battery cover by sliding the cover
outwards with your thumb. Insert new AAA batteries into the
compartment and make sure they are placed correctly following the
polarity symbols ( + / - ) and place battery cover back on.
• Do not mix new batteries with old while first setting up remote control
or replacing batteries.
• If you are not using fan or remote contorl for long period of time,
remove the batteries from the battery compartment to avoid leakage.
WARNING - ELECTRIC SHOCK HAZARD.
Do not plug in the power supply into electrical outlet and turn on the
power until the fan is completetly 100% assembled. Please follow the
instructions on the pages following.

10
Getting Started (Cont.)
Fan Parts

11
Getting Started (Cont.)
Assembling the Fan.
NOTE - use the illustration of FAN PARTS while following instructions.
1. Unscrew the L-shaped screw and remove it and the clamping
washer from the end of the base tube. (bottom of Fan base)
2. Loosen the height adjustment ring at the top of the base tube and pull
out the extension pole to the desired height, or all the way to the top
for maximum height (you may have to push it up from the bottom if it
is tight or stuck). At the height you want, turn the height adjustment
ring clockwise to tighten and secure it.
3. Insert the base tube into the hole on the base, turn over the base and
screw/tighten to hold the tube using the L-shaped screw and the
clamping washer together. Tighten the screw firmly but do not overtighten.
4. Place on a level surface.
5. Loosen the set screw, attach the fan body to the top of the extension
pole. Push the body down as far as possible and then tighten with the
set screw.
6. The motor housing has the blade cap and guard nut attached. Remove
the cap by turning it clockwise and the nut by turning it anticlockwise.
7. Place the rear guard on the front of the motor housing, lining up the
two positioning knobs on the front of the motor housing with the two
holes in the rear guard. Make sure that the handle is up the top. Push
the guard in firmly until the three knobs protrude through the holes.
Secure the rear guard by reattaching the guard nut and turning it
clockwise to tighten.
8. If the motor shaft is covered with a protected sleeve, remove the
sleeve. Slide the blade onto the motor shaft, making sure to match the
protrusions on the shaft with the slots in the blade. Tighten the blade
with the blade cap, turning it anticlockwise to tighten it securely.
9. Test the fan by rotating the blade with your hands, making sure that
there is no contact with the nut. The fan blade should rotate freely.
10. The front and rear guard are held together with a guard ring, which
has two grooves, one for each of the guards. Slightly loosen the large
screw at the bottom of the ring and ensure the edge of the guard sits
in the appropriate groove, all around the rear guard. Then fit the front
guard against the rear guard and ensure that the edge sits properly in
the other groove. Retighten the screw to secure the guards together.

12
Getting Started (Cont.)
MODES
Press the mode button on remote control to change the fan breeze
modes.
Normal - The fan operates at a constant speed
(mode indicator o)
Natural - Simulates a natural breeze by cycling on and o.
(palm tree indicator)
Sleep - Simulates soft and natural breeze suitable for night time.
(half moon indicator)
SWING (OSCILATTION)
Press the swing button on remote control or control panel to turn on
oscillation mode which will swing left to right.
Press button again to turn o.
TIMER
Press the Timer button on remote control or control panel) to set the tim-
er in increments of 0.5H (30 minutes) to a maximum of 7 1/2 hours.
There are four indicator lights for the timer: 0.5H, 1H, 2H, 4H
* 0.5H - indicates the timer will shut o after 30 minutes.
* 0.5H and 2H - indicates it will shut o after 2½ hours.
* 0.5Hh, 1H, 2H, 4H - indicates it will shut o after 7½ hours.

13
APP / Wi-Fi Control
Working with your mobile device, using your home Wi-Fi network router
to communicate with the portable air conditioner and control it.
Controlling the portable air conditioner remotely is very easy.
You will need:
- Android smartphone or tablet, or an Apple iPhone or iPad
- Internet connection at your home
- Wi-Fi network router set up at home.
You must also have the Tuya Smart App installed or updated on your
smartphone or mobile device. This app is available from Google Play Store
or Apple App Store.
Initial set-up
Upon completing setup of your portable air conditioner, or when you have
changed your mobile device or wireless router, you will have to set up the
communication between the devices.
In order to do this, make sure you have the Tuya Smart App installed or
updated on your mobile device, your Wi-Fi router is switched on and your
mobile device connected to your home Wi-Fi network.
On your mobile device, tap on the Tuya Smart app (1). It will open and
take you to the Login Page (2).
1 2

14
APP / Wi-Fi Control (Cont.)
Before you log in, please press REGISTER and register your account using
an email address. (3 and 4)
Once entered email address, tap GET VERIFICATION CODE and an email
will be sent your email address with a verification code. Enter this code.
Now you can enter a password for your account. Please remember this
password or write it down. (5)
4
5
3

15
APP / Wi-Fi Control (Cont.)
IMPORTANT
Before you can control your fan remotely, you must reset the Wi-Fi mod-
ule. To do so please follow instructions:
1. Unplug the fan from the power outlet for 10 seconds.
2. On the control panel, press and hold SWING for 5 seconds to reset.
When the Wi-Fi Indicator on the control is blinking rapidly, the Fan is now
ready to configure with your smart device.

16
APP / Wi-Fi Control (Cont.)
You will now enter device list.
1. Tap the plus ( + ) or ADD DEVICE to add your device. (7).
2. Select the type of product which in this case is: FAN. (8)
3. Select Wi-Fi network then enter in the password to connect. (9)
Note: Make sure to select 2.4GHz NOT a 5GHz Wi-Fi network.
5GHz Wi-Fi Network will not work with this app.
Now that you have already reset the
Wi-Fi module on page 15 and the
Wi-Fi indicator is blinking fast. your
device will now be ready to connect
to your smartphone as to the image
to the right (10).
7 8 9
10

17
APP / Wi-Fi Control (Cont.)
Now that the device is being added, progress screen will now appear as to
below: (11, 12, 13).
Once completed, it will show your product is now added. click DONE.
Click on the device name and you can now start navigating the controls of
the app. (14, 15)
11 12 13
14 15
GERMANICA

18
APP / Wi-Fi Control (Cont.)
Add the Tuya Smart app to your Google Home app.
1. Open your Google home app.
(Before you link your app to your Google Home app, you will have
to have a Google Home account already set up.
2. From the home screen of the Google Home App, press ADD.
Press SET UP DEVICE, then select HAVE SOMETHING ALREADY SET
UP? under the WORKS WITH GOOGLE banner.
3. Search for Tuya Smart.
4. Press the Tuya Smart app and enter your
Tuya Smart app account details and password.
Then press SIGN IN.
Add the Tuya Smart app to your Amazon Alexa Account.
You must have to already have an Amazon Alexa account set up.
1. Home screen of Amazon Alexa app, press the 3 bars in the top left
hand corner. Select SKILLS & GAMES, then search for
Tuya Smart.
2. Select the Tuya Smart app, Ensure you have followed the
steps listed, then select CONFIRMED and then select NEXT.
Enter your Tuya Smart acount details and password then
press SIGN IN.
* Instructions for adding Tuya Smart app are general
instructions only. Detailed steps or specific message from your Google
Home or Amazon Alexa account may vary depending on the version.
Smartphone and Wi-Fi specification requirements
Minimum smartphone specifications
Android 5.0 version or later
IOS 9.0 version or later

19
FAQs
Problem Possible cause and solution
During the
set-up, the fan
cannot be configured
successfully.
Check that you have internet reception and your
smart device and the fan are connected to the same
Wi-Fi network.
Make sure your Wi-Fi password is correct.
Make sure that no firewalls or other restrictions
are set.
Make sure that the router works normally.
Ensure that the fan, router and smart device are
all on the same Wi-Fi network and within the
signal range.
I cannot control the
fan with my app.
If a message is displayed to alert you to an
identification failure, the fan has been reset and the
smart device lost control permission. You need to
reconnect the phone to the fan, following the set-up
instructions in this manual.
If after these steps you still cannot control the fan
with your smart device, please delete the fan from
your device list and reconnect again.
My app cannot find
the fan.
If a message is displayed to alert you that the
device is oine, please check and ensure that your
fan is connected to your mains supply and power is
switched on at the outlet.
Also ensure that your router is connected to
the mains supply and that the router and your
mobile phone are properly connected to your
Wi-Fi network.

20
SPECIFICATIONS
Power 220-240V ~ 50/60Hz 45W
Remote control 2 x AAA batteries (not included)
CUSTOMER HELPLINE:
info@ayonz.com
DISTRIBUTED BY:
Ayonz Pty Ltd
Table of contents
Other GERMANICA Fan manuals
Popular Fan manuals by other brands

KLASS Fan
KLASS Fan MODULO P1 Series user manual

Goldair
Goldair 75CM operating instructions

Casablanca
Casablanca Brescia Casablanca Brescia Gallery Edition owner's manual

Lava Aire
Lava Aire Amiti CM-126P instruction manual

Flex-a-Lite
Flex-a-Lite 340 installation instructions

Hi-Velocity
Hi-Velocity HE-Z Series installation manual