6 7
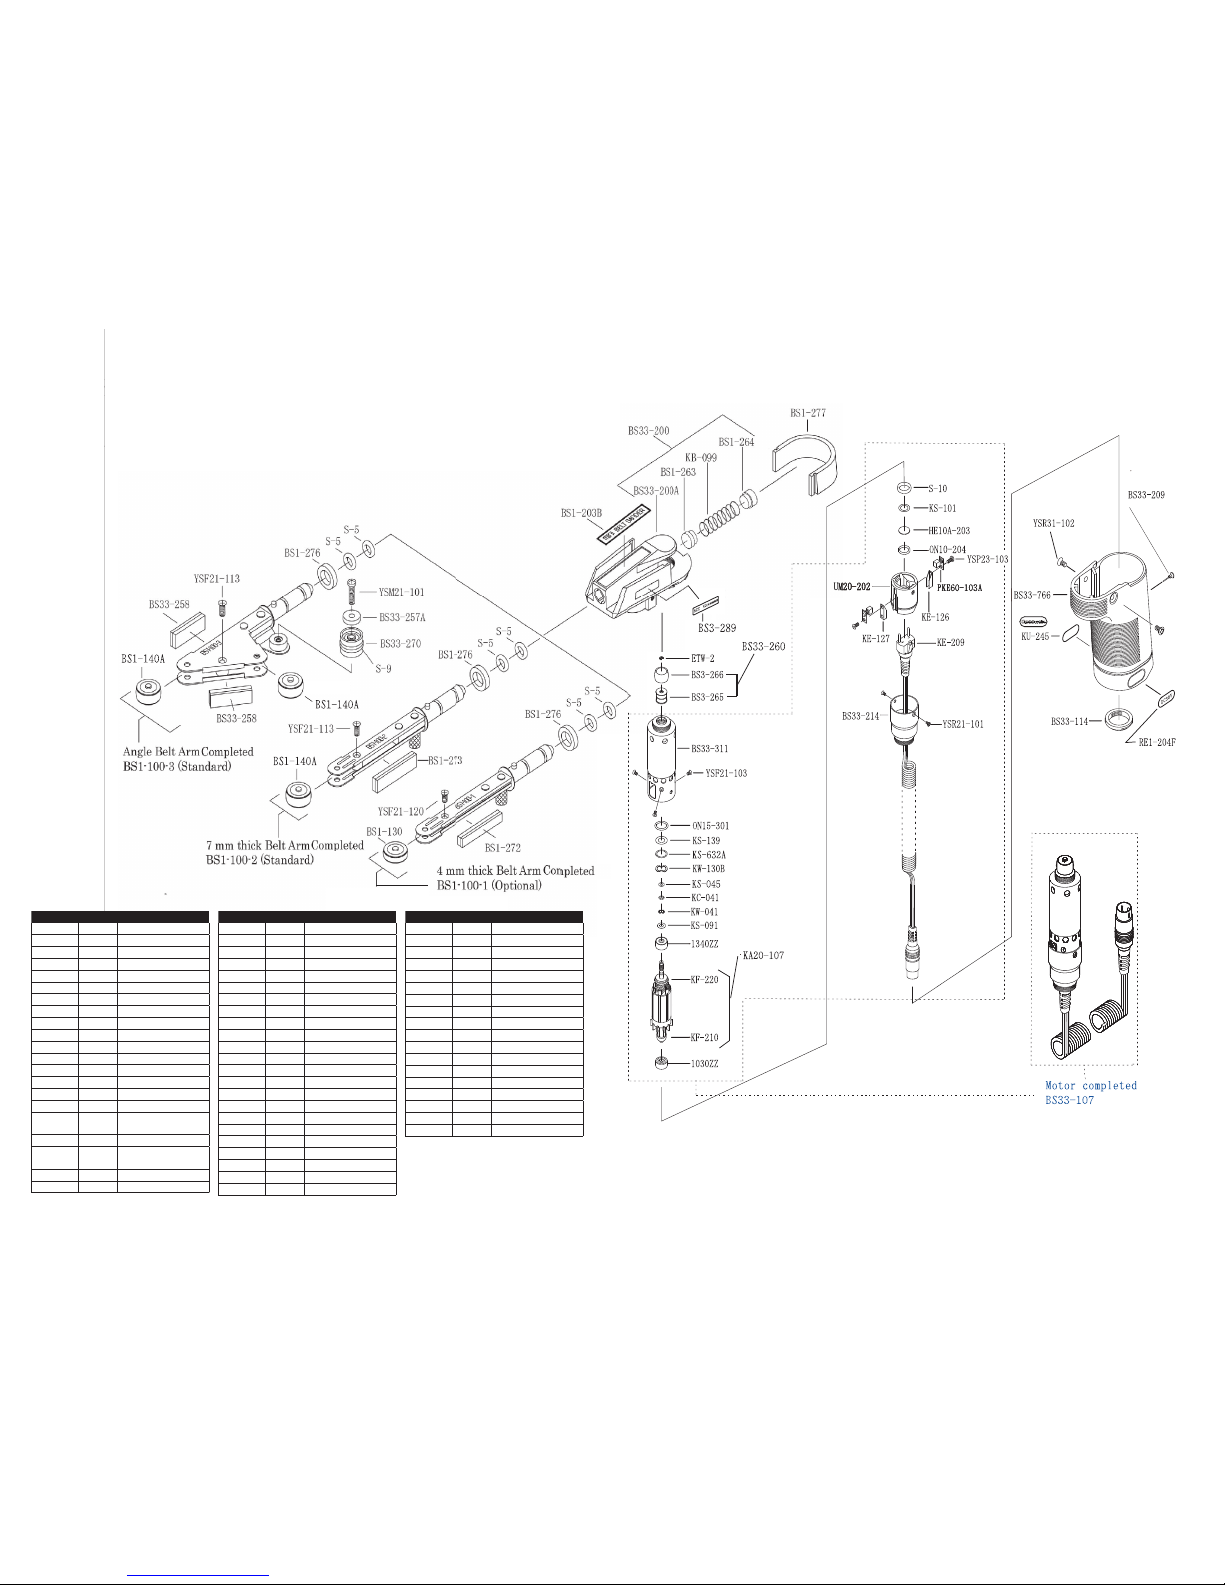
Part# Item# Description
BS1-100-1 510-0494 Belt Arm Completed (4mm)
BS1-100-2 510-0496 Belt Arm Completed (7mm)
BS1-100-3 510-0495 Belt Arm Completed (45°)
BS1-130 896-0183 Belt Arm Pulley (4 mm)
BS1-140A 896-0350 Belt Arm Pulley (7 mm)
BS1-272 896-0185 Support Arm Pad (4 mm)
BS1-273 896-0186 Support Arm Pad (7 mm)
BS33-258 896-0187 Support Arm Pad (45°)
BS1-276 896-0188 Dust Proof Cushion
S-5 896-0189 O-Type Rubber Ring
YSF21-120 896-0190 Pan Headed Screw
YSF21-113 896-0191 Pan Headed Screw
BS33-270 896-0192 Guide Pulley Completed
S-9 896-0193 O-Type Rubber Ring
BS33-257A 896-0194 Pulley Cover
YSM21-101 896-0195 Countersunk Head Screw
BS33-200 896-0196 Belt Holder Body
Completed
BS33-200A 896-0197 Belt Holder Body
BS1-203B 896-0198 Minibelt Sander Name
Plate
BS3-289 896-0351 BZX Name Plate
BS1-263 896-0200 Spring Base
Part# Item# Description
BS1-264 896-0201 Screw Lid
KB-099 896-0202 Coil Spring
BS1-277 896-0203 Protection Cover
BS33-107 896-0352 Motor Completed
BS33-260 896-0353 Driving Pulley Completed
BS3-265 896-0206 Driving Pulley Only
BS3-266 896-0207 Driving Rubber Ring
ETW-2 896-0156 E-Type Clip Ring
BS33-311 896-0354 Motor Housing
ON15-301 896-0160 O-Type Rubber Ring
KS-139 896-0161 Metal spacer
KS-632A 896-0163 Metal spacer
KW-130B 896-0355 Wave Washer
KS-045 896-0165 Fiber Spacer
KC-041 896-0209 C-Type Clip Ring
KW-041 896-0167 Wave Washer
KS-091 896-0210 Spacer
YSF21-103 896-0002 Countersunk Head Screw
KA20-107 896-0356 Armature
KF-220 896-0357 Dust Proof Collar
KF-210 896-0011 Dust Proof Collar
1340ZZ 510-3094 Ball Bearing
1030ZZ 510-3073 Ball Bearing
Part# Item# Description
S-10 896-0012 O-Type Rubber Ring
KS-101 896-0013 Teflon Spacer
HE10A-203 896-0014 Rear Lid
PKE60-103A 510-0161 Carbon Brush ( 2 pcs)
UM20-202 896-0321 Brush Side Lid
YSP23-103 896-0017 Pan Headed Screw
ON10-204 896-0015 O-type Rubber Ring
BS33-214 896-0358 Motor Cap
KE-126 896-0018 (+) Terminal Plate
KE-127 896-0019 (-) Terminal Plate
KE-209 510-0171 Motor Cord with Plug
YSR21-101 896-0359 Countersunk Head Screw
BS33-766 896-0360 Handgrip
BS33-114 896-0361 Handgrip Retaining Nut
BS33-209 — Grounding Pin
YSR31-102 896-0119 Handgrip Locking Screw
KU-245 896-0122 Gesswein Name Plate
RE1-204F 896-0121 DC30V Name Plate
BZX Belt Sander Parts List
When ordering parts, specify part# (or item# if applicable) and description.