manuals.online logo
Brands
  1. Home
  2. •
  3. Brands
  4. •
  5. GFA
  6. •
  7. Door Opening System
  8. •
  9. GFA VR/TF2E User manual

GFA VR/TF2E User manual

This manual suits for next models

1

Other GFA Door Opening System manuals

GFA SI 8.180 FU-30,00 User manual

GFA

GFA SI 8.180 FU-30,00 User manual

GFA ELEKTROMAT KE 60.24-55,00 User manual

GFA

GFA ELEKTROMAT KE 60.24-55,00 User manual

GFA ELEKTROMAT ST 80.15-50,00 User manual

GFA

GFA ELEKTROMAT ST 80.15-50,00 User manual

GFA ELEKTROMAT KE 80.12-55,00 Ex User manual

GFA

GFA ELEKTROMAT KE 80.12-55,00 Ex User manual

GFA ELEKTROMAT KE 120.30 FU-55,00 User manual

GFA

GFA ELEKTROMAT KE 120.30 FU-55,00 User manual

Popular Door Opening System manuals by other brands

Mobeye Call-Key MCK100 installation manual

Mobeye

Mobeye Call-Key MCK100 installation manual

SALICE Lapis Assembly instructions

SALICE

SALICE Lapis Assembly instructions

Cal-Royal N-F77CVR Installation instruction

Cal-Royal

Cal-Royal N-F77CVR Installation instruction

Scrigno OPEN1000 Assembly manual

Scrigno

Scrigno OPEN1000 Assembly manual

BFT WIND RMB 130B 200 installation manual

BFT

BFT WIND RMB 130B 200 installation manual

Alecto ADI-250 user manual

Alecto

Alecto ADI-250 user manual

Besam Swingmaster MP Installation, adjustment and maintenance instructions

Besam

Besam Swingmaster MP Installation, adjustment and maintenance instructions

Assa Abloy SARGENT 1431 Series instructions

Assa Abloy

Assa Abloy SARGENT 1431 Series instructions

GAL MOVFR Quick setup

GAL

GAL MOVFR Quick setup

Häfele Finetta T 70 VF manual

Häfele

Häfele Finetta T 70 VF manual

AGS D-PL Instructions for fitting, operating and maintenance

AGS

AGS D-PL Instructions for fitting, operating and maintenance

Stanley MA900ñ Installation and owner's manual

Stanley

Stanley MA900ñ Installation and owner's manual

WITTUR Hydra Plus UD300 Instruction handbook

WITTUR

WITTUR Hydra Plus UD300 Instruction handbook

Alutech TR-3019-230E-ICU Assembly and operation manual

Alutech

Alutech TR-3019-230E-ICU Assembly and operation manual

Pamex KT-INP35 Installation instruction

Pamex

Pamex KT-INP35 Installation instruction

MPC ATD ACTUATOR 50 ATD-313186 Operating and OPERATING AND INSTALLATION Manual

MPC

MPC ATD ACTUATOR 50 ATD-313186 Operating and OPERATING AND INSTALLATION Manual

Chamberlain T user guide

Chamberlain

Chamberlain T user guide

Dorma MUTO COMFORT M DORMOTION 50 Mounting instruction

Dorma

Dorma MUTO COMFORT M DORMOTION 50 Mounting instruction

manuals.online logo
manuals.online logoBrands
  • About & Mission
  • Contact us
  • Privacy Policy
  • Terms and Conditions

Copyright 2025 Manuals.Online. All Rights Reserved.

Technical Specification
Declaration of Conformity
Key Features
12.2021
433.92 MHz Rolling
Code Transmitter
VR/TF2E 2 Channel
40019030 00001
VR/TF4E 4 Channel
40019031 00001
The transmitter must be used with a
compatible receiver. The transmitter code
changes on every activation to prevent
scanning or copying of the signal.
A special algorithm keeps the transmitter and
receiver synchronised. (Keeloq® Hopping
code)
A factory set serial number identifies each
transmitter. The serial number is stored in the
receiver memory during commissioning.
These instructions are for Doors with TS 970 or TS 981 Controls and Radio
Receiver VR/R2E. For Doors with TS 971 Controls refer to the TS 971
Instruction book
INSTRUCTIONS
Only transmitters whose codes are held
in the receiver memory will activate the
receiver.
Supply: 12 Vdc
Battery type: 23A –L1028
Current consumption: 25 mA
Operating frequency: 433.92 MHz
Security code combinations: 264
Modulation: AM/ASK AM/ASK
E.r.p.: 100 –200 µW 100 - 200 µW
Range in open space: 150 –250 m 150 - 250 m
Operating temperature: -10 ºC + 50ºC -10 °C - +50 °C
Dimensions: 81 x 46 x 16 81 x 46 x 16 mm
Weight: 40 g 40 g
Hereby, CDVI Wireless Spa, declares that the radio equipment type VR/TFxE is in compliance with
directive 2014/53/EU. The full text of the EU declaration of conformity is available at the following
internet address: www.gfa-elektromaten.co.uk
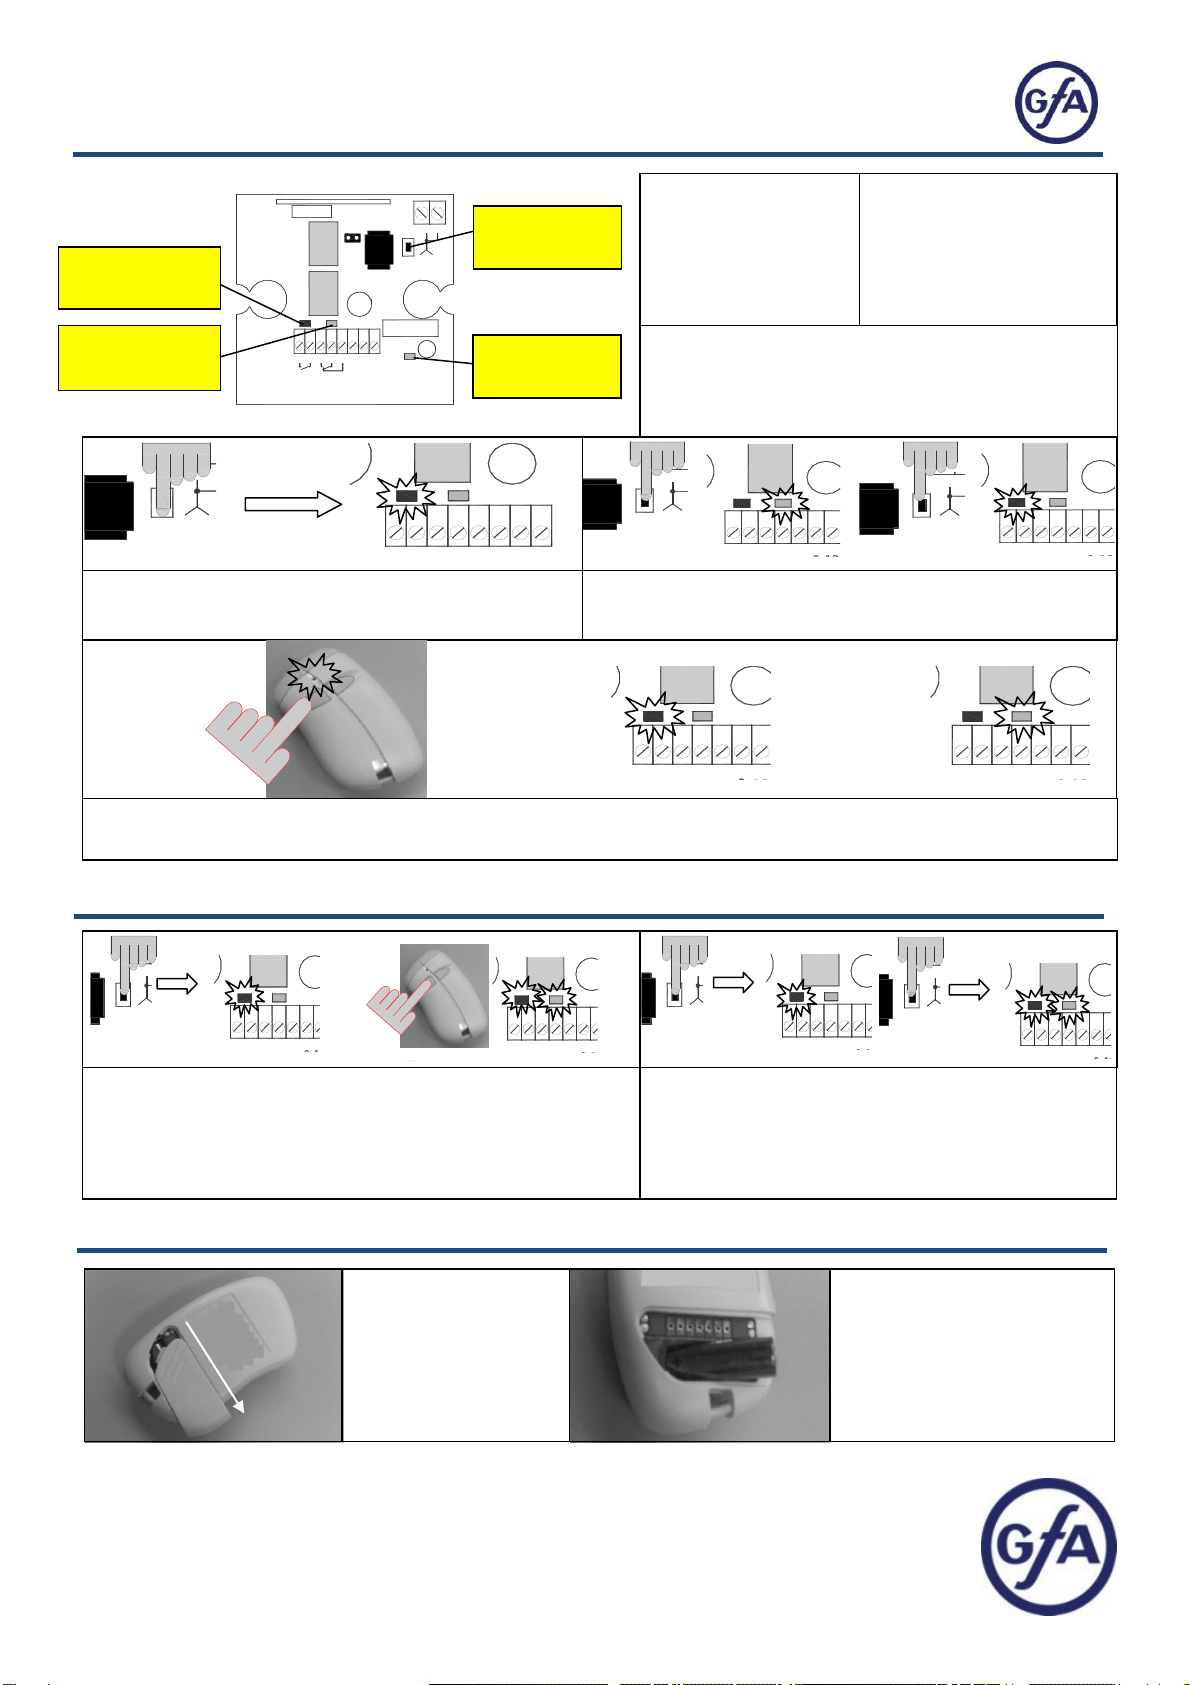
Storing the Transmitter Code in the 2-Channel Mini
Cancelling Transmitter Codes from the 2-Channel Mini
14 15
678 9 10111213
01224
- + +
ch4ch3
K3
K4
JP1
P1
DL3 DL4
Programme
button P1
Relay 3 Red
LED DL3
Relay 4 Green
LED DL4
Supply ON
Green LED
14 15
678 9 10111213
01224
- + +
ch4ch3
K3
K4
JP1
P1
DL3 DL4
3 sec.
14 15
678 9 10111213
01224
- + +
ch4ch3
K3
K4
JP1
P1
DL3 DL4
14 15
678 9 10111213
01224
- + +
ch4ch3
K3
K4
JP1
P1
DL3 DL4
14 15
678 9 10111213
01224
- + +
ch4ch3
K3
K4
JP1
P1
DL3 DL4
Press and hold Radio Receiver button P1 for 3
seconds until red LED DL3 turns on.
14 15
678 9 10111213
01224
- + +
ch4ch3
K3
K4
JP1
P1
DL3 DL4
14 15
678 9 10111213
01224
- + +
ch4ch3
K3
K4
JP1
P1
DL3 DL4
Press button P1 again to select Relay K3 or K4 indicated
by LED DL3 or DL4
Control Relay K3 –Sequential operation when
used with TS 9xx
Control Relay K4 –Open command only when
used with TS 9xx
Decide which transmitter button will operate the Shutter and press it. The selected relay will energise and the
corresponding LED will flash. Another transmitter can be added while LED DL3 or DL4 is on.
Relay K3
Sequential operation
determined by the
setting of TS 9xx
parameter P2.6
Relay K4
Open command only.
Shutter closes by TS 9xx
time delay or close push
button.
14 15
678 9 10111213
01224
- + +
ch4ch3
K3
K4
JP1
P1
DL3 DL4
14 15
678 9 10111213
01224
- + +
ch4ch3
K3
K4
JP1
P1
DL3 DL4
OR
+
-
Remove the old battery and
replace
Ensure that the new battery
is correctly oriented
( + / - )
Replace the battery
with type 23A –
L1028 only.
Remove the battery
cover.
Battery Replacement
1
2
3
14 15
678 9 10111213
01224
- + +
ch4ch3
K3
K4
JP1
P1
DL3 DL4
14 15
678 9 10111213
01224
- + +
ch4ch3
K3
K4
JP1
P1
DL3 DL4
14 15
678 9 10111213
01224
- + +
ch4ch3
K3
K4
JP1
P1
DL3 DL4
Cancelling a Single Transmitter Code.
Press and hold Radio Receiver button P1 for 3 seconds
until red LED DL3 turns on. Press the Transmitter button
that is to be cancelled. If it is a stored code it will be
cancelled and LED’s DL3 and DL4 will flash twice.
3 sec.
14 15
678 9 10111213
01224
- + +
ch4ch3
K3
K4
JP1
P1
DL3 DL4
14 15
678 9 10111213
01224
- + +
ch4ch3
K3
K4
JP1
P1
DL3 DL4
14 15
678 9 10111213
01224
- + +
ch4ch3
K3
K4
JP1
P1
DL3 DL4
14 15
678 9 10111213
01224
- + +
ch4ch3
K3
K4
JP1
P1
DL3 DL4
3 sec.
6 sec.
Cancelling all Transmitter Codes.
Press and hold Radio Receiver button P1 for 3
seconds until red LED DL3 turns on. Release and
Press P1 again, hold for 6 seconds until LED’s
DL3 and DL4 flash three times.
Supplied by:
GfA ELEKTROMATEN UK Ltd
Agincourt road, Warwick CV34 6XZ, England.
Telephone: 01926 452452 Fax: 01926 336417
E-mail: sales@ gfa-elektromaten.co.uk
Web Site: www.gfa-elektromaten.co.uk
Manufactured by:
CDVI Wireless Spa
Via Piave, 23 - 31020
San Pietro di Feletto (TV) - Italy