Ghibli & Wirbel POWER EXTRA 7 User guide

www.ghibliwirbel.com
Professional Cleaning Machines Since 1968
EN
Use and Maintenance
8050831
ed. 10-2018

www.ghibliwirbel.com
Professional Cleaning Machines Since 1968
2
Mod.
Art.
Cap.ty
Vac mba
Air flow l/s
Nr
3
4
56
7
8
1
2

www.ghibliwirbel.com
Professional Cleaning Machines Since 1968
3
1234
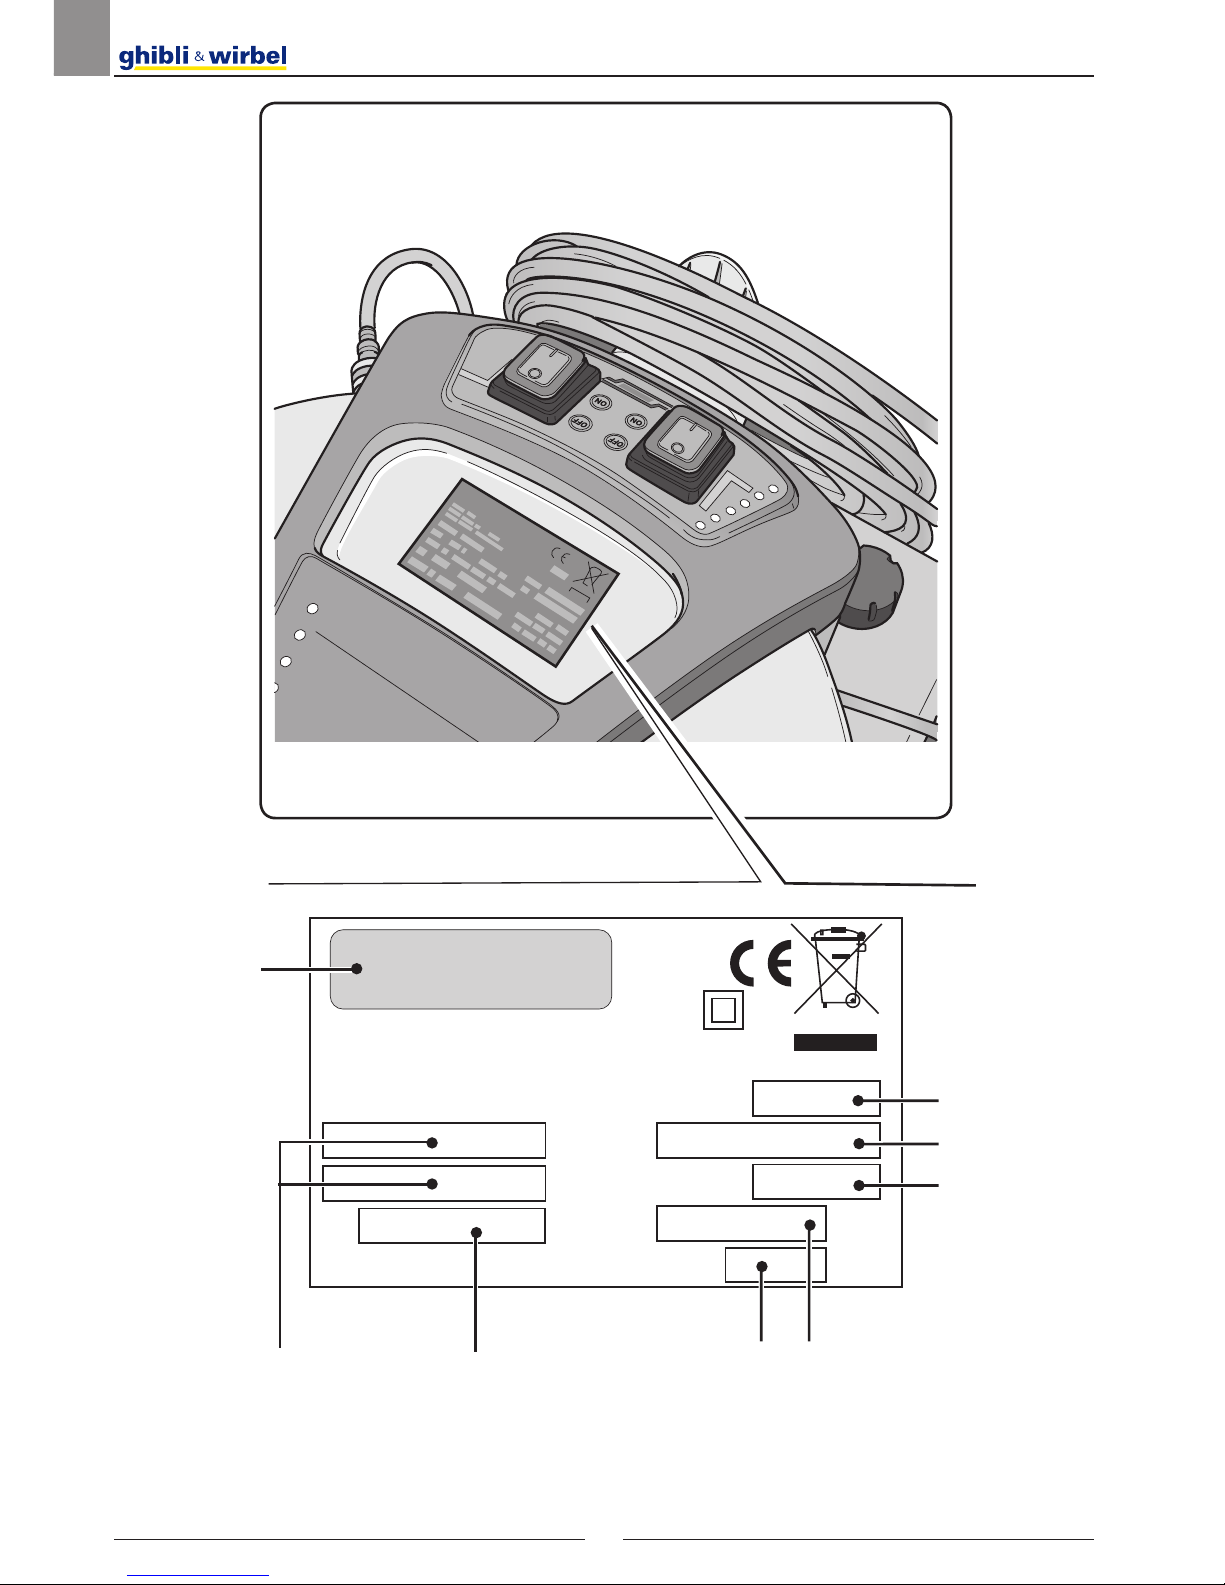
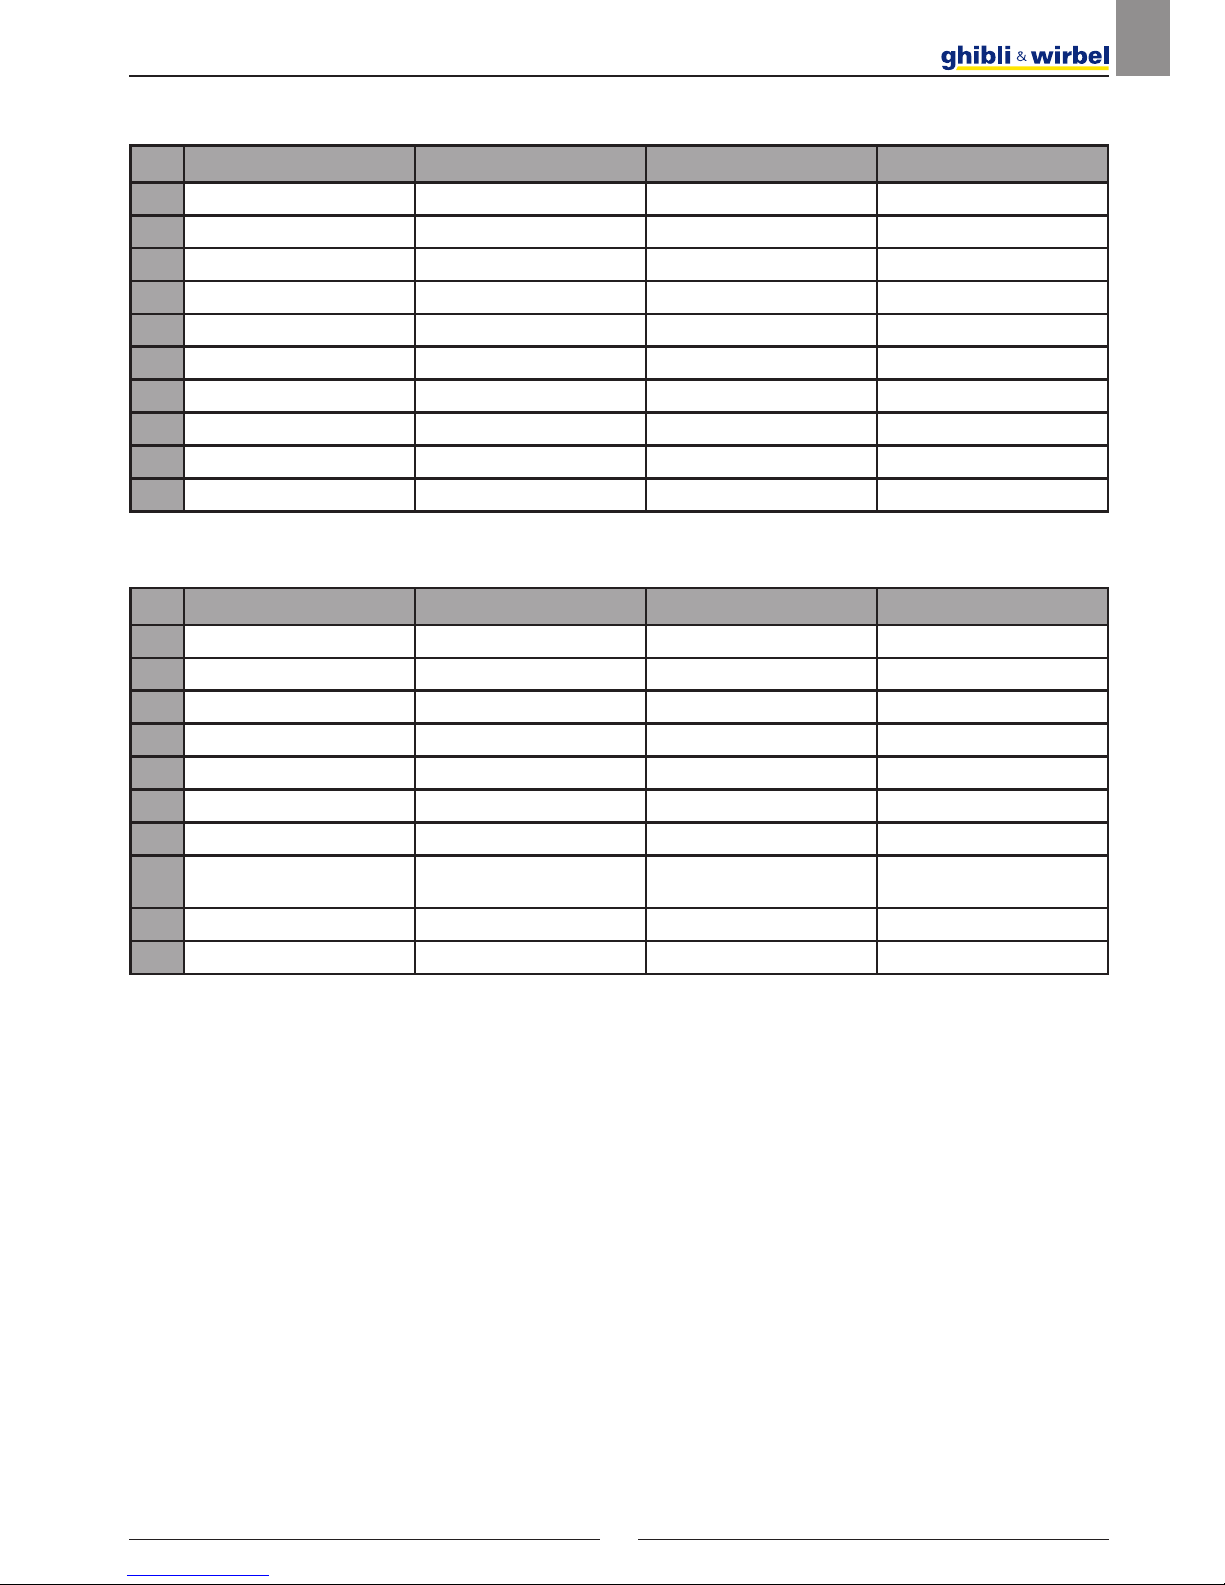
IT Produttore Modello Articolo Capacità fusto
EN Manufacturer Model Article Container capacity
FR Producteur Modèle Article Capacité de la cuve
DE Hersteller Modell Artikel
Fassungsvermögen des Körpers
ES Fabricante Modelo Artículo Capacidad del bidón
PT Produtor Modelo Artigo Capacidade do reservatório
NL Producent Model Artikel Inhoud reservoir
CS Výrobce Model Typ Obsah nádoby
RU
AR
5678
IT Capacità aspirazione Portata d’aria N° Matricola Caratteristiche elettriche
EN Vacuum Air flow Serial N° Electrical characteristics
FR Capacité d’aspiration Débit d’air N° Matricule Caractéristiques électriques
DE Ansaugleistung Luftdurchsatz Matrikelnr. Elektrische Eigenschaften
ES Capacidad de aspiración Caudal de aire N° Matrícola Características eléctricas
PT Capacidade de aspiração Caudal de ar Número de série Características elétricas
NL Zuigcapaciteit Luchtdebiet Serienummer Elektrische eigenschappen
CS Sací výkon
vzduchu Elektrické údaje
RU
AR

www.ghibliwirbel.com
Professional Cleaning Machines Since 1968
4
Fig. 1 Fig. 2 Fig. 3 Fig. 4
Fig. 5 Fig. 6 Fig. 7
Fig. 8 Fig. 9
Fig. 10
Fig. 12
Fig. 11
Fig. 13
13
20
21
9
7
5
17
1
4
11
8
1
10 14
19
18
2
3
6
10
9
10
11
10
11
12
11
13
15
9
8
16
22
23
24
25

www.ghibliwirbel.com
Professional Cleaning Machines Since 1968
5
Fig. 14
Fig. 20
Fig. 19
Fig. 17
Fig. 21
Fig. 15 Fig. 16
Fig. 18
30
21
31
26
34
29
27
11
33
28
37
13
10
9
28
30
32
35
36

www.ghibliwirbel.com
Professional Cleaning Machines Since 1968
6
Fig. 26 Fig. 27
Fig. 22
Fig. 24
Fig. 23
Fig. 25
40
39
38
38
40
37
39
39
40
37 38
41

www.ghibliwirbel.com
Professional Cleaning Machines Since 1968
7
CODICE - CODE
CODE - KENNNR.
CÓDIGO - CÓDIGO
CODE - KÓD
КОД -
زمرلا
EXTRA 7 I AUTO 16254010001
EXTRA 7 I AUTO 16258711950
EXTRA 7 I 16244010001
EXTRA 7 I 16248711950
EXTRA 7 P 16221210001
EXTRA 7 P 16228611950
MODELLO -MODEL
MODÈLE - MODELL
MODELO - MODELO
MODEL - MODEL
МОДЕЛЬ -
زارطلا

www.ghibliwirbel.com
Professional Cleaning Machines Since 1968
8

www.ghibliwirbel.com
Professional Cleaning Machines Since 1968
9
EN
English ............................................................................................................. EN - 1
(Translation of original instructions)


www.ghibliwirbel.com
Professional Cleaning Machines Since 1968
EN -
1
TECHNICAL
CHARACTERISTICS
Voltage..................................See data plate
Motor power .....................................1200 W
Sound level ....................................60 dB(A)
Depression....................................240 mbar
Useful capacity tank............................... 11 l
Detergent tank capacity ........................... 7 l
Dimensions ...............530 x 380 x 485H mm
Weight.............................................. 10.5 kg
Accessories................................... Ø 36 mm
INTRODUCTION
DANGER:
Before using the appliance please read the
booklet “SAFETY INSTRUCTIONS FOR
FANS” attached to this.
This manual forms an integral part of the
machine itself. It must therefore be kept in
a safe place where it is accessible to all us-
ers (operators and maintenance personnel)
throughout the life of the machine until it is
scrapped.
TYPE OF USE
This appliance was designed for spray wash-
ing and extracting any type of fabric, carpet,
car seats, floors etc.
It can be used as a vacuum cleaner and or
solid and liquid suction unit with the appropri-
ate accessories upon request.
It has only been designed for these uses.
DANGER:
The manufacturer can not be held respon-
sible for any damage due to improper or
incorrect use.
Any other use releases the manufacturer
from liability for harm to persons and/or
property and invalidates any warranty
condition.
IMPROPER USE
Do not use the appliance to:
- Aspirate flammable, explosive, corrosive
and toxic substances.
- Aspirate hot substances.
- Do not use the appliance in liquid suction
mode to suction powder and vice versa
Do not use the appliance in areas at risk of
explosion.
PREPARING THE
APPLIANCE
Assembling the hoses
- Insert, as far as possible, the sleeve (1
Fig. 1) of the suction hose into the nozzle
(2 Fig. 1) on the drum.
- To release the sleeve (1 Fig. 2) move the
lever (3 Fig. 2) clockwise then pull the
sleeve outwards (1 Fig. 2).
- Connect the (4 Fig. 3) detergent delivery
hose to the quick coupling (5 Fig. 3); to
release it push the quick coupling (5 Fig.
3) inwards.
- Connect the detergent suction (6 Fig. 4)
hose to the quick coupling (7 Fig. 4); to
release it push the quick coupling (7 Fig.
4) inwards.
Rigid pipe assembly for washing
carpets or floors (if present)
After connecting the suction hose to the out-
let the drum, do as follows:
- Make sure the lever (8 Fig. 5) is in verti-
cal position then attach the first extension
(10 Fig. 5) to the ergonomic handle (9
Fig. 5) of the flexible hose and lock it in
place by turning the lever (8 Fig. 5) to the
horizontal position.
- Attach the first extension (10 Fig. 6) to the
second extension (11 Fig. 6) and lock it
in place using the lever (12 Fig. 6) as de-
scribed previously for the first extension.
- Attach the floor nozzle (13 Fig. 7) to the
second extension (11 Fig. 7) and lock it
in place using the lever (14 Fig. 7) as de-
scribed above.

www.ghibliwirbel.com
Professional Cleaning Machines Since 1968
EN -
2
Hose assembly for fabric washing (if
present)
After connecting the suction hose to the out-
let the drum, do as follows:
- Make sure the lever (8 Fig. 8) is in vertical
position then attach the fabric nozzle (15
Fig. 8) to the ergonomic handle (9 Fig. 8)
and lock it in place by turning the lever (8
Fig. 8) to the horizontal position.
Professional hose assembly for fab-
ric washing (if present)
After connecting the suction hose to the out-
let the drum, do as follows:
- Insert the fabric nozzle (16 Fig. 9) into the
flexible hose (17 Fig. 9).
- Connect the detergent hose (18 Fig. 9)
to the quick coupling (19 Fig. 9) on the
flexible hose; to release it push the quick
coupling (19 Fig. 9) towards the hose.
Filling the detergent tank
- Remove the cap (20 Fig. 10) and pour
the detergent liquid (suitable for the sur-
faces to be washed) into the tank (21 Fig.
10).
NOTE:
For detergent dosing refer to the manufac-
turer’s instructions.
- Put the cap back on (20 Fig. 10).
USING THE APPLICANCE
- The appliance is fitted with wheels and
can therefore be pulled along using the
flexible hose.
- To lift it up, insert your fingers under the
handle (22 Fig. 11) on the top of the cov-
er.
Starting up the appliance
- Insert the plug (23 Fig. 12) into the electri-
cal socket.
- Push the switch (24 Fig. 13) on “I” to start
the suction motor; the switch lights up.
- Push the switch (25 Fig. 13) on “I” to start
the detergent pump; the switch lights up.
NOTE:
The suction motor and the detergent pump
operate independently; therefore, it is pos-
sible to:
- wash fabrics or floors/ carpets by starting
only the detergent pump;
- wash and suction liquid simultaneously
by starting up the detergent pump and
suction motor at the same time;
- suction liquids by only starting the suction
motor.
NOTE:
For the ergonomic handle (if present) it is
possible to adjust the suction force using the
selector (26 Fig. 14).
The suction force is decreased by opening
the window (27 Fig. 14).
Washing floors or carpets
- To wash floors or carpets it is necessary
to mount the hose with ergonomic handle
(9 Fig. 15), the rigid extensions (10 and
11 Fig. 15) and the floor nozzle (13 Fig.
15), if present.
- Start the suction motor and the detergent
pump by pressing the relative switches
(24 - 25 Fig. 13).
- Press the switch (28 Fig. 15) to dispense
the detergent, release the button to stop
dispensing.
The switch (28 Fig. 15) can be blocked
in the pushed position (continuous deter-
gent dispensing) by moving the slide (29
Fig. 15) towards the switch (28 Fig. 15).
When the slide (29 Fig. 15) is moved
back to its original position the switch is
released and detergent dispensing stops.
- The detergent released washes the floor/
carpet / and the dirty liquid is suctioned
into the tank of the appliance.

www.ghibliwirbel.com
Professional Cleaning Machines Since 1968
EN -
3
For very dirty areas it is recommended
you apply detergent to the dirty area with-
out suctioning it; leave the detergent al-
lowing it to work for several seconds and
then wash the area and suction the dirt.
NOTE:
To prevent the detergent pump from break-
ing, it is recommended that you stop its op-
eration, pushing the relative switch, when
dosing has not occurred for several minutes.
NOTE:
When the recovery tank is full, noise in-
creases and the appliance does not suction;
therefore, switch it off and empty the tank as
described in the relevant paragraphs.
Cleaning chairs
- Mount the fabric nozzle (30 Fig. 16) on
the relative hose (31 Fig. 16).
- Start the suction motor and the detergent
pump by pressing the relative switches
(24 - 25 Fig. 13).
- Place the nozzle on the fabric pressing
slightly then press the switch (28 Fig. 15)
or the lever (32 Fig. 15), depending on
the nozzle type, to dispense the deter-
gent, release to stop dispensing.
For very dirty areas it is recommended
you apply detergent to the dirty area with-
out suctioning it; leave the detergent al-
lowing it to work for several seconds and
then wash the area and suction the dirt.
NOTE:
To prevent the detergent pump from break-
ing, it is recommended that you stop its op-
eration, pushing the relative switch, when
dosing has not occurred for several minutes.
NOTE:
When the recovery tank is full, noise in-
creases and the appliance does not suction;
therefore, switch it off and empty the tank as
described in the relevant paragraphs.
Switching off the appliance
- Press the switches (24 and 25 Fig. 13) to
“0” to switch off the appliance; the lamps
on the switches will go out.
- Remove the plug (23 Fig. 12) from the
electrical socket.
- Wind up the cable (33 Fig. 17) and hook
it onto its housing (34 Fig. 17).
CLEANING AND
MAINTENANCE
DANGER:
Before performing any maintenance op-
erations, unplug the appliance from the
electrical socket.
Daily cleaning
Emptying the recovery tank
- Disconnect the detergent delivery hose
(4 Fig. 3) and the flexible hose (1 Fig. 2).
- Disconnect the detergent suction hose (6
Fig. 4).
- Lift up the levers (35 Fig. 18) and remove
the cover (36 Fig. 19) complete with mo-
tor.
- Remove the detergent container (21 Fig.
20) lifting it by the handles.
- Place yourself over a floor drain and
empty the liquid in the recovery tank (37
Fig. 21)
- Clean the inside of the tank with running
water and then reassemble everything
proceeding in the reverse order.
Cleaning the detergent dosing circuit
At the end of each workday, clean the de-
tergent dosing circuit as follows to prevent
clogging:
- Disconnect the detergent delivery hose
(4 Fig. 3).
- Disconnect the detergent suction hose (6
Fig. 4).
- Lift up the levers (35 Fig. 18) and remove
the cover (36 Fig. 19) complete with mo-

www.ghibliwirbel.com
Professional Cleaning Machines Since 1968
EN -
4
tor.
- Remove the detergent container (21 Fig.
20) lifting it by the handles.
- Remove the cap (20 Fig. 10) of the de-
tergent container and empty the residual
liquid into a suitable container.
- Wash the inside of the detergent contain-
er with running water.
- Reassemble all of the parts performing
these operations in the reverse order.
- Pour clean water into the detergent con-
tainer, electrically connect the appliance
and start the dosing pump by pressing
the switch (25 Fig. 13).
- Clean the circuit by pressing the switch
(28 Fig. 15) or the lever (32 Fig.15), de-
pending on the type of nozzle.
- Dispense the liquid from the nozzle until
clean water comes out.
- Empty the water in the detergent tank as
described above.
Cleaning the appliance body
- Clean the unit body with a cloth damp-
ened with water or a mild detergent;
DANGER:
Do not wash the appliance using jets of
water.
Periodic checks
Checking the air outlet filter
- Loosen the screws (38 Fig. 22) and re-
move the cover (39 Fig. 22)
- Remove the filter sponge (40 Fig. 23) and
clean it with a blast of air (Fig. 24).
The filter sponge can be washed in warm
water and must only be replaced once it
is completely dry. If it is too dirty, replace
it with a new one.
- Reassemble all the parts by following the
dismantling process steps in the reverse
order.
Cleaning the detergent dispensing
nozzle
If you note that the detergent is not dispensed
evenly, clean the nozzle as described below:
- Remove the ring nut (37 Fig. 25).
- Remove the nozzle (38 Fig. 25) and
clean it with running water, if it is clogged
use a pin being careful not to distort the
shape of the nozzle.
- Reassemble all of the parts performing
these operations in the reverse order.
Cleaning the detergent suction filter
If you note that the detergent is not being
suctioned properly, check and clean the suc-
tion filter located inside the detergent tank.
- Using a screw driver, loosen the suction
cap (39 Fig. 26) and remove it from the
tank with the relative suction hose.
- Remove the filter (40 Fig. 26) and wash it
under running water; if it is too clogged it
should be replaced.
- Reassemble all of the parts performing
these operations in the reverse order.
Replacing the floor nozzle squeegee
(if present)
If when washing the floors the washing liquid
is not suctioned properly and the floor or car-
pet remains wet, check the condition of the
squeegee (41 Fig. 27).
If the squeegee is worn or damaged replace
it by slipping the squeegee and its bristles off
the nozzle as shown in figure 27.
SPARE PARTS
Manual nozzle (vers. auto) ...Code 7180085
Extractor M7 + strip ..............Code 6010692
Small nozzle .........................Code 6010695
PROBLEM CAUSE SOLUTION
The vacuum cleaner does
not work.
Switch not pressed.
Plug not inserted.
Power cut.
Press the switch.
Insert the plug into the sock-
et.
Check the power
line.
Suction is not satisfactory. Accessories or tubes
clogged.
Suction nozzle squeegee
worn or damaged.
Check and clean the flexible
hose and the suction nozzle.
Check and replace the
squeegee.
Detergent dispensing not
even.
Nozzle clogged.
Filter clogged.
Clean nozzle.
Clean suction filter.
Detergent dispensing not
working.
Switch not pressed. Press the switch.

www.ghibliwirbel.com
Professional Cleaning Machines Since 1968
EN -
5
PROBLEM CAUSE SOLUTION
The vacuum cleaner does
not work.
Switch not pressed.
Plug not inserted.
Power cut.
Press the switch.
Insert the plug into the sock-
et.
Check the power
line.
Suction is not satisfactory. Accessories or tubes
clogged.
Suction nozzle squeegee
worn or damaged.
Check and clean the flexible
hose and the suction nozzle.
Check and replace the
squeegee.
Detergent dispensing not
even.
Nozzle clogged.
Filter clogged.
Clean nozzle.
Clean suction filter.
Detergent dispensing not
working.
Switch not pressed. Press the switch.

www.ghibliwirbel.com
Professional Cleaning Machines Since 1968
EN -
6


Professional Cleaning Machines Since 1968
DEALER
Ghibli & Wirbel S.p.A.
Via Circonvallazione, 5 - 27020 Dorno PV - Italia
P.
+39 0382 848811 -
F.
+39 0382 84668 -
M.
www.ghibliwirbel.com
100% MADE IN ITALY
A COMPANY GROUP OF RIELLO INDUSTRIES
Cod. 8050831 - 3^ ed. - 10/2018
Table of contents
Popular Air Cleaner manuals by other brands

Ecoair
Ecoair PURE126 user manual

AIRINNOVATIONS
AIRINNOVATIONS COMPACT AIR PURIFIER instructions

Better Air
Better Air BIODIFY quick start guide

GAMA
GAMA Clinell Rediair RAIR-UK product manual

Johnson & Starley
Johnson & Starley CLEANFLOW User and Pad Replacment Instructions

M Confort
M Confort E1200 user manual

CoolSpace
CoolSpace FLURRY CS6-210 Operation and maintenance manual

AIRINNOVATIONS
AIRINNOVATIONS XJ-209 Instruction manual and warranty information

Silvercrest
Silvercrest 296100 Operation and safety notes

BLUE STONE
BLUE STONE APB-9545 user manual

Johnson & Starley
Johnson & Starley CLEANFLOW PETITE User instructions

Colzer
Colzer BKJ-33 user manual