Gigafast EE102-DLX User manual

EE-102DLX User Manual
(32-bit PCIMCIA 10/100 Mbps Fast Ethernet Adapter)

Copyright
The contents of this publication may not be reproduced in any part or as a whole,
stored, transcribed in an information retrieval system, translated into any
language, or transmitted in any form or by any means, mechanical, magnetic,
electronic, optical, photocopying, manual, or otherwise, without the prior written
permission.
Trademarks
All products, company, brand names are trademarks or registered trademarks of
their respective companies. They are used for identification purpose only.
Specifications are subject to be changed without prior notice.
Copyright© 2004, GigaFast Inc., All Right Reserved
2

FCC Interference Statement
This equipment has been tested and found to comply with the limits for a Class B
digital device pursuant to Part 15 of the FCC Rules. These limits are designed to
provide reasonable protection against radio interference in a commercial
environment. This equipment can generate, use and radiate radio frequency
energy and, if not installed and used in accordance with the instructions in this
manual, may cause harmful interference to radio communications. Operation of
this equipment in a residential area is likely to cause interference, in which case
the user, at his own expense, will be required to take whatever measures are
necessary to correct the interference.
CE Declaration of Conformity
This equipment complies with the requirements relating to electromagnetic
compatibility, EN 55022/A1 Class B, and EN 50082-1. This meets the essential
protection requirements of the European Council Directive 89/336/EEC on the
approximation of the laws of the member states relation to electromagnetic
compatibility.
3

Table of Contents:
Chapter 1...........................................................................................5
Introduction................................................................................................. 5
Features........................................................................................................ 5
Package Content........................................................................................ 5
Requirements.............................................................................................. 6
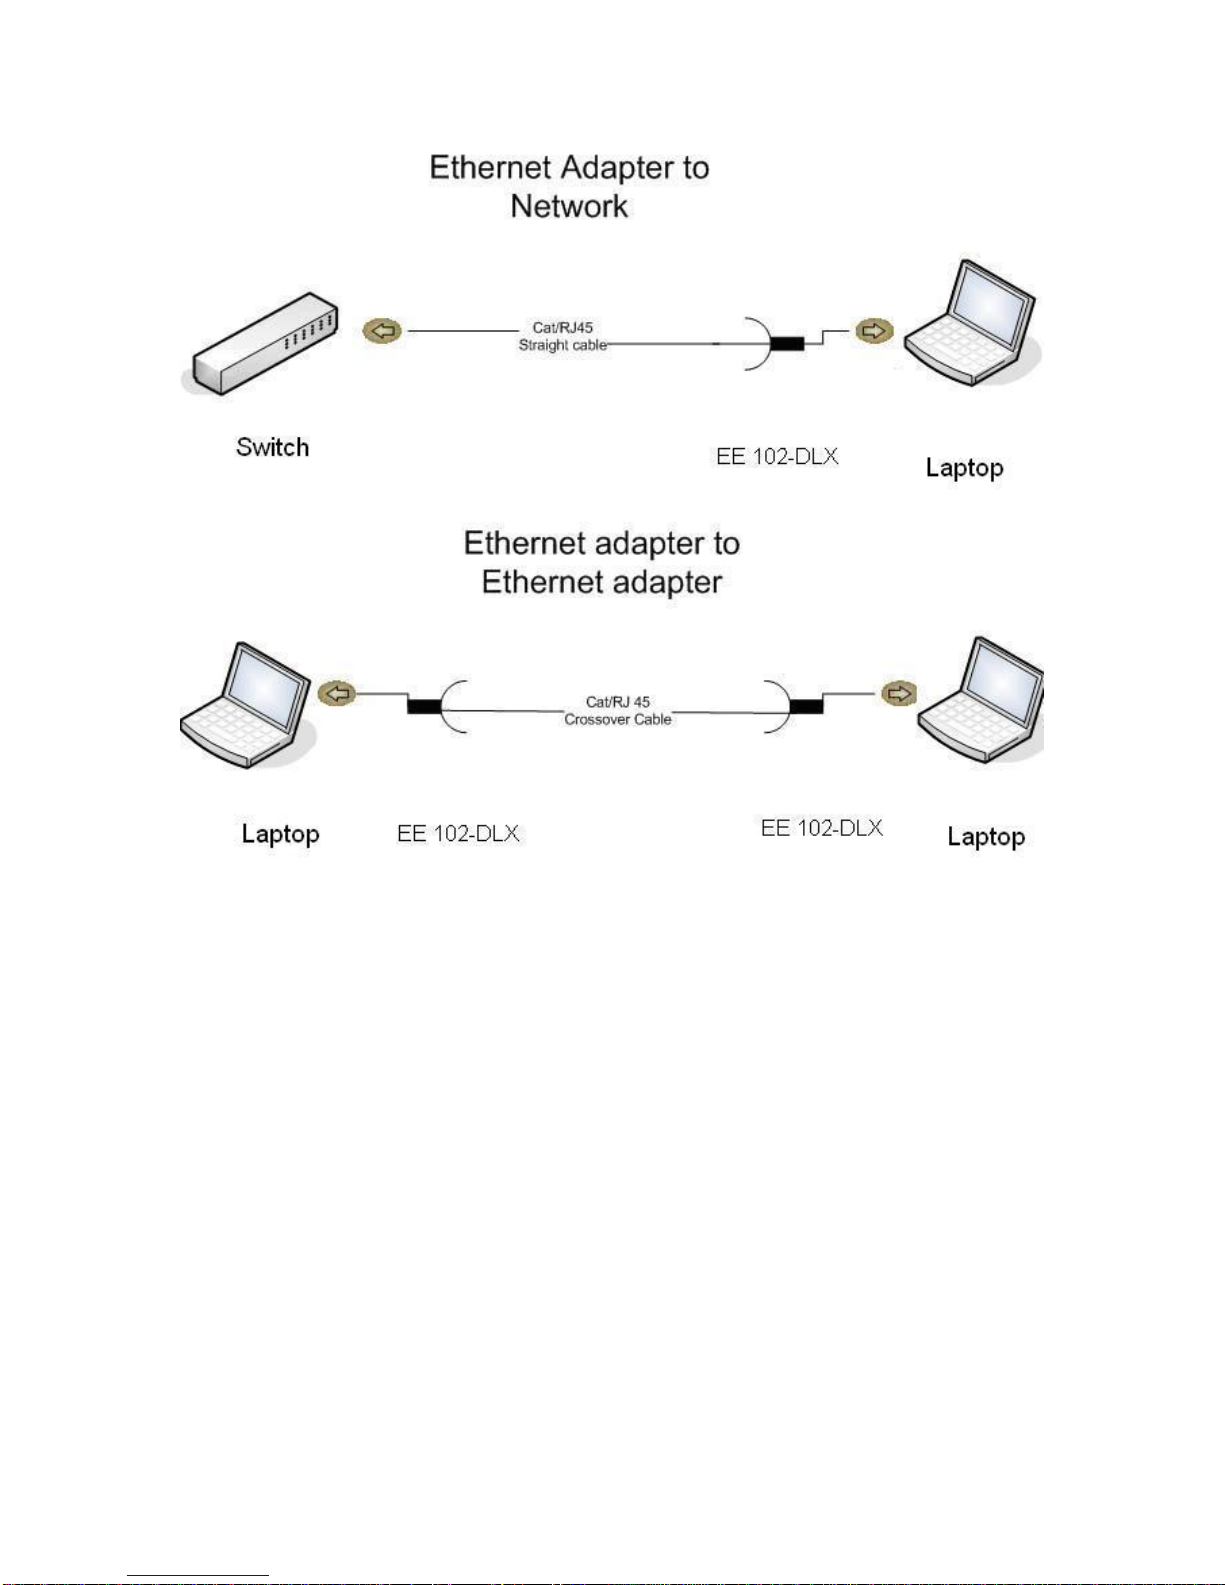
Wire Diagram............................................................................................... 6
Chapter 2...........................................................................................8
Installing Network Drivers....................................................................... 8
Standard Windows 95 (Version 4.00.950 and 4.00.950a)................. 9
Standard Windows 95 Version 4.00.950b (OSR2) ........................... 10
Windows NT Version 4.0........................................................................ 10
Windows 98 ............................................................................................... 11
Windows 2000........................................................................................... 11
Windows Millennium Edition ................................................................ 12
NetWare ODI Client.................................................................................. 12
Microsoft Network Client for DOS....................................................... 14
Chapter 3.........................................................................................15
Troubleshooting / Frequently Asked Questions ............................. 15
Appendix A: Cabling and Pin Assignment........................................17
Appendix B: Glossary....................................................................... 19
Appendix C: Technical Specifications ..............................................21
Appendix D: Warranty Info. .............................................................. 22
Appendix E: Contact Information......................................................22
4

Chapter 1
Introduction:
Congratulations on the purchase of this 32 bit PCIMCIA 10/100 Mbps Ethernet
adapter. High speed broadband internet is commonly used these days. It’s
almost a must have product in homes and offices. No matter if you have a high
speed broadband internet connection or a simple peer-to-peer connectivity; this
product will help you through these simple tasks. Installation only takes few
minutes! EE-100dlx is also compatible with most of the popular operating
systems. Read on this manual for further information on this 32 bit PCIMCIA
10/100 Mbps Ethernet adapter.
Features:
•Compliant with IEEE802.3u 10Base-T/100Base-TX
•addressPlug-and-Play installation automatically sets up IRQ and I/O
•Fully compliant with 32-bit PCIMCIA Local Bus specification
•Full duplex design to double the performance to 20Mbps/200Mbps
•icrosoft
tic, IBM
LAN server, ODI Netware 2.x/3.x/4.x/5.x, SCO UNIX, Linux
•Provides diagnostic software and lights to indicate network status
Pac a
•(1) PCIMCIA 10/100based Ethernet Adapter
•(1) Driver/Floppy OR Driver/Compact Disc With User manual included
•Supports Auto-Negotiation function
•Built-in FIFO buffers to eliminate external memory
•One STP connector for 100Mbps or 10Mbps network speed
Supports early interrupt on transmit to increase performance
•Driver supports Microsoft Windows 3.1/3.11/95/98/ME/2000/XP, M
Windows NT 3.51/NT4.0/NDIS, Microsoft LAN manager, LANtas
k ge Content:
5

Requirements:
•A running operating system
•A laptop (or reader) that has an open 32bit PCIMCIA slot available
A Pentium 1•similar or higher processor/IBM compatible personal
computers
ire Diagram:
thernet Adapter to Network:
e laptop (connected with the EE-100axp) and out to your modem/router/switch.
thernet Adapter to another Ethernet Adapter (Peer to Peer):
th
your
on how to setup a Peer to Peer
onnection please read our FAQ guide.
W
E
The ‘Ethernet Adapter to Network’ simply shows how a user can use the EE-
100dlx to connect to his/her modem/router/switch. One Ethernet cable goes from
th
E
The bottom diagram shows how the connection works when a user wishes to do
a peer to peer connection in the network. Simply have both sides connected wi
an CAT5 crossover cable and setup both computers with IP addresses in
TCP/IP properties For more information
c
6

7

Chapter 2
Installing Network Drivers
This file describes how to install REALTEK rtl8139B(L) CardBus network card
that completes your notebook PC to network.
Before You Install the Network Driver
Make sure which network driver you should use. The drivers for each OS
environment are provided on the list:
Windows 95 version 4.00.950 or 4.00.950a
Windows 95 version 4.00.950b or OSR2
Windows NT version
Windows 98
Windows 2000
Windows Millennium
NetWare ODI Client
Microsoft Network Client for DOS
Windows for Workgroups v3.11
Which Windows 95 version am I running?
You must determine if you are running the new Windows 95 OEM Service
Release 2 (OSR2) or the standard Windows 95 before you install the network
driver.
Since standard Windows 95 does not support CardBus, the driver installation
directory is different.
Follow these steps to find out which version of Windows 95 you are running:
1. In the Windows 95 Control Panel, double-click System to display the
System Properties dialog box.
2. Click the General Tab to display the Windows 95 version information.
If your Windows 95 version is 4.00.950 or 4.00.950a, go to the next section
to install the network driver.
If your Windows 95 version is 4.00.950b (OSR2), go to the Windows 95 Version
4.00.950b (OSR2) section to install the network driver.
8

Standard Windows 95 (Version 4.00.950 and 4.00.950a)
Installation:
1. Make sure that the Rtl8139BL PC Card is inserted.
2. In the Windows 95 Control Panel, double-click on Add New Hardware.
3. In the Add New Hardware window, click Next.
4. Respond to the "Do you want Windows to search for your hardware"
prompt with No and click Next.
5. Double-click on Network Adapters in the list that appears and click
Next.
6. In the Select Device window, click on the Have Disk button.
7. Insert the OEM diskette in the floppy drive. Choose the directory
"a:\win95a" and click OK.
8. Select "RealtekRTL8139 (B/C) CardBus Fast Ethernet" and click OK.
9. In the New Hardware Wizard Window click Next.
10. Click Finish to complete the driver installation
11. If prompted, supply the Windows 95 CD-ROM or type the directory
path to the Windows 95 files on your PC and click OK.
12. Remove the OEM diskette and restart computer.
Confirming Installation:
1. Double-click the My Computer icon
2. Double-click the Control Panel icon.
3. Double-click thee System icon.
4. Click the Device Manager tab.
5. Double-click the Network Adapters icon.
The name of the installed "Realtek RTL8139(B/C) CardBus Fast Ethernet"
appears.
9

6. Double-click the Rtl8139BL name to display a description of the card
and its current status.
Standard Windows 95 Version 4.00.950b (OSR2)
Installation:
1. Make sure that the Rtl8139BL PC Card is inserted.
2. In the Update Device Driver Wizard window, click Next. If this window
does not appear, click System and then click Refresh.
3. Click Other Locations
4. Insert the OEM diskette in the floppy drive. Choose the directory
"a:\win95b" and click OK.
5. Select "RealtekRTL8139(B/C) CardBus Fast Ethernet" and click OK.
6. In the copying files window, type "a:\win95b" and click OK.
7. If prompted, supply the Windows 95 CD-ROM or type the directory
path to the Windows 95 files on your PC and click OK.
8. In the Update Device Driver Wizard, click Finish.
9. Remove the OEM diskette and restart computer.
Windows NT Version 4.0
Installation:
1. Make sure that the Rtl8139BL PC Card is inserted.
2. Using Control Panel, double-click Network.
3. Select the Adapter tab and click Add.
4. Select Have Disk.
5. Insert the OEM diskette in the floppy drive. Choose the directory
"a:\winnt4" and click OK.
10

6. Select "RealtekRTL8139(B/C) CardBus 10/100 Ethernet" and click OK.
7. Select proper resources allocations and click OK.
8. Click close.
9. Click YES to reboot your computer.
Windows 98
Installation:
1. Make sure that the Rtl8139BL PC Card is inserted.
2. In the Add Hardware Device Driver Wizard window, click Next. If this
window does not appear, click System and then click Refresh.
3. Click the recommended item and Next.
4. Insert the OEM diskette in the floppy drive. Type the directory
"a:\win98" and click OK.
5. In the copying files window, type "a:\win98" and click OK.
6. If prompted, supply the Windows 95 CD-ROM or type the directory
path to the Windows 95 files on your PC and click OK.
7. In the Update Device Driver Wizard, click Finish.
8. Remove the OEM diskette and restart computer.
Windows 2000
Installation:
1. Inter Rtl8139BL PC Card and the Found New Hardware Wizard window
will appear.
2. In the Found New Hardware Wizard window, click Next. If this window
does not appear, click System and then click Refresh.
3. Click the default "Search for a suitable driver for my device
(recommended)" and click Next.
11

4. Select Specify a location and click Next.
5. Insert the OEM diskette in the floppy drive. Type or browse the
directory "a:\win2000" and click OK.
6. Click Next.
7. In the Digital Signature Not Found window, click Yes.
8. Click Finish.
Windows Millennium Edition
Installation:
1. Inter Rtl8139BL PC Card and the Found New Hardware Wizard window
will appear.
2. In the Found New Hardware Wizard window, click Next. If this window
does not appear, click System and then click Refresh.
3. Click the default "Search for a suitable driver for my device
(recommended)" and click Next.
4. Select Specify a location and click Next.
5. Insert the OEM diskette in the floppy drive. Type or browse the
directory "a:\winme" and click OK.
6. Click Next.
7. In the Digital Signature Not Found window, click Yes.
8. Click Finish.
NetWare ODI Client
Installation:
1. Make sure that the Rtl8139BL PC Card is inserted.
2. Check your system file config.sys. Add this line
12

"device=c:\DOS\himem.sys"
In order to work well with emm386, remove the argument "NOEMS" as
"device=c:\dos\emm386"
or edit it as
"device=c:\dos\emm386 x=d000-d3ff"
or remark it as
"rem device=c:\dos\emm386"
3. Save it and reboot your PC.
4. Insert the OEM diskette in the floppy drive. Choose the directory
"a:\nwclient".
5. Copy all files to your local directory.
6. Execute encbodi.bat, and the driver is installed.
13

Microsoft Network Client for DOS
Windows for Workgroups v3.11
Installing the NDIS2 driver for CardBus card is the following steps:
After install driver in Microsoft Client or Windows 3.11
1. Check config.sys and remove the argument "NOEMS" of EMM386.sys
2. Copy rtpci.exe and rtbios.com to any directory.
Example c:\wfw311
3. In autoexec.bat, add two lines of command, "rtpci /md000 /i11"
and "rtbios" in front of "net start" and "net initialize".
Example:
If only "net start" exists,
:
:
c:\wfw311\rtpci.exe /md000 /i11
c:\wfw311\rtbios.com
c:\wfw311\net start
:
:
or if "net initialize" exists,
:
:
c:\wfw311\rtpci.exe /md000 /i11
c:\wfw311\rtbios.com
c:\wfw311\net initialize
:
:
4. Restart the computer.
14

Chapter 3
Troubleshooting / Frequently Asked Questions
Win95b (Win95 OSR2)
PROBLEM: The CardBus card is not detectable.
SOLUTION: Win95b (Win95 OSR2) can't recognize some new CardBus
controller
devices by its default pcmcia.inf. Ask the CardBus controller vendor
for new setup file, rename it to pcmcia.inf and copy it to
c:\windows\inf. Delete the "Standard pcmcia driver" or "Unknown
PCMCIA device" on "Device manager" and restart the computer.
DOS (NWCLIENT, NDIS2DOS)
PROBLEM: The CardBus card is not detectable.
SOLUTION: Check your system file config.sys. Add this line
"device=c:\DOS\himem.sys"
In order to work well with emm386, remove the argument "NOEMS" as
"device=c:\dos\emm386"
or edit it as
"device=c:\dos\emm386 x=d000-d3ff"
or remark it as
"rem device=c:\dos\emm386".
Save config.sys and restart the computer.
PROBLEM: The CardBus card is detected. Drivers and protocols are loaded, but
it hangs when using VLM or NETX to log on the net.
SOLUTION: Restart the computer. Change the argument of rtpci.exe to other
IRQ
value. Example: rtpci.exe /md000 /ixx
(xx is the value depends on various notebook, it could be 7-14)
WINNT4
PROBLEM: When CardBus card is installed. the computer hangs when it restarts.
SOLUTION: Removed the CardBus card and enter NT4. Select another I/O port
value
in property dialog box of "Realtek Rtl8139(B/C) CardBus 10/100
Ethernet", and restart the computer.
PROBLEM: The CardBus card is detected. Drivers and protocals are loaded, but
15

it hangs when using VLM or NETX to log on the net.
SOLUTION: Select another Interrupt value in property dialog box of "Realtek
Rtl8139(B/C) CardBus 10/100 Ethernet", and restart the computer.
16

Appendix A: Cabling and Pin Assignment
A-1 RJ-45
There are different grades, or categories, of twisted-pair cabling. Category 5
is the most reliable and is highly recommended. Category 3 is a good second
choice. Straight-through cables are used for connecting computers’ NIC
cards to a hub. Crossover cables are used for connecting a hub to another
hub. (The router provides a built-in uplink/normal switch. Uplink mode is
crossed internally, which allows you to link or connect hubs together with a
straight-through cable instead.)
A-1-1 RJ-45 pin assignment
There are 8 thin, color-coded wires inside, run from one end of the cable
to the other. All 8 wires are used.
Table 0-1
RJ-45 Color Chart
Wire 1 White with an Orange
stripe
Wire 2 Orange
Wire 3 White with a Green Stripe
Wire 4 Blue
Wire 5 White with a Blue Stripe
Wire 6 Green
Wire 7 White with a Brown Stripe
Wire 8 Brown
Pin 1
*Note* To determine which wire is wire number 1, hold the cable so that
the end of the plastic RJ-45 tip (the part that goes into a wall jack first) is
facing away from you. Face the clip down so that the copper side faces up
(the springy clip will now be facing the floor), when looking down on the
copper side, wire 1 is on the far left.
Connection between NIC card and Hub
17

In a straight-through cable, wire 1, 2, 3, and 6 at one end of the cable are the
same as wires 1, 2, 3, and 6 at the other end. The straight through cable is used to
connect the NIC card and the hub.
Table 0-2 Straight Through Cabling
Wire Becomes
1 1
2 2
3 3
6 6
Connection between Hub and Hub
In a crossover cable, the orders of the wires change from one end to the other. Wire 1
becomes 3, and 2 becomes 6. The crossover cable is used in connecting hubs directly.
Table 0-3
Crossover Cabling
Wire Becomes
1 3
2 6
3 1
2
18

Appendix B: Glossary
DHCP
Dynamic Host Configuration Protocol is a method in which IP addresses are
assigned by server dynamically to the clients on the network. DHCP is used for
Dynamic IP Addressing and requires a dedicated DHCP server on the network.
Ethernet
Ethernet is a 10/100Mbps network that runs over dedicated home/office wiring.
Users must be wired to the network at all times to gain access.
Gateway
A gateway is a hardware and software device that connects two dissimilar
systems, such as a LAN and a mainframe. In Internet terminology, a gateway is
another name for a router. Generally a gateway is used as a funnel for all traffic
to the Internet.
Local Area Network (LAN)
A LAN is a group of computers, each equipped with the appropriate network
adapter card connected by cable/air, that share applications, data, and
peripherals. All connections are made via cable or wireless media, but a LAN
does not use telephone services. It typically spans a single building or campus.
Network
A network is a system of computers that is connected. Data, files, and messages
can be transmitted over this network. Networks may be local or wide area
networks.
Protocol
A protocol is a standardized set of rules that specify how a conversation is to
take place, including the format, timing, sequencing and/ or error checking.
RJ-45
A connector similar to a telephone connector that holds up to eight wires, used
for connecting Ethernet devices.
Router
Protocol-dependent device that connects subnet works together. Routers are
useful in breaking down a very large network into smaller sub networks; they
introduce longer delays and typically have much lower throughput rates than
bridges.
19

Static IP Addressing
A method of assigning IP addresses to clients on the network. In networks with
Static IP address, the network administrator manually assigns an IP address to
each computer. Once a Static IP address is assigned, a computer uses the same
IP address every time it reboots and logs on to the network, unless it is manually
changed.
Transmission Control Protocol / Internet Protocol (TCP/IP)
TCP/IP is the protocol suite developed by the Advanced Research Projects
Agency (ARPA). It is widely used in corporate Internet works, because of its
superior design for WANs. TCP governs how packet is sequenced for
transmission the network. The term “TCP/IP” is often used generically to refer to
the entire suite of related protocols.
20
Table of contents
Other Gigafast Adapter manuals

Gigafast
Gigafast 32-bit PCI BUS 10/100Mbps Fast Ethernet... User manual

Gigafast
Gigafast PE901-UI User manual

Gigafast
Gigafast WF727-AEX User manual

Gigafast
Gigafast PE909-UI User manual

Gigafast
Gigafast WF747-Ul User manual

Gigafast
Gigafast EE100-AXP User manual

Gigafast
Gigafast EE100-AEP User manual

Gigafast
Gigafast WF728-AEX User manual
Popular Adapter manuals by other brands

Keysight
Keysight U1117A operating instructions

Mitsubishi Electric
Mitsubishi Electric PAC-SE55RA-E instruction manual

Digital-Ally
Digital-Ally ThermoVu DTM-500 Guide

Flex
Flex PS 10.8/18.0 Original operating instructions

Sunrich Tech
Sunrich Tech PCIe 3 user manual

KILLARK
KILLARK VMCHVM INSTALLATION, OPERATION & MAINTENANCE DATA SHEET