7
A38H / SEA / A31008-M2054-Y701-1-7619 / main.fm / 07.11.2008
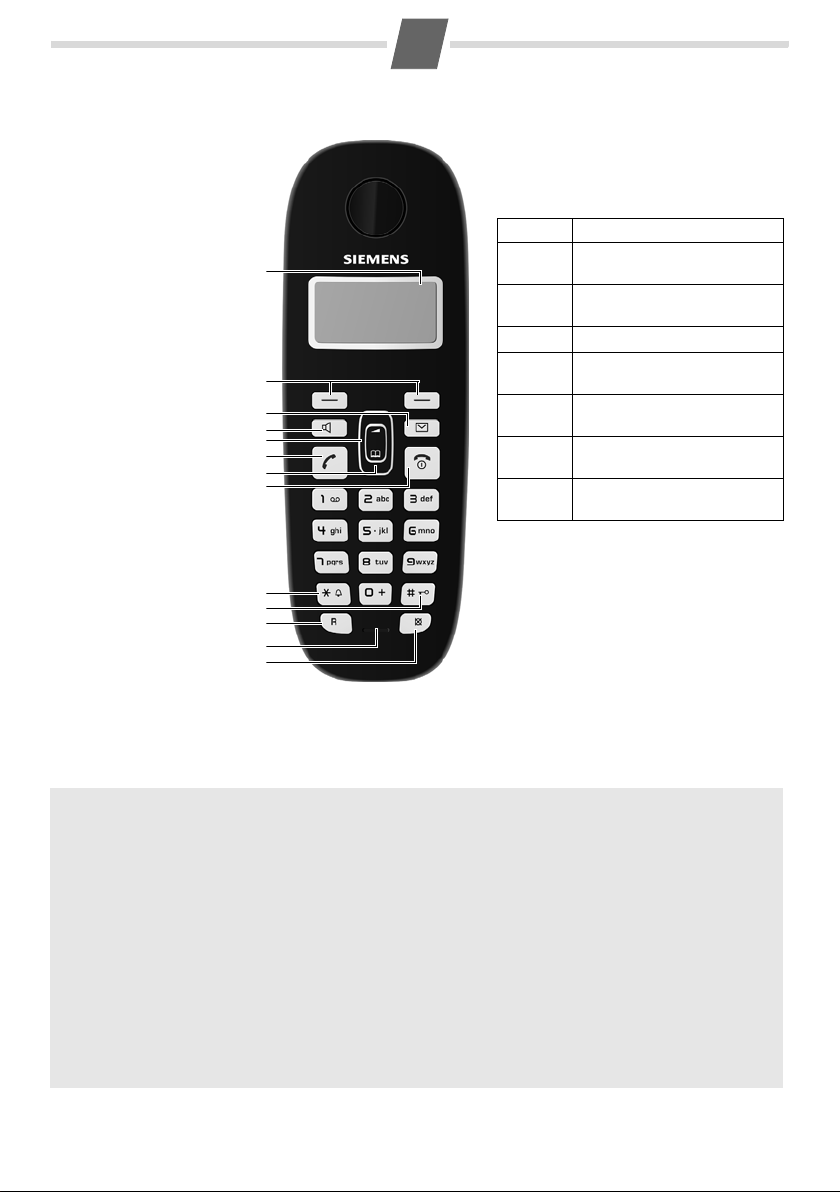
Making calls
Making external calls and ending calls
External calls are calls using the public telephone
network.
~(Enter the phone number) ¢c.
The phone number is dialled. (Or you can first
press and hold c[dial tone] and then enter the
number.) During the call you can adjust the ear-
piece volume using tand set the volume with u.
End the call/cancel dialling:
Press the end call key a.
Accepting a call
The handset indicates an incoming call by ringing
and by a display on the screen.
Press the talk key cto accept the call.
When Auto Answer is activated (see Menu tree
¢page 10), simply remove the handset from the
base station/charging cradle.
In idle status, use tto activate the menu for set-
ting the call volume and use uto set the volume.
Muting
You can mute your handset when making external
calls. Your caller can no longer hear you.
Press the "Microphone off" key mduring the call to
activate/deactivate the function.
Handsfree
To activate while dialling:
Enter the number ~and press the handsfree key
d.
Switching between earpiece and handsfree
mode:
During a call and when listening to the answer
machine (A385 only), press the handsfree key dto
activate or deactivate handsfree talking.
During a call, use tto activate the menu for set-
ting the handsfree volume and use uto set the
volume.
Making internal calls
Internal calls are free calls to other handsets that
are registered to the same base station.
To make a call to other handsets, press
◆INT ¢~(1...4, enter internal number of the
handset) ¢OK, the handset is called or
◆INT ¢star key P¢OK, all handsets are
called.
When a participant answers you can speak to
them. To end the call, press a.
Using the directory and lists
Directory
To open the directory: press h.
You can save up to 140 phone numbers
(max. 32 digits) with corresponding names
(max. 14 characters). Enter letters/characters
¢page 9.
Saving the first number in the directory
h¢New Entry? ¢OK
¢~(enter number) ¢OK
¢~ (enter number) ¢OK
Storing a number in the directory
h¢MENU ¢New Entry ¢OK
¢~(enter number) ¢OK
¢~ (enter number) ¢OK
Selecting a directory entry
Open the directory with h.You have the following
options:
◆Use uto scroll through the entries until the
required name is selected.
◆Enter the first character of the name and scroll
to the entry with u, if required.
Dialling with the directory
h¢u (select entry) ¢c
Using other functions
h¢u(select entry) ¢MENU
The following functions can be selected with u:
New Entry Save new phone number.
Show Number Display the phone number.
Use Number Edit or add to the number.
Then dial or use other functions
with MENU.
Edit Entry Edit selected entry.
Delete Entry Delete selected entry.
Send Entry Send a single entry to another
handset (¢page 8).
Delete List Delete all directory entries.
Send List Send the complete list to
another handset (¢page 8).
Shortcut For shortcuts, assign the cur-
rent entry to a key.