Gigaset WIDEX W570A User manual

Gigaset W570A / UK-IE / A31008-M2728-L131-1-7619 / Cover_front_Widex.fm / 4/4/18

1
Gigaset W570A / LUG UK-IE en / A31008-M2728-L131-1-7619 / intro_Widex.fm / 4/4/18
Template Go, Version 1, 01.07.2014 / ModuleVersion 1.0
Gigaset (Widex) W570A – Premium cordless phone with direct
transmission to Widex hearing aids
The W570A is a premium large button cordless landline phone that transmits phone calls
wirelessly and in real-time directly to Widex hearing systems. No supplementary devices are
required. You can hear the person you are speaking to directly over both hearing systems and
also have best possiblespeech comprehension when making calls. Simplicity of use and modern
design are standout features of the W570A. It is used like a standard phone and works without
any conversions also without hearing systems.
Features
•Makes phone calls stress-free yet with best speech comprehension thanks to the direct and
simultaneous transmission of phone conversations into both hearing systems without
additional devices.
•Automatic coupling by means of AutoConnect function. The phone automatically
establishes a wireless connection to the hearing aids as soon as it is located near hearing
systems. The energy-efficient WidexLink wireless technology is deployed. No additional
power is drawn from the hearing aid batteries.
•Transmission in real-time. You can hold a conversation immediately after you accept a call.
•Compatible with all Widex hearing systems based upon universal chip platform Unique/
Beyond (or newer) and featuring the Widex-Link technology.
•Premium large button cordless phone that can also be used by family members and guests
who have normal hearing. This means no additional phone is required in the household.
•Comprehensive functions of the phone base, e.g.
•Memory capacity for up to 150 phone numbers
•Answer machine with user function
•Handsfree function with volume control
•Emergency call function
•Range up to 300 metres from the base station (depending on local conditions)
Operation
Coupling the phone and a Widex hearing system
¤Keep the phone handset near your hearing system. The phone is automatically coupled to
the hearing system.
Cancelling a coupling
¤Move the phone to outside the range of the hearing systems.
Changing the volume
You can adjust the volume if the sound transmission or WidexLink transmission is too quiet or
too loud.
¤Press the volume keys on the right of the handset: at top : louder / at bottom : quieter.
Otherwise the phone works as described in these instructions.

2
Template Go, Version 1, 01.07.2014 / ModuleVersion 1.0
Handset
Gigaset W570A / LUG UK-IE en / A31008-M2728-L131-1-7619 / overview_E560A_LUG.fm / 4/4/18
Overview
Handset
4
5
11
12
14
9
3
10
7
6
1
2
8
13
1 Direct dialling key A ( p.13)
("SOS key", p. 25)
Illuminated: Emergency function
Flashes: Emergency call started
2 Direct dialling keys B to D ( p.13)
3Displaykeys( p. 14)
Various functions, depending on the operating
situation
4 Talk key
Accepting call; selecting displayed number;
opening redial list
Flashes: Accepting a call
5 Control key ( p. 12)
Opening a menu; navigating in menus and
entry fields; accessing functions (depending on
the situation)
6Key1
Answer machine/Call the network mailbox
( p. 34)
7Starkey
Ringers on/off (press and hold
8 Torch and signal light (LED) ( p. 39)
9Volumekeys
for ringtone, receiver/headset, speaker
Upper key: Setting "extra-loud" during a call
( p. 19)
10 Handsfree key ( p.18)
Switch between earpiece and handsfree mode;
Lights up: handsfree activated
11 End call key, On/Off key
End call; cancel function; go back one menu
level (press briefly); back to idle status (press
and hold); activate/deactivate handset (press
and hold in idle status)
12 Hash key
Keypad lock on/off (press and hold, p. 12);
upper/lower case and digits ( p. 16)
13 Recall key
Consultation call (flash): press and hold
14 Microphone
Changing the display language:
p. 43
Gigaset service contact numbers:
For personal advice on our range of products and for repairs or guarantee/warranty claims call:
Service Centre UK: 020 369 53111 (local call cost charge)
Please have your proof of purchase ready when calling.

3
Gigaset W570A / LUG UK-IE en / A31008-M2728-L131-1-7619 / overview_E560A_LUG.fm / 4/4/18
Template Go, Version 1, 01.07.2014 / ModuleVersion 1.0
Gigaset W570A base
Gigaset W570A base
You can use the keys on the base to operate the integrated answer machine, search for handsets
("paging" p. 42) and register handsets to the base p. 41.
Answer machine keys
Playback/Stop key: play back messages from the answer machine or cancel playback.
Forward key: skip to next message.
Back key: skip to beginning of the current or the previous message.
Delete key: delete the current message during message playback or all old messages in
idle status.
Volume keys: adjust volume
( = quieter; = louder)
•During message playback: adjust loudspeaker volume.
•While an external call is being signalled: adjust ringer volume.
•During the call: Changing the volume.
Direct dialling keys B to D (¢p. 13)
Tab (¢p. 11)
Microphone
Display
Direct dialling key A (¢p. 13) / SOS key with emergency
LED (¢p. 25)
Handsfree key: accept/end call;
flashes: incoming call
Registration/paging key:
•Press briefly: search for handsets
(paging) ¢p. 42)
•Press and hold: register handsets
and DECT devices ¢p. 41.
Loudspeaker
Display

4
Template Go, Version 1, 01.07.2014 / ModuleVersion 1.0
Gigaset W570A base
Gigaset W570A / LUG UK-IE en / A31008-M2728-L131-1-7619 / overview_E560A_LUG.fm / 4/4/18
Answer machine display
Lights up: Answer machine is activated. The number of saved messages is displayed.
00 flashes: The answer machine is recording a new message.
Flashes slowly: There are new messages. The number of new messages is displayed.
99 flashes quickly: The answer machine is full.
If the answer machine is being operated from a handset or if it is recording a message
(00 flashes), it cannot be operated from the base at the same time.

5
Gigaset W570A / LUG UK-IE en / A31008-M2728-L131-1-7619 / E560A_IVZ.fm / 4/4/18
Template Go, Version 1, 01.07.2014 / ModuleVersion 1.0
Contents
Contents
Overview . . . . . . . . . . . . . . . . . . . . . . . . . . . . . . . . . . . . . . . . . . . . . . . . . . . . . . . . . . . . . . . . . . . . . . . . . . . . . 2
Handset . . . . . . . . . . . . . . . . . . . . . . . . . . . . . . . . . . . . . . . . . . . . . . . . . . . . . . . . . . . . . . . . . . . . . . . . . . . . . . . 2
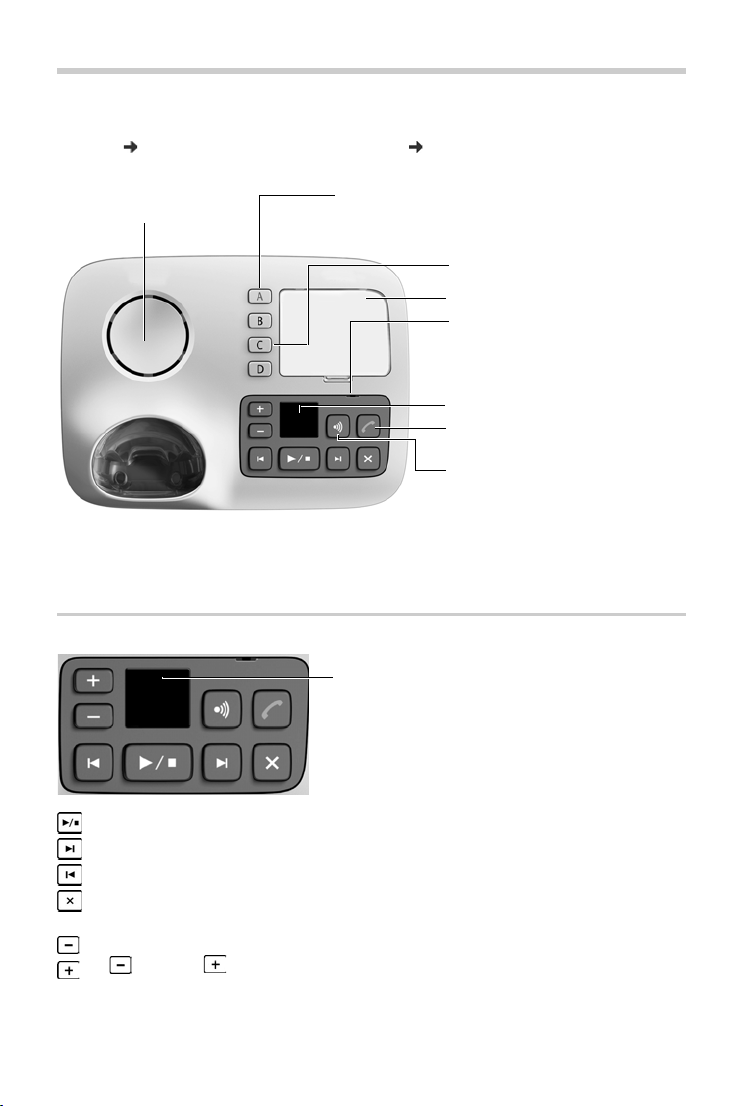
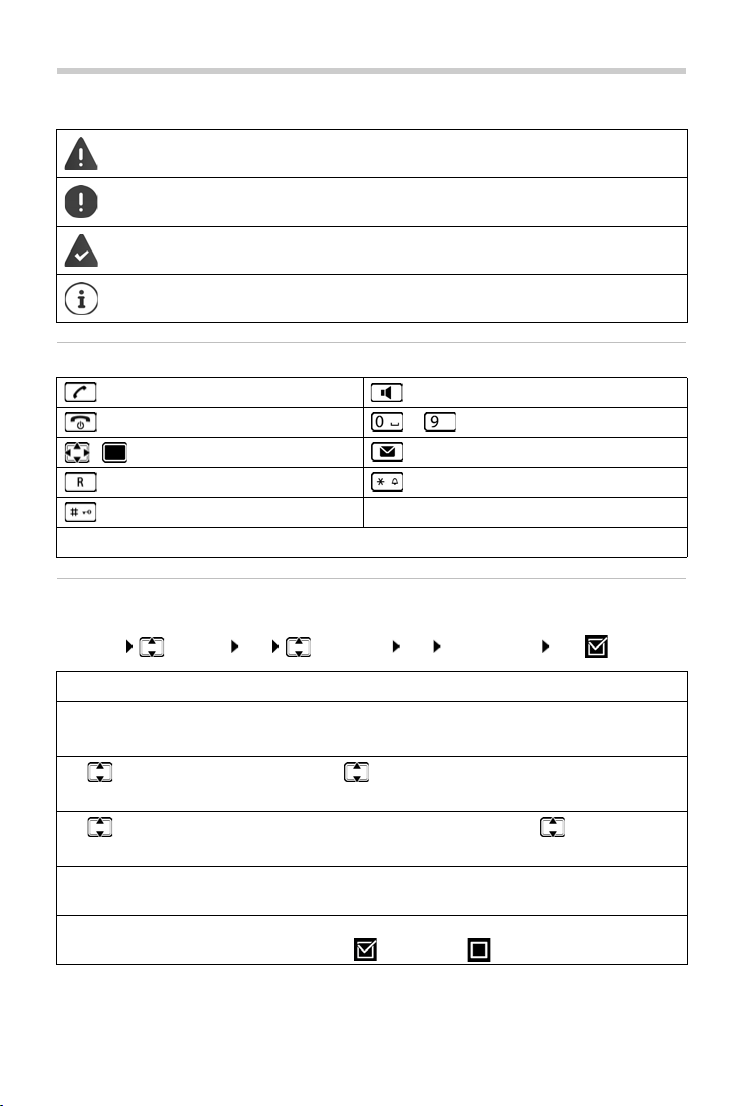
Gigaset W570A base . . . . . . . . . . . . . . . . . . . . . . . . . . . . . . . . . . . . . . . . . . . . . . . . . . . . . . . . . . . . . . . . . . . 3
Illustration in the user guide . . . . . . . . . . . . . . . . . . . . . . . . . . . . . . . . . . . . . . . . . . . . . . . . . . . . . . . . . . . . 6
Safety precautions . . . . . . . . . . . . . . . . . . . . . . . . . . . . . . . . . . . . . . . . . . . . . . . . . . . . . . . . . . . . . . . . . . . . 7
Getting started . . . . . . . . . . . . . . . . . . . . . . . . . . . . . . . . . . . . . . . . . . . . . . . . . . . . . . . . . . . . . . . . . . . . . . . 8
Connecting the base . . . . . . . . . . . . . . . . . . . . . . . . . . . . . . . . . . . . . . . . . . . . . . . . . . . . . . . . . . . . . . . . . . . 9
Handset . . . . . . . . . . . . . . . . . . . . . . . . . . . . . . . . . . . . . . . . . . . . . . . . . . . . . . . . . . . . . . . . . . . . . . . . . . . . . . 10
Using the phone . . . . . . . . . . . . . . . . . . . . . . . . . . . . . . . . . . . . . . . . . . . . . . . . . . . . . . . . . . . . . . . . . . . . . 12
Getting to know your telephone . . . . . . . . . . . . . . . . . . . . . . . . . . . . . . . . . . . . . . . . . . . . . . . . . . . . . . . 12
Making calls . . . . . . . . . . . . . . . . . . . . . . . . . . . . . . . . . . . . . . . . . . . . . . . . . . . . . . . . . . . . . . . . . . . . . . . . . . 17
Lists . . . . . . . . . . . . . . . . . . . . . . . . . . . . . . . . . . . . . . . . . . . . . . . . . . . . . . . . . . . . . . . . . . . . . . . . . . . . . . . . . . 20
Directory . . . . . . . . . . . . . . . . . . . . . . . . . . . . . . . . . . . . . . . . . . . . . . . . . . . . . . . . . . . . . . . . . . . . . . . . . . . . . 23
Emergency function . . . . . . . . . . . . . . . . . . . . . . . . . . . . . . . . . . . . . . . . . . . . . . . . . . . . . . . . . . . . . . . . . 25
Answer machine . . . . . . . . . . . . . . . . . . . . . . . . . . . . . . . . . . . . . . . . . . . . . . . . . . . . . . . . . . . . . . . . . . . . . 29
Operating the answer machine . . . . . . . . . . . . . . . . . . . . . . . . . . . . . . . . . . . . . . . . . . . . . . . . . . . . . . . . 29
Using the network mailbox . . . . . . . . . . . . . . . . . . . . . . . . . . . . . . . . . . . . . . . . . . . . . . . . . . . . . . . . . . . . 34
Further functions . . . . . . . . . . . . . . . . . . . . . . . . . . . . . . . . . . . . . . . . . . . . . . . . . . . . . . . . . . . . . . . . . . . . 36
ECO DECT . . . . . . . . . . . . . . . . . . . . . . . . . . . . . . . . . . . . . . . . . . . . . . . . . . . . . . . . . . . . . . . . . . . . . . . . . . . . . 36
Using the handset as an alarm clock . . . . . . . . . . . . . . . . . . . . . . . . . . . . . . . . . . . . . . . . . . . . . . . . . . . 37
Baby monitor . . . . . . . . . . . . . . . . . . . . . . . . . . . . . . . . . . . . . . . . . . . . . . . . . . . . . . . . . . . . . . . . . . . . . . . . . 38
One touch call . . . . . . . . . . . . . . . . . . . . . . . . . . . . . . . . . . . . . . . . . . . . . . . . . . . . . . . . . . . . . . . . . . . . . . . . 39
Torch . . . . . . . . . . . . . . . . . . . . . . . . . . . . . . . . . . . . . . . . . . . . . . . . . . . . . . . . . . . . . . . . . . . . . . . . . . . . . . . . . 39
Protection against unwanted calls . . . . . . . . . . . . . . . . . . . . . . . . . . . . . . . . . . . . . . . . . . . . . . . . . . . . . 40
Using multiple handsets . . . . . . . . . . . . . . . . . . . . . . . . . . . . . . . . . . . . . . . . . . . . . . . . . . . . . . . . . . . . . 41
Adjusting the telephone . . . . . . . . . . . . . . . . . . . . . . . . . . . . . . . . . . . . . . . . . . . . . . . . . . . . . . . . . . . . . 43
Handset settings . . . . . . . . . . . . . . . . . . . . . . . . . . . . . . . . . . . . . . . . . . . . . . . . . . . . . . . . . . . . . . . . . . . . . . 43
Base settings . . . . . . . . . . . . . . . . . . . . . . . . . . . . . . . . . . . . . . . . . . . . . . . . . . . . . . . . . . . . . . . . . . . . . . . . . . 47
Operating the base on the PABX . . . . . . . . . . . . . . . . . . . . . . . . . . . . . . . . . . . . . . . . . . . . . . . . . . . . . . . 49
Operating the telephone on a router . . . . . . . . . . . . . . . . . . . . . . . . . . . . . . . . . . . . . . . . . . . . . . . . . . . 49
Appendix . . . . . . . . . . . . . . . . . . . . . . . . . . . . . . . . . . . . . . . . . . . . . . . . . . . . . . . . . . . . . . . . . . . . . . . . . . . 50
Service (Customer Care) - United Kingdom and Ireland . . . . . . . . . . . . . . . . . . . . . . . . . . . . . . . . . 50
Questions and answers . . . . . . . . . . . . . . . . . . . . . . . . . . . . . . . . . . . . . . . . . . . . . . . . . . . . . . . . . . . . . . . . 50
Manufacturer's advice . . . . . . . . . . . . . . . . . . . . . . . . . . . . . . . . . . . . . . . . . . . . . . . . . . . . . . . . . . . . . . . . . 53
Specifications . . . . . . . . . . . . . . . . . . . . . . . . . . . . . . . . . . . . . . . . . . . . . . . . . . . . . . . . . . . . . . . . . . . . . . . . . 55
Index . . . . . . . . . . . . . . . . . . . . . . . . . . . . . . . . . . . . . . . . . . . . . . . . . . . . . . . . . . . . . . . . . . . . . . . . . . . . . . . . 57
Not all functions described in the user guide are available in all countries or from all
network providers.
For specialist retailers: You can switch the phone to demo mode.
The instructions are available to download from www.gigaset.com/manuals

6
Template Go, Version 1, 01.07.2014 / ModuleVersion 1.0
Illustration in the user guide
Gigaset W570A / LUG UK-IE en / A31008-M2728-L131-1-7619 / user_guide_operating_steps.fm / 4/4/18
Illustration in the user guide
Keys
Procedures
Example: Switching Auto answer on/off:
¤Menu Settings OK Telephony OK Auto Answer OK ( =on)
Warnings, which, if not heeded, can result in injury to persons or damage to devices.
Important information regarding function and appropriate handling or functions
that could generate costs.
Prerequisite for being able to carry out the following action.
Additional helpful information.
Talk key Handsfree key
End call key to Number / letter keys
/ Control key rim / centre Message key
Recall key Star key
Hash key
OK,Back ... Displaykeys
Step Follow this procedure
¤Menu Press the display key Menu when the handset is in idle status.
The main menu opens.
¤
¤OK
Use the control key to navigate to the entry Settings.
Select OK to confirm. The submenu Settings opens.
¤Telephony
¤OK
Select the Telephony entry using the control key .
Select OK to confirm. The submenu Telephony opens.
¤Auto -Answer The function to switch Auto answer on/off appears as the first menu
item.
¤OK Select OK to activate or deactivate.
Function is activated /deactivated .

7
Gigaset W570A / LUG UK-IE en / A31008-M2728-L131-1-7619 / security.fm / 4/4/18
Template Go, Version 1, 01.07.2014 / ModuleVersion 1.0
Safety precautions
Safety precautions
Read the safety precautions and the user guide before use.
The device cannot be used in the event of a power failure. In case of a power failure it
is also not possible to make emergency calls.
Emergency numbers cannot be dialled if the keypad/display lock is activated!
Use only rechargeable batteries that correspond to the specification (see list of permit-
ted batteries www.gigaset.com/service). Never use a conventional (non-rechargea-
ble) battery or other battery types as this could result in significant health risks and per-
sonal injury. Rechargeable batteries, which are noticeably damaged, must be replaced.
The handset must not be operated if the battery cover is open.
Do not use the devices in environments with a potential explosion hazard
(e.g. paint shops).
The devices are not splashproof. For this reason do not install them in a damp environ-
ment such as bathrooms or shower rooms.
Use only the power adapter indicated on the device.
Whilst charging, the power socket must be easily accessible.
Remove faulty devices from use or have them repaired by our Service team, as these
could interfere with other wireless services.
Do not use the device if the display is cracked or broken. Broken glass or plastic can cause
injury to hands and face. Send the device to our Service department to be repaired.
Do not hold the rear of the handset to your ear when it is ringing or when speaker mode
is activated. Otherwise you risk serious and permanent damage to your hearing.
The phone may cause interference in analogue hearing aids (humming or whistling) or
cause them to overload. If you require assistance, please contact the hearing aid supplier.
Using your telephone may affect nearby medical equipment. Be aware of the technical
conditions in your particular environment, e.g. doctor's surgery. If you use a medical
device (e.g. a pacemaker), please contact the device manufacturer. They will be able to
advise you regarding the susceptibility of the device to external sources of high fre-
quency energy (for the specifications of your Gigaset product see "Technical data").

8
Template Go, Version 1, 01.07.2014 / ModuleVersion 1.0
Getting started
Gigaset W570A / LUG UK-IE en / A31008-M2728-L131-1-7619 / starting_Widex.fm / 4/4/18
Getting started
Contents of the package
•One Gigaset W570A base
•One Gigaset handset Gigaset W570H
•Two batteries
•One battery cover
•One power adapter for the base
•An phone connector cable, such as for connecting to a phone jack on your router
•One user guide
•One plastic cover for the tab
If you have purchased a model with multiple handsets, the package should contain the follow-
ing for each additional handset:
•Two batteries
•One battery cover
•One charging cradle
•One power adapter
Connecting the base
The base station and charging cradle are designed for use in closed, dry rooms within
a temperature range of +5 °C to +45 °C.
The device's feet do not usually leave any marks on surfaces. However, due to the mul-
titude of different varnishes and polishes used on furniture, contact marks on the sur-
faces cannot be completely ruled out.
Never expose the telephone to heat sources, direct sunlight or other electrical
devices.
Protect your telephone from moisture, dust, corrosive liquids and vapours.
¤First connect the phone jack for your country
and insert the cables in the cable ducts.
¤Then connect the power adapter .
1
2
1
2

9
Gigaset W570A / LUG UK-IE en / A31008-M2728-L131-1-7619 / starting_Widex.fm / 4/4/18
Template Go, Version 1, 01.07.2014 / ModuleVersion 1.0
Handset
Alternatively: Connect the base station to a router
Tabs
Handset
Connecting the charger (if included)
¤Connect the phone socket of the device and
the phone socket of the router with the phone
cable supplied.
The answer machine is ready for use approx. 15 seconds after the base has been con-
nected or reset.
1
2
1
2
You can also download tabs from the Internet
in the form of a PDF file:
www.gigaset.com/insertstrips.
1
2
3
4

10
Template Go, Version 1, 01.07.2014 / ModuleVersion 1.0
Handset
Gigaset W570A / LUG UK-IE en / A31008-M2728-L131-1-7619 / starting_Widex.fm / 4/4/18
Setting up the handset for use
The display is protected by a plastic film. Please remove the protective film!
Inserting the battery and closing the battery cover
Charging the batteries
¤Charge the batteries fully prior to first use in the
charging cradle/base.
The batteries are fully charged when the power
icon disappears from the display.
¤Connect the flat plug on the power
adapter .
¤Plug the power adapter into the plug
socket .
To remove the plug from the charging cradle
again:
¤Disconnect the power adapter from the mains
power supply.
¤Press the release button .
¤Pull out the plug .
1
2
3
4
Only use a rechargeable battery, as this could otherwise result in significant health
risks and personal injury. For example, the outer casing of the battery could be
destroyed or the battery could explode. The device could also malfunction or be
damaged as a result of using batteries that are not of the recommended type.
¥Insert the batteries (for
correct +/- direction, see
diagram).
¥Fit the cover from the top .
¥Then press the cover until it
clicks into place .
1
2
To open the battery cover:
¥Push the cover down .
3
1
2
3
Batteries may heat up during charging. This is not dangerous.
After a time, the charge capacity of the battery will decrease for technical reasons.
Handsets contained in the package have already been registered to the base. In the
event that a handset is not registered however, (indicated by "Please register hand-
set"), register the handset manually ( p. 41).

11
Gigaset W570A / LUG UK-IE en / A31008-M2728-L131-1-7619 / starting_Widex.fm / 4/4/18
Template Go, Version 1, 01.07.2014 / ModuleVersion 1.0
Handset
Setting the language
Display language
When using the device for the first time, you are prompted in German for the language required
for the display.
¤. . . Use to select the language required OK
Language for voice prompting and default answer machine
announcement
The default setting is German
¤Menu Enter the digit for the desired language
( = German; = French; = Italian) OK
Setting the date and time
Set the date/time so that the correct date and time can be assigned to incoming calls, and so that
you can use the alarm.
¤Press the display key below the display Time.The entry field will open.
¤Enter the day, month and year in 8-digit format using the keypad, e.g.
for1April2018.OK
To correct errors: Press left or right on the control key in order to swap between fields.
¤Enter the hours and minutes in 4-digit format using the keypad, e.g. for
07:15. Switch between the fields using the control key, if necessary. OK
The display shows Saved. You will hear a confirmation tone.
To revert to idle status: Press and hold the End call key .

12
Template Go, Version 1, 01.07.2014 / ModuleVersion 1.0
Getting to know your telephone
Gigaset W570A / LUG UK-IE en / A31008-M2728-L131-1-7619 / operating.fm / 4/4/18
Using the phone
Getting to know your telephone
Activating/deactivating the handset
¤Press and hold the end call key (confirmation tone).
Activating/deactivating the keypad lock
The keypad lock prevents any inadvertent use of the phone.
¤In idle status, press and hold the hash key (confirmation tone). The keypad lock is
activated or deactivated. If it is activated, the icon appears in the display.
If the keypad lock is activated, a corresponding message is displayed when you press a key.
The keypad lock deactivates automatically when you receive a call. It is reactivated when the call
is finished.
Control Key
In the description below, the side of the control key (up, down, right, left) that you have to press
in the different operating situations is marked in black, e.g. for "press right on the control
key" or for "press the centre of the control key".
It is not possible to call emergency numbers either when keypad lock is activated.
The SOS key still works even if the keypad lock is activated.
The control key enables you to navigate the menus and input fields, and also to
call up certain functions depending on the situation.
In idle status
Opening the directory
Opening the main menu or
Opening the list of handsets
In submenus, selection and entry fields
Confirming a function
During a conversation
Opening the directory
Muting the microphone
Initiating an internal consultation call

13
Gigaset W570A / LUG UK-IE en / A31008-M2728-L131-1-7619 / operating.fm / 4/4/18
Template Go, Version 1, 01.07.2014 / ModuleVersion 1.0
Getting to know your telephone
Volume keys
During a call or when listening to a message, set the volume for the receiver/headset or speaker
or in the case of an incoming call, set the volume of the ringtone (5 levels).
¤Press the volume keys on the right side of the handset:
(louder) / (quieter)
The current setting is permanently saved after approx.
two seconds ( p. 44).
Extra-loud function
¤Press the top volume key until you reach the highest
level.
The extra-loud setting only applies for the duration of the call.
Direct dialling keys A to D
You can store particularly important numbers called frequently under the four Direct dial keys.
You can assign an external number or an internal call to every direct dial key.
To dial these saved numbers, press the relevant direct dialling key to on the handset or
on the base.
You can also assign the emergency function to direct dialling key ( p.25).
Assigning a function to direct dialling keys
Prerequisite: The direct dialling key in question has not already been assigned a function.
¤In idle status, press the direct dialling key ( to ) on the handset to which you wish to
assign a function.
Select the relevant function using :
The labelling of the direct dialling keys applies to the handset and the base.
Volume:
Back OK
•This setting can result in harm to health in persons with a normal hearing ability
and is only intended for persons with a hearing impairment or reduced hearing.
•Disruptive noises on the phone line can be increased.
¤Label with Ext. No. Enter an external phone number directly.
¤Enter the number and press OK.
¤Enter the name and press OK.
¤Label with internal No. Direct dial to a handset registered to the same base.
If more than one other handset is registered: Select handset OK
¤Label with Call All Int. Direct dial to all handsets registered to the same base.
¤Label with Dir. Number Label the key with a number from the directory. The directory is
opened. Select a number and press OK.

14
Template Go, Version 1, 01.07.2014 / ModuleVersion 1.0
Getting to know your telephone
Gigaset W570A / LUG UK-IE en / A31008-M2728-L131-1-7619 / operating.fm / 4/4/18
Changing the function of the direct dialling keys
¤Menu Settings OK Direct Dial Keys OK Select direct dialling key
(Ato D)
The current labelling is displayed after the key number, e.g.,
You can now change the labelling.
Select a new function using Menu Not all functions may be available, depending on the
current assignment. An entry that is already present must be deleted in advance.
Display keys
The functions of the display keys change depending on the particular operating situation.
Example:
Examples:
Display icons
¤A: <no >entry> i.e., the key is not currently labelled.
¤Delete Entry Delete current key labelling.
¤Edit Entry Change phone number and/or name.
Only key : Assign key with emergency function p. 26
Redial Menu
Current display key function
Display keys
1
2
1
2
1
2
Open redial list.
Open main menu/menu for further functions.
Confirm selection or save entry.
Missed calls or messages on the answer machine/network mailbox ( p. 22).
Delete key: delete character by character/word by word from right to left.
Go back one menu level or cancel operation.
Mute the microphone ( p. 19).
Redial
Menu
OK
Delete
Back
Mute
Action complete Action failed
Information Alarm call ( p. 37)
Please wait ... Display up/Down

15
Gigaset W570A / LUG UK-IE en / A31008-M2728-L131-1-7619 / operating.fm / 4/4/18
Template Go, Version 1, 01.07.2014 / ModuleVersion 1.0
Getting to know your telephone
Menu guidance
Your telephone's functions are accessed via a menu consisting of several levels.
Main menu (first menu level)
¤When the handset is in idle status, press the display key Menu to open the main menu.
The functions in the main menu are shown by means of an icon
and the function's name.
Selecting a function:
¤You can scroll between functions using the control key .
The selectable function is shown in the display.
¤Press the display key OK to select the displayed function.
This opens the corresponding submenu and the first entry
is displayed.
If you press the display key Back or briefly press the end call key , the display returns to idle
status.
Sub menu
The functions in the sub menu are indicated by name.
Selecting a function:
¤You can scroll between functions using the control key .
The relevant function is shown in the display.
¤Press the display key OK to select the displayed function.
This opens the corresponding submenu and the first entry
is displayed.
Briefly press the display key Back or the end call key to return to the previous menu level.
Reverting to idle status
From any point in the menu:
¤Press and hold the end call key or
¤Do not press any key: after 2 minutes, the display will auto-
matically revert to idle status.
Settings
Back OK
Display
Back OK
07:15
01.04.2016
Menu

16
Template Go, Version 1, 01.07.2014 / ModuleVersion 1.0
Getting to know your telephone
Gigaset W570A / LUG UK-IE en / A31008-M2728-L131-1-7619 / operating.fm / 4/4/18
Writing and editing names
The following rules apply when writing names:
•Each key between and is assigned several letters and characters.
•Control the cursor with .
•Characters are inserted at the cursor position.
•Press the display key Delete to delete the character to the left of the cursor.
•The first letter of the name is automatically capitalised and then followed by lower case let-
ters.
¤Briefly press the key several times in succession to select the required letter/character.
Setting upper/lower case or digits
Repeatedly press the hash key to change the text input mode.
The change of mode is displayed in the middle of the display.
Correcting incorrect entries
You can correct incorrect characters in the input fields by navigating to the incorrect entry using
the control key . You can then:
•Use the display key Delete to delete the character to the left of the cursor,
•Insert characters at the cursor position
•Overwrite the highlighted (flashing) character e.g., when entering time and date.
The characters assigned to the key are shown in a selection line at the bottom left of
the screen. The selected character is highlighted.
1 Writing digits
A Upper case; First letter in capitals, all others in lower case
aLowercase

17
Gigaset W570A / LUG UK-IE en / A31008-M2728-L131-1-7619 / telephony.fm / 4/4/18
Template Go, Version 1, 01.07.2014 / ModuleVersion 1.0
Making calls
Making calls
When the display backlight is switched off, pressing any key will activate the backlight. The rel-
evant key function is performed.
Making an external call
External calls are calls to the public telephone network.
¤Enter the number Press the Talk key briefly
or
¤Press and hold the Talk key . . . use to enter the number
Ending call/cancelling selection
¤Press the End call key or place the handset in the base or charging cradle.
Accepting a call
The handset indicates an incoming call in three ways: by ringing, by a display on the screen and
by the flashing talk key . The signal light on the back of the handset flashes if the function
LED Call Signal is activated ( p. 45).
Options for answering a call:
On the handset
¤Press the Talk key .
¤Press the Handsfree key .
¤Press the display key Accept.
On the base
¤Press the Handsfree key and use the speaker for talking.
Switching the ringtone off:
¤Press the display key Silence. You can accept the call while it is displayed on the screen.
Dialling the phone number:
•with the Direct dial key p. 13
•from the directory p. 23
•from the missed calls list p. 21
•from the redial list p. 20
If the handset is in the base and the Auto Answer function is activated ( p. 44), the
handset will accept a call automatically when you lift it out of the base.

18
Template Go, Version 1, 01.07.2014 / ModuleVersion 1.0
Making calls
Gigaset W570A / LUG UK-IE en / A31008-M2728-L131-1-7619 / telephony.fm / 4/4/18
Calling Line Identification
When you receive a call, the caller's number is displayed on the screen, if the following prerequi-
sites are met.
•Your network provider supports CLIP, CLI.
•CLI (Calling Line Identification): The caller's number is transmitted.
•CLIP (Calling Line Identification Presentation): The caller's number is displayed.
•You have requested CLIP from your network provider.
•The caller has arranged CLI with the network provider.
Call display
When you receive a call, the phone number is shown in the display.
If the number of the caller is stored in your directory, the display is
replaced by the corresponding directory entry.
The following is displayed in place of the number:
•Extern. Call, if no number is transmitted.
•Withheld, if the caller has withheld Calling Line Identification.
•Unavailable, if the caller has not arranged Calling Line Identifi-
cation.
Handsfree operation
In handsfree mode, you activate the loudspeaker so that you can hear the caller without having
to hold the handset to your ear. You therefore have both hands free and other people can listen
in on the conversation.
Activating/deactivating handsfree mode
Activating while dialling
Switching between earpiece and handsfree mode
During a call and when listening to the answer machine activate or deactivate handsfree mode.
If you wish to place the handset in the charger during a call:
¤Press and hold the handsfree key while placing the handset in the charger and for a fur-
ther 2 seconds. Otherwise, the call is cancelled.
The ringer can be switched off for unknown calls (calls with Calling Line Identification
withheld) ( p. 40).
Inform your caller before you use the handsfree function so that the caller knows a
third party may be listening.
Enter the number and press the handsfree key.
Press the handsfree key.
John
Accept Silence
Table of contents
Other Gigaset Cordless Telephone manuals

Gigaset
Gigaset A510 User manual

Gigaset
Gigaset SL400 User manual

Gigaset
Gigaset A410 User manual

Gigaset
Gigaset C610 User manual

Gigaset
Gigaset A540h User manual

Gigaset
Gigaset Dune CL540 User manual

Gigaset
Gigaset Gigaset SL 74 User manual

Gigaset
Gigaset C610H User manual

Gigaset
Gigaset A230 User manual

Gigaset
Gigaset C430H User manual

Gigaset
Gigaset E550H User manual

Gigaset
Gigaset E310 User manual

Gigaset
Gigaset A690 User manual

Gigaset
Gigaset Pro Maxwell C User manual

Gigaset
Gigaset 3070 isdn User manual

Gigaset
Gigaset E310H User manual

Gigaset
Gigaset Gigaset A245 User manual

Gigaset
Gigaset E370A User manual

Gigaset
Gigaset CL390A Duo User manual

Gigaset
Gigaset AS180 User manual