Gigaset Pro series Hybird 120 User manual

1
2
Power Status DSL SIPSD Card ISDN1 ISDN2
3
NTBA
DECT200
analoges
(DECT-)
Telefon
ISDN-
Telefon
SIP-
Telefon
max. 10 Endgerä e
Mobil eil
PC
Gigase
N720 DM PRO Gigase
N720 PRO
FXS1FXS2 S/U 1 S/U 2 LAN1 LAN2 LAN3 LAN4
FXO1
SD-Kar e
DECT200
192.168.0.250
1
2
3
Anmeldung an der Konfigura ionsoberfläche
V. 2.1 - 20140701 - 5500001561
A31008-N2002-N101-1-3N43
Für die Konfigura ion des Gerä s müssen folgende Sys emvorausse zungen
erfüll sein:
Be riebssys em Microsof Windows ab Windows 2000; Windows XP SP3
benö ig folgenden Ho fix: h p://suppor .microsof .com/kb/953761
In erne Explorer Version 7 oder 9 (bei Bedarf sind die Sicherhei s-
eins ellungen anzupassen), Mozilla Firefox ab Version 4
Ins allier e Ne zwerkkar e (E herne )
Ins allier es TCP/IP-Pro okoll
PC zum au oma ischen Bezug von IP-Adresse und DNS-Server konfigurier
Hohe Farbanzeige (mehr als 256 Farben) für die korrek e Dars ellung
der Grafik
Vorsich : Alle Bereiche, die sich nur mi Werkzeug öffnen lassen, sind
Gefahrenbereiche.
Die Belüf ungsöffnungen müssen frei bleiben. Das Gerä darf keiner direk en
Sonneneins rahlung oder anderen Wärmequellen ausgese z sein.
Das Gerä muss aufrech an der Wand mon ier werden.
Zur Vermeidung eines Elek roschocks is Vorsich beim Anschließen von
Telekommunika ionsne zen (TNV-S romkreisen) gebo en.
Das Gerä und die in ernen Anschlüsse dürfen nur innerhalb von Gebäuden
mon ier und verleg werden!
Das Gerä darf nur mi dem mi geliefer en, zugelassenen S eckerne zgerä
be rieben werden.
Beach en Sie, dass nur CE-zer ifizier e Endgerä e an das Gerä angeschlossen
werden.
Für die Dauer eines S romausfalls is das Gerä über den ex ernen ISDN-
Anschluss nich erreichbar.
Es dürfen keine Flüssigkei en in das Gerä einnere oder das S eckerne zgerä
gelangen können.
Bevor Sie das Gerä zur Repara ur abgeben, soll en Sie alle Da en speichern
und die Telefonanlage anschließend in den Auslieferungszus and
zurückverse zen.
LED Farbe Status I formatio
Power Gelb an S romversorgung is angeschlossen
aus keine S romversorgung
S a us Gelb an nach dem Einschal en: Gerä wird ges ar e
während des Be riebs: Fehler
langsam Das Gerä is ak iv
blinkend
SD Card an SD-Kar e ges eck , keine Lese-/Schreibzugriffe
aus keine SD-Kar e ges eck
flackernd Lese-/Schreibzugriff
DSL Gelb aus Nich un ers ü z
langsam Nich un ers ü z
blinkend
an Nich un ers ü z
flackernd Nich un ers ü z
SIP Gelb an erfolgreich beim SIP-Provider regis rier
aus keine SIP-Regis rierung
ISDN 1 Gelb an Schich 1 ak ivier
aus Ruhezus and oder außer Be rieb
ISDN 2 Gelb an Schich 1 ak ivier
aus Ruhezus and oder außer Be rieb
hybird 120 Gigase Edi ion
ein Ne z eil
ein E herne -Kabel (gelb)
ein ISDN-BRI-Kabel (schwarz)
SD-Kar e mi Voice Mail-Da en
Inbe riebnahme-Anlei ung
Sicherhei shinweise
Verfügbare A schlüsse für E dgeräte
Zum Anschluss der Endgerä e verwenden Sie die den Endgerä en beigefüg en
Kabel. Endgerä e können Sie en weder über die Buchsen an der Un ersei e
des Gerä es oder über die zusammengeschal e en Klemmbuchsen un er der
abnehmbaren Oberschale anschließen.
2 x analoges Endgerä (RJ12-Buchsen, erwei erbar über Klemmblock)
1 x ISDN (zwei er Anschluss durch Konfigura ion von ex ern auf in ern ums ellbar)
3 x SIP (4 x ohne PC, durch Swi ch erwei erbar)
Maximal können zehn Endgerä e direk angeschlossen werden.
Beach en Sie die Vorausse zungen für die Konfigura ion über die Web-
Oberfläche. Diese sind in der Kurzanlei ung beschrieben.
Ihre hybird 120 GE is werkssei ig als DHCP-Server eingerich e . Sie
übermi eln also PCs in Ihrem LAN, die über keine IP-Konfigura ion verfügen,
alle für eine Verbindung no wendigen Eins ellungen. Der PC, mi dem Sie die
Grundkonfigura ion durchführen wollen, muss für den au oma ischen Bezug
einer IP-Konfigura ion eingerich e sein.
In der Web-Oberfläche können Sie wei ere Eins ellungen z. B. zur
Telefonie vornehmen. Die Kurzanlei ung gib Ihnen Hinweise zum
Anschluss und zur Inbe riebnahme von SIP-Telefonen.
Sie haben op ional die Möglichkei , für Telefonverbindungen nach ex ern
SIP-Provider einzu ragen. Beach en Sie dazu die Beschreibung in der
Online-Hilfe im Menü VoIP -> Ei stellu ge -> SIP-Provider -> Neu.
Sie können Ihrem SIP-Telefon im Menü E dgeräte -> Gigaset-Telefo e ->
VoIP eine in erne Rufnummer zuweisen.
Eine in egrier e Online-Hilfe bie e De ailinforma ionen zu einzelnen
Konfigura ionsop ionen.
Zur erwei er en Konfigura ion empfehlen wir, informieren Sie sich auf
unserer Websei e un er wiki.gigase pro.com. Sie können den Servicezugriff
über den ISDN-Login im Menü Systemverwaltu g -> Admi istrativer
Zugriff freigeben. Ak ivieren Sie dor das Kon rollkäs chen Service Logi
(ISDN Web-Access). Bes ä igen Sie mi OK. Al erna iv können Sie die
Service-Verbindung ini iieren, indem Sie an einem Telefon die Tas enfolge
*96 eingeben. Schließen Sie die Eingabe dann mi # ab.
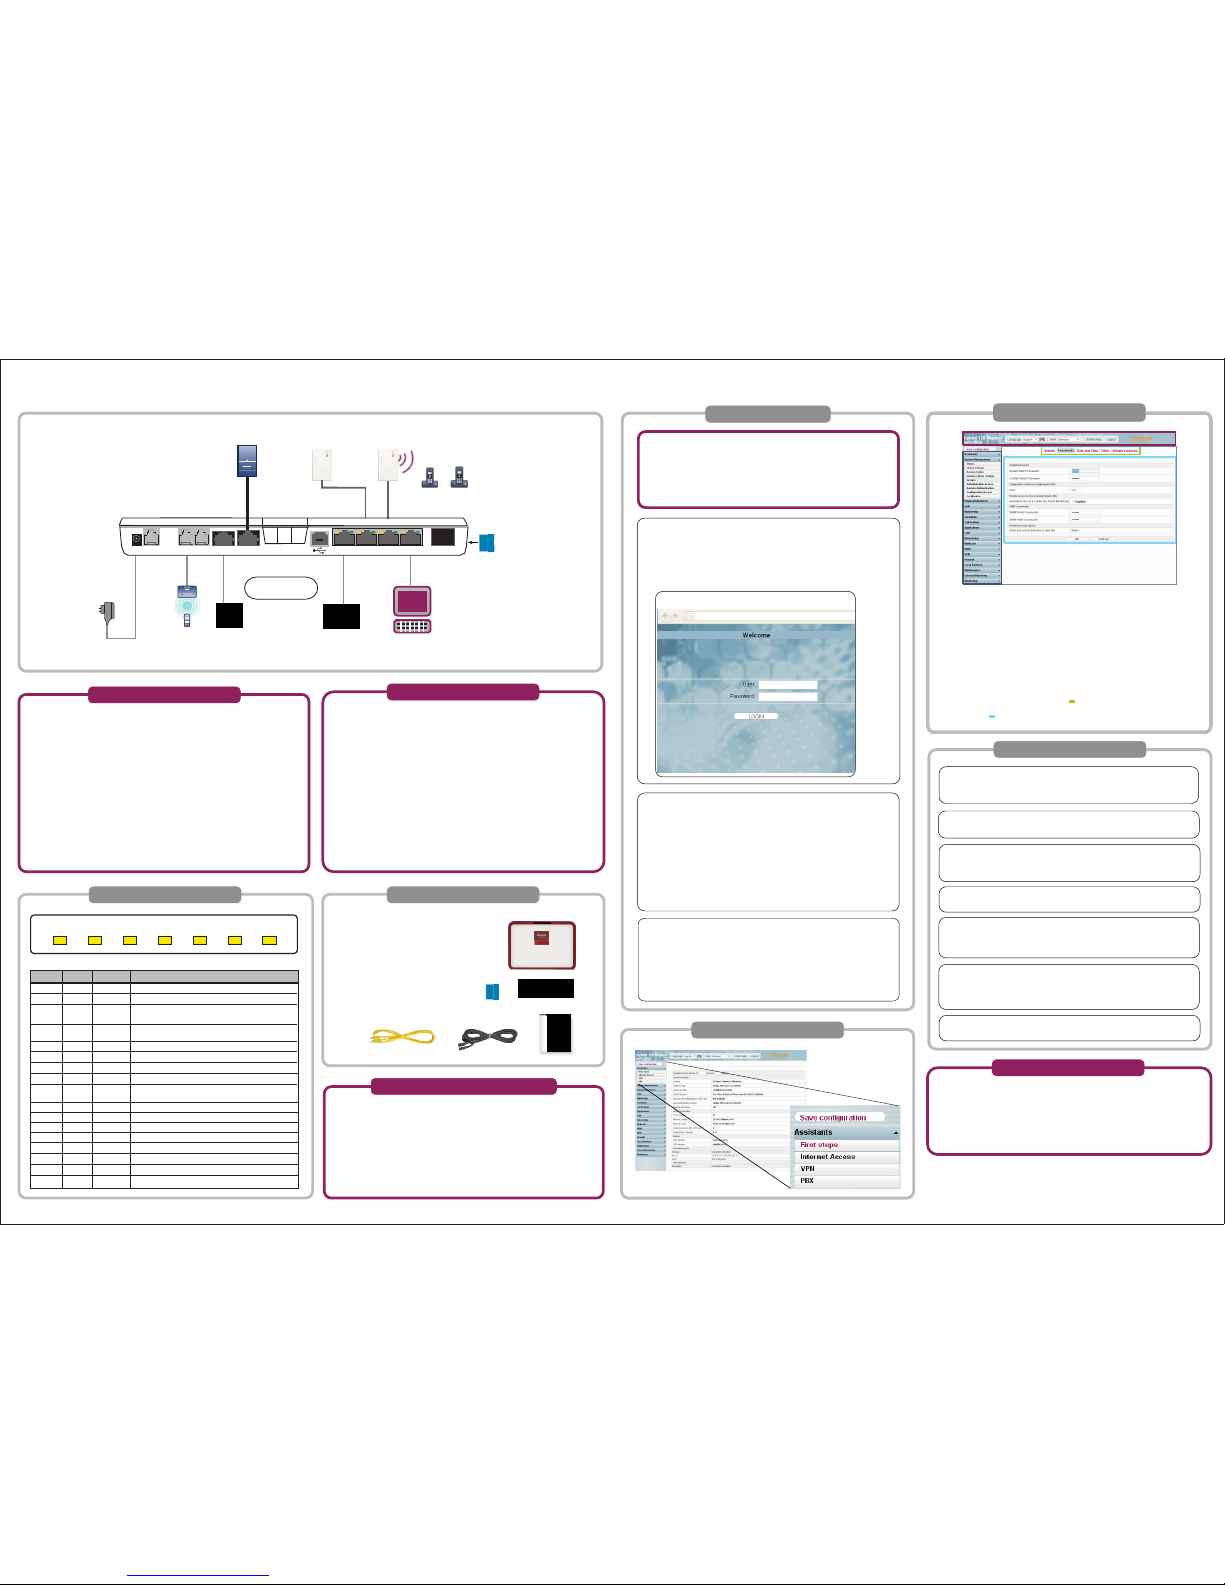
ISDN: Verbinden Sie den NTBA Ihres Service-Be reibers über das schwarze
ISDN-Kabel mi dem Anschluss "S/U 2" der hybird 120 GE.
ISDN-E dgerät: Schließen Sie ein ISDN-Endgerä an den in ernen ISDN-
Anschluss der hybird 120 GE an. Die ISDN-Buchse "S/U 1" is für den Be rieb
in erner ISDN-Gerä e mi S0-Anschluss vorkonfigurier .
VoIP: Für einen reinen IP-Anschluss ohne ISDN verwenden Sie ein eigenes
Kabel und die vom Provider berei ges ell e Anlei ung.
hybird 120 GE: Mon ieren Sie das Gerä an geeigne er S elle (Informa ionen
zur Mon age finden Sie im Handbuch un er
wiki.gigase pro.com
) und verbinden
Sie es über das mi geliefer e Ne zgerä mi dem S romne z.
PC: Schließen Sie einen geeigne en PC über ein E herne -Kabel an eine der
E herne -Schni s ellen der hybird 120 GE an. Soll en Probleme bei der
Verbindung zwischen PC und hybird 120 GE auf re en, lesen Sie bi e die
en sprechenden Kapi el in der Kurzanlei ung.
SIP-Telefo e: Schließen Sie Ihre SIP-Telefone an die 10/100/1000 Base-T
E herne -Schni s ellen an. Einen le z en Schri müssen Sie am PC ausführen.
Informa ionen dazu finden Sie auf unserer Wiki un er wiki.gigase pro.com.
A aloge E dgeräte: Schließen Sie Ihre analogen Endgerä e an den analogen
Anschlüssen FXS1, FXS2 der hybird 120 GE an.
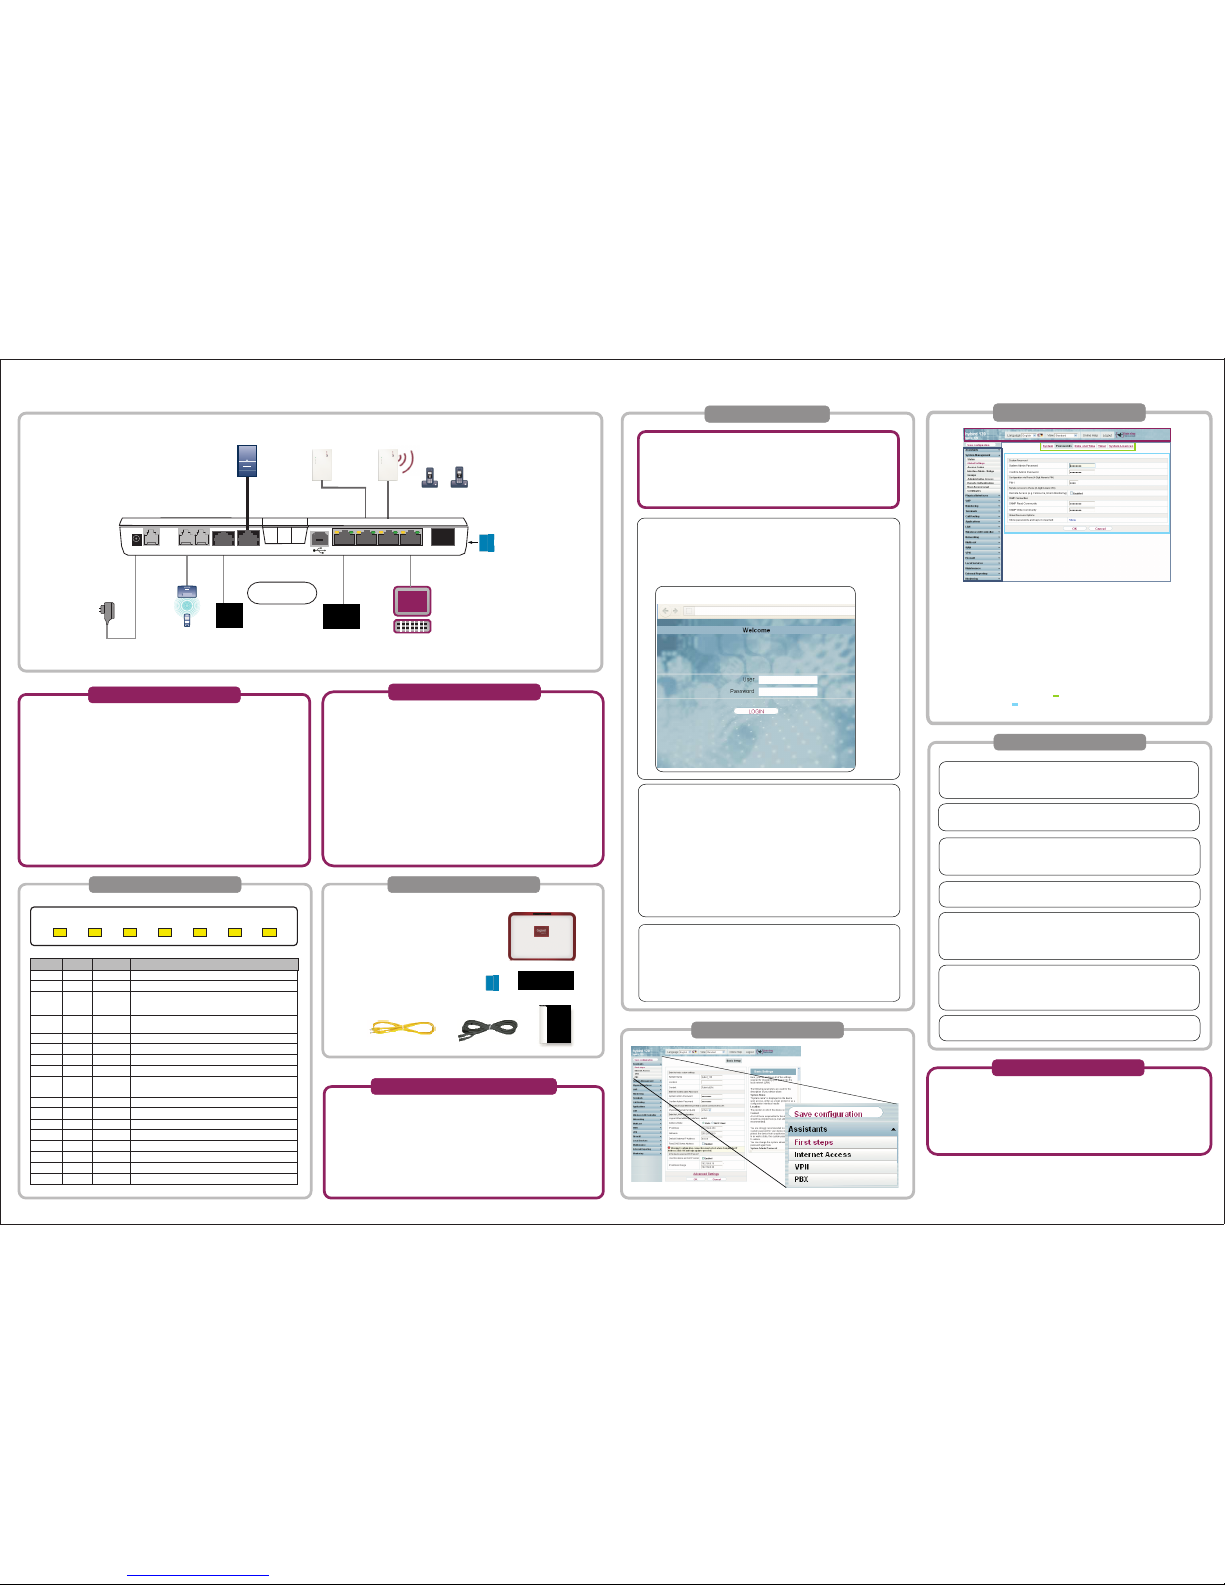
Kopfleiste
Sprache: Wählen Sie die Sprache der Konfigura ionsoberfläche.
A sicht: Wählen Sie aus, ob Sie die S andard-Konfigura ionsoberfläche oder den
eingebau en SNMP-Browser zur Konfigura ion verwenden wollen.
O li e-Hilfe: Rufen Sie durch Anklicken der Schal fläche die Hilfe auf.
Auslogge : Klicken Sie auf diese Schal fläche, um sich von der Konfigura ionsoberfläche
abzumelden.
Navigatio sleiste
In der Naviga ionsleis e sind die verschiedenen Eins ellungen in Gruppen sor ier .
Klicken Sie auf einen Ein rag, um das en sprechende Un ermenü zu öffnen. Klicken
Sie auf ein Un ermenü, werden Ihnen die verfügbaren Eins ellungsparame er im
Haup konfigura- ionsfens er angezeig .
Hauptko figuratio sfe ster
Mi hilfe der S euerelemen e im oberen Teil () des Haup konfigura ionsfens ers können
Sie wiederum zwischen einzelnen Eins ellungssei en hin- und herschal en. Nu zen Sie
den un eren Teil () des Haup konfigura ionsfens ers, um Ihr Gerä zu konfigurieren.
admi
admi
Noch Fragen? Um schnelle Hilfe zu erhal en, Besuchen Sie uns un er
www.gigase pro.com. Der Händler, bei dem Sie Ihre Telefonanlage gekauf haben,
wird gerne alle Fragen zu Ihrer Gigase pro Telefonanlage bean wor en.
Haben Sie Fragen bezüglich der Verwendung Ihrer Telefonanlage, besuchen Sie
unsere Knowledge Base wiki.gigase pro.com.
Gru dko figuratio
Sicherheitshi weise
Systemvoraussetzu ge
Ko takt
hybird 120 Gigaset Edition Installation
Lieferumfa gLEDs
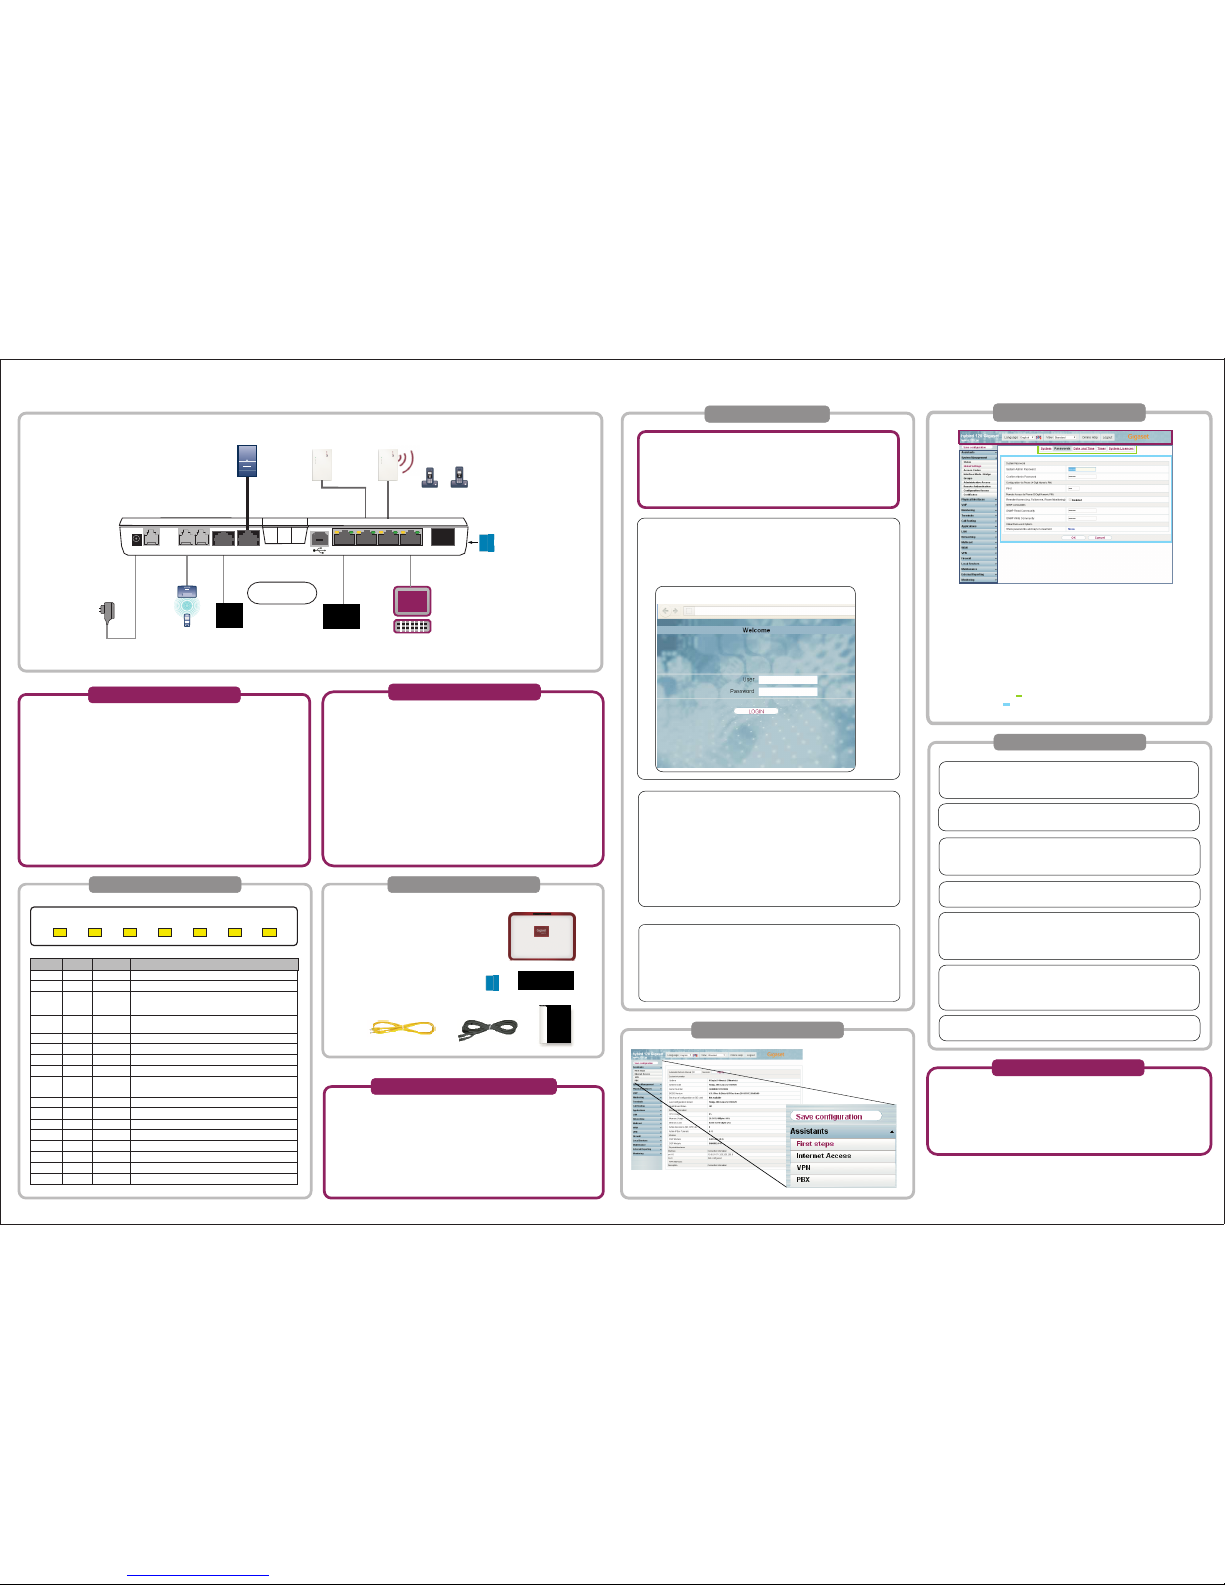
Geben Sie die IP-Adresse 192.168.0.250 i die Adresszeile Ihres
Browsers ei .
Verwenden Sie folgende Informa ionen für Ihre Anmeldung:
User: admin
Password: admin
Sie werden aufgeforder , das Adminis ra or-Passwor zu ändern.
Ei richte mit ei em PC
Geräte u d Kabel a schließe
Ko figuratio soberfläche

1
2
Login til konfigurations interfacet
192.168.0.250
admin
admin
1
2
3
Power Status DSL SIPSD Card ISDN1 ISDN2
3
NTBA
DECT200
analogue
(DECT-)
Telephone
ISDN-
Telephone
SI -
Telephone
max. 10 terminals
Handsets
C
Gigaset
N720 DM RO Gigaset
N720 RO
FXS1FXS2 S/U 1 S/U 2 LAN1 LAN2 LAN3 LAN4
FXO1
SD Card
DECT200
V. 2.1 - 20140701 - 5500001561
A31008-N2002-N101-1-3N43
Advarsel: Alle områder der kun kan åbnes med et værktøjsing er klassificeret
som et område af risiko.
Ventilations åbningerne skal holdes fri. Enheden bør ikke udsættes for direkte
sollys eller andre varme kilder
Udstyret skal installeres lodret på en væg.
Når forbundet til ethvert telekommunikations netværk (TNV kredsløb)
vær forsigtig for at undgå elektrisk stød.
Enheden og de interne forbindelser, bør kun installeres indendørs i en bygning!
Enheden må kun opereres med den godkendte og medfølgende strømforsyning.
Vær sikker på at kun CE godkendte terminaler forbindes til enheden.
Det vil ikke være muligt at tilgå enheden via den eksterne ISDN under et
strømsvigt.
Ingen væsker bør tillades at tilgå den indvendige side af enheden eller
strømforsyningen.
Før indlevering til reparation, bør du gemme alle data, og nulstille telefon
systemet til dets oprindelige tilstand.
Header
Spro : Vælg sproget til konfigurations interfacet.
Vis: Vælg om du vil bruge standard konfigurations interfacet, eller den indbyggede
SNM browser for konfigurations formål.
Online Hjælp: Kald hjælp funktionen ved at klikke på knappen.
Lo out: Tryk på denne knap for at logge ud af konfigurations interfacet.
Navi ations bar
De forskellige indstillinger er sorteret i grupper i navigations baren. Tryk
på en post for at åbne undermenuen.Hvis du trykker på en undermenu vil de tilgængelige
indstillings parametre blive vist i hoved konfigurations vinduet.
Hoved konfi urations vinduet
Du kan så skifte frem og tilbage imellem de individuelle indstillings vinduer, ved at
bruge kontrol elementerne i toppen ( ) af hoved konfigurations vinduet.
Brug den nederste del ( ) af hoved konfigurations vinduet, for at konfigurere din
enhed.
Basis confi uration
Sikkerhedsanvisnin er
Systemkrav
Til konfiguration af enheden, skal følgende systemkrav være opfyldt:
Microsoft Windows operativ system Windows 2000 eller nyere;
Windows X S 3 kræver følgende hotfix:
http://support.microsoft.com/kb/953761
Internet Explorer Version 7, 9 eller højere (sikkerhedsindstillinger skal muligvis
tilpasses), Mozilla Firefox Version 4 eller højere
Installeret netværkskort (Ethernet)
Installeret TC /I protokol
C konfigureret til automatisk at hente I adresse og DNS server
Høj opløseligt display (mere end 256 farver) til at vise grafikken korrekt
Kontakt
hybird 120 Gigaset Edition Installation
hybird 120 Gigaset Edition
Strømforsynings enhed
Ethernet kabel (gul)
ISDN BRI kabel (sort)
SD kort med voicemail data
Installations Instruktioner
Sikkerhedsmeddelelser
Brug de medfølgende kabler til terminalerne, til at forbinde terminalerne.
Terminaler kan enten tilsluttes med stik i bunden af enheden, eller med de
forbundne adaptere under den aftagelige frontplade.
2 x analoge terminaler (RJ12 stik, udskydelige via klemrække)
1 x ISDN (anden forbindelse justerbar gennem konfiguration fra intern til ekstern)
3 x SI (4 x uden C, kan udvides igennem en switch)
Et maksimum af 10 terminaler kan tilsluttes direkte.
Forbindelser til terminaler
Medføl ende udstyrLysdioder
I browserens adresse felt, indtast I adressen
192.168.0.250
og log ind med følgende information:
User: admin
Password: admin
Du vil blive bedt om at ændre administrator password.
Opsætnin med en PC
Du skal opfylde kravene for at udføre konfigurationen med webinterfacet.
Disse er beskrevet i manualen.
I dens oprindelige tilstand, er hybird 120 konfigureret som DHC server.
Derfor er du nødt til at foretage alle de nødvendige indstillinger for dine pc'er
i dit netværk der ikke har en I konfiguration.
Den C du har til hensigt at bruge til at udføre den grundlæggende
konfiguration, skal sættes op til automatisk at hente en I konfiguration.
Forbind enheder o kabler
ISDN: Brug det sorte ISDN kabel for at forbinde din service operatørs NTBA
til "S/U2" porten på din hybird 120.
ISDN terminal: Tilslut en ISDN terminal til det interne ISDN stik på
hybird 120."S/U 1" ISDN stikket er prækonfigureret til interne ISDN enheder
med en S0 forbindelse`.
Analo e terminaler: Tilslut dine analoge terminaler til de analoge porte
FXS1, FXS2 på hybird 120.
VoIP: For en ren I forbindelse uden ISDN, brug et dedikeret kabel og
quick installations guiden leveret af udbyderen.
hybird 120: Installer enheden i en egnet lokation (for monterings information,
referer til online guiden på
wiki.gigasetpro.com
) og forbind til stikkkontakten
med den medfølgende strømforsyning.
PC: Brug et Ethernet kabel til at forbinde en passende pc til en af Ethernet
grænsefladerne på hybird 120. Skulle du opleve problemer med
forbindelsen mellem pc'en og hybird 120, kan du læse det relevante kapitel i
manualen.
Konfi urations interface
LED Colour Status Information
ower Gul tændt Strømforsyningen er tilsluttet
slukket Ingen strømforsyning
Status Gul tændt Efter strømtilslutning: Enheden er startet
Under drift: Fejl
blinker Enheden er aktiv
langsomt
SD card tændt SD kort indsat, ingen læse/skrive adgang
slukket Ingen SD kort indsat
blinker læse/skrive adgang
DSL Gul slukket Ikke understøttet
blinker Ikke understøttet
langsomt
tændt Ikke understøttet
blinker Ikke understøttet
SI Gul tændt Registreret successfuldt med SI udbyder
slukket Ingen SI registrering
ISDN1 Gul tændt Layer 1 aktiveret
slukket I standby eller ikke aktiveret
ISDN 2 Gul tændt Layer 1 aktiveret
slukket I standby eller ikke aktiveret
I web interfacet kan du foretage andre indstillinger, f.eks. til telefoni.
Manualen indeholder information om at forbinde og starte op din
SI telefon.
Som en mulighed, kan du indtaste SI udbydere, for eksterne telefon
forbindelser. For dette, betragt beskrivelsen i online hjælpen i
VoIP ® Settin s ® SIP provider ® New menuen.
Du kan tildele et internt nummer til din SI telefon i
Terminals ® Other phones ® VoIP menuen.
Den integrerede online hjælp,giver detaljeret information om individuelle
konfigurations muligheder.
SIP telefoner: Tilslut dine SI telefoner til 10/100/1000 Base-T
Ethernet grænsefladerne. Du er nødt til at udføre et sidste skridt på din C.
For information om dette, referer til guiden som er tilgængelig på vores wiki
wiki.gigasetpro.com.
For avanceret konfiguration, refererer vi til vores wiki på
wiki.gigasetpro.com. Du kan også aktivere service access via ISDN login i
System Mana ement ® Administrative Access menuen.
Her, aktiver Service Lo in (ISDN web access) kontrol boksen.
Bekræft med OK. Alternativt,kan du indlede service forbindelsen ved at
taste kombinationen *96.
Derefter fuldfør ved at taste #.
Spørgsmål? For hurtig assistance, venligst besøg www.gigasetpro.com.
Forhandleren hvor du har købt dit telefonsystem, vil med glæde hjælpe dig med
yderligere spørgsmål vedrørende vores Gigaset rofessionelle telefonsystem.
Hvis du har nogen spørgsmål når du bruger dit telefonsystem, venligst besøg
wiki.gigasetpro.com.

1
2
Login to configuration interface
192.168.0.250
admin
admin
1
2
3
Power Status DSL SIPSD Card ISDN1 ISDN2
3
NTBA
DECT200
analogue
(DECT-)
Telephone
ISDN-
Telephone
SIP-
Telephone
ma . 10 terminals
Handsets
PC
Gigaset
N720 DM PRO Gigaset
N720 PRO
FXS1FXS2 S/U 1 S/U 2 LAN1 LAN2 LAN3 LAN4
FXO1
SD Card
DECT200
V. 2.1 - 20140701 - 5500001561
A31008-N2002-N101-1-3N43
Header
Language Select the language for the configuration interface.
View Select whether you want to use the default configuration interface or the built-
in SNMP browser for configuration purposes.
Online Help Call the help function by clicking the button.
Logout Click this button to log out of the configuration interface.
Navigation bar
The various settings are sorted into groups in the navigation bar. Click on an entry
in order to open the corresponding submenu. If you click on a submenu, the available
settings parameters will then be displayed to you in the main configuration window.
Main configuration window
You can then switch back and forth between individual settings pages using the control
elements in the top part ( ) of the main configuration window.
Use the bottom part ( ) of the main configuration window in order to configure your
device.
Basic configuration
Caution: Any area that can only be opened using a tool is classed
as an area of risk.
The ventilation openings must be kept uncovered. The device should not be
e posed to direct sunlight or any other source of heat.
The equipment should be installed upright on a wall.
When connecting any telecommunications network (TNV circuit),
take care to avoid electrical shock.
The device and the internal connections should only be assembled
and installed inside a building!
The device may only be operated using the approved power supply unit
that comes supplied.
Ensure that only CE-certified terminals are connected to the device.
It will not be possible to access the device via the e ternal ISDN during a
power failure.
No liquids should be allowed to get inside the device or the power supply unit.
Before releasing the device for repair, you should save all data,
then reset the telephone unit to its e works state.
Safety notices
System requirements
For the configuration of the device, the following system requirements
must be met:
Microsoft Windows operating system Windows 2000 or higher;
Windows XP SP3 requires the following hotfi :
http://support.microsoft.com/kb/953761
Internet E plorer Version 7 or 9 or higher (security settings may need to be
customised), Mozilla Firefo Version 4 or higher
Installed network card (Ethernet)
Installed TCP/IP protocol
PC configured to automatically obtain IP address and DNS server
High colour display (more than 256 colours) to show graphics accurately
Contact
hybird 120 Gigaset Edition Installation
hybird 120 Gigaset Edition
Power supply unit
Ethernet cable (yellow)
ISDN BRI cable (black)
SD card with voicemail data
Installation Instructions
Safety notices
Use the cables supplied with the terminals to connect the terminals.
Terminals can either be connected using the sockets on the bottom of the device,
or using the connected adapters beneath the detachable faceplate.
2 analogue terminal (RJ12 sockets, e tendible via terminal block)
1 ISDN (second connection adjustable through configuration from internal
to e ternal)
3 SIP (4 without PC, e tendible through switch)
A ma imum of ten terminals can be directly connected.
Available connections for terminals
Scope of supplyLEDs
In the browser's address line, enter IP address
192.168.0.250
and log in with the following information:
User admin
Password admin
You will be prompted to change the administrator password.
You should comply with the requirements for doing the configuration with
the web interface. These are described in manual.
In its e works state, your hybird 120 GE is set up as a DHCP server.
Therefore you need to make all the settings required for a connection on
the PCs in your LAN that have no IP configuration.
The PC you intend to use to perform the basic configuration must be set up
to automatically obtain an IP configuration.
Connect devices and cables
ISDN Use the black ISDN cable to connect your service operator's NTBA
to the "S/U 2" slot of the hybird 120 GE.
ISDN terminal Connect an ISDN terminal to the internal ISDN connector of
the hybird 120 GE. The "S/U 1" ISDN socket is preconfigured for operating
internal ISDN devices with an S0 connection`.
Analogue terminals Connect your analogue terminals to analogue
connectors FXS1, FXS2 of the hybird 120 GE.
VoIP For a purely IP connection without ISDN, use a dedicated cable and
the quick installation guide furnished by the provider.
hybird 120 GE Install the device in a suitable location (for assembly
information, refer to the online guide at
wiki.gigasetpro.com
) and connect
to the mains using the power unit supplied.
PC Use an Ethernet cable to connect a suitable PC to one of the Ethernet
interfaces on the hybird 120 GE. Should you encounter any problem with
the connection between the PC and the hybird 120 GE, please read the
relevant chapter in the manual.
Configuration interface
LED Colour Status Information
Power Yellow on The power supply is connected
off No power supply
Status Yellow on After switching on: Device is started
During operation: Fault
slow The device is active
flashing
SD card on SD card inserted, no read/write access
off No SD card inserted
flickering Read/write access
DSL Yellow off Not supported
slow Not supported
flashing
on Nor supported
flickering Nor supported
SIP Yellow on Registered successfully with SIP provider
off No SIP registration
ISDN1 Yellow on Layer 1 activated
off On standby or not functioning
ISDN 2 Yellow on Layer 1 activated
off On standby or not functioning
In the web interface you can make other settings, e. g. for telephony.
The manual provides information on connecting and starting up your
SIP telephone.
As an option, you may enter SIP providers for e ternal telephone
connections. For this, observe the online help description in the
VoIP ® Settings ® SIP provider ® New menu.
You can assign an internal number to your SIP telephone in the
Terminals ® Other phones ® VoIP menu.
Integrated online help provides detailed information on individual
configuration options.
SIP telephones Connect your SIP telephones to the 10/100/1000 Base-T
Ethernet interfaces. You need to perform one last step on the PC.
For information about this, refer to the guide provided in our wiki at
wiki.gigasetpro.com.
For advanced configurations, we recommend that you refer to our wiki at
wiki.gigasetpro.com. You can also enable service access via
the ISDN login in the System Management ® Administrative Access
menu. Here, enable the Service Login (ISDN web access) control bo .
Confirm with OK. Alternatively, you can initiate the service connection by
entering the key sequence *96. Then complete your entry with #.
Questions? For rapid assistance, please visit www.gigasetpro.com. The trade outlet
where you bought your telephone system will be happy to help you with further
questions relating to our Gigaset Professional telephone system.
If you have any questions when using your telephone system, please visit
wiki.gigasetpro.com.
Setting up with a PC

1
2
3
TR1
DECT200
Teléfono
analógico
DECT
Teléfono
RDSI
Teléfono
SIP
Máx. 10
terminale por defecto
Terminal inalámbrico
PC
Giga et
N720 DM PRO Giga et
N720 PRO
FXS1FXS2 S/U 1 S/U 2 LAN1 LAN2 LAN3 LAN4
FXO1
Tarjeta SD
DECT200
192.168.0.250
1
2
3
Regi tro en la interfaz de configuración
V. 2.1 - 20140701 - 5500001561
A31008-N2002-N101-1-3N43
Power. Status
DSL SIP
SD Card
ISDN1 ISDN2
VoIP: para que la conexión IP in RDSI ea perfecta utilice un cable
del proveedor y la in truccione proporcionada por el proveedor.
Para configurar el di po itivo deben cumplir e lo iguiente requi ito
del i tema:
Si tema operativo Micro oft Window a partir de Window 2000;
Window XP SP3 nece ita el iguiente hotfix:
http:// upport.micro oft.com/kb/953761
Internet Explorer ver ión 7
ó
9 (en ca o nece ario e deben per onalizar
lo aju te de eguridad), Mozilla Firefox a partir de la ver ión 4
Tarjeta de red in talada (Ethernet)
Protocolo TCP/IP in talado
PC configurado para la obtención automática de la dirección IP y el
ervidor DNS
Pantalla de alta den idad (má de 256 colore ) para una repre entación
correcta de lo gráfico
Atención: toda la zona que deban abrir e con herramienta on
zona peligro a .
La entrada de aire deben permanecer de pejada . El di po itivo
no debe e tar expue to a la radiación olar directa u otra fuente de calor.
El di po itivo debe in talar e recto en la pared.
La conexión de rede de telecomunicacione (circuito VRT) debe
realizar e con cuidado para evitar una de carga eléctrica.
El di po itivo y la conexione interna olo deben montar e e in talar e
re pectivamente en el interior de edificio .
El di po itivo olo debe utilizar e con el tran formador de alimentación
autorizado que e umini tra.
A egúre e de que e conecten al di po itivo únicamente terminale
con certificado CE.
Durante un fallo de corriente no e podrá acceder al di po itivo a travé
de laconexión externa RDS.
No debe permitir e la entrada de líquido en el interior del di po itivo o el
tran formador de alimentación.
Ante de llevar a reparar el di po itivo, debe guardar todo lo dato y
re tablecer la centralita al e tado de fábrica.
LED Color Es ado Información
Power Amarillo Encendido La fuente de alimentación e tá conectada
Apagado No hay fuente de alimentación
Statu Amarillo Encendido Tra la conexión: e inicia el di po itivo
Durante el funcionamiento: error
Intermit. lento El di po itivo e tá activo
SD Card Amarillo Encendido SD card in ertada,
no hay acce o de lectura/e critura
Apagado SD card no in ertada
Parpadeante Acce o de lectura/e critura
DSL Amarillo Apagado No oportado
Intermit. lento No oportado
Encendido No oportado
Parpadeante No oportado
SIP Amarillo Encendido Regi tro correcto en el proveedor SIP
Apagado No hay regi tro SIP
ISDN 1 Amarillo Encendido Capa 1 activada
Apagado En repo o o fuera de ervicio
ISDN 2 Amarillo Encendido Capa 1 activada
Apagado En repo o o fuera de ervicio
hybird 120 Giga et Edition
Una fuente de alimentación
Un cable Ethernet (amarillo)
Un cable RDSI-BRI (negro)
Tarjeta SD con dato de buzón de voz
In truccione para la pue ta en funcionamiento
Indicacione de eguridad
Conexiones disponibles para los erminales
Para conectar lo
terminale
e nece ita el cable incluido con lo
terminale
.
Lo
terminale
e pueden conectar a la toma de la parte po terior
del di po itivo o bien a travé de lo conectore interconectado que hay debajo
de la cubierta extraíble.
2
terminale
analógico (toma RJ12,
ampliable mediante bloque de conexión)
1 RDSI (una egunda conexión que e puede aju tar mediante configuración
de externa a interna)
3 SIP (4 in PC, ampliable mediante conmutador)
Como máximo e pueden conectar diez
terminale
directamente.
Tenga en cuenta lo requi ito para la configuración a travé de la interfaz
web. Lo encontrará en el manual de u uario. Su hybird 120 GE e tá
configurado de fábrica como ervidor DHCP. Lo PC que no di pongan de
configuración IP recibirán lo aju te nece ario para la conexión. El PC con
el que de ea realizar la configuración bá ica debe tener habilitada la
configuración para la obtención automática de una IP.
En la interfaz web puede realizar otro aju te , p. ej. de telefonía.
En la guía rápida encontrará indicacione obre la conexión y la pue ta en
funcionamiento de teléfono SIP. También puede realizar lo aju te
para conexione telefónica de acuerdo con el proveedor SIP externo.
Para ello, tenga en cuenta la de cripción de la ayuda online del menú
VoIP -> Ajus es -> Proveedor SIP -> Nuevo. En el menú
Terminales -> O ros eléfonos -> VoIP puede a ignar a u
teléfono SIP un número de teléfono interno. Una ayuda online integrada
ofrece información detallada obre la opcione de configuración.
Para la configuración avanzada le recomendamo que e informe en
nue tra página web, en wiki.giga etpro.com. Puede autorizar el acce o al
ervicio a travé del inicio de e ión RDSI en el menú Adminis ración
del sis ema -> Acceso adminis ra ivo. Active allí la ca illa de comprobación
Inicio de sesión del servicio (acce o web ISDN). Confirme con OK. También
puede iniciar la conexión al ervicio marcando *96 en un teléfono.
Para terminar pul e la tecla #.
RDSI: con el cable RDSI negro conecte el TR1 de u operador de ervicio
a la conexión "S/U 2" del di po itivo hybird 120 GE.
hybird 120 GE: in tale el di po itivo en un lugar adecuado (encontrará
información obre el montaje en el manual, en
wiki.giga etpro.com
) y
conéctelo a la red eléctrica travé de la fuente de alimentación umini trada.
PC: con un cable Ethernet conecte un PC adecuado a una interfaz Ethernet
del di po itivo hybird 120 GE. Si tiene problema con la conexión entre el PC y
el di po itivo hybird 120 GE, lea el capítulo corre pondiente en el manual.
Teléfono SIP: conecte u teléfono SIP a la interface Ethernet
10/100/1000 Ba e-T. Debe realizar un último pa o en el PC.
Encontrará información al re pecto en nue tra Wiki, en wiki.giga etpro.com.
Terminal RDSI: conecte un di po itivo de alida RDSI a la
conexión RDSI interna del di po itivo hybird 120 GE. La toma RDSI "S/U 1"
e tá preconfigurada para el funcionamiento de di po itivo RDSI interno
con conexión para S0.
Terminales analógicos: conecte u
terminale
analógico a la conexione
analógica FXS1, FXS2 del di po itivo hybird 120 GE.
Cabecera
Idioma: eleccione el idioma de la interfaz de configuración.
Vis a: eleccione i de ea utilizar para la configuración la interfaz de configuración
e tándar o el navegador de SNMP incorporado.
Ayuda online: acceda a la ayuda haciendo clic en el botón.
Finalizar la sesión: haga clic en e te botón para cerrar la e ión de la interfaz de
configuración.
Barra de navegación
En la barra de navegación e tán lo diver o aju te organizado por grupo . Haga
clic en una entrada para abrir el ubmenú corre pondiente. Haga clic en un ubmenú
i de ea vi ualizar en la ventana principal de configuración lo parámetro de aju te
di ponible .
Ven ana principal de configuración
Con la opcione de mando de la parte uperior ( ) de la ventana principal de
configuración puede ir de una página de aju te a otra. En la parte inferior ( ) de la
ventana principal de configuración tiene la opcione para configurar u di po itivo.
admin
admin
¿Alguna pregunta? Para obtener ayuda rápida, vaya a www.giga etpro.com.
El di tribuidor donde ha comprado u centralita re ponderá u pregunta obre la
centralita telefónica Giga et Profe ional.
Si tiene pregunta relacionada con el u o de u centralita, vi ite nue tra página web
wiki.giga etpro.com.
Configuración básica
Indicaciones de seguridad
Requisi os del sis ema
Con ac o
Instalación de hybird 120 Gigaset Edition
Con enido de la caja
LEDs
Introduzca la dirección IP 192.168.0.250 en la línea de dirección de u
navegador.
Utilice la iguiente información para iniciar e ión:
Usario: admin
Con raseña: admin
Se le pedirá que cambie la clave de admini trador.
Configuración con un PC
Conexión de disposi ivos y cables
In erfaz de configuración

1
2
Connexion à l'interface de configuration
192.168.0.250
admin
admin
1
2
3
3
NTBA
DECT200
T
éléphone
analogique
DECT)
T
éléphone
RNIS
T
éléphone
SIP
10 terminaux max
.
Combin
és téléphoniques
PC
Gigaset
N720 DM PRO Gigaset
N720 PRO
FXS1FXS2 S/U 1 S/U 2 LAN1 LAN2 LAN3 LAN4
FXO1
Carte SD
DECT200
Power Status DSL SIPSD Card ISDN1 ISDN2
V. 2.1 - 20140701 - 5500001561
A31008-N2002-N101-1-3N43
Haut de pa e
Lan ue : sélectionnez la langue de l'interface de configuration.
Afficha e : choisissez si vous souhaitez utiliser l'interface de configuration par
défaut ou le navigateur SNMP intégré pour la configuration.
Aide en li ne : consultez l'aide en cliquant sur ce bouton.
Déconnexion : cliquez sur ce bouton pour vous déconnecter de l'interface de
configuration.
Barre de navi ation
Les différents paramètres sont classés par groupe dans la barre de navigation. Cliquez sur une
entrée pour ouvrir le sous-menu correspondant. Cliquez sur un sous-menu pour afficher les
paramètres de réglage disponibles dans la fenêtre de configuration principale.
Fenêtre de confi uration principale
Vous pouvez ensuite passer d'une page de réglage individuelle à une autre à l'aide des éléments
de contrôle situés dans la partie supérieure ) de la fenêtre de configuration principale.
Vous pouvez configurer votre appareil dans la partie inférieure ) de la fenêtre de configuration
principale.
Confi uration de base
Avertissement : toutes les parties pouvant être ouvertes uniquement à l'aide
d'un outil sont considérées comme des parties à risque.
Les orifices de ventilation ne doivent pas être couverts. L'appareil ne doit pas
être exposé directement aux rayons du soleil ou à toute autre source de chaleur.
L'appareil doit être installé sur un mur, en position verticale.
Lors de la connexion de tout réseau de télécommunication circuit TNV),
assurez-vous d'éviter les chocs électriques.
L'appareil et les connexions internes doivent être montés et installés
en intérieur !
L'appareil doit être utilisé uniquement lorsqu'il est relié à un bloc d'alimentation
approuvé.
Assurez-vous que seuls des terminaux certifiés CE sont connectés à l'appareil.
Il est impossible d'accéder à l'appareil via le RNIS externe lors d'une panne
de courant.
L'intérieur de l'appareil ou le bloc d'alimentation ne doit pas être mis en
contact avec du liquide.
Avant de faire réparer l'appareil, enregistrez toutes vos données, puis
réinitialisez les paramètres par défaut du téléphone.
Conseils de sécurité
Confi uration syst
ème requise
Afin de configurer l'appareil, veuillez
respecter la configuration système requise :
Système d'exploitation Windows 2000 ou version ultérieure ;
pour Windows XP SP3, le hotfix suivant est requis :
http://support.microsoft.com/kb/953761
Internet Explorer version 7, 9 ou ultérieure il peut être nécessaire de
personnaliser les paramètres de sécurité), Mozilla Firefox version 4 ou ultérieure
Carte réseau installée Ethernet)
Protocole TCP/IP installé
PC configuré pour obtenir automatiquement l'adresse IP
et l'adresse de serveur DNS
Nombre élevé de couleurs supérieur à 256) nécéssaires afin d'avoir un
affichage précis des graphiques
Contact
Installation du hybird 120 Gi aset Edition
hybird 120 Gigaset Edition
Bloc d'alimentation
Câble Ethernet jaune)
Câble RNIS noir)
Carte SD avec données de messagerie vocale
Instructions relatives à l'installation
Conseils de sécurité
Utilisez les câbles fournis avec les terminaux pour les connecter.
Les terminaux peuvent être connectés via les prises situées sur la face inférieure
de l'appareil ou via les adaptateurs connectés situés sous la partie frontale
amovible.
2 x terminal analogique prises RJ12, extensibles grâce au bornier)
1 x RNIS deuxième connexion réglable grâce à une configuration de l'intérieur
vers l'extérieur)
3 x SIP 4 x sans PC, extensibles grâce au commutateur)
Dix terminaux maximum peuvent être connectés directement à l'appareil.
Connexions disponibles des ter
minaux
É
léments fournis
DEL
Dans la barre d'adresse du navigateur, saisissez l'adresse IP
192.168.0.250
puis connectez-vous grâce aux informations suivantes :
Identifiant : admin
Mot de passe : admin
Vous êtes ensuite invité à changer le mot de passe administrateur.
Confi uration via un PC
Il est recommandé de respecter les conditions nécessaires lors de la
configuration via l'interface Web. Vous trouverez ces conditions dans
le manuel d'instructions.
Lorsque votre hybird 120 GE est paramétré par défaut, il est configuré en
tant que serveur DHCP.
Vous devez donc effectuer tous les réglages nécessaires sur votre LAN
dont la configuration IP n'est pas définie afin de pouvoir connecter votre
appareil au PC. Le PC utilisé pour procéder à la configuration basique doit
être configuré de manière à obtenir automatiquement une configuration IP.
Connexions des appareils et des c
âbles
RNIS :
utilisez le câble RNIS noir pour connecter le NTBA de votre
fournisseur de services à l'emplacement « S/U 2 » de l'hybird 120 GE
.
Terminal RNIS :
connectez un terminal RNIS au connecteur RNIS interne
de l'hybird 120 GE. La prise RNIS « S/U 1 » est préconfigurée pour
fonctionner avec des appareils RNIS internes avec une connexion S0
.
Terminaux analo iques : connectez vos terminaux analogiques aux
connecteurs analogiques FXS1, FXS2 de l'hybird 120 GE
.
VoIP :
pour une connexion IP sans RNIS, utilisez un câble dédié et le guide
d'installation rapide donné par le fournisseur
.
hybird 120 GE : installez l'appareil dans un endroit approprié pour toute
information relative au montage, reportez-vous au guide en ligne à l'adresse
suivante : wiki.gigasetpro.com
)
, puis raccordez-le au secteur à l'aide du
bloc d'alimentation fourni
.
PC : utilisez un câble Ethernet pour connecter un PC compatible à l'une des
interfaces Ethernet de l'hybird 120 GE. En cas de problème lors de la
connexion de votre PC à l'hybird 120 GE, veuillez consulter le chapitre
concerné dans le manuel.
Interface de confi uration
DEL Couleur État Si nification
Power Jaune activé
Bloc d'alimentation branch
é
desactivé
Pas d'alimentation
électrique
Status Jaune activé
Apr
ès l'allumage de l'appareil : appareil démarré
En cours de fonctionnement
: panne
clignotement
Appareil en fonctionnement
lent
SD Card activé
Carte SD ins
érée, pas d'accès en lecture/écriture
desactivé
Pas de carte SD ins
érée
clignotement Acc
ès en lecture/écriture
normal
DSL Jaune desactivé
Non pris en charge
clignotement Non pris en charge
lent
activé
Non pris en charge
clignotement Non pris en charge
normal
SIP Jaune activé
Enregistr
é avec succès chez un fournisseur SIP
desactivé
Pas d'enregistrement SIP
ISDN1 Jaune activé
Couche 1, activ
ée
desactivé
En veille ou
éteint
ISND2 Jaune activé
Couche 1, activ
ée
desactivé
En veille ou
éteint
L'interface Web vous permet de procéder à d'autres réglages, notamment
de la téléphonie.
Vous trouverez des informations relatives à la connexion et au démarrage
de votre téléphone SIP dans le manuel d'instructions.
En option, vous pouvez saisir les opérateurs SIP pour les connexions
téléphoniques externes. Pour cela, référez-vous à l'aide en ligne dans
le menu VoIP ® Paramètres ® Fournisseur SIP ® Nouveau.
Vous pouvez attribuer un numéro interne à votre téléphone SIP dans
le menu Appareil terminal ® Autres téléphones ® VoIP.
L'aide en ligne intégrée fournit des informations détaillées sur les options
de configuration individuelles.
Téléphones SIP : connectez vos téléphones SIP aux interfaces Ethernet
10/100/1000 Base-T. Vous devez effectuer une dernière étape sur votre PC.
Pour en savoir plus cette étape, reportez-vous au guide disponible sur notre
wiki à l'adresse suivante : wiki.gigasetpro.com.
Pour les configurations avancées, nous vous recommandons de vous
reporter à notre wiki à l'adresse suivante : wiki.gigasetpro.com.
Vous pouvez également activer l'accès au service grâce à l'identifiant RNIS
dans le menu Gestion du système ® Accès administratif.
Cochez la case Identifiant service (accès Internet RNIS).
Confirmez en cliquant sur OK. Vous pouvez également établir la connexion
au service en saisissant la séquence de touches *96, puis confirmez avec
la touche #.
Des questions ? Pour obtenir une aide rapide, rendez-vous sur www.gigasetpro.com.
L'équipe du point de vente où vous avez acheté votre système téléphonique sera
heureuse de répondre à toutes vos questions relatives à votre système téléphonique
Gigaset Professional.
Si vous avez des questions concernant lutilisation de votre serveur téléphonique,
merci de visiter notre site support wiki.gigasetpro.com.

1
2
3
ISDN-NT
DECT200
Telefono
analogico
DECT
Telefono
ISDN
Telefono
SIP
max. 10 terminali
Parte mobile
PC
Gigaset
N 20 DM PRO Gigaset
N 20 PRO
FXS1FXS2 S/U 1 S/U 2 LAN1 LAN2 LAN3 LAN4
FXO1
Scheda SD
DECT200
192.168.0.250
1
2
3
Connessione all'interfaccia di configurazione
V. 2.1 - 20140 01 - 5500001561
A31008-N2002-N101-1-3N43
Power Status DSL SIPSD Card ISDN1 ISDN2
Nell'interfaccia Web è possibile eseguire altre impostazioni, ad es. per la
telefonia. La guida rapida fornisce le indicazioni per il collegamento e la
messa in funzione dei telefoni SIP. È possibile, a scelta, registrare un
provider SIP per i collegamenti telefonici verso l'esterno. Tenere presente a
tal fine la descrizione nella guida online per il menu VoIP -> Impostaz on
-> Prov der SIP -> Nuovo. È possibile assegnare un numero interno al
telefono SIP mediante il menu Term nal -> Altr telefon -> VoIP.
Per informazioni dettagliate sulle singole opzioni di configurazione,
consultare la guida online integrata.
Per collegare i terminali utilizzare i cavi in dotazione ai terminali. I terminali
si possono collegare mediante le prese nella parte inferiore dell'apparecchio o
tramite i morsetti connessi sotto il coperchio rimovibile.
Per eseguire la configurazione del dispositivo, è necessario che siano
presenti i seguenti requisiti di sistema:
Sistema operativo Microsoft Windows, a partire da Windows 2000;
Windows XP SP3 richiede l'hotfix seguente:
http://support.microsoft.com/kb/953 61
Internet Explorer oppure 9 (personalizzare eventualmente le impostazioni
di protezione), Mozilla Firefox dalla versione 4
Scheda di rete (Ethernet) installata
Protocollo TCP/IP installato
PC configurato per ottenere automaticamente l'indirizzo IP e il server DNS
Alta definizione dei colori (oltre 256 colori) per una corretta visualizzazione
della grafica
Attenzione: tutte le parti che si possono aprire solo con attrezzi sono pericolose.
Le aperture di areazione devono restare libere. Non esporre l'apparecchio alla
luce diretta del sole o ad altre fonti di calore.
L'apparecchio deve essere montato sulla parete in posizione verticale.
Per evitare scosse elettriche prestare attenzione quando si chiude la rete delle
telecomunicazioni (circuito TNV).
L'apparecchio e i collegamenti interni possono essere montati e messi in opera
soltanto all'interno di edifici.
L'apparecchio può essere messo in funzione soltanto con l'alimentatore di rete
consentito.
Tenere presente che soltanto i terminali certificati CE possono essere collegati
all'apparecchio.
Durante un ammanco di corrente l'apparecchio non è raggiungibile dal connettore
ISDN esterno .
Non immettere alcun tipo di liquido all'interno dell'apparecchio o nell'alimentatore
di rete.
Prima di eseguire riparazioni, memorizzare tutti i dati e reimpostare l'impianto
allo stato iniziale.
LED Colore Stato Informaz one
Power Giallo On L'alimentazione elettrica è collegata
Off Nessuna alimentazione
Status Giallo On Dopo l'attivazione: l'apparecchio viene avviato
Quando è in funzione: errore
lamp. lento L'apparecchio è attivo
SD Card Giallo On La scheda SD è inserita,
nessun accesso in lettura/scrittura
Off Nessuna scheda SD inserita
lampegg. Accesso in lettura/scrittura
DSL Giallo Off Non supportato
lamp. lento Non supportato
On Non supportato
lampegg. Non supportato
SIP Giallo On registrazione con il provider SIP avvenuta
Off nessuna registrazione SIP
ISDN 1 Giallo On Strato 1 attivo
Off Inattività o fuori servizio
ISDN 2 Giallo On Strato 1 attivo
Off Inattività o fuori servizio
hybird 120 Gigaset Edition
un alimentatore
un cavo Ethernet (giallo)
un cavo ISDN-BRI (nero)
una scheda SD con dati Voice Mail
Guida alla messa in funzione
Informazioni sulla sicurezza
Collegament d spon b l per term nal
2 x terminali analogici (prese RJ12, ampliabile mediante morsettiera)
1 x ISDN (secondo collegamento modificabile mediante configurazione da
esterno a interno)
3 x SIP (4 x senza PC, ampliabile mediante switch)
Si possono collegare direttamente max. 10 terminali.
Consultare i requisiti per la configurazione mediante interfaccia Web. Tali
requisiti sono descritti nella guida rapida. L'hybird 120 GE è preimpostato
come server DHCP. Trasmettere ai computer della LAN che non dispongono
di alcuna configurazione IP tutte le impostazioni necessarie per un collega-
mento.Il PC da utilizzare per eseguire la configurazione di base deve essere
impostato per ottenere automaticamente la configurazione degli IP.
Per una configurazione avanzata si consiglia di consultare il sito Web
all'indirizzo wiki.gigasetpro.com. Per accedere al servizio di assistenza
sull'accesso ISDN, utilizzare il menu Gest one s stema -> Accesso
amm n strat vo. Attivare la casella di controllo Accesso serv z o (accesso Web
ISDN). Confermare con OK. In alternativa, è possibile avviare la
connessione al servizio digitando i tasti *96 in un telefono. Digitare il
tasto # dopo aver composto il numero.
ISDN: Collegare l'NT del provider di servizi mediante il cavo nero ISDN con il
collegamento "S/U 2" di hybird 120 GE.
Term nale ISDN: Collegare un terminale ISDN al collegamento ISDN interno
di hybird 120 GE. La presa ISDN "S/U 1" è preconfigurata per il funzionamento
degli apparecchi ISDN interni con il collegamento S0.
VoIP: Per una connessione IP pura senza ISDN, utilizzare il proprio cavo e le
istruzioni del provider già fornite.
hyb rd 120 GE: Montare l'apparecchio in un luogo appropriato (per informazio-
ni sul montaggio consultare il manuale all'indirizzo
wiki.gigasetpro.com
) e colle-
garlo alla rete elettrica utilizzando l'adattatore di alimentazione in dotazione.
PC: Collegare un PC adatto a una delle interfacce Ethernet di hybird 120 GE
tramite un cavo Ethernet.Se si verificano problemi con la connessione tra il
PC e hybird 120 GE, leggere il capitolo pertinente contenuto nella guida rapida.
Telefon SIP: Collegare i telefoni SIP all'interfaccia Ethernet 10/100/1000
Base-T. È necessario eseguire un ultimo passaggio sul PC. Per maggiori
informazioni consultare la nostra Wiki all'indirizzo wiki.gigasetpro.com.
Term nale analog c : Collegare i terminali analogici ai collegamenti analogici
FXS1, FXS2 di hybird 120 GE.
Intestazione
L ngua: selezionare la lingua dell'interfaccia di configurazione.
V sta: selezionare se si desidera utilizzare l'interfaccia di configurazione predefinita o
il browser incorporato SNMP per la configurazione.
Gu da onl ne: premere il pulsante per richiamare la guida.
D sconnett : fare clic su questo pulsante per disconnettersi dall'interfaccia di
configurazione.
Barra di navigazione
Nella barra di navigazione sono presenti i gruppi delle diverse impostazioni. Fare clic
su una voce per aprire il sottomenu corrispondente. Fare clic su un sottomenu per
visualizzare le impostazioni disponibili nella finestra di configurazione principale.
Finestra di configurazione principale
Utilizzare i comandi nella parte superiore ( ) della finestra principale di configurazione
per passare tra le singole pagine delle impostazioni. Utilizzare la parte inferiore ( )
della finestra principale di configurazione per configurare l'apparecchio.
adm n
adm n
In caso di domande visitare il nostro sito all'indirizzo www.gigasetpro.com.
Il rivenditore presso cui è stato acquistato l'impianto telefonico potrà rispondere a tutte
le domande sull'impianto Gigaset professionale.
Per le domande sll'utilizzo dell'impianto telefonico, visitare il nostro sito all'indirizzo
wiki.gigasetpro.com.
Conf guraz one d base
Avvertenze d s curezza
Requ s t d s stema
Contatto
hybird 120 Gigaset Edition - Installazione
Dotaz oneLED
Immettere l'indirizzo IP 192.168.0.250 nella barra degli indirizzi del
browser.
Per la connessione utilizzare le informazioni seguenti:
Utente: admin
Password: admin
Viene richiesto di modificare la password di amministratore.
Impostaz one med ante PC
Collegament degl apparecch e de cav
Interfacc a d conf guraz one

1
2
3
192.168.0.250
admin
admin
1
2
3
Log in om een configuratie-interface
Gigaset
N720 DM PRO Gigaset
N720 PRO
NT
analoog toestel
(b deurintercom)
ISDN-
toestel
Gigaset pro
toestel
standaard 10
toestellen
Handsets
PC
FXS1FXS2 S/U 1 S/U 2 LAN1 LAN2 LAN3 LAN4
FXO1
SD
Kaart
V. 2.1 - 20140701 - 5500001561
A31008-N2002-N101-1-3N43
Header
Language Selecteer de taal an de Configuratie-interface.
View Selecteer of u de standaard configuratie-interface of de ingebouwde SNMP
browser wenst te gebruiken oor configuratie doeleinden.
Online Help Klik op de knop om de Online help functie op te roepen.
Logout Klik op deze knop om uit te loggen.
Navigatiebalk
De erschillende instellingen zijn gesorteerd in groepen in de na igatiebalk. Klik op
een groep om het corresponderende submenu te openen. Als u klikt op een submenu,
zullen de beschikbare parameters worden weergege en in het hoofd configuratie
enster.
Hoofd configuratie venster
U kunt heen en weer schakelen tussen indi iduele pagina's met instellingen met
behulp an de bedieningselementen in het bo enste deel ( ) of het hoofd configuratie
enster. Gebruik het onderste deel ( ) an het hoofd configuratie enster om het
apparaat the configureren.
Basis configuratie
Let op: Elk deel an het toestel dat alleen kan worden geopend met behulp
an gereedschap, wordt aangemerkt als een gebied met risico.
De entilatie-openingen moeten onbedekt blij en. Het apparaat mag niet
worden blootgesteld aan direct zonlicht of een andere warmtebron.
De apparatuur moet rechtop worden geïnstalleerd op een muur.
Bij het aansluiten an een PSTN of ISDN lijn, let op om elektrische
schokken te oorkomen.
Het apparaat en de interne erbindingen mogen alleen worden gemonteerd
en geïnstalleerd in een gebouw!
Het apparaat mag alleen worden aangesloten op het lichtnet met de
bijgele erde goedgekeurde netadapter.
Zorg er oor dat alleen CE-gecertificeerde toestellen zijn aangesloten op
het apparaat. Alle Gigaset pro toestellen zijn CE-gecertificeerd.
Het zal niet mogelijk zijn om toegang tot het apparaat te krijgen ia de
externe ISDN erbinding tijdens een stroomstoring.
Vloeistoffen mogen NOOIT in het apparaat of de netadapter terecht komen.
Voordat u het apparaat ter reparatie aanbiedt dient u alle gege ens op te
slaan en daarna het apparaat terug te zetten naar de fabrieksinstellingen
(factory reset).
Veiligheidsmededeling
Minimale systeemeisen
Voor de configuratie an het apparaat, moet aan de olgende systeem ereisten
worden oldaan:
Microsoft Windows-besturingssysteem Windows 2000 of hoger, Windows
XP SP3 ereist de olgende hotfix: http://support.microsoft.com/kb/953761
Internet Explorer ersie 7, 9 of hoger (be eiligingsinstellingen moeten
mogelijk worden aangepast), Mozilla Firefox ersie 4 of hoger
Geïnstalleerde netwerkkaart
(Ethernet)
Geïnstalleerd TCP / IP-protocol
PC is geconfigureerd om automatisch een IP-adres en de DNS-ser er te
erkrijgen
Hoog kleurendisplay (meer dan 256 kleuren) om afbeeldingen nauwkeurig
te tonen
Contact
hybird 120 Gigaset Edition Installatie instructies
hybird 120 Gigaset Edition
Netadapter
Ethernet kabel (geel)
ISDN BRI kabel (zwart)
SD kaart met oicemail data
Installatie Instructies
Veiligheidsmededeling
Gebruik de meegele erde kabels om de toestellen op de klemmen aan te sluiten.
Toestellen kunnen zowel worden aangesloten met behulp an de aansluitingen
aan de onderkant an het apparaat, of met behulp an de aansluit adapters
onder het afneembare frontje.
2 x
analoge toestellen ( ia RJ12 poorten en 2 x ia klemmenblok).
1 x
ISDN (tweede erbinding instelbaar ia insteekkaart positie, an interne
S0 naar externe ISDN).
4 x
Ethernet
Standaard kunnen er maximaal 10 toestellen worden aangesloten.
Beschikbare aansluitingen voor toestellen
Leveringsomvang
LEDs
Voer het onderstaande IP-adres in de browser adresbalk in:
192.168.0.250
en login met de olgende gege ens:
User admin
Password admin
U wordt ge raagd om het beheerderswachtwoord te wijzigen.
Configureren via Web Interface
Het aansluiten van toestellen en kabels
ISDN
Gebruik de meegele erde zwarte ISDN kabel om het apparaat te
erbinden met de ISDN lijn (NT1) en de "S/U 2" poort an de hybird 120 GE.
ISDN toestel
Standaard is de hybird 120 GE zo ingesteld dat u op de
"S/U1" poort een S0 ISDN toestel kunt aansluiten.
Analoge toestellen
Op de FXS1 en FXS2 poort kunt u analoge toestellen
(bij . een deurintercom) aansluiten op de hybird 120 GE.
VoIP
Voor een installatie met alleen VoIP en zonder ISDN, gebruik dan een
kabel/aansluiting die oor de hybird 120 GE is bedoeld en de instructies
gele erd door de pro ider.
hybird 120
Installeer het apparaat op een geschikte locatie (raadpleeg
de online gids op wiki.gigasetpro.com) en sluit het apparaat aan op het
lichtnet doormiddel an de meegele erde netadapter.
PC Gebruik een Ethernet-kabel om een geschikte pc aansluiten op een
an de Ethernet-interfaces an de hybird 120 GE. Mocht u problemen onder
inden met de erbinding tussen de pc en de hybird 120 GE, dan kunt u
het betreffende hoofdstuk in de handleiding raadplegen.
Configuratie-interface
LED Kleur Toestand Informatie
Power
Geel aan De netadapter is aangesloten
uit De netadapter is niet aangesloten
Status
Geel aan Na aanzetten: Apparaat start op
Tijdens bedrijf: Fout
langzaam Het apparaat is actief
knipperen
SD card
aan
SD
kaart is aanwezig, geen lees/schrijf toegang
uit
Geen SD
kaart aanwezig
knipperend Lees/schrijf toegang
DSL
Geel uit Niet beschikbaar
langzaam Niet beschikbaar
flashing
aan
Niet beschikbaar
knipperend Niet beschikbaar
SIP
Geel aan Succes ol geregistreerd bij SIP pro ider
uit Geen SIP registratie
ISDN1
Geel aan
Layer 1
geacti eerd
uit Standby of niet werkend
ISDN 2
Geel aan
Layer 1
geacti eerd
uit Standby of niet werkend
Gigaset pro toestellen Op de 10/100/1000 Base-T Ethernet-interfaces kunt
u Gigaset pro toestellen aanluiten. U moet dan nog een laatste stap ia de
Web Interface uit oeren.
Informatie hiero er indt u in de online gids op wiki.gigasetpro.com.
Voor gea anceerde configuraties, raden wij u aan onze wiki te raadplegen
wiki.gigasetpro.com. U kunt op di erse manieren het system beheren op
afstand. Via de Web Interface bij oorkeur ia VPN of ISDN.
U kunt beheer ia ISDN op 2 manieren actie eren:
Via de Web Interface: System Management ®Administrative Access menu.
Via een ISDN toestel: Voeren de toetsencombinatie *96 in en sluit
af met een #.
Vragen? Voor snelle ondersteuning, ga naar wiki.gigasetpro.com. Voor erdere
ondersteuning kunt u altijd terecht bij uw Distributeur, zij hebben een eigen helpdesk
en zullen u graag oorzien an antwoorden op uw ragen o er onze Gigaset
Professional telefoon systemen en toestellen.
DECT200
DECT200
Het is belangrijk dat de PC die gebruikt wordt om het toestel ia de Web
Interface te configureren oldoet aan de juiste ereisten. Deze worden
beschre en in de handleiding.
Standaard (fabrieksinstellingen) is uw hybird 120 GE ingesteld als DHCP-
ser er. U moet daarom alle PC's in het LAN die geen IP-configuratie-instellingen
hebben, juist instellen.
De PC die u wilt gebruiken om de basisconfiguratie uit te oeren, moet zo
worden ingesteld dat deze automatisch een IP-configuratie krijgt (DHCP).
In de Web Interface kunt u di erse zaken instellen, onder andere oor
telefonie. De handleiding be at informatie o er het aansluiten en opstarten
an uw Gigaset pro toestel.
Als optie kunt u SIP pro iders oor externe telefoon erbindingen in oeren.
Raadpleeg de online help oor meer informatie ia het
VoIP ®Settings ®SIP provider ®New menu.
U kunt een intern nummer toewijzen aan uw Gigaset pro toestel ia het
Terminals ®Other phones ®VoIP menu.
De geïntegreerde online Help be at gedetailleerde informatie o er
indi iduele configuratie-opties.
Power Status DSL SIPSD Card ISDN1 ISDN2

1
2
Power Status DSL SIPSD Card ISDN1 ISDN2
3
NTBA
DECT200
Telefone
DECT
analógico
Telefone
RDIS
Telefone
SIP
máx. 10 te minais
Te minal móvel
PC
Gigaset
N720 DM PRO Gigaset
N720 PRO
FXS1FXS2 S/U 1 S/U 2 LAN1 LAN2 LAN3 LAN4
FXO1
Ca tão SD
DECT200
192.168.0.250
1
2
3
Registo na inte face de configu ação
V. 2.1 - 20140701 - 5500001561
A31008-N2002-N101-1-3N43
Pa a a configu ação do apa elho, devem cump i -se os seguintes equisitos de
sistema:
Sistema ope ativo Mic osoft Windows a pa ti do Windows 2000; o Windows XP
SP3 eque o seguinte Hotfix: http://suppo t.mic osoft.com/kb/953761
Inte net Explo e 7 ou 9 (se necessá io, as configu ações de segu ança devem
se ajustadas), Mozilla Fi efox a pa ti da ve são 4
Placa de ede instalada (Ethe net)
P otocolo TCP/IP instalado
PC configu ado pa a a obtenção automática do ende eço de IP e se vido DNS
Ec ã a co es de alta esolução (mais de 256 co es) pa a a exibição co eta dos
g áficos
Cuidado: Todas as á eas que só podem se abe tas com fe amentas são
pe igosas.
As abe tu as de ventilação não devem esta bloqueadas. O apa elho não deve
se exposto à luz sola di ecta ou a out as fontes de calo .
O apa elho deve se montado ve ticalmente na pa ede.
Pa a evita um choque eléct ico, é necessá io te atenção ao conecta a ede
de telecomunicações (ci cuitos TNV).
O apa elho e as ligações inte nas devem se apenas montados e instalados no
inte io de edifícios!
O apa elho só pode se ope ado com o t ansfo mado ap ovado fo necido.
Note-se que apenas te minais com ce tificação CE estão conectados ao
apa elho.
Du ante um co te de ene gia, o apa elho não é acessível at avés das po tas
exte nas RDIS.
Não deve ent a nenhum líquido no inte io do apa elho ou no t ansfo mado .
Antes de envia o apa elho pa a epa ação, deve gua da todos os dados e, em
seguida, estau a as definições da cent al telefónica pa a o estado de
fo necimento.
LED Cor Estado I formação
Powe Ama elo ligado Alimentação fo necida
desligado Alimentação não fo necida
Status Ama elo ligado depois de liga : o apa elho inicia
du ante o funcionamento: e o
pisca lent. O apa elho está ligado
SD Ama elo ligado Ca tão SD inse ido,
Ca d sem acessos de leitu a/esc ita
desligado Ca tão SD não inse ido
t émulo Acesso de leitu a/esc ita
DSL Ama elo desligado Não supo tado
pisca lent. Não supo tado
ligado Não supo tado
t émulo Não supo tado
SIP Ama elo ligado egistado com sucesso no fo necedo SIP
desligado Nenhum egisto SIP
ISDN 1 Ama elo ligado Camada 1 activada
desligado Em modo de espe a ou fo a de se viço
ISDN 2 Ama elo ligado Camada 1 activada
desligado Em modo de espe a ou fo a de se viço
hybi d 120 Gigaset Edition
uma fonte de alimentação
um cabo Ethe net (ama elo)
um cabo RDIS-BA (p eto)
Ca tão SD com dados de co eio de voz
Guia de utilização
Indicações de segu ança
Ligações dispo íveis para os termi ais
Pa a conecta os te minais, use o cabo incluído pa a te minais.
Pode conecta os te minais at avés dos conecto es fêmea na pa te infe io do
apa elho, ou at avés das buchas de expansão inte ligadas sob o painel f ontal
emovível.
2 x te minal analógico
(conecto es fêmea RJ12, expansíveis at avés de bloco de te minais)
1 x
RDIS
(segunda ligação, alte ável at avés da configu ação de exte no pa a inte no)
3 x SIP (4 x sem PC, expansível at avés de switch)
Podem se di ectamente conectados, no máximo, dez te minais.
Tenha em atenção os p é- equisitos pa a configu ação at avés da inte face
Web. Estes estão desc itos no guia ápido. O seu hybi d 120 GE está
configu ado de fáb ica como um se vido DHCP. Dispõe de PCs na sua ede
de á ea local (LAN) sem configu ação de IP, que obtive am todas as
configu ações de conexão necessá ias.O PC, com o qual deseja executa
as configu ações básicas, deve se configu ado pa a obte automaticamente
uma configu ação de IP.
Na inte face Web, pode efectua out as configu ações, po ex. elativas
à telefonia. O guia ápido fo nece-lhe indicações pa a conecta e coloca
em funcionamento os telefones SIP. Tem a opção de se egista em linhas
telefónicas confo me o fo necedo SIP exte no. Consulte a desc ição na
ajuda online do menu VoIP -> Co figurações -> For ecedor SIP -> Novo.
Pode at ibui um núme o inte no ao seu Telefone SIP no menu Termi ais
-> Outros telefo es -> VoIP. Um sistema de ajuda online integ ada fo nece
info mações detalhadas sob e as opções de configu ação individuais.
Pa a configu ações avançadas, ecomendamos que se info me no nosso
site em wiki.gigasetp o.com. Pode acede ao se viço at avés do Login
RDIS no menu Gestão do sistema -> Acesso admi istrativo. Ma que a
caixa de selecção Service Logi (ISDN Web-Access). Confi me com OK.
Como alte nativa, pode inicia a conexão ao se viço at avés da digitação
da sequência de teclas *96 num telefone.
Pa a conclui a int odução, p essione #.
RDIS: Conecte o NTBA do seu p ovedo de se viço at avés do cabo RDIS
p eto à po ta "S/U 2" do hybi d 120 GE.
Termi ais RDIS: Conecte um te minal
RDIS
à po ta
RDIS
inte na do
hybi d 120 GE. O conecto fêmea
RDIS
"S/U 1" é p é-configu ado pa a o
funcionamento de apa elhos
RDIS
inte nos com a po ta S0.
VoIP: Pa a uma ligação IP co ecta sem
RDIS
, use um cabo p óp io e as
inst uções fo necidas pelo p ovedo de se viço.
hybird 120 GE: Monte o apa elho num local adequado (pa a obte
info mações sob e a montagem, consulte o manual em
wiki.gigasetp o.com
)
e conecte-o at avés do ca egado fo necido com ede eléct ica.
PC: Conecte um PC adequado a uma das inte faces Ethe net do
hyb id 120 GE, at avés de um cabo Ethe net. Se oco e em p oblemas com a
conexão ent e o PC e o hybi d 120 GE, leia o capítulo co espondente no guia
ápido.
Telefo e SIP: Conecte o seu telefone SIP à 10/100/1000 Base-T das
inte faces Ethe net. Deve executa uma última etapa no PC.
Pode encont a info mações na nossa Wiki em wiki.gigasetp o.com.
Termi ais a alógicos: Conecte os seus te minais analógicos às po tas analógicas
FXS1, FXS2 do hybi d 120 GE.
Cabeçalho
Idioma: Escolha o idioma da inte face de configu ação.
Vista: Escolha se deseja aplica a inte face de configu ação pad ão ou o b owse
SNMP integ ado como configu ação.
Ajuda online: Aceda à ajuda com um clique do botão.
Logoff: Clique neste botão pa a sai da inte face de configu ação.
Barra de avegação
Na ba a de navegação, as vá ios configu ações são sepa adas po g upos. Clique
numa ent ada pa a ab i o submenu co espondente. Ao clica num submenu, os
pa âmet os de configu ação disponíveis na janela p incipal de configu ação se ão
exibidos.
Ja ela pri cipal de co figuração
Com a ajuda dos elementos de cont olo na pa te supe io ( ) da janela p incipal de
configu ação, pode alte na novamente ent e páginas de configu ação individuais.
Utilize a pa te infe io ( ) da janela p incipal de configu ação pa a configu a o seu
apa elho.
admi
admi
Tem dúvidas? Pa a obte ajuda ápida, aceda a www.gigasetp o.com.
O come ciante a quem comp ou a sua cent al telefónica te á todo o p aze em
esponde a quaisque pe guntas sob e a sua cent al telefónica Gigaset P ofessional.
Se tive pe guntas elativas ao uso da sua cent al telefónica, visite o nosso website
wiki.gigasetp o.com.
Co figurações básicas
I dicações de segura ça
Requisitos do sistema
Co tacto
Instalação hybird 120 Gigaset Edition
Compo e tes for ecidosLEDs
Int oduza o ende eço de IP 192.168.0.250 na ba a de ende eço do seu
b owse .
Utilize as seguintes info mações pa a o seu egisto:
User: admin
Password: admin
Se -lhe-á pedido pa a alte a a palav a-passe de administ ado .
Co figurar com um PC
Co ectar aparelhos e cabos
I terface de co figuração
Other manuals for Pro series Hybird 120
2
Table of contents
Languages: