Gildewerk ZXM-07000 User manual

GILDEWERK BV
GILDEWERK BV
1
Gildewerk
Soap Extruder
Instruction Manual
for
ZXM-07000 (1500 W)
ZXM-07050 (2200 W)

GILDEWERK BV
GILDEWERK BV
2
CONTENTS
Chapter
1 Introduction p. 3
1.1 Important points
1.2 Safety guidelines
1.3 Ambient conditions
2 Construction p. 5
2.1 Motor housing
2.2 Operation and connections
2.3 Worm screw
2.4 Worm screw cylinder
2.5 Feeder funnel
2.6 Press head
2.7 Extrusion plates
3 Operation p. 7
3.1 Start-up
3.2 Short-term deactivation
3.3 Long-term deactivation
4 Transport en Installation p. 9
4.1 Transport
4.2 Installation
5 Maintenance p. 10
5.1 Cleaning
6 Extruder specifications p. 12

GILDEWERK BV
GILDEWERK BV
3
CHAPTER 1
INTRODUCTION
This soap extruder has been designed to produce bar-shaped soap from soap
granulate, which is a semi-processed product. This is made possible by means of
extrusion. The machine is equipped with a variable revolution control and, depending
on the model, electronic temperature regulation and/or water cooling. By using
assorted extrusion plates, it is possible to produce differently shaped bars of soap.
PLEASE NOTE: Read this instruction manual carefully before use. Only use
the soap extruder if the ambient temperature is at least
18 °C.
1.1 IMPORTANT POINTS
This machine has been tested prior to delivery. However, you should still do
the following:
1 Check the machine for visible damage.
2 Make sure that the electrical specifications on the model plaque
correspond to the available current.
3 Because the worm screw and the press cylinder - when new - must
hone one another to create a perfect fit, some tiny steel particles may
be released. This is not in any way a problem.
In case of failure, transport damage and/or defects, please notify Gildewerk
immediately.
1.2 SAFETY GUIDELINES
-This machine is splash-proof and is intended for indoor use.
-The operation and maintenance of this machine must only be performed
under the constant supervision of a competent individual.
-This machine is only suitable for the extrusion of soap granulate supplied
by Gildewerk and using Gildewerk fragrances and colourants.
-Please note!!
If ingredients not mentioned above are used, the guarantee becomes
null and void and Gildewerk will not be liable for injury and/or
damage. This also applies to possible modifications which could
influence the functioning of machine, and to use in an area with an
ambient temperature below 18 °C!

GILDEWERK BV
GILDEWERK BV
4
1.3 AMBIENT CONDITIONS
In order to guarantee reliable performance and a long useful life, the below
conditions must be met:
1 Ambient temperature: 18 °C to 25 °C
2 Relative humidity: max 90 %
3 Vibration: max 0.5 G
4 No aggressive fumes or gases present.
5 No excessive dust, sand, etc.
6 Adequate ventilation.

GILDEWERK BV
GILDEWERK BV
5
CHAPTER 2
CONSTRUCTION
The soap extruder consists of a number of basic components.
1 Motor casing- with the
2 Control unit- attached to the
3 Worm screw- which revolves inside the
4 Press cylinder with the mixing plate- on top of which is the
5 Feeder funnel with lid- that is fixed to the
6 Press head- with, finally, the
7 Extrusion plates
2.1 MOTOR CASING
This is the large stainless steel casing that contains the electric motor and
transmission system. The operation and control unit is attached to this.
The motor casing stands on four adjustable feet, which can be set to stabilise the
machine using a no. 17 spanner.
The openings on the underside of the machine ensure that the motor receives
adequate ventilation. It is therefore important that these openings are not obstructed.
The power cable is also fixed to the motor casing, as are the heating system and/or
cooling connectors, depending on the model. The feeder funnel lid safety switch is
also mounted onto this casing.
2.2 Operation and connections
Towards the side of the control unit, there is a foot pedal connector. A foot pedal
must be connected, since the extruder will not work without it.
Depending on the model ordered, a heating system may also be mounted to the side
of the machine, with a round connector for connecting the press head heating and an
indicator lamp above it. On the other side of the machine, there can be a hose
connection for the purpose of press cylinder cooling.
The control panel with:
-Main switch (ON/OFF).
-Emergency stop button.
-Numeric display with two arrow buttons and a further three programme
buttons.
-Red or green indicator lamp for displaying foot pedal status.
-Three-way switch with positions F –0 –R
-A dial for adjusting revolution speed.

GILDEWERK BV
GILDEWERK BV
6
2.3 Worm screw
The worm screw, which becomes visible when the press cylinder is
disassembled, is attached to the motor in the motor casing.
The soap is carried along by the movement of this screw. It is important that
this screw is kept as clean as is possible. The smoother the screw, the more
efficient the extrusion process.
2.4 Press cylinder
The press cylinder is a stainless steel tube that houses the worm screw. It is
fixed to the motor casing with three hex bolts. As the screw rotates, soap is
extruded via this cylinder –which leads to the press head - through the large
mixing plate. Depending on the model, the press cylinder can be provided with
a water cooling tube for the purpose of cooling the press cylinder.
2.5 Feeder funnel
The feeder funnel is located above the press cylinder and is covered with a lid
for safety reasons. The lid is equipped with a grid, and soap granulate can be
added from above.
If the lid is opened while the machine is active, the worm screw will stop
immediately. Never insert any objects into the feeder to e.g. push the soap
down. This can cause irreparable damage to the worm screw and press
cylinder.
2.6 Press head
The press head is mounted to the end of the press cylinder by means of a
large bronze ring with six claw wrench holes. Onto this head, the various
extrusion plates can be fixed and exchanged.
Depending on the model, the press head may be heated for optimum
performance during soap extrusion. Such heating can connected using the
cable and plug leading from the heating cuff of the heating system.
2.7 Extrusion plate
The shape of this plate determines the style of the extruded bar of soap. The
plate is fixed to the press head with four crosshead screws.

GILDEWERK BV
GILDEWERK BV
7
CHAPTER 3
OPERATION
PLEASE NOTE: Before use, it is necessary to ensure that all hex bolts
are in place and have been manually tightened using
the supplied hex key. The press head must also be
tightened using the claw wrench.
3.1 START-UP
-Makes sure that the main switch is in the ‘OFF’ position.
Connect the plug to an earthed wall socket.
Please note! To ensure safety and to prevent damage to the machine,
it is absolutely essential that the machine is connected to a suitably
earthed wall socket. If you are in doubt, have it checked by a
competent technician.
-Depending on the model, attach the plug belonging to the press head
heating cuff to the connector on the press head and make sure that it fits
securely: Push the plug onto the connector (PLEASE NOTE! It only fits
when inserted in a certain way) and carefully turn the ring on the plug in a
clockwise direction.
-Make sure that the ‘EMERGENCY STOP’ button is released and
deactivated. Otherwise, the machine will not start!
-Depending on the model, connect the cooling system inlet and outlet
hoses, but wait until the extruder has warmed up before activating the
cooling system.
The ‘main switch’ activates the machine and will make the display light up and flash
the set revolution speed.
-Depending on the model, the machine will now warm up the press head.
The indicator lamp will glow red to indicate that the heating has been
activated. Once this lamp turns green, the press head is fully heated. You
should, nonetheless, wait a further fifteen minutes to ensure that it is
heated throughout. Fill the feeder funnel with the soap product and close
the funnel lid by pressing its metal lip firmly into the groove. This lid will
only fit in a single position.

GILDEWERK BV
GILDEWERK BV
8
-Set the dial to the desired revolution speed, usually 50 rpm at start-up.
-Use the dial to select option ‘F’ from the three available options:
- “R” = reverse, the worm screw revolves backwards
- “F” = forward, the worm screw revolves forwards
- “0” = the worm screw is stationary
Starting the machine: depending on the model, either depress and hold
the foot pedal, or depress it briefly and release. Indicator lamp glows
green.
Stopping the machine: release foot pedal or depress briefly again and
release. Indicator lamp glows red.
- Please note! Do not run the machine at a low speed for too long. This will
affect the quality of the soap, while the motor will not receive enough
ventilation, causing it to overheat and automatically shut down. If this
happens, you must turn off the machine and allow it to cool for at least an
hour before restarting it.
- The ‘EMERGENCY STOP’ speaks for itself and should only be used in
case of an emergency. To restart the machine, turn the emergency stop
button in the direction of the arrow to make it pop out again.
3.2 OPENING THE FEEDER FUNNEL
- If you open the feeder funnel lid while the machine is running, the machine will
stop immediately. It is not necessary to constantly open the lid to fill the feeder
funnel. The grid openings are large enough to allow soap granulate to pass
through.
- Once the lid is closed again, the machine will restart.

GILDEWERK BV
GILDEWERK BV
9
3.3 TURNING OFF THE MACHINE
- The machine can be turned off by:
- using the foot pedal
- turning the dial to ‘0’
- opening the lid
- We do not recommend using the main switch or the emergency switch. If this
is done, all power to the machine is cut off and the control unit cannot cool
down the internal electronics.
CHAPTER 4
TRANSPORT AND INSTALLATION
4.1 TRANSPORT
WARNING: Before moving, always make sure that the plug has been
removed from the wall socket!
If the machine must be moved, please note the following:
- Never lift the machine by its cables, knobs, switches or other fragile parts.
- Because of the “open bottom” of the motor casing, provide a flat base
underneath the machine when transporting it with a pallet truck or forklift.
- Avoid intense vibration during transport.
- Avoid shifting due to vibration.
- Only move the machine horizontally and upright. Under no circumstances may
the machine be placed on its side or on its back, since oil from the
transmission system can leak through the air vents.
4.2 INSTALLATION
- Place the machine on a flat surface with a load capacity of at least 90 kg (e.g.
a worktable / workbench).
- The area where the machine is placed must be well-ventilated.
- Set up the machine in such a way that all controls can easily be accessed.
- Ensure that all the machine’s feet make contact with the surface. This can be
done by screwing the feet in or out.
- Avoid damage to the electrical cable during transport.

GILDEWERK BV
GILDEWERK BV
10
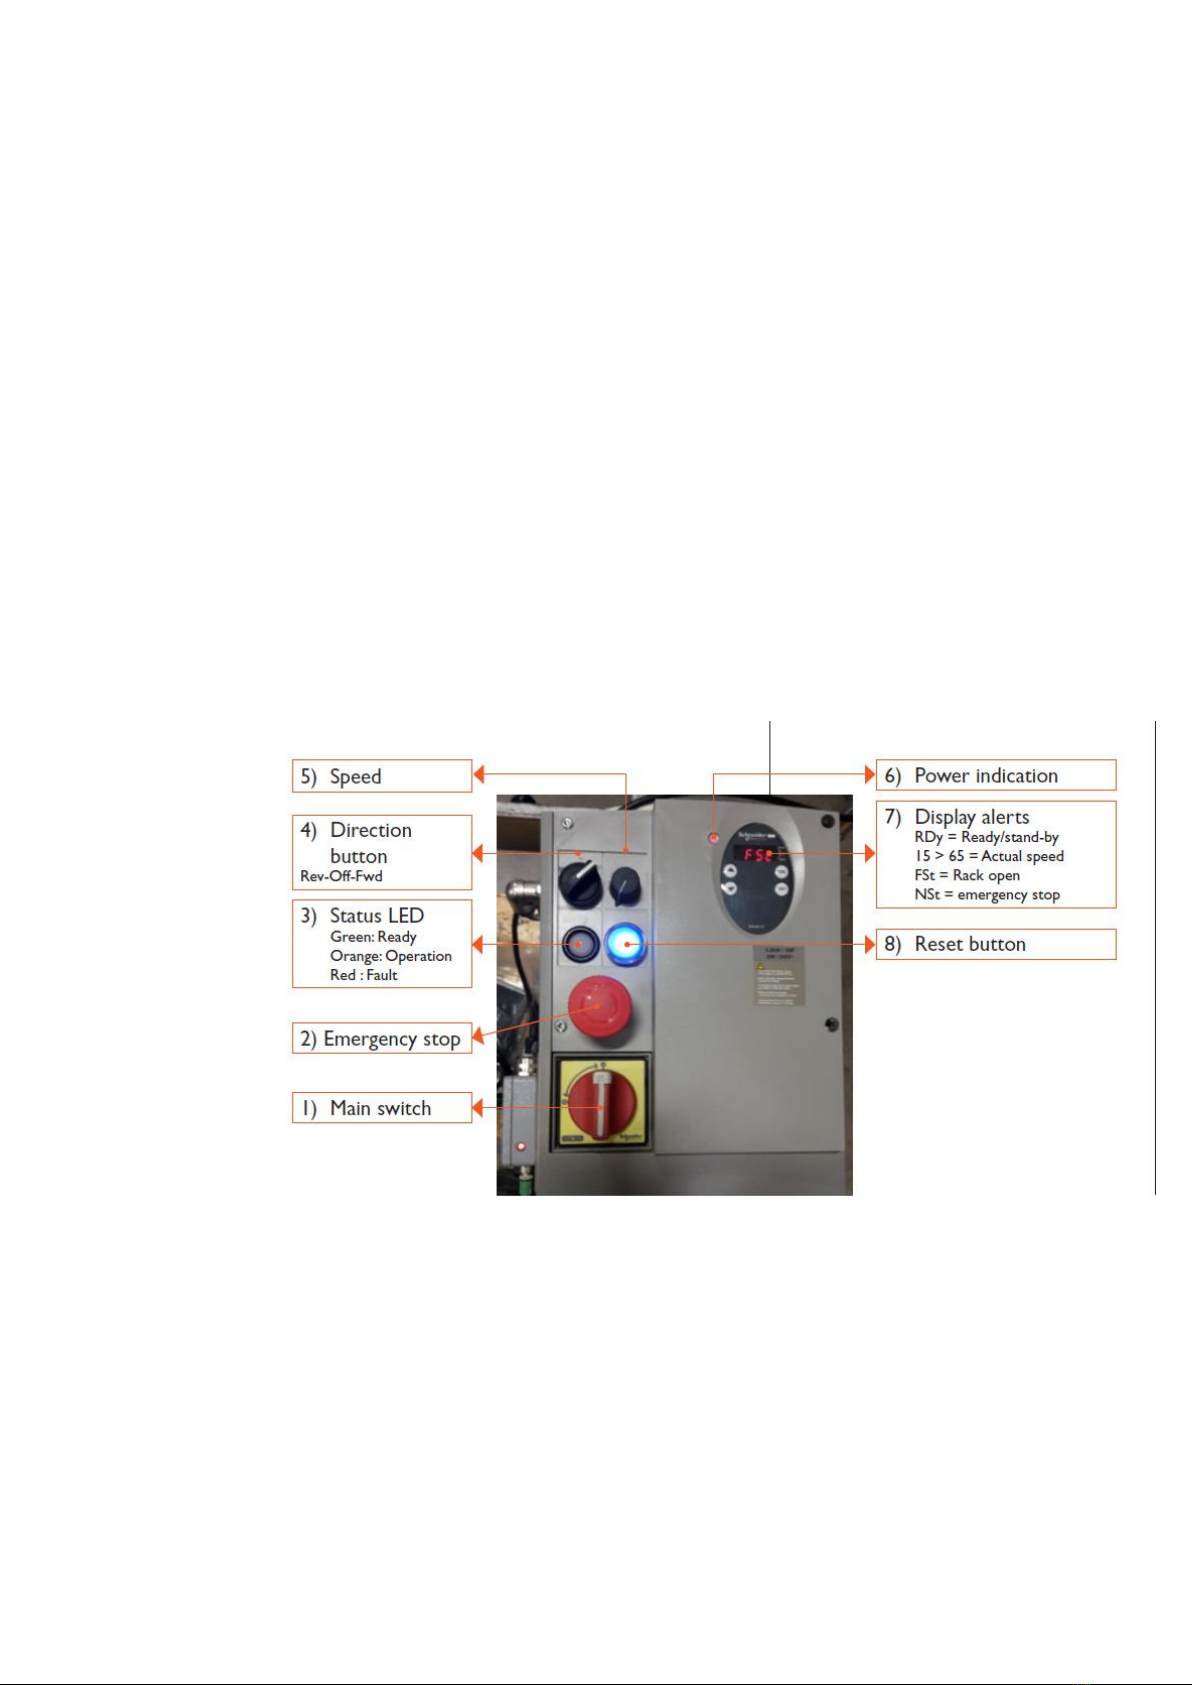
- Make sure that the main switch on the control unit is in its off position before
inserting the plug into a wall socket.
- Never connect to an unearthed wall socket!
CHAPTER 5
MAINTENANCE
1.1 CLEANING
WARNING: Place the main switch in the “0” position and remove
the plug from the wall socket before removing any
machine components!
WARNING: Never rinse or submerge any components in water,
detergents, etc. unless this is specifically prescribed!
Do the following:
-Allow the machine to empty almost completely. The machine is almost
empty when virtually no more soap exits through the extrusion plate while
the motor is running.
-Depending on the model, turn off the heating and disconnect the cord from
the press head heating cuff.
-Remove the four crosshead screws from the extrusion plate and place
these in a safe place. If one of these screws falls into the machine, it can
cause irreparable damage!
-Turn the motor back on to its slow speed and allow the pressure to push
the extrusion plate from the press head.
-Place the dial in the “R” position and briefly run the machine in reverse to
release the pressure on the worm screw.
-Use the supplied claw wrench to loosen the bronze ring on the press head
and run the machine with the dial in the “F” position, so that the press head
is forced free with the remaining soap. Make sure that it doesn’t drop off
suddenly!
-Depending on the model, disconnect the cooling system quick couplings
after shutting off the water supply.
-Use the supplied hex key to remove the three hex bolts from the press
cylinder and run the machine at its slowest speed to free the press
cylinder. The machine will stop automatically once the feeder funnel
detaches from the safety shutdown. The feeder funnel can now be
removed.
-Use the main switch to turn off the machine and remove the plug from the
wall socket.
-When removing the press head, the ‘large mixing plate’ will detach along
with it. From the front, push the remaining soap from the press head. This

GILDEWERK BV
GILDEWERK BV
11
is easier once the press head has cooled somewhat. A handy tool (item no.
ZXB-01001) is available to help you do this.
-Use a wooden palette knife to remove the rest of the soap stuck to the
press head.
-Clean the mixing- and spaghetti plates using water and a brush. Useful
tools (items no. ZXB-01002 or ZXB-01003) are also available for cleaning
the mixing plate.
-Clean the press cylinder with a moist cloth.
-Clean the worm screw with a wooden palette knife and/or a moist cloth. We
recommend that you lubricate the screw’s rubber O-ring with acid-free
Vaseline. Once you have finished cleaning the machine, it can be
reassembled.
Do the following:
-Carefully slide the press cylinder over the worm screw.
-Make sure that the pins fit into the notches of the press cylinder flange and
that the bolt holes line up. Use the hex key to manually tighten the hex
bolts.
-Fix the ‘large mixing plate’ to the front of the press cylinder with the larger
sides of the holes facing the worm screw.
-Attach the press head to the press cylinder, along with the heating cuff,
depending on the model. Make sure that the electrical connection on the
press head faces sideways. Use the claw wrench to secure the bronze
ring.
-Place the small spaghetti plate in position and attach it evenly using the
four crosshead screws. Use a no. 2 ‘Phillips’ screwdriver to do this.
-Depending on the model, reconnect the press head heating and/or the
water cooling quick couplings.
WARNING: Unattached and/or unsecured bolts or screws can cause
irreparable damage to the machine during operation.
The soap extruder is now ready for further use. If it is regularly cleaned following the
above-mentioned procedures, the machine will remain in excellent condition.

GILDEWERK BV
GILDEWERK BV
12
CHAPTER 6
SPECIFICATIONS of OEM EXTRUDER and later models
- Voltage : 220V-240V/ 50 Hz
- Motor consumption : 1.5 kW or 2.2 kW
- Revolutions : 15 - 65 rpm
- Heating : 80 W
- Max rated consumption : 1.6 or 2.3 kW
- Length * Width * Height : 110 * 40 * 55 mm
- Weight : 90 kg
- Capacity : 7 kg soap product
Below is the CE hallmark.
This manual suits for next models
1
Table of contents
Other Gildewerk Industrial Equipment manuals