Gilis BebeStars MACAN 920 User manual

MACAN 920
ISOFIX
Group 0+123
Suitable for 0-36kg

2
INTRODUCTION
1.NOTICE
1.1 Group0+, I (Rearward Position),II,III
This Child Restraint is classified for “Semi-universal” use and is
suitable for fixing into the seat positions of the following cars:
CAR FRONT REAR
Outer Centre
AUDI A4 Yes Yes No
Passat Yes Yes No
Seat positions in other cars may also be suitable to accept this
child restraint.
If in doubt, consult either the child restraint manufacturer or the retailer.
1.2 Group I (Forward Position)
This is an ISOFIX CHILD RESTRAINT SYSTEM. It is approved to
Regulation No.44, 04 series of amendments for general use in vehicles
fitted with ISOFIX anchorages systems.
It will fit vehicles with positions approved as ISOFIX positions
(as detailed in the vehicle handbook), depending on the category of the
child seat and of the fixture.
ENEN

3
ENEN

4
ENEN IMPORTANT! Please carefully read and make sure you understand
all instructions in this manual and in the vehicle owner's manual
related to child safety seats. Install and use the child safety seat as
described in the instruction manual. Failure to do this could result in
serious injury or death of your child. Keep the instructions together
with the child restraint for future reference.
IMPORTANT! Because of potential medical issues inherent to low
birth weight and premature infants, always have a trained professional
doctor or hospital staff member assess the suitability of the child
restraint prior to leaving the hospital or using the child restraint.
DO NOT modify or attempt to modify the child safety seat in any way.
DO NOT take apart or attempt to take apart this child safety seat
except as instructed in this manual.
DO NOT use a child safety seat with damaged or missing parts.
DO NOT use damaged or frayed harness straps or vehicle belt.
NEVER use this child safety seat without the car seat cover.
DO NOT replace the child seat cover or harness with any other than
the ones we recommend as these parts are integral to the child safety
seat's performance.
NEVER use this child restraint with any other base except ones that
the manufacturer permits.
DO NOT use a child safety seat that has been in a crash. A crash can
cause damage to the child safety seat that you cannot see.
DO NOT use a second-hand child seat or child seat whose history
you do not know.
ALWAYS check the tightness of the restraint and the harness before
each use.
ALWAYS make sure no vehicle belts or harness straps are twisted
before each use.
NEVER leave the child in the seat when the harness straps are loose
or undone.
DO NOT leave your child in this restraint for an extended period of
time.
DO NOT use on vehicle seats that face the sides or rear of the vehicle.
Use the child safety seat only on forward-facing vehicle seats.
According to accident statistics, children are safer when properly
restrained in rear seats than in front seats.

5
ENEN
DO NOT use in any configuration not shown in the instructions.
NEVER use this child safety seat with 2-point vehicle belts.
DO NOT use alternative routings not shown in these instructions.
MAKE sure that the child safety seat does not become trapped by a
folding or moveable passenger seat or in the door of your car.
MAKE sure all folding passenger seats are properly latched.
DO make sure any loose objects such as luggage or books in your
car are properly secured as they may cause injuries in the event of an
accident.
This child restraint should be securely belted in the vehicle or store in
trunk even when not in use. In a crash or sudden stop, an unsecured
child safety seat may injure other occupants.
ALL occupants of the vehicle should be correctly restrained.
Unrestrainded passengers may be thrown against other passengers
and cause serious injury or death in a crash.
DO NOT allow children to play with or adjust the child safety seat.
NEVER take a child out of the child safety seat when the vehicle is
moving.
HOT! Cover the child safety seat when left in direct sunlight. Parts of
a child safety seat may become too hot for the child's skin. Always
check surfaces before placing a child in the seat. Seat cover may
fade in direct sunlight.
Make sure the lap strap of the harness is worn low down, so that the
infant pelvis is firmly engaged.
Before adjusting any parts of child safety seat please carry out your
child.
When using ISOFIX, please read over manufacturer handbook about
ISOFIX fixed point illustrations.
Correct/ Proper
Car Safety Belt—Diagonal Belt
Car Safety Belt—Lap Belt

6
ENEN
4.SAFETY SEAT USE METHOD
4.1 How to Use the Harness Buckle
Hold the two buckle latches together.
Make sure the right side is up.
Engage them before putting them into the harness buckle,
which should make a CLICK noise.
Pull shoulder straps to remove all slack from the lap section ensuring
that the harness is lying flat and the harness buckle is locked.
Open the harness buckle by pressing the red button.
Instructions

7
ENEN
4.2 Removing 5-Point Harness
A.Removing Shoulder Pads and Belts
Loosen the 5-point harness of the child seat as much as possible by
press the button of the shoulder belt height adjuster.
Slide the belt loops off from Gear fixed link, slide the left shoulder belt
first then to the right one, you can remove the shoulder belt.
Then from the front of the child seat, pull out shoulder straps through
the slots, put them on below of cloth cover.
B.Removing Buckle
Pull down buckle to clot, and vertically push out “8” metal plate from
the back of seat.
Remove safety belt from mental link and pull out it from buckle hole.
Then remove buckle, finally put redundant belt into cloth cover.
B:
A:
Instructions

8
ENEN
4.3 Removing the Fabric Cover
1. Remove the 5-point harness.
2. Take off the cover from the backrest and base.
3. Move the headrest of the child seat up to the highest position.
4. First take the cover off the base of the headrest, then remove the
cover of the headrest.
To re-fit the cover, simply follow the above steps in reverse.
CAUTION! Never use the child seat without a correctly installed buckle.
Make sure that the metal plate is correctly attached.
CAUTION! Check that the harness straps are not twisted and that they
have been correctly inserted in the belt slots of the cover.
1
4
5
4.4 Adjust the Angle of the Child Safety Car Seat
This child safety car seat can be adjusted to 4 positions.
Before fixing a child in the child restraint system, the seat must be set
on the recline position for rear-facing use, lying level (see picture⑤) or
in the siting position for forward-facing use, see pictures ①②③④.
To achieve this, use the recline handle located in front of the child
restraint system between the seat and the base to adjust it to the
desired position.
Four levels of inclination are possible:
①first level②second level③third level ④fourth level
lying level
Instructions

9
ENEN
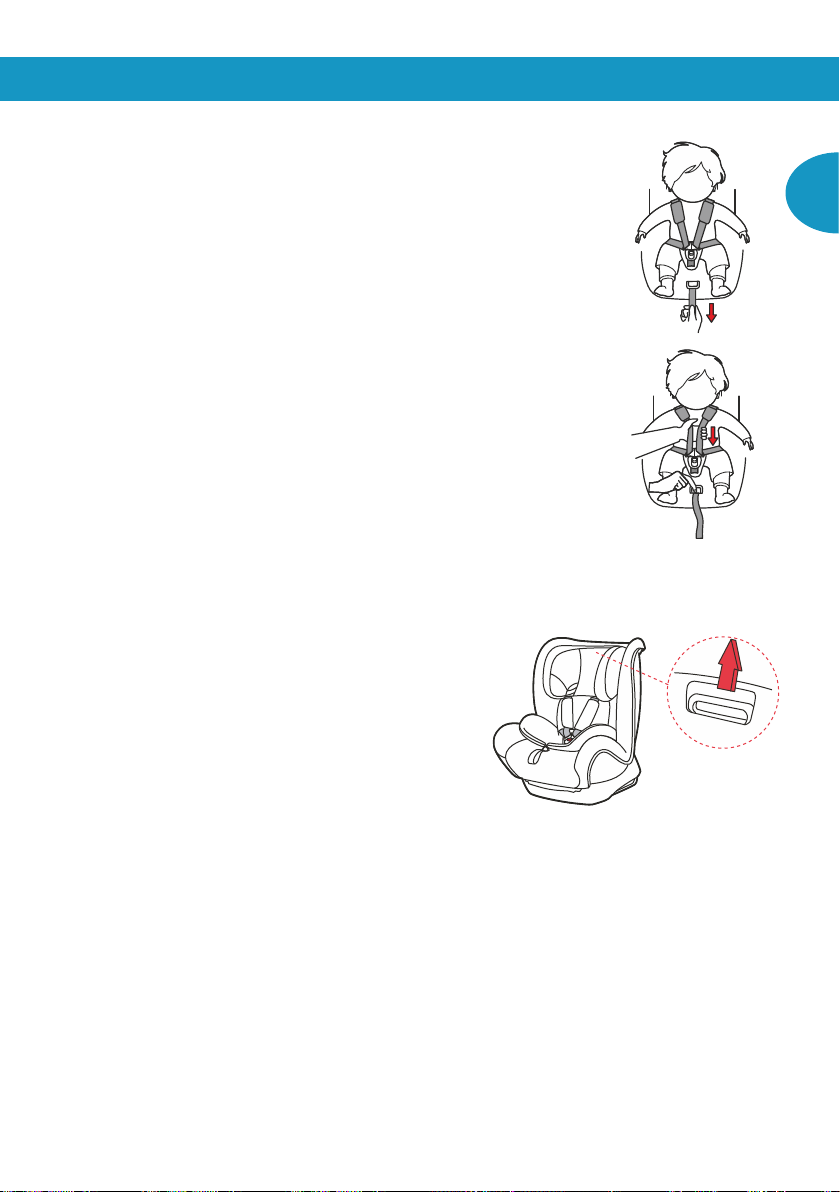
4.5 Adjust Safety Belt Lengthen
A. Tighten Safety Belt
Pull up shoulder belt and the lap belt will tighten,
then pull crotch belt to tighten safety belt.
As soon as possible tighten safety belt.
Lap belt as lower as possible, the belt should
put near child's crotch not belly.
P.S.: Loose safety belt is dangerous.
Please check safety belt adjuster whether work,
then tighten safety belt.
B.Loosen Safety Belt
Press red button can loosen safety belt.
When pressing limited slide button, the other
hand grasping shoulder belt which under
shoulder pad (not grasp shoulder pad belt) to
child right ahead to loosen safety belt.
B:
A:
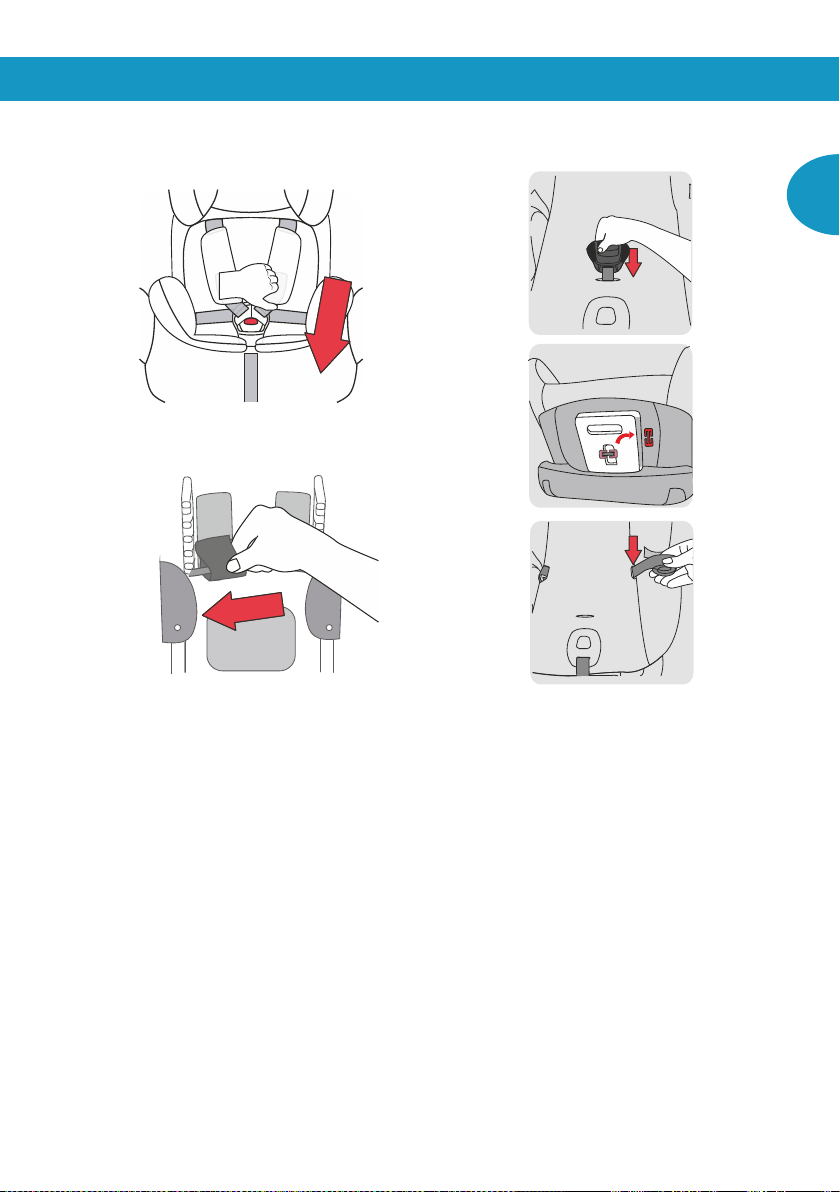
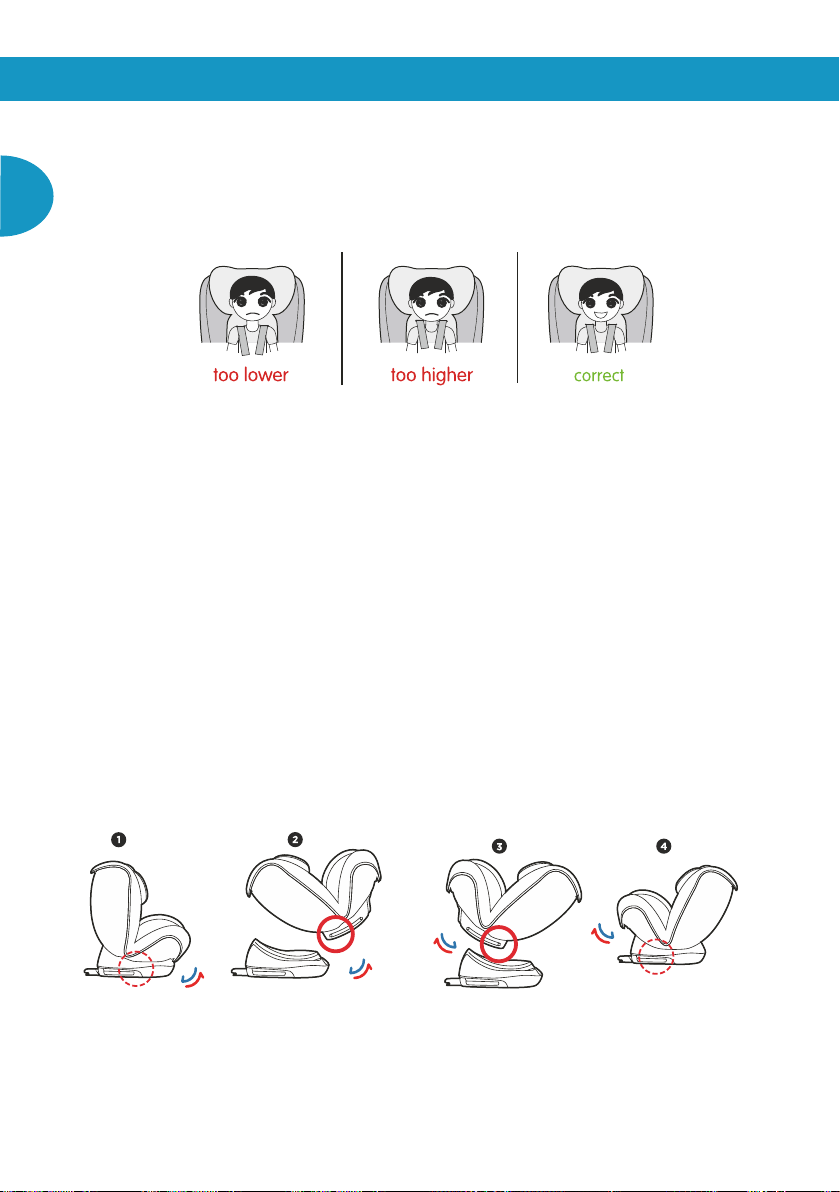
4.6 Adjust the headrest
A. When Use in Group0+,Ⅰ(Use 1-7 level)
The shoulder straps are adjusted as follows:
Loosen the shoulder straps of the child seat
as much as possible.
Pull the headrest height adjuster, select the
correct height of the
shoulder straps and engage it in the
position that fits your child by
releasing the adjuster.
B. When Use in GroupⅡ,Ⅲ(Use 7-10 level)
When child grow up above 15KG, the headrest should use 7-10 level
height.
Slide the belt loops off from Gear fixed link, slide the left shoulder belt
first then to the right one, you can remove the shoulder belt.
Then from the front of the child seat, pull out shoulder straps through
the slots, put them on below of cloth cover.
After remove them, pull the headrest height adjuster, select the correct
height of the shoulder straps and engage it in the position that fits your
child by releasing the adjuster.
Instructions

10
ENEN
ATTENTION! A correctly adjusted headrest ensures optimal protection
for your child in the safety seat:
The headrest must be adjusted so that the shoulder straps are at the
same level as your child's shoulders.
CAUTION! The shoulder straps must not run behind the child's back,
at ear height or above the ears.
4.7 Adjust Seat Forward and Rearward Direction
Forward direction change to rearward direction follow these step:
①One hand pull the headrest height adjuster let the spring blot be
retracting, and the other hand pull the seat body follow direction of
red arrow.
②Pull the seat body until the body and base seperated.
③Don't move base, still pull the adjuster, turn the body 180°degree,
insert the body into base.
④Pull the body into base follow red arrow direction, until the spring blot
popping into groove, at the end, slightly shake seat body to confirm
whether already locking.
popping popping
retracting retracting
Instructions

11
ENEN
5.Installed in Car
5.1 Installed in Rearward Facing Position with ISOFIX
5.1.1 Group0+Ⅰ(0-18KG)
Put the ISOFIX insert guide into the two ISOFIX attachment points of
your vehicle.
NOTE:The ISOFIX attachment points are located between the surface
and the backrest of the vehicle seat.
Press the ISOFIX button to pull out the two locking arms from the base
bottom. Pull the locking arm to and fro until you hear an audible CLICK
which indicates they are fully engaged. And on both sides of the locking
arms' button turn into green safety color.
Pull out the top tether, and press the release button, through the belt
guidance①, pull the top tether long enough to hang the latch on the
back of the car seat.
Fixed the latch on the fixed point, and the position of the fixed point are
shown in the picture(one of the three positions).Make sure the hook is
tightened up.
CLICK
Instructions

12
ENEN
5.2 Installed in Forward Facing Position with ISOFIX
5.2.1 GroupⅠ(9-18KG)
Put the ISOFIX insert guide into the two ISOFIX attachment points of
your vehicle.
NOTE: The ISOFIX attachment points are located between the surface
and the backrest of the vehicle seat.
Press the ISOFIX button to pull out the two locking arms from the base
bottom. Pull the locking arm to and fro until you hear an audible CLICK
which indicates they are fully engaged. And on both sides of the locking
arms' button turn into green safety color.
Pull out the top tether, and press the release button, pull the top tether
long enough to hang the latch on the back of the car seat.
Fixed the latch on the fixed point, and the position of the fixed point are
shown in the picture(one of the three positions).Make sure the hook is
tightened up.
Instructions

13
ENEN
5.2.2 GroupⅡ,Ⅲ (15-36KG)
NOTE: When you use this safety
car seat in groupⅡ,Ⅲ, please
remove the 5-point harness,
sleeping pads and the triangle
pads refer to Chapter 4.2.
Place the child seat forward facing on the
vehicle seat (in the direction of travel).
Put the ISOFIX insert guide into the two
ISOFIX attachment points of your vehicle.
NOTE:The ISOFIX attachment points are
located between the surface and the backrest of the
vehicle seat.
Press the ISOFIX button to pull out the two locking arms from the base
bottom.
Pull the locking arm to and fro until you hear an audible CLICK which
indicates they are fully engaged.
And on both sides of the locking arms' button turn into green safety color.
Guide the diagonal seatbelt section into the belt guidance② until it lies
completely in the belt guidance③ and is not twisted.
NOTE: Make sure that the diagonal seatbelt
section runs over your child's shoulder bone,
and not in front of his or her neck.
Place the diagonal and lap sections of the
vehicle's seatbelt through the belt guidance③
on the child safety car seat. Lock the seatbelt
buckle into the vehicle seat buckle with a
CLICK noise.
CAUTION! The diagonal seat belt section
must run diagonally backward. You can adjust
the course of the belt with your vehicle's
adjustable belt deflector on both sides.
Shake the child safety car seat to make
sure it is securely attached.
Place the lap belt section on the other
side of the child seat in the belt guide③.
CAUTION! The lap belt section must lie as low as possible over your
child's hips on both sides.
Guide the diagonal seat belt section into the belt guidance② until it lies
completely in the belt holder and is not twisted.
Instructions

14
ENEN
6.Care and Maintenance
Periodically inspect your child seat for worn or damaged parts. If
damaged parts are found, replace the child seat. Keep the child seat
clean. Do no lubricate any parts of the child seat.
To prolong the life of your nursery product, keep it clean and do not
leave it in direct sunlight for extended periods of time.
Removable fabric covers and trims may be cleaned using warm water
with a household soap or a mild detergent. Allow it to dry fully, preferably
away from direct sunlight.
CLEANING THE BUCKLE
Food, drink, or other debris may collect inside the harness buckle which
can affect proper functioning. Wash in warm water until clean. Be sure
you can hear an audible click to make sure the buckle is working properly.
CLEANING THE HARNESS AND SHELL
Sponge clean using warm water and mild soap; do not use any other
cleaning agents.
STORAGE
Store in a safe, dry place and away from heat and direct sunlight. Avoid
placing heavy objects on top of the seat.
7.Warranty
The warranty period starts from the date of purchase and is valid for a
period of 24 months. The warranty is only applicable to material and
production defects. The date of purchase can only be proven with the
original sales receipt. This warranty is only applicable to the original
owner and is not transferable. The warranty is only applicable to
products that have not been adapted by the user. In the case of any
defects, the owner is required to return the product to the retailer.
The manufacturer is not liable for any damages other than those to
products supplied or manufactured.
Instructions

15
ΕΙΣΑΓΩΓΗ
GR
1. ΣΗΜΕΙΩΣΗ
1.1. GROUP 0 + 1 (0-18KG), ΕΓΚΑΤΑΣΤΑΣΗ ΜΕ ΠΡΟΣΩΠΟ ΠΙΣΩ,
GROUP 2 + 3
Αυτό το παιδικό κάθισμα έχει χαρακτηριστεί ως ημί-ενιαία χρήση και
είναι συμβατό για εγκατάσταση σε αυτοκίνητο στις παρακάτω θέσεις:
ΑΥΤΟΚΙΝΗΤΟ ΕΜΠΡΟΣ ΠΙΣΩ
Εξωτερικές κεντρικές
AUDI A4 Ναι Ναι Όχι
Passat Ναι Ναι Όχι
Οι θέσεις καθισμάτων σε άλλα αυτοκίνητα μπορεί επίσης να είναι
κατάλληλες για την αποδοχή αυτού του παιδικού καθίσματος.
Σε περίπτωση αμφιβολίας, συμβουλευτείτε τον κατασκευαστή ή τον
έμπορο λιανικής πώλησης.
1.2 GROUP 1 (ΕΓΚΑΤΑΣΤΑΣΗ ΜΕ ΠΡΟΣΩΠΟ ΕΜΠΡΟΣ)
Αυτό είναι ένα παιδικό κάθισμα με ISOFIX. Εγκρίνεται σύμφωνα με τον
κανονισμό αριθ. 44, σειρά τροποποιήσεων 04 για γενική χρήση σε
οχήματα εξοπλισμένα με συστήματα ISOFIX.
Θα τοποθετηθεί σε οχήματα με θέσεις που έχουν εγκριθεί ως θέσεις
ISOFIX (όπως περιγράφεται λεπτομερώς στο εγχειρίδιο του οχήματος)
ανάλογα με την κατηγορία του παιδικού καθίσματος και της
τοποθέτησης.

16
GR
Κάλυμμα θέσης
Μαξιλαράκια ώμων
Ζώνη ώμων
Κόκκινο κουμπί
Μαξιλαράκι
καβάλου
Κουμπί ρύθμισης
Κουμπί αναστροφής 360
Βάση
Λαβή ανάκλισης
Μπλε οδηγός
Σύνδεσμος
Μεταλλικός
Σύνδεσμος
Λαβές κλειδώματος ISOFIX
Κουμπί ISOFIX
Οδηγός εισαγωγής ISOFIX
Σημείο σύνδεσης ISOFIX
Προσκέφαλο
Ρυθμιστής ύψους προσκέφαλου

17
GR
ΠΡΟΣΟΧΗ!
ΣΗΜΑΤΙΚΟ! Παρακαλώ διαβάστε προσεκτικά και σιγουρευτείτε ότι
καταλαβαίνετε πλήρως τις οδηγίες αυτού του εγχειριδίου και του
οχήματος που πρόκειται να εγκατασταθεί. Εγκαταστήστε και
χρησιμοποιήστε το παιδικό κάθισμα όπως περιγράφεται στις οδηγίες
χρήσης. Η αποτυχία της εγκατάστασης μπορεί να επιφέρει ζημία ή και
θάνατο στο παιδί σας. Κρατήστε τις οδηγίες μαζί με το παιδικό κάθισμα
για μελλοντική αναφορά.
ΣΗΜΑΝΤΙΚΟ! Λόγω πιθανών ιατρικών ζητημάτων που ενυπάρχουν
στο χαμηλό βάρος κατά τη γέννηση και στα πρόωρα βρέφη, να έχετε
πάντα έναν εκπαιδευμένο επαγγελματία γιατρό ή μέλος του
προσωπικού του νοσοκομείου να αξιολογήσει την καταλληλότητα του
παιδικού καθίσματος αυτοκινήτου πριν από την έξοδο από το
νοσοκομείο.
ΜΗΝ τροποποιείτε ή προσπαθείτε να τροποποιήσετε το παιδικό
κάθισμα καθ 'οπιονδήποτε τρόπο.
ΜΗΝ αφαιρείτε ή προσπαθείτε να αφαιρέσετε αυτό το παιδικό κάθισμα
ασφαλείας χωρίς τις οδηγίες του παρόντος εγχειριδίου.
ΜΗΝ χρησιμοποιείτε παιδικό κάθισμα ασφαλείας με εξαρτήματα που
έχουν υποστεί ζημιά ή που λείπουν.
ΜΗΝ χρησιμοποιείτε ιμάντες ασφαλείας που είναι φθαρμένοι ή κομμένοι.
ΜΗΝ χρησιμοποιείτε ποτέ το κάθισμα αυτοκινήτου χωρίς το κάλυμμα.
ΜΗΝ αντικαθιστάτε το κάλυμμα του παιδικού καθίσματος ή τους
ιμάντες με άλλα εκτός από αυτά που σας προτείνουμε, καθώς αυτά τα
εξαρτήματα αποτελούν αναπόσπαστο κομμάτι της απόδοσης των
παιδικών καθισμάτων.
ΠΟΤΕ μην χρησιμοποιείτε αυτό το σύστημα συγκράτησης για παιδιά με
οποιαδήποτε άλλη βάση εκτός από αυτές που επιτρέπει ο
κατασκευαστής.
ΜΗΝ χρησιμοποιείτε παιδικό κάθισμα που υπέστη σύγκρουση. Μια
σύγκρουση μπορεί να προκαλέσει βλάβη στο παιδικό κάθισμα που
μπορεί να μην φαίνεται.
ΜΗΝ χρησιμοποιείτε μεταχειρισμένο παιδικό κάθισμα ή παιδικό
κάθισμα το ιστορικό του οποίου δεν γνωρίζετε.
Πάντα να ελέγχετε τη εφαρμογή του συστήματος συγκράτησης και των
ιμάντων πριν από κάθε χρήση.
Πάντα να βεβαιώνεστε ότι δεν έχουν περιστραφεί οι ζώνες οχημάτων ή
οι ιμάντες συγκράτησης πριν από κάθε χρήση.
ΠΟΤΕ μην αφήνετε το παιδί στο κάθισμα όταν οι ιμάντες συγκράτησης
είναι χαλαροί ή δεν είναι ασφαλισμένοι.

18
GR
ΠΡΟΣΟΧΗ!
Ζώνη ασφαλείας αυτοκινήτου - Ζώνη μέσης
Λάθος / Ακατάλληλο
ΠΟΤΕ μην αφήνετε το παιδί σας χωρίς επιτήρηση ακόμη και για μικρό
χρονικό διάστημα.
ΜΗΝ αφήνετε το παιδί σας στο κάθισμα για μεγάλο χρονικό διάστημα.
ΜΗΝ χρησιμοποιείτε το κάθισμα αυτοκινήτου σε θέσεις με πρόσωπο
τα πλαϊνά ή το πίσω μέρος του αυτοκινήτου. Σύμφωνα με στατιστικά,
τα παιδιά είναι πιο ασφαλή όταν είναι δεμένα στα πίσω καθίσματα από
τα μπροστινά.
ΜΗΝ χρησιμοποιείτε οποιαδήποτε ρύθμιση που δεν εμφανίζεται στις
οδηγίες.
ΠΟΤΕ μην χρησιμοποιείτε αυτό το κάθισμα αυτοκινήτου με ζώνη δύο
σημείων.
ΜΗΝ ακολουθείτε διαφορετική δρομολόγηση από αυτήν που φαίνεται
στις οδηγίες.
Βεβαιωθείτε ότι το παιδικό κάθισμα δεν παγιδεύεται από πτυσσόμενο
ή κινητό κάθισμα συνοδηγού ή από την πόρτα του αυτοκινήτου σας.
Βεβαιωθείτε ότι όλα τα πτυσσόμενα καθίσματα έχουν κλείσει σωστά.
Βεβαιωθείτε ότι τυχόν χαλαρά αντικείμενα όπως αποσκευές ή βιβλία
στο αυτοκίνητό σας είναι σωστά ασφαλισμένα, καθώς μπορεί να
προκαλέσουν τραυματισμούς σε περίπτωση ατυχήματος.
Αυτό το κάθισμα αυτοκινήτου πρέπει να ασφαλιστεί καλά στο όχημα ή
στο πορτ-παγκάζ ακόμα και όταν δεν είναι σε χρήση. Σε τυχόν ατύχημα,
το κάθισμα που δεν έχει ασφαλιστεί μπορεί να τραυματίσει τους
υπόλοιπους επιβάτες.
Όλοι οι επιβάτες πρέπει να είναι δεμένοι με τις ζώνες ασφαλείας. Οι
επιβάτες που δεν έχουν δεθεί μπορεί να πέσουν πάνω σε άλλους
επιβάτες και να τραυματιστούν σοβαρά ή ακόμα και να πεθάνουν σε
περίπτωση πρόσκρουσης.
ΜΗΝ επιτρέπετε στα παιδιά να παίζουν ή να ρυθμίζουν το παιδικό
κάθισμα.
ΠΟΤΕ μην σηκώνετε το παιδί σας από το παιδικό κάθισμα ενώ το
όχημα είναι εν κινήσει.

19
GR
ΖΕΣΤΗ! Καλύψτε το παιδικό κάθισμα ασφαλείας όταν μένει σε επαφή με
άμεσο ηλιακό φως. Τα μέρη του παιδικού καθίσματος ασφαλείας μπορεί
να είναι πολύ ζεστά για το δέρμα του παιδιού. Ελέγχετε πάντοτε τις
επιφάνειες πριν τοποθετήσετε το παιδί στο κάθισμα. Το κάλυμμα του
καθίσματος μπορεί να αλλοιωθεί σε άμεσο ηλιακό φως.
ΒΕΒΑΙΩΘΕΙΤΕ ότι η ζώνη μέσης έχει φορεθεί χαμηλά, ώστε η λεκάνη
του βρέφους να είναι σταθερή.
Πριν ρυθμίσετε τα μέρη του καθίσματος πρέπει να βγάλετε το παιδί από
το κάθισμα.
Όταν χρησιμοποιείτε το ISOFIX , παρακαλώ διαβάστε το εγχειρίδιο
χρήσης του κατασκευαστή για το σημείο εγκατάστασης του ISOFIX.
4. ΧΡΗΣΗ ΚΑΘΙΣΜΑΤΟΣ ΑΣΦΑΛΕΙΑΣ
4.1 ΠΩΣ ΝΑ ΧΡΗΣΙΜΟΠΟΙΗΣΕΤΕ ΤΗΝ ΠΟΡΠΗ ΑΣΦΑΛΕΙΑΣ
Κρατήστε τις δύο ασφάλειες της πόρπης μαζί.
Σιγουρευτείτε ότι η δεξιά πλευρά είναι επάνω.
Ενώστε τα πριν τα βάλετε μέσα στην πόρπη, και θα ακουστεί ένα ΚΛΙΚ.
Τραβήξτε τις ζώνες ώμου για να μην είναι χαλαρές και σιγουρευτείτε ότι
οι ιμάντες είναι σε ευθεία και η πόρπη ασφαλισμένη.
Ανοίξτε την πόρπη πιέζοντας το κόκκινο κουμπί.
Οδηγίες

20
GR
4.2 ΑΦΑΙΡΕΣΗ ΖΩΝΗΣ 5 ΣΗΜΕΙΩΝ
Α. Αφαιρέστε τα μαξιλαράκια ώμου από τις ζώνες ώμου
Χαλαρώστε την ζώνη 5 σημείων του παιδικού καθίσματος όσο το
δυνατόν περισσότερο πιέζοντας το κουμπί της πόρπης.
Σύρετε τους ιμάντες από τους πίσω άξονες των ζωνών, μετακινήστε
πρώτα τον αριστερό ιμάντα ώμου στη δεξιά πλευρά και αφαιρέστε τον
ιμάντα ώμου.
Στη συνέχεια, από το μπροστινό μέρος του παιδικού καθίσματος,
τραβήξτε τους ιμάντες ώμου μέσα από τις σχισμές, τοποθετήστε τις κάτω
από το κάλυμμα του υφάσματος.
Β. ΑΦΑΙΡΕΣΗ ΤΗΣ ΠΟΡΠΗΣ
Τραβήξτε κάτω την πόρπη για να κουμπώσει και μετακινήστε κάθετα τη
μεταλλική πλάκα "8" από το κάτω μέρος του καθίσματος.
Αφαιρέστε την ζώνη ασφαλείας από τη σύνδεση και τραβήξτε την από
την τρύπα της πόρπης. Στη συνέχεια, αφαιρέστε την πόρπη και βάλτε
το υπόλοιπο της ζώνης στο κάλυμμα.
B:
A:
Οδηγίες
Table of contents
Languages:
Popular Automobile Accessories manuals by other brands

Cycle Country
Cycle Country SNOW FORCE 18-0050 owner's manual

Menabo
Menabo FIX 606FP Fitting instructions

Hayman Reese
Hayman Reese 03260R installation instructions

INDIWORK
INDIWORK IW-EVO5-N23 instruction manual

TELEPASS
TELEPASS SAT ETOLL2ST-1HEB Operating instruction

Warn
Warn 80360 installation instructions

Tomei
Tomei ARMS MX8280 1JZ-GTE installation manual

Daken
Daken M803994 owner's manual

Kuda-Phonebase
Kuda-Phonebase 284400 Installation instruction

Guardsman
Guardsman MG HS FITTING INSTRUCTION

Gewiss
Gewiss JOINON Column Installation and operation manual

Metra Electronics
Metra Electronics 95-7339S installation instructions