GILMAN gemini GAF1700 User manual

1
MODEL NO.: GAF1700
1700W
DIGITAL
ARIA FRYER
A GILMAN GROUP BRAND
電子控制無油氣炸鍋

2
Please read and retain for future reference.
• Ensure the appliance is in placed on a horizontal, even and stable surface.
• Verify that the mains voltage is the same as that indicated on the rating plate
on the appliance before use.
• Make sure that you always use a grounded wall socket to connect the appliance.
• Always remove the plug from the wall socket when the appliance is not in use.
• Remove the plug from the wall socket by pulling the plug, not the power cord.
• Make sure that the appliance, the power cord and plug do not make contact
with water.
• Make sure that the appliance, the power cord and plug do not make contact
with hot surface, such as a hot hob or naked ame.
• Check the appliance’s power cord regularly to make sure it is not damaged.
• Do not use the appliance if the power cord is damaged. If the power cord is
damaged, it must be replaced by an electrical technician or a person with
similar qualication, in order to avoid any hazards.
• Never use the appliance in the vicinity of ammable material.
• Certain part of the appliance may get hot, such as air outlet. Do not touch
these part to prevent scalding yourself.
SAFETY INSTRUCTION - GENERAL
SAFETY INSTRUCTION - ELECTRICITY AND HEAT
• Use this appliance solely in accordance with these instructions.
• This appliance is for household use only, not for commercial purpose.
• Remove all packaging material from the appliance before use.
• This appliance shall not be used by children of 0 to 8-year old.
• This appliance can be used by children older than 8-year old and persons
with reduced physical, sensory or mental capabilities or lack of experience
and knowledge, but only if they have been given supervision or instruction
concerning use of the appliance in safe way and understand the hazards
involved.
• Children should be supervised to ensure that they do not play with the appliance.
• Cleaning and maintenance must not be done by children.
• Have any repairs carried out solely by a qualied electrician. Never try to re-
pair the appliance yourself.
• Do not handle the plug or appliance with wet hands.
• Do not immerse the main body in water.
• Children shall not play with the appliance.
• Only use the attachments/accessories supplied with the product.

3
• Do not place the appliance against a wall or against other appliance, it should
be placed with a minimum distance of 20cm away.
• During operation, high-heat steam is released through the air outlet. Keep
your hands and face at a safe distance away from the steam and the air
outlet. Also be careful of hot steam and air when you remove the frying basket
from the appliance.
• Pay attention to any accessible surfaces that may become hot during use.
• Slight smoke on the rst use is a normal occurrence. It will disappear shortly
afterward.
SAFETY INSTRUCTION - DURING OPERATION

4
Aira Fryer
Touch screen control panel
1. Air inlet
2. Touch screen control panel
3. Body
4. Glass door
5. Bake tray (2 pieces)
6. Bake rack
7. Bake tray/ Bake rack tong
8. Rotisserie set with 2 screws
9. Rotisserie handle
10. Air-frying basket with
detachable handle
11. Air outlet
12. Rotisserie tool holder &
hole supporter
13. Glass door handle
1. 8presetcookingprogramindicator
2. Menubutton
3. LampOn/Offbuttonandindicator
4. Temperature/Timebutton
5. IncreaseTemp./Timebutton
6. DecreaseTemp./Timebutton
7. PowerOn/Off/Pausebutton
(Longpress3secondswhenturnoff
theappliance)
8. Rotisseriebutton
9. Reservationsettingbutton
PRODUCT OVERVIEW
1
2 3
4 5 6 7 8 9
2
3
58
9
10
12
13
6
7
4
111

5
• Place the appliance on a stable, horizontal and
level surface.Leave at least 20cm free distance
against the back and every side views, and pay
attention away from curtains, wall covering and
other combustible materials.
• For roasting whole chicken.
• Insert the fork from the right of the shaft (Pic.1&2), and insert whole chicken
into the shaft from the left. (Pic.3&4)
• Insert the left fork into the shaft. (Pic.5)
• Insert both forks into the chicken and tighten the screws. (Pic.6)
• Place the whole rotisserie tool with chicken in proper location for rotisserie
function.
• The handle should always be used when taking the basket in and out of the
unit. The metal locking hook needs to be in place before lifting the basket.
(Pic.7&8)
• To place the handle on the basket, squeeze the handle together in the open
position (See Pic. 9). Then attach it to the basket with the hooks facing down
and bottom-up installation (See Pic 10), lock in place with metal hook securely
before hold up the basket (See Pic. 11).
ASSEMBLY INSTRUCTION
Rotisserie assemble
Air-frying basket with detachable handle assemble
Open hook Locked hook
Pic.1
Pic.4
Pic.2
Pic.5
Pic.7
Pic.9 Pic.10 Pic.11
Pic.8
Pic.3
Pic.6
(Metal locking
hook must be
locked in place)
Shaft
* Hook must lock at front of
handle as shown in Pic. 8
Fork

6
Temperature/ Time setting
Reservation Preset ON setting
• Connect the appliance to the wall socket, the display is on with two long
“beep” sounds at same time.
• Press Power On/ Off/ Pause button , all control panel lights will be on,
the default Chicken wing mode indicator is ashing, The default time and
temperature displays alternately, time 8 min, temperature 180ºC .
• If you want to stop the program for a while and continue later, you can short
press the “Power on/ off/ Pause” button to pause the process, and can short
press the “Power on/ off/ Pause” button again to continue the program, and
long press 3 seconds to shut down the appliance.
• If you open the door during the operation, the operation will be pause. The
time and fan will be stopped count down. Close the door again to continue
with the previous setting.
• Press the Temperature/ time button , the display “°C” is ashing, press the
+ or - button to adjust the temperature. After adjusting temperature and then
press the temperature/time button again to set the time, the display “MIN”
is ashing, press the + or - button to increase or decrease the time.
• After time and temperature setting done, press “Power on/ off/ Pause ”button
to start the cooking process.
• Press and hold the + or - button for a long time, can quickly adjust the time
and temperature.
• After selected the cooking program and adjusted the cooking time and
temperature, you can press the reservation button to preset the appliance
to start the setting at a specic time. Press the reservation button and
the reservation button is ashing. The default preset time is 240 minutes.
You can press the + or - button to adjust the reservation time. After setting,
the appliance will count down according to the preset time, and the cooking
program will start when the preset time is reached. There is no need to press
the power button during the process. If you need to re-adjust the preset
time, press the + or - button to adjust. The reservation setting is off when the
reservation button light up all the time.
OPERATING INSTRUCTION
* For the rst usage, please turn on the appliance to heat around 10 minutes
at 160ºC and clean the accessories with warm water.
Menu Selection

7
Interior Lamp
Rotisserie function
Cooking Setting
• The default mode, the interior lamp is turned off. Press the lamp button , the
interior lamp will be on, and the lamp button indicator is ashing. Press the
lamp button again, the interior lamp will be off, and the lamp button indicator
will be light up all the time.
• The default mode, the rotisserie function is turned off and the rotisserie
button is light up all the time , you can press the rotisserie button to
turn it on, the rotisserie button is ashing.
• MENU mode: In the menu, there are 8 preset cooking programs, respectively:
• Chicken wing, French fries (Freezing), Meat, Fish, Chicken, Dry Fruit, Bread,
Shrimp
• Press “MENU” button once, the rst program of “Chicken wing” start ashing,
click the “MENU” button once more, the next program indicator light ashing,
and press the “MENU” button one by one. The program will ash one by
one.
• While the selected program is flashing, press the Power on/ off/ Pause
button , the appliance begins to work under the default temperature and
time. The preset cooking time and temperature are listed in the table below
and can be adjusted if necessary according to the actual ingredients and user
desired cooking result.
*Within 30 minutes setting, each increase/decrease time interral is 1 minute,
over 30 minutes setting, each increase/decrease time interral is 30 minutes.
* Preheat 5-10 minutes under the selected cooking program before start cooking.
Program Amountof
ingredients
underdefault
program
Default
temperature
(℃)
Adjustable
temperature
range(℃)
Temperature
increase/
decrease(℃)
Default
time
(min)
Adjustable
timerange
(min)
Timeincrease/
decrease(min)
Chicken
wings
10 pcs wings
(300g)
180 175-200 5 8 1-60 1
French
fries
300g 180 175-200 5 12 1-60 1
Meat
300g (Thin Cut)
190 180-200 5 10 1-60 1
Fish 1 pc (600g) 200 160-200 5 15 1-60 1
Chicken 1pc (1300g) 180 160-200 5 30 1-60 1
Dry fruit 12 slices per
layer
60 45-80 5 240 1-720 1/30*
Bread
4 slices 200 180-200 5 5 1-60 1
Shrimp
400g 170 160-190 5 8 1-60 1

8
Cooking nish
• When the appliance is nished cooking, it will be heard 3 “BEEP” sounds, its heater
has stopped heats up, but the fan will continue to work for 30 seconds after the heater
stops.
• Open the front door, then assemble and lock the handle on the basket, and make sure
the handle and basket are fastened tightly together with the metal hook. Hold the
handle, take out the basket. (Refer to step on page 5)
• It is recommended to preheat for 5-10 minutes before selecting the desired cooking
program.
• For the frozen food, please defrost completely before cooking.
• To achieve a better cooking result, strongly recommended to use a bake rack to cook
meats. The bottom of the bake tray is airtight, which may hinder the hot air convection
and affect the cooking result.
• For a crispy result on the surface of chicken, you can take out the roast chicken during
cooking and add some honey / vegetable oil on it, then put back into the appliance to
continue the rest of the cooking process.
• In the process of cooking, please ip food regularly, to help to cooking more evenly.
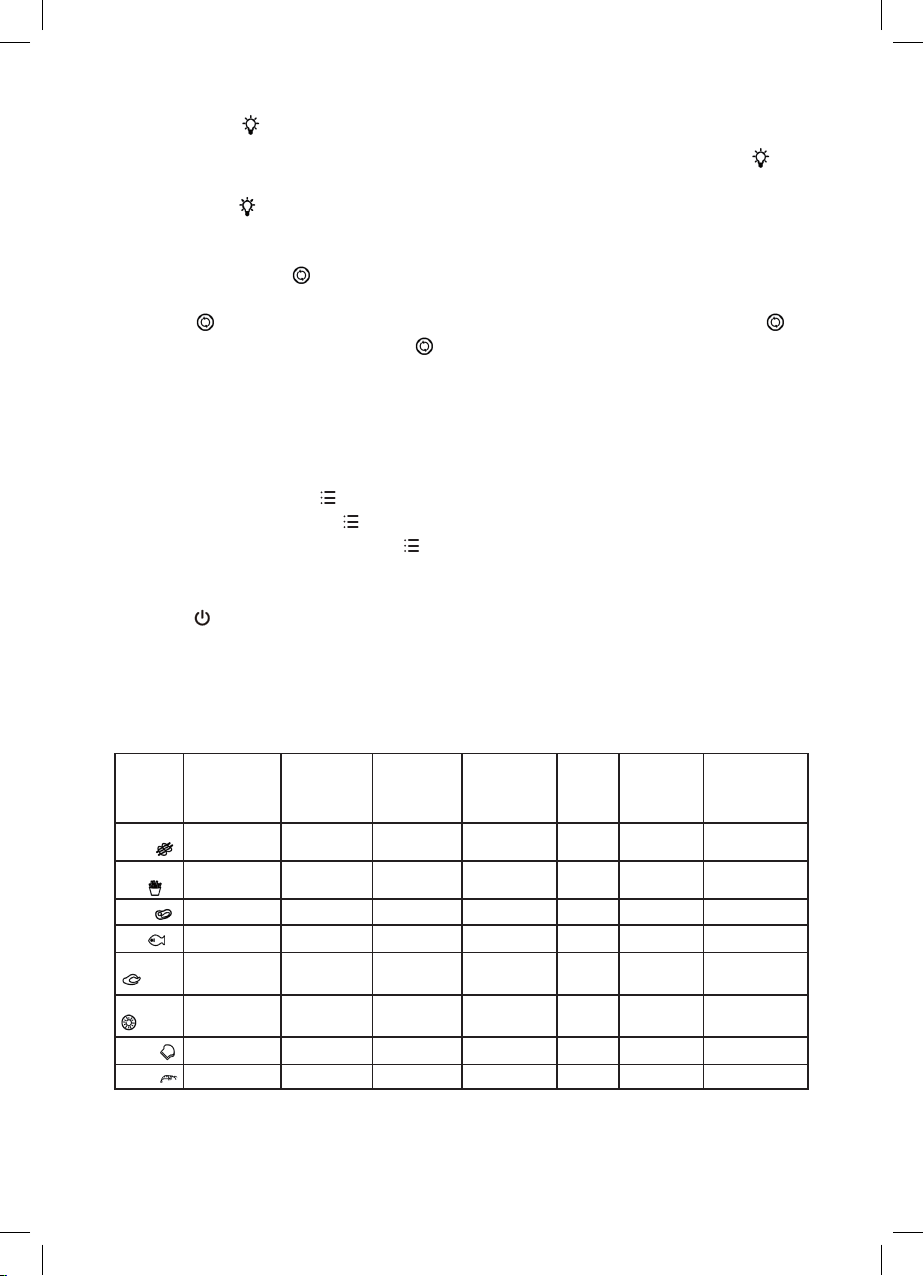
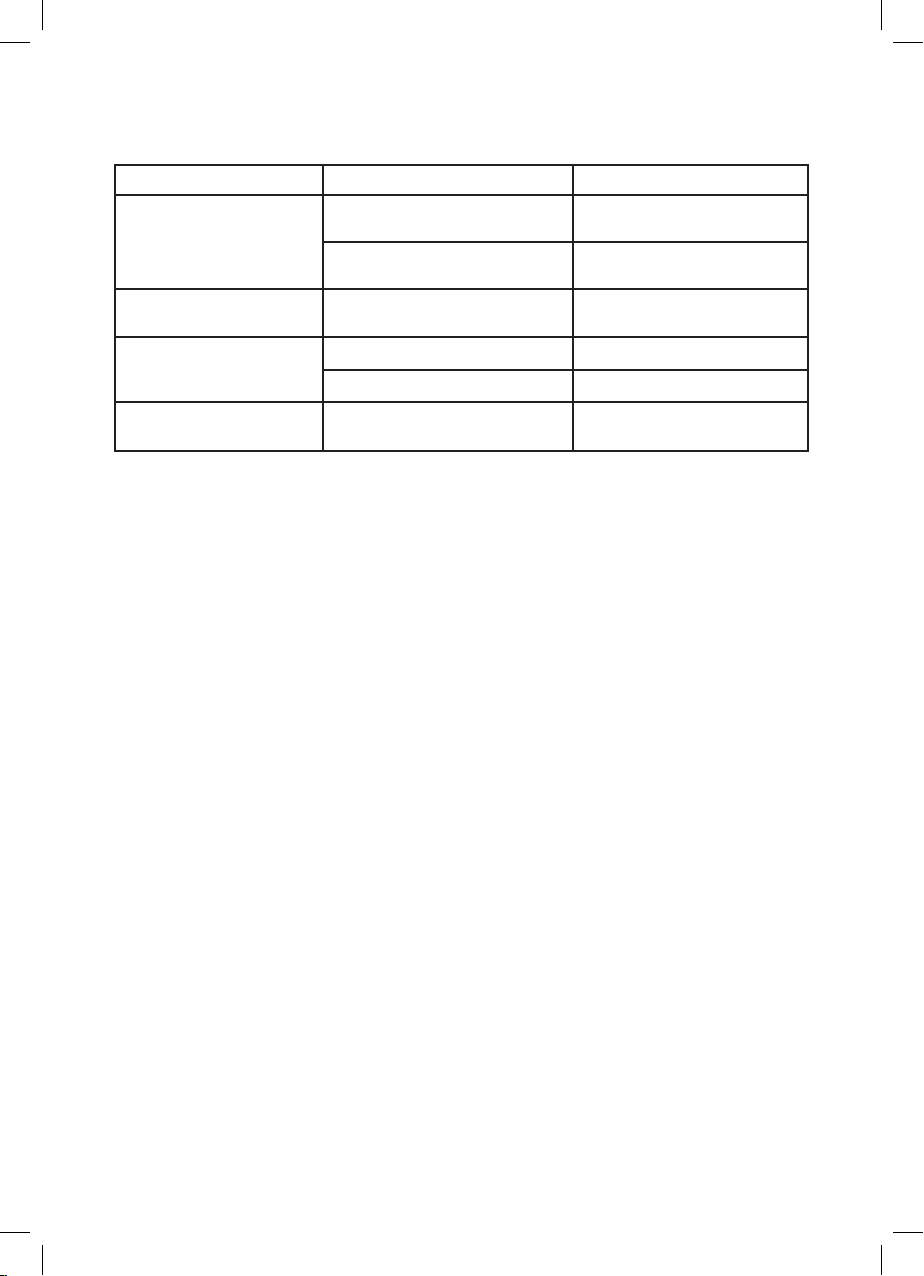
• As ingredients differ in origin, size, shape and brand, please adjust the best cooking
time and temperature accordingly for your ingredients.
• During cooking, the air-frying basket, bake tray, bake rack, rotisserie set’s temperatures
are very high. Pay attention to the hot surface and do not touch them with bare hands.
• Every time when you pull out the basket to ip the foods need to use handle, then push
the Basket into the air fryer again, and press “Power on/off/Pause” button to continue
working.
• When taking out the basket from the appliances, never try to unlock the Handle and
the Basket. It’s dangerous.
• If the ingredients are not well cooked yet after program is nished, simply put the food
back into the appliance and select same program to set few more minutes of extra
cooking time again. Certain part of the appliance may get hot, such as air outlets. Do
not touch these part to prevent scalding yourself.
CAUTION:
DANGER:
TIP
• Clean the appliance after every use
• Remove the plug from the wall socket and let the appliance cool down completely.
• Wipe the exterior, inside and heating parts of the appliance with a moist cloth.
• Clean the accessories with hot water and some detergent.
NOTE
• All accessories are dishwasher-proof.
• Unplug the appliance and let it cool down completely before storage
• Make sure all parts are cleaned and dry before storage.
CLEANING AND STORAGE

9
TROUBLESHOOTING
PROBLEM CAUSE SOLUTION
The appliance doesn’t
work.
The appliance is not connected
to the power supply
Connect to the power supply
The air fryer is power off Press “Power on/ off /
Pause”button
The interior lamp doesn’t
work
The interior lamp is turned off Press the interior lamp button
to turn it on
The food is burnt Cooking time is too long Reduce cooking time
Cooking temperature is too high Reduce cooking temperature
There is peculiar smell
when cooking
There is oil on inside surfaces of
appliance or accessories
Clean inside surfaces of
appliance and accessories
PRODUCT SPECIFICATIONS
Model no.: GAF1700
Voltage: 220-240V
Frequency: 50Hz
Output power: 1700W
Product dimensions: 335(W) x 350(H) x 345(D) mm
* The nal product specication may be varied according to a different lot of
material and actual input voltage power of the usage area.

10
安全指引 - 一般安全
安全指引 - 電子和熱能產品
- 請按照這些說明事項, 使用本產品。
- 本產品僅供家用,不作商業用途。
- 使用前,請將所有包裝材料拆除。
- 0至8歲的兒童不應使用本產品。
- 超過8歲的兒童可使用本產品,但請勿由肢體不健全、感覺或精神上有障礙或
缺乏相關經驗知識的人使用,除非有負責他們安全的人對他們使用本產品進行
監督或指導。
- 請務必看顧好兒童,以確保他們不玩耍本產品。
- 兒童不應清潔或維修本產品。
- 當需進行任何維修,必須由專業維修人員進行維修。永遠不要嘗試自己修理本
產品。
- 手濕時不可以接觸電源插頭或本機。
- 主機不可以浸入水中。
- 兒童不可以把玩本機。
- 只使用隨機附送的配件。
- 請把本產品放置在平穩的表面上使用。
- 使用相符的電源和電壓,以防止觸電。
- 本產品只能使用帶接地線的電源插座。
- 當本產品不使用時,請從牆上的插座中拔掉插頭。
- 從牆上插座中拔掉插頭時,應拿著插頭而不是電源線。
- 確保本產品、電源線和插頭不與水接觸。
- 確保本產品、電源線和插頭不接觸發熱表面,如明火。
- 定期檢查本產品的電源線以確保其沒有損壞。如果電源線損壞,請勿使用其產
品,並須由專業維修人員來更換,以避免出現任何危險。
閱讀下列說明事項並請妥善保管,以供日後參考。

11
安全指引 - 操作期間
- 不要把產品貼近牆身或其他電器,保持距離至少20厘米以上。
- 使用產品時,高熱蒸氣通過出風口釋放。勿把手和臉貼近本產品。當你拿出籃子
時要小心被熱蒸氣和熱空氣弄傷。
- 使用時,請注意碰到熱表面。
- 在第一次使用本產品時,會有輕微的煙霧,均屬正常的。不久後,將會消失。

12
部件示意圖
1. 入風口
2. 輕觸式控制面板
3. 機身
4. 玻璃門
5. 烤盤(2個)
6. 烤網
7. 烤盤/烤網把手
8. 轉叉工具套(連兩粒鏍絲)
9. 轉叉把手
10.炸籃連易拆式手柄
11.出風口
12.轉叉工具支架及孔位
13.玻璃門手柄
1. 8種功能菜單指示燈
2. 功能菜單選擇鍵
3. 內置燈鍵
4. 溫度/時間設置鍵
5. 增加溫度/時間鍵
6. 減少溫度/時間鍵
7. 電源開/關/暫停鍵(長按3秒關機)
8. 旋轉轉叉鍵
9. 預約開機設置鍵
氣炸鍋
輕觸式控制面板
1
2
3
4 5 6 7 8 9
2
3
58
9
10
6
7
4
111
12
13

13
安裝說明
- 將產品放置在平坦的表面上。 在背面和各側面預留
至少20厘米空間,並註意遠離窗簾,牆布和其他可
燃材料。
- 用於烤整隻雞功能。
- 把右邊的叉子穿進軸上 (圖1&2),再從左側把雞穿進軸中。(圖3&4)
- 再把左邊的叉子子穿進軸上 (圖5)
- 把兩邊的叉子都插進肉里,鎖緊螺絲。(圖6)
- 放在內腔把轉叉掛好並扣到位。
- 放入或取出炸籃時,應使用手柄。在提起籃子之前,必須將鎖鈎固定到位。
(參考圖7-8)
- 將手柄安裝在炸籃上。首先擠壓手柄上的開口位置(圖9),從下移上裝上於炸
籃扣位內(圖10),再將鎖鈎固定扣緊使不能鬆掉,才可提起炸籃。(圖11)
轉叉安裝
炸籃配可拆式手柄
(手柄的鎖鈎必
須安裝扣緊)
*鎖鈎必需扣緊於手柄前方
靠近炸籃位置(如圖8)
鎖
鈎
打開 鎖
鈎
關閉
圖1
圖4
圖2
圖5
圖7
圖9 圖10 圖11
圖8
圖3
圖6
鈾 叉子

14
-
按溫度/時間鍵 進行溫度/時間設置,顯示屏“℃”閃爍,按 + 或 -鍵調節溫度。
調整完溫度後,再按溫度/時間鍵 一次,顯示屏“MIN”閃爍,進行時間設
置,按 + 或 - 鍵調節所需時間。
- 完成時間和溫度設置後,按電源開/關/暫停鍵 ,便可以開始工作。
- 長按 +或 -,可以快速調節時間和溫度。
選擇好功能並調節好烹飪時間和溫度後,可以按預約鍵 ,設定本機於特定時
間後,才開始烹飪。按下預約鍵 ,預約鍵閃爍,默認預設時間為240分鐘,
這時可以按 + 或 - 鍵調節預約時間,完成後,本機會根據預設時間進行倒計
時,達到預設時間便會進行烹飪。過程無需按電源鍵 ,如需重新調節預設時
間,按 + 或 -鍵進行調整。當預約鍵 長亮,預設設置關閉。
默認模式為關閉內置爐內燈狀態,按下燈鍵 ,開啟內置爐內燈,燈鍵指示燈
閃爍。再按燈鍵 ,內置爐內燈熄滅,燈鍵指示燈長亮。
溫度/時間設置
預設開啟烹飪時間設置
內置爐內燈
- 把本機連接牆身上的電源,有兩下長“beep”聲發出。
- 輕按電源開/關/暫停鍵 ,控制面板全部點亮,默認雞翼模式指示燈閃爍,此
時顯示屏交替顯示默認溫度和時間,時間為 8分鐘,溫度180度。
- 如果您想暫停程序一段短時間並稍後繼續,可以短按電源鍵暫停該程式,然後
再次按電源鍵繼續該程序。長按3秒電源開/關/暫停鍵 可直接關機。
- 如果在烹調途中按下電源鍵鍵之後開門,烹飪程序會暫停,倒計時及風扇將會
停止,再關門,之前的烹飪程序會繼續。
默認關閉旋轉轉叉功能,旋轉轉叉鍵 長亮。可按旋旋轉轉叉鍵 ,當旋轉轉
叉鍵 閃爍,為開啟旋轉轉叉功能。
旋轉轉叉功能
使用說明 - 模式選擇
*首次使用時,請打開本機以160度加熱約10分鐘及用溫水清潔配件。
功能菜單選擇鍵

15
- 菜單模式:有8種功能菜單,分別為:雞翼,薯條 (雪藏),肉類,魚,雞,
乾果,麵包,蝦。
- 按功能菜單選擇鍵 一次,第一種菜單“雞翼”開始閃爍,再次按功能菜單選
擇鍵 ,下個菜單燈閃爍,然後逐個按下功能菜單選擇鍵 。菜單將逐一閃爍。
- 當菜單閃爍時,按電源開/關/暫停鍵 ,便開始於以下默認的烹調時間及溫度工
作。以下是8款MENU的默認預設內容只供參照或自行按實際食材調節。
- 建議先預熱5-10分鐘,才選用所需的功能菜單。
- 使用急凍食品時,請在烹飪前, 先完全解凍。
- 為達到更佳烹飪效果, 強烈建議使用烤網來烹調肉類, 烤盤密封的底部, 有機會
阻礙熱風對流, 影響其烹飪效果。
- 若要增加雞皮表面的香脆口感,可於烹飪中途取出烤雞, 並在表面上塗上蜜糖 /
食用油再放入機內, 繼續餘下的烹飪程式。
- 在烹飪食物的過程中,不時需翻轉食物,以確保食物平均煮熟。
*在30分鐘設置時間內,每次增加/減少時間為1分鐘,超過30分鐘時間設置,每
次增加/減少時間為30分鐘。
*開始烹飪前,請在選擇的功能菜單上,先預熱5-10分鐘。
烹飪設置
注意
模式 預設模式下的
食材份量(克)
預設溫(℃) 可調溫度
範圍(℃)
溫度加減
(℃)
默認時間
(分鐘)
Default可調
時間範圍
(分鐘)
時間加減
(分鐘)
雞翼 10 隻
(300克)
180 175-200 5 8 1-60 1
薯條 300克180 175-200 5 12 1-60 1
肉類 300克 (薄切) 190 180-200 5 10 1-60 1
魚 1條 (600克) 200 160-200 5 15 1-60 1
雞 1隻 (1300克) 180 160-200 5 30 1-60 1
乾果 12 片 (每層) 60 45-80 5 240 1-720 1/30*
麵包 4 片 200 180-200 5 5 1-60 1
蝦 400克170 160-190 5 8 1-60 1
- 完成烹調後,若食物效果未如理想,只需將食物放回本產品中,再選用相同菜
單並多加所需分鐘烹飪時間。本產品周圍及部分機件/配件可能會發熱,如出
風口。請勿觸摸這些部件以防止燙傷自己。
提示

16
- 從機上取出炸籃時,切勿嘗試解開手柄。 這是非常危險。
- 所有可拆式配件都可以用洗碗機清洗。
- 在儲藏前,切斷產品的電源,並使其完全冷卻。
- 在儲藏前,確保各部件是乾淨並已乾透。
- 每一次製作後,需清潔所有配件及產品。
- 從牆上插座移除插頭,讓產品完全降溫。
- 用濕布抹擦產品表面,內部及發熱部分。
- 用熱水清洗配件,可使用一些洗滌劑。
警告
注意
問題 原因 解決方法
產品不工作 產品沒有連接電源 連接電源
沒有開機 按下電源鍵
內置燈不亮 沒有開啟內置燈 按下燈鍵
食物烤焦 烹飪時間太長 減少烹飪時間
烹飪溫度太高 降低烹飪溫度
烹飪過程中有異味 產品內部或配件表面有油污 清洗產品內部或配件
疑難排解
清潔及保養
- 當設定的烹調工作完成後,將發出3次“BEEP”聲,表示會停止加熱功能,
但風扇會繼續工作,約30秒後,風扇才會停止工作。
- 打開機門,然後將手柄裝到炸籃上,確保把手柄鎖鈎和炸籃扣緊。握著手柄,
取出籃子。(參閱第13頁步驟)
烹飪完成
- 以上的設定只供參考,當食材的產地、大小、形狀和品牌不同時,設定亦需作
出調校。
- 在烹飪過程中,炸籃,烤盤,烤網,轉叉,切勿用手觸摸。
- 每次需先裝上手柄才拉出籃子翻轉食物,再將籃子推入機內,然後按電源鍵繼
續工作。

17
型號: GAF1700
電源: 220-240V
頻率: 50Hz
熱量輸出:1700瓦
產品尺寸:335(闊) x 350(高) x 345 (深) 毫米
產品規格
* 相關產品的規格,可能會因配件批次或實際使用地區的電壓差異而有所不同。

18
太平家庭電器
Table of contents
Other GILMAN Fryer manuals
Popular Fryer manuals by other brands

Kalorik
Kalorik AFO 47797 SS user manual

Coopers of Stortford
Coopers of Stortford Compact Mini Fryer Instructions for use

Chef's Mark
Chef's Mark AF005 owner's manual

Bayou Classic
Bayou Classic 700-701 u Instruction care and use manual

Trisa
Trisa 7411.70 Instructions for use

Gaabor
Gaabor GA-M4A instructions