Gilson Microman Series User manual

e pipette of Choice for Problem Liquids!

2
Contents Page
1 INTRODUCTION 2
2 PARTS CHECK LIST 3
3 DESCRIPTION 3
4 OPERATING RANGES AND MATERIALS 5
5 USING MICROMAN 5
6 FITTING THE CAPILLARY AND PISTON 6
7 SETTING THE VOLUME 8
8 PIPETTING 9
9 GLP FEATURES 10
10 TROUBLESHOOTING 11
11 CLEANING AND DECONTAMINATION 11
12 SPECIFICATIONS 14
WARRANTY 16
EC DECLARATION OF CONFORMITY 17
Before use, please read carefully the Warranty
page 16 of this User's Guide!

3
1 INTRODUCTION
Congratulations on acquiring your new MICROMAN®
pi-
pette. MICROMAN is suitable for many dierent types of
application, including pipetting volatile, viscous, dense,
or high surface tension liquids. It is a quality product
from Gilson, which is fully ISO8655 compliant, CE labeled
(conforms to the EC directive on in vitro diagnostic
medical devices).
The six models permit precise and accurate pipetting
of viscous, dense and vaporous liquids. They also
allow contamination free pipetting, avoiding vapor
contamination and cross-contamination. M25, M50 and
M250, with thin and long CPs are especially suited for use
with long or narrow vessels. M10 and M100 autoclavable
models are especially suited for 100 % contamination
free pipetting.
Enjoy the following features:
- MICROMAN pipettes are equipped with a positive
displacement mechanism that isolates the aspirated
liquid from the body of the pipette. The positive dis-
placement mechanism prevents the sample-to-sample
contamination that can result from the aerosol eect.
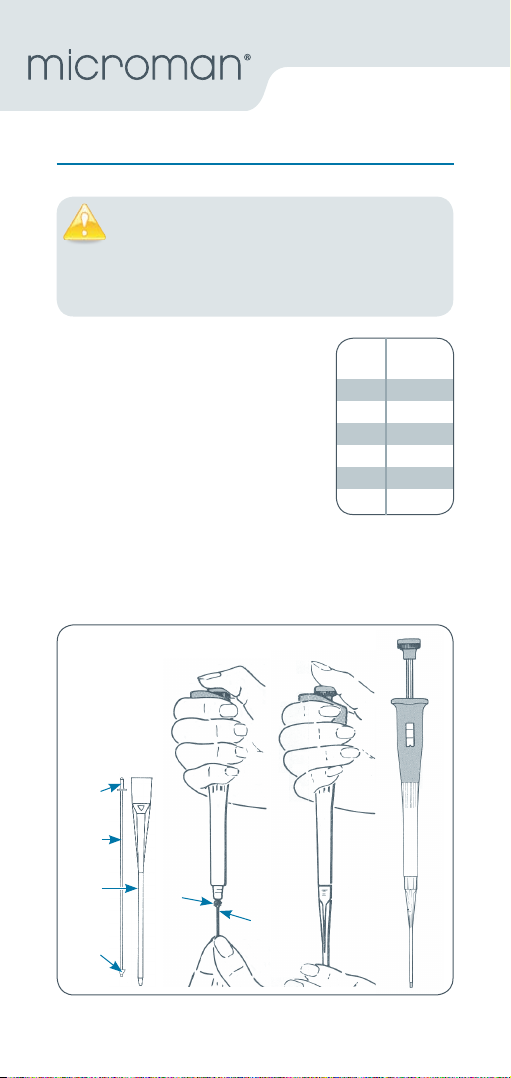
- MICROMAN uses disposable capillaries and pistons.
Changing these parts, which must be the only ones
to make contact with the aspirated liquids, can pro-
vide absolute protection against the contamination
caused by carry-over from one sample or reagent to
another. You simply have to change the capillary and
piston between each assay; they are automatically and
simultaneously ejected, thus avoiding any risk to the
operator.
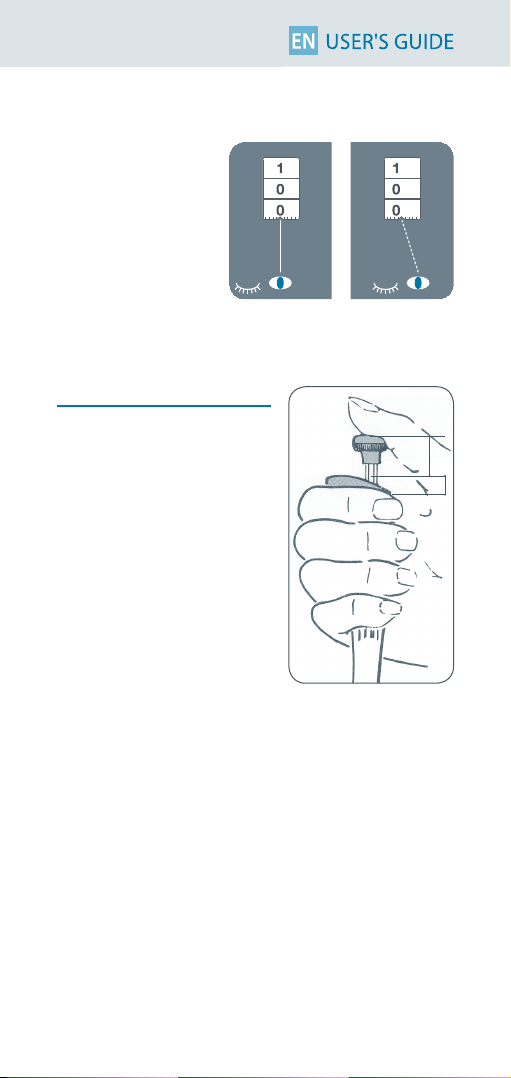
- MICROMAN is equipped with a direct reading volu-
meter that allows precise and continuous adjustment
of the required volume. MICROMAN is permanently
calibrated at the manufacturing stage, the capillary
and piston are positioned automatically, therefore it
requires no further calibration.

4
- MICROMAN requires no lubrication or maintenance,
because of the nature and quality of the materials
used in its construction.
2 PARTS CHECK LIST
Just take a moment to verify that the following items
are present:
MICROMAN,
User's Guide,
Safety bag,
Adhesive id-tags (strip of 6),
Capillary-pistons (10),
Certicate of conformity
(including bar-code sticker).
3 DESCRIPTION
1 Color coded push-button (red
for autoclavable MICROMAN),
and magnier with volume
range for aspirating, and
dispensing.
2 Body or handle.
3 Capillary.
4 Piston.
5 Capillary-piston holder.
6 Shaft.
7 Thumbwheel for setting the
volume.
8 Volumeter.
1
7
8
2
6
5
43

5
4 OPERATING RANGES AND MATERIAL
Available Models (Table 1)
Model Volume Range Autoclavable
M10 1 µL to 10 µL Yes
M25 3 µL to 25 µL No
M50 20 µL to 50 µL No
M100 10 µL to 100 µL Yes
M250 50 µL to 250 µL No
M1000 100 µL to 1000 µL No
Materials (Table 2)
Model Spring Clamp Shaft Body Capillary Piston C-P
CP Holder (B) (C) (P)
M10 SS Be Alloy Polyester PVDF Polypropylene Polyester CP10
M25 SS Be Alloy Polyester PVDF Polypropylene Polyester CP25
M50 SS Be Alloy Polyester PVDF Polypropylene Polyester CP50
M100 SS Be Alloy Polyester PVDF Polypropylene Polyethylene CP100
M250 SS Be Alloy Polyester PVDF Polypropylene Polyethylene CP250
M1000 SS Be Alloy Polyester PVDF Polypropylene Polyacetal
CP1000
SS = Stainless Steel
Be = Beryllium
PVDF = Polyvinylidene Fluoride
5 USING MICROMAN
Three simple steps are necessary:
1) Mount the capillary-piston.
2) Set the volume.
3) Aspirate and Dispense.
MICROMAN is automatically calibrated, by correctly fitting a
capillary-piston. After setting the volume, the volume measured
will be accurate and precise.

6
6 FITTING THE CAPILLARY AND PISTON
Verify that the model of capillary-
piston (CP) corresponds to the
MICROMAN you are preparing for use:
CP25, CP50 and CP250 Bulk
Capillaries and pistons are delivered in
two separate boxes. To t a capillary-
piston, follow this procedure:
1) Take care not to damage the sealing tip 1 when you
handle the piston 3.
2) Press the push-button to the second stop to open
the clamp 5.
6
5
MICROMAN
CP model
CP10 M10
CP25 M25
CP50 M50
CP100 M100
CP250 M250
CP1000 M1000
2
3
4
1
Never lubricate the capillary-holder, capillary,
or any other part of the pipette. If the capillary
tends to slip o the capillary-holder, clean the
capillary-holder with ethanol, using a medical wipe
or similar soft tissue.

7
3) Select a piston and slide the stem 2 fully into the
clamp.
4) Slide the mounted piston into the capillary 4.
5) Gently push the capillary until it snaps onto the
capillary-holder 6.
CP10, CP25, CP50, CP100, CP250
and CP1000 Tipack
The capillary-pistons (CP) are deliv-
ered already assembled. To t a cap-
illary-piston, follow this procedure:
1) Press the push-button on the
MICROMAN past the rst stop
position to the second stop po-
sition. The piston clamp should
now be open and protruding
from the capillary-holder.
2) Slide the MICROMAN piston
clamp inside the top of the capil-
lary tube until the piston clamp is
halfway down the piston mount-
ing stem.
3) Slowly release the push-button,
while pushing the body of the
MICROMAN into the capillary-
piston until it is rmly seated on
the MICROMAN.
4) Continue releasing the push-
button to ensure that the piston
is secured by the piston clamp.
5) To ensure that the piston is
correctly seated, and therefore
calibrated, slowly press the push-
button until you feel and hear a
slight click.
Step 2
Step 3
1
2
3
4
CP

8
7 SETTING THE VOLUME
The volume of liquid to be aspirated is set using the
volumeter. The volumeter consists of three number-
dials, which are read from top (most signicant digit) to
bottom (least signicant digit). A marker is used to set
exact or intermediate volumes using the scale on the
bottom dial. The dials are colored either black or red to
indicate the position of the decimal point, according to
the model (see examples).
Model Color of volumeter numbers
Black Red
M10, M25, M50 µL 0.1 µL
M100, M250 µL none
M1000 0.1 and 0.01 mL mL
The volume is set by turning the thumbwheel slowly to
reach the required setting.
To obtain maximum accuracy when setting the volume,
proceed as follows:
- when decreasing the volume
setting, slowly reach the required
setting, making sure not to over-
shoot the mark.
- when increasing the volume
setting, pass the required value
by 1/3 of a turn and then slowly
decrease the volume to reach
the required setting, making
sure not to overshoot the mark.
0
6
8
6.8 µL
M10
0
6
8
68 µL
M100
8
3
6
8
36.8 µL
M50
0
6
6.8 µL
M25
1
6
8
168 µL
M250
0
7
5
0.75 mL
M1000

9
To avoid parallax
errors, make sure that
the volume indicator
and the selected
volume marking are
in your direct line of
vision. At close range
you may nd it helps
to close one eye.
8 PIPETTING
Aspirating
- press the push-button to the
rst stop (1),
- immerse the capillary 2 mm
into the liquid,
- slowly, release the push-
button to draw up the
liquid (top position),
- wipe any liquid from the out-
side of the capillary, taking
care not to touch the orice.
Dispensing
- place the end of the capillary against the inside wall
of the recipient vessel,
- press the push-button slowly to the rst stop,
- keeping the push-button depressed, move the capillary
away from the side wall,
- withdraw MICROMAN from the vessel and release the
push-button.
Ejecting the Piston-capillary:
Press the push-button to the rst stop (1), then press
harder to the second stop (2); at this point the piston
and capillary are ejected simultaneously.
Top
1
2

10
9 GLP FEATURES
These are as follows:
-
No-need-to-touch disposables (capillary-piston).
-
Serial Number: engraved on body of the pipette.
- Bar Code: on the box and with the
certicate (can be transferred).
- ID Tag (Application or User).
- Colour coded push-button blue
for standard MICROMAN, red for
autoclavable MICROMAN.
- Colour-coded magnifier with
volume range.
- Gilson certicate of conformity
according to ISO8655.
- MICROMAN and CP are CE IVD
labeled.
10 TROUBLESHOOTING
You may be able to identify and to correct the problem
by reference to the following table. If you can’t solve the
problem, contact your Gilson representative.
Leaks:
Change the capillary and piston.
No stroke:
The piston is not properly tted into the clamp; check
that the piston is seated correctly (refer to pages 6-7).
ID Tag
Serial Number
Before returning any pipette, ensure that it is com-
pletely free of chemical, biological, or radioactive
contamination. Use the safety bag provided by
Gilson.

11
Dicult to t a capillary:
Clean the capillary-holder with ethanol.
Inaccuracy:
You should check the capillary is correctly mounted on
the capillary-holder (refer to pages 6-7).
Imprecision:
Change the capillary and piston.
Dicult to set the volume:
This suggests that the pipette is damaged internally; in
which case you should contact your Gilson representative.
If the problem persists...
Contact your Gilson representative.
11 CLEANING AND DECONTAMINATION
MICROMAN is designed so that the parts normally in
contact with liquid contaminants, can easily be cleaned
and decontaminated.
Cleaning
The pipette must be cleaned with soap solution before
it is decontaminated.
External
1) Wipe the entire pipette with a soft-cloth or lint-free
tissue impregnated with soap solution, to remove all
dirty marks. If the pipette is very dirty, a brush with
soft plastic bristles may be used.
2) Wipe the entire pipette with a soft-cloth or lint-free
tissue impregnated with distilled water.
3) Leave the parts to dry by evaporation or wipe them
with a clean soft-cloth or lint-free tissue.

12
Internal
The following components only can be immersed in a
decontaminant solution: clamp assembly, return spring
and capillary-holder (shaft).
1) Unscrew the capillary-holder (shaft).
2) Remove the clamp assembly and return spring from
the shaft.
3)
Set aside the body (handle) in a dry and secure location.
4) Clean the individual components using an ultrasonic
bath (for 20 minutes at 50 °C) or with a soft-cloth and
brushes. Small round brushes with soft plastic bristles
may be used to clean the interior of the shaft.
5) Rinse the individual components with distilled water.
6) Leave the parts to dry by evaporation or wipe them
with a clean soft-cloth or lint-free tissue.
7) Reassemble the pipette.
Decontamination
You may refer to the Decontamination Procedure
LT802288 available at www.gilson.com.
Chemical Decontamination
The pipette should be cleaned before it is decontami-
nated. Full details of recommended decontamination
procedures for Gilson pipettes are available from your
supplier. Whatever other decontaminant you use, check
with the supplier of the decontaminant that it is com-
patible with the materials used in the construction of
the pipette, and does not attack either of the following
plastics: Polyester or PVDF (Polyvinylidene Fluoride).
Non-immersible Parts
1) Wipe the body (handle) of the pipette with a soft-
cloth or lint-free tissue impregnated with the chosen
decontaminant.
2) Wipe the body (handle) of the pipette with a soft-
cloth or lint-free tissue impregnated with distilled
water or sterilized water.

13
Immersible Parts
The following components only can be immersed in a
decontaminant solution: clamp assembly, return spring
and capillary-holder (shaft).
1) Unscrew the capillary-holder (shaft).
2) Remove the clamp assembly and return spring from
the shaft.
3)
Set aside the body (handle) in a dry and secure location.
4) Immerse the components in the decontaminant solu-
tion or wipe them according the instructions given by
the manufacturer or supplier of the decontaminant.
5) Rinse the individual components with distilled or
sterilized water.
6) Leave the parts to dry by evaporation or wipe them
with a clean lint-free tissue or a soft-cloth.
7) Reassemble the pipette.
Autoclaving
Only MICROMAN M10 and M100 are autoclavable. The
four other models (MICROMAN M25, M50, M250, and
M1000) are not autoclavable.
1) Unscrew the capillary-holder (shaft).
2) Remove the clamp assembly and return spring from
the shaft.
3) Clean the parts to be autoclaved, especially the shaft.
4) Put the parts in an autoclaving sack.
5)
Autoclave for 20 minutes at 121 °C, 0.1 MPa.
6) Check that the parts are dry before reassembling the
pipette.
7) Set the pipette aside to stabilize at room temperature.

14
12 SPECIFICATIONS
MICROMAN is a high quality pipette that oers excellent
accuracy and precision. The gures given in the “Gilson
Maximum Permissible Errors” table were obtained using
Gilson CPs. These gures are only guaranteed by using
genuine Gilson CPs.
Each pipette is inspected and validated by qualied
technicians according to the Gilson Quality System.
Gilson declares that its manufactured pipettes comply
with the requirements of the ISO 8655 Standard, by
type testing. The adjustment is carried out under strictly
dened and monitored conditions (ISO 8655-6):
• Basis of adjustment, Ex.
• Reference temperature, 20 °C
• Relative humidity, 50%
• Barometric pressure, 101 kPa
• Use of distilled water grade 3 (ISO 3696)
• Ten measurements for each test volume, which are
Nominal Volume, 50% of Nominal Volume, and the
minimum or 10% of Nominal Volume.
Performance Tests
Each pipette is inspected and validated according to the
Gilson Quality Assurance System. Based on extensive
historical data, manufacturing conditions and expertise,
and in compliance with ISO standards relative to statistical
process control, the assurance level of this instrument
performing to specications is 99.8%. Specications rely
on the quality and consistency for the whole pipetting
system; they are guaranteed only when the pipette is
used with Gilson capillary-pistons.

15
The data given in the table conform to the ISO 8655-2 Standard.
Gilson Maximum Permissible Errors
Maximum Permissible Errors
Model Volume Gilson ISO 8655
(Reference) (µL) Systematic Random Systematic Random
error (µL) error (µL) error (µL) error (µL)
M10 Min 1 ± 0.09 0.03 ± 0.2 0.1
(F148501) 5 ± 0.10 0.03 ± 0.2 0.1
Max. 10 ± 0.15 0.06 ± 0.2 0.1
M25 Min. 3 ± 0.25 0.08 ± 0.12 0.3
(F148502) 10 ± 0.27 0.08 ± 0.12 0.3
Max 25 ± 0.30 0.10 ± 0.12 0.3
M50 Min. 20 ± 0.34 0.20 ± 0.20 0.3
(F148503) Max. 50 ± 0.70 0.30 ± 0.20 0.3
M100 Min. 10 ± 0.50 0.20 ± 0.80 0.6
(F148504) 50 ± 0.75 0.30 ± 0.80 0.6
Max. 100 ± 1.00 0.40 ± 0.80 0.6
M250 Min. 50 ± 1.50 0.30 ± 8 3.0
(F148505) 100 ± 1.70 0.30 ± 8 3.0
Max. 250 ± 2.50 0.50 ± 8 3.0
M1000 Min. 100 ± 3.0 1.6 ± 12 4.0
(F148506) 500 ± 5.0 2.5 ± 12 4.0
Max. 1000 ± 8.0 4.0 ± 12 4.0

16
WARRANTY
Gilson warrants this pipette against defects in material under
normal use and service for a period of 12 months from the date
of purchase.
This warranty shall not apply to pipettes which are subject to
abnormal use and/or improper or inadequate maintenance
(contrary to the recommendations given in the User’s guide),
including, but not limited to pipettes which have been subjected
to physical damage, improper handling, or spillage or exposure
to any corrosive environment. This warranty shall also be void in
the event pipettes are altered or modied by any party other than
Gilson or its designates. Gilson’s sole liability under this warranty
shall be limited to, at Gilson’s sole option, repair or replacement of
any defective components of pipettes or refund of the purchase
price paid for such pipettes.
THE FOREGOING WARRANTY IS EXCLUSIVE AND GILSON
HEREBY DISCLAIMS ALL OTHER WARRANTIES, WHETHER
EXPRESS OR IMPLIED, INCLUDING ANY WARRANTIES OF
MERCHANTABILITY AND ANY WARRANTIES OF FITNESS FOR
A PARTICULAR PURPOSE, UNDER NO CIRCUMSTANCES SHALL
GILSON BE LIABLE FOR ANY CONSEQUENTIAL, PUNITIVE,
INDIRECT OR INCIDENTAL DAMAGES ARISING OUT OF ANY
BREACH OF ANY EXPRESS OR IMPLIED WARRANTY.

17
EC DECLARATION OF CONFORMITY
MICROMAN®
M10, M25, M50, M100, M250, M1000
Positive displacement Capillaries/Pistons
98/79/EC*
on In Vitro Diagnostic Medical Devices
comply with the requirements of the following European
Directives:
Villiers-le-Bel, November 18th, 2011
A. El Sayed H. Ledorze
General Manager Quality Manager
GILSON S.A.S.
19, avenue des Entrepreneurs
BP. 145 - 95400 Villiers-le-Bel (France)
Tel.: +33(0) 1 34 29 50 00
Fax: +33(0) 1 34 29 50 20
www.gilson.com
* Annex III, self-declared
The company,
Hereby certies on its sole responsibility that the products
listed below:

18
NOTES

19

LT801502/E - ©2011 Gilson SAS All rights reserved December 2011
English Printed in France
Specifications subject to change without notifications - errors omitted.
Gilson, Inc. World Headquarters
3000 Parmenter Street
I
P.O. Box 620027
I
Middleton, WI 53562-0027, USA
Tel: (1) 800-445-7661 or (1) 608-836-1551
I
Fax: (1) 608-831-4451
Gilson S.A.S.
19, avenue des Entrepreneurs
I
BP 145, F-95400 Villiers-le-Bel, France
Tel: +33 (0) 1 34 29 50 00
I
Fax: +33 (0) 1 34 29 50 20
www.gilson.com
This manual suits for next models
6
Table of contents
Other Gilson Dispenser manuals
Popular Dispenser manuals by other brands

Follett
Follett Chewblet 7 Series Installation, operation and service manual

FM
FM HARBIL NSC50 Operating and instruction manual

Sanela
Sanela SLZN 66 Mounting instructions

Westomatic
Westomatic EVOLVE installation guide

Dolphin
Dolphin BC632 Installation and maintenance guide

Sanela
Sanela SLZN 91E4 Instructions for use