Gin Gliders Gingo Airlite User manual

Rev.1.0, 04/04/2012
Gingo Airlite harness Owner’s Manual
Please read this manual before flying with the Gingo Airlite for the first time.

2
Thank You…
Thank you for choosing the Gingo Airlite harness. We are confident that this harness will
provide you with enhanced comfort, control, performance and fun in flight. This manual contains
all the information you need to set up, trim, fly and maintain your harness. A thorough
knowledgeofyourequipmentwillkeepyousafeandenableyouto maximize yourfullpotential.
Pleasepasson this manual to thenewownerifyoudoresellyour harness.
HappyFlights and Safe Landings,
TheGIN Team
Safety Notice
By the purchase of our equipment, you are responsible for being a certified paraglider
pilot and you accept all risks inherent with paragliding activities including injury and
death. Improper use or misuse of GIN equipment greatly increases these risks. Neither
Gin Gliders Inc nor the seller of GIN equipment shall be held liable for personal or
third party injuries or damages under any circumstances. If any aspect of the use of
our equipment remains unclear, please contact your local GIN reseller or importer in
your country.

3
Contents
ThankYou…..............................................................................................................................................2
SafetyNotice...........................................................................................................................................2
1.GinGliders...........................................................................................................................................4
2.IntroducingtheGingoAirlite...............................................................................................................5
FeaturesoftheGingoAirlite..............................................................................................................6
Airbagfor back protection (substitution for backprotector).............................................................7
OptionalItems ...................................................................................................................................7
OtherAccessories..............................................................................................................................8
3.Beforeyou fly......................................................................................................................................9
Assembly............................................................................................................................................9
Adjustments.....................................................................................................................................12
Storage ............................................................................................................................................14
4.Flyingwith the Gingo Airlite..............................................................................................................15
Pre-flightchecks..............................................................................................................................15
Rescue Deployment..........................................................................................................................15
Pockets.............................................................................................................................................16
Landingwiththe Gingo Airlite .........................................................................................................16
5.Miscellaneous.....................................................................................................................................17
Towing..............................................................................................................................................17
TandemFlying..................................................................................................................................17
Flyingoverwater.............................................................................................................................17
Act responsibly and help preserve your flying sites........................................................................17
6.Maintenanceand Repair .....................................................................................................................18
Maintenance.....................................................................................................................................18
Inspectionchecklist.........................................................................................................................18
Repair...............................................................................................................................................19
Environmentallyfriendly disposal oftheharness...........................................................................19
7.TechnicalData....................................................................................................................................20
Specification....................................................................................................................................20
Certification.....................................................................................................................................20
Description.......................................................................................................................................20

4
1. Gin Gliders
Gin Gliders was formed in 1998 by paraglider designer and competition pilot Gin Seok Song and
histeamof engineersand testpilots.
Gin’s philosophy is simple: to design paragliding equipment that he and any other pilot love to
fly. This philosophy applies equally for a harness such as the Gingo Airlite, as for the world-
beating competition glider, the Boomerang. No product is released to the market without Gin’s
complete satisfaction. Gin Gliders produce a complete range of accessories and can provide you
with many useful items for flying which are all manufactured in Gin Gliders own production
facilityto guaranteehighest quality standards.
Ginhas over 20 years’ experience ofdesigning and manufacturing paragliders and isbacked up
by an equally experienced team, both within the company in Korea and throughout a worldwide
network of distributors and dealers. The “GIN Team” has won the Paragliding World Cup overall
several times and has had countless other competition successes in World Cups, World and
National Championships. This high level of expertise provided by dedicated professionals
ensuresthat you get the bestpossible productsupportand after sales service.

5
2. Introducing the Gingo Airlite
The Gingo Airlite was developed by the R&D team of Gin Gliders to meet the highest standards
of the most demanding pilots who are tired of a heavy harness and want to travel lighter. The
Gingo Airlite is one of the harnesses used by GIN test pilots during the development of new
paragliders. The Gingo Airlite is suitable for a wide range of pilots, from the occasional club
pilotto theexperiencedcrosscountry pilot.
The Gingo Airlite can be flown with all types of paragliders unless the manufacturer of your
paraglider requires a specific harness to be used with his paraglider. Please refer to the manual
ofyour paragliderto find out if thismightbe the case.
The Gingo Airlite is a sleek and easy harness, designed for maximum comfort and ease of use.
Theelegantdesignfocuses on simplicity,eliminating the needfor complicated adjustments.
The overall geometry of the harness enables the pilot to feel the feedback from the glider
sensitively, whilst retaining a secure feeling in flight. This increases the precision of turns
while thermalling and aids active flying. On long flights, the comfort of the Gingo Airlite is
secondto none.
Leg and chest straps areintegrated into the “T-bar system”to prevent the pilot from falling out
ofthe harnessif heforgetstofastenthe leg straps.
The safety has also been improved by incorporating an airbag into the harness helping to
protect the pilot in case he falls on his back. The new Gingo Airlite features a foam pre-inflation
system to ensure that the airbag is almost always fully inflated, e.g. when ground handling on
take-off.
The bottom rescue container has a wide entrance, designed to enable a fast and easy
deployment of the parachute. The bottom position is ideal because the weight of the rescue
stays near the centre of gravity and therefore provides you with the most balanced comfort and
feelingin flight.
The new elastic speed bar retainer prevents the bridle of your rescue becoming entangled in
caseof a rescue deployment.

6
Gingo Airlite Components
1 Shoulderstrapadjustment
2 Elastictoholddrink system tube
3 Shoulderstrapconnection
4 Whistle
5 SuspensionPoint
6 Cheststrap
7 ABSStrap
8 LegStrap
9 Safe-T-Band
10 Buckle
11 SeatBoard
12 Airinlet
13 Holefor drink sysytemtube
14 LateralStrap adjustment
15 BackPocket (Inside)
16 SeatStrap
17 Velcrofor Side protector(Inside)
18 SidePocket
19 Pulleyfor Accelerator Line
20 Holefor Accelerator Line
21 Elasticlineforautomatic
retractionofSpeedbar
22 GuideLoop for Foot Stirrup
23 Rescuehandle
24 RescueOuter Container
25 RescueBridle

7
Features of the Gingo Airlite
Rescueattachmentbridle
Carabiners
Largedorsalstoragepocketandnumeroussmall pockets for long flights
TheGingo AirlitehasbeencertifiedbyLTF,andis available in sizesXS, S,M and L.
Weight:3.1Kg(Msize with Carbonseat plate).
Airbag for back protection (substitutionforbackprotector)
The Gingo Airlite is a harness with a built-in airbag. Since the air bag is divided into
compartments,
it can help prevent air being dissipated too rapidly in the event of hard impact.
The Gingo Airlite is designed to reduce the energy of an impact and to help to protect the pilot
as much as possible in an accident, but it cannot completely eliminate the risk of injury. The
GingoAirlite backprotection with an airbag hasreceivedcertification from
LTF.
Optional Items
Thefollowing itemsareavailable as optional extras.
Carbonseatplate
The Gingo Airlite can be installed with a Gin Carbon Seat plate, which weighs less than half the
weightof a woodenseat.
Sideprotection
TheGingo AirliteiscompatiblewithGINsideprotection.
Rescueparachute
The Gingo Airlite is designed for use with a GIN rescue parachute, such as the ONE G or Yeti
rescue. Other manufacturers’ rescue systems may also be used. Every first installation of a
rescue system into the harness (that means every new combination of harness and rescue
system) must be checked by a qualified paragliding professional. This is called a "compatibility
check”. In this compatibility check the pilot himself, who will be flying with this harness, must
always sit in the harness hanging from a simulator and deploy the rescue from the harness
container. This check must also be done each time after the rescue has been repacked and re-
installed

8
Speedbar
The Gingo Airlite
is compatible with all common types of speed systems. We recommend the GIN
aluminiumspeedbar
.
Flightdeck
The Gingo Airlite
may be fitted with a flight deck, allowing easier viewing of instruments and/or
carryingof ballast.
Stirrup(Footbar)
The pilot can attach an optional stirrup (foot bar) to the main carabiners, running the stirrup
linesthrough the guides above eachside of the seatplate.
Other Accessories
Forup-to-date information on additional accessories,visit www.gingliders.comor contactyour
localGIN dealer orthedistributor in your country.

9
3. Before you fly
TheGingo Airlitemustbeassembledbyasuitably qualified paraglidingprofessional, for
exampleyour instructor.In particular greatcare and attentionmustbepaid tothe fitting of the
rescue parachute inthe harness. Thepilot should then adjust the harnessfor comfort.
Assembly
Gin Gliders recommend that assembly be carried out in the order below. If there is any doubt
whatsoever about this procedure, please seek professional advice from your instructor, GIN
dealeror importer.
Side Protection
The Gingo Airlite can be fitted with GIN side protection plates into the side pockets these are
heldin placewithVelcro.
Speed System
Thespeed systemisassembledfrom top to bottom.Pass thecord ofthespeedbar through the
pairof pulleys nearthe sidepocketandroute it outthroughtheeyeletnear thefront corners at
each side ofthe seat. Attachthe elastic cord tothe speed bar toprevent tangling in caseof a
parachutedeployment
.
RescueInstallationand CheckofCompatibility
The Gingo Airlite
is compatible with GIN rescue parachutes. Other manufacturer’s rescues may be
usedas well,but as already mentioned earlierinthis manual:
Every first installation of a rescue system into the harness (that means every new combination
of harness and rescue system) must be checked for compatibility by a qualified paragliding
professional. Prior to the installation, you should also ensure that you have the necessary
materialsto completetheprocedure,forexample,suitable maillons and thread.
Rescue parachutes should be repacked at least every 6 Months; so installing your rescue in a
new harness may also provide a good opportunity for a repack. A compatibility check always
must be executed by the pilot itself who will fly with the harness. The pilot must sit in the
harness which is hanging in a simulator and release the rescue from the rescue container to be
sure this is possible in an emergency situation. A compatibility check (check if the rescue

10
parachute can be released from the integrated container of a harness) must be executed after
eachrepacking oftherescue parachute.
Checklistwhen repacking therescue parachute
Item Check Item Check
Validationofdateof rescue packing Certification (LTF, EN)
Correctsizeofdeployment bag of the
rescue? Conditionof rescue deployment
bag?
Rescuehandleattachmentat
deploymentbagcorrect? Checkstrength of rescue handle
attachment
Originalrescuehandleof harness? Check if the handle connected atthe
correctpositionofdeployment bag
Whentherescuehandle is pulled, is
thepinreleasedbefore the
connectionbecomestight? The rubber band tension of rescue
innercontainermust be less than
30N
Istherescuepin engaged? Check attachment of rescue handle
totheharness
Forcetoopenthe rescue less than
70N? ChecktheVelcroworks
Hasthecorrectmethod been used to
connecttherescue and bridle? Check if there is any object
interferingwiththeopening of the
rescue
Isthemaillonconnecting the rescue
withharnessbridlelocked tightly?
Checkifthebridle and rescue riser
securedtothemaillons with a
suitablematerial(e.g. tape, rubber
bandsetc.)toprevent friction
Check your rescue manual for further details.
When you attach the rescue bridles to the harness webbing, a Maillon Rapid type 7mm Stainless
Steel carre (square) is recommended. But in any case, the connector should be rated at least 9
times the maximum weight, for example, a 7mm, 3125kg stainless connector that has an EN
certificateof conformity.
The Maillon should be held in place with rubber bands, tape or plastic heat shrink tube. Webbing
to webbing connections are not recommended, due to the danger of getting the knot the wrong
way round, which significantly weakens the connection and also difficult to disconnect the
rescueparachuteif you land intrees.
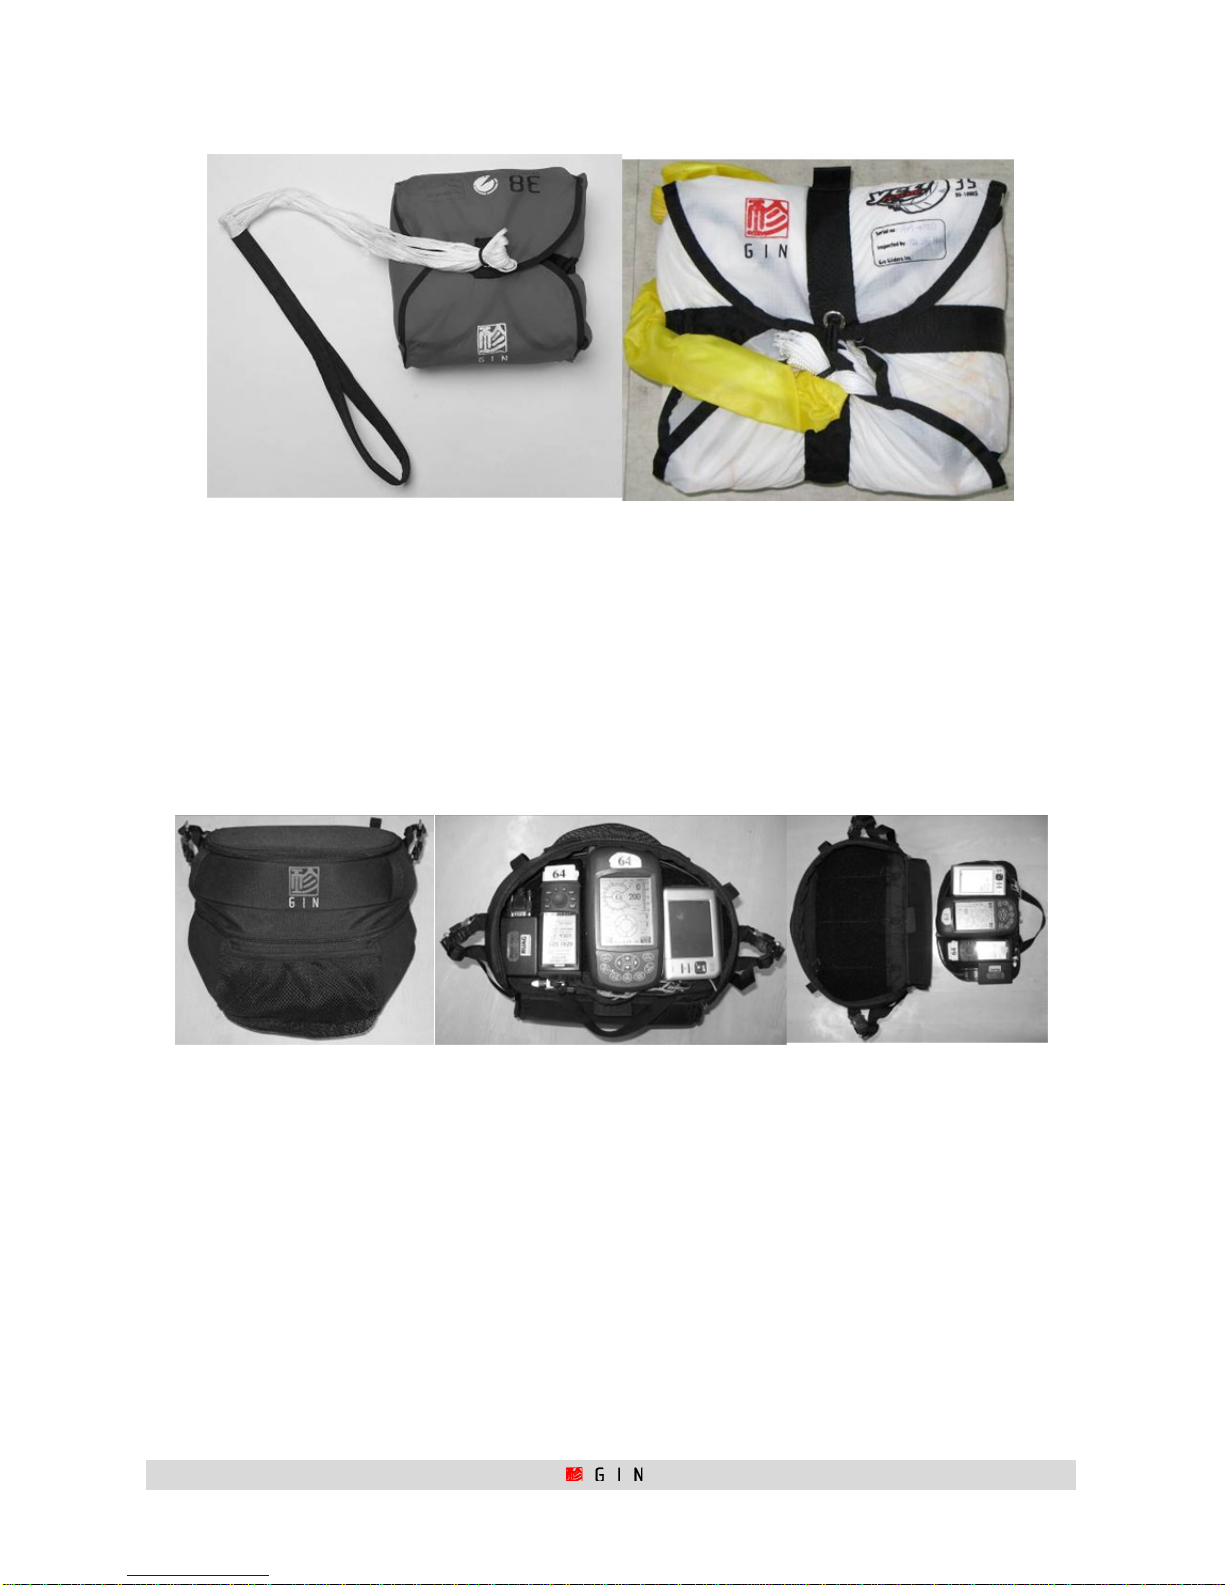
Attaching rescue deployment bag to the harness deployment handle
Therescue containerof the Gingo Airlitecomeswithits owndeployment handle. Thishandle
anditsstrapmustbe connectedtothedeploymentbagoftheparachute. If yourparachute’s
deploymentbag doesnot havethe proper loop, please contact yourparachute dealerora
qualifiedprofessional toattach the deployment handle by sewingitor addinganewloopinthe
correctpositiononthedeploymentbag.

11
Inany case a qualified professionalmust check thecompatibilityofthesystem; harnessand
rescueparachute,when a rescueparachuteis installedfor the first time. After every repack of
therescue parachuteyoucan doacompatibility check yourself.Please observe carefully how
theprofessionalinstalls the rescuesystem, so thatyoucanrememberthe procedureif you
haveto do ityourselfthenext time.
Thiscompatibilitycheckrequiresthatyou test to make sure that therescue parachute can be
releasedfromtherescuecontainer in the harness– it must be donebythepilothimself, sitting
inthe harnesshanging from asimulator. It must bedoneaftereveryrepackoftherescue
parachute tobe sure that therescue can be releasedwithout problems in thecase of an
emergency.
Rescue installation guide
Take special care: The deployment handle must be attached to the side loop on the deployment
bag, not to the centre loop. When fitting the rescue to the harness ensure the loop/handle
attachment is positioned uppermost,close tothe seat plate.

12
Adjusting the volume of the rescue container
Thevolume of therescue containerof the Gingo Airlitecanbeadjustedwithvelcrosinbetween
5Land 10L to accommodate different sizes of rescueparachutes.Attach both sidesofthe
velcros toeachother to make itsmaller in volumewhen you wantto usethe rescue container for
smallrescues.
Ifyou install alightweight rescuesuch as the Yetirescue, thecontainer should be made smaller
as shownin the photos below. Werecommend to usethe small size ofthe rescue container for
rescuesup to 1.8kg.
Adjustments
The Gingo Airlite
should be adjusted to suit your physique and flying style. It is important to
adjustitcorrectly to ensure you caneasilyslide into the sittingpositionafter take off.
Adjustments should ideally be tested before your first flight by hanging in a simulator.
Additionalfine-tuning canbe done during your first few flights.
Ensure that the rescue system, back and side protection have been installed before making
adjustments.

13
ShoulderStraps
The optimum setting for the shoulder straps depends on the height of the pilot. Stand upright
with the chest/leg straps closed and symmetrically adjust the shoulder straps until they are
just tight. During flight, these straps should be a little slack. You will find the adjustable
buckleseithersideof the seat.
Lateral Straps
The lateral straps adjust the angle between the thighs and the back. This angle can be set
between 100° and 130°. Lengthening the straps increases the angle and vice-versa. The easiest
way to adjust them correctly is during a flight in calm air. Remember that flying in the “supine
position” that means leaning back, reduces the stability of the harness and increases the risk of
twistingafteranasymmetricdeflation.
Leg Straps
The correct adjustmentof the leg straps allows the pilotto easily reach the sitting position
aftertake-off without usinghis hands.In the standingposition,usethebucklesunder thechest
strap toadjust the leg straps so thatthey fit comfortablywithout being tight; makesure you do
itsymmetrically. Ifitisnecessary tolengthen theleg straps,firstcheckthat theshoulder
strapsare nottoo tight. It isnot normally necessary to make large adjustments fromthe
defaultlegstrapsetting.
ChestStrap
The
adjustment of the chest strap controls the distance between the carabiners and affects the
handling and stability of the glider. Widening the distance between the carabiners increases
feedbackfrom the wing and allowsforeasierweightshifting.Closingthe strap gives you a more
stablefeeling in turbulence but increasesthe risk ofstable spiral and also theriskof twisting!
We advise pilots of GIN paragliders to fly with a distance between the carabiners of
approximately44 to 48 cm.
The chest strap may also be adjusted in flight according to the conditions; for example, it may
be tightened in turbulent air 9 (within the manufacturer’s recommended range) and flown at a
loosersetting in weak conditions.
Seat Straps
Theseat strapschange the depth of the seat.Adjustto find a comfortable position.Inthe
sitting position, lengthen the strapsto their maximum atfirst and thenuse the plastic buckles
toshortenthestraps to find a comfortable positionwith goodbacksupport.Lengtheningthe
strapsalsohelpsyou to slideeasily into theharnessattake off, whileshortening the straps
helpsyou to beinthestanding positionforlanding.
SpeedBar
Hanging in the simulator, adjust the length of the speed bar cord so that the bar hangs at least
15cm below the front of the harness. Making the cord too short could result in the speed system
being constantly or unintentionally engaged during flight. It is safer to start with the speed bar

14
a little long and shorten it following your first flights. Test the speed bar in flight only after
you are comfortable with your new harness, and always do so in calm conditions with ample
clearanceabove theground.
Storage
Oneof the specialfeatures of Gingo Airlite is thatit isdesigned tofunction as an airbag.Airis
scoopedinto theairbagchambers through achannelonthe side of the harness. Pilotsshould
makesure thatthischannel and theairways are openand thatairis freetoflowthrough and
intothe air chambersin theback ofGingo Airlite.
Thereare two pocketsinsidetheairbag.Put bags and
otherstufffor stowage inside thesepockets and zipthem
closed.Otherwise,theairbag won’t work properly.

15
4. Flying with the Gingo Airlite
Pre-flight checks
Formaximum safety, use a complete and consistent system of pre-flight checks andrepeat the
samemental sequence
every
flight.
Checkthat:
Thereis no visibledamage to the harness orcarabiners that could affectitsairworthiness.
The rescue parachutecontainer is closed correctly and thepins are in the right position.
Thedeployment handleis completely inserted intothe elasticpockets.
All buckles, belts, zips are securely fastened. Buckles should click into place as you close
them, and a gentle pull on the fastened buckle verifies this. Secure any zips
after
fasteningthebuckles. Take extra care in snowyor sandy environments.
The paraglider is connected correctly to the harness and both carabiners are secured by
theirlocking mechanisms.
Thespeed bar isattachedcorrectly to the glider.
Allpockets are closedproperly and anylooseitemsare tieddown safely.
Part of air chamber is closed with Velcro along the bottom, this allows you to check inside
the air chamber for damage, etc. It is important to check that this Velcro is fully
closedbefore eachuse;otherwise it could lead to malfunctionoftheairbag.
Checkagain thatyouhaveclosed yourlegandchest straps before you take off!
Rescue Deployment
It is vital to periodically feel the position of the rescue handle in normal flight, so that the
action ofreaching for therescue handle is instinctivein an emergency.
In the event of an emergency, the pilot must quickly evaluate his or her height and the
seriousness of the incident. Deploying the rescue when the glider is recoverable may increase
the danger of injury. If you have sufficient height and the glider is in a flat spin, it is preferable
to first try to stop thespin (e.g. full stall), due to the risk ofentanglement. On the other hand, a
second’s hesitation indeploying the reservecould provecostlyifthereis insufficient height.

16
If the rescue is to be deployed, the procedure is as follows:
Lookfor the rescuehandleand graspit firmly with one hand
Pull sideward and upwards on the handle to release the deployment bag from the harness
container
Look for a clear area, and in a continuous motion, throw (and RELEASE!) the rescue away
from yourself and the glider, preferably into the air stream and against the direction
ofspin
After deployment, avoid entanglement and pendulum motions by pulling in the glider as
symmetricallyaspossiblewith theB,C,Dorbrakelines
On landing take an upright body position and be sure to do a PLF (Parachute Landing Fall)
tominimize the risk of injury
Pockets
There are large pockets inside the airbagat the back of the harness and 2 smaller side pockets.
These are positioned to prevent contents from falling out during flight if the pocket is opened.
There is also a radio compartment inside the back pocket and a buttonhole to pass the cable
throughfor a handheldspeaker-microphone or a Camel Back.
Landing with the Gingo Airlite
Before landing, slide your legs forward in the harness so that you adopt the standing position.
NEVER land in the seated position; it is verydangerous for your back even if youhave an airbag.
Standing up before landing is an active safety precaution, and is much more effective than the
passivesystem ofanybackprotection.

17
5. Miscellaneous
Towing
The Gingo Airlite is also excellent for towing.
The tow release can be connected to the main
carabiners. The best position to attach a tow release is to use a towing adapter, which slides
over the lower ends of the risers of the paraglider. For further details refer to the
documentation provided with your tow release or towing adaptor or ask a qualified towing
instructoratyour tow site.
Tandem Flying
TheGingoAirlite
isnot recommendedfor tandem flying
.
Flying over water
It is not recommended to use the Gingo Airlite on any flights over water, especially extreme
manoeuvres training, due to the possibility that the airbag could keep the pilot under water in
the eventof a water landing.So, if you doflyoverwater, you must take extreme care.
Act responsibly and help preserve your flying sites
Pleaseobservealllocal rules at theflyingsitesyou use. It is important not toendangerthe
preservation offlying sites that are avital necessity tothe enjoyment of ourbeautiful sport.

18
6. Maintenance and Repair
The materials used in the Gingo Airlite have been carefully selected for maximum durability.
Nevertheless, keeping your harness clean and airworthy will ensure a long period of continuous
safeoperation.
Maintenance
TheGingo Airliteparaglider harness has to betransportedinside aparagliderrucksack,so
thatitisprotectedagainstdamage.
Keep itaway from sharpobjects which could damagetheharness.
Duringstorage,makesuretheharness is protectedfrom animals such as rodents or
insects.
Avoiddragging yourharnessover rough orrockyground.
Unnecessaryexposure to UVradiation, heat, humidity and chemicalsshouldbealways
avoided.
Keepthe harnessinyourrucksackwhennotin use.
Storeallyour paraglidingequipmentin a cool, dry place, and never put it awaywhile damp
orwet.
Keepyour harnessas cleanaspossibleby regularlycleaning off dirtwithaplastic bristled
brushand/ora dampcloth. If the harness getsexceptionally dirty, wash it with water
anda mild soap.Makesureyoufirstremoveallthe sub-components: seat board, back
plate,back protection,rescueparachute etc. Allow the harness todrynaturally in a
wellventilatedareaawayfrom direct sunlight.
If yourrescue parachute evergets wet (e.g. ina water landing) you must remove it from
theharness,dry it andrepack it before putting it backinthecontainer.
Aftera hard landingyou must checkyourback protectionfordamage. A tear in the airbag
couldsignificantlynoefficiency of the protectionit.
The zipsand buckles maybe occasionally lubricated withsilicone spray, no morethan once
ayear.
Inspection checklist
In addition to regular pre-flight checks, the Gingo Airlite should be inspected thoroughly on
everyrescue repack,normally every6months.Additional inspections shouldbe performed after
any crash, bad landing or take off, or if there are any signs of damage or undue wear. Always
seek professional advice whenever in doubt. The following preflight checks should be carried
out:
Check all webbing, straps and buckles for wear and damage, especially the areas
that are noteasily seen, such as theinside of the carabinerhook-in points.
All sewing must be intact and any anomalies attended to immediately to avoid
exacerbationof theproblem.
Special attention should be paid to the rescue installation, particularly the
elasticandVelcroparts.

19
Check that the airbag protector does not have any holes. The function could be in
questioniftheairbag has been perforated.
Theseat andbackplatesmustbe freefromcracks.
The main aluminium carabiners must be replaced at least every 5 years or after
500 hours, whatever comes first. Impacts may create undetectable cracks that
couldresultinstructuralfailureundercontinuous load.
Repair
The manufacturer or an approved specialist should carry out any repair that involves critical
partsof the harness.Thiswillensurethat thecorrect materials andrepair techniquesare used.
Environmentally friendly disposal of the harness
When this paragliding harness cannot be used any longer after an extended period of life time,
then you must ensure that it will be disposed in an environmentally friendly way. Please
observe the existingregulations and laws in your country.

20
7. Technical Data
Specification
Description Paragliding harness
Size XS S M L
Heightof main attachment
pointsaboveseatplate 39cm 41cm 43cm 45cm
CarabinerDistance 36-50cm 36-51cm 36-52cm 36-54cm
Weight(withCarbonseat) 2.7Kg 3Kg 3.1Kg 3.3Kg
Parachute Container Integrated container underneath theseat plate
Volumeof ParachuteContainer 5L–10L
EN,LTF certified max.load 120Kg
Options Flightdeck,Stirrup (footbar),Carbon Seat plate,
Sideprotector
Certification
GingoAirlite harness
LTF& EN Nr... EAPR-GZ-7536/12
Description
FABRICOF HARNESS
OUTSIDE:420DHD N/OXFORD(100%NYLONF.YARNWOVEN FABRIC),N/160DATYPUR/S(100%
NYLONcodura)
INSIDE: Oxford210DPU
WEBBING:DYNEEMA25mm/ Nylon66-30mm
BUCKLES/RING:T-LOOK SAFETY BUCKLE "LIGHT" BUCKLE AUTOMATIQUELIGHT30MM,
PassantMALE 26.5mm + Cadre Female 27.5mm
THREAD:P/F 210 D/9 Bonded, P/F 210 D/4 &210 D/6 Bonded POLYESTER
Every effort has been made to ensure that the information in this manual is
correct, but please remember that it has been produced for guidance only.
This owner's manual is subject to changes without prior notice. Please check
with www.gingliders.com for the latest information regarding the Gingo Airlite
and other GIN products.
Table of contents
Other Gin Gliders Accessories manuals

Gin Gliders
Gin Gliders Heated gloves User manual

Gin Gliders
Gin Gliders Genie lite 3 rescue deck User manual

Gin Gliders
Gin Gliders Gingo Airlite 4 User manual

Gin Gliders
Gin Gliders Switch 2 User manual

Gin Gliders
Gin Gliders Camino User manual

Gin Gliders
Gin Gliders Gingo Airlite XS User manual

Gin Gliders
Gin Gliders Safari Pilot 2 User manual
Popular Accessories manuals by other brands

Lowrance
Lowrance LMF-400 Installation and operation instructions

TREND
TREND LLO installation instructions

Hytronik
Hytronik SensorDIM HEC7030 manual

PCB Piezotronics
PCB Piezotronics IMISensors Echo 670A01 Installation and operating manual

Antelope
Antelope Orion owner's manual

unotec
unotec 10H quick start guide