Ginnys CKY-4D User manual

BRAND
HALOGEN TURBO CONVECTION
OVEN
User Guide
Item: 62597
Ginnys.com • 800-544-1590
Facebook.com/GinnysBrand
Pinterest.com/GinnysBrand
Ginnys.com/Blog

TABLE OF CONTENTS
Important Safeguards 3
Electrical Safety and Specicaons 4
Get to Know Your Oven 5
How to Operate 6-10
Cleaning & Care 11
Recipes 12-15
Warranty 16
____________________________________________________________
____________________________________________________________
Thank you for purchasing a Ginny’s Brand
Halogen Turbo Convecon Oven! No
pre-heang me needed, the convecon fan
circulates the hot air quickly, and you can fry
without oil! This lile gem is tried and true—
it’s fast, economical, ecient, and allows you
to cook healthier foods. This oven does it all...
right on your countertop. Enjoy!
President, Ginny’s
2Ginnys.com 800-544-1590
____________________________________________________________
____________________________________________________________

President, Ginny’s
IMPORTANT SAFEGUARDS
READ CAREFULLY BEFORE USING AND SAVE THESE INSTRUCTIONS!
• FOR HOUSEHOLD USE ONLY. Do not use this appliance for other than its
intended use.
• REMOVE all packaging materials and labels before rst use.
• WASH all removable parts before rst use. See Cleaning & Care.
• A SHORT CORD is provided to reduce the hazards resulng from
entanglement or tripping. Do not drape the cord over the counter or
tabletop, where it can be pulled on or tripped over. Never wrap the cord
ghtly around the appliance, as this could cause the cord to fray.
• We do not recommend using an extension cord with this appliance.
However, IF AN EXTENSION CORD IS USED, the marked electrical rang
should be at least as great as the electrical rang of this appliance.
• CLOSE SUPERVISION is necessary when using this appliance near
CHILDREN.
• A re may occur if this appliance is used near FLAMMABLE MATERIALS,
including curtains, towels, walls, etc. Do not place any paper, plasc, or
other non-food items in the appliance. Do not place the appliance or its
cord on or near a heated surface, or in a heated oven.
• This appliance should always be used on a STABLE, DRY, HEAT-RESISTANT
SURFACE. Do not use near water.
• Do not use an accessory or aachment not recommended by Ginny’s, as
this may cause injury, or damage the appliance.
• Keep hands, hair and clothing away from all MOVING PARTS.
• Always use OVEN MITTS when handling hot food or appliances. Do not
aempt to move an appliance when it is hot, or has hot contents.
• Do not use outdoors.
• Turn OFF AND UNPLUG this appliance when not in use.
• NO SERVICEABLE PARTS INSIDE THIS APPLIANCE.
• DO NOT USE AN APPLIANCE WITH A DAMAGED CORD OR PLUG, OR
AFTER THE APPLIANCE MALFUNCTIONS, OR HAS BEEN DAMAGED IN ANY
MANNER.
• Do not operate in the presence of explosive and/or ammable fumes.
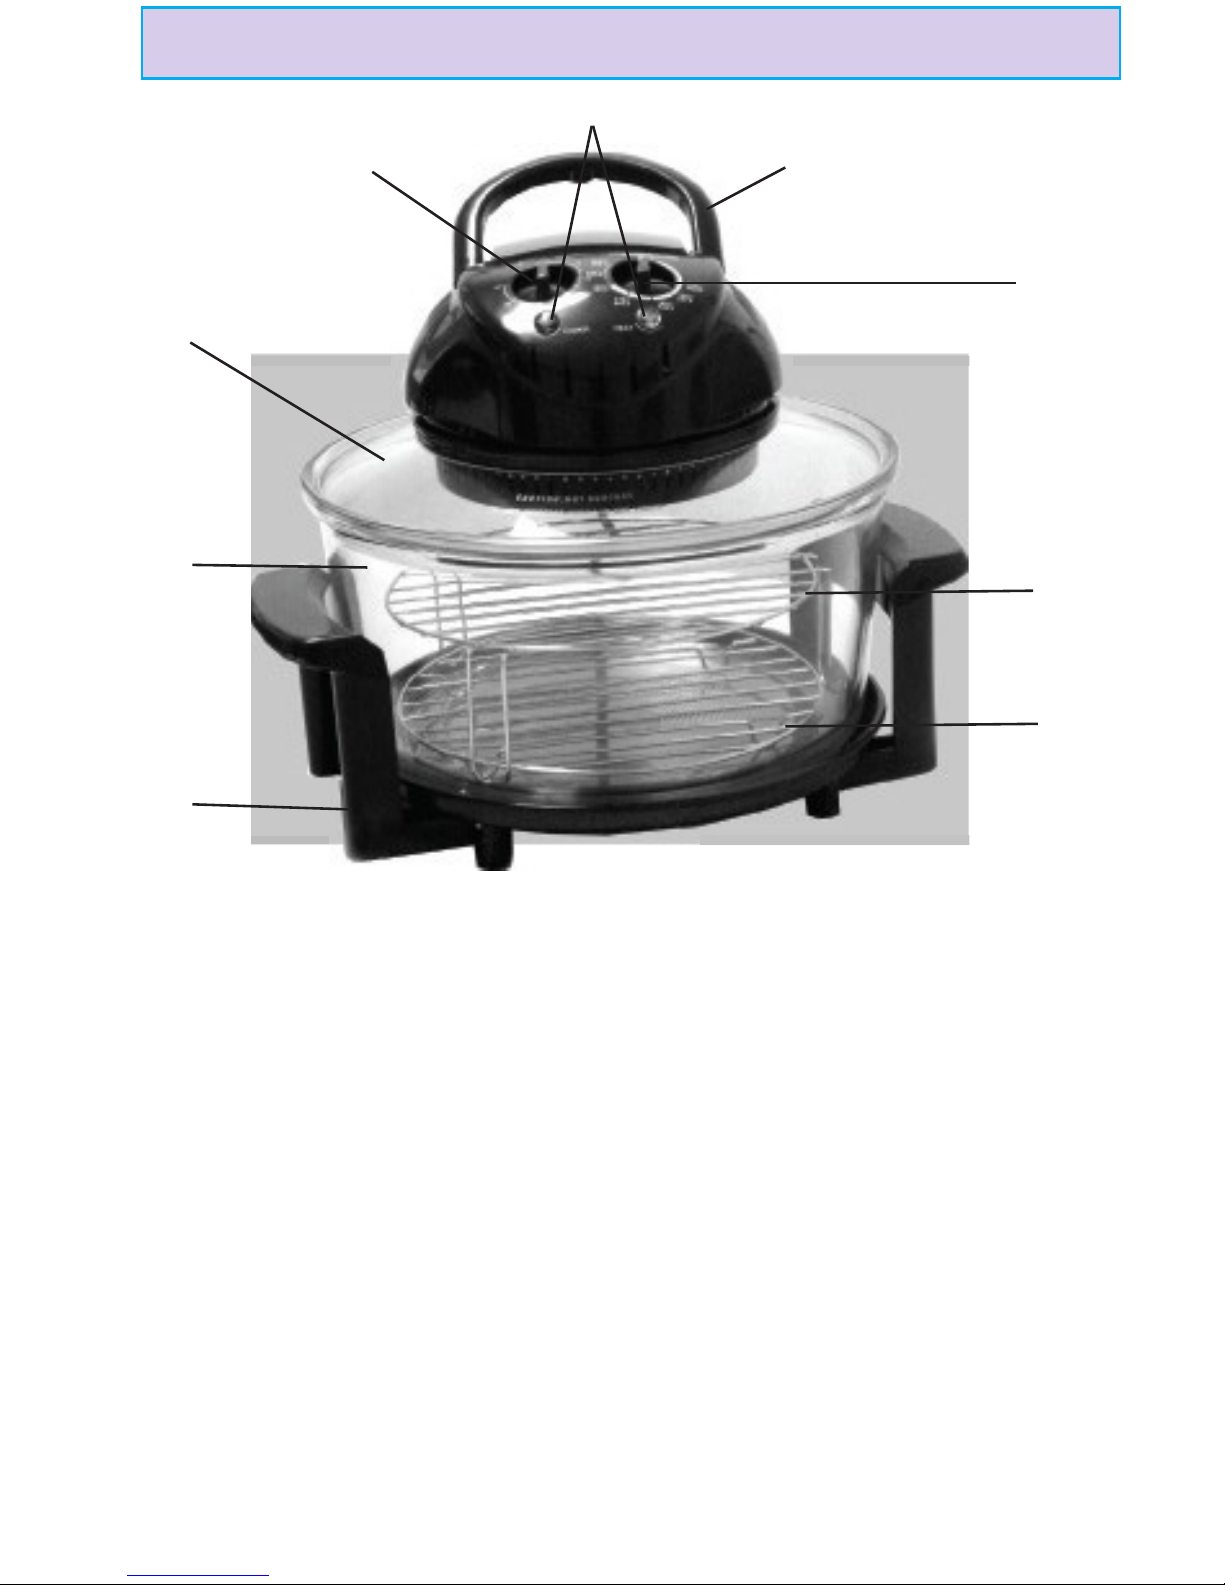
• NEVER operate the oven without rst placing it on the supplied base.
3
Facebook.com/GinnysBrand

ELECTRICAL SAFETY
SPECIFICATIONS
This appliance is equipped with a three-prong grounding plug. This is a
safety feature to reduce the risk of electrical shock. Using an extension
cord is not recommended with this appliance. It is recommended that
an electrical outlet serving ONLY this appliance be used. This outlet must
be properly installed and grounded. If you have any quesons about the
grounding or electrical instrucons, contact a qualied electrician. Do not
aempt to modify the plug in any way. Ginny’s cannot accept any liability
for damage or injury resulng from failure to observe these safety
procedures.
POWER RATING 120 V 1300 W 60 Hz
CAPACITY 12 quarts
CORD LENGTH 48”
DIMENSIONS Bowl 13” x 6.5”
Assembled 16” x 13.5” x 12.5”
MODEL CKY-4D
4Pinterest.com/GinnysBrand

GET TO KNOW YOUR OVEN
5
Ginnys.com/Blog
4
1
7
6
3
5
9
8
2
1. Lid
2. Timer Knob (0-60 minutes)
3. LED Lights (Red for POWER, Green for HEAT)
4. Lid Handle
5. Temperature Knob (0-475° F)
6. Tall Rack
7. Short Rack
8. Glass Pot
9. Base
10. Wire Tongs for moving Racks (not shown)
11. Wire Lid Holder (not shown)

HOW TO OPERATE
6
Ginnys.com 800-544-1590
1. Place food on the racks, on foil or in an oven-safe pan, per recipe
direcons. For best results, keep food approximately 1” from the glass
pot wall to allow maximum hot air circulaon.
: We recommend using the racks to allow for beer air
circulaon and even cooking. Brush the racks with oil or
spray with cooking spray to ease clean-up.
2. Put the lid on the pot (ensure the lid does not touch the food) and push
down the handle. THE OVEN WILL ONLY WORK IF THE LID HANDLE IS
COMPLETELY FOLDED DOWN.
3. Plug the power cord into an outlet.
4. Set the temperature per recipe direcons.
5. Set the mer to the desired me. The red and green lights will illuminate,
as well as the interior light, as the oven begins to heat.
6. When the oven reaches the desired temperature, the green light and
interior light will turn o. (These lights will automacally turn o and on
during cooking as needed, to maintain selected temperature.)
Temperature may be adjusted at any me while the oven is cooking.
7. When the set me has elapsed, the oven will turn o and all lights will
turn o. Unplug the oven.
8. While wearing an oven mi, li the lid with the handle and place the lid
onto the lid holder. NEVER PUT THE HOT LID DIRECTLY ON THE
COUNTERTOP AS THIS MIGHT CAUSE DAMAGE, OR BECOME A FIRE
HAZARD.
Before rst use, heat up the empty oven at maximum
temperature for ve minutes. This will burn o any excess
residue from the manufacturing process. A slight amount of
smoke may be produced and is not considered a defect.
Handle DOWN
Handle UP
READY TO
OPERATE

HOW TO OPERATE
7
Facebook.com/GinnysBrand
Air Frying: Lile or no oil is used, yet the eect is like deep frying!
• Place food directly on either rack, or use an oven-safe pan that
will t easily inside the glass pot.
• Cover and cook per recipe instrucons, or see pages 9-10.
• If air frying on the top and boom racks at the same me, rotate
the food halfway through to ensure even cooking.
• When done, promptly remove the lid from the glass pot to keep
the steam inside from making the food soggy instead of crispy.
WARNING: NEVER FILL THE GLASS BOWL WITH OIL. THIS APPLIANCE IS
NOT TO BE USED AS A DEEP FRYER!
Roasng:
• Place food directly on the low rack, or use an oven-safe pan that
will t easily inside the glass pot.
• Cover and cook per recipe instrucons, or see pages 9-10.
• You may want to rub oil on foods that tend to dry out in an oven.
• Rotate the food halfway through to ensure even cooking.
: - Fruit jams, preserves and jellies work well as glazes!
- Spice rubs are a great way to seal in avor and juices (see
page 15).
Grilling:
• Place food directly on the low rack.
• Cover and cook per recipe instrucons, or see pages 9-10.
• You may want to rub oil on foods that tend to dry out in an oven.
• Rotate the food halfway through to ensure even cooking.

8
Pinterest.com/GinnysBrand
HOW TO OPERATE
Baking:
• Use any oven-safe pan that will t easily inside the glass pot. Place it
on the short rack.
• Cover and cook per recipe instrucons.
• Tradional baking recipes may need to be modied to avoid over-
cooking; lower the temperature slightly and turn the pan while
cooking if browning occurs too quickly. Monitor closely.
Broiling:
• Place the food directly on the tall rack, or use any oven-safe pan
that will t easily inside the glass pot.
• Cover and cook per recipe instrucons.
• Ensure the lid does not touch the food.
• Monitor broiling closely to avoid over-cooking.
Steaming:
• Place the food directly on the short rack, or use any oven-safe pan
that will t easily inside the glass pot.
• Pour water or broth into the boom of the glass cooking bowl using
half a cup of liquid for every pound of food. The water should not
touch the food.
• Cover and turn the temperature knob to 350°- 375 °F, and cook per
recipe instrucons.
• Add more liquid as needed so the pot does not run dry. Monitor
closely.
For extra avor when steaming:
- Add chopped fresh herbs, before or aer steaming.
- Toss steamed vegetables with garlic sauteed in olive oil.
- Add ginger, onions, garlic or herbs to your steam water.
- Drizzle steamed vegetables with lemon juice.

9
Ginnys.com/Blog
HOW TO OPERATE
Thawing:
• Place the food directly on the rack, or use any oven-safe pan
that will t easily inside the glass pot.
• Cover and turn the temperature knob to THAW
•Thawing mes will vary depending on weight and thickness of food.
• Monitor thawing closely.
Suggested Cooking Times: Cooking mes may vary depending on
weight, thickness, cut or amount of fat. Monitor cooking closely.
MEATS TIME TEMPERATURE
Beef Rib Roast 31 minutes per pound
(medium) 400°F
Meat Loaf (2 pound) 50 - 60 minutes 350°F
1” Beef Rib Eye or
Strip Steak
12 min per side
(medium) 400°F
Beef Flat-iron or Flank
Steak
8-12 minutes
(medium - rare) 375°F
Pork Loin Roast 29 minutes per pound 360°F
1/2” Pork Chops 10-16 minutes 460°F
Bacon (1 lb.) 12-16 minutes 350°F
Leg of Lamb 31 minutes per pound
(medium) 390°F
Lamb Chops 21 minutes (medium) 400°F
Hamburgers 10-18 minutes 400°F
Hot Dogs (1 ½ - 2 oz.) 5-10 minutes 400°F
Sausage Paes (1 lb.) 16 minutes 390°F
connued on page 10

10
Ginnys.com 800-544-1590
POULTRY TIME TEMPERATURE
Whole Chicken
(unstued) 21 minutes per pound 460°F
Chicken Breasts 26 - 31 minutes 460°F
Chicken Tenderloins 20 minutes 400°F
Whole Turkey
(unstued)
26 - 31 minutes per
pound 460°F
Turkey Breast (3 lbs.) 45 - 60 minutes 460°F
Cornish Hen 26 minutes per pound 460°F
SEAFOOD TIME TEMPERATURE
Whole Snapper 31 minutes 400°F
Salmon Steak 10 minutes 400°F
Grilled Shrimp 12 - 14 minutes 400°F
Lobster Tail 18 minutes 400°F
Breaded Fish Fillet
(frozen)
10 minutes less than
package directs 350°F
Mahi Mahi 5 minutes 450°F
Crab Legs 10 - 13 minutes 300°F
VEGETABLES TIME TEMPERATURE
Baked Potato (6-8 oz.,
white or sweet) 30-40 minutes 400°F
Corn on the Cob
(unshucked ears) 26 minutes 400°F
French Fries 16 minutes or unl
crisp 450°F
Brussels Sprouts 15 - 20 minutes 450°F
Green Beans 15 minutes 450°F
HOW TO OPERATE

11
Facebook.com/GinnysBrand
CLEANING & CARE
1. ALLOW THE OVEN TO COOL COMPLETELY BEFORE ATTEMPTING TO
CLEAN!
2. This oven has a special self-cleaning seng labeled WASH on the
temperature knob.
A. Remove excess food and drain away fat from the glass pot.
B. Add approximately ½ inch of warm water to the glass pot with a
squirt of dish soap. Put on the lid and turn the temperature control
to WASH.
C. Set the me control to 10 - 15 minutes. The combinaon of heat,
the swirling moon caused by the fan, and the soap will clean the
glass pot quickly and eciently. The cooking racks may also be le
in the glass bowl when using the wash seng.
D. Turn o and unplug the appliance. Allow the pot to cool
completely before rinsing.
3. The glass bowl and racks are also dishwasher safe, or may be washed by
hand.
4. Do not use abrasive brushes or pads, or harsh cleaning soluons.
5. Use a so cloth, sponge or rubber spatula to remove any stuck-on food or
residue.
6. Wipe the lid with a damp cloth. To clean the fan cover, remove
the screw, and take the cover o to be washed in warm, soapy water.
7. Do not immerse any electrical appliance, its cord, or its plug, into water.
8. Ensure all parts are dried thoroughly before reassembling and using
this appliance.

RECIPES
12
Pinterest.com/GinnysBrand
8 eggs, beaten
3 leaves of kale or collard greens, chopped
1 small zucchini, thinly sliced
¼ - ½ c. fresh mushrooms, chopped
½ c. milk
⅛ c. olive oil
½ c. shredded cheddar
Add chopped onions, fresh herbs, or salt and pepper to taste.
1. Mix all ingredients together in a medium bowl.
2. Spray an 8” round oven safe pan with cooking spray. Pour mixture into
pan and cook at 325°F on lower rack for 30 minutes.
3. Decrease temperature to 300°F for another 10 minutes, if needed. Serve
with fresh fruit and toast.
Serves 4-6
1 ½ c. our ½ t. cayenne pepper
1 t. pepper 1 c. buermilk
1 ½ t. salt ½ chicken, cut into pieces (skin on)
1. In a large bowl, whisk together the dry ingredients.
2. Pour the buermilk in another bowl.
3. Coat the chicken pieces in the dry ingredients, then in the buermilk,
then back into the dry ingredients.
4. Put the coated chicken pieces on a rack in 1 layer with a lile space
between each piece. If cooking on both racks, rotate pieces halfway
through the cooking me (the chicken on the tall rack will cook faster).
5. Cook at 360° F for 15 minutes. Flip the chicken pieces and cook for another
10-15 minutes unl done. Chicken is done when juices run clear and
internal temperature is 165°F.
Serves 2-3

13
Ginnys.com/Blog
RECIPES
1 lb. fresh green beans (40-50 beans)
2 cloves garlic, chopped
¼ c. slivered almonds
olive oil
salt & pepper
¾ c. our
1 c. panko bread crumbs
¼ c. Parmesan cheese, shredded
1 T. parsley, chopped
1 egg, beaten
4 lapia llets
1. Mix beans, garlic and almonds together in an 8” round, oven-safe pan.
Drizzle with olive oil, salt & pepper to taste, and toss.
2. Cook on short rack at 425° F for 10-15 minutes, tossing once.
3. Reduce heat to 350°F and add the tall rack.
4. In a medium bowl, mix our, bread crumbs, Parmesan, parsley, salt &
pepper to taste.
5. Beat the egg in a shallow bowl.
6. Dip llets into egg, then roll in bread crumb mixture. Coat well.
7. Place llets in an 8” round, oven-safe pan. Cook on the tall rack at 350°F for
10-15 minutes, turning once.
Serves 2-4

RECIPES
14
Ginnys.com 800-544-1590
¼ c. honey
¼ c. soy sauce
2 T. bourbon whiskey
1.5 – 2 lb. pork tenderloin, trimmed
6 T. olive oil
salt & pepper
2 medium potatoes, peeled and cubed
3 small turnips, peeled and cubed
2 carrots, peeled and sliced
2 cloves of garlic, chopped
1 t. dried rosemary
1 t. dried thyme
½ medium onion, sliced
4 leaves of kale, nely chopped
1. Mix the honey, soy sauce and whiskey in a small sauce pan and heat on
low heat, to blend avors.
2. Rub the tenderloin with a teaspoon of the olive oil and salt & pepper to
taste. Place in 8” oven-safe pan.
3. In a medium bowl, toss together the potatoes, turnips, carrots, garlic, and
herbs with half of the remaining olive oil. Add salt & pepper to taste and
place all in another 8” oven-safe pan.
4. Place the vegetables on the short rack and the tenderloin on the tall rack.
5. Cook at 425°F for 15 minutes. Sr the vegetables and turn the tenderloin.
6. Cook for another 10 minutes. Check temperature of the tenderloin
(should be 160°F). Remove the tenderloin from oven. Let the tenderloin
rest 10 minutes.
7. Add the onion, kale, and remaining olive oil to the vegetables and toss.
Cook another 15 minutes. Vegetables and loin will be ready to serve at
the same me. Slice the tenderloin into medallions and drizzle generously
with the honey bourbon sauce. Enjoy!
Serves 4

RECIPES
15
Facebook.com/GinnysBrand
Chicken or Pork Loin Rub
2 T. kosher salt ½ T. dried rosemary
2 T. brown sugar ½ T. dry mustard
1 T. onion powder ½ T. ground cumin
1 T. garlic powder ½ T. dried thyme
1 T. smoked paprika ½ T. cayenne pepper
½ T. black pepper
Beef or Venison Tenderloin Rub
3 cloves fresh garlic, pressed 2 T. kosher salt
1 T. ground black pepper 1 T. ground coriander
1 T. smoked paprika 1 T. onion powder
1. Mix all ingredients together and pat generously on the meat.
2. See pages 9-10 for cooking mes.
3. When done, let meat rest at least 5 minutes before serving.
16 oz. low fat cream cheese 1 T. lemon zest
½ c. sugar 2 large eggs
½ t. vanilla 9” pre-made graham cracker crust
1 T. lemon juice 1 can (15 oz.) lemon pie lling, chilled
1. With a mixer on low speed, blend the cream cheese, sugar, vanilla, juice,
zest, and eggs unl well blended.
2. Pour the cream cheese mixture into the crust and bake on the short rack
at 325° F for 55-60 minutes (the top should be nicely browned). Cool for
30 minutes, then refrigerate for 2 hours.
3. Top each piece with a heaping tablespoon of the lemon pie lling before
serving.
Serves 8

WARRANTY
Ginny’s warrants this product free from defects in material and
workmanship for one year from provable date of purchase.
Within this warranty period, Ginny’s will repair or replace, at its opon,
defecve parts at no charge, provided the product is returned, freight
prepaid with proof of purchase to Ginny’s. Allow 2-4 weeks for return
shipping.
This warranty does not cover improper installaon, misuse, abuse or neglect
on part of the owner. Warranty is also invalid in any case that the product is
taken apart or serviced by an unauthorized service staon.
This warranty gives you specic legal rights and they may vary from
state to state.
THE FOREGOING WARRANTIES ARE IN LIEU OF ALL OTHER WARRANTIES AND
CONDITIONS, EXPRESS OR IMPLIED, INCLUDING BUT NOT LIMITED TO THOSE
OF MERCHANTIBILITY OR FITNESS FOR A PARTICULAR PURPOSE.
Ginny’s, Inc.
1112 7th Avenue
Monroe, WI 53566
Customer Service: 800-544-1590
8:00 a.m. to Midnight CST, Monday through Friday
16
Ginnys.com 800-544-1590
Table of contents
Other Ginnys Convection Oven manuals