Gio Pelle Skin Scanner Installation instructions

Skin Scanner
Operator & Owner’s Manual
Model #GP-DV-C
with Internal Camera

Congratulations and thank you for your purchase of the Gio Pelle Skin Scanner with Internal Camera. The Skin Scanner
is a major advancement in skin analysis enabling clients and professionals to exam the entire face for skin problem areas
together. The professional will be able to better communicate and convince their client about the benets of proper skin
treatment and guide them on how to use cosmetics correctly.
This precision designed piece of equipment, engineered with you in mind, will provide many years of trouble free opera-
tion. It will save you time and increase your ability to service your client in ways you never believed possible.
Please read carefully and understand this owner’s manual before proceeding. Be sure to thoroughly familiarize yourself
with the operation of the equipment prior to using it on any patient.
We appreciate your business and believe the performance, value and reliability of our equipment will earn your trust.
Sincerely,
Joanne Bianchini
President
Skin Scanner Parts ....................................... 2
Specications ............................................... 2
Skin Scanner Features ................................. 3
Skin Scanner Set-up ..................................... 4
Skin Scanner Operation................................ 5
Camera Operation......................................... 5
Skin Scanner Shutdown................................ 5
Microsoft Picture & Fax View
Software Overview .................................... 6-7
Viewing Photos ............................................. 8
Photo Archiving............................................. 8
Precautions................................................... 8
Maintenance ................................................. 8
Troubleshooting and Technical Service ...... 9
Warranty...................................................... 10
Table of Contents
1
Gio Pelle, Inc. reserves the right to incorporate any modications or improvements in machines and machine specications which it considers necessary and does not
assume any obligation to make these said changes in machines and equipment previously sold. The information in this document is subject to change without notice and
does not represent a commitment on the part of Gio Pelle, Inc. No part of this document may be reproduced or transmitted in any form or by any means, electronic or
mechanical, including photocopying, for any purpose without the express written permission of Gio Pelle, Inc.
Inspection Checklist
Two 6w Black Light Bulbs
Four 10w Black Light Bulbs
Skin Scanner
Two Replacement
Fuses
Power Cord

1
.
3
M
e
g
a
P
i
x
e
l
s
.
F
o
v
=
5
6
E
f
f
l
=
4
.
5
m
m
F
/
N
o
=
2
.
5
1.
2.
3.
5.
6.
7.
Skin Scanner External Parts
8.
9.
10.
Skin Scanner Internal Parts
8. Adjustable Client Viewing Mirror
9. 1.3 Megapixel Camera
10. 10 Watt Black Lights (four total)
11. 6 Watt Black Lights (two total)
12. Magnetic Lock
1. Carrying Handle
2. Operator Eye Scope
3. Power Switch
4. Power Cord Connector
5. External USB Port
6. Cover Door
7. Skirting
Dimensions: 480 x 310 x 160 mm; (L)x(W)x(H)
Net Weight: 10.2 kg; G. Weight: 11.5 kg
Voltage: 220-230V~
Fuses: 1x5A
Camera MegaPixels: 1.3 (1280 × 1024)
4.
11.
Figure 1
Figure 2
Skin Scanner Specications
2
12.

Skin Scanner Features
• Easy operation
• Helps the professional to recommend the perfect treatments and increase skin care sales
• Internal black lights reveal skin conditions that are not visible with the naked eye
• Skin conditions appear as different colors
• Ultraviolet black lights are completely safe for the skin and eyes
• An internal concave mirror with 2x magnication allows patient to evaluate their progress and see exactly what
the professional sees
• Internal camera
• No special darkroom is necessary
• Track patient results between treatments
• Internal cooling fan has a deodorizing function to allow for continuous usage
• Photos are downloaded to a PC via the USB port
• No installation software needed; uses your existing Windows Picture and Fax Viewer program
• Compatible with most PC’s
3

4
Skin Scanner Set-up
Opening the Skin Scanner
1. Place the Skin Scanner on a hard level surface to allow the client and
professional to sit across from each other to view comfortably.
2. Gently press in on the bottom of the cover door located on the backside
of the Skin Scanner (g. 3). The cover door will disconnect from the
magnetic lock that secures the door when closed.
3. Raise the door all the way up to the top for the door to stay in place.
The skirting will unfold when the door is opened completely.
Bulb Installation
4. Place the power switch on the side of unit in the OFF position (g. 5).
5. Install the bulbs if they did not come preinstalled (g. 4). Carefully line
up each bulb’s prongs with it’s socket loading slots. Rotate each bulb
90 degrees.
Power Cord
6. Plug the power cord into the connector located below the power switch
(g. 5). Attach the other end to a properly grounded outlet.
USB Cable
7. Plug the USB cable into the USB port on the Skin Scanner (g. 5). Attach
the other end to the USB port on your computer.
NOTE: Your computer should be turned on before plugging in the USB cable.
Turning the Skin Scanner On
8. Press the power switch to turn the Skin Scanner on (g. 5). The internal
cooling fan will start and the long-wave ultraviolet lights will illuminate.
9. Your computer should display a “New Hardware Found” message on
the tool bar near the clock (g. 6). The unit is now ready to use.
Figure 6
Found New Hardware
i
x
?
Figure 5
Power
Cord
USB
Port
USB
Cable
Power Switch
Figure 3
Door
Magnetic Lock
Skirting
Figure 4
1
.
3
M
e
g
a
P
i
x
e
l
s
.
F
o
v
=
5
6
E
f
f
l
=
4
.
5
m
m
F
/
N
o
=
2
.
5
6W Bulb
6W Bulb
10WBulb

Skin Scanner Operation
NOTE: The client’s skin should be cleaned before use.
Patient Positioning
1. Have the client position their head into the skirting of the unit (the skirting
should cover the client’s head and neck).
2. Have the client face the front of the concave mirror and adjust the mirror
angle for their own viewing convenience (g. 7).
WARNING: Care should be taken to avoid direct contact between the
skin and the bulbs.
Examination
3. The operator examines the client’s entire face from the eye scope with
a 2x magnication lens on the front of the unit.
4. Keep a record of each individual client’s skin condition to prepare
treatment and for the client to review the results of the treatment at a
later date.
Camera Operation
NOTE: See pages 6 and 7 for detailed camera software functions.
Opening the Software
1. The Skin Scanner should be connected to your computer.
2. Double-click the “My Computer” icon on your desktop.
3. Double-click the “USB Video Device” icon (g. 8). The Windows Picture
and Fax Viewer software that is included with Microsoft Windows will
open.
NOTE: Windows Picture and Fax Viewer software video program may
vary depending on which version of Microsoft Windows is installed on
your computer.
Image Capture
4. Click the “Take A New Picture” icon located in the “Camera Task”
menu to take a photo of the live image displayed in the “Photo Area”
(g. 9).
5. The photo le names will display below the “Photo Area” (g. 10).
6. Double-click the a photo le name for additional tools (g. 10).
Skin Scanner Shut Down
1. Turn off the Skin Scanner between exams and when not in use.
2. Push the cover door down (g. 11). The operator may need to adjust
the skirting if it does not completely store inside of the Skin Scanner.
NOTE: Closing the door on the skirt could result in damage to the unit
and skirting. If the skirting does not t inside of the unit open the door and
adjust it until the door can be closed.
Figure 7
Figure 11
My Computer
File Edit ViewFavoritesTools Help
Back Search Folders
Address
My Computer
System Tasks
>>
View system information
Add or remove programs
Other Places
>>
My Network Places
My Documents
Control Panel
Details
>>
>
Go
3½ Floppy (A:)
Local Disk (C:)
CD-RW (D:)
USB Video Device
Change a setting
USB Video Device
File Edit ViewFavorites ToolsHelp
Back Search Folders
Address
My Computer
Ta ke a new picture
Delete all picture on
camera
Other Places
>>
My Network Places
My Documents
My Network Places
Details
>>
>
Go
Name Type Date TakenPicture Size
Camera Tasks
>>
Picture 001.jpgJPG File 1/26/2009 10.2 KB
USB Video Device
File Edit ViewFavorites To olsHelp
Back Search Folders
Address My Computer
Ta ke a new picture
Delete all picture on
camera
Other Places
>>
My Network Places
My Documents
My Network Places
Details
>>
>
Go
Name Type Date TakenPicture Size
Camera Tasks
>>
Picture 001.jpgJPG File 1/26/2009 10.2 KB
Door
Magnetic Lock
Skirting
Eye Scope
Skirting
Figure 8
Figure 9
Figure 10
5

6
USB Video Device
File Edit ViewFavorites ToolsHelp
Back Search Folders
Address
My Computer
Take a new picture
Delete all picture on
camera
Other Places
>>
My Network Places
My Documents
My Network Places
Details
>>
>
Go
Name Type Date TakenPicture Size
Camera Tasks
>>
Picture 001.jpgJPG File 1/26/2009 10.2 KB
Window’s Picture & Fax View
Software Overview
(Initial Image Capture Screen)
1.
Figure 12
Photo
Area
The following screen should appear when you launch the software program
Note: Your screen and software may vary depending on the version of Windows Picture and Fax Viewer installed on your computer.
1.
Image Capture Screen (g. 12)
1. Take a New Picture: Click this icon to take a snapshot of the live image shown in the photo
area.
2. Delete All Pictures on Camera: Deletes all the photos listed below the Photo Area.
3. Other Places: Navigation buttons to go to other places on your computer
4. Photos: Lists each photo taken.
2.
3.
4.

+
Picture 001.jpg - Windows Picture and Fax Viewer
-
?
7
Window’s Picture & Fax View
Software Overview
(Advanced Image Capture Screen)
1.
Figure 13
Photo
Area
The following screen should appear when you double-click one of the photo names
Note: Your screen and software may vary depending on the version of Windows Picture and Fax Viewer installed on your computer.
Advanced Image Capture Screen (g. 13)
1. Previous Image: Go to the previous image in this folder
2. Next Image: Go to the next image in this folder.
3. Best Fit: Reduce or enlarge the image to t into the window’s current size (unless the image is already at the optimal window
size)
4. Actual Size: Display the image without scaling.
5. Start Slide Show: Displays each image in the folder in a slide show. Start, pause, navigate or end the slide show using the slide
show toolbar in the upper right hand corner.
6. Zoom In: Enlarge the display image to twice its size.
7. Zoom Out: Reduce the display image by half its size.
8. Rotate Clockwise: Rotate the image by 90 degrees clockwise.
9. Rotate Counter Clockwise: Rotate the image by 90 degrees counter clockwise.
10. Delete Image: Delete the image. Windows prompts you to conrm that you want to delete the image. If you click Yes, the image
is deleted, and the next image in the folder is displayed. If there are no more images, the window is empty.
11. Print: Print the current image.
12. Copy To: Copy the image le to another location.
13. Close Program for Editing: Closes video software and opens the image for editing
14. Help: Display the Help le.
1. 2. 3. 4. 5. 6. 7. 8. 9. 10. 11. 12. 13. 14.

Viewing Saved Photos
Your saved photos can be viewed in the photo archiving software of your choice. There are several programs available for
viewing and editing digital photos including Adobe Photoshop Elements and Corel Paintshop Pro. There are many free photo
viewing and edition programs that can be download from the internet including Picasa and Paint.net. You can also check for
programs that may already be loaded onto your computer like Microsoft Publisher.
Photo Archiving
Below are some recommendations for naming, saving and archiving photos.
Naming Folders
We recommend the following system for creating and saving your photos and folders.
• Create a folder where all your photos will be saved named “Skin Scanner Photos”.
• Inside the “Skin Scanner Photos” folder you should create a master folder for each patient/client using their name.
• Inside the patient/client folder you should create a folder for every date a treatment will be photographed.
• Inside of each date folder you could have two additional folders called “Before Treatment” and “After Treatment”.
Photo Backup
Periodically you will want to backup photos or remove them from your computer to create more hard drive space. Below are
the most popular storage devices for archiving photos.
• CD Burner: Many new computers are equipped with a CD burner. CD’s can hold up to 800 megabytes of storage.
• Portable External Hard Drive: Plugs into an available USB port and can hold several hundred gigabytes.
• Flash Drive/Key Drives: These very small, inexpensive drives can hold up to 1 or 2 gigabytes worth of data.
• Online Server: Allows you to backup computer les onto an online sever. You can access the photos from any computer
that is connected to the internet. This method eliminates physical media including CD’s and ash drives.
Precautions
1. Do not use the equipment in a wet environment to avoid electrical shock.
2. Always verify the right voltage/power supply.
3. Do not operate the Skin Scanner in high temperature.
4. Do not store the Skin Scanner in direct sunlight, high humidity and dusty places.
5. Do not touch the inside of the equipment when operating.
6. Always use on a level at surface.
7. After usage, switch off the power supply.
8. Do not use chemical agents to clean the lens or mirror.
9. Do not use chemical agents to clean the surface of the Skin Scanner.
10. Do not drop the equipment.
11. This appliance is not intended for use by persons (including children) with reduced physical, sensory or mental capabili-
ties or lack of experience and knowledge, unless they have been given supervision or instruction concerning use of the
appliance by a person responsible for their safety.
12. To prevent electrical shock or damage do not attempt to disassemble or repair the Skin Scanner or camera yourself.
Maintenance
1. The outside of the Skin Scanner can be cleaned with a damp wet cloth/towel.
2. Never spray liquids or chemicals directly onto the Skin Scanner.
3. Do not use chemical agents to clean the lens or mirror.
4. Clean the camera lens with a lens brush or dry, soft lens cleaning cloth (available at camera stores).
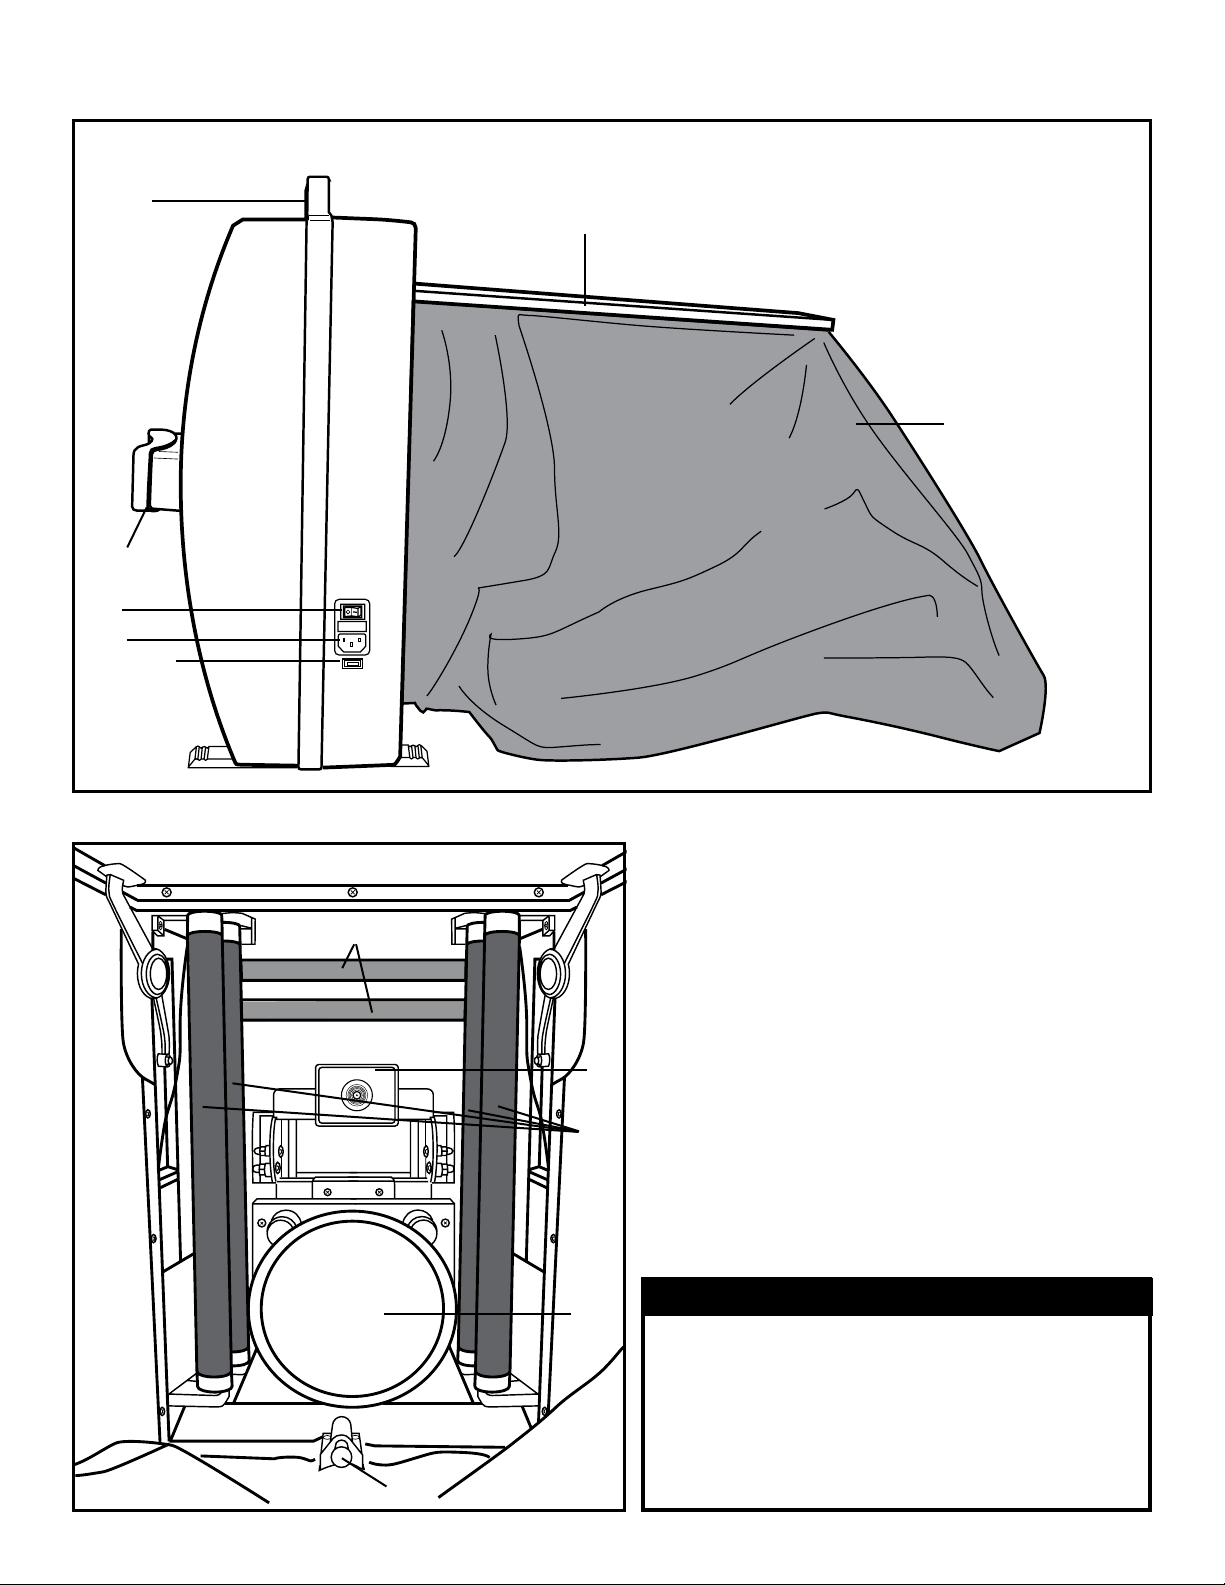
5. To replace bulbs rotate the bulb 90 degrees. Carefully slid bulb prongs out of socket loading slots. Dispose of bulbs ac-
cording to local, state and federal regulations. Remove new bulb from box. Carefully line up the prongs on each end of
the bulb. Insert the prongs into the socket loading slots and rotate 90 degrees.
6. To replace fuses, open fuse box located under the power switch.
8

Troubleshooting
We nd that most difculties can be resolved with a quick phone call. If you have questions concerning any aspect of the
Skin Scanner, and you can’t nd the answer in this manual, then call us toll free at 800-428-1610.
Problem Possible Cause Solution
Door does not open Magnetic lock not releasing door Press in on bottom of back door
until you hear a click
Twist the bulb gently in both directionsBulbs are loose
Individual bulbs do not light
Door will not close
Magnetic lock not engaged Press in on the bottom of back door
until you hear a click
Client/Patient cannot see their
reection on the internal mirror Mirror not adjusted Adjust the mirror until client/patient
can view their face
Green power switch light is not on Fuse has shorted out
Fuse box is located under the green power
switch. Remove power cord and open the
fuse box door. Replace fuse.
Replace bulbsBulbs burned out
Skirting caught in door Adjust skirting until door can be closed
Picture not clear or blurry
when photographing
Lens not focused Turn the ring on the edge of the lens
until picture is focused
Gently clean camera lens with lens brush
or dry, soft lens cleaning cloth (available at
camera stores)
Patient moved while taking photo Have patient sit still
• Power switch off
• Power cord not connected
• Turn on power switch
• Check power cord connection
at the wall and at the unit
No power
Lens needs cleaned
9
• Turn the unit on
• Connect USB cable to the unit
and computer
• If software still refuses to open, shut
down and restart computer. Once com-
puter has restarted, relaunch the camera
software application.
• Contact Microsoft. They will be able to
assist you in locating the software.
If the software is not on your computer you
may be able to download the latest ver-
sion of Windows Picture and Fax Viewer
software.
• If problem persist call Gio Pelle
• Unit is not turned on
• Unit not connected to computer
• Computer needs to be restarted
• Windows Picture and Fax Viewer
not installed on your computer
Windows Picture and Fax Viewer
does not launch

WARRANTY
Gio Pelle, Inc. will repair or replace any parts that fail because of defect in materials or work-
manship within one (1) year from the date of shipment when used by the original purchaser
and given normal and proper usage as described in this manual. If labor is needed, Gio Pelle,
Inc. provides it in their facility at no charge during the rst year. During this limited warranty
period, additional services performed beyond the remedial assistance necessary to correct
defects, will be charged at the labor service rate in effect at the time of repair.
The limited warranty period for Gio Pelle, Inc. replacement parts is 90 days, material only,
unless the part failed during the warranty. If the part failed during the original warranty period,
replacement part warranty ends on the termination of the system warranty of 90 days from the
date of installation of the part.
The limited warranty for retrot options, kits and accessories ends on the termination of the
system warranty or 90 days from the date of installation of the part unless otherwise stated,
provided the retrot is installed by an authorized Gio Pelle, Inc. representative.
Any failure of the equipment, replacement parts, retrot options, kits and accessories and/or
damages, including the cost of parts and labor for repairs, due to installation or operational
errors, accidents, transportation, neglect, misuse by the user or improper execution of instruc-
tions given by Gio Pelle, Inc. representatives over the telephone and causes occasioned by
other than ordinary use are the sole responsibility of the user from the date of shipment. As
a condition of this limited warranty, upon discovery all defects must be reported to Gio Pelle,
Inc. by phone and also in writing when requested. Gio Pelle, Inc. will determine the method of
providing remedial service through telephone support, a visit by our representative or product
return. All defects shall be subject to verication and determination by Gio Pelle, Inc. to its
reasonable satisfaction, upon inspection by its designated representative, that said part(s)
and the equipment in which the same may be embodied are and have been subjected only to
ordinary use and service and used in accordance with instruction in the manuals supplied and
other instruction sheets relating to this equipment, parts, options, kits and accessories.
Materials and parts alleged to be defective should be returned to Gio Pelle, Inc. if and when its
so requests, transportation charges prepaid. Gio Pelle, Inc. shall not be liable for any transpor-
tation or installation charges, nor for any expenses for repairs or replacement incurred without
Gio Pelle, Inc. prior approval. Gio Pelle, Inc. will pay all freight charges on warranty parts from
Gio Pelle, Inc. to the dealer, distributor or authorized agent or from Gio Pelle, Inc. directly to
the customer, as the case may be. This limited warranty does not cover parts that are the cus-
tomer’s maintenance responsibility such as, but not limited to, media, disposable items, tips,
lamps, fuses, hoses, rubber parts, etc. Use of non Gio Pelle products voids the warranty.
In no event shall Gio Pelle, Inc. be liable for any incidental, special or consequential dam-
ages. Other than as stated herein, Gio Pelle, Inc. makes no express or implied warranties,
including any warranty or merchantability, safety, performances, tness for a particular use or
otherwise.
10

Operator & Owner’s Manual
Model #GP-DV-C
Skin Scanner
with Internal Camera
7740 Records Street • Indianapolis, IN 46226
(317) 545-6196 • 800 428-1610 • Fax (317) 543-3289
www.giopelle.com
LGMNSSWC03 01 09
This manual suits for next models
1
Table of contents
Other Gio Pelle Personal Care Product manuals