LIMITED 5-YEAR WARRANTY
WHAT IS COVERED
The manufacturer warrants its parts and products to be free of substantial defects in materials and workmanship from the original date of purchase under normal home use. This
warranty is offered only to the original consumer purchaser and may not be transferred.
Coverage for vanity combos lasts for five years from the original date of purchase.
During the warranty period, the manufacturer, at its option, will repair or replace any part or product that proves to have substantial defects in materials or workmanship, or
the manufacturer will provide an equivalent replacement product. In keeping with our policy of continuous product improvement, the manufacturer reserves the right to change
specifications in design and materials without notice and with no obligation to retrofit products we previously manufactured.
This warranty gives you specific legal rights, and you may also have other rights that vary from state to state.
Because of the varying natural characteristics of wood and the effects of aging, product shown in displays and/or printed materials will not be an exact match to new cabinetry you
will receive. Depending on the wood characteristics, the age of a sample and the environment of the showroom, samples will show some degree of variation from new product. In
addition, you should not expect all doors, drawer fronts, trim or molding to match exactly in either finish or grain. Variation in wood is normal and unavoidable. In addition, it is not
possible to exactly match our colors in printed materials. Therefore, you should view the actual samples when making your color selection.
WHAT IS NOT COVERED
This warranty does not cover any problems or damage which result from improper transportation, improper installation, mishandling, misuse, abuse, neglect, abnormal use,
commercial use, improper maintenance, non-manufactured repairs, accidents, or acts of God, such as hurricanes, fire, earthquakes or floods. This warranty and any applicable
implied warranties do not cover incidental or consequential damages arising from any defects in the product, such as labor charges for installation or removal of the product or
any associated products. This warranty does not cover defects or damage caused by normal wear & tear, alterations, environmental conditions, humidity absorption, or mold. In
addition, variations in wood grain, finish color, aging or other natural wood and stain characteristics are not considered defects and are not covered by this warranty. Some states
do not allow the exclusion or limitation of incidental or consequential damages, so the above limitation or exclusion may not apply to you.
THE MANUFACTURER DISCLAIMS ANY IMPLIED WARRANTY OF MERCHANTABILITY, AND THERE ARE NO WARRANTIES THAT EXTEND BEYOND THE DESCRIPTIONS ON THE FACE
HEREOF. TO THE EXTENT THAT SUCH DISCLAIMER IS NOT VALID UNDER APPLICABLE LAW, ANY IMPLIED WARRANTY SHALL BE COEXTENSIVE IN DURATION WITH THIS WARRANTY.
Products should be examined for defects prior to installation. This warranty does not cover labor charges for installation or removal of the product or any associated products. If
upon inspection you find our product has a damaged or missing part, it may not be necessary to return the unit to the store of purchase. Please contact customer service to obtain
a replacement part.
If you need replacement parts or would like to make a warranty claim, please contact customer service at 1-888-774-8062. All warranty claims must include the model number of
the product, copy of the original receipt and the nature of the problem. In addition, the manufacturer may at its discretion require inspection of the installation site or authorize the
prepaid return of the claimed defective part. Merchandise not pre-approved for return will not be accepted and the associated claim not accepted.
IMPORTANT HEALTH NOTICE
Some of the building materials used in this home (or these building materials) emit formaldehyde. Eye, nose, and throat irritation, headache, nausea and a variety of asthma-like
symptoms, including shortness of breath, have been reported as a result of formaldehyde exposure. Elderly persons and young children, as well as anyone with a history of asthma,
allergies, or lung problems, may be at greater risk. Research is continuing on the possible long-term effects of exposure to formaldehyde.
Reduced ventilation may allow formaldehyde and other contaminants to accumulate in the indoor air. High indoor temperatures and humidity raise formaldehyde levels. When a
home is to be located in areas subject to extreme summer temperatures, an air-conditioning system can be used to control indoor temperature levels. Other means of controlled
mechanical ventilation can be used to reduce levels of formaldehyde and other indoor air contaminants.
If you have any questions regarding the health effects of formaldehyde, consult your doctor or local health department.
Care and Cleaning
Warranty
□Use a water-dampened cloth to clean the cabinet. Avoid using abrasive cleaners.
□Use a mild liquid soap and a soft cloth to clean your vanity top. Avoid using any harsh, abrasive cleaners or mineral spirits.
Safety Information
Troubleshooting
Please read and understand this entire manual before attempting to assemble, operate or install the product.
Installation (continued)
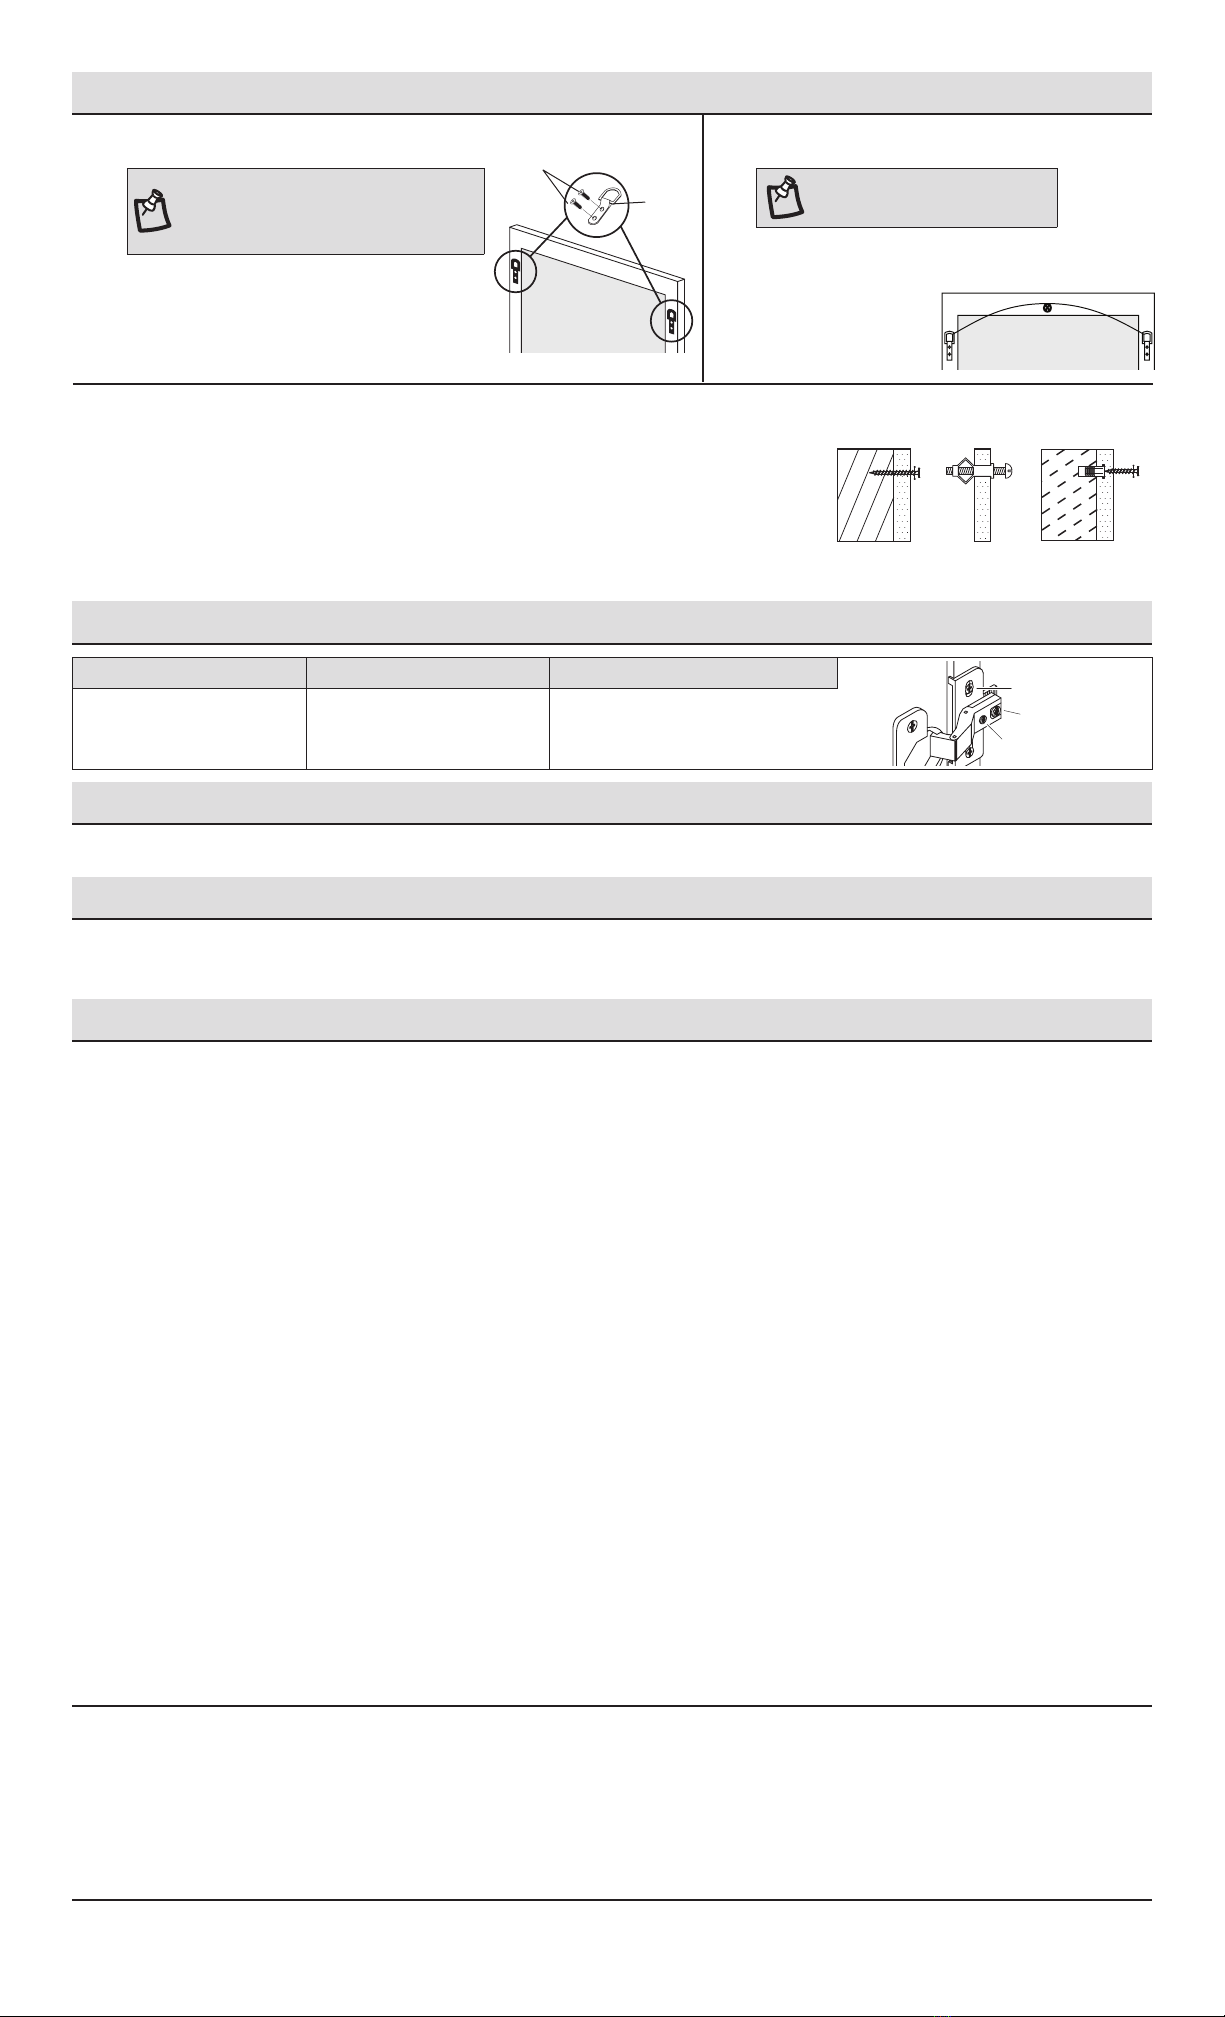
Problem Possible Cause Solution Up — Down
In — Out
Left— Right
The doors do not align or
the space is too big or too
tight between the doors.
The hinges are misaligned. Hold the door while loosening
screws. Align the doors properly,
and re-tighten the screws.
6 INSTALLING THE HANGING BRACKETS
NOTE: Before installing, make sure all parts
are present. Compare parts with the Hardware
Included list. If any part is missing or damaged,
do not attempt to install the product.
□Attach the hanging brackets (CC) to the
back of the mirror using the included
screws (DD).
7 INSTALLING THE HANGING WIRE
NOTE: This step is optional, and the
hanging hardware is not included.
□If you choose to use
hanging wire (not
included) attach
it to brackets as
shown below.
8 INSTALLING THE MIRROR
□For wall stud installation, insert #12 x 3 in. screws with washers into the stud
locations (not included).
□For drywall installation, drill holes at the appropriate locations and insert toggle
bolts with washers (not included).
□For concrete wall installation, drill 1/4 in. holes at the appropriate locations and
insert #12 wall anchors, followed by #12 x 3 in. screws (not included).
DD
CC
U180596
HOMEDEPOT.COM
Please contact 1-888-774-8062 for further assistance.


