glass 1989 PASODOBLE STEAM User guide

STEAM
Manuale d’uso & manutenzione
Use and maintenance guide
Bedienungs- & wartungsanleitung
Manual de uso & mantenimiento
Notice d’utilisation & maintenance


IT
ES
FR
RU
EN
DE
ITALIANO
CONSERVARE IL PRESENTE MANUALE
(CHE É PARTE INTEGRANTE DEL PRODOTTO )
PER CONSULTAZIONI FUTURE
ENGLISH
KEEP THIS GUIDE
(WHICH IS AN INTEGRAL PART OF THE PRODUCT)
FOR FUTURE CONSULTATION.
DEUTSCH
DIESES HANDBUCH
(DAS EIN WESENTLICHER BESTANDTEIL DES PRODUKTS IST)
FÜR ZUKÜNFTIGE EINSICHTNAHMEN AUFBEWAHREN.
ESPAÑOL
CONSERVE EL PRESENTE MANUAL DE INSTRUCCIONES
(QUE ES PARTE INTEGRANTE DEL PRODUCTO)
PARA CONSULTAS FUTURAS.
FRANCAIS
CONSERVER CE MANUEL
(QUI FAIT PARTIE INTÉGRANTE DU PRODUIT)
POUR TOUTE ÉVENTUELLE CONSULTATION FUTURE
РУССКИЙ


1
IT
ITALIANO
Introduzione Pag. 2
MODELLI TASTIERA
Modello A Pag. 3

2
IT
Questo manuale fornisce una guida al funzionamento delle diverse tipologie di comando
utilizzate nei nostri prodotti con funzione Steam (Bagno di vapore).
Leggere attentamente il manuale d’uso del proprio comando, sin dal primo avvio, al
ne di apprendere velocemente come far funzionare ed utilizzare la propria sauna.
IL BUON FUNZIONAMENTO DEL PRODOTTO DIPENDE DA UNA CORRETTA
MANUTENZIONE E DA UNA PULIZIA PERIODICA EFFICIENTE, A TAL PROPOSITO
CONSULTARE IL "MANUALE MONTAGGIO E MANUTENZIONE" DEL PROPRIO
MODELLO.
ATTENZIONE ATTENZIONE
Leggere ed osservare attentamente tutte le avvertenze di pericolo e le norme di
sicurezza emanate dagli enti preposti in ogni nazione.
La casa costruttrice declina ogni responsabilità:
- Qualora non vengano rispettate le disposizioni della norma C.E.I. 64.8 (IEC 364)
relativamente all’impianto elettrico dell’abitazione.
- Qualora non vengano rispettate le disposizioni d’installazione e manutenzione riportate
nel "MANUALE MONTAGGIO E MANUTENZIONE" del proprio prodotto.
- Qualora il prodotto venga usato o posto in opera non conformemente alle norme
C.E.I. EN 60335-1 e C.E.I. EN 60335-2-53.
- Qualora la manutenzione straordinaria non venga effettuata da personale qualicato.
E' FATTO ASSOLUTO DIVIETO DI UTILIZZARE IL PRODOTTO PER USI DIVERSI
DA QUELLI ESPRESSAMENTE PREVISTI.
STEAM:
BAGNO DI VAPORE
Con un semplice bagno di calore si eliminano, attraverso il sudore, le tossine ed i riuti
della pelle, aumentando la traspirazione. L’aumento della temperatura corporea ha
inoltre effetti beneci sulla muscolatura, che si rilassa e diminuisce la sua tensione.
INTRODUZIONE

3
IT
1. DISPLAY
2. Tasto ON/OFF
3. Tasto Funzione STEAM
4. Tasto LUCE/
CROMOTERAPIA
5. Tasto AUDIO
6. Tasto - / DECREMENTO
7. Tasto STOP
8. Tasto PLAY/PAUSA
9. Tasto + / INCREMENTO
Quando una funzione è attiva, l’icona
relativa a quella funzione sulla tastiera è
illuminata con una luce BIANCA.
Quando si seleziona una funzione si
sente un segnale acustico (BEEP) che
conferma la selezione.
TASTO ON/OFF (stand-by)
La tastiera è in modalità STAND-BY
quando il display risulta spento e anche
tutti i simboli, tranne l’icona “ON/OFF”.
FUNZIONI DISPLAY - Modello A
Per uscire dalla modalità stand-by e
poter passare al MENU di ogni singola
funzione, selezionare l’icona “ON/
OFF”, sul DISPLAY comparirà il logo,
ora è possibile selezionare la funzione
desiderata e le impostazioni abbinate ad
essa.
NOTA: Se la selezione non viene fatta
entro 5 secondi, la tastiera ritornerà in
modalità STAND-BY.
Tramite il tasto “ON/OFF” è possibile
spegnere tutte le funzioni in corso,
toccando un unico tasto.

4
IT FUNZIONE BAGNO DI VAPORE
Prima di attivare la funzione controllare
che la Porta della zona hammam sia chiusa e
che non ci siano eccessive Perdite di vaPore.
40° 0:20
1
2
3
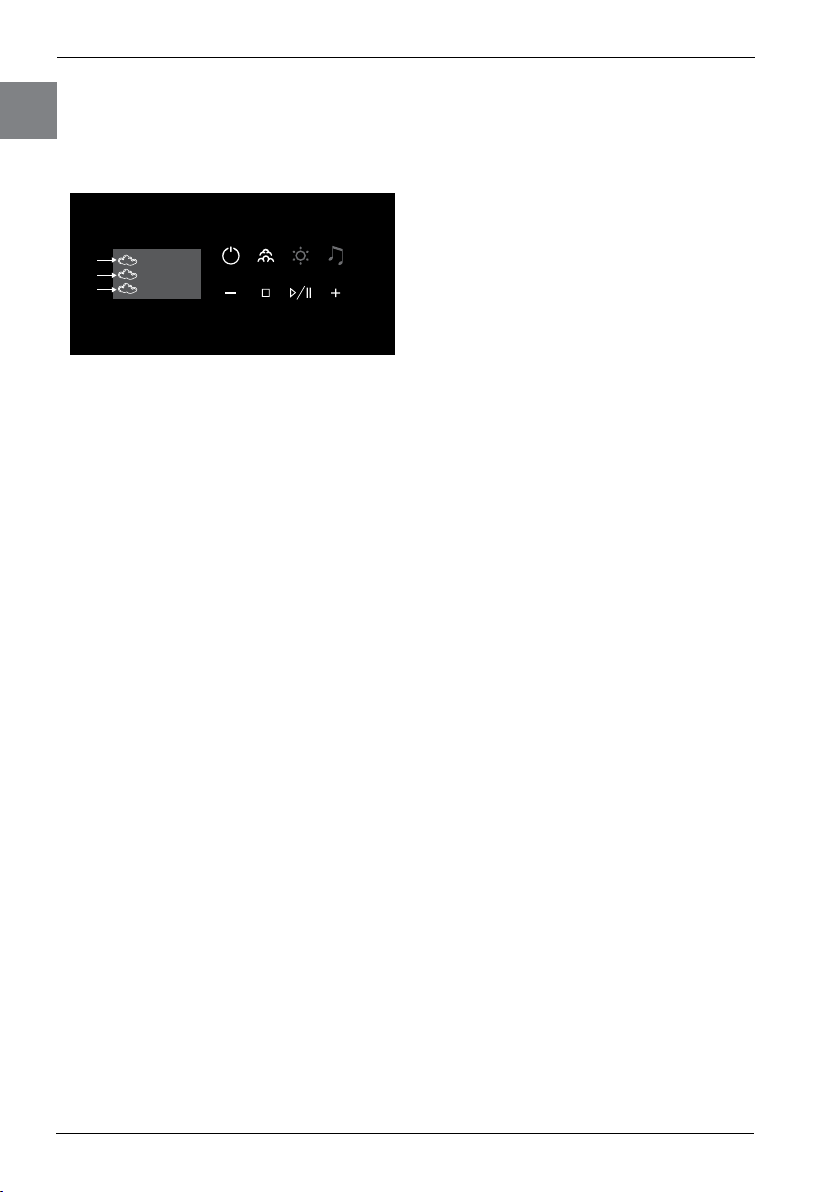
È possibile attivare la funzione BAGNO
DI VAPORE toccando l’icona “STEAM”.
SCHERMATA INIZIALE
Sul DISPLAY si visualizza una “nuvola”
(la prima in basso), la temperatura
ad essa associata (40°) ed la durata
preimpostata di 20 minuti.
Per interrompere il processo prima
della ne della durata preimpostata è
sufciente tenere selezionata l’icona
“STEAM” per 2 secondi oppure
selezionando il tasto "ON/OFF".
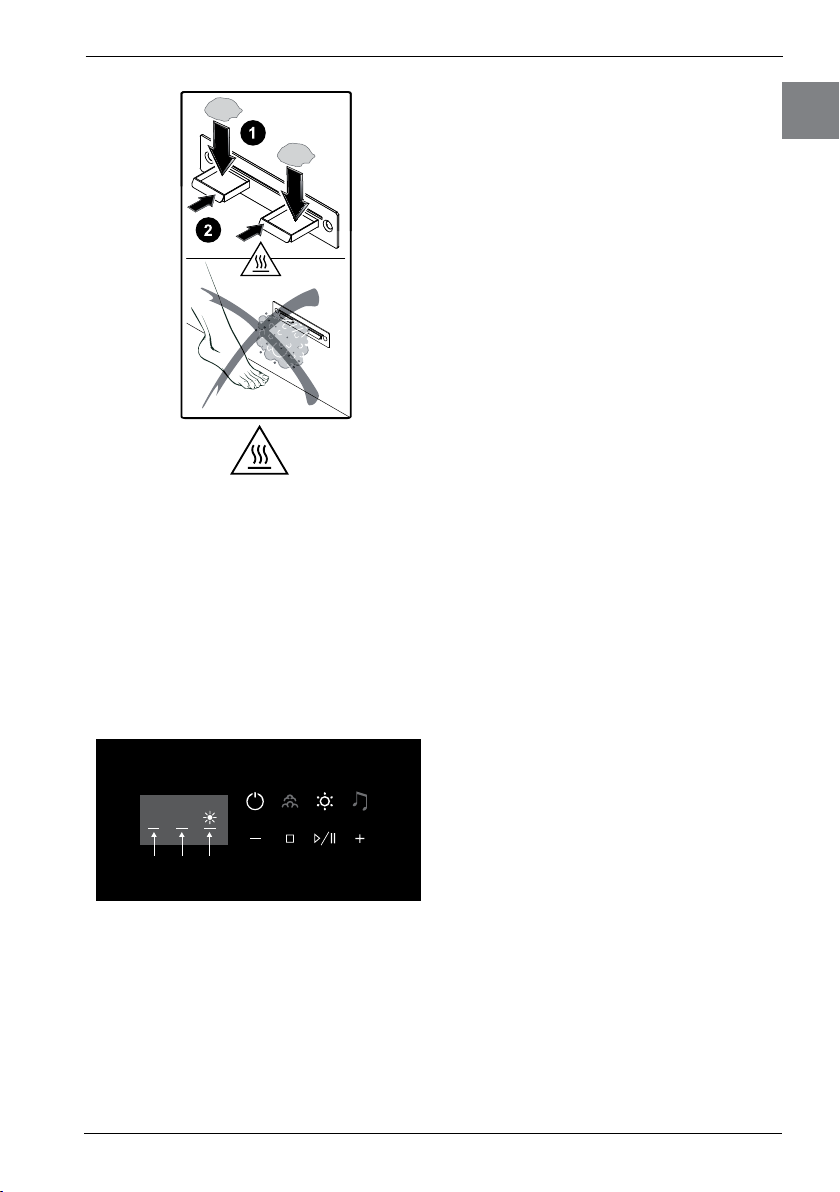
IMPOSTAZIONI TEMPERATURA
Per variare la temperatura, selezionare
più volte l’icona “STEAM”, sul DISPLAY
compaiono 1, 2 o 3 icone “nuvola” con le
rispettive temperature preimpostate:
1 “nuvola” : 40° C
2 “nuvole” : 45° C
3 “nuvole” : 48° C
Per scegliere la temperatura desiderata,
è sufciente fermarsi con la selezione,
sulla “nuvola” corrispondente.
IMPOSTAZIONI DURATA
La durata della funzione (20 min.) può
essere variata per un valore di 5’ in 5’,
da Min di 10 minuti a un Max di 40 minuti
procedendo come segue: selezionare
l’icona “Play/Pausa“, sul DISPLAY il
valore dei minuti si evidenzia (stato
di modica). Ora è possibile variare il
tempo preimpostato tramite le icone "+"
e "-".
Per confermare la il valore inserito,
selezionare l’icona “STOP”.
Per reimpostare la durata al valore
precedente, ripetere la stessa procedura.
Se non intervengono modiche nelle
impostazioni tramite le icone “+” e “-“,
dopo 5 secondi il valore dei minuti si
deseleziona automaticamente ritornando
allo stato iniziale.
A ne ciclo inizia la fase di risciacquo e
svuotamento della caldaia, che avviene
tramite il diffusore di vapore.
FUNZIONAMENTO DIFFUSORI
• E’ possibile inserire all’interno del
diffusore di vapore del cotone imbevuto
con prodotti aromatici. Prestare
attenzione a non ostruire lo scarico del
diffusore con il cotone.
• La durata del bagno di vapore va
contenuta, soprattutto per le prime
volte. Successivamente la durata può
essere gradualmente allungata, sempre
facendo attenzione alle condizioni siche
generali.
• Alla ne del bagno di vapore è consigliato
risciacquarsi con una doccia tiepida,
quindi asciugarsi, massaggiando
vigorosamente tutto il corpo. E’ opportuno
applicare sulla pelle una crema idratante.
• Prima e dopo il bagno di vapore è
consigliato bere acqua, spremute
di frutta o integratori salini.

5
IT
Avvertenza: rischio di scottature!
Il diffusore di vapore diventa molto caldo
nel corso della funzione di vapore!
Durante il ciclo di vapore, potrebbe tralare
acqua dal diffusore.
Non toccare il diffusore di vapore
durante il funzionamento e negli
istanti immediatamente successivi allo
spegnimento dello stesso.
LUCE / CROMOTERAPIA (LED)
1
P1 P2
2 3
Per attivare la funzione è sufficiente
selezionare l’icona “LUCE”.
NOTA: La luce ha una durata preimpostata
di 60 minuti, dopo la quale si spegne
automaticamente.
SCHERMATA INIZIALE:
Sul DISPLAY compare il logo e il simbolo
luce con sotto un “linea” (n°3).
La funzione CROMOTERAPIA presenta
2 programmi automatici (durata 1h
circa) oppure una sequenza di colori
ssi ad attivazione manuale (ROSSO -
ARANCIONE - VERDE - BLU - GIALLO
- BIANCO).
Per scegliere un “programma” selezionare
l’icona “Play/Pausa “. Alla prima pressione
del tasto la linea sotto il simbolo si spegne
e si accende lampeggiante sotto il logo
(n°1), ripremendo si passa alla linea
lampeggiante successiva (n°2).
Selezionare il programma desiderato,
confermare con l’icona “STOP” entro 5
secondi, la linea lampeggiante diventa
ssa e si attiva il programma colore scelto.
Nel programma manuale (n°3), tramite le
icone “+” e “-“ si può passare da un colore
all’altro.
Per spegnere la luce è sufficiente
selezionare l’icona “LUCE” fino allo
spegnimento avvenuto oppure tramite
l’icona “ON/OFF”.
MUSICA TRAMITE BLUETOOTH®
Prima di poter utilizzare questa funzione,
va effettuata la connessione tra il
trasmettitore (lettori MP3, cellulari, PC
e altri lettori/riproduttori con Bluetooth®
2.1) e il ricevitore Bluetooth presente nel
prodotto.
ASSOCIAZIONE DEI DISPOSITIVI
Per cercare altri dispositivi, effettuare
una scansione con il trasmettitore (vedi
manuale del trasmettitore). La presenza
del ricevitore Bluetooth®verrà visualizzato
con il nome “GLASS”. Selezionare il
dispositivo “GLASS” e procedere con
l’associazione inserendo il codice PIN
‘0000’ (Il codice protezione verrà usato
solo alla prima associazione di dispositivi).
Dopo l’associazione, il dispositivo “GLASS”
verrà salvato nella vista “dispositivi
associati”.

6
IT SCHERMATA INIZIALE
Sul DISPLAY si attivano le seguenti icone:
1
Ora si può avviare una traccia audio,
selezionando l’icona “Play/Pausa “.
Tramite le icone “+” e “-“, è possibile
passare alla traccia successiva oppure
quella precedente.
Tramite l’icona “Play/Pausa“ si può attivare
o mettere in pausa il brando.
Tramite il tasto “STOP” si blocca la
riproduzione del brano in esecuzione e
si ritorna all’inizio del brano selezionato.
La funzione musica può terminare:
• selezionando l’icona “ON/OFF”
• selezionando l’icona “Audio” per 2
secondi.
• quando la sorgente Bluetooth®viene
sconnessa.
ATTENZIONE: se selezionando
l’icona “Audio” questo lampeggia
3 volte, indica che la connessione
con il dispositivo Bluetooth®NON È
AVVENUTA.
REGOLAZIONE AUDIO
Per regolare l’AUDIO selezionare l’icona
“Audio”, così facendo si passa alla
seguente schermata del display:
1 2 3
Tramite questa schermata si possono
variare i seguenti parametri:
1. VOLUME
2. BASSI
3. ALTI
Il simbolo ”VOLUME” compare sempre
evidenziato (stato di modica).
Per passare da un parametro all’altro,
selezionare l’icona ”Play/Pausa”.
Tramite le icone “+” e “-“, è possibile
incrementare o decrementare il valore
associato al parametro evidenziato.
Tramite il tasto “STOP” si conferma
la modifica effettuata sul parametro
selezionato.
Per tornare alla schermata precedente,
selezionare l’icona “Audio”.
ALLARMI E SEGNALAZIONI
Nel caso si vericano uno o più allarmi:
• tutte le funzioni in corso si spengono
• si spengono tutti i led
• sul display viene visualizzata, ad intensità
normale, una schermata con i codici
allarme attivati (max 10).
Dopo 30 secondi la retroilluminazione
torna a bassa intensità, la tastiera rimane
BLOCCATA no al RESET del sistema.
MESSAGGI DIAGNOSTICI
Messaggio "E1_1"
Allarme comunicazione Potenza
- Mancata comunicazione tra tastiera e
potenza. Timeout di comunicazione (5”)
->RESET DEL SISTEMa
Messaggio "E1_2"
Allarme comunicazione DLC
- Mancata comunicazione tra tastiera e
DLC. Timeout di comunicazione (5”)
->RESET DEL SISTEMa
Messaggio "E1_3"
Allarme comunicazione DLC
- Mancata comunicazione tra tastiera e

7
IT
Audio. Timeout di comunicazione (5”)
->RESET DEL SISTEMa
Messaggio "E2"
Sonda di temperatura bassa
- Temperatura fuori range (1-80°C)
->Contattare centro assistenza
Messaggio "E3"
Guasto EEPROM Tastiera
- Errore R/W
->Contattare centro assistenza
Messaggio "E4"
Guasto EEPROM Audio
- Errore R/W
->Contattare centro assistenza
Errore impostazione volume, alti, bassi
- Mancata comunicazione tra audio e
gestore volume, alti, bassi
->RESET DEL SISTEMa
Errore Bluetooth
- Mancata comunicazione tra audio e
Bluetooth
->RESET DEL SISTEMa
Messaggio "E6"
Errore EVS
- Interviene timeout durante lo scarico
(EVS otturata o sonda di livello guasta).
->Contattare centro assistenza
Messaggio "E7"
Errore EVC
- Interviene timeout durante il carico (EVC
otturata, sonda di livello guasta, mancanza
di acqua di rete).
->Vericare presenza di acqua in rete.
->Contattare centro assistenza
Qualora compiendo le operazioni indicate
il problema non si dovesse risolvere
contattare direttamente il centro assistenza
autorizzato più vicino.

8
IT

1
ENGLISH
EN
Introduction Page 2
KEYBOARD MODELS
Model A Page 3

2
EN
INTRODUCTION
This manual provides a guide to the operation of the various types of commands used
in our products with Steam function (Steam bath).
Carefully read the operating manual for the commands, from the rst time the sauna
is used, in order to quickly learn how to use the sauna.
PROPER OPERATION OF THE PRODUCT DEPENDS ON CORRECT MAINTENANCE
AND ON EFFICIENT PERIODIC CLEANING; IN THIS REGARD REFER TO THE
"ASSEMBLY AND MAINTENANCE MANUAL" FOR YOUR MODEL.
ATTENTION ATTENTION
Carefully read and follow all danger warnings and the safety standards issued by the
relevant authorities in each country.
The manufacturer disclaims all liability:
- In the event of failure to comply with the requirements of I.E.C. Standard 64.8 (IEC
364) relating to the house electric system.
- In the event of failure to comply with the installation and maintenance requirements
contained in the "ASSEMBLY AND MAINTENANCE MANUAL" for the product.
- In the event the product is not used or installed in compliance with I.E.C. Standards
EN 60335-1 and I.E.C. EN 60335-2-53.
- In the event special maintenance is not carried out by qualied personnel.
IT IS STRICTLY FORBIDDEN TO USE THE PRODUCT FOR PURPOSES OTHER
THAN THOSE FOR WHICH IT WAS INTENDED.
STEAM:
STEAM BATH
A simple heat bath induces sweating, which rids the skin of toxins and wastes and
increases its transpiration. The increase in body temperature is also benecial in relaxing
muscles and relieving muscle tension and strain.

3
EN
DISPLAY FUNCTIONS - Model A
1. DISPLAY
2. ON/OFF key
3. STEAM function key
4. LIGHT/CHROMOTHERAPY
key
5. AUDIO key
6. - / DECREASE key
7. STOP key
8. PLAY/PAUSE key
9. + / INCREASE key
When a function is active, the icon
relating to that function on the keyboard
is lit up with a WHITE light.
When you are selecting a function you
will hear a BEEP conrming the selection.
ON/OFF BUTTON (stand-by)
The keyboard is in STAND-BY mode
when the display and all the symbols are
switched off, except for the “ON/OFF”
icon.
To exit the stand-by mode and switch to
the MENU of every single function, select
the “ON/OFF” icon and the DISPLAY
will feature the logo; it is now possible
to select the desired function and the
relative settings.
NOTE: If no selection is made within 5
seconds, the keyboard will go back to
STAND-BY mode.
Using the “ON/OFF” key it is possible
to switch off all the active functions, by
touching a single button.

4
EN
STEAM BATH FUNCTION
Before activating the function, make sure
the door of the hammam area is closed and
that there are not too many steam leaks.
40° 0:20
1
2
3
Activate the STEAM BATH function by
touching the “STEAM” icon.
HOME SCREEN
The DISPLAY features a “cloud” (the
rst one at the bottom), the relative
temperature (40°) and the pre-set
duration of 20 minutes.
To stop the process before the pre-set
time has elapsed simply press and hold
the “STEAM” icon for 2 seconds or select
the "ON/OFF" key.
TEMPERATURE SETTINGS
To change the temperature, press
the “STEAM” icon several times; the
DISPLAY will feature 1, 2 or 3 “cloud”
icons with the respective pre-set
temperatures:
1 “cloud” : 40° C
2 “clouds” : 45° C
3 “clouds” : 48° C
To select the desired temperature, simply
select the corresponding “cloud”.
DURATION SETTINGS
The duration of the function (20 min.)
may be changed in 5’ steps, from Min 10
minutes to Max 40 minutes as follows:
select the “Play/Pause“ icon, the minute
value will be highlighted on the DISPLAY
(modication status). It is now possible
to change the pre-set time using the "+"
and "-" icons.
To conrm the value entered, select the
“STOP” icon.
To reset the duration to the previous
value, repeat the same procedure.
If no changes are made to the settings
using the “+” and “-“ icons, after 5
seconds the minute value is deselected
automatically, going back to the initial
status.
The boiler rinsing and draining stage
starts at the end of the cycle, via the
steam diffuser.
DIFFUSER OPERATION
• Cotton wool soaked in aromatic products
can be inserted into the steam dispenser.
Be careful not to obstruct the vent of the
diffuser with the cotton wool.
• The duration of the steam bath should
be limited, especially the first times.
Subsequently, the duration can be
increased gradually, always paying
attention to the general physical
conditions.
• At the end of the steam bath it is
advisable to rinse with lukewarm water,
then dry, massaging the whole body
vigorously. It is recommended to apply
moisturising cream.
• Before and after the steam bath it is
recommended to drink water, fruit juice
or salt supplements.

5
EN
Warning: risk of burns!
The steam diffuser becomes very hot
during the steam function!
Some water may leak out from the diffuser
during the steam cycle.
Do not touch the steam diffuser while in
operation and right after turning it off.
LIGHT / CHROMOTHERAPY (LED)
1
P1 P2
2 3
To start the function, simply touch the
"LIGHT" icon.
NOTE: The light has a pre-set duration
of 60 minutes, after which is switches off
automatically.
HOME SCREEN:
The DISPLAY features the logo and the
light symbol with a “line” underneath (no.
3).
The CHROMOTHERAPY function
features 2 automatic programs (duration
approximately 1h) or a sequence of xed
colours with manual activation (RED -
ORANGE - GREEN - BLUE - YELLOW
- WHITE)
To choose a “program” select the “Play/
Pause“ icon. The first time the key
is pressed the line under the symbol
switches off and a ashing line appears
under the logo (no. 1); press the key again
to go to the next ashing line (no. 2).
Select the desired program, confirm
by pressing the “STOP” icon within 5
seconds; the flashing line becomes
xed and the selected colour program is
activated.
In the manual program (no. 3), you can
switch from one colour to another using
the “+” and “-“ icons.
To switch the light off simply select the
“LIGHT” icon until it has switched off or
press the “ON/OFF” icon.
MUSIC VIA BLUETOOTH®
Before using this function, the transmitter
(MP3 player, mobile phones, PCs and
other music players with Bluetooth®2.1)
must be connected to the Bluetooth
receiver featured in the product.
ASSOCIATING THE DEVICES
To find other devices, perform a scan
using the transmitter (see transmitter
manual). The presence of the Bluetooth®
receiver will be displayed with the name
“GLASS”. Select the “GLASS” device and
associate the devices by entering the PIN
code ‘0000’ (the protection code will only
be used the rst time the devices are
associated).
After the devices have been associated,
the “GLASS” device will be saved in the
“associated devices”.

6
EN
HOME SCREEN
The DISPLAY will feature the following
icons:
1
You can now play a soundtrack, by
selecting the "Play/Pause" icon.
Skip to the next track or to the previous
one using the “+” and “-“ icons.
Play or pause the track using the “Play/
Pause“ icon.
Stop the track and go back to the beginning
of the selected track using the “STOP” key.
The music function may end:
• by selecting the “ON/OFF” icon
• by selecting the “Audio” icon for 2
seconds.
• when the Bluetooth®source is
disconnected.
3 times when it is selected, it means
that the connection with the Bluetooth®
device HAS FAILED.
SOUND ADJUSTMENT
To adjust the SOUND select the "Audio"
icon; the display will then feature this
screen:
1 2 3
From this screen you can change the
following parameters:
1.VOLUME
2.BASS
3.TREBLE
The ”VOLUME” symbol always appears
highlighted (modication status).
To switch from one parameter to another,
select the ”Play/Pause” icon.
Increase or decrease the value associated
with the highlighted parameter using the
“+” and “-“ icons.
Conrm the change made to the selected
parameter using the “STOP” key.
To go back to the previous screen, select
the “Audio” icon.
ALARMS AND ALERTS
In the event of one or several alarms:
• all the active functions switch off
• all the LEDs switch off
• the display features a screen at normal
intensity with the active alarm codes (max
10).
After 30 seconds the backlight goes back
to low intensity, the keyboard is LOCKED
until the system is RESET.
DIAGNOSTIC MESSAGES
Message "E1_1"
Power communication alarm
- Failed communication between keyboard
and power. Communication timeout (5”)
->SYSTEM RESET
Message "E1_2"
DLC communication alarm
- Failed communication between keyboard
and DLC. Communication timeout (5”)
->SYSTEM RESET
Message "E1_3"
DLC communication alarm
- Failed communication between keyboard
and Audio. Communication timeout (5”)
->SYSTEM RESET

7
EN
Message "E2"
Low temperature probe
- Temperature out of range (1-80°C)
->Contact service centre
Message "E3"
Keyboard EEPROM failure
- R/W error
->Contact service centre
Message "E4"
Audio EEPROM failure
- R/W error
->Contact service centre
Volume, bass, treble setting error
- Failed communication between audio
and volume, bass, treble manager
->SYSTEM RESET
Bluetooth error
- Failed communication between audio
and Bluetooth
->SYSTEM RESET
Message "E6"
EVS error
- A timeout intervenes during draining
(EVS clogged or level probe faulty).
->Contact service centre
Message "E7"
EVC error
clogged, level probe faulty, no mains
water).
->Check that there is mains water.
->Contact service centre
If the problem persists even after
performing the procedures above, contact
the nearest authorised service centre
directly.

8
EN
Other manuals for PASODOBLE STEAM
1
Table of contents
Languages:
Other glass 1989 Iron manuals