manuals.online logo
Brands
  1. Home
  2. •
  3. Brands
  4. •
  5. Glass Expansion
  6. •
  7. Laboratory Equipment
  8. •
  9. Glass Expansion D-Torch User manual

Glass Expansion D-Torch User manual

D-Torch* with Quartz Outer Tube
Varian 700-ES or Vista Radial
30-808-3052
Glass Expansion © INS-0131 Page 1 of 4
Version 3
BEFORE YOU START
Congratulations on the purchase of your D-Torch.
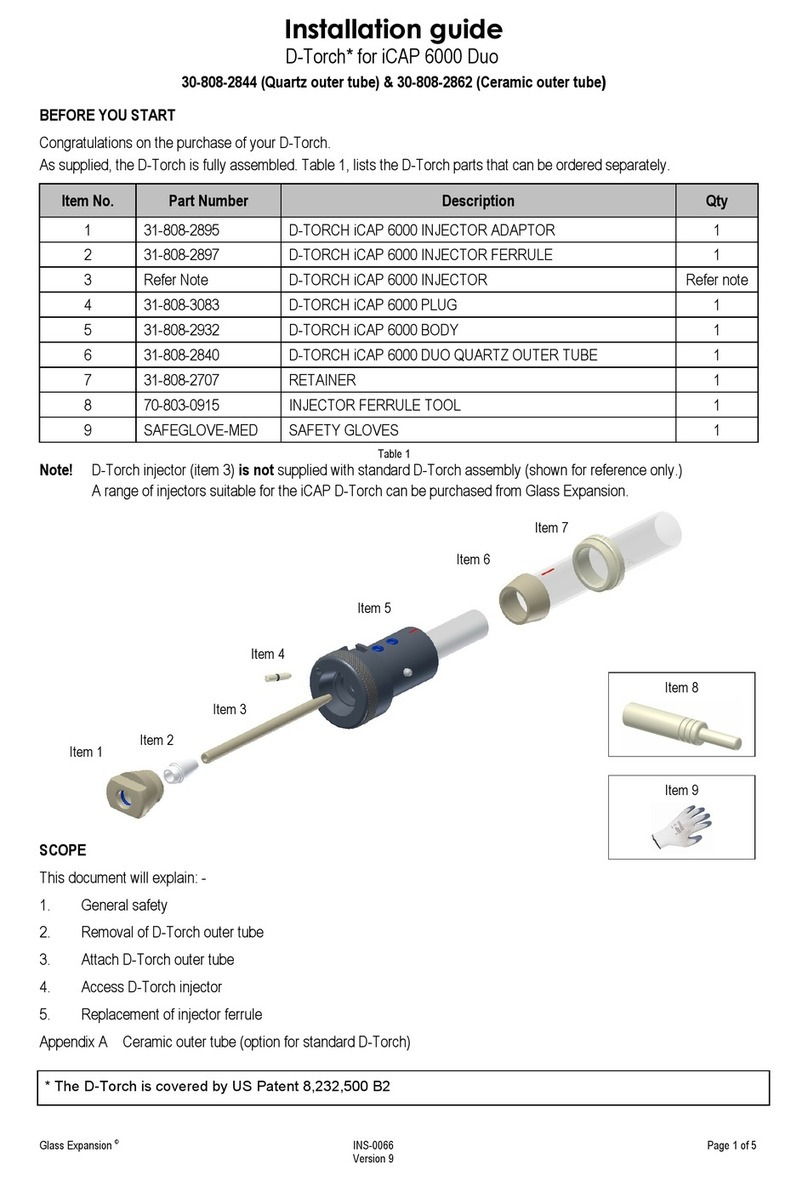
The D-Torch is supplied fully assembled. This document will explain how to dismantle and replace the D-Torch
components. Table 1 lists D-Torch components, they can be ordered separately from your D-Torch supplier.
Item No. Part Number Description Qty
1 31-808-2921 D-Torch injector retainer 1
2 Refer Note D-Torch injector Refer Note
3 31-808-3146 D-Torch Varian radial body 1
4 31-808-3062 D-Torch Varian radial quartz outer tube 1
5 31-808-2818 Outer tube retainer 1
6 SAFEGLOVE-MED Safety gloves 1
7 GAZ-06 GazFit connectors 6mm (four per pack) Refer Note
Table 1
Note:
Item 2. D-torch injector not supplied with standard D-torch assembly (Shown for reference only). There is a range of
different injectors suitable for this D-Torch – These can be purchased from your D-Torch supplier
Item 7. Use GazFit connectors to attach ICP tubes to the D-torch side arms. Four connectors are supplied (two
spare).
Scope
This document will explain how to: -
1. Install D-torch
2. Removal of D-Torch outer tube.
3. Re-attach D-Torch outer tube.
4. Access D-Torch injector.
Item 1
Item 4
Item 3
Item 2
Item 5
Item 6
* The D-Torch is covered by US Patent 7,847,210 B2
Item 7
D-Torch* with Quartz Outer Tube
Varian 700-ES or Vista Radial
30-808-3052
Glass Expansion © INS-0131 Page 2 of 4
Version 3
GENERAL SAFETY

Always wear safety gloves (item 6) and safety glasses when handling ICP torches.

It is recommended you read and understand this procedure before starting.

The person performing this work must be competent in making basic ICP connections

The ICP torches are made from high grade engineered materials – handle all torches with extreme care
1. INSTALL D-TORCH
D-Torch is fully compatible with the traditional Varian ICP torch. It can be installed and used in the same way.
1.1 Remove existing ICP Torch
1.2 Fit D-Torch in mounting block and connect gas tubes as normal.
1.1a 1.1b 1.2
1.3 Check position of D-Torch relative to RF coil.
There must be gap of 2 to 4mm between end of D-Torch inner tube and lower arm of RF coil (Fig 1.3b).
2 ~ 4mm gap
1.3a 1.3b
Once satisfied with the D-Torch position and gas line connections, the D-Torch is ready for use.
D-Torch* with Quartz Outer Tube
Varian 700-ES or Vista Radial
30-808-3052
Glass Expansion © INS-0131 Page 3 of 4
Version 3
2. REMOVAL OF D-TORCH OUTER TUBE
The D-Torch’s outer tube is accurately located in the D-Torch body with a retainer cap.
The outer tube can be removed at any time by completing the following steps.
2.1 If fitted, remove D-Torch assembly from ICP (not shown).
2.2 Unscrew retainer ½ turn.
2.3 Grip outer tube (lower end, near D-Torch body) then gently wriggle the tube from side to side (figure 2.3).
You will hear a ‘click’ as the outer tube releases.
2.4 Fully unscrew the retainer then carefully withdraw the outer tube from the D-Torch body
2.2. 2.3. 2.4.
3. RE-ATTACH D-TORCH OUTER TUBE
To fit the D-Torch outer tube to D-Torch body, complete the following steps.
3.1 Check that both locating surfaces (outer tube and torch body) are clean and free from damage.
3.2. Carefully slide the outer tube over the inner tube – the outer tube will self locate into the torch body.
3.3 Tighten the retainer to fix the outer tube in place.
Do not over tighten retainer - Only medium force by hand is necessary.
3.1. 3.2. 3.3.
3.4 If required, return torch assembly to ICP and connect as normal (not shown).
Note! D-Torch outer tube is permanently fitted with a taper ferrule - do not attempt to remove ferrule from outer tube.
Alumina inner tube is permanently fixed to D-Torch body - do not attempt to remove alumina inner tube from D-
Torch
body
D-Torch* with Quartz Outer Tube
Varian 700-ES or Vista Radial
30-808-3052
Glass Expansion © INS-0131 Page 4 of 4
Version 3
4. ACCESS THE D-TORCH INJECTOR
To access D-Torch injector, complete the following steps.
To remove the injector
4.1 Unscrew the injector retainer ½ turn
4.2 Grip injector and gently wriggle it from side to side.
You will hear a “click” as the injector releases from the D-Torch body.
4.3 Fully unscrew injector retainer from D-Torch body
Injector is now loose in D-Torch body
4.1 4.2 4.3
4.4 Pull out injector from D-Torch body
Check condition of the injector. Replace if damaged or deteriorated.
4.4a 4.4b
To reinstall the injector
4.5 Check that both locating surfaces are clean and free from damage
4.6 Slide injector into D-torch body.
4.7 Screw injector retainer to D-torch body.
Do not over tighten injector retainer - Only medium force by hand is necessary.
4.5 4.6 4.7
Note!
If you have questions regarding the D
-
Torch or this document, please contact your supplier.
Note!
A tapered ferrule is permanently fixed to the injector – Do not attempt to remove the ferrule from the injector.

This manual suits for next models

1

Other Glass Expansion Laboratory Equipment manuals

Glass Expansion 70-803-1923 User manual

Glass Expansion

Glass Expansion 70-803-1923 User manual

Glass Expansion D-Torch User manual

Glass Expansion

Glass Expansion D-Torch User manual

Popular Laboratory Equipment manuals by other brands

Westlab 665-134 product manual

Westlab

Westlab 665-134 product manual

Cron HDI-600 user manual

Cron

Cron HDI-600 user manual

Leica HistoCore AUTOCUT Instructions for use

Leica

Leica HistoCore AUTOCUT Instructions for use

THORLABS PMTSS Series user guide

THORLABS

THORLABS PMTSS Series user guide

Leica EM FC7 operating manual

Leica

Leica EM FC7 operating manual

Dymec DY-HI8011-90bt user manual

Dymec

Dymec DY-HI8011-90bt user manual

Haemonetics PCS 2 manual

Haemonetics

Haemonetics PCS 2 manual

Leica VT1000 S instruction manual

Leica

Leica VT1000 S instruction manual

Restek Q-sep 3000 Operators & service manual

Restek

Restek Q-sep 3000 Operators & service manual

ABS PH-ABT-UCFS-0220M owner's guide

ABS

ABS PH-ABT-UCFS-0220M owner's guide

Axis T8154 60 W SFP installation guide

Axis

Axis T8154 60 W SFP installation guide

Lumencor AURA Light Engine manual

Lumencor

Lumencor AURA Light Engine manual

Fisher Scientific 88861041 instruction manual

Fisher Scientific

Fisher Scientific 88861041 instruction manual

iSNATCH 64.2506.20 user manual

iSNATCH

iSNATCH 64.2506.20 user manual

Xylem TitroLine 7800 operating manual

Xylem

Xylem TitroLine 7800 operating manual

Extreme Networks ExtremeWireless AP-PSBIAS1P3-AFR Installing

Extreme Networks

Extreme Networks ExtremeWireless AP-PSBIAS1P3-AFR Installing

EUTHANEX SMARTBOX EA-34004C Setup and user's manual

EUTHANEX

EUTHANEX SMARTBOX EA-34004C Setup and user's manual

Fritsch premium PULVERISETTE 14 operating instructions

Fritsch

Fritsch premium PULVERISETTE 14 operating instructions

manuals.online logo
manuals.online logoBrands
  • About & Mission
  • Contact us
  • Privacy Policy
  • Terms and Conditions

Copyright 2025 Manuals.Online. All Rights Reserved.