Glem GFLP User manual

GFLP
GFEP
GFMP
manuale uso
operating
instructions pour l’usage
instroções de uso
manual de uso
3172618-001 ItIFPE.qxd:- 30/1/13 12:49 Página 1

1Selettore di temperatura.
2Selettore di funzione.
2
3 421
3Blocco apertura sportello. Quando questa
spia è illuminata, lo sportello del forno è
bloccato e non può essere aperto.
4Orologio elettronico di programmazione.
Pannello di comando
1Selettore di temperatura.
2Selettore di funzione.
3Blocco apertura sportello. Quando questa
spia è illuminata, lo sportello del forno è
bloccato e non può essere aperto.
4Orologio elettronico di programmazione.
3 42 1
3172618-001 ItIFPE.qxd:- 30/1/13 12:49 Página 2

3
Modello GFEP: /////
////
Modello GFMP-GFLP: / / /
////
Spegnimento del forno
Standard
Si utilizza per dolci e torte in cui il calore ricevu-
to deve essere uniforme al fine di ottenere una
consistenza morbida e spugnosa.
Standard ventilato
Adatto per arrosti e pasticceria. La ventola distri-
buisce uniformemente il calore all'interno del forno
riducendo il tempo e la temperatura di cottura.
/ Grill
Gratinatura e cottura arrosto superficiale.
Consente di dorare lo strato esterno degli ali-
menti senza modificarne la parte interna.
Indicato per alimenti piatti come bistecca, costi-
ne, pesce, pane tostato.
/ MaxiGrill
Consente di gratinare superfici più estese rispet-
to al Grill, oltre a fornire una maggiore potenza di
gratinatura, per ottenere una doratura più rapi-
da degli alimenti.
Il grill o il maxi grill può essere usato anche
insieme al girarrosto per carni di maggiori
dimensioni, come, per esempio, polli interi e
giunti di manzo o agnello .
MaxiGrill ventilato
Consente una cottura arrosto uniforme e nel
contempo effettua una doratura superficiale.
Ideale per le grigliate. Adatto in particolar modo
a porzioni di alimenti di grandi dimensioni come
pollame, cacciagione, ecc. Si consiglia di collo-
care il pezzo di carne sulla griglia del forno e il
vassoio al di sotto, per raccogliere il liquido o i
grassi di cottura.
Attenzione
Durante l'uso della funzione Grill, MaxiGrill o
MaxiGrill ventilata, lo sportello deve essere tenu-
to chiuso.
Turbo
La ventola distribuisce il calore proveniente
dalla resistenza nella parte posteriore del forno.
La temperatura uniforme consente di cucinare
gli alimenti su due altezze
contemporaneamente .
Elemento inferiore con Turbo (pizza)
Ideale per pizze, torte salate, crostate e dolci
alla frutta.
Inferiore
Il calore proviene solo dalla parte inferiore del
forno. Adatto per riscaldare piatti o far lievitare
impasti.
Scongelamento
Questa funzione è indicata per lo scongelamen-
to graduale degli alimenti, in particolare quelli
che vengono consumati senza necessità di cot-
tura, come ad esempio creme, pasta, torte,
paste, ecc.
Pirolisi
Questa funzione consente di realizzare un ciclo
di pulizia tramite pirolisi in cui si produce un pro-
cesso di ossidazione e carbonizzazione dei gras-
si accumulati durante la cottura grazie alle alte
temperature che si raggiungono all’interno del
forno. Durante il ciclo di pulizia, l’illuminazione
interna del forno resterà spenta.
Nota
La luce resta accesa durante tutte le funzioni di
cottura, tranne la Pirolisi.
Funzioni del forno
ITALIANO
3172618-001 ItIFPE.qxd:- 30/1/13 12:49 Página 3

4
Regolazione dell'orologio elettronico
Quando si collega il forno all'alimentazione, si
osserverà che sull'orologio appare l'indi-
cazione 00:00 lampeggiante. Toccando i senso-
ri o sarà possibile regolare l’orologio;
quindi si sentiranno due beep di seguito a con-
ferma dell'ora selezionata.
Per modificare l'ora, premere i tasti o
fino a quando lampeggeranno la parola e
l'ora corrente. Quindi premere il tasto .
Premendo i tasti o sarà possibile modi-
ficare l'ora. Infine, verranno emessi 2 beep di
seguito che confermerrano l’avvenuta modifica.
Funzionamento manuale
Una volta regolato l'orologio, il forno è pronto
per essere utilizzato. Selezionare una funzione
e una temperatura di cottura.
Quando inizia la cottura si noterà che il simbolo
si illumina in modo progressivo fino a quan-
do il forno si riscalda fino a raggiungere il 100%
della temperatura impostata.
Portare i comandi in posizione per spegnere
il forno.
Il simbolo si spegnerà in modo progressivo
via via che si riduce la temperatura interna del
forno.
Funzioni dell'orologio elettronico
Allarme acustico: genera un segnale acustico
al termine del tempo impostato; affinché fun-
zioni non è necessario che il forno sia acceso.
Durata di cottura: consente di cuocere per il
tempo impostato, trascorso il quale il forno si
spegnerà automaticamente.
Ora di fine cottura: consente di cuocere fino a
un orario definito, trascorso il quale il forno si
spegnerà automaticamente.
Tempo di cottura e fine cottura: consente di
programmare il tempo e l'ora di fine cottura.
Con questa funzione il forno si accenderà auto-
maticamente all'ora necessaria per cuocere per
il tempo impostato (Tempo di cottura) e termi-
nare la cottura in modo automatico all'ora indi-
cata (Fine cottura).
Funzione di sicurezza per i bambini: questa
funzione blocca il forno evitando che possa
essere messo in funzione da parte di bambini
piccoli.
Programmazione pirolisi
Programmazione dell'allarme acustico
1Premere il tasto fino a quando il simbolo
si illumina. Quindi premere il tasto .
2Selezionare il tempo dopo il quale si desidera
che l'orologio emetta l'allarme acustico toc-
cando i sensori o .
3Saranno emessi due beep di seguito, sarà
visualizzata l'ora corrente e il simbolo
resterà illuminato per indicare che l'allarme
acustico è già programmato.
4Trascorso il tempo impostato, il forno emette-
rà un allarme acustico e il simbolo ini-
zierà a lampeggiare.
5Premere qualsiasi tasto per disattivare l'allar-
me acustico; a questo punto il simbolo si
spegnerà.
In qualsiasi momento è possibile visualizzare il
tempo rimanente premendo i tasti o
fino a quando il simbolo lampeggerà e pre-
mendo poi il tasto . In questa fase è possi-
bile modificare il tempo selezionato premendo i
tasti o . Si sentiranno due beep di segui-
to a conferma della modifica.
Se si desidera visualizzare in modo permamen-
te il tempo rimanente, premere i tasti o
fino a quando il simbolo lampeg-
gerà e premendo poi il tasto in modo pro-
lungato. Il simbolo lampeggerà e la parola
si illuminerà. Per tornare all'ora corrente
basta premere di nuovo il tasto in modo
prolungato.
Comandi del forno
3172618-001 ItIFPE.qxd:- 30/1/13 12:49 Página 4

5
ITALIANO
Programmazione del tempo di cottura
1Premere i tasti o fino a quando il sim-
bolo si illumina. Quindi premere il tasto
.
2Selezionare la durata premendo i tasti
o.
3Saranno emessi due beep di seguito, sarà
visualizzata l'ora corrente e il simbolo
resterà illuminato per indicare che il forno si
spegnerà automaticamente.
4Selezionare una funzione e una temperatura
di cottura.
5Trascorso il tempo di cottura, il forno si spe-
gnerà, sarà emesso un segnale acustico e il
simbolo lampeggerà.
6Toccare qualsiasi tasto per bloccare il segna-
le acustico, il forno si riaccenderà.
7Portare i comandi in posizione per spe-
gnere il forno.
In qualsiasi momento è possibile visualizzare il
tempo di cottura rimanente premendo i tasti
o fino a quando il simbolo lampeggerà
e premendo poi il tasto . In questa fase è
possibile modificare il tempo selezionato pre-
mendo i tasti o . Si sentiranno due beep
di seguito a conferma della modifica.
Se si desidera visualizzare in modo permamente
il tempo rimanente, premere i tasti o fino
a quando il simbolo lampeggerà e premen-
do poi il tasto in modo prolungato. Il simbo-
lo lampeggerà e la parola si illumi-
nerà. Per tornare all'ora corrente basta premere
di nuovo il tasto in modo prolungato.
Programmazione dell'ora di fine cottura
1Premere i tasti o fino a quando il sim-
bolo si illumina. Quindi premere il tasto
.
2Selezionare l'ora di fine cottura premendo
i tasti o .
3Saranno emessi due beep di seguito, sarà
visualizzata l'ora corrente e il simbolo
resterà illuminato per indicare che il forno si
spegnerà automaticamente.
4Selezionare una funzione e una temperatura
di cottura.
5Raggiunto l'orario impostato, il forno si spe-
gnerà, sarà emesso un segnale acustico e il
simbolo lampeggerà.
6Toccare qualsiasi tasto per bloccare il segna-
le acustico, il forno si riaccenderà.
7Portare i comandi in posizione per spe-
gnere il forno.
In qualsiasi momento è possibile visualizzare
l'ora di fine cottura premendo i tasti o
fino a quando il simbolo lampeggerà e pre-
mendo poi il tasto . In questa fase è possi-
bile modificare l'ora di fine cottura selezionata
premendo i tasti o . Si sentiranno due
beep di seguito a conferma della modifica.
Questa funzione può essere utilizzata anche se il
forno è già in funzione. A tal fine seguire le istru-
zioni indicate a eccezione della numero 4.
Programmazione del tempo di cottura e del-
l'ora di fine cottura
1Premere i tasti o fino a quando il
simbolo si illumina. Quindi premere il
tasto .
2Selezionare la durata premendo i tasti
o.
3Saranno emessi due segnali acustici di
seguito, sarà visualizzata l'ora corrente e il
simbolo resterà illuminato.
4Premere i tasti o fino a quando il
simbolo si illumina. Quindi premere il
tasto .
5Selezionare l'ora di fine cottura premendo i
tasti o .
6Saranno emessi due segnali acustici di
seguito, sarà visualizzata l'ora corrente e il
simbolo resterà illuminato.
7Selezionare una funzione e una temperatu-
ra di cottura.
8Il forno resterà spento con i simboli
e illuminati. Il forno adesso è pro-
grammato.
3172618-001 ItIFPE.qxd:- 30/1/13 12:49 Página 5

6
9Quando si raggiunge l'ora di inizio cottura, il
forno si accenderà e resterà in funzione per
il tempo impostato.
10 Raggiunta l'ora di fine cottura programmata,
il forno si spegnerà, sarà emesso un segna-
le acustico e i simboli e lampeg-
geranno.
11 Toccare qualsiasi tasto per bloccare il
segnale acustico, il forno si riaccenderà.
12 Portare i comandi in posizione per spe-
gnere il forno.
Se si desidera modificare l'ora di fine cottura,
premere i tasti o fino a quando il sim-
bolo si illumina, quindi premere il tasto
. In questa fase è possibile modificare l'ora
selezionata premendo i tasti o . Si senti-
ranno due beep di seguito a conferma della
modifica.
Funzione di sicurezza per i bambini
Per attivare la funzione, premere il tasto in
modo prolungato; si sentiranno due beep di
seguito e il simbolo si illuminerà. L'orologio
a questo punto è bloccato.
Se si attiva la funzione di sicurezza per i bambi-
ni con il forno spento (selettore funzione su )
si impedirà l'accensione del forno. Se si attiva
questa funzione di sicurezza insieme a qualsia-
si funzione di cottura, si bloccherà solo l'orolo-
gio elettronico.
Per disattivare la funzione, premere il tasto
in modo prolungato; si sentiranno due beep di
seguito e il simbolo si spegnerà.
Attenzione
In caso di interruzione dell'alimentazione elettrica,
la programmazione dell'orologio elettronico sarà
cancellata e sull'orologio sarà visualizzata l'indica-
zione 00:00. Sarà quindi necessario procedere a
una nuova regolazione e programmazione.
3172618-001 ItIFPE.qxd:- 30/1/13 12:49 Página 6

9Al termine del ciclo di pulizia pirolitica, si
avvertirà un segnale acustico, il simbolo
lampeggerà e sarà visualizzata l'ora
corrente sul display dell'orologio.
10 Premere qualsiasi tasto dell'orologio per
bloccare il segnale acustico.
11 Portare in posizione il selettore delle fun-
zioni di cottura.
12 Il processo di riscaldamento del forno è com-
pleto, ma il forno è troppo caldo e non può
essere utilizzato. Fino a quando il forno non
si è raffreddato, si noterà che il motore di raf-
freddamento continuerà a funzionare, la
spia rimane illuminata e il simbolo
lampeggia sul display dell'orologio.
IMPORTANTE
A causa delle alte temperature all'interno del
forno, il processo di raffreddamento può durare
fino a 2 ore.
13 Dopo che il forno si è raffreddato, si spegne
la spia .
14 Premere il tasto
PIRO
per disattivare il lam-
peggiamento del simbolo .
IMPORTANTE
Per sbloccare lo sportello (spia accesa), il selet-
tore di funzione deve trovarsi in posizione . Se
non è stata seguita l'istruzione 11, portare il selet-
tore di funzione in posizione e attendere alcuni
minuti affinché lo sportello si sblocchi e la spia si
spenga.
15 Aprire lo sportello del forno e passare un
panno umido all'interno della cavità elimi-
nando la cenere che si è prodotta durante il
ciclo di pulizia. Nelle zone difficilmente
accessibili all’interno del forno sarà neces-
sario pulire con una spugna senza fibre
metalliche.
16 Dopo la pulizia del forno, non dimenticare
di rimettere in posizione i supporti e gli
accessori.
17 Il forno è pronto per una nuova cottura.
IMPORTANTE: Se si riscontrano problemi nella
programmazione e nel controllo di questa fun-
zione, consultare “Problemi nel funzionamento
della pirolisi”.
7
ITALIANO
PROGRAMMAZIONE E UTILIZZO DELLA FUNZIONE DI PIROLISI
Seguire le istruzioni qui riportate per effettuare
un ciclo di pulizia pirolitica:
1 IMPORTANTE: estrarre tutti gli accessori
(vassoi, griglie, supporti laterali per il
posizionamento dei vassoi, guide telesco-
piche) dall'interno del forno.
2Ruotare il selettore di funzione portandolo
sulla posizione Pirolisi .
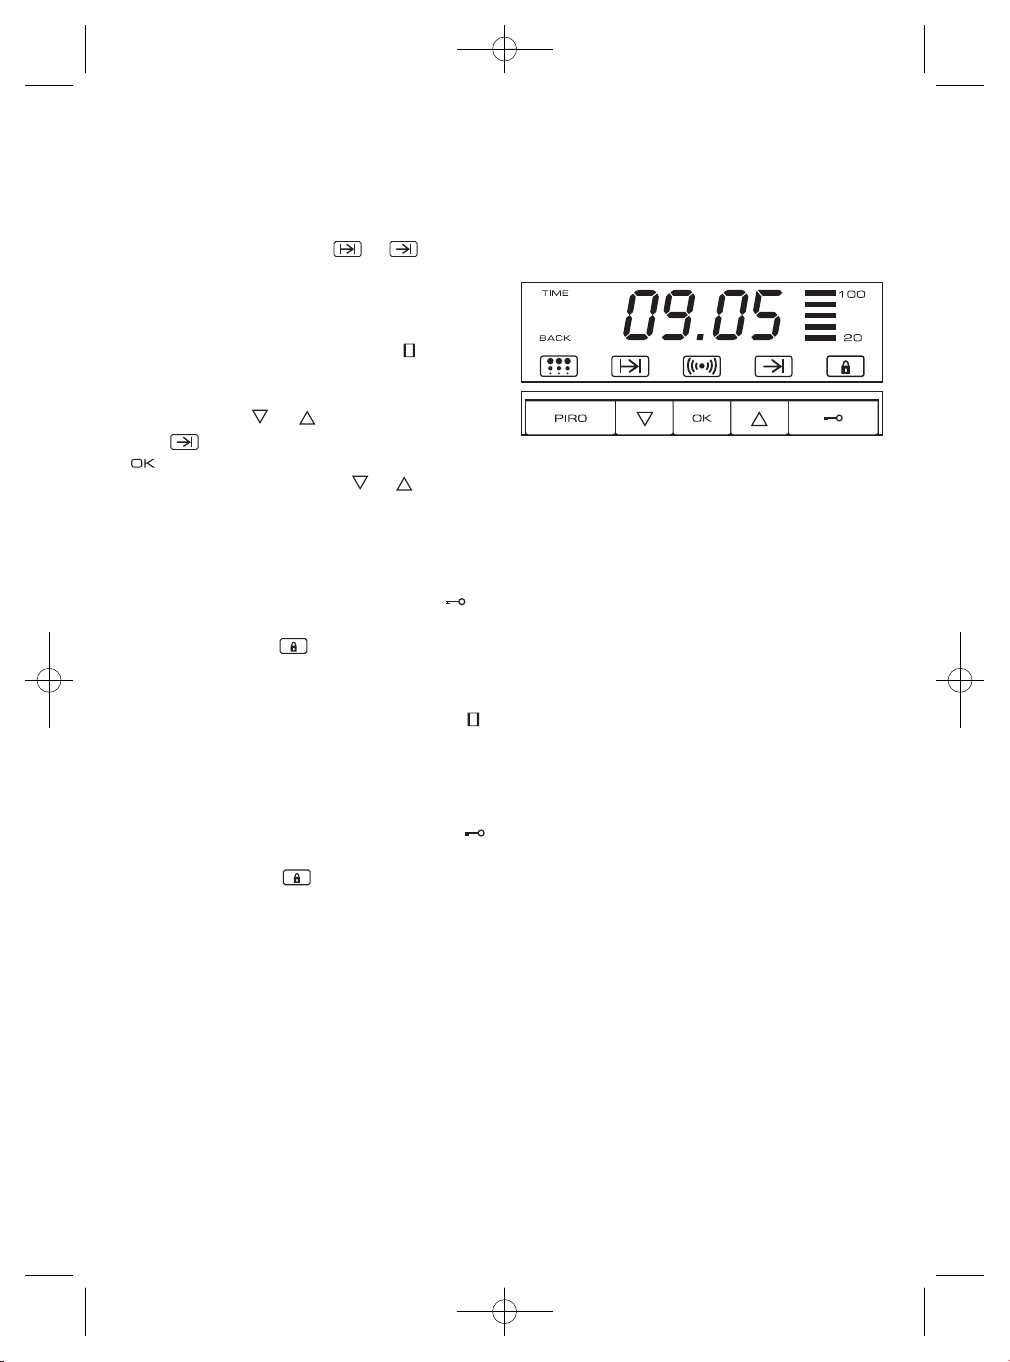
3Quindi premere il tasto
PIRO
dell'orologio; si
osserverà la dicitura PIRO sul display.
4Dopo qualche secondo, sul display dell'oro-
logio apparirà l'indicazione P2 (programma 2
di pirolisi) e anche il simbolo BACK sarà illu-
minato.
5A questo punto è possibile modificare il pro-
gramma di pirolisi su P1, P2 o P3 premendo
i tasti + o –, dove:
P1: Programma minimo. Durata 1 ora.
P2: Programma standard. Durata: 1,30 ora.
P3: Programma massimo. Durata: 2 ore.
6Dopo qualche secondo o premendo il tasto
PIRO
si sentiranno 2 beep di seguito a con-
ferma del programma selezionato.
7In questa fase è ancora possibile modificare
il programma di pirolisi premendo il tasto
PIRO
e i tasti + o –.
8Dopo un breve tempo, sul display dell'orolo-
gio sarà visualizzato il tempo restante al ter-
mine del programma selezionato e i simboli
e BACK saranno illuminati. La spia si
illuminerà e lo sportello del forno non potrà
più essere aperto poiché inizierà la fase di
riscaldamento.
IMPORTANTE: A questo punto, il forno è pro-
grammato per effettuare il ciclo di pulizia piroliti-
ca. Mentre si completa questo ciclo, non è pos-
sibile selezionare alcuna funzione dell'orologio
del forno, tranne la funzione di sicurezza per
bambini. Non tentare di aprire lo sportello del
forno poiché potrebbe causare l'interruzione del
processo di pulizia.
3172618-001 ItIFPE.qxd:- 30/1/13 12:49 Página 7

8
ANNULLAMENTO DEL CICLO DI PULIZIA PIROLITICA
La pirolisi è una funzione automatica e in quan-
to tale può essere attivata solo tramite program-
mazione dell'orologio. Per annullare un ciclo di
pulizia occorre resettare la programmazione del
forno attenendosi alle seguenti istruzioni:
1Portare in posizione il selettore di funzione.
2Sbloccare lo sportello del forno.
3Annullare la programmazione Pirolisi dell'o-
rologio.
1 Portare in posizione il selettore di fun-
zione. Il forno interromperà il riscaldamento.
Attendere qualche minuto prima di seguire le
istruzioni per sbloccare lo sportello.
2 Sbloccare lo sportello del forno. Per annul-
lare la programmazione del ciclo di pulizia è
essenziale che lo sportello del forno sia
sbloccato. A tal fine ricordare quanto segue:
a) Sblocco dello sportello dopo 30 minuti
di ciclo di pulizia. Se il forno è rimasto in
funzione per un periodo superiore ai 30
minuti, lo sblocco dello sportello avverrà
automaticamente quando l'apparecchio
si sarà raffreddato fino a raggiungere la
temperatura di sicurezza. A questo punto
la spia si spegnerà.
b) Sblocco dello sportello nei primi 30
minuti del ciclo di pulizia (a bassa tem-
peratura). Se sono trascorsi meno di 30
minuti dal ciclo di pulizia, procedere allo
sblocco manuale dello sportello. Attenersi
alle seguenti istruzioni:
1Ruotare il selettore di funzione portan-
dolo sulla posizione .
2Attendere circa 1 minuto.
3Ruotare il selettore di funzione portan-
dolo sulla posizione .
4Dopo circa 1 minuto si spegnerà la
spia e sarà possibile aprire lo spor-
tello del forno.
3 Annullare la programmazione Pirolisi del-
l'orologio. Per annullare la programmazione
procedere come segue:
1Ruotare il selettore di funzione portando-
lo sulla posizione e poi tornare nuova-
mente nella posizione .
2Premere il pulsante
PIRO
per alcuni
secondi.
3Di seguito il display dell'orologio mostrerà
l'ora corrente e il simbolo scomparirà.
3172618-001 ItIFPE.qxd:- 30/1/13 12:49 Página 8

9
ITALIANO
PROBLEMI NEL FUNZIONAMENTO DELLA PIROLISI
PROBLEMA CAUSA SOLUZIONE
Gli accessori e i supporti dei
vassoi sono danneggiati.
Non sono stati rimossi prima
del ciclo di pulizia pirolitica.
È necessario sostituirlo e
rimuoverli prima dei successivi
cicli di pulizia.
Il colore dello smalto è
cambiato o sono comparse
delle macchie.
La composizione chimica di
alcuni alimenti può causare
questi cambiamenti dello
smalto.
È un caso normale che non
pregiudica le proprietà dello
smalto.
Lo sportello del forno è
bloccato, la spia è accesa
ma il forno non riscalda.
Il selettore di funzione è stato
portato in posizione ma
non è stata effettuata nessuna
operazione aggiuntiva.
Spegnere il forno e attenersi
alle istruzioni di sblocco dello
sportello nei primi 30 minuti
di funzionamento a bassa
temperatura.
Quindi selezionare la funzione
Pirolisi seguendo tutte le
istruzioni in modo corretto.
Ho ruotato il selettore di
funzione in posizione , ho
premuto il tasto
PIRO
, sullo
schermo vedo l'indicazione P1,
P2 o P3 ma la spia non si
illumina e il forno non riscalda.
Lo sportello del forno non è
chiuso correttamente, quindi
non è possibile bloccare
l'apertura dello sportello.
Controllare lo sportello e
accertarsi che sia ben chiuso.
Ho ruotato il selettore di
funzione in posizione ,
ho premuto il tasto
PIRO
, sullo
schermo vedo l'indicazione P1,
P2 o P3 ma la spia non si
illumina e il forno non riscalda.
L'interruttore dello sportello
non ha funzionato anche se lo
sportello è chiuso
correttamente.
Chiamare il servizio di
assistenza tecnica poiché
l'interruttore dello sportello
è guasto.
Ho programmato la funzione
pirolitica, il forno funziona
correttamente ma la spia
non si accende.
La spia non funziona
correttamente.
Chiamare il servizio di
assistenza tecnica.
Il programma di pirolisi è
terminato e il forno è freddo,
ma lo sportello è bloccato e il
simbolo lampeggia.
Non è stato portato in
posizione il selettore di
funzione al termine del
programa di pirolisi.
1. Portare in posizione
il selettore di funzione
e attendere 1 minuto.
2. Ruotare il selettore di
funzione portandolo sulla
posizione e attendere
1 minuto.
3. Portare nuovamente in
posizione il selettore di
funzione e attendere che la
spia si spenga.
4. Premere il pulsante
PIRO
per 3 secondi.
3172618-001 ItIFPE.qxd:- 30/1/13 12:49 Página 9

10
PROBLEMA CAUSA SOLUZIONE
Ho portato in posizione
il selettore di funzione e lo
sportello continua a essere
bloccato.
Il forno non si è raffreddato
fino a raggiungere la
temperatura di sicurezza.
Attendere che la temperatura
si abbassi e la spia si
spenga. Quindi annullare la
programmazione Pirolisi
dell'orologio.
Ho portato in posizione il
selettore di funzione, il forno
è freddo e lo sportello continua
a essere bloccato.
Non sono state seguite in
modo corretto le istruzioni
fornite per l'annullamento della
funzione.
1. Portare in posizione il
selettore di funzione e
attendere 1 minuto.
2. Ruotare il selettore di
funzione portandolo sulla
posizione e attendere
1 minuto.
3. Portare nuovamente in
posizione il selettore di
funzione e attendere che
la spia si spenga.
Ho portato in posizione il
selettore di funzione e lo
sportello è sbloccato, ma il
simbolo resta illuminato
e sul display è visualizzato il
tempo rimanente del ciclo di
pulizia.
Non sono state seguite in
modo corretto le istruzioni
fornite per l'annullamento della
funzione.
Seguire le istruzioni di
annullamento della
Programmazione pirolisi
dell'orologio.
Uso del girarrosto
Il girarrosto è composto da un motore rotativo,
un gancio di supporto e uno spiedo completo di
manico. Per utilizzarlo, procedere come segue:
1Collegare il gancio (A) al supporto (B) situato
nella parte superiore del forno. Vedi figura.
2Inserire un'estremità dello spiedo nel raccordo
del motore (C). Appoggiare l'altra estremità sul
gancio (A).
3Posizionare il selettore sulla funzione o
.Attenzione
Ricordarsi sempre di svitare il manico dallo
spiedo prima di procedere con la cottura,
altrimenti non sarà possibile chiudere la porta
del forno .
C
B
A
3172618-001 ItIFPE.qxd:- 30/1/13 12:49 Página 10

11
ENGLISH
CONTROL PANEL
1Temperature selector.
2Function selector.
3 421
3Door lock. When this pilot light is on, it indica-
tes that the oven door is locked and cannot
be opened.
4Electronic clock.
3 42 1
1Temperature selector.
2Function selector.
3Door lock. When this pilot light is on, it indica-
tes that the oven door is locked and cannot
be opened.
4Electronic clock.
3172618-001 ItIFPE.qxd:- 30/1/13 12:49 Página 11

12
Model GFEP: /////
////
Model GFMP-GFLP: ////
///
Switch off oven
Conventional
It is used for sponges and cakes where the heat
received must be uniform to achieve a spongy
texture.
Conventional with fan
Appropriate for roasts and cakes. The fan spre-
ads the heat uniformly inside the oven.
/ Grill
For preparing dishes with superficial roasting. It
allows the outer layer to be browned without
affecting the inside of the food. Ideal for flat
food, such as steaks, ribs, fish, toast.
/ MaxiGrill
Allows greater surfaces to be prepared, than
with the grill, together with higher power redu-
cing the time required for browning of the food.
The grill or maxigrill can also be used in
combination with the turnspit for meat items of
greater volume, such as whole chickens or joints
of beef or lamb.
MaxiGrill with fan
Allows uniform roasting at the same time as sur-
face browning. Ideal for grills. Special for large
volume pieces, such as poultry, game, etc. It is
recommended to put the item on a rack with a
tray beneath to collect the stock and juices.
Caution
While using the Grill, MaxiGrill or MaxiGrill with
fan, the door must be kept closed.
Turbo
The fan distributes the heat coming from an
element located at the back of the oven. As a
result of the evenly distributed temperature,
food can be cooked on two levels at the same
time.
Lower Element with Turbo (pizza)
Ideal for baking pizzas, pies, and fruit tarts or
sponges.
Lower element
Heats only from beneath. Suitable for heating
dishes and raising pastry and similar.
Defrosting
This cooking mode is suitable for gently defros-
ting of food. In special food to be consumed
unwarmed, e.g.: cream, custard, pastry, tarts,
cakes, fruit, etc.
Pyrolytic Function
This programme allows you to carry out a pyroly-
tic cleaning cycle which involves the oxidisation
and carbonisation of grease accumulated during
cooking, through the high temperatures that are
reached inside the oven. During the cleaning
cycle the light inside the oven will remain off.
NB
The light remains on through all cooking func-
tions except the pyrolytic function.
Oven Functions
3172618-001 ItIFPE.qxd:- 30/1/13 12:49 Página 12

13
ENGLISH
Use of the Oven
Setting the time on the Electronic Clock
When the oven is connected to the power sup-
ply, the word and the indication 00:00
flash on the display. Press or to set the
time on the clock. The clock beeps twice to con-
firm the selected time.
If you wish to modify the time, press or
until the word and the current time flash
on the screen. Press . Then press or
to modify the time. The clock beeps twice to
confirm the modification.
Manual Operation
The oven is ready to be used when the clock has
been set. Select a cooking function and a tem-
perature.
When you begin cooking, symbol lights up
gradually until the oven heats up 100% to the
selected temperature.
Set the controls to to turn the oven off.
Symbol gradually goes out as the tempera-
ture inside the oven drops.
Functions of the Electronic Clock
Alarm: Creates an alarm signal when the period
of time finishes; the oven does not need to be in
use in order to use this function.
Cooking Time: To cook for a selected length of
time; the oven turns itself off automatically
when the time finishes.
End Cooking Time: To cook until a set time; the
oven turns itself off automatically when the time
finishes.
Cooking time and End Cooking Time: To cook
for a selected length of time and end at a set
time. When this function is set, the oven comes
on automatically at the time required in order to
cook for the set length of time (Cooking time)
and end automatically at the indicated time
(End Cooking Time).
Child Safety Function
This function blocks the oven to prevent small
children from interfering with the controls.
Programming the Pyrolytic function
Programming the Alarm
1Press until symbol lights up. Press
.
2Set the period of time after which you wish
the alarm to sound by pressing or .
3The clock beeps twice, the current time is
displayed and symbol lights up perma-
nently to indicate that the alarm has been
set.
4When the set period of time comes to an end,
the alarm sounds and symbol starts to
flash.
5Press any button to stop the alarm; symbol
goes out.
You can consult the remaining time at any
moment by pressing or until symbol
flashes and then pressing . You can
also modify the set time at this point by press-
ing or . The clock beeps twice to confirm
the change.
If you wish the remaining time to be displayed
until the end of the set period of time, press
or until symbol flashes and then
press and keep it pressed in. Symbol
flashes and the word lights up. Keep
pressed in again to return to the real time.
Setting the Cooking Time
1Press or until symbol lights up.
Press .
2Select the period of time you wish to cook for
by pressing or .
3The clock beeps twice, the current time is dis-
played and symbol lights up permanent-
ly to indicate that the oven will turn itself off
automatically.
4Select a cooking function and temperature.
3172618-001 ItIFPE.qxd:- 30/1/13 12:49 Página 13

14
5When the cooking time comes to an end, the
oven turns itself off, the alarm sounds and
symbol flashes.
6Press any button to stop the alarm and turn
the oven back on again.
7Set the controls to to turn the oven off.
You can consult the remaining cooking time at
any moment by pressing or until symbol
flashes and then pressing . You can
also modify the set time at this point by press-
ing or . The clock beeps twice to confirm
the change.
If you wish the remaining time to be displayed
until the end of the set period of time, press
or until symbol flashes and then
press and keep it pressed in. Symbol
flashes and the word lights up. Keep
pressed in again to return to the real time.
Setting the End Cooking Time
1Press or until symbol lights up.
Press .
2Select the time you wish the cooking process
to finish at by pressing or .
3The clock beeps twice, the current time is dis-
played and symbol lights up permanent-
ly to indicate that the oven will turn itself off
automatically.
4Select a cooking function and temperature.
5When the set time is reached, the oven turns
itself off, the alarm sounds and symbol
flashes.
6Press any button to stop the alarm and turn
the oven back on again.
7Set the controls to to turn the oven off.
You can consult the end cooking time at any
moment by pressing or until symbol
flashes and then pressing . You can
also modify the end cooking time at this point by
pressing or . The clock beeps twice to
confirm the change.
This function can be used even when you are
already using the oven. To do this, follow the
instructions indicated above except point num-
ber 4.
Setting the Cooking Time and the End
Cooking Time
1Press or until symbol lights up.
Press .
2Select the period of time you wish to cook
for by pressing or .
3The clock beeps twice, the current time is
displayed and symbol lights up perma-
nently.
4Press or until symbol lights up.
Press .
5Select the time you wish the cooking process
to finish at by pressing or .
6The clock beeps twice, the current time is
displayed and symbol lights up perma-
nently.
7Select a cooking function and temperature.
8The oven remains off with symbols and
lit up. Your oven is set.
9When the time to start cooking is reached,
the oven starts up and cooks for the set
period of time.
10 When the set end cooking time is reached,
the oven turns itself off, the alarm sounds
and symbols and flash.
11 Press any button to stop the alarm and turn
the oven back on again.
12 Set the controls to to turn the oven off.
You can modify the end cooking time by
pressing or until symbol lights up
and then pressing . You can now modify the
end cooking time by pressing or . The
clock beeps twice to confirm the change.
3172618-001 ItIFPE.qxd:- 30/1/13 12:49 Página 14

15
ENGLISH
Child Safety Function.
Keep pressed in to activate this function.
The clock beeps twice and symbol lights
up. The clock is blocked.
If the child safety function is activated when
the oven is off (function control set to ), then
the oven cannot be turned on until the func-
tion is deactivated. If the child safety function
is activated when the oven is set to a cooking
function, then the clock settings cannot be
modified until the function is deactivated.
Keep pressed in to deactivate this function.
The oven beeps twice and symbol goes
out.
Important
In the event of a power cut, all the electronic
clock settings are deleted and the indication
00:00 flashes on the display. It is necessary to
set the time and programme the clock again.
3172618-001 ItIFPE.qxd:- 30/1/13 12:50 Página 15

16
PROGRAMMING AND OPERATING THE PYROLYTIC FUNCTION
Follow the instructions below to carry out a
pyrolytic cleaning cycle:
1 IMPORTANT: Remove all accessories
(shelves, grids, side supports to hold up
the shelves, telescopic guide rails) from
inside the oven.
2Turn the cooking control dial to Pyrolysis
position .
3Next, press the
PIRO
key, the word PIRO
should appear on the timer display.
4After a few seconds, P2 (pyrolysis program-
me 2) will appear on the timer display, the
BACK symbol will also remain lit up.
5You can now change the pyrolysis program-
me to P1, P2 or P3 by pressing the + or –
keys:
P1: Minimum programme. Duration 1 hour
P2: Standard programme. Duration 1 hour
and 30 minutes
P3: Maximum programme. Duration 2 hours
6You will hear 2 consecutive beeps after seve-
ral seconds or by pressing the
PIRO
key con-
firming the chosen programme.
7You can still change the pyrolysis program-
me by pressing the
PIRO
key and the + or –
keys.
8After a short time, you will see the time
remaining for the selected programme to
end and the symbols and BACK lit up
on the timer display. The pilot light will
turn on and the oven door cannot be ope-
ned, as the heating will have begun.
IMPORTANT: At this point, the oven is program-
med and the pyrolytic cleaning cycle is under-
way. During the cycle, none of the timer func-
tions can be selected, except the child lock. Do
not try to open the oven door as it may interrupt
the cleaning process.
9When the pyrolytic cleaning cycle has finis-
hed, an alarm will sound, the symbol
will flash and you will see the correct time on
the display.
10 Press any of the timer’s keys to disable the
alarm.
11 Set the cooking control dial to position .
12 The oven’s heating process has ended,
however the oven is extremely hot and can-
not be used. The cooling motor will operate
until the oven cools down, pilot light
will remain on and the symbol will flash
on the timer display.
IMPORTANT
The cooling process may last up to 2 hours owing
to the high temperatures inside the oven.
13 Once the oven has cooled down, pilot light
will automatically turn off.
14 Press the
PIRO
key to stop symbol 9 flas-
hing. .
IMPORTANT
To open the door (pilot light on), the control dial
must be in position . If you did not follow ins-
truction 11 set the control dial to position and
wait a few minutes until the door unlocks and the
pilot light switches off.
15 Open the oven door and wipe the inside with
a damp cloth, cleaning up the ash from the
cleaning cycle. Areas in the oven that are dif-
ficult to access will need to be cleaned with
a non-metallic fibre scourer.
16 Once the oven is clean, do not forget to
replace the supports and accessories.
17 The oven is now ready to be used.
IMPORTANT: If any incidents are detected in
the programming and operating of this func-
tion, consult the section “Incidents while
Operating the Pyrolytic Function”.
3172618-001 ItIFPE.qxd:- 30/1/13 12:50 Página 16

17
ENGLISH
CANCELLING THE PYROLYTIC CYCLE
Pyrolysis is an automatic function and therefore
can only be activated from the timer programme.
To cancel a cleaning cycle it is necessary to reset
the oven, following the instructions below:
1Set the control dial to position .
2Unlock the oven door.
3Cancel the pyrolysis programme.
1 Set the control dial to position . The
oven will no longer heat up. Wait a few minu-
tes before continuing with the instructions to
unlock the door.
2 Unlock the oven door. To cancel the clea-
ning cycle, the oven door must be unlocked.
To do so, consider the following:
a) Unlocking the door 30 minutes after
the cleaning cycle. If the oven has been
operating for more than 30 minutes, the
door will unlock automatically once the
oven has cooled down to the safe tempe-
rature. Then, pilot light will switch off.
b) Unlocking the door in the first 30 minu-
tes (at a low temperature). Within the
first 30 minutes the oven door will unlock
automatically. Follow the instructions
below:
1Turn the control dial to position .
2Wait for approximately 1 minute.
3Turn the control dial to position .
4Approximately, 1 minute later pilot
light will turn off and the oven door
can be opened.
3 Cancel the pyrolysis programme. To can-
cel the programme you must:
1Turn the control dial to position and
then to position .
2Press the
PIRO
key for 3 seconds.
3Next, the timer display will show the
correct time and symbol will disap-
pear.
3172618-001 ItIFPE.qxd:- 30/1/13 12:50 Página 17

18
INCIDENTS WHEN OPERATING THE PYROLYTIC FUNCTION
INCIDENT CAUSE SOLUTION
My accessories and shelf
supports are damaged.
You have not removed the acces-
sories and supports during the
pyrolytic cleaning cycle.
You must replace them and
remove them in later cleaning
cycles.
The enamel colour has
changed and stains have appe-
ared.
The chemical composition of
some foodstuffs may cause
changes in the enamel.
This is normal and does not
damage the properties of the
enamel.
The oven door is locked, pilot
light is lit up but the oven is
not hot.
You have turned the control
dial to position and no
other additional operation has
been performed.
Switch off the oven and follow
the instructions to unlock the
door in the first 30 minutes at a
low temperature.
Next, select the pyrolytic
function, carefully following the
instructions.
I have turned the control dial to
position , pressed the
PIRO
key, I can see the P1, P2 or P3
on the display but the pilot light
is not lit up and the oven is
not heating up.
The oven door is not closed
properly, so the door cannot be
locked.
Check the door and make sure
that it is closed properly.
I have turned the control dial to
position , pressed the
PIRO
key, I can see the P1, P2 or P3
on the display but the pilot light
is not lit up and the oven is
not heating up.
The door switch is not working
even though the door is
properly closed.
Call Technical Assistance
Service as there is a fault in
the door switch.
I have programmed the
pyrolysis function, the oven is
working properly but pilot light
is not lit up.
Pilot light does not work pro-
perly.
Call the Technical Assistance
Service.
The pyrolysis programme has
ended and the oven is cold, but
the door is locked and symbol
is flashing.
You did not turn the control dial
to position when the pyroly-
sis programme ended.
1. Turn the control dial to
position and wait for 1
minute.
2. Turn the control dial to posi-
tion and wait for 1 minu-
te.
3. Turn the control dial to posi-
tion again and wait until
pilot light turns off.
4. Press the
PIRO
key for 3
seconds.
3172618-001 ItIFPE.qxd:- 30/1/13 12:50 Página 18

19
ENGLISH
INCIDENT CAUSE SOLUTION
The control dial is in position
and the door is still locked.
The oven has not cooled down
to the safe temperature.
Wait until the temperature
lowers and pilot light turns
off. Then, cancel the pyrolysis
programme.
The control dial is in position
, the oven is cold and the
door is still locked.
You have not followed the
instructions to cancel the
operation correctly.
1. Turn the control dial to
position and wait for 1
minute.
2. Turn the control dial to
position and wait for 1
minute.
3. Turn the control dial to posi-
tion again and wait until
pilot light turns off.
I have put the control dial in
position and the door is
unlocked, however symbol
is still lit up and the
remaining time of the cleaning
cycle can be seen on the
display.
You have not followed the
instructions to cancel the
operation correctly.
Follow the instructions to
cancel the pyrolysis
programme.
Use of Turnspit
The turnspit accesory consists of a rotary motor,
a support hook and a complete spit with handle.
It is used in the following way:
1Connect the hook (A) to the support (B)
situated at the top of the oven. See figure.
2Insert the end of the spit in the motor fitting
(C). The other end of the spit is supported on
the hook (A).
3Set the mode selector to or function.
Warning
Do not forget to unscrew the handle from the
spit before cooking, otherwise it will not be
possible to close the oven door.
C
B
A
3172618-001 ItIFPE.qxd:- 30/1/13 12:50 Página 19

20
Panneau Frontal de Commande
1Sélecteur de températures.
2Sélecteur de fonctions.
3 421
3Blocage Ouverture Porte. Quand ce témoin
est allumé, cela indique que la porte du four
est bloquée et ne peut être ouverte.
4Horloge électronique.
1Sélecteur de températures.
2Sélecteur de fonctions.
3Blocage Ouverture Porte. Quand ce témoin
est allumé, cela indique que la porte du four
est bloquée et ne peut être ouverte.
4Horloge électronique.
3 42 1
3172618-001 ItIFPE.qxd:- 30/1/13 12:50 Página 20
This manual suits for next models
2
Table of contents
Languages: