Glem GHF527SI User manual


- Thanksverymuchfor choosing our product, please carefully read the
following important information regarding installation safety and
maintenance. And Keep this information booklet accessible for further
consultations.
INSTRUCTION MANUAL
BUILT-IN HOOD
1

Dear Customer,
If you follow the recommendations contained in this Instruction Manual, our
appliance will give you constant high performance and will remain efficient
for many years to come.
CONTENTS
RECOMMENDATIONS AND SUGGESTIONS
CHARACTERISTICS
INSTALLATION & USE
MAINTENANCE
TROUBLE SHOOTING
WARRANTY CARD
RECOMMENDATIONS AND SUGGESTIONS
INSTALLATION
* The manufacturer will not be held liable for any damages resulting from
incorrect or improper installation.
* Please read this instruction manual before installing and using this
rangehood. Please keep this instruction manual in a safe place for future
reference.
* Only a qualified and trained service technician can undertake the work of
installation and servicing.
* Check that the main voltage corresponds to the one indicated on the rating
plate fixed inside the hood.
* Do not connect the hood to exhaust ducts carrying combustion fumes
(boilers, fireplaces, etc.)
* If the hood is used in conjunction with non-electrical appliances (e. g. gas
burning appliances), a sufficient degree of ventilation must be guaranteed in
the room in order to prevent the backflow of exhaust gas. The kitchen must
have an opening directly with the open air in order to guarantee the entry of
clean air.
* The minimum distance is 750mm from the cooker hood to a gas hob, and
2

3
is 650mm to an electric hob. If the installation instructions for gas hobs
specify a greater distance, this must be taken into account.
NOTICE: Two or more people are required to install or move this appliance.
Failure to do so can cause physical injuries.
USE
* The rangehood has been designed only for domestic use to eliminate
kitchen fumes.
* Never use the hood for purposes other than what it has been designed for.
* Never leave high naked flames under the hood when it is in operation.
* Adjust the flame intensity to direct it onto the bottom of the pan only;
making sure that it does not engulf the pan sides.
* Deep fat fryer must be continuously monitored during use: overheated oil
can burst into flame.
* The hood should not be used by children or person not instructed in its
correct use.
MAINTENANCE
* Proper maintenance of the rangehood will assure proper performance of
the unit.
* Disconnect the hood from the main supply before carrying out any
maintenance work.
* Clean and/or replace aluminum grease filters and activated charcoal filters
after specified period of time.
* Clean the hood using a damp cloth and a neutral liquid detergent.
* DISPOSAL: Do not dispose this product as unsorted municipal waste.
Collection of such waste separately for special treatment is necessary.
WARNING!!
In certain circumstances electrical appliances may be a danger hazard.
* Do not check the status of the filters while the rangehood is operating.
* Do not touch the light bulbs after appliance use.
* Do not disconnect the appliance with wet hands.
* Avoid free flame, as it is damaging for the filters and a fire hazard.

4
* Constantly check food frying. Overheated oil may become a fire hazard.
* Disconnect the electrical plug prior to any maintenance.
* Children don’t recognize the risks of electrical appliances. Therefore use or
keep the appliance only under supervision of adults and out of the reach
from children.
* Don’t use this product outdoors.
* This appliance is not intended for use by persons (including children) with
reduced physical, sensory or mental capabilities, or lack of experience and
knowledge, unless they have been given supervision or instruction,
concerning use of the appliance by a person responsible for their safety.
Children should be supervised to ensure that they do not play with the
appliance.
* There should be adequate ventilation of the room where the range hood is
used at the same time as appliances burning gas or other fuels.
* There is a fire risk if cleaning is not carried out in accordance with
instructions.
* Do not flambé under the rangehood.
* The exhaust air must not be discharged into a flue which is used for
exhausting fumes from appliances burning gas or other fuels.
CHARACTERISTICS
DIMENSIONS

5
INSTALLATION & USE
Note 1 : On stainless steel hoods, carefully remove the plastic protective film
from all exterior surfaces of the hood prior to final installation.
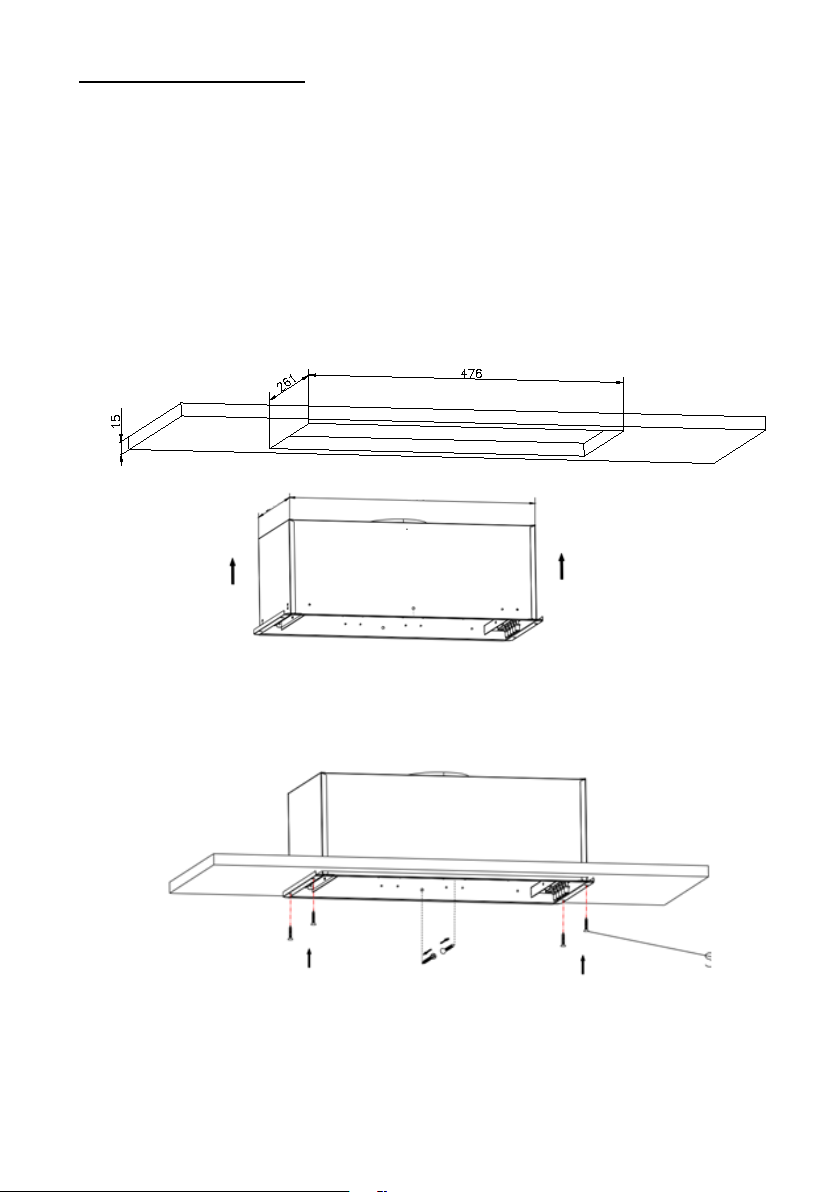
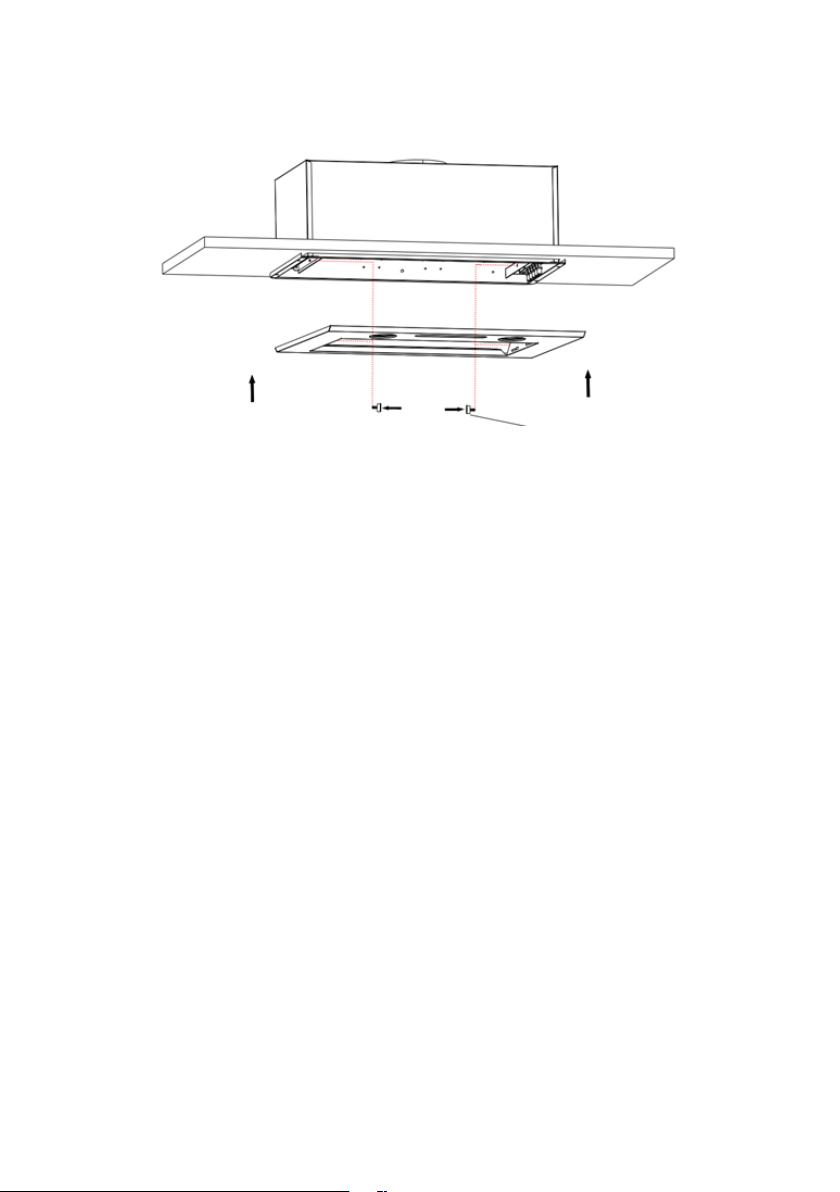
Note 2: At least two people will be required to mount the hood.
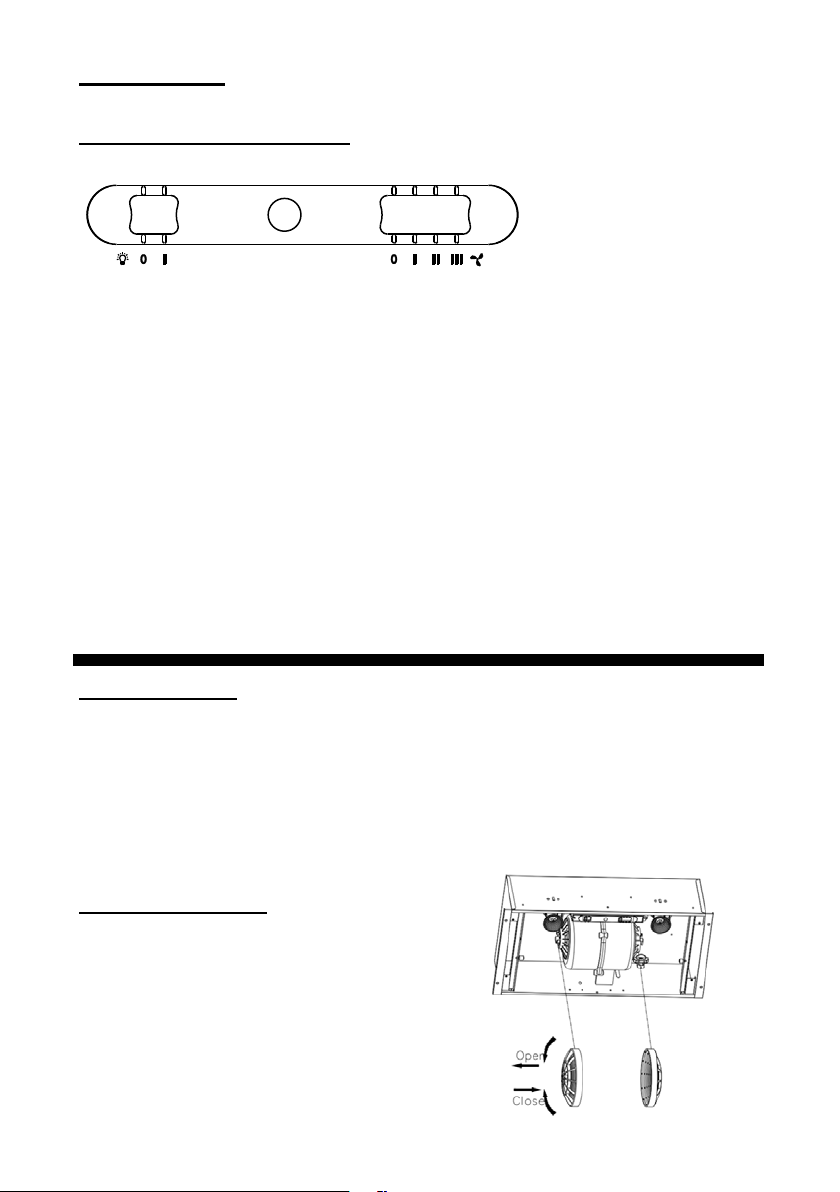
DESCRIPTION / CONNECTIONS
The hood may be installed in the Ducting or
the Recalculating version.
Ducting version
The hood draws cooking fumes saturated with
fumes and odour through the grease filters
and expels it to the outside through an outlet
pipe.
Caution: To reduce the risk of fire, use of
metal ductwork is preferred.
Do not use flammable material to convey
exhaust air.
1. Decide where the ductwork will run between the hood and the outside.
2. A straight, short duct run will allow the hood to perform most efficiently.
3. Long duct runs, elbows, and transitions will reduce the performance of
the hood. Use as few of them as possible. Larger ducting may be
required for best performance with longer duct runs.
4. It is recommended that φ120mm round duct is to be used.
5. The air must not be discharged into a flue that is used for exhausting
fumes from appliances burning gas or other fuels. Regulations
concerning the discharge of air have to be followed. Check with the
local authority and building code for exhaust ducting requirements.
6. Install a roof/wall cap. Connect round ductwork to cap and work back
towards hood location.

6
Recirculation version
The hood draws cooking fumes saturated with fumes and odor through the
grease filters and charcoal filters and returns clean air into the room. For
constant efficiency, the charcoal filters must be replaced periodically.
Decide from the outset on the type of installation (recirculation or
ducting). For greater efficiency, we recommend you install the hood
in the ducting version.
Electrical Connection
* Electrical wiring must be done by a qualified person(s) in accordance with
all applicable codes and standards. Turn off electrical power at service
entrance before wiring.
* If the supply cord is damaged, it must be replaced by the manufacturer, its
service agent or similarly qualified persons in order to avoid a hazard.
* Do not use the plug and an extension cord other than the ones initially
supplied with the hood.
INSTALLATION
Before beginning installation, to better handle the hood, we advise removing
the face plate.
The range hood is designed to operated with φ120mm exhaust Ducting.
DUCTING & RECIRCULATIING VERSION INSTALLATION:
Before fixing, the outlet exhaust duct for air evacuation to the outside must
be installed. Use an outlet exhaust duct with: - minimum indispensable
length; -Minimum possible bends (maximum angle of bend: 90°); -certified
material (according to local, building and fire regulations); and as smooth as
possible inside. It is also advisable to avoid any drastic changes in duct
cross-section (recommended diameter: 120mm).
For recirculation version, please consider some outlets for clean air returns
into the room.

7
Fitting under wall unit
1. Before fixing the hood to the wall unit, drill a hole of 135mm diameter for
φ120mm exhaust Ducting in the wall unit.
2. In any case, check the position of the power outlet and consider where
the power cable will run, since a hole might have to be made in the wall
unit to accommodate it.
3. Unscrew the 2 visible screws located on hood of both inner size of filter
frame and remove the face plate. The 6 mounting holes around the unit
are then accessible.
4. Lift the range hood and fit through the opening of the cabinet. Secure
unit by using 6 long mounting screws.
473
258

8
5. Fit the face plate on the hood by screwing 2 screws.
6. Rotate the spot LED lights clockwise into the lamp hole.
7. Make the electrical connection.
Installation is now complete.
Notice:
-Exhaust air must not be discharged into a flue which is used for exhausting
fumes from appliance burning gas or other fuels.
-If the instructions for installation for the gas hob specify a greater distance
than 750mm, this has to be taken into account.
-The regulations concerning the discharge of exhaust air have to be followed.
Check with the local authority for building codes for exhaust ducting
requirements

9
CONTROLS
OPERATION OF CONTROLS
This hood may be operated using the slide switch on the face plate.
The light switch turns the lamps on and off.
The fan switch turns the fan on to three speed settings:
0 - OFF
1 - LOW SPEED
2 - MEDIUM SPEED
3 - HIGH SPEED
MAINTENANCE
GREASE FILTER
* The grease filters should be cleaned frequently (every two months of
operation, or more frequently for heavy use). Use a warm detergent
solution.
* Grease filters are washable.
CHARCOAL FILTER
This filter is not washable, cannot be
regenerated, and should be replaced
approximately every 3 months of operation,
or more frequently in the case of heavy
usage.

10
1. To install the charcoal filter, lock it until the stop click is heard.
2. Install the face plate after charcoal filter is installed.
3. To remove the charcoal filters, remove the charcoal filter by turning
anti-clockwise.
LAMPS
This range hood may require two GU10 LED SPOT (AC 230V, 4W Max each)
WARNING: Always switch off the electrical supply before carrying out any
operation on the appliance.
To change LED spot:
1. Remove the aluminum filter.
2. Loosen the LED spot anti-clockwise, and replace with LED of same kind.

11
CAUTION:
1. THE SURFACE, THE LIGHT COVER MAY BE HOT. TAKE CARE WHEN
REPLACING LED LAMPS.
2. THE LED LAMPS MAY BE HOT. TAKE CARE WHEN REPLACING LED LAMPS.
We recommend only using lamps of the same specification as the
ones being replaced.
HOOD CLEANING
Stainless steel is one of the easiest materials to keep clean. Occasional care
will help preserve its fine appearance.
Cleaning tips:
* Hot water with soap or detergent is all that is usually needed.
* Follow all cleaning by rinsing with clear water. Wipe dry with a clean, soft
cloth to avoid water marks.
* For discolorations or deposits that persist, use a non-scratching household
cleanser or stainless steel polishing powder with a little water and a soft
cloth.
* For stubborn cases use a plastic scouring pad or soft bristle brush together
with cleanser and water. Rub lightly in direction of polishing lines or “ grain”
of the stainless finish. Avoid using too much pressure that may damage the
surface.
* Do not allow deposits to remain for long periods of time.
* Do not use ordinary steel wool or steel brushes. Small bits of steel may
adhere to the surface causing rust.
* Do not allow salt solutions, disinfectants, bleaches, or cleaning compounds
to remain in contact with stainless steel for extended periods. Many of these
compounds contain chemicals that may be harmful. Rinse with water after
exposure and wipe dry with a clean cloth.
* Painted surfaces should be cleaned with warm water and mild detergent
only.

12
TROUBLE SHOOTING
The range hood may not work or work improperly. Before calling after-sales
service, switch off the appliance, unplug the power supply and refer to this
guide to determine the problem.
If malfunction persist, contact our After Sales Service and specify the nature
of the problem, appliance model no and serial number (on the rating plate
inside the hood)
Status Reasons Solutions
No
response of
the lamps
and the
motor
1. The plug is off from
the power socket.
2. The power cord is
damaged.
1. Ensure that the plug is put
into the power socket
properly.
2. Replace the power cord if the
power cord is damaged.
The fuse on the PCB
board is damaged.
Replace the fuse on the PCB
board.
The switch is damaged. Repair or replace the switch.
The lamp
doesn’t
work
The lamp is damaged. Replace the damaged lamp.
The hood
body gives
out strong
vibrations
and a loud
noise
1. The hood has not
been installed
properly according
to the installation
process described
in the instruction
manual.
2. Check if the joint
connection of each
part is damaged.
Ensure the hood has been
installed properly according to
the instruction manual.

13
The air
exhaust
performanc
e is bad
Check if the distance
between the hood and
the cooker top is too
big.
The ideal distance is 65-75cm.
Ensure there is
adequate ventilation.
Open the door and windows
properly. Improve the
environment.
The duct is damaged.
Grease Filters or
charcoal filter clogged
Exhaust air outlet
clogged
Repair or replace the damaged
duct.
Replace or clean the filters
Clear the air exhaust outlet

- Ringraziandola per aver scelto il nostro prodotto, la invitiamo a
leggere attentamente le seguenti informazioni attinenti la sicurezza
nel corso dell’installazione e la manutenzione. Tenere questo
manuale a portata di mano per futura consultazione.
MANUALE DI ISTRUZIONI
CAPPA DA INCASSO
14

Gentile cliente,
seguendo le raccomandazioni contenute in questo Manuale di Istruzioni, il
nostro dispositivo continuerà a fornire prestazioni elevate e manterrà la
propria efficienza per molti anni a venire.
INDICE
RACCOMANDAZIONI E SUGGERIMENTI
CARATTERISTICHE
INSTALLAZIONE E USO
MANUTENZIONE
RISOLUZIONE DEI PROBLEMI
CERTIFICATO DI GARANZIA
RACCOMANDAZIONI E SUGGERIMENTI
INSTALLAZIONE
* Il produttore non verrà ritenuto responsabile per danni derivanti da
un’installazione scorretta o impropria.
* Leggere questo manuale di istruzioni prima di procedure all’installazione e
all’utilizzo della cappa da cucina. Conservare il manuale in un luogo sicuro
per poterlo consultare in futuro.
* L’installazione e manutenzione della cappa può essere eseguita solo da un
tecnico qualificato e opportunamente preparato.
* Verificare che la tensione della rete elettrica corrisponda a quella indicata
sulla targhetta riportata all’interno della cappa.
* Non collegare la cappa a condotti di scarico che trasportano fumi di
combustione (boiler, camini ecc).
* Se la cappa viene utilizzata con strumentazioni non elettriche (ad es.
apparecchi a combustione a gas), è necessario garantire un livello
sufficiente di ventilazione al fine di evitare il riflusso dei gas di scarico. La
cucina deve essere dotata di una apertura diretta con l’aria esterna per
assicurare l’entrata di aria pulita.
* La distanza minima della cappa da un piano cottura a gas è di 750mm e di
15

16
650mm da un piano cottura elettrico. Nel caso in cui le istruzioni per
l’installazione del piano cottura a gas indichino una distanza maggiore, sarà
necessario tenerlo in considerazione.
NOTA: l’installazione o lo spostamento di questa apparecchiatura richiedono
due o più persone. In caso contrario, potrebbero derivarne lesioni fisiche.
UTILIZZO
* Questa cappa è stata progettata esclusivamente per uso domestico con
l’obiettivo di eliminare i fumi di scarico provenienti dalla cucina.
* Non utilizzare mai la cappa per fini diversi da quelli per cui è stata
progettata.
* Non lasciare mai fiamme libere elevate sotto la cappa quando è in uso.
* Regolare l’intensità della fiamma in modo che sia diretta solo sul fondo
della pentola; assicurarsi che essa non fuoriesca dai lati della pentola.
* Le friggitrici devono essere costantemente monitorate durante l’uso: l’olio
surriscaldato può incendiarsi.
* La cappa non deve essere utilizzata da bambini o persone che non abbiano
ricevuto istruzioni sul suo corretto uso.
MANUTENZIONE
* Effettuando una corretta manutenzione della cappa da cucina, l’unità
garantisce prestazioni adeguate.
* Disconnettere la cappa dall’alimentazione prima di svolgere qualsiasi
intervento di manutenzione.
* Pulire e/o sostituire i filtri antigrasso in alluminio e i filtri a carbone attivo
dopo un determinato periodo di tempo.
* Pulire la cappa con un panno umido e con un detergente liquido neutro.
* SMALTIMENTO: non smaltire il prodotto come rifiuto urbano generico. È
necessario raccoglierlo separatamente e sottoporlo a un trattamento
speciale.
ATTENZIONE!!
In alcune circostanze, le apparecchiature elettriche possono costituire un
pericolo.

17
* Non controllare lo stato dei filtri mentre la cappa da cucina è in uso.
* Non toccare le lampadine successivamente all’utilizzo
dell’apparecchiatura.
* Non disconnettere l’apparecchiatura con le mani bagnate.
* Evitare l’accensione di fiamme libere poiché possono danneggiare i filtri e
costituire un rischio di incendio.
* Mantenere sotto costante controllo la frittura di cibo. L’olio surriscaldato
può costituire un rischio di incendio.
* Staccare la spina dalla corrente prima di qualsiasi intervento di
manutenzione.
* I bambini non sono consapevoli dei rischi connessi alle apparecchiature
elettriche. Utilizzare pertanto il prodotto esclusivamente sotto la
supervisione di un adulto e tenerlo al di fuori della portata dei bambini.
* Non utilizzare il prodotto all’aria aperta.
* L’apparecchiatura non è destinata a persone (compresi i bambini) con
ridotte capacità fisiche, sensoriali o mentali, o prive di esperienza e
conoscenze, salvo il caso in cui siano state supervisionate o istruite riguardo
all’uso dell’apparecchiatura da una persona responsabile della loro sicurezza.
I bambini devono essere supervisionati per assicurarsi che non giochino con
l’apparecchiatura.
* Quando la cappa da cucina viene utilizzata dovrebbe essere garantita una
adeguata ventilazione del locale allo stesso modo in cui viene richiesta per le
apparecchiature brucianti gas o altri combustibili.
* Se la pulizia non viene effettuata secondo le istruzioni c’è rischio di
incendio.
* Non produrre fiamme sotto la cappa.
* L'aria di scarico non deve essere scaricata in una canna fumaria utilizzata
per i gas di scarico degli apparecchi che bruciano gas o altri combustibili.

18
CARATTERISTICHE
DIMENSIONI
INSTALLAZIONE & UTILIZZO
Nota 1 : sulle cappe in acciaio inossidabile, rimuovere con cura la pellicola
protettiva di plastica da tutte le superfici esterne della cappa stessa prima
dell'installazione finale.
Nota 2: per il montaggio della cappa occorrono almeno due persone.
DESCRIZIONE / CONNESSIONI
La cappa può essere installata nella
versione Canalizzabile o a Ricircolo.
Versione di scarico
La cappa aspira i vapori di cottura saturi di fumi
e odori attraverso i filtri antigrasso e li espelle
all’esterno attraverso un tubo in uscita.
Attenzione per ridurre il rischio di incendio, è
preferibile l'uso di condutture metalliche.
Non utilizzare materiali infiammabili per
convogliare l'aria di scarico

19
1. Decidere dove posizionare il tubo di scarico per collegare la cappa
all’esterno.
2. Un condotto dritto e breve consentirà alla cappa di funzionare al
massimo della propria efficienza.
3. I condotti lunghi con curve e raccordi di transizione riducono le
prestazioni ottimali della cappa. Utilizzarne il meno possibile. Se si
utilizzano condotti lunghi, potrebbero essere necessari tubi di diametro
maggiore.
4. Si consiglia di utilizzare un condotto rotondo di φ120mm.
5. L’aria non deve essere scaricata in una canna fumaria utilizzata per fumi
di scarico emessi da apparecchi di cottura a gas o altri combustibili. È
necessario attenersi alle norme relative alla scarico dell’aria. Per le
condotte di scarico verificare i requisiti previsti dalle autorità locali e dal
codice di costruzione.
6. Installare un rivestimento a soffitto/parete. Collegare il tubo circolare al
rivestimento e procedere a ritroso verso la cappa.
Versione di ricircolo
La cappa aspira i vapori di cottura saturi di fumi e odori attraverso
i filtri antigrasso e quelli a carbone e immette nuovamente aria
pulita nel locale.
Per mantenere un’efficienza costante, è necessario sostituire
periodicamente i filtri a carbone.
Decidere sin dall’inizio il tipo di installazione desiderata (ricircolo o
scarico). Per una maggiore efficienza, si consiglia di installare la
cappa nella versione di scarico.
Collegamento elettrico
* I collegamenti elettrici devono essere effettuati da una
persona(e) qualificata(e) in conformità con i codici e gli standard
applicabili. Staccare la corrente elettrica dalla centralina prima di
procedere al cablaggio.
* Se il cavo dell’alimentazione è danneggiato, deve essere sostituito dal
This manual suits for next models
1
Table of contents
Languages:
Other Glem Ventilation Hood manuals

Glem
Glem GHB972IX User manual

Glem
Glem CK75UCF Specification sheet

Glem
Glem CK90TBLED Specification sheet

Glem
Glem GHD670IX User manual

Glem
Glem CKS61MXI User manual

Glem
Glem GHS972IX User manual

Glem
Glem GHB98IX User manual

Glem
Glem kb901 Manual

Glem
Glem GHI9100BK User manual

Glem
Glem COOKER HOOD PN-36 User manual