manuals.online logo
Brands
  1. Home
  2. •
  3. Brands
  4. •
  5. Glendo
  6. •
  7. Cutter
  8. •
  9. Glendo GRS 004-642 User manual

Glendo GRS 004-642 User manual

Page 1 of 4LIT-004-198
Ring Size Cutter
INSTRUCTIONS • USA/British Model #004-642 • Metric Model #004-643
READ FIRST
We know you are eager to use your new GRS Ring Size
Cutter. But, PLEASE familiarize yourself with proper
installation and operating procedures BEFORE you begin.
Improper installation and use could damage your new ring
cutter or cause personal injury! Thank you for buying a GRS
product.
INSTALLATION
The ring size cutter comes with its handle moved for
shipping. You must reposition the handle in order to use it.
First, remove the hex-head bolt and spacer located on the
cutter crank pin (FIG. 1). Slide the handle out and rotate the
cutter crank pin until you can replace the handle as shown
in FIG. 2. Replace the hex-head bolt with spacer into the
tapped hole in the handle and tighten.
Use the 4 metal screws provided to securely fasten the
ring size cutter to a workbench or table top. If these screws
are not compatible with your bench top, you must supply a
fastener with equal or greater strength. The shearing action
requires moderate force on the handle. The cutter must
be secured to safely absorb this force without pulling itself
loose from the workbench. Be certain that the ring cutter is
mounted properly to avoid possible injury.
Most users will want to mount the ring cutter near the front of
their bench. We suggest that you mount it back far enough
to allow for a “catch tray” under the cutter area to collect the
ring slugs. You might consider putting the front mounting
screws about 6" in from the edge of your bench. (FIG. 3)
CAUTIONS
Since this tool will cut metals, it will easily cut your nger or
most anything else you put under the cutters. You do NOT
need to have your ngers near the cutter when actually
making a cut. Once you are certain that the ring and cutter
are correctly positioned, remove your ngers and smoothly
pull the handle.
OPERATION
The ring size cutter is actually a special shearing tool. It
works by shearing a selected size of shank material from
the bottom of the ring. You control the amount of material
removed by selecting the corresponding cutter size. There
are seven cutter sizes that come with the USA / British
ring cutter: from 1/2" to 2", in 1/4" increments. These sizes
directly relate to ring sizes. Thus, if you want to reduce a
ring by 1 ring size, choose the size 1 cutter. It’s that simple.
For the metric version there are nine cutter sizes to choose
from. Once you have chosen the cutter size, you will then
need to correctly install the cutter for use. First lower the
handle to its full down position. Now, loosen the adjustment
knob (FIG. 4) by turning it counter-clockwise. Install your
selected cutter by placing its hole over the crank pin and
FIG. 1
FIG. 2
FIG. 3 PLEASE READ THESE
INSTRUCTIONS AND
SUGGESTIONS BEFORE
USING THIS TOOL.
Shipped with handle in
wrong position. Handle
must be moved before
you can use it.
This is the correct
placement of the
handle.
MAGNETIC
STORAGE
FOR CUTTERS
LIT-004-198 Page 2 of 4
then swinging it down between the two cutter bars (FIG. 5).
If necessary, loosen the adjustment knob further to widen
the space between cutter bars.
You are now ready to set the proper clearance for a clean
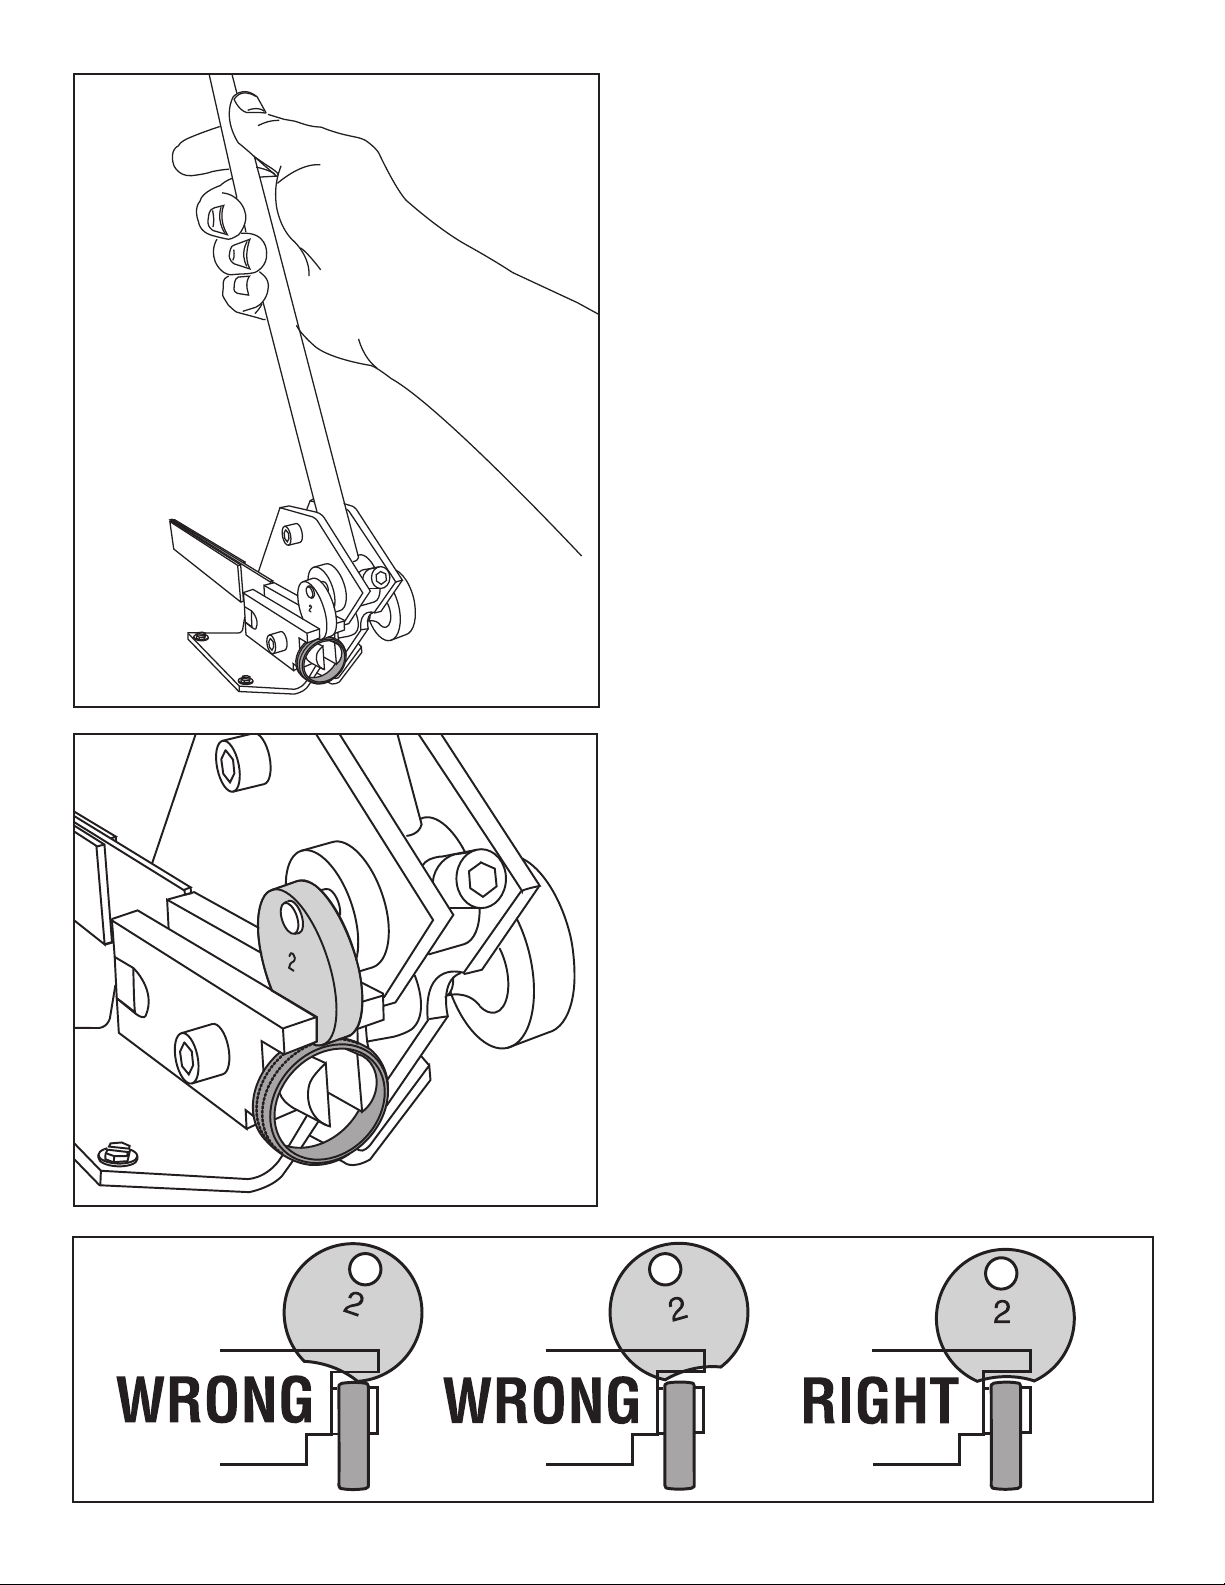
shear cut. Visually verify that the cutter is hanging between
the open cutter bars. Now, hold the cutter inward with your
nger (FIG. 6) and simultaneously turn the adjusting knob
clockwise until a light squeeze is felt between the cutter
bars and the cutter. DO NOT OVER TIGHTEN! You have
now set the correct clearance for your cut.
Raise the handle up fully and position your ring over the
cutter bars (FIG. 7 & FIG. 8). Now lower the handle to bring
the cutter in proper contact with the ring. After verifying that
the cutter is correctly positioned over the ring (FIG. 9), pull
smoothly downward on the handle until it stops. Your cut is
complete. Raise the handle, remove the ring. BE SURE TO
REMOVE THE RING SLUG from between the cutter bars.
Once you are familiar with cutter selection and adjustment,
you will nd it to be a fast and simple process. The ring size
cutter has specially shaped cutters that conform to most
convex ring shanks. Notice that the actual cutting area is a
concave notch. This notch must be positioned properly over
the ring shank to make a clean cut. Fig. 9 shows both the
incorrect and correct cutter positions. Although these gures
are somewhat exaggerated, they illustrate an important
point.
INCORRECT CUTTER POSITIONS CAN PRODUCE
ROUGH CUTS AND DAMAGE THE CUTTERS
THEMSELVES!
If you follow the correct procedure for adjusting the cutter
clearance (FIG. 4 to FIG. 9), you will have little trouble with
this problem. Please be sure that the cutter is correctly
aligned before you pull the handle to cut.
MAINTENANCE
There is very little maintenance required for the ring size
cutter. With proper care, the cutters will provide good
service. This tool is designed to CUT PRECIOUS METAL
ALLOYS ONLY, such as used in jewelry. Do NOT use it
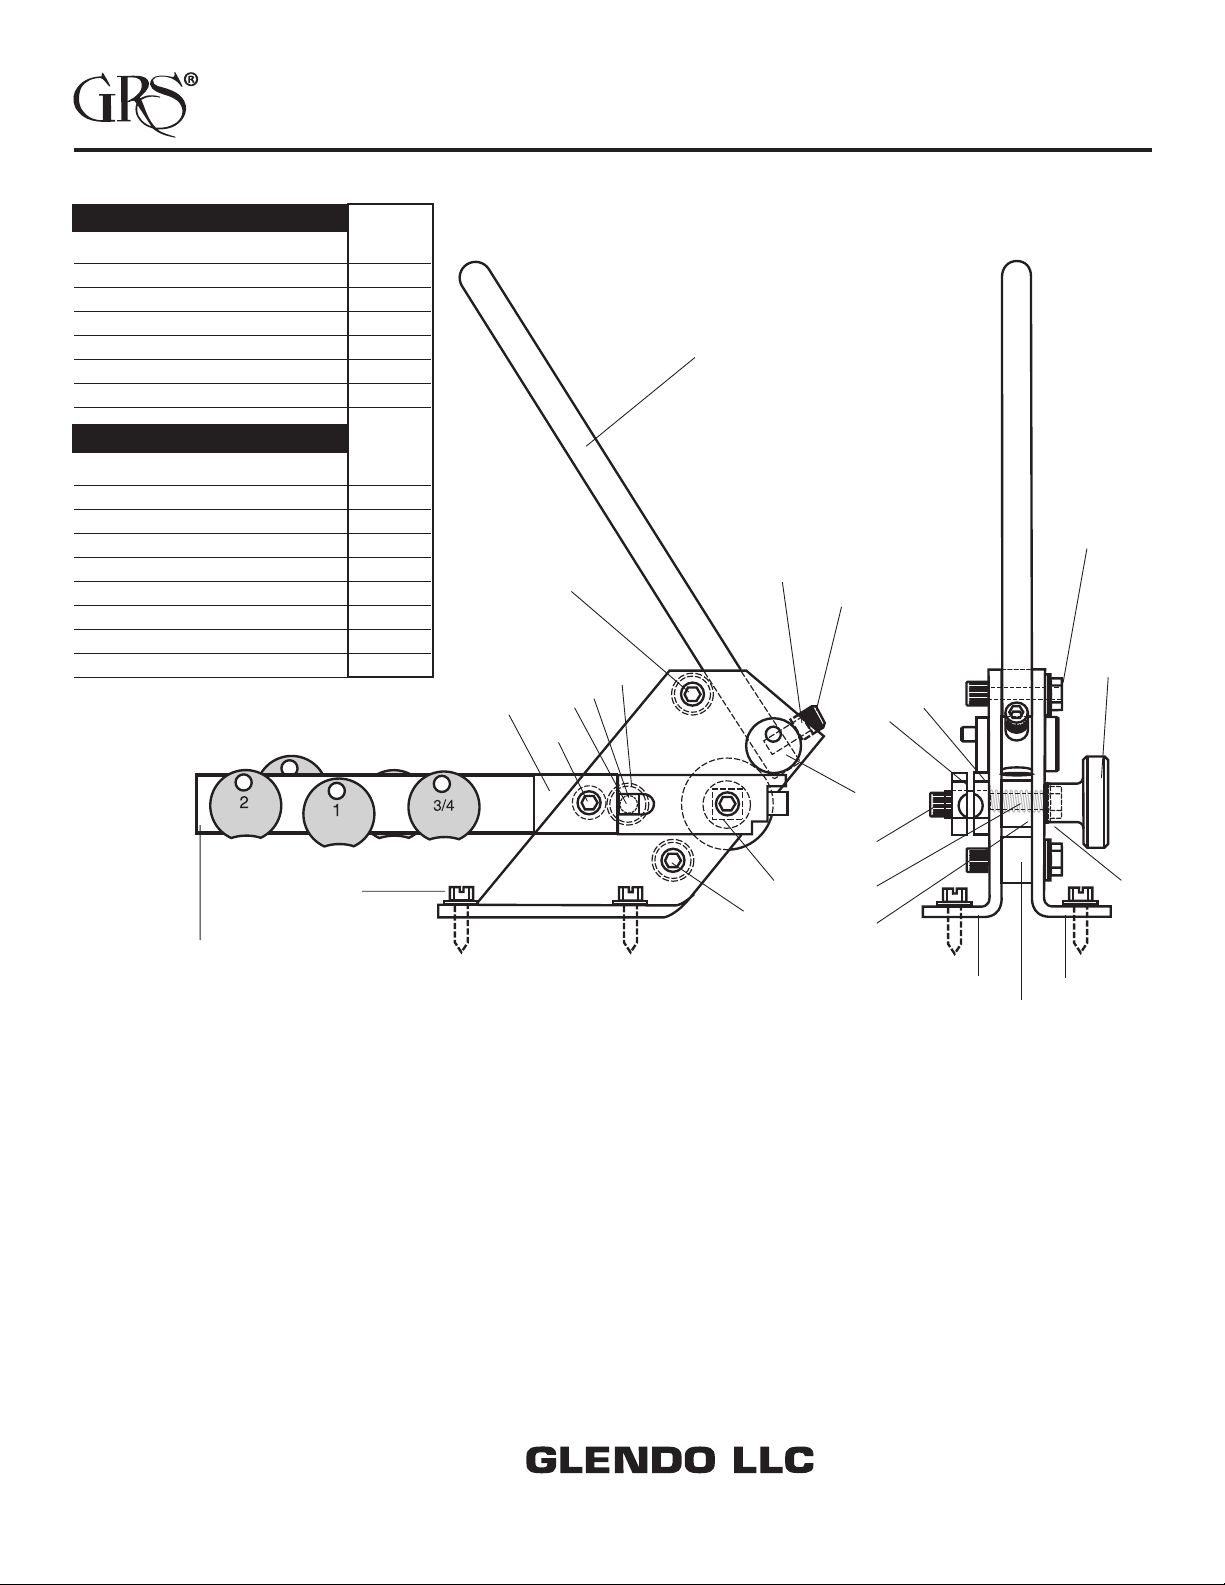
on hard steels, stainless steels, etc. The cutter and cutter
bars are replaceable. You will nd the complete parts listing
on the back of these instructions. Cutters may be ordered
individually or in sets.
The cutter crank may need lubricant from time to time. Most
oils or grease will work. You may nd small amounts of
metal building up on the cutters and inside the cutter bars.
This build-up can hamper correct cutter clearance since
it keeps the cutter bars further apart. If this happens, just
remove this built-up metal with a small le, but be careful
not to round the cutting edges. You should NEVER attempt
to cut anything that does not t across BOTH cutter bars.
This tool is designed to cut a notch from a ring or part that
is supported on both sides. It is NOT a one side shear;
using it this way could cause damage.
FIG. 4
FIG. 5
FIG. 6
TIPS: AVOIDING FRUSTRATION
AND RING DAMAGE
The GRS Ring Cutter cuts by shearing. Some ring shank
shapes and softer alloys may be distorted by this cutting
process. Here are some ways to minimize or prevent this:
1. Observe how the ring shank ts the curved area of
the cutter. Some shanks don’t t the cutter curve well
enough. In a short time you’ll know which rings may
cause problems just by looking at them. You may decide
not to cut some rings with the Ring Cutter. Most jewelers
report using the GRS Ring Cutter well over 80% of
the time. Many tell us they use it virtually 100% once
Page 3 of 4LIT-004-198
FIG. 9
they understand it. We want to share this actual trade
experience because the more you understand, the more
you’ll like this wonderful tool.
2. From a lifetime bench jeweler: If you think distortion may
be a problem, select the ring cutter that is 1/4 size less
than the total you need to remove. After cutting with the
ring cutter, close the ring shank but don’t solder it yet.
It should now be 1/4 size bigger than the desired nal
size. Using a rigid separating disc in your ex shaft or
rotary handpiece (the standard disc is 0.023" (0.6 mm)
wide), cut the ring shank along the same cut shank
again. You should now have a nice parallel joint, free
from distortion. Now solder and nish. The ring should
be the correct size since the separating disc removed
the last 1/4 ring size. Note: You shouldn’t need to use
this technique often, but it’s nice to know.
3. If the shank is such that it must be sawed, put it in the
ring cutter with the correct cutter size. Then, pull down
on the handle just enough to slightly mark (with two
slight dents) the ring shank with the cutter. These two
“dents” will now help guide your saw blade to cut the
precise width you need.
4. Use only with gold or silver rings.
5. Always remove the cut piece left between the jaws
BEFORE cutting the next ring. This piece stays so it
won’t fall and get lost, but you have to remove it (just
open the jaws by turning the knob) so it doesn’t interfere
with the jaw spacing on your next cut.
COMPLETE RING CUTTERS
• #004-642 Includes complete unit plus 7 USA / British
cutters
• #004-643 Includes complete unit plus 9 Metric cutters
REPLACEMENT CUTTER KITS
• #004-585 USA / British Cutter Kit: Includes 7 cutters
• #004-600 Metric Cutter Kit: Includes 9 cutters
FIG. 7
FIG. 8
LIT-004-198 Page 4 of 4
Ring Size Cutter
PARTS LIST • USA/British Model #004-642 • Metric Model #004-643
INDIVIDUAL CUTTERS
USA British WIDTH
004-156 1/2 B#1 .050"
004-157 3/4 B#1.5 .075"
004-158 1 B#2 .100"
004-159 1-1/4 B#2.5 .125"
004-160 1-1/2 B#3 .150"
004-161 1-3/4 B#3.5 .175"
004-162 2 B#4 .200"
Metric
004-205 1 mm .039"
004-206 1.5 mm .059"
004-207 2 mm .079"
004-208 2.5 mm .098"
004-209 3 mm .118"
004-210 3.5 mm .137"
004-211 4 mm .157"
004-212 4.5 mm .177"
004-213 5 mm .196"
1 004-296 Post, Ring Shear
2 002-815 Washer, 0.255" x 1/2" x 0.005"
*3 004-294 Cutter Bar (FIXED)
*4 004-295 Cutter Bar (Moveable)
5 004-271 Right Hand Side Plate
6 004-265 Spacer
7 002-900 1/4-20 x 1 1/8" SHCS
8 004-155 Spacer, Ring Shear
9 004-292 Spacer
10 004-270 Left Hand Side Plate
11 002-536 Nut, 1/4-20 Lock
12 002-107 1/4-20 x 1/2" SHCS
13 004-269 Adjustment Shaft
14 002-901 Spring
15 002-962 Spring Washer
16 004-290 Knob
17 004-584 Crank Pin Assembly
18 002-490 1/4-20 x 7/8" SHCS
19 004-195 Spacer, Ring Shear
20 004-150 Handle
21 004-297 Cutter Storage Bar
22 002-489 1/4-20 x 5/8" SHCK
23 050-011 0.060 x 1" Magnet Strip
24 002-554 #10 x 3/4" SMS
NOT SHOWN
002-742 3/16" Hex Wrench
022-211 10 Compartment Box
*NOTE: When replacing Cutter Bars -BOTH- should be
replaced for the ring cutter to work correctly. Factory
replacement recommended.
23
20
11
16
10 5
8
6
14
22
3
4
19
18
7
21
12
7
24
(qty. 4)
15
17
MAGNETIC STORAGE
FOR CUTTERS
1
13
9
2
900 Overlander Road • Emporia, KS 66801 USA
800-835-3519 • 620-343-1084 • Fax: 620-343-9640
[email protected] • www.grstools.com
Last Updated: 2015-09-30

This manual suits for next models

1

Popular Cutter manuals by other brands

Marshalltown Bullet BT92-2195 owner's manual

Marshalltown

Marshalltown Bullet BT92-2195 owner's manual

AL-KO GS 7,2 Li Translation of the original instructions for use

AL-KO

AL-KO GS 7,2 Li Translation of the original instructions for use

Robot Coupe R8 manual

Robot Coupe

Robot Coupe R8 manual

Vector Welding CUT 50PD operating instructions

Vector Welding

Vector Welding CUT 50PD operating instructions

Full Spectrum Laser MUSE 3D user manual

Full Spectrum Laser

Full Spectrum Laser MUSE 3D user manual

Trotec Speedy 500 Operation manual

Trotec

Trotec Speedy 500 Operation manual

Powermate 024-0089 instruction manual

Powermate

Powermate 024-0089 instruction manual

RASOR GRT10 user manual

RASOR

RASOR GRT10 user manual

Pace Technologies MEGA-T400A instruction manual

Pace Technologies

Pace Technologies MEGA-T400A instruction manual

Mul-t-lock KC5 User's operation manual

Mul-t-lock

Mul-t-lock KC5 User's operation manual

Fein MF 12-180 brochure

Fein

Fein MF 12-180 brochure

Woods BRUSHBULL BB6000X Operator's manual

Woods

Woods BRUSHBULL BB6000X Operator's manual

TOP GUN WELDING 2040 5IN1 Operator's manual

TOP GUN WELDING

TOP GUN WELDING 2040 5IN1 Operator's manual

HSGM HSG-0 operating instructions

HSGM

HSGM HSG-0 operating instructions

RotoZip Revoluton Series Instructions for use

RotoZip

RotoZip Revoluton Series Instructions for use

aidapt VM925AB Usage and maintenance instructions

aidapt

aidapt VM925AB Usage and maintenance instructions

Jet LF-20 Operating instructions and parts manual

Jet

Jet LF-20 Operating instructions and parts manual

JMA CAPRI instruction manual

JMA

JMA CAPRI instruction manual

manuals.online logo
manuals.online logoBrands
  • About & Mission
  • Contact us
  • Privacy Policy
  • Terms and Conditions

Copyright 2025 Manuals.Online. All Rights Reserved.