Glorious GZ5 User manual

GZ5
Operation
Manual
5-Axis
Zirconia Dental Cutting Machine

CONTENT
Equipment Introduction..................................................................................................1
1.1 Equipment Destription................................................................................... 1
1.2 Equipment Features........................................................................................1
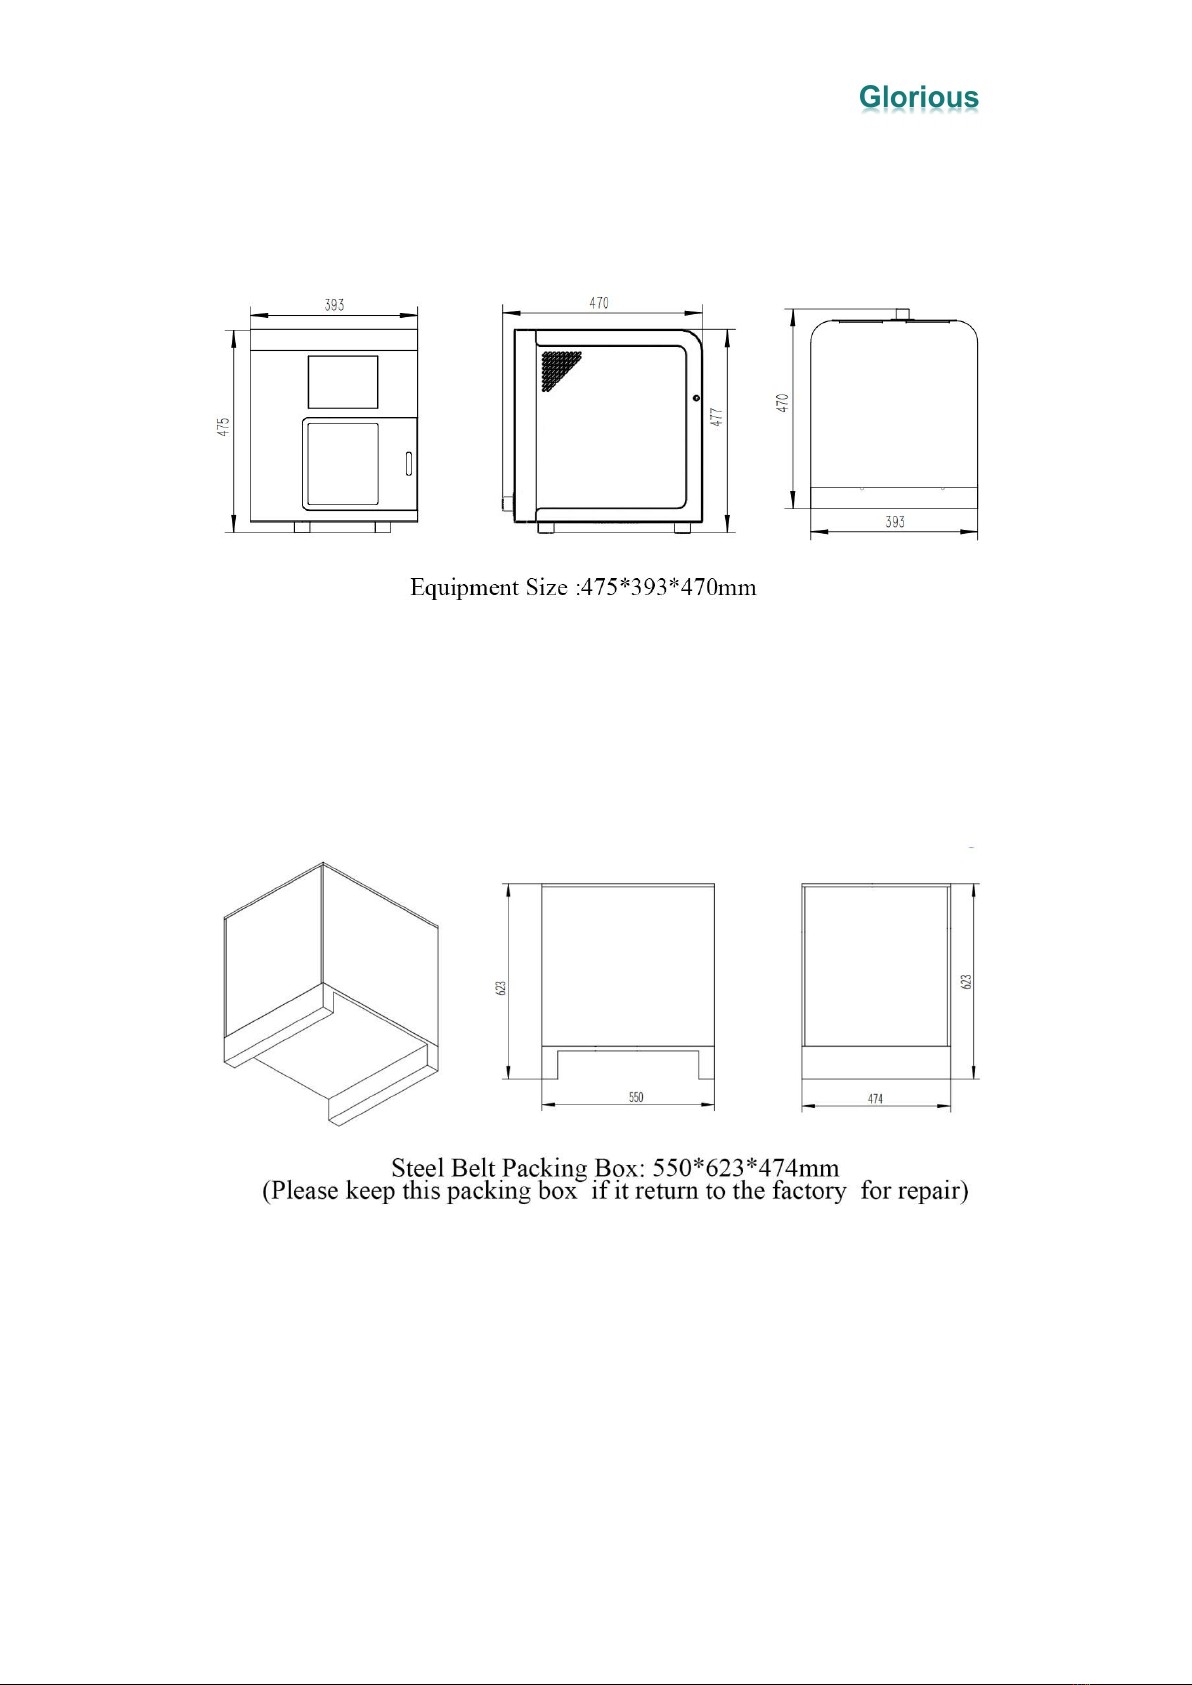
1.3 Equipment Parameters....................................................................................4
Installation Environment................................................................................................ 5
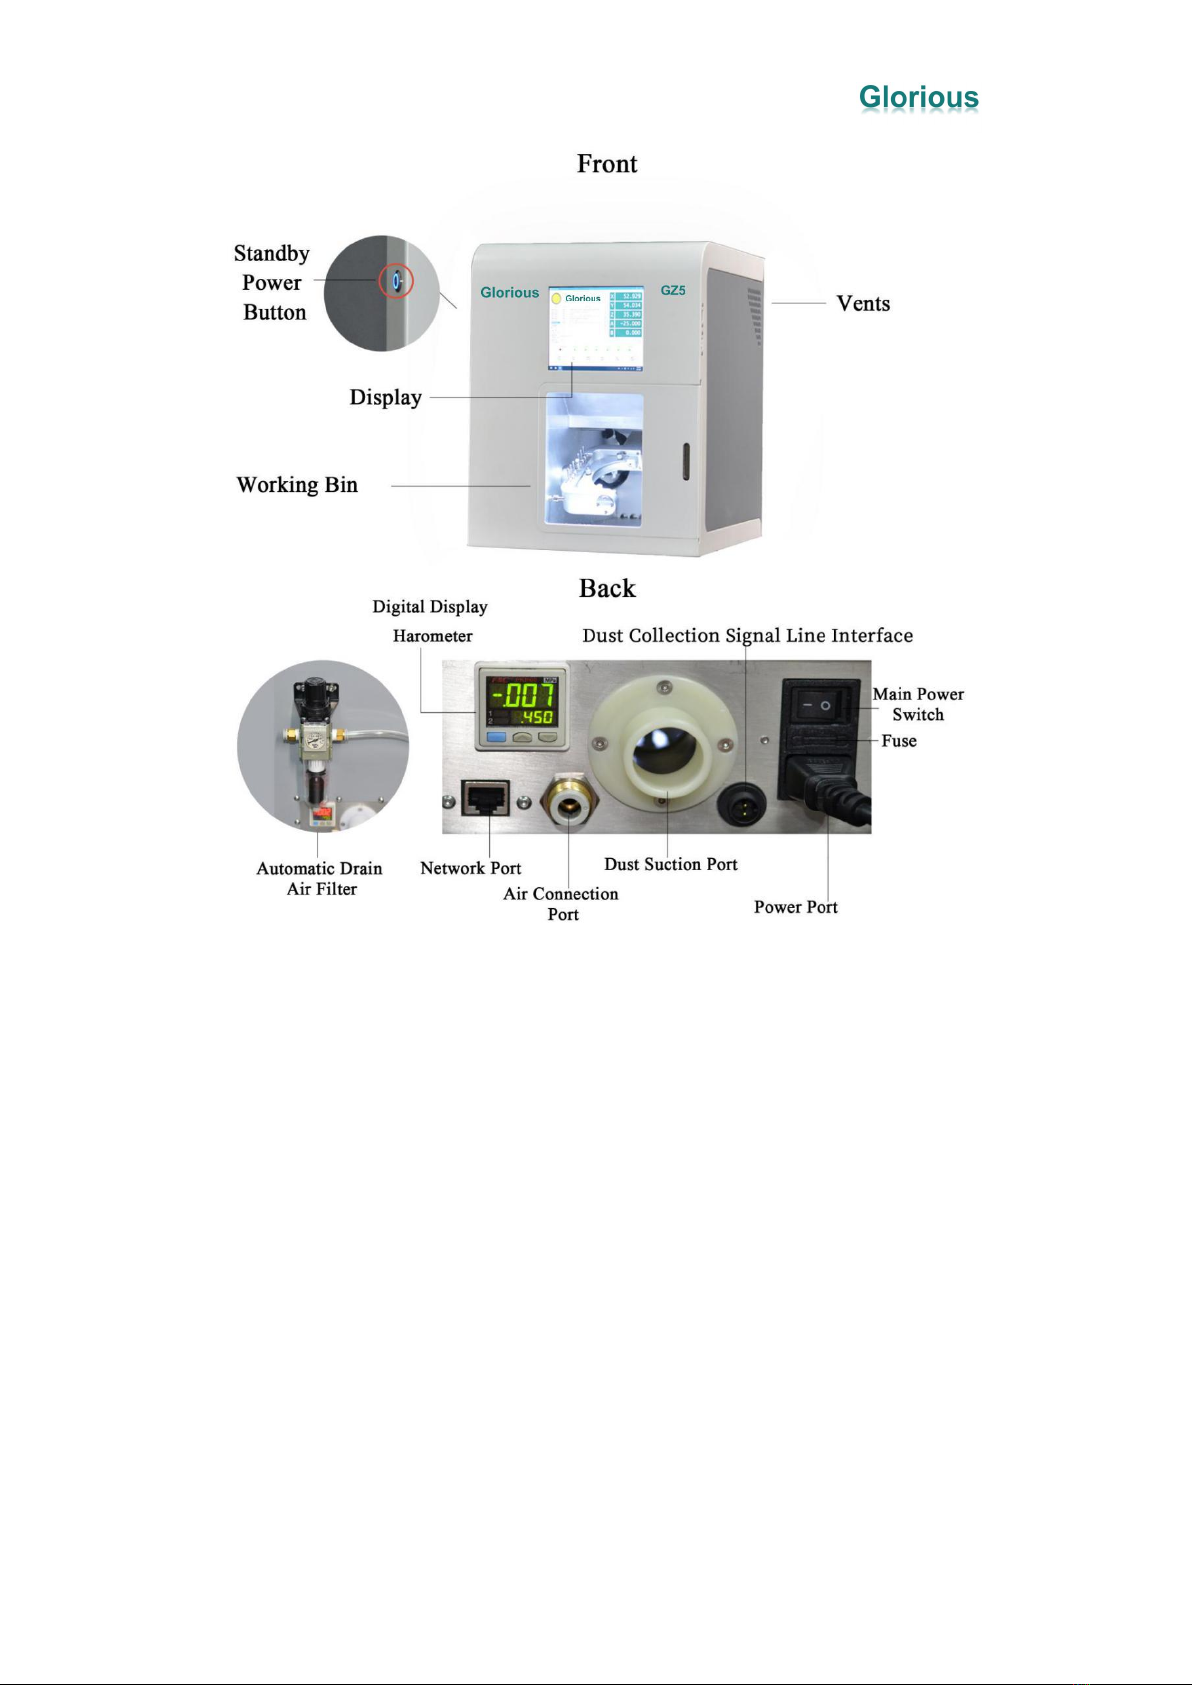
2.1 GZ5`s Installation Environment and Conditions........................................... 5
Equipment Accessories and Installation.........................................................................6
3.1 Whiteth GZ5 Accessories List........................................................................6
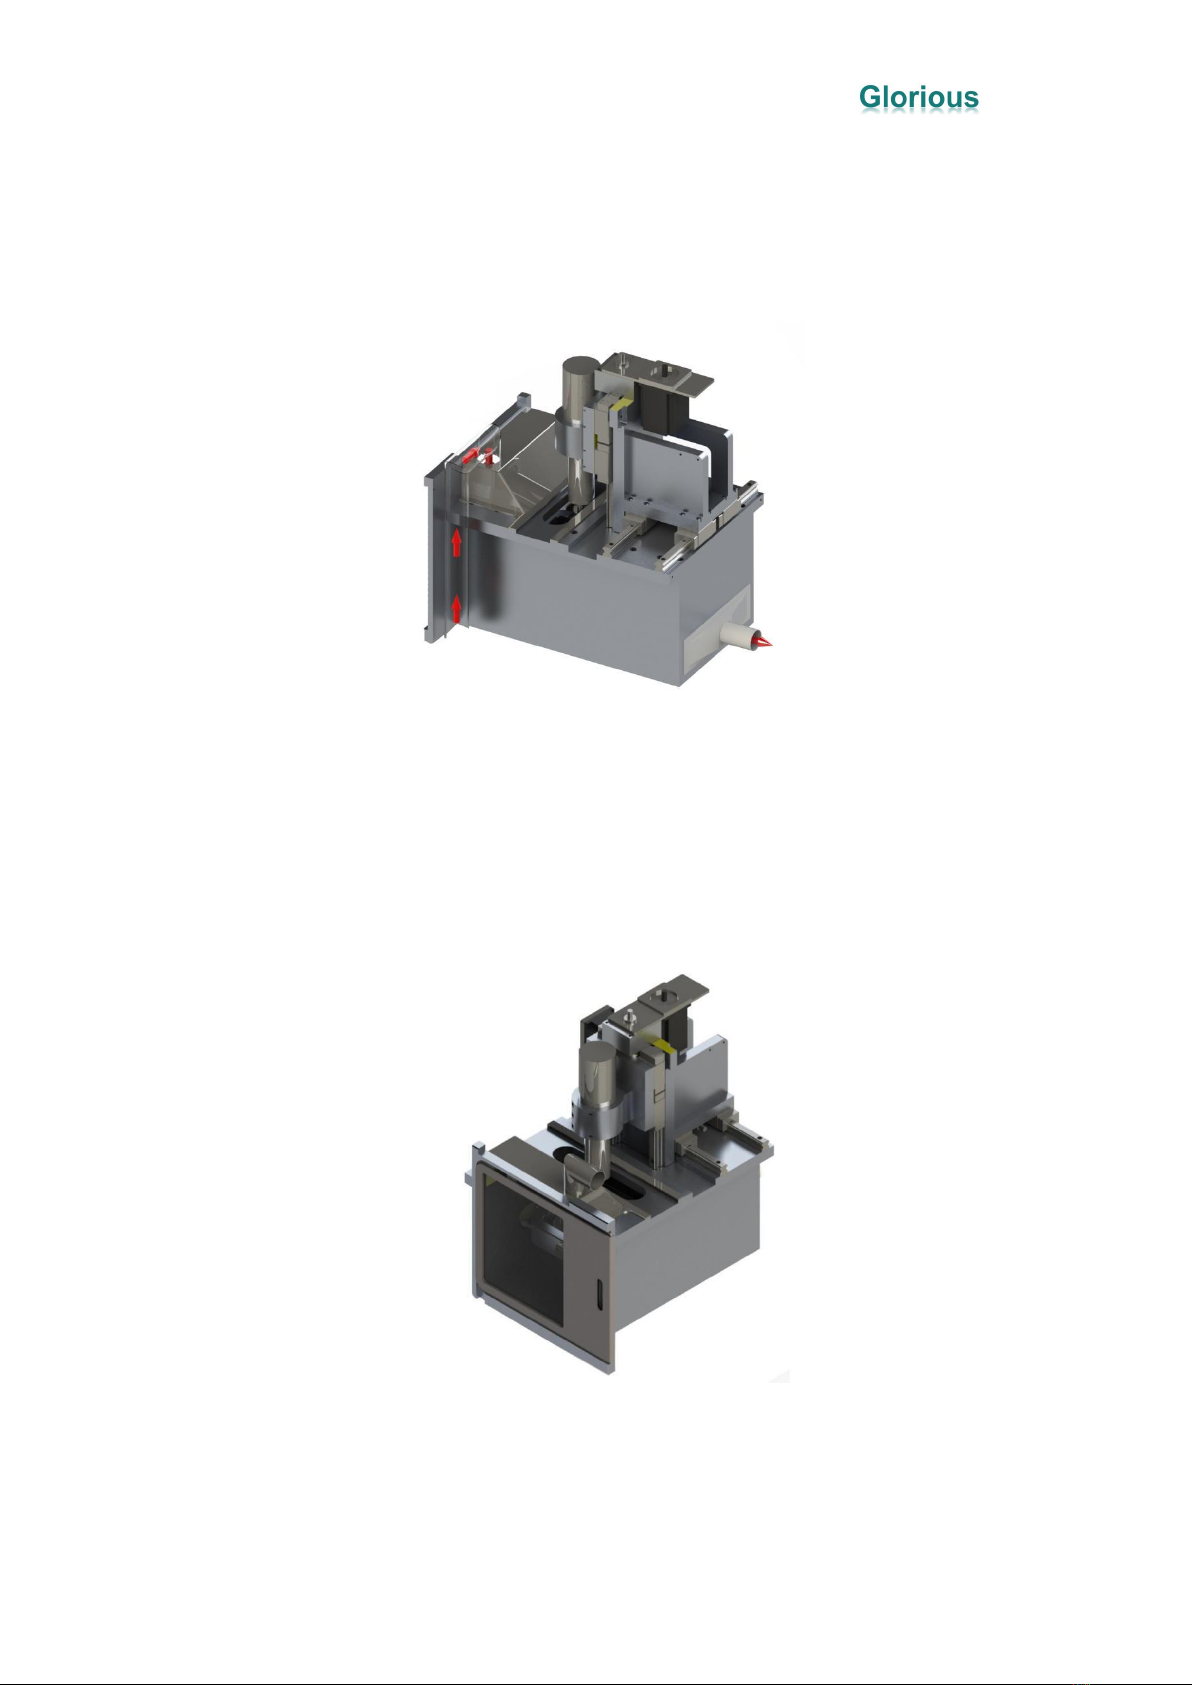
3.2 Installation guide of GZ5............................................................................... 6
Equipment Operation Guidance..................................................................................... 9
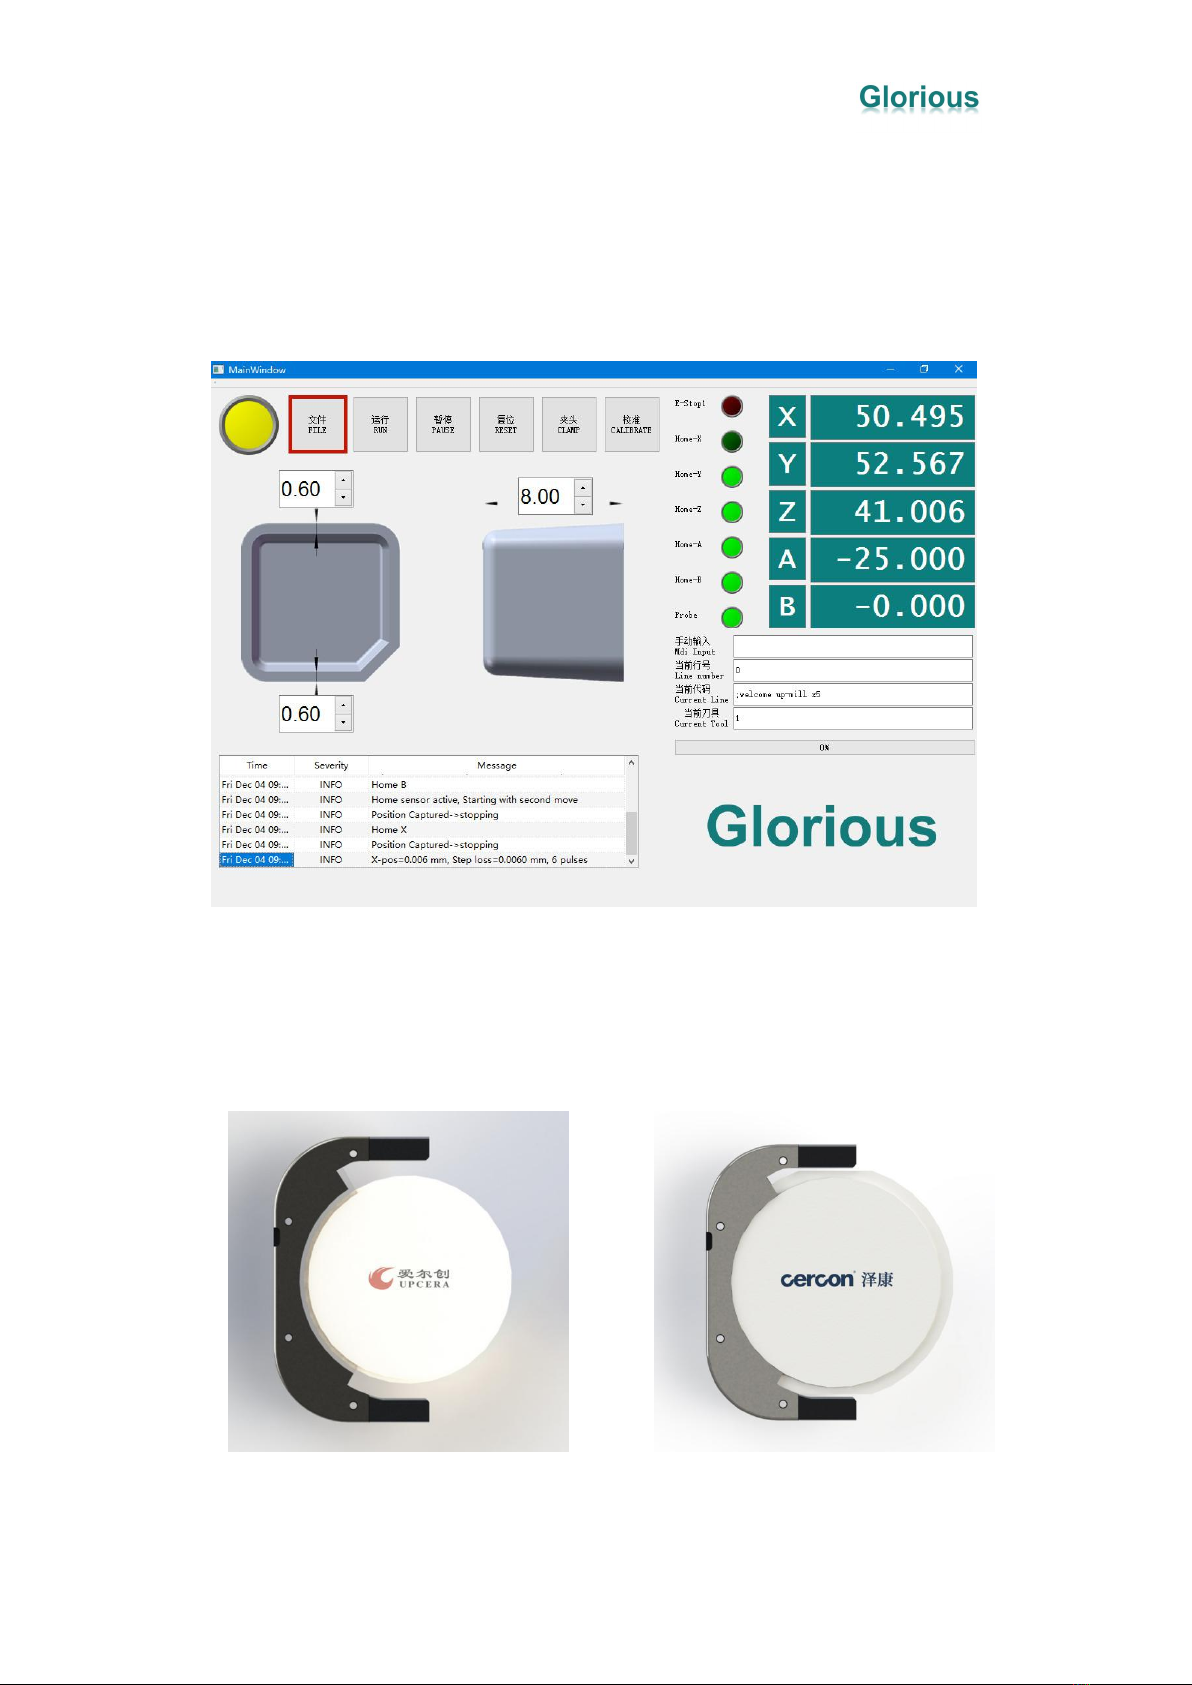
4.1 How To Use....................................................................................................9
4.2 Precautions..................................................................................................... 9
4.3 Solution After An Alarm Occurs.................................................................. 10
4.4 Material Saving Mode Fixture Adjustment Method.................................... 12
4.5 CERCON Φ105mm Large Size Fixture Adjustment Method...................... 12
4.6 Accuracy Calibration Method...................................................................... 13
4.7 GZ5 Typesetting Software Post-Processing (Only for reference by CAM
software application engineers).............................................................................16
4.8 Tool size........................................................................................................18

Glorious GZ5 Operation Manual/
1
Equipment Introduction
1.1 Equipment Destription
Glorious GZ5 is a 5-axis 5-linkage denture cutting machine ,mainly used for cutting
zirconia materials. The structure of the equipment is compact and powerful. It can cut
various types of dentures to fit the individual needs of customers.
1.2 Equipment Features
Feature one Comprehensive Alarm System
This equipment has a comprehensive alarm system, it can provide warning during the
process, remind some kinds of behaviors which may damage materials, tools, or
machines, such as:
A) Low pressure of the air cooling;
B) Low pressure of the changing knife and wait the air pressure enough;
C) Unsuccessful grasping knife and returning knife;

Glorious GZ5 Operation Manual/
2
D) Automatic tool calibration, when the tool attrition exceeds 0.05mm in a tool
path;
E)Tool breaks during cutting ;
F)When tool number is wrong ; Force the spindle not to clamp the tool before the
program is run; put the tool back to the tool library after processing,prevent the user
placing the wrong knife。
Feature two Friendly Human-Computer Interface
The equipment comes with a touchable operation panel and WIFI built in,which can
be remotely controlled,and convenient for training,diagnosis and maintain。
Each equipment has an independent ID. When the equipment has a problem, the
manufacturer can perform remote diagnosis and maintenance based on the ID; these
can reduce the issue solving time.
Feature three Open CAM System
The equipment is compatible with any CAM system on the market,such as:WorkNC、
Millbox,Sum3D,Hyperdent,etc.
Feature four Large-Angle 5-Axis 5-Linkage Cutting
The angle of the A-axis can be ±25; the angle of the B-axis can be 0~360; and 5-axis
5-linkage processing.

Glorious GZ5 Operation Manual/
3
Feature five Automatic Calibration and Automatic Processing
The equipment has an automatic calibration function, which ensures the accuracy of
the equipment and avoids errors when it begins to formal cut. These can save time and
materials.
Feature six Various Fixture Modes
The equipment fixture can be adjusted to a material-saving mode, and a large-size
plate material (such as CERCON) can also be installed.
【Material-Saving Fixture Φ98mm】 【CERCONΦ105mm】

Glorious GZ5 Operation Manual/
4
Feature seven Excellent Cleaning Effect
The equipment has a good dust suction effect, and there is an air duct in the working
chamber to avoid vacuuming during processing, causing dust to be unable to be
completely sucked out.
Feature eight Long-Term Maintenance Accuracy and Longer Service Life
The equipment is a box structure, each axis has 4 sliders, with high rigidity, which can
ensure that the body is not deformed during use or transportation, maintain the
accuracy of the equipment for a long time, and make the life of the machine longer.
1.3 Equipment Parameters

Glorious GZ5 Operation Manual/
5
Installation Environment
2.1 GZ5`s Installation Environment and Conditions
As some parts of the equipment have certain requirements on the environment, please
confirm the following installation environment and conditions before installing the

Glorious GZ5 Operation Manual/
6
machine to ensure the normal use of the machine.
Equipment Accessories and Installation
3.1 Whiteth GZ5 Accessories List
3.2 Installation guide of GZ5

Glorious GZ5 Operation Manual/
7
1)Equipment Size
2)Package Size
3)Installation instructions of GZ5

Glorious GZ5 Operation Manual/
8
A.Automatic Drain Air Filter: Pull up and turn the upper knob to adjust the air
pressure, and automatically filter the water and oil in the discharged air.
B.Digital Display Barometer: Display the size of the barometric pressure, and an
alarm will be issued if it is lower than the set value.
C.Air Connection Port: Connect the Φ8mm air pipe from the OUT end of the
automatic drain filter.
D.Dust Suction Port: Connect the Φ31mm vacuum tube from the air outlet of the
vacuum cleaner
E.Dust Collection Signal Line Interface: When the equipment starts roughing, it
outputs 24V as start signal of the vacuum cleaner. If the vacuum cleaner doesn`t have
these mechanism, connect a 24V relay.
F.Power port: Connect to 220V power supply. You can replace the spare fuse when it
needs.
G.Standby power button: For the daily use of the equipment, and only controls the
power supply of components except the computer.

Glorious GZ5 Operation Manual/
9
H. Main power switch: Turn on this button for the daily use of the machine. And you
need to turn off it when the machine is not been used for a long time or transported.
Please be fouced that you should turn off the standby power button normally before
turning off the main power switch.
Equipment Operation Guidance
4.1 How To Use
1) Preparation before starting: Check the air pressure, and the Digital display
barometer on the back of the machine, whose value should be about 600
(450≤PA≤700).
2) Turn on the machine: First,turn on the main power switch, and then press and
hold the standby power button for 3 seconds to turn on the machine.
3) The control panel is opened and the indicator light turns from green to yellow:
After the machine is turned on, it will automatically open the machine control panel
and return to the origin.
4) Place the tool: Place the tool according to the number marked on the tool library,
No. 1 R1.0*L18 /No.2 R0.5*L16 / No.3 R0.3*L10.
5) Reconfirm that the tools are placed correctly.
6) Confirm that there are no other residues in the working cabin.
7) Load the machinable material.
8) Transfer the file and start processing .Press [FILE] to call the processing file,
press [RUN] to start processing.
4.2 Precautions
1) During processing, press [STOP] to pause processing, and press [RUN] to
continue .
2) After the processing is completed, the machine will return to the origin again, and
then you can remove the machinable material.
3) Clean regularly (once a day), press [CLEAN] to flip the fixture, and vacuum with a
cleaner manually, After cleaning, press the standby power button on the left side of
the display to turn off the power. If the machine is not used for a long time, please
Turn off the main power switch on the back of the machine.
4) Regular maintenance (according to actual usage) to reduce machine failures and

Glorious GZ5 Operation Manual/
10
prolong machine life. Remove the back cover of the machine, open the left side panel
and right side panel, then clean the dust, especially the dust on the screw guide
rail,finally Apply some lubricant.
4.3 Solution After An Alarm Occurs
1)The warning message show warn air pressure low waiting...
Alarm reason: Insufficient air supply to the machine;
Solution: Check the barometer behind the machine and press [RUN] to continue
working when it reaches 450 or more.
2) The warning message show Error probe damage
Alarm reason: Signal error of the tool setting instrument,or the tool setting
instrument is damaged;
Solution: Replace the tool setter.
3)The warning message show error please select a tool from 1 to 6
Alarm reason: The tool number in the processing code is not 1-6, and the processing
code is wrong;
Solution: Check whether or not use the processing files of other machines or the
Dental typesetting software configuration is wrong.
4)The warning message show error tool change failed
Alarm reason: Automatic tool change failed;

Glorious GZ5 Operation Manual/
11
Solution: Check whether the machine chuck is loosened, whether the tool ring on the
tool is installed in place, or the tool library is damaged.
5) The warning message show error there is tool on the spindle
Alarm reason: There is a tool on the spindle when the it begin to detect the tool;
Solution: If there is no tool in the spindle, but the tool number is displayed incorrectly,
click the [CLAMP] button on the control panel, and the current tool number will be
automatically cleared; if there is a tool on the spindle, click the [CLAMP] button on
the control panel and take it manually the tool on the spindle,then returned to the
corresponding tool library, and the current tool number is automatically cleared.
6)The warning message show error the spindle must not be clampe tool before the
program is run
Alarm reason: The current tool number is not 0, and processing cannot be started;
Solution: Turn off the alarm message, reset the machine, press the [CLAMP] button
to remove the toolr on the spindle and put it back into the corresponding tool library,
and restart processing.
7) The warning message show CPU State=SIMULATION
Alarm reason: The program is running in the simulation mode, the machine does not
return to the origin when the machine is turned on, and the file cannot be read (the
prompt can be seen by pulling the prompt page to the top third line), indicating that
the machine computer is not connected to the machine motherboard.
Solution: Copy the cnc.ini and macro.cnc files in the C drive to the WhitethCNC
folder to overwrite the original files, restart DentalMill, if the alarm still occurs, check
whether the USB connection or network cable connection between the computer and
the control board is not contact well, If the wire is damaged, it needs to be replaced;
after removing the above, check whether the computer and control board are damaged
and need to be replaced.
8)The warning message show ESTOP active, please reset
Alarm reason: Air pressure alarm;
Solution: Turn off the alarm message after the air pressure returns to normal, and then
reset it.
9)The warning message show EXTERR IN active, please reset.
Alarm reason: Driver alarm;
Solution: Shut down and check whether the five-axis motor of xyzab and the spindle
inverter wire and the connection between them are in poor contact, whether they are
damaged and need to be replaced; or whether the five-axis motor of xyzab is smooth
and not stuck, and whether the spindle rotates flexibly.

Glorious GZ5 Operation Manual/
12
4.4 Material Saving Mode Fixture Adjustment Method
No. ①is the standard secondary fixture (included in the Factory packing box );
No. ②is the plastic secondary fixture.
Adjustment Method:
1) Turn off the machine, turn to the back of the fixture, remove the three secondary
fixture fixing screws, and remove fixture No.①.
2) Replace the fixture cover on fixture No.②, and glue the rubber block No. ②and
the zirconia block with glue.
* The plastic secondary clamp has a clamping position to ensure that the material is
in a fixed position each time when it is clamped. There is no need to draw a mark and
mark each time when it is clamped. It can also cut the edge of the denture on the
plastic secondary clamp, which is more convenient than the semicircular clamp
Typesetting, saving the materials.
* Plastic secondary fixture are disposable consumables, which is used for one plate
at a time and can buy from the machine supplier.
4.5 CERCON Φ105mm Large Size Fixture Adjustment Method

Glorious GZ5 Operation Manual/
13
No. ①is the standard secondary fixture (included in the Factory packing box )
No. ②is thecover of fixture (included in the Factory packing box )
Adjustment Method:
1) Turn off the machine, turn to the back of the fixture, remove the secondary fixture
screws, and remove fixture No.①.
2) Replace the fixture cover No. ②, and install the CERCON plate material.
4.6 Accuracy Calibration Method
1) Close the main program DentMill5, and open the program Calibrate.

Glorious GZ5 Operation Manual/
14
2) After waiting for automatic reset, load a wax disc or low hardness resin disc with a
thickness of Φ98*10-14mm, and click [FILE] to read the calibrated processing file.
3) Select the calibration block file Calibrate304 around or in the middle of
Calibrate304 (the difference between the two is limited to the different layout
positions, which can be selected according to the remaining material), and the
material rotation angle can be installed for multiple cuttings next time.
【Calibrate304 Around】 【Calibrate304 Middle】

Glorious GZ5 Operation Manual/
15
4) After processing the calibration block, use a vernier caliper to measure the size of
the calibration block, modify the value column, and confirm that it is correct. Click
[CALIBRATE] to complete the calibration.

Glorious GZ5 Operation Manual/
16
4.7 GZ5 Typesetting Software Post-Processing (Only for reference by
CAM software application engineers)
(Program Begin)
gosub check_empty_tool ;Confirm there is no tool on the spindle at the beginning
of the program.
g0 g17 g40 g49 g54 g80 g90 ;G code initialization.
(Tool Path Begin)
if need to change tool
m9 ;Stop vacuuming.
m5 ;Stop spindle.
gosub azxy_safe ;Return to A->Z->X-> safe position.
g0 b0.0 ;B-axis return to angle 0.
If there is no tool on the spindle(t0)
m100 ;Confirm there is no tool on the Spindle
End Judgement
t—— m6 ;Change tool.
g0 g90 a—— b—— ;A-axis and B-axis return to the initial angle of the tool
path.
IF t1
m8 ;If it is roughing,turn on the vacuum.
End Judgement
s—— m3 ;Set the speed of the spindle,turn on spindle.

Glorious GZ5 Operation Manual/
17
g0 x—— y—— ;XY axis returns to the initial position of the tool path。
If don`t change tool
If the B-axis needs to change angle
gosub azxy_safe ;Return to A->Z->X->Y safe position.
g0 a—— b—— ;A-axis and B-axis return to the initial angle of the program.
s—— m3 ;Set the speed of the spindle,turn on spindle.
g0 x—— y—— ;XY axis returns to the initial position of the program.
If the B-axis does not change angle
If the A-axis need to change angle
gosub azxy_safe ;Return to A->Z->X->Y safe position.
g0 a—— b—— ;A-axis and B-axis return to the initial angle of the tool path.
s—— m3 ;Set the speed of the spindle,turn on spindle.
g0 x—— y—— ;XY axis returns to the initial position of the program.
If the A-axis does not change angle
gosub z_safe ;Z axis back to the highest position.
g0 a—— b—— ;A-axis and B-axis return to the initial angle of the tool path.
s—— m3 ;Set the speed of the spindle,turn on spindle.
g0 x—— y—— ;XY axis returns to the initial position of the program.
End Judgement
End Judgement
End Judgement
(End Tool Path )
gosub z_safe ;Z axis back to the highest position.
g0 a0.0 ;A-axis return to angle 0.
(End)
m9 ;Stop vacuuming.
m5 ;Stop spindle.
m100 ;Measure tool loss.
t0 m6 ;Spindle tool return.
g30 ;Back to the second reference point of the machine tool.
m101 ;Back to origin.
m30 ;End of program.
The positive direction of the X axis is the international standard direction

Glorious GZ5 Operation Manual/
18
International standard direction of the positive direction of Y axis
The positive direction of the Z axis international standard direction
The positive direction of the A axis is the opposite of the international standard
direction International standard direction of the positive direction of B axis
4.8 Tool size
1)Tool Position
2)Tool Detail Size
Tool NO.1 R1*L18mm
Tool NO.2 R0.5*L16mm
Tool NO.3 R0.3*L10
Table of contents
Popular Cutter manuals by other brands

Makita
Makita DCS553 instruction manual

Husqvarna
Husqvarna K 535i Operator's manual

Kronen
Kronen Nako KC-32 Translation of the original instruction manual

eXact
eXact PipeCut 170 operating instructions

Land Pride
Land Pride RCB5710 Operator's manual

Central Forge
Central Forge 41711 Assembly & operating instructions