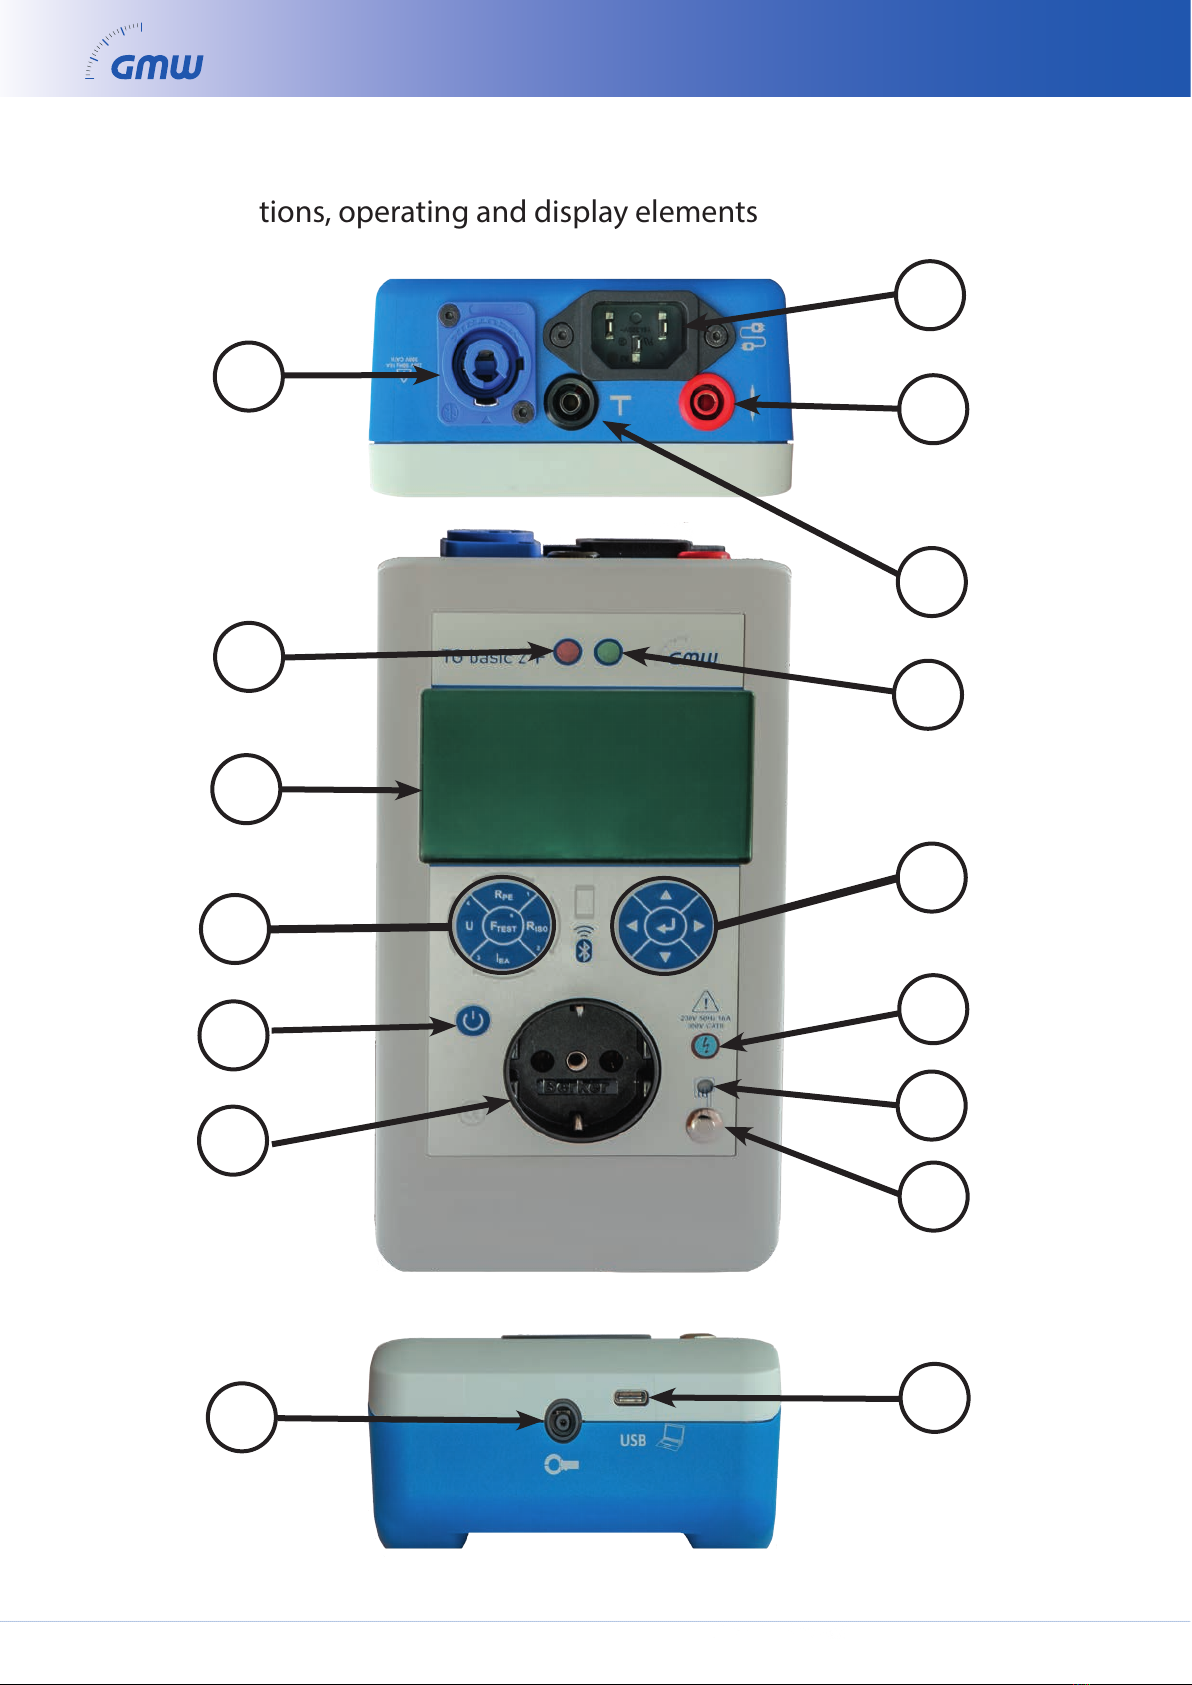
GMW TG Basic 2 User manual

Operating Manual
for
TG Basic 2 / TG Basic 2+
Appliance Tester
DIN VDE 0701/0702
ÖVE 8701 - 1 - 2
Gilgen, Müller & Weigert (GMW) GmbH & Co. KG Am Farrnbach 4A
90556 Cadolzburg
Tel: +49 (0) 9103 7129-0
Fax: +49 (0) 9103 7129-205/207

www.g-mw.de2
Product overview
LOW VOLTAGE AND MEDIUM VOLTAGE CURRENT
CONVERTER ENERGY MANAGEMENT
ANALOGUE DISPLAY UNITS
DIGITAL PANEL-MOUNTED MEASURING INSTRUMENTS
PRINTERS
S H U N T S
SWITCH CABINET COMPONENTS
P O T E N T IO M E T E R S
LOW VOLTAGE SWITCHGEARS
APPLIANCE TESTER
MEASURING TRANSDUCERS

www.g-mw.de 3
All texts, illustrations and technical specications were compiled with care. In spite of this care,
errors cannot be ruled out entirely. The author and the manufacturer of the test device cannot
assume legal responsibility nor any liability for incorrect information and the consequences
thereof.
This operating manual must be read carefully and fully before using the test device!
Warning notices and warning signs are intended to warn in particular against risks or hazards!
Warning notices and warning signs in the operating manual, on the test device and accessories,
must be heeded in particular e.g.:
General warning: hazardous situation!
Follow the operating manual!
Warning: dangerous high voltage!

www.g-mw.de4
2 Application
2
3
4 Connections, operating and display elements
4.1 Mains connection, Neutrik powerCON blue
3 Scope of delivery
4.6 Black measuring socket„GND“
4.4 Connection, shockproof test socket
4.11 Buttons for individual measurements
4.2 Connection, TG Basic 2 + non-heating appliance plug
4.8 Green LED display
4.5 Red measuring socket„Probe“
4.9 LCD display
4.16 USB Type C interface, TG Basic 2+ only
4.7 Red LED display
4.10 Adjustment buttons
4.12 Phase control lamp
4.13 Finger contact LED
4.14 Finger contact
4.15 Clip-on ammeter connection, TG Basic 2+ only
5 Function description
5.1 Power supply
5.2 Memory
6 Testing the electrical connection
6.2 Single-phase connection
8.4 Individual measurements
8.5 Function test
8.6 Inspecting the inscriptions
8.7 Documenting the test
7 Commissioning the test device
7.1 Performing a visual inspection
7.3 Starting the test
7.2 Supplying the test device with mains voltage
1 General safety and warning notices
6.1 Display connection
8 Testing electrical appliances
8.1 Specialist responsibility
8.2 Electrical connection
8.3 Visual inspection
1.1 Meaning of symbols on the divice
1.2 Meaning of symbols in the operating manual
4.3 Connection, TG basic 2
Seite
6
8
8
9
9
10
11
11
11
11
12
12
12
12
12
12
12
13
13
13
13
13
13
13
13
14
15
15
15
15
15
16
17
18
18
18
18
20
20
20

www.g-mw.de 5
2
3
9 Connection options, gures, examples
9.1 Protective earth conductor measurements of alternating current test objects
9.2 Protective earth conductor measurements of alternating current test objects
9.4 Protective earth conductor resistance measurements of extension cables
9.3 Protective earth conductor resistance measurements of test objects with xed connections
9.5 Protective earth conductor resistance measurement
(e.g. three-phase current test objects) with two measuring lines
9.6 Protective earth conductor resistance measurement of
three-phase current test objects with the extension cable adapter
9.7 Touchable, insulated, conductive parts
9.8 Insulation resistance LN-PE
9.9 Insulation resistance LN-PE of three-phase current test objects with
the extension cable adapter
9.10 Substitute leakage current measurement LN-PE
9.13 Voltage measurement
9.14 Dierential current measurement on test objects with shockproof plugs
9.17 Wiring test (in the Test-Master app only)
10 Error message, troubleshooting
10.1 The display is o
10.2 Touch current measurement shows 0,000 mA
10.4 Dierential current measurement shows„F“
10.3 Touch current measurement over 0,5 mA
9.11 Substitute leakage current measurement LN-probe
9.12 Substitute leakage current measurement probe-probe
11 Replacement parts
Seite
9.15 Clip-on ammeter function test (TG Basic 2+ only)
9.16 RCD function test (TG Basic 2+ only)
16 Test-Master app
15 Warranty and guarantee
13 Disposal
12 Technical data
12.1 Dimensions
14 Service information
14.1 Location
14.2 Product description
14.3 Calibration / service order
17 Accessories (optional)
21
21
22
23
23
25
25
26
27
28
29
30
30
31
32
33
33
33
34
34
34
34
34
34
35
36
36
36
36
36
36
37
37
38

www.g-mw.de6
1 General safety and warning notices
The„TG Basic 2 (+)“ test device was built and tested to the following safety regulations:
• DIN EN 61010-1 (VDE 0411 Part 1),
• DIN EN 61010-2-30; VDE 0411-2-030
„Safety requirements for electrical equipment for measurement, control, and laboratory use,
General requirements“
• DIN VDE 0404 Part 1 and Part 2,
„Devices for testing the safety measures of electrical equipment“
• Interference immunity in accordance with DIN EN 61326,
„Electrical equipment for control and laboratory use - EMC requirements“
To maintain this level of safety and ensure danger-free operation, users must heed the following
warning notices:
All tests must be performed by a specialist or an electrically trained
person under his or her direction and supervision. The user (tester)
must have been instructed by a specialist in conducting and
evaluating the test! TRBS 1203 stipulates the precise requirements
that must be met for this.
The test device must be used for the intended purpose to ensure the safety of the tester,
test device and test object.
Heed the warnings on the test device and the mains adapter cables!
The he device must only be operated on a 230 V AC mains fused with max. 16 A!
It is not suitable for testing electrical installations!
All texts, illustrations and technical specications were compiled with care. In spite of this care, errors
cannot be ruled out entirely. The author and the manufacturer of the test device cannot assume legal
responsibility nor any liability for incorrect information and the consequences thereof!
This operating manual must be read carefully and fully before using
the test device. Make the operating manual available to all users.
Unfused measurement circuits must not be measured!

www.g-mw.de 7
Repair work and modications to the test device must only be carried out by the
manufacturer itself or specialists authorised by the manufacturer!
Only specialists may perform repair work on mains adapter cables.
Only the original replacement parts specied by the manufacturer may be tted
and used!
If safe operation is no longer possible, e.g. due to:
- Visible damage,
- Improper storage,
- Improper transportation,
- Failure of a phase control lamp,
- Failure of measurement functions, etc.,
the test device must no longer be operated! The test device must be
decommissioned without delay and secured to prevent unintentional commissio-
ning! The test device may be repaired by centres authorised by the manufacturer!
Measurements may only be performed on protective earth conductor resistances
and touch currents under certain circumstances
and in compliance with the corresponding hazard warnings!
Note that the test objects may carry high voltages, e.g. from charged capacitive
circuits!
Do not connect the test object to the test socket until the mains connection is
technically safe!
WARNING! When connecting the test object to a test socket, voltages dangerous
to the touch can result on a defective test object or touchable conductive parts
not connected to the protective earth conductor.
Directive 2012/19/EU on Waste Electrical and Electronic Equipment
WEEE Directive 2012/19/EU is intended to avoid electrical and electronic equipment
waste and reduction of such waste via re-use, recycling and other forms of use.
REACH Directive (EC) No.: 1907/2006 on registration, evaluation, approval and
restriction of chemicals.

www.g-mw.de8
1.1 Meaning of symbols on the device
Warning hazardous situation
WARNING! HEED documentation
The device must not be disposed of with domestic waste.
European conformity marking
Maximum permissible voltage and measurement category between the connections and the earth
300 V CAT II
1.2 Meaning of symbols in the operating manual
WARNING!
Warning: Voltage!
Note!

www.g-mw.de 9
2 USE
The TG basic 2 / TG basic 2+ test device is a measuring device for evaluating the eectiveness of protective
measures on electrical appliances in accordance with DIN VDE 0701-0702 respektive ÖVE 8701-1-2
3 Scope of delivery
• 1 TG basic 2 or TG basic 2+ test device
• 1 red measuring line, 2m
• 1 black measuring line, 2m
• 1 mains connection cable, shockproof plug, Neutrik powerCon blue 1,5m
• Test cable, shockproof non-heating appliance plug (TG basic 2+)
• Test cable, shockproof 4mm safety plug [A1] (TG basic 2)
• Test cable, non-heating appliance plug -4mm safety plug [A2] (TG basic 2)
• 1 soft pouch
• Quick guide
• Factory calibration certificate
Maximum permissible voltage and measurement category between the connections and the earth

www.g-mw.de10
4 Connections, operating and display elements
1
4
3
2
6
11
13
10
9
14
15
7
5
Bild 2
16
8
12

www.g-mw.de 11
Connections (Figure 2)
Before connecting the test device to the mains voltage, the corresponding warnings in Section 1 ‘General
safety and warning notices’, the warnings on the mains adapter cable and, if applicable, the warnings on
the accessories must be heeded! The safety of the user, appliance and test object is only ensured when
they are used as intended! The protective earth conductor potential must be tested using the nger
contact after connecting the test device.
1. Mains connection Neutrik Power CON blue
2. Non-heating appliance plug connection for extension cables and RCD testing (TG Basic 2+), IEC 60320 C19
3. Connection for red measuring line„Probe“ or for connecting adapter A1 and A2
(Rpe measurement) (for TG Basic 2 only)
4. Connection for black measuring line„GND“
5. FAULT LED
6. GOOD LED
7. LCD-Display
8. Arrow keys
9. Buttons for individual measurements and
10. On / O button
11. Phase control lamp indicates mains voltage at the shockproof test socket
12. Finger contact LED
13. Finger contact
14. USB Typ C connection for communication (for TG Basic 2+only)
15. Connection for a clip-on ammeter (for TG Basic 2+ only)
16. Test socket
4.1 Mains connection, Neutrik powerCON blue (1)
Mains connection of the test device. The test device must only be operated on a 230 V AC +/-10 % 40 – 60 Hz,
grid fused with max. 16 A!
4.2 Connection, non-heating appliance plug TG Basic 2+ C13 (2)
To connect the included non-heating appliance line with an extension, or test non-heating appliance lines.
4.3 Connection, TG basic 2 (3)
To connect the included test cables/adapters (A1 or A2) with an extension or to test non-heating
appliance lines.
4.4 Connection, shockproof test socket (16)
To connect the test cable to a shockproof socket up to 16 A.
Do not connect protective earth conductor until immediately before the mains is switched on.
WARNING!!!
When connecting the test object to a test socket, a voltage dangerous to the touch can result on a
defective test object or touchable conductive parts not connected to the protective earth conductor.

www.g-mw.de12
4.5 Red measuring socket„Probe“ (3)
Connecting the measuring line for the plus pole for measurement of the protective earth conductor resistance,
insulation resistance. Measurement input for voltage, substitute leakage current and touch current measurement.
4.6 Black measuring socket„GND“ (4)
Connecting the measuring line for the minus pole for measurement of the protective earth conductor
resistance, touch current, voltage and insulation resistance.
4.7 Red LED indicator (5)
Display: Threshold exceeded
4.8 Green LED indicator (6)
Display: Measurement value OK
4.9 LCD display (7)
The display has a resolution of 320x240 pixels and is backlit.
All information (user interface, help texts) and measurement results
(Measurement functions, threshold values, measurement values and units) are shown in plain text.
• For displaying the menu and measurement values in single mode
• In remote mode, the display shows only ‘Remote mode
4.10 Adjustment buttons (8)
All measurements can be operated simply and conveniently using the arrow key controls.
• - Bluetooth symbol without function or ESC
• - Arrow keys to move the cursor/select parameters
• - Enter key to enter and conrm the menu
4.11 Buttons for individual measurements (9)
• On / OFF button
• Passive measurements: - Protective earth conductor measurement
- Insulation measurement
- Substitute leakage current measurement
• Active measurements: - Function test with measurement of touch current,
dierential current, voltage, current consumption and output
- ELV test, secondary DC voltage measurement

www.g-mw.de 13
4.12 Phase control lamp (11)
Indicates presence of mains voltage at the shockproof test socket.
4.13 Finger contact LED (12)
The nger contact LED must not ash!
The nger contact LED indicates the presence of voltage at the PE conductor when the nger contact LED is touched.
The nger contact LED is normally o.
4.14 Finger contact (13)
The nger contact is used to check the mains potential at the PE conductor. Information is displayed
via nger contact LED.
4.15 Clip-on ammeter connection, TG Basic 2+ only (15)
Connection of a TGSZ 40 dierential clip-on ammeter, to measure phase currents and dierential currents.
4.16 USB Typ C (16) interface, for TG Basic 2+ only
Connection of a USB-C connector for service mode only.
5 Functionality description
5.1 Power supply
The device is supplied with power via the mains (230V ± 10%).
The measurement electronics are supplied via an internal fuse.
5.2 Memory
The measurement values can only be stored in the Test-Master app on a mobile phone or tablet.
Test devices TG Basic 2 / TG Basic 2+ do not have internal memory.

www.g-mw.de14
6 Testing the electrical connection
The operator is responsible for the safety of the electrical installation (incl. on-site electrical connection
and equipotential bonding system), in accordance with the fundamental statutory regulations
(accident prevention regulations, valid standards).
Testing the electrical connection is not part of the test requirements for modication, testing and repeat
testing on the electrical devices. In spite of this, it is still important to know that the mains status is OK
before testing electrical appliances.
The test device does not test the electrical connection as required by DIN VDE 0100.
However, it does make important and meaningful measurements for the electrical connection, e.g.:
• Testing the mains protective earth conductor potential via the nger contact
• Mains protective earth conductor potential PE < 30 V
• Testing the N conductor for disruptions (display stays o)
• Display of the phase control lamp when the relay is activated
• Measurements of voltage phase to N (display 1 bis 260 V AC)
Note:
• First, check whether the protective earth conductor is connected by touching the nger contact.
If the red LED ashes, the protective earth conductor is not connected. ‘PE>30V!!’appears on the
display if the protective earth conductor connection is not OK. The device also emits a short audible
warning signal.
• Measurements with the test device can only be performed again after the protective earth
conductor has been repaired successfully.
• If N/PE are mixed up, the on-site fault-current circuit breaker disconnects.
• If there is no display, there may be voltage present at PE. Test the appliance using the nger contact,
disconnect the test device from the mains and check it in another socket. If the appliance works now,
have the socket checked by a specialist.
• When used in an IT network, and if the test device is connected via an isolating transformer, there
is no PE connection: The following message is shown on the display:„PE > 30V!!“.
Note!
The designations described here could dier by
device, operating system and software version!

www.g-mw.de 15
6.1 Display connection
The rst menu,„Connection“, shows the mains voltage present and the quality of the N and PE conductor
connection.
You can check that the nger contact LED is working properly by touching the nger contact in the
individual measurement„IEA LN - Probe“ with the probe. The LED must ash.
6.2 Single-phase connection
WARNING!!!
• If voltage L1 < 207 V, or L1 > 253 V, reliable and meaningful measurements are no longer possible!
If the message ‘PE>30V!!’is shown, there is probably a disruption in the protective earth conductor or
there may be an external voltage at the protective earth conductor (check with the nger contact)!
See„Checking the electrical connection“ on page 13 for details of how to check the protective earth
conductor.
7 Commissioning the test device
7.1 Performing a visual inspection
• See the safety instructions in Section 1!
• Visually inspect the mains connection, test device and measurement accessories!
• Heed warnings on the test device, mains adapter cable and measurement accessories!
7.2 Supplying the test device with mains voltage
The test device is supplied via the mains connection on the top of the device.
The TG Basic 2 and TG Basic 2+ devices are automatically deactivated completely after approx. 10 min.
Important note! For the TG Basic 2+ tester:
The rechargeable batteries are fully charged after approx. 5 hours of charging.
The rechargeable batteries must be fully charged before commissioning for the rst time!!!
The device can only be charged when it is switched o.
The charging process is indicated by a ashing red LED.
There is no automatic deactivation if the device is in remote mode (Test-Master app).

www.g-mw.de16
The Ni-MH batteries can be aected by a memory eect. To counteract this, you should discharge the
batteries completely roughly once a month.
• The„Discharge battery“ function can be found on the Connection menu of the TG Basic 2+.
• Press the button to start the discharge process; the screen switches o, the relays switch on and
the red LED ashes. The charging process starts automatically as soon as the batteries are completely
discharged
• The maximum discharge period is 5 hours
• The maximum charge period is 10 hours
The device must be supplied with power at all times during the discharging and charging process!
• When the device has been charged 20 times (without previously discharging it fully), a message
appears prompting you to discharge the battery.
Display of the charging state: ‘Charge!’is shown on the display when the device needs charging.
7.3 Starting the test
The individual tests can be selected via the direct selection buttons. Optionally, tests can be performed
automatically via the Bluetooth connection using the Test-Master app in remote mode.

www.g-mw.de 17
8 Testing electrical appliances
The tests required by standards are implemented in the integrated test sequences. Before performing the
test, the test object has to be classied in the Prole menu.
After repairs, modications and repeat testing, electrical appliances must also oer users protection
comparable with the protection of new appliances against electrical hazards. Tests in compliance with the
corresponding standards can determine whether the required safety is given. The tests outlined below
must be conducted in the specied sequence. Each test must be passed before the next test is started:
• Visual inspection
• Testing the protective earth conductor
• Measure the insulation resistance and leakage current or insulation resistance and an alternative
measurement in the substitute leakage current method for appliances with protection class I,
where this is permitted for the test object.
• Measure the insulation resistance, the touch current or insulation resistance and an alternative
measurement in the substitute leakage current method for appliances with protection class II and
for all touchable conductive parts of appliances with protection class I that are not connected to the
protective earth conductor, where this is permitted for the test object.
• Note for
Function tests:
The protective earth conductor resistance measurement must have been completed successfully before a
protective earth conductor current measurement is performed on appliances with protection class I!
An insulation resistance measurement at 500 V DC must be successfully completed before performing a
touch current measurement on appliances with protection class II or III (except IT equipment)!
External connection points from protective extra-low voltage generated in the device must be assessed for
compliance with the limits for the protective measure!
8.1 Specialist responsibility
There are particularly strict requirements for the specialist qualications of electricians.
DGUV Regulation 3 and the VDE Regulations, which are also formalised as electrical regulations,
include the legally binding and mandatory requirement that a responsible electrician is deployed.
Specialist responsibility includes the obligation to do the right thing. Accordingly, the corresponding
technical rules (electrical rules, VDE provisions etc.) must be observed. The specialist electrician must not
omit any actions that should have been taken to avoid damage. The specialist responsibility becomes
particularly clear when, for whichever reasons, tests cannot be performed completely. If a test required in
the corresponding standard cannot be performed for technical reasons or local factors, or the associated
workload, the specialist electrician must decide whether safety can be conrmed or not in spite of this
omission. This decision must be justied, documented and the specialist must take responsibility!

www.g-mw.de18
8.2 Electrical connection
According to the fundamental statutory regulations, the accident prevention regulations and valid
standards, it is not the manufacturer of the appliances to be connected who is responsible for the safety of
the on-site electrical connection and, where applicable, connection of the equipotential bonding system
to the device; these are the client’s responsibility. Tests on devices with xed connections cannot always
be conducted, often for technical reasons, local circumstances or the associated workload. If the appliance
connection is dicult to reach, full testing entails disconnecting its connections to the mains supply
(L1, L2, L3, N, PE) elsewhere, e.g. at the appliance’s mains terminal, socket, distributor etc., which is a
labour-intensive process.
WARNING!!!
Electrical appliances with a rated current of over 16 A must be connected directly to an all-pole mains
isolator (load switch, circuit breaker or power switch). Plugs and sockets or appliance connectors with a
rated current of over 16 A must not be connected or disconnected from the mains under load
(always deactivate beforehand).
Plugs and sockets or appliance connectors for appliances with a rated current of no more than 16 A do
not require a mains isolator.
8.3 Visual inspection
The appliances are always subject to a visual inspection for externally visible defects and, where possible,
for suitability for the place of installation:
• Damage to the housing
• External defects of the connecting cables
• Defects of the cord connector guard and strain relief of the connecting cables
• Signs of overload and improper use
• Unauthorised interference and modications
• Proper condition of the protective covers
• Soiling and corrosion with an adverse eect on safety
• Existence of necessary air lters
• Clear cooling vents
• Absence of leaks
• Clear legibility of safety-related inscriptions, e.g. warning symbols, protection class, fuse specications,
switch positions on circuit breakers, etc.
Note:
Externally visible defects, which could lead to a mechanical or re hazard, should be repaired immediately.
8.4 Individual measurement
Depending on the test object and potential electrical hazards arising from it, the following measurements
can be selected. Potential individual measurements are marked on the circuit in the appliance.

www.g-mw.de 19
Buttons: Function:
= Low-resistance measurement with 200 mA DC test current
• Plug = Low-resistance measurement via the shockproof socket and the red connection
• Fixed connection = Low-resistance measurement via the mains connecting cable
(blue powerCON)/via the system installation and the red probe connection
• Probe - probe = Low-resistance measurement between the red probe connection and
black probe connection
• Extension = Low-resistance measurement via the shockproof socket and the non-heating
appliance plug C13 (TG Basic 2+)
• Extension = Low-resistance measurement via the shockproof socket and adapter A2
(TG Basic 2)
• Rsl calibration = Calibration of measurement line resistances
/ = Insulation test with a test voltage of 250 or 500 V DC (max. 1 mA)
• LN – PE = Isolationsprüfung zwischen Aktivleitern (gebrückt) und Schutzleiter
• LN – probe = Insulation test between active conductors and the red probe connection
• Probe – PE = Insulation test between the red probe connection and the protective earth
conductor contact on the shockproof plug test socket
• Probe – probe = Insulation test between the red probe connection and black probe
connection
• L – N = Insulation test between the L and N active conductors
WARNING! The test voltage of 500 V DC can destroy the test objects.
= Substitute leakage current measurement with an idle voltage of approx. 95 V AC (max. 2,5 mA)
• LN – PE = Measurement of substitute leakage currents when an alternating current is
applied between the active conductor and the protective earth conductor.
• LN – probe = Measurement of substitute leakage currents when an alternating current is
applied between the active conductor and the red probe connection.
• Probe – probe = Measurement of substitute leakage currents when an alternating current
is applied between the red and black probe connections.
= Voltage measurement across the red and black probe connections. The mains voltage is
switched on at the shockproof test socket for this!
= Function test with dierential, touch current measurement, phase current, voltage,
active power and standby power measurement in one measurement step.
• Socket function test = The mains voltage is switched on at the shockproof test socket.
Touch currents can be sampled at all conductive parts with the red sensor, while
dierential current, voltage, phase current and active power measurements are conducted
simultaneously. The arrow keys can be used to activate additional functions, like standby
power measurement and polarity reversal of phase and neutral conductor.
• Additional functions in the TG Basic 2+
• Clip-on ammeter function test = Dierential current and phase current can be tested here with a
clip-on ammeter. The touch current can also be sampled with the red sensor.
• RCD triggering time function test with 30 mA

www.g-mw.de20
8.5 Function test
After completion of the electrical test, a function test must be carried out on the appliance.
A partial test can be sucient in accordance with legal requirements.
8.6 Inspecting the inscriptions
Safety-related inscriptions, for example stipulations on the direction of rotation, must be checked and,
where necessary, renewed or supplemented in suitable form.
8.7 Documenting the test
Tests must be documented when they are passed. If an appliance proves to be unsafe, this should be
clearly indicated on the appliance and the operator must be informed in writing (test report/list of defects).
The measurement values and any changes must be documented. Attachment of a test seal
e.g.„Tested per VDE 0701-0702 and DGUV Regulation 3“ on the appliance is recommended when a safety
test is passed.
This manual suits for next models
1
Table of contents
Other GMW Test Equipment manuals
Popular Test Equipment manuals by other brands

Tektronix
Tektronix 4 Series Declassification and security instructions

Keysight Technologies
Keysight Technologies InfiniiVision 2000 X Series user guide

Extech Instruments
Extech Instruments ET25 instructions

Vermason
Vermason 223002 Installation, operation and maintenance

Keysight Technologies
Keysight Technologies N5991 Getting started guide

Siemens
Siemens ELTPHB quick start guide