GN Resound Danalogic 6 6070-DVI User manual

USER GUIDE
Danalogic 6 BTE
6070-DVI
6080-DVI

DANALOGIC 6
BEHIND-THE-EAR
PERSONAL HEARING SYSTEM
Congratulations with your new fully-digital GN ReSound
hearing instrument!
This booklet describes the functionality of all BTE
(Behind-The-Ear) models in the Danalogic 6 product
line. The functionality depends on the model; your
hearing care professional will highlight the features of
your particular hearing instrument.
GN ReSound’s advanced technology and customized
programmes, selected by your hearing care profes-
sional, will bring the best possible hearing solution to
your family life, and your professional and social activ-
ities.
Your hearing instrument has been adjusted to your
individual hearing loss. Please familiarize yourself with
the information in this booklet. Proper understanding
and use of your new GN ReSound hearing instrument
will allow you to derive maximum hearing benefit.
This instruction covers the following Danalogic 6 BTE
products: 6070-DVI and 6080-DVI.
Danalogic 6 is a trademark of GN ReSound.
2

Contents page
Your Danalogic 6 Hearing Instrument 4
Programme Selector 6
Your Programme Environments 6
Telecoil 7
Directionality 7
Stand-by Function 7
On/Off Function 7
SmartStart 8
Volume Control 8
Direct Audio Input (DAI) 9
Low Battery Warning 9
Inserting and removing the Instrument 10
Changing the Battery 12
Battery Warning Information 13
Daily Maintenance 14
Cleaning the Ear Mould and
replacing Sound Outlet Filter 15
Sound Outlet Filter 16
How To Remove Filter 16
How ToPlace Filter On Hook 16
Cleaning The FlexTube And Dome 17
How To Mount The Tulip Dome 18
Telephone Use 20
Using Assistive Listening Systems 21
Repairs 21
Troubleshooting Guide 22
General Precautions 24
Technical Data 24
Key Word Index 25
3

Your Danalogic 6 Hearing Instrument
1. Programme Selector
2. Battery Compartment & On/Off Switch
3. Sound Outlet
4. 1st Microphone Sound Inlet
5. 2nd Microphone Sound Inlet
6. Volume Control (optional)
7. Direct Audio Input (DAI) (optional)
4
2
3
4
1
6
7
5

8. Left/Right indicator and battery lock
(Right=Red, Left=Blue)
9. Model
10. Manufacturer
5
8
9
6070-DVI
10

Programme Selector
Your hearing care professional has most likely programmed
multiple programmes into your instrument. You can select
programmes simply by depressing the programme selector
once. You will then hear one or more “beeps”, indicating
which programme you have selected. Your hearing instru-
ment will switch programmes as follows:
Examples:
3programmes: 1→2, 2 →3, 3 →1
With optional telecoil: 1 →2, 2 →3, 3 →T, T →1
With telecoil
plus microphone: 1 →2, 2 →3, 3 →MT, MT →1
You can always return to programme 1 by turning your
instrument off and then on again or by placing it in stand-
by mode and then returning to its operating mode.
Your Programme Environments
Programme Description of when to use
6

7
Telecoil:
See section “Telephone Use” for a detailed description of
this function.
Danalogic 6 BTE instruments are all equipped with a telecoil
in their standard version.
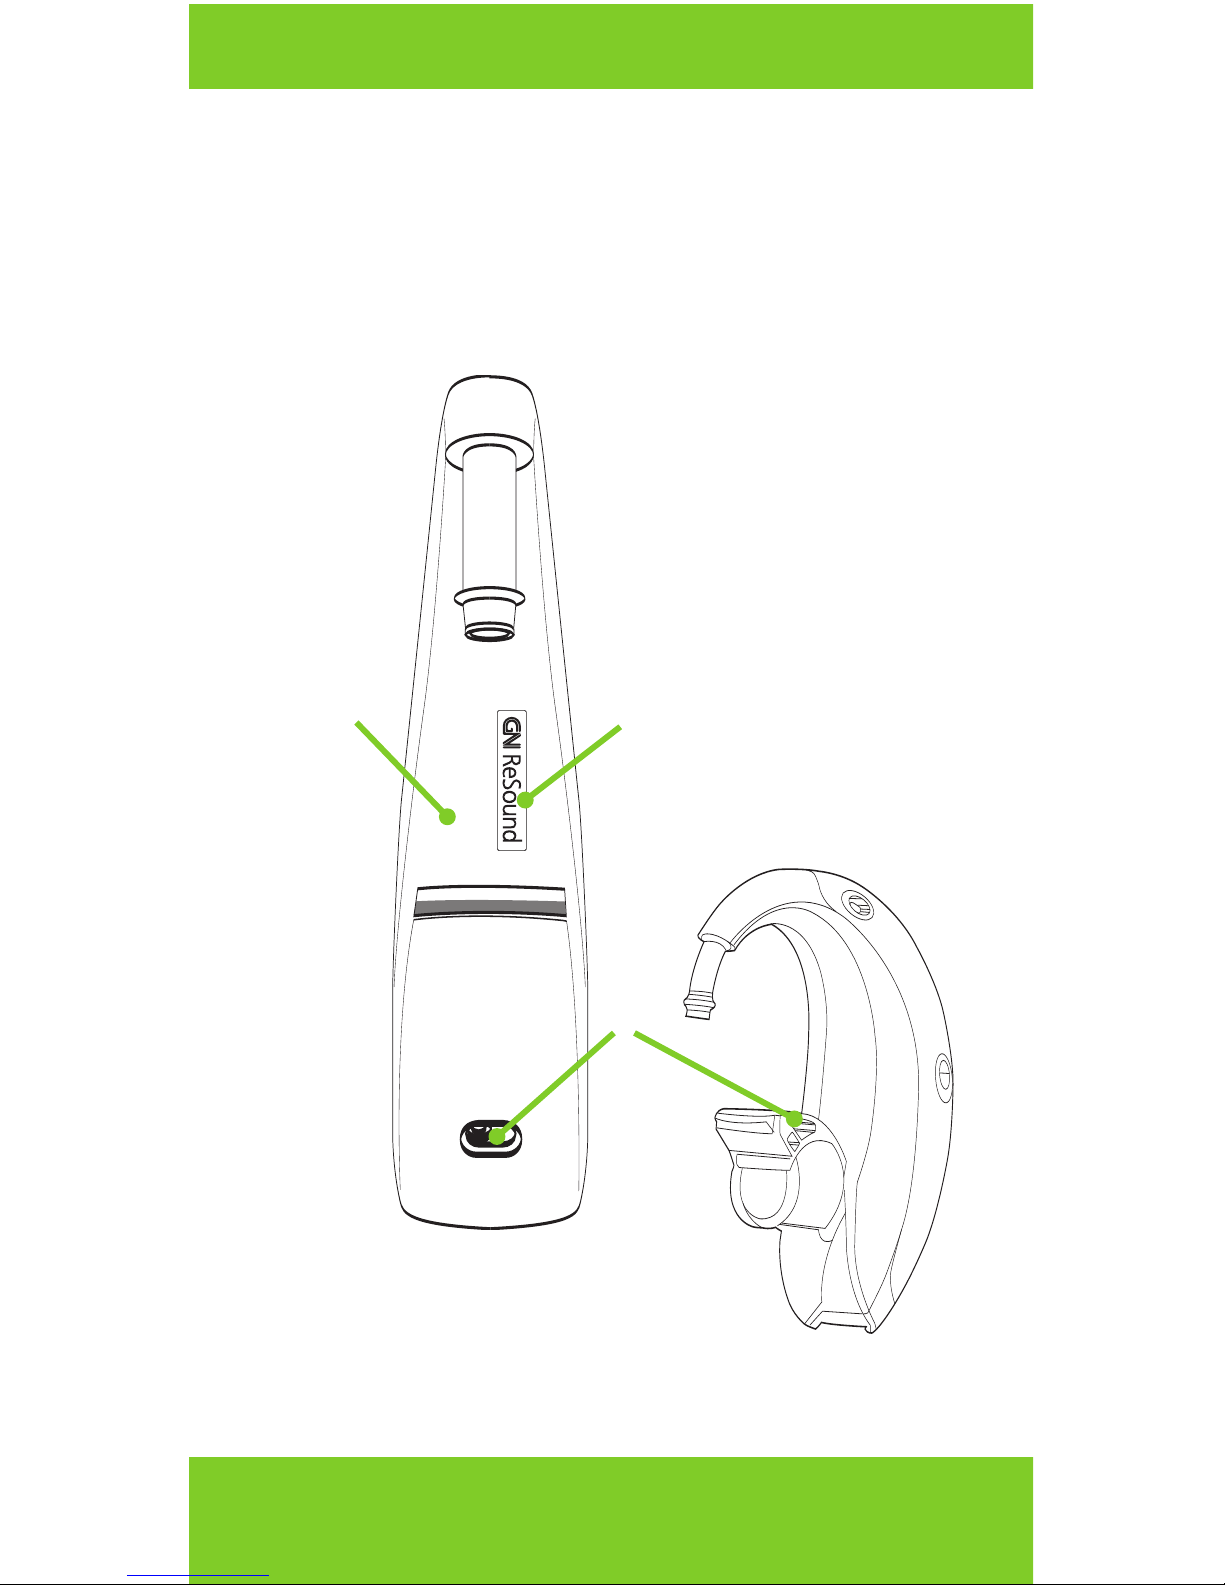
Directionality
The Danalogic 6 instrument is equipped with two micro-
phones and thus offer directionality. That is a function which
enables better speech understanding in noisy situations. This
function focuses on speech in front of you while sounds
coming from the back or the side are suppressed. Please ask
your hearing care professional about this automatic feature.
Stand-by Function
To put the instrument into stand-by mode, hold down the
programme selector for 5 seconds. You will hear a series of
beeps, and the device is now in stand-by mode. Before
returning to functional mode, you will need to wait approx-
imately 5 seconds. After waiting, press the programme
selector down once. Please note that the instrument is using
asmall amount of power when it is in stand-by mode.
On/OffFunction
Your Danalogic 6 BTE is equipped with an on/off switch inte-
grated into the battery compartment. When the battery
compartment is fully closed, the instrument is turned on in
its functional mode and programme 1 will be activated. To
turn the instrument off, press the tab on the base of the
instrument with your fingertip. The battery compartment
then snaps partly open and the instrument is turned off.
Whenever you are not wearing the instrument, remember to
turn it off to reduce battery consumption.

SmartStart
Smart Start allows you to insert the instrument in the ear
without annoying sounds like squealing. It delays the switch
on time 10 seconds after closing the battery compartment,
and is indicated by a beep every second after closing the bat-
tery compartment.
Volume Control
Danalogic 6 offers a volume control allowing you to turn the
volume up and down. When wearing the instrument, you
can increase the volume by turning the volume control
wheel up, and reduce volume by turning it down.
For each volume step, you will hear a “beep” signal indicat-
ing the change. If you reach the upper or lower limit of the
volume control range, there will be a different type of
“beep” signal with a lower pitch.
Please note that your instrument has been fitted by your
hearing care professional and that your hearing loss has
required a certain amount of amplification. This means that
you may not be able to increase the volume as much as you
can decrease it.
8
Down
Up

9
Direct Audio Input (DAI)
Danalogic 6 offers you the possibility of direct, undisturbed
connection to facilities such as television, radio and remote
microphone via the Direct Audio Input socket. Often, this
will improve sound quality. The sound source is connected to
your instrument with a cable or a wireless FM system to the
audio shoe. The audio shoe will connect with a “click” to
the hearing instrument and switch to Direct Audio Input
automatically.
Low Battery Warning
When the battery voltage/power decreases to a low level, the
instrument will inform you by a soft low-battery-warning sig-
nal (beep-beep). The signal indicates you should replace the
battery, and for this reason we recommend that you always
have a spare battery. The battery-warning signal will be
repeated every 5-10 minutes until the battery runs out of
power. The instrument will then automatically switch off.

10
Inserting and removing the instrument
(6070 and 6080 - with ear mould)
Inserting the instrument
• With the battery door opened in the off
position take the ear mould between
thumb and index finger and position its
‘point’ in your ear canal. Now, slide
the ear mould all the way into
your ear with a gentle, twisting
movement. Insertion can be
easier if you gently pull
your auricle backwards with your other hand.
• Turn the top-part of the ear mould
gently backwards and forwards
so that it fits behind the fold
of skin above your ear canal.
• Place the hearing instrument behind
your ear. Move the ear mould up
and down and press gently to
ensure it is positioned correctly in
the ear. Opening and closing your
mouth can ease insertion. You will
feel when the ear mould is positioned
correctly.
• When correctly positioned switch on your instrument by
closing the battery door.

11
Inserting and removing the instrument
(6070 and 6080 with FlexTube)
Inserting the instrument
• Hang the instrument over the top
of the ear.
• Grasp the FlexTube where it bends and push the dome
into your ear canal. The dome should
be placed far enough into the ear that
the sound tube lies flush with
your head. When the dome is
placed appropriately, you should
not see the FlexTube sticking out
when you look directly into a mirror.
• If the device whistles, the most likely reason is that the
dome is not placed correctly in the ear
canal. Other reasons can be buildup
of earwax in the ear canal, or that
the sound tube connection to the
instrument has become loose, in
which case the sound tube must be
changed. It is also possible that the
instrument settings are not optimal. If
you have ruled out other reasons for the
instrument squealing, it is recommended to contact your
hearing care professional.

Changing the Battery
Open the battery compartment by turning the instrument
off, and then using your fingernail to open it completely.
After removing the old battery, insert the new one with the
“+” (flat) side facing the “+” on the battery door. It should
fit in like a puzzle piece. The battery door should close very
easily. Never use force to close the door as this may damage
your hearing instrument.
Always use a size 13 Zinc-Air battery. Please note that if the
battery is weak, the hearing instrument performance will be
reduced. Removing the battery when you are not wearing
the instrument will help prevent corrosion of the battery
contacts.
12
“+”

Battery Warning Information
Batteries contain dangerous substances and should be dis-
posed of carefully in the interest of your safety and for the
environment.
•Do NOT attempt to recharge batteries which are not
specifically designated rechargeable as they may leak or
explode.
•Do NOT attempt to dispose of batteries by burning them.
•Keep batteries away from small children and pets.
•Do NOT place batteries in your mouth.
If swallowed, see a physician immediately.
13

14
Daily Maintenance
Keep your hearing instrument clean and dry. Wipe the case
with a soft cloth or tissue after use to remove grease or
moisture. If the instrument has been exposed to high
humidity or perspiration, enclose it (with the ear mould) in a
sealed container together with a drying agent (desiccant)
overnight. Consult your hearing care professional concerning
which drying agent to use.
Toavoid the need for unwarranted repairs:
•Never immerse the instrument in water or other liquids
since this may cause permanent damage to the circuitry.
•Protect your hearing instrument from rough handling,
and avoid dropping it on hardsurfaces or floors.
•Do not leave the instrument in or near direct heat or sun-
light since excessive heat can damage the instrument or
deform the casing.

15
Cleaning the Ear Mould and replacing Sound
Outlet Filter
The ear mould should be cleaned regularly. Remove the ear
mould and the silicone tubing from the hearing instrument
before you clean it. Lukewarm water should be enough to
clean wax off the ear mould. If ear wax is stuck in the sound
canal of the ear mould, the cleaning loop or a syringe with
lukewarm water can easily be used to “push” the wax out.
Be sure to thoroughly dry the ear mould and its tubing
before reconnecting it to the hearing instrument. Blow gently
through the tubing to remove moisture trapped inside.
The silicone tubing connecting the ear mould to the hearing
instrument should be changed if it becomes stiff or brittle.

16
Sound Outlet Filter
Your Danalogic 6 hearing instrument is equipped with a fil-
ter. This filter is located at the top of the sound outlet and
prevents moisture and debris from
getting into the hearing instru-
ment. If the hearing instrument
seems to have lost power and
changing the battery does not
help, the filter may be blocked,
and needs to be changed. See
instructions below:
How to remove filter
Place the hook of the instru-
ment into the long groove of
the filter stick. Pull down and
the filter will be removed.
How to place filter on hook
Place the hook on one filter
and push gently. Rock the
hook back and forth until
the filter is released.
Now take the hook with the
filter attached and press it in
the hole at the end of the
filter. The filter will now be
fastened.

17
Cleaning the FlexTube and dome
The FlexTube feeds the amplified sound from the hearing
instrument into the ear. It is important that the FlexTube and
the dome fit correctly into your ear. If the FlexTube or the
dome irritate your ear in any way and prevent you from
wearing your hearing instrument, please contact your hear-
ing care professional. You should never attempt to modify
the shape of the FlexTube yourself.
The FlexTube and the dome should
be cleaned regularly. Remove the
FlexTube from the instrument
before cleaning by unscrewing it.
Use a damp cloth to clean the
FlexTube and dome on the outside
and use the black cleaning rod to
“push” any debris out of the
FlexTube. The cleaning rod should be inserted where the
FlexTube attaches to the instrument and pushed all the way
through the sound tube and out through the dome. It is not
recommended to submerge or rinse the FlexTube and dome
with water, as there is a risk that a water drop may become
lodged in the FlexTube. If this should occur, it will prevent
sound coming through the FlexTube, and may be harmful for
the instrument's electronics.
The FlexTube and dome should be changed every third
month or sooner if the FlexTube becomes stiffor brittle. We
recommend that you have your hearing careprofessional
change the dome for you. If your hearing careprofessional
instructs you to change the domes yourself, make surethat
they aresecurely fastened to the sound tube beforeinserting
them in your ear.Afailureto change the domes in accord-
ance with the instructions could result in injury.

18
How to mount the Tulip-Dome
(1) + (2) The Tulip-Dome is mounted on the FlexTube by
pushing it over the grooves on the FlexTube.
12

19
The Tulip-Dome should be directed with the sound outlet
hole facing either down towards your shoulders or up
towards your hair. (3) The sound outlet
hole can turn both ways; the direction
of the sound outlet hole affects the
length of the sound tube according
to the entrance of your ear canal.
Please ask your hearing care
professional which way the
sound outlet hole should turn in your ear.
The Tulip-Dome consists of two “leaves” and it is important
that the largest “leaf” is the outermost “leaf” (4). This can
easily be done by pushing the “leaves” away from the
FlexTube with your forefinger and middle finger (5). This will
make the large “leaf” bend forward. Then you push it back
and it will be placed on top of the smaller “leaf” (6). Now the
Tulip-Dome is ready for insertion (7).
3
45
67

Telephone Use
Your hearing instrument is equipped with an induction coil
(telecoil) which picks up magnetic emanations from a hear-
ing instrument compatible telephone. Your hearing care
professional can activate the telecoil. By selecting the telecoil
programme, the hearing instrument will only pick up the
sounds coming from the telephone.
When using the telecoil programme, the receiver of the tele-
phone should be held as shown in the drawing. You may
need to move the handset around slightly to find the best
reception.
If you do not wish to have a telecoil programme, you may
still use the phone while wearing your hearing instrument.
Many hearing instruments will whistle (feedback) when in
close proximity to a telephone. To reduce the potential for
this problem, your hearing instrument is equipped with an
adaptive digital feedback suppression (Stabilizer DFS) system
which allows for use of the telephone while greatly reducing
the chance of feedback. Hold the phone close to the top
microphone of the hearing instrument, but not directly on it.
If there is feedback, it may take a few seconds for the instru-
ment to adapt.
Using the telephone, while wearing your hearing instru-
ment, may require some practice.
20
This manual suits for next models
1
Table of contents
Other GN Resound Hearing Aid manuals