Go Electronic RCC1000 User manual


Preface
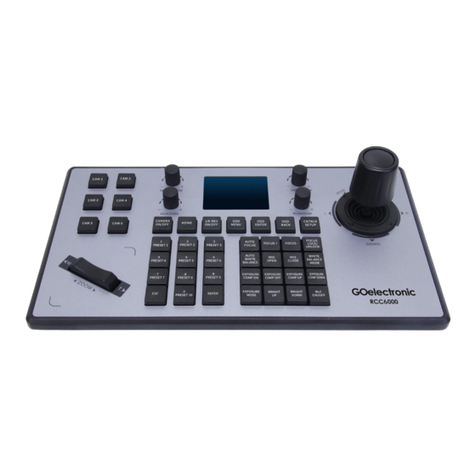
This controller is designed for Sony pan/tilt/zoom cameras and
supports VISCA protocol. It has all the functions of the Sony
PTZ camera handheld remote controller and adds a touch
sensitive joystick control. In addition to the joystick and
keyboard, the controller has an LCD screen for displaying
commands and the camera's working status.
Features and functions of joystick controller:
* Supports VISCA protocol
* Can set and call 1-46 presets of Sony PTZ cameras
* Communication modes: RS485, RS422, RS232
* All parameters can be set conveniently through function keys
* Can control up to seven Sony PTZ cameras
* Supports operation password function
* Key-press sound on/off function
* Variable speed joystick control
user manual | 1

The contents of this manual may be updated periodically
without notification.
Notes:
* The LCD is fragile. Avoid long exposure under strong light.
* The controller should be used withinin the specified
temperature and humidity ranges (see chart below).
* Follow the connection method defined in this manual
* Joystick is fragile. Make sure product is packed in original or
adequate packaging if transported.
user manual | 2
Parameters:
Accessories:

Contents
1.1 Keyboard ... 4
1.2 LCD screen ... 7
1.3 Joystick ... 7
1.4 Rear panel ... 8
1. Front panel and rear panel ................................................................................ 4
2. Operation .............................................................................................................. 9
2.1 Single key functions and combined key functions ... 9
2.2 Combined key functions ... 9
2.3 Camera ID setup ... 10
2.4 Preset setup and recall ... 10
2.5 Menu setup ... 11
user manual | 3
3. System settings ................................................................................................. 13
3.1 System settings setup ... 13
3.2 Settings framework ... 15
3.3 System settings display ... 15
4. Camera connection ............................................................................................ 16
5. FAQ ...................................................................................................................... 19

1. Front Panel and Rear Panel
1.1 Keyboard
user manual | 4
[Esc] Back to previous menu
[Setup] Press and hold 3s to get into setup menu
[Search] Display keyboard model number, serial
number, key-press sound and operation
lock
1.1.1 Keyboard function keys:
[Auto] Enable auto focus
[Manual] Enable manual focus
1.1.2 Sony PTZ camera function setup/recall keys:

user manual | 5
[Data Screen] Open/close data screen
[Back Light] Turn on/turn off back light
[Home] Move camera to home position
[P-T Reset] Reset the camera
[Power] Power on/off camera
[SetID] Camera ID setup
[Preset] Camera preset setup; used with number
key and [Cam] key
[Call] Recall camera preset; used with number
key and [Cam] key
[Menu] Display camera menu
[Cam] Select the camera's ID

user manual | 6
[Near] In manual focus mode, focus near
[Far] In manual focus mode, focus far
[Tele] Zoom-in in slow speed, increase
magnification (note: to zoom-in faster, use
joystick and turn clockwise)
[Wide] Zoom-out in slow speed, decrease
magnification (note: to zoom-out faster,
use joystick and turn counter clockwise)
[Open] In manual aperture mode, enlarge camera
aperture
[Close] In manual aperture mode, reduce camera
aperture
[LR-REV] Reverse direction of controller; camera
moves in opposite direction of controller
1.1.3 Number keys:
[CLR] Delete all information keyed in
[0] - [9] Number keys: 0,1,2,3,4,5,6,7,8,9
[Enter] Confirm and save all information keyed in
1.1.4 PTZ camera basic function keys:

user manual | 7
[LR-STD] Reset direction of controller to standard;
camera moves in same direction as
controller
1.2 LCD Screen
All operations of keys and joystick will display on LCD screen when pressed. LCD
screen will go into power saving mode (brightness level is reduced) if there is no user
activity for more than 30 seconds.
1.3 Joystick

user manual | 8
1.4 Rear panel
Rear panel: 5 ports for RS422, 1 port for RS232, 1 DC 12V input port, 3 status
indicator lights
Rear panel description

2. Operation
2.1 Single key functions and combined key functions
user manual | 9
Single key functions: press key and camera will recall the specified function
Single funtion keys: [Auto] [Data Screen] [Home] [Back Light] [P-T Reset] [Tele]
[Wide] [Open] [Close] [LR-STD] [LR-REV] [Joystick]
Combined key functions: press key for more than 2 seconds and camera will recall
the specified function
Combined funtion keys: [Manual] [Preset] [Call] [Menu] [Cam] [Power] [SetID] [CLR]
2.2 Combined key functions
Must be in control mode. If LCD screen displays controller is in control
mode. If screen displays other information, press [Esc] to go back to control mode.
2.2.1 Select camera ID:
Press [Cam], enter camera ID number, press [Enter]
For example, to select Camera 2:
Press [Cam], LCD will display:
Press [2], LCD will display:
Press [Enter], LCD will display:

2.3 Camera ID setup:
user manual | 10
Sony PTZ camera ID will be set as '1' automatically after powering on.
2.3.1 Camera ID setup for single camera use
Connect camera to controller, press and hold [SetID] for 2 seconds, LCD screen will
display to denote the camera ID has been set as '1'
2.3.2 Camera ID setup for multiple camera use (up to 7)
Connect first camera to controller and subsequent cameras in daisy chain
configuration. Press and hold [SetID] for 2 seconds. LCD screen will display
to denote the camera IDs have been set in sequence as '1', '2', '3'...
2.4 Preset setup and recall:
Preset setup: Select camera ID and press [Preset]. LCD will display
Adjust the camera to desired position and zoom, key in a number for this preset and
press [Enter]. Repeat steps to setup other presets or press [Esc] to exit.
Preset recall: Select the camera ID and press [Call]. LCD will display
Key in preset number and press [Enter]. Repeat steps to recall other presets or press
[Esc] to exit.


user manual | 12
10. CAM_LR_ReverseModeInq: LCD screen displays Move joystick
left/right to select ON or OFF.
11. CAM_FreezeModeInq: LCD screen displays Move joystick left/right
to select ON or OFF.
12. CAM_PictureEffectModeInq: LCD screen displays Move joystick
left/right to select ON or OFF.
13. CAM_ICRModeInq: LCD screen displays Move joystick left/right to
select ON or OFF.
14. CAM_AutoICRModeInq: LCD screen displays Move joystick left/
right to select ON or OFF.
Note:
1. The controller will receive answer code from camera when performing above
operations. If answer code is not correct, controller LCD screen will display "RE
DATA UNKNOWN".
2. When finished making menu selection, LCD screen will display There
are two options for saving a menu setting. Press [Enter] to save current setup until it
is modified by user (setting will be saved even if controller is powered off). Press
[Esc] to save current setup only until controller is powered off.

3. System settings
3.1 System settings setup
user manual | 13
The controller's system settings include: password, default factory settings, key-press
sound on/off, ID, lock.
3.1.1 Default factory settings
Press and hold [Setup] for 3 seconds. LCD screen displays
Key in password (default is '8888'), press [Enter]. LCD screen displays
Move joystick right. LCD screen displays
Press [Enter]. LCD screen displays
Press [Enter] again. Buzzer will sound for about 1 second. Setup is finished and LCD
screen displays
Press [Esc] to quit and exit without saving setup.
Press [Esc] two times to return to normal mode.
3.1.2 Keyboard lock on/off setup
Press and hold [Setup] for 3 seconds. LCD screen displays
Key in password and press [Enter]. LCD screen displays
Move joystick to select item 6. LCD screen displays
Press [Enter] to turn off keyboard lock function. LCD screen displays
Move joystick left/right. LCD screen displays

user manual | 14
Press [Enter]. LCD screen displays
Key in 4 digit password. Press [Enter] again. LCD screen displays
Press [Esc] two times to quit and return to normal mode.
3.1.3 Keyboard lock setting
In normal mode, press [Esc]. LCD screen displays
Key in password and press [Enter] to lock controller. LCD screen displays
Press any key. LCD screen displays
Key in password and press [Enter]. Controller will return to unlocked mode.

3.2 Settings framework
user manual | 15
Press [Search] and the following information will display:
3.3 System settings display

4. Camera connection
4.1 Typical camera connection diagram
user manual | 16
TABLE 1. VISCA RS422 port definition:

4.2 Camera connection details
user manual | 17
4.2.1 Connection between controller and camera
When using the RS422 connection, the 3rd port of the controller (Ra) connects to the
3rd port of the camera (TXD IN-), the 4th port of the controller (Rb) connects to the
4th port of the camera (TXD IN+), the 1st port of the controller (Ta) connects to the
1st port of the camera (RXD IN-) and the 2nd port of the controller (Tb) connects to
the 2nd port of the camera (RXD IN+).
When using the RS232 connection, the 1st connector of the controller (RXD)
connects to the 3rd connector of the camera (TXD), the 2nd connector of the
controller (TXD) connects to the 5th connector of the camera (RXD), the 3rd
connector of the controller (GND) connects to the 4th connector of the camera
(GND). Or use a standard RS232 cable (EVI CONTROL CABLE) to connect both
devices.
r

user manual | 18
4.2.2 Connection between cameras
When using the RS422 control, the 1st camera's output connects to the 2nd
camera's input, the 2nd camera's output connects to the 3rd camera's input, and so
on.
When using the RS232 control, the connection method is the same. The 1st
camera's output connects to the 2nd camera's input, the 2nd camera's output
connects to the 3rd camera's input, and so on. Use RS232 EVI DS-CABLE to
connect camera to camera.

Other Go Electronic Controllers manuals
Popular Controllers manuals by other brands

Clare Controls
Clare Controls CH-OS-L Installation sheet

Tech Controllers
Tech Controllers EL480zPID user manual

Grundfos
Grundfos PM 1 Installation and operating instructions
micro-trak
micro-trak MT-3405 F II Reference manual

MC Electronic
MC Electronic DORADO MX3 Instructions for use

IP Power
IP Power 9258 Quick start user manual