Goblin Carpet Cleaner User manual

3-in-1 cleaning system
Please read and keep these instructions
getting the best from your
new 3-in-1...
If your cleaner isn’t performing as well as it
should, please check
• Shampoo feed
If the shampoo/water solution is not feeding through check that the
shampoo tank is filled and the shampoo tube is connected to both the
machine and the shampoo tank, see page 10.
Only use defoaming shampoo. A bottle of shampoo is supplied,
additional shampoo can be purchased by calling the above
replacement parts number.
• Accessories
Some accessories must be stored inside the tank when you unpack
the machine, please check and remove before first use.
• Filters
It is important that the cartridge and foam filters are cleaned regularly
or replaced to allow air through the appliance.
• Blockages
Check the nozzle, tubes and hose for blockages.
• Dustbags
If using with the dustbag it is important to replace them, otherwise the
performance of the cleaner will be impaired.
www.morphyrichards.co.uk
70223 Rev 2 9/8/04 4:00 PM Page 1

Important safety
instructions
The use of any electrical appliance
requires the following of common sense
safety rules.
Primarily there is danger of personal
injury and secondly danger of damage to the
appliance and property. These are indicated
in the instructions text by the following two
conventions:
WARNING: Danger of personal injury
IMPORTANT: Damage to the appliance
In addition we offer the following
essential safety advice.
Location
•Do not use or keep this product outside
when it is raining.
•Do not store the appliance near hot
ovens or heating appliances.
Mains lead
•Do not allow the mains lead to become
strained or run this appliance over it.
•If the electrical cable becomes damaged
the complete cable assembly must be
replaced. Do not attempt this task
yourself, contact Goblin using the
helpline number.
Children
•Children do not understand the dangers
associated with operating electrical
appliances. Never allow children to use
this appliance.
Dangerous substances
•Never use the appliance to vacuum hot
ashes, broken glass, sharp objects or
liquids.
•Never use in the presence of explosive
liquids or vapours.
•Never pick up inflammable or poisonous
liquids such as petrol, copier toner, or
other volatile substances.
•Never pick up acids, asbestos or
asbestos dust.
•Never use in the presence of explosive
liquids or vapours.
•Never pick up hot or glowing ash, hot
cigarette ends, hot coals or any other
similar items.
Other safety considerations
•Never use the appliance without the filter
installed.
•Always disconnect the appliance from the
mains supply after use or prior to
cleaning or servicing.
•The appliance should never be left
running unsupervised.
•Never modify the cleaner in any way.
•Repairs to electrical appliances are only
to be undertaken by trained personnel.
Unprofessional repairs can be dangerous
for users.
•Use only genuine Goblin spare parts and
accessories
2
70223 Rev 2 9/8/04 4:00 PM Page 2

Electrical
requirements
When using this appliance outdoors it
should be additionally protected by a RCCB
(Residual Current Circuit Breaker).
Please check that the supply voltage
details given on the rating plate (located on
the side of the motor housing inside the
tank) are in accordance with your electricity
supply.
If the socket outlets in your home are not
suitable for the plug supplied with this
appliance, the plug should be removed and
the appropriate one fitted.
WARNING: The plug removed from
the mains lead, if severed, must be
destroyed as a plug with bared flexible
cord is hazardous if engaged into a live
socket outlet.
Should the fuse in the 13 amp plug
require replacement, a BS1362 13 amp fuse
must be fitted.
Introduction
Your new machine is a tough, powerful
and extremely versatile Wet & Dry vacuum
cleaner and carpet shampooer. In addition
to normal household cleaning it can be
used for:
•Liquids: spills and leaks, blocked sinks
and soakaways, floods, ponds and
cleaning out chest freezers after
defrosting.
•Bulky waste: sawdust, wood shavings,
plaster, sand, grinding dust, nails, screws,
broken glass, soil in the potting shed.
•Shampooing: carpets, chairs, sofas
and seats.
How does your
cleaner work?
Wet and dry vacuuming usage
A heavy duty motor is located on top of
the waste tank. The powerful vacuum lifts
dirt and liquids through the hose which settle
in the bottom of the tank. This arrangement
protects the motor from liquids. A float shut-
off valve cuts off the suction when the waste
tank gets full of liquid.
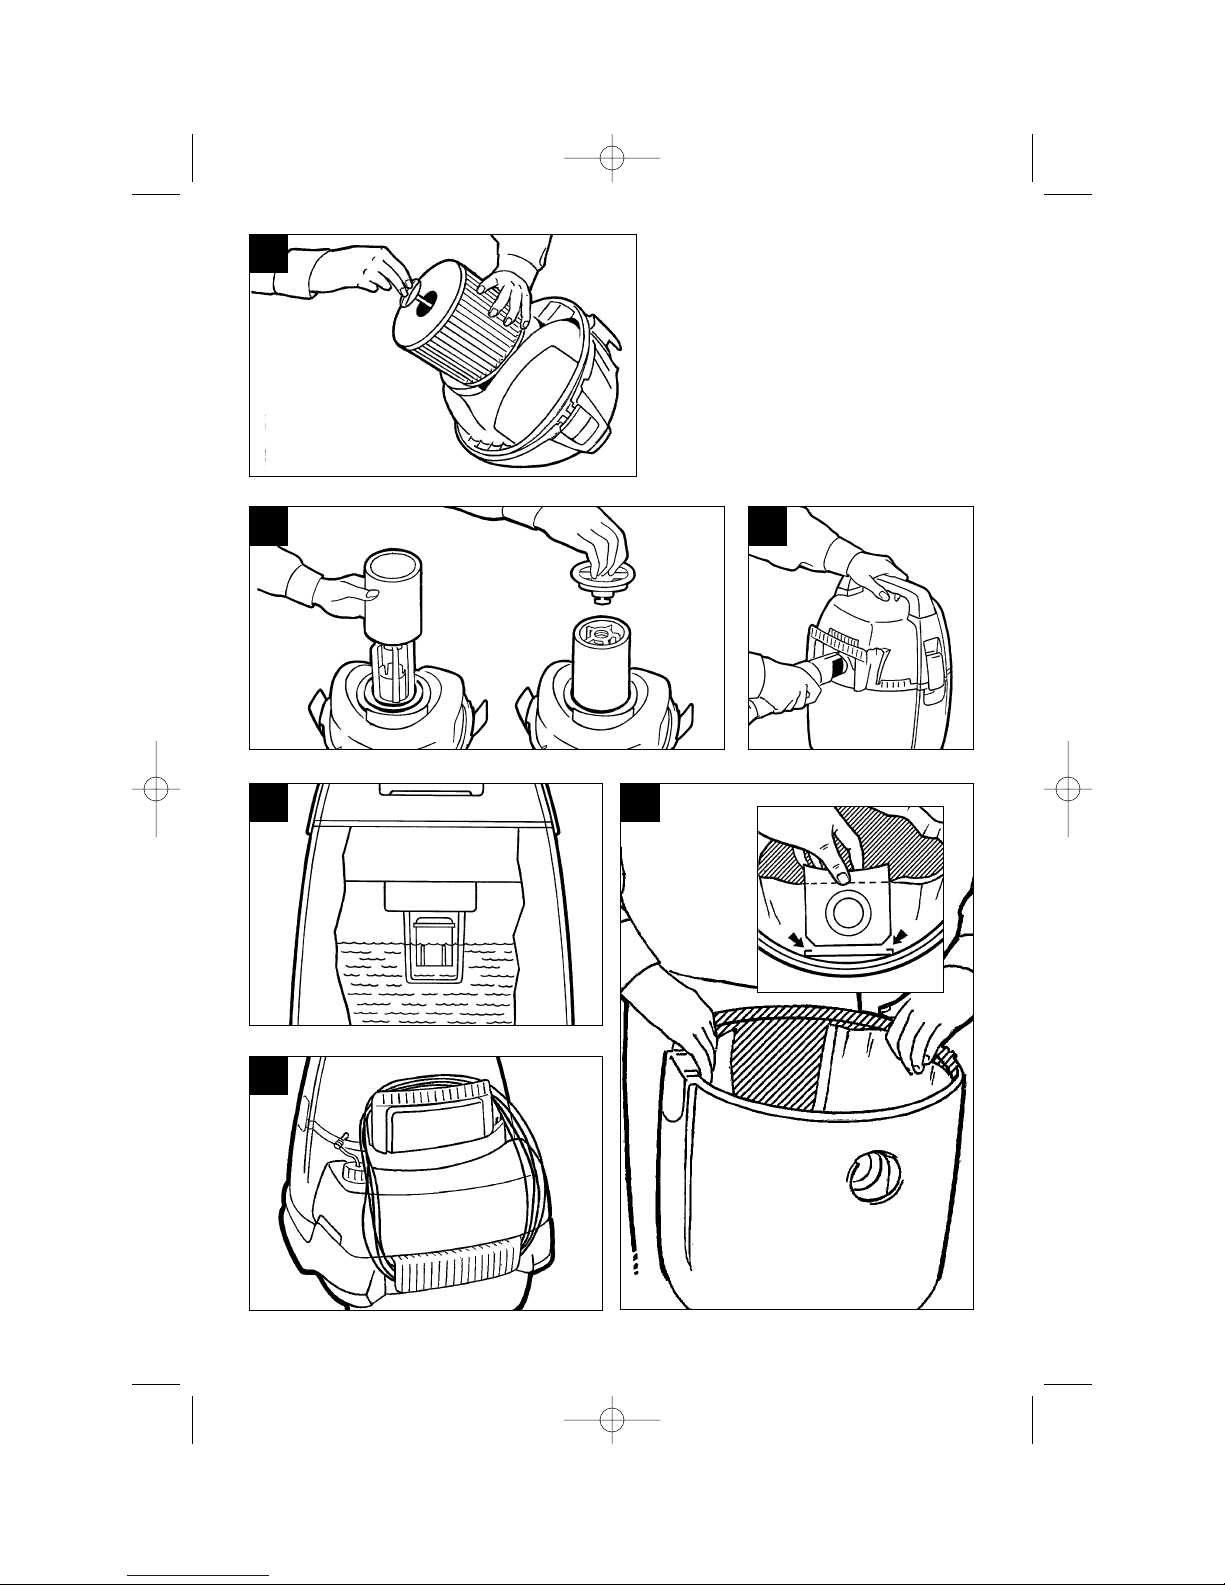
A long-life cartridge filter is used when
picking up dry waste to prevent fine particles
being blown back out again. Paper bags can
also be used for easier disposal.
Your Wet & Dry may sound louder than
smaller conventional cleaners. This is normal
for a heavy duty motor, designed to provide
power and long life.
Tip: Do not press down when cleaning -
let the powerful suction do the work.
Shampooing usage
Water, mixed with a cleaning solution, is
pumped deep into the fibres of a carpet via
the shampoo nozzle. The water can then be
sucked back into the waste tank along with
the dirt and grime dislodged by the cleaning
solution. Water can be pumped up to 2
metres above the machine so that stairs may
also be shampooed.
These instructions first cover wet and dry
usage, first section of this booklet; then how
the shampooing facility, second section of
this booklet.
3
70223 Rev 2 9/8/04 4:00 PM Page 3

Features
⁄Waste tank
¤Motor housing
‹Power switch
›Tank latches
fiCastors
flInlet
‡Hose end
·Carrying handle
‚Hose
„Curved handle
‰Extension tubes
ÂFloor nozzle
ÊBolt
ÁScrew
ËWheel
ÈHub cap
ÍExhaust filter flap
ÎCable storage hook
ÏCardboard collar (on paper bag)
ÌTool storage cart
ÓCartridge filter
ÔBucket
Foam filter
ÒFoam filter locking plate
ÚCrevice tool
ÛUpholstery tool
Assembly
1Release the tank latches and lift off the
motor housing as shown D.
2Remove any parts stored for transit inside
the tank.
3Turn the tank upside down. To fit the
wheels, slot a bolt through the centre of a
wheel, push the bolt into the hole on the
side of the cart and secure by inserting a
screw B1 .
4Now fit a hub cap B1 . Do the same for
the other wheel.
5Push the 2 castors into the holes and
press firmly B2 .
6Refit the motor housing ensuring that the
switch is positioned above the inlet as
illustration A. If the motor housing is
fitted in any other position the latches will
not lock.
•Press the middle and not the bottom of
the latch to lock.
7Assemble hose, extension tubes and
nozzles as required, see A. Insert the
hose end into the tank inlet and twist to
secure.
Wet & dry vacuuming usage
4
70223 Rev 2 9/8/04 4:00 PM Page 4

B1
Ê
Á
D
B2
A
⁄
¤
›
fi
fl
‡
·
‚
„
‰
Ë
Í
È
ÎÌ
Ô
‹
C
Í
5
Â
Ú
Û
70223 Rev 2 9/8/04 4:00 PM Page 5

6
F
Ï
Î
G
Ó
Ò
E2
E1
H
I
70223 Rev 2 9/8/04 4:00 PM Page 6

Power controls
This is a simple to operate rocker switch.
IMPORTANT: Do not leave pump running
dry.
Cartridge filter
Your cleaner features a removable heavy
duty cartridge filter, designed to filter both
large debris and fine dust. The cartridge filter
will be one of 2 types and will already have
been fitted in place under the motor housing
E1 . Type 1 is simply pushed firmly into
place. Type 2 is a looser fit and has a locking
nut to hold the cartridge filter in place -
simply position the filter and twist the locking
nut clockwise.
Dry usage
IMPORTANT: The cartridge filter must
always be fitted when not picking up liquids.
Failure to do so may cause damage by
allowing dust and larger particles into the
motor (and invalidation of the guarantee).
To clean the filter, remove it and brush
the grooves with a soft brush, ensuring you
don’t damage the surface. Proper
maintenance will give it a much extended
life.
Wet usage
When picking up liquids, the foam filter
should be used. Remove the cartridge filter
from underneath the motor housing. The
foam filter should be pushed up against the
base of the motor housing and secured by
use of the foam filter locking plate. The
locking plate is inserted beneath the foam
filter and rotated clockwise until it locks into
position E2 . Refit the motor housing.
IMPORTANT: Always switch off and
unplug from wall socket before removing or
replacing the filters.
7
Usage type
Wet pick-up
shampoo
(large volumes of
liquids, floods, spills,
blocked drains).
Dry pick-up
(Household use,
wood chips,
sawdust, soil,
sanding debris).
Wet and dry pick-up
(Combination of both
but not large volumes
of liquid).
Cartridge filter ÓFoam Filter Paper bag ÏComments
Never use the paper
bag for wet pick-up.
The paper bag is
recommended for
extra hygiene and
convenient disposal
of fine dust. The
foam filter can be
used in conjunction
with the paper bag
but should never be
used alone for dry
pick-up.
Always use the
cartridge filter for
combination pick-up.
Filtration
Vac on
Off
Pump on (shampooing only)
70223 Rev 2 9/8/04 4:00 PM Page 7

Float shut-off
When the waste tank is full of liquid the
float shut-off valve Gautomatically cuts off
the suction which is indicated by a higher
pitched noise from the motor. If this occurs:
1Turn the motor OFF.
2Switch off and disconnect electrical
supply by removing the plug from the
wall socket.
3Raise hose to drain liquid back into the
tank.
4To minimise any back-flow of liquid keep
hose in raised position until emptied.
IMPORTANT: Do not attempt to remove
the float as this is important for safe
performance.
If the cleaner overturns during use turn
the motor off, return to upright and wait until
the float falls free.
Exhaust filter
In addition to the cartridge filter your
cleaner also has a filter fitted to the exhaust.
This is housed in the exhaust filter holder.
To access the filter remove the exhaust
filter holder by inserting your fingers into the
bottom of it and pulling C. The filter can
then be removed and cleaned by either
gently tapping or rinsing in water.
Once dry, the filter can be put back in the
exhaust filter holder. This can then be
replaced by first locating the bottom into
position, and then pushing the top firmly
until it clicks into position. Ensure that the
exhaust filter holder has been fitted securely
otherwise it may come off during use.
Blower
Your cleaner may also be used to blow
debris instead of vacuuming. To use the
blower facility remove the exhaust filter
holder as described under ‘Exhaust filter’.
Insert the hose end into the semi-circular
location at the back of the cleaner. The hole
in the hose end must be pointing to the right.
Twist to secure F.
Emptying
Switch off and unplug the cleaner from
the mains supply. Unclip and remove the
motor housing D. Empty the waste tank or
bucket (if used) and refit motor housing.
Crevice and
upholstery tools
The crevice tool Úcan be used for
difficult to reach areas.
The upholstery nozzle Ûis ideal for dry
vacuuming sofas, chairs and stair steps.
8
70223 Rev 2 9/8/04 4:00 PM Page 8

Dust collection
bags
When collecting dry material, your
cleaner can be used with or without a paper
dust collection bag. Using a bag makes for
easier collection and disposal and should be
fitted as shown H.
With the hose end removed, slide the
cardboard collar on the collection bag into
the slots inside the waste tank and push the
bag so that it fits around the outside of the
tank. Bend the top of the cardboard collar
back along the crease to allow easy fitment
of the motor housing. Refit the hose end and
then the motor housing. There is no need to
remove the cartridge filter. Replacement
bags are available.
•Do not use a bag for picking up nails,
broken glass or other sharp objects as
these may cause it to tear.
•Do not use a bag for wet pick up.
•Dust collection bags cannot be used
when the bucket is fitted inside the tank.
Cable storage
When not in use, the cable can be stored
by wrapping it around the section above the
exhaust filter flap and the cable storage
hook at the back of the cleaner I.
9
70223 Rev 2 9/8/04 4:00 PM Page 9

Features
In addition to the components previously
mentioned under the ‘Wet & Dry’ section, the
following will be used when shampooing:
Foam filter E2
ÒFoam filter locking plate E2
ÙClean water tank
ıFiller cap
ˆFilter
˜Feed pipe
¯Cleaning solution
˘Water inlet
Shampoo tube
Shampoo Nozzle
Tube connector
Shampoo jet
Upholstery shampoo nozzle
Assembly
For best results, carpets to be
shampooed should be vacuumed first using
the standard floor nozzle.
After following the assembly instructions
in the wet and dry section, remove the filler
cap from the clean water tank and add up to
3.5 litres of water. Warm water may be used,
but never hot. Add cleaning solution to the
water following instructions on the bottle J.
Replace the filler cap ensuring the filter is
on the end of the feed pipe (using without
the filter may damage your machine and
invalidate the guarantee). Fit the clean water
tank into the tool storage cart. Push the
nozzle on the other end of the feed pipe into
the water inlet K.
Ensure the bucket is fitted inside the
waste tank. It is possible to shampoo
without using the bucket although it is far
simpler to empty dirty water when the
bucket is used. Fit the hose end into the
waste tank after the bucket has been
installed.
Remove the cartridge filter from
underneath the motor housing (see
‘Cartridge Filter’ in the Wet & Dry section). Fit
the foam filter in its place.
IMPORTANT: The foam filter must always
be fitted when you are shampooing.
The filter should be pushed up against
the base of the motor housing and secured
by use of the foam filter locking plate. The
locking plate is inserted beneath the foam
filter and rotated clockwise until it locks into
position E2 . Refit the motor housing.
Slide the coiled shampoo tube and hose
and extend to full length. L. Fit one end of
the shampoo tube into the main housing
connector and the other end into the
shampoo nozzle jet .
Controls
To shampoo press the rocker switch to
the II position, the pump will be activated
and water and cleaning solution will be
forced down the shampoo tube.
IMPORTANT: Do not switch the pump on
when there is no water in the clean water
tank - this will damage the pump.
36
35
Shampooing instructions
34
35
33
10
36
37
70223 Rev 2 9/8/04 4:00 PM Page 10

L
J K
¯
ı
Ùıˆ
˜
˘
◊
36
11
34
35
70223 Rev 2 9/8/04 4:00 PM Page 11

12
N
M
O
37
70223 Rev 2 9/8/04 4:00 PM Page 12

Preparing to use
1Ensure that the shampooing attachments
have been correctly assembled as shown
previously.
2Check that there is water and cleaning
solution in the clean water tank.
3Remove furniture from the room to
be cleaned, or move it away from the
cleaning area.
4Position the shampoo nozzle at a point
furthest away from the vacuum cleaner
where you intend to begin cleaning.
5Plug in and press the rocker switch to the
II position.
6Apply shampoo to a strip of carpet and
then switch the rocker switch to Ito
vacuum away the shampoo and the dirt.
Cleaning tips
•Position the vacuum cleaner near the
doorway to the room, extend the hose
fully and work backwards towards the
doorway. This avoids walking over the
cleaned carpet until drying is complete.
•Work on a strip at a time. Apply shampoo
and then vacuum away with backwards
and forwards strokes before moving onto
the next strip. M
•For particularly dirty patches, move the
shampoo nozzle backwards and forwards
over the area so that the brush in the
shampoo nozzle scrubs the carpet.
•Avoid over wetting and, if necessary, pass
over the area using suction only.
•For heavily soiled areas, it is advisable to
repeat the cleaning process.
•Do not walk over newly cleaned carpet
until it is fully dry.
•Do not replace furniture until the carpet is
completely dry.
Upholstery
shampoo nozzle
The upholstery shampoo nozzle is ideal
for cleaning sofas, chairs, stairs and car
interiors. O
It can be attached directly onto the
handle.
The shampoo tube fixes in the same way
as the floor nozzle. N
Emptying
It is advisable to empty the dirty solution
after each tankful of water and cleaning
solution has been used.
1Switch off the machine and remove the
plug from the mains.
2Lift up the hose so that any dirty water
remaining will drain back into the waste
tank.
3Remove the hose end from waste tank.
4Remove the motor housing and lift out
the bucket by the handle.
5After emptying, refit the bucket and
reassemble the machine.
13
70223 Rev 2 9/8/04 4:00 PM Page 13

Storage
Prior to storage the following steps
should be taken:
1Empty the bucket and reassemble as
described under ‘Emptying’.
2Remove the shampoo nozzle and, using
the end of the extension tube, suck up
some clean water so that the inside of
the tubes and hose are cleaned.
3Empty the bucket once more and wipe
clean.
4Remove the foam filter and rinse under a
tap. Either refit the foam filter or, if the
cleaner is to be used next for dry pick up,
refit the cartridge filter.
5Empty any solution remaining in the clean
water tank. This may then either be re-
fitted into the tool storage cart, or stored
elsewhere so that tools may be stored in
the cart.
How to get the
best from your
shampoo system
•Always use AquaVac or Goblin cleaning
solution. This contains the right amount
of cleaner and defoamer.
•Only fill the clean water tank as directed.
•Do not over wet the area being cleaned. If
this occurs pass over with suction only.
•Do not walk on carpets or replace
furniture until fully dry.
•Clean out the tanks, bucket, hose and
extension tubes after use.
•Do not leave solution inside the tank
when not in use.
•Never use a cleaning solution without a
defoaming agent included.
•The transparent shampoo nozzle can be
cleaned by removing the four screws so
that it can be taken apart. Wipe with a
damp cloth. When re-assembling, ensure
the screws are firmly tightened.
•If water and cleaning solution fails to
come out of the shampoo nozzle, check
the following:
- is the rocker switch in the correct position?
- is the clean water tank empty?
- is the feed pipe connected to the water
inlet?
- is the tube connector attached to the
shampoo jet?
- is the correct shampoo being used?
Helpline
If you have any difficulty with your
appliance, do not hesitate to call us. We’re
more likely able to help than the store from
where you bought it.
Please have the following information
ready to enable our staff to deal with your
query quickly:
•Name of the product
•Model number as shown on the
underside of the motor housing (inside
the tank).
14
70223 Rev 2 9/8/04 4:00 PM Page 14

Your two-year
guarantee
•It is important to retain the retailers
receipt as proof of purchase. Staple
your receipt to this back cover for future
reference.
Please quote the following information if
the product develops a fault. These numbers
can be found on the base of the product.
Model no. Serial no.
All Goblin products are individually tested
before leaving the factory. In the unlikely
event of any appliance proving to be faulty
within 28 days of purchase it should be
returned to the place of purchase for it to be
replaced.
If the fault develops after 28 days and
within 24 months of original purchase, you
should take the appliance to your nearest
service agent. A list containing details of
your nearest service agent is included with
your appliance but please contact the
helpline quoting model number and serial
number should you require further
assistance. Repair or replacement of the
product is subject to the exclusions set out
below (1-6).
If you suspect a fault, follow the simple
checks detailed below before returning the
appliance or calling the helpline.
•Check the dust bag and filters for
blockages.
•Check the hose and tubes for blockages.
•Check the plug is firmly in the socket and
the supply is switched on.
•Make sure the socket is working by trying
another appliance.
If for any reason this item is replaced
during the two-year guarantee period, the
guarantee on the new item will be calculated
from original purchase date. Therefore it is
vital to retain your original receipt or invoice
to indicate the date of initial purchase.
To qualify for the two-year guarantee the
appliance must have been used according to
the manufacturers instructions.
Goblin shall not be liable to replace or repair
the goods under the terms of the Guarantee
where:
1The fault has been caused or is attributable
to accidental use, mis-use, negligent use or
used contrary to the manufacturers
recommendations or where the fault has
been caused by power surges or damage
caused in transit.
2The appliance has been used on a voltage
supply other than that stamped on the
products.
3Repairs have been attempted by persons
other than our service staff (or authorised
dealer).
4Where the appliance has been used for hire
purposes or non-domestic use.
5The guarantee excludes consumables such
as bags, filters and shampoo.
6Goblin are not liable to carry out any type of
servicing work, under the guarantee.
This guarantee does not confer any rights
other than those expressly set out above
and does not cover any claims for
consequential loss or damage. This
guarantee is offered as an additional benefit
and does not affect your statutory rights as a
consumer.
•This guarantee is valid in the UK and
Ireland only.
15
70223 Rev 2 9/8/04 4:00 PM Page 15

PN869/09/70 Rev 2 0604
The After Sales Division,
Registered address,
Goblin, Mexborough,
South Yorkshire, England, S64 8AJ
Helpline (office hours)
UK 0870 060 2604
Republic of Ireland 1800 409119
Goblin products are intended for
household use only
Goblin has a policy of continuous
improvement in product quality and
design. The Company, therefore,
reserves the right to change the
specification of its models at any time.
For additional information on Goblin products www.morphyrichards.co.uk
70223 Rev 2 9/8/04 4:00 PM Page 16
This manual suits for next models
1
Table of contents
Other Goblin Vacuum Cleaner manuals
Popular Vacuum Cleaner manuals by other brands

E.zicom
E.zicom E.ziclean vac100 user manual

Dustbuster
Dustbuster CWV1408 instruction manual

HydraMaster
HydraMaster drimaster owner's manual

METROPOLITAN VACUUM CLEANER CO
METROPOLITAN VACUUM CLEANER CO VAC N BLO CAR VAC COMMERCIAL Series instruction manual

Rowenta
Rowenta MINI SPACE CYCLONIC instructions

Philips
Philips FC8734/01 Service manual