manuals.online logo
Brands
  1. Home
  2. •
  3. Brands
  4. •
  5. Goblin
  6. •
  7. Vacuum Cleaner
  8. •
  9. Goblin IB70210 User manual

Goblin IB70210 User manual

This guarantee is valid in the UK and Ireland
only. It is in your interest to retain the retailers receipt
as proof of purchase. Please quote the following
information if the product develops a fault. These
numbers can be found on the motor unit of the product.
Model No. Serial No.
(Please enter numbers for future reference)
All Goblin products are individually tested before
leaving the factory. In the unlikely event of any
appliance proving to be faulty within 28 days of
purchase it should be returned to the place of purchase
for it to be replaced.
If the fault develops after 28 days and within 24
months of original purchase, you should take the
appliance to your nearest service agent. A list
containing details of your nearest service agent is
included with your appliance but please contact the
helpline quoting Model number and Serial number should
you require further assistance, repair or replacement of
the product is subject to the following exclusions. (see
Exclusions).
If you suspect a fault, follow the simple checks
detailed below before returning the appliance or
calling the helpline.
1 Check the dustbags and filters for blockages.
2 Check the hose and tubes for blockages.
3 Check the plug is firmly in the socket and the
supply is switched on.
4 Make sure the socket is working by trying
another appliance.
To qualify for the 2 year parts and labour guarantee
the appliance must have been used according to the
manufacturers instructions.
EXCLUSIONS
Goblin shall not be liable to replace
or repair the goods under the terms of the
Guaranteewhere:
1 The fault has been caused or is attributable to
accidental use, misuse, negligent use or used
contrary to the manufacturers recommendations
or where the fault has been caused by power
surges or damage caused in transit.
2 The appliance has been used on a voltage
supply other than that stamped on the
products.
3 Repairs have been attempted by persons other
than our service staff (or authorised dealer).
4 Where the appliance has been used for hire
purposes or non-domestic use.
5 The guarantee excludes consumables such as
bags, filters and air freshners.
This guarantee does not confer any rights other
than those expressly set out above and does not cover
any claims for consequential loss or damage. This
guarantee is offered as an additional benefit and does
not affect your statutory rights as a consumer.
If for any reason this item is replaced during the 2
year guarantee period, the guarantee on the new item
will be calculated from original purchase date. Therefore
it is vital to retain your original till receipt or invoice to
indicate the date of initial purchase.
The After Sales Division, Goblin, Mexborough, South Yorkshire, England, S64 8AJ
HELPLINE (OFFICE HOURS ): UK (LOCAL RATE) 0345 010340, REPUBLIC OF IRELAND
DIMPCO LTD 01 842 4833
Wet and Dry vacuum cleaner
2 year parts and labour guarantee
Instruction Manual
2
Important SafeguardsImportant Safeguards
Important Safeguards
This product has been designed with your
safety in mind. However, for safe operation, it
is important that you observe the following
points:
1Read all the instructions.
2To obtain best results from your
cleaner please read these instructions
carefully and keep them in a safe
place.
3This product conforms to the relevant
safety regulations for electrical appliances.
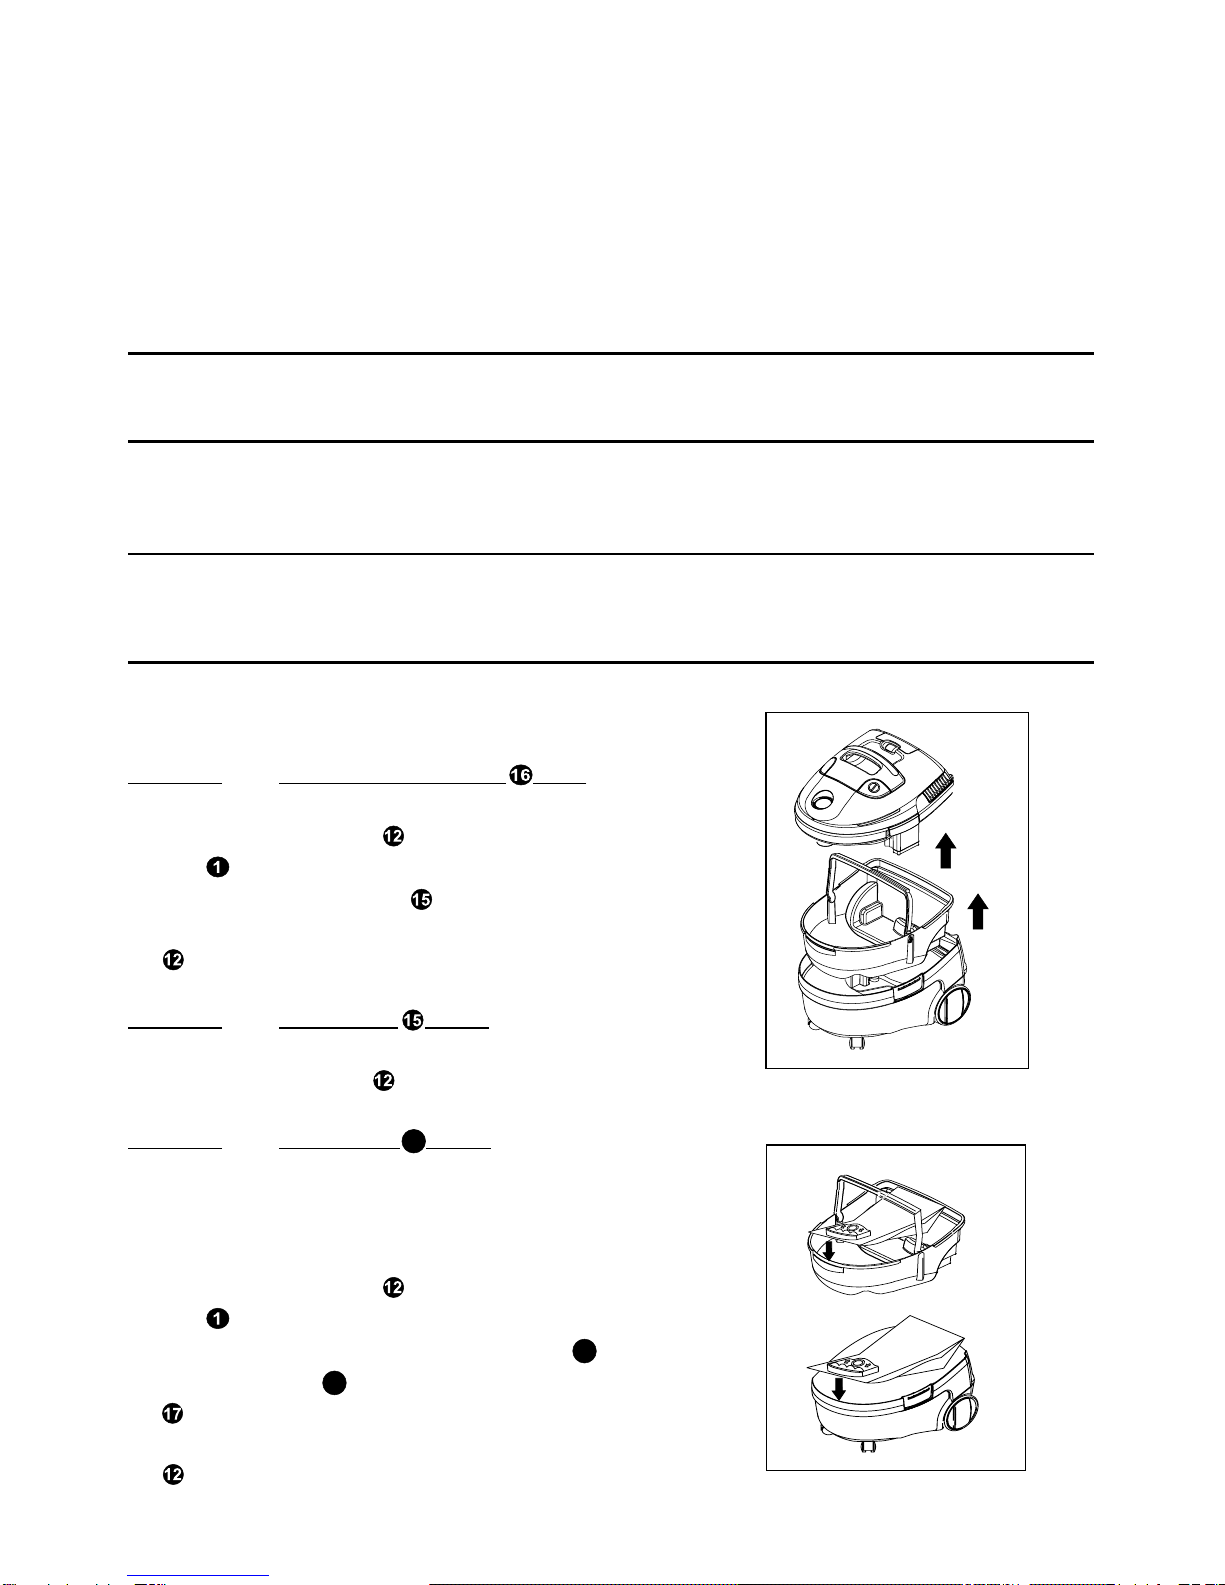
4Never use the appliance without the foam
pre filter and motor protection panel filter
installed.
5Use only genuine Goblin spare parts and
accessories.
6If the electrical cable becomes damaged the
complete cable assembly must be replaced.
Do not attempt this task yourself, contact
Goblin using the helpline number on the
front of this leaflet.
7Never use this appliance to vacuumhot
ashes, hot cigarette ends, hot coals or
other similar items.
8Never use in the presence of explosive
liquids or vapours.
9Never pick up inflammable or poisonous
liquids such as petrol, copier toner, or other
volatile substances.
10 Never pick up acids, asbestos or asbestos
dust.
11 Do not store the appliance near hot ovens
or heating appliances.
12 The appliance should never be left running
unsupervised.
13 Children do not understand the dangers
associated with operating electrical
appliances. Never allow children to use this
appliance.
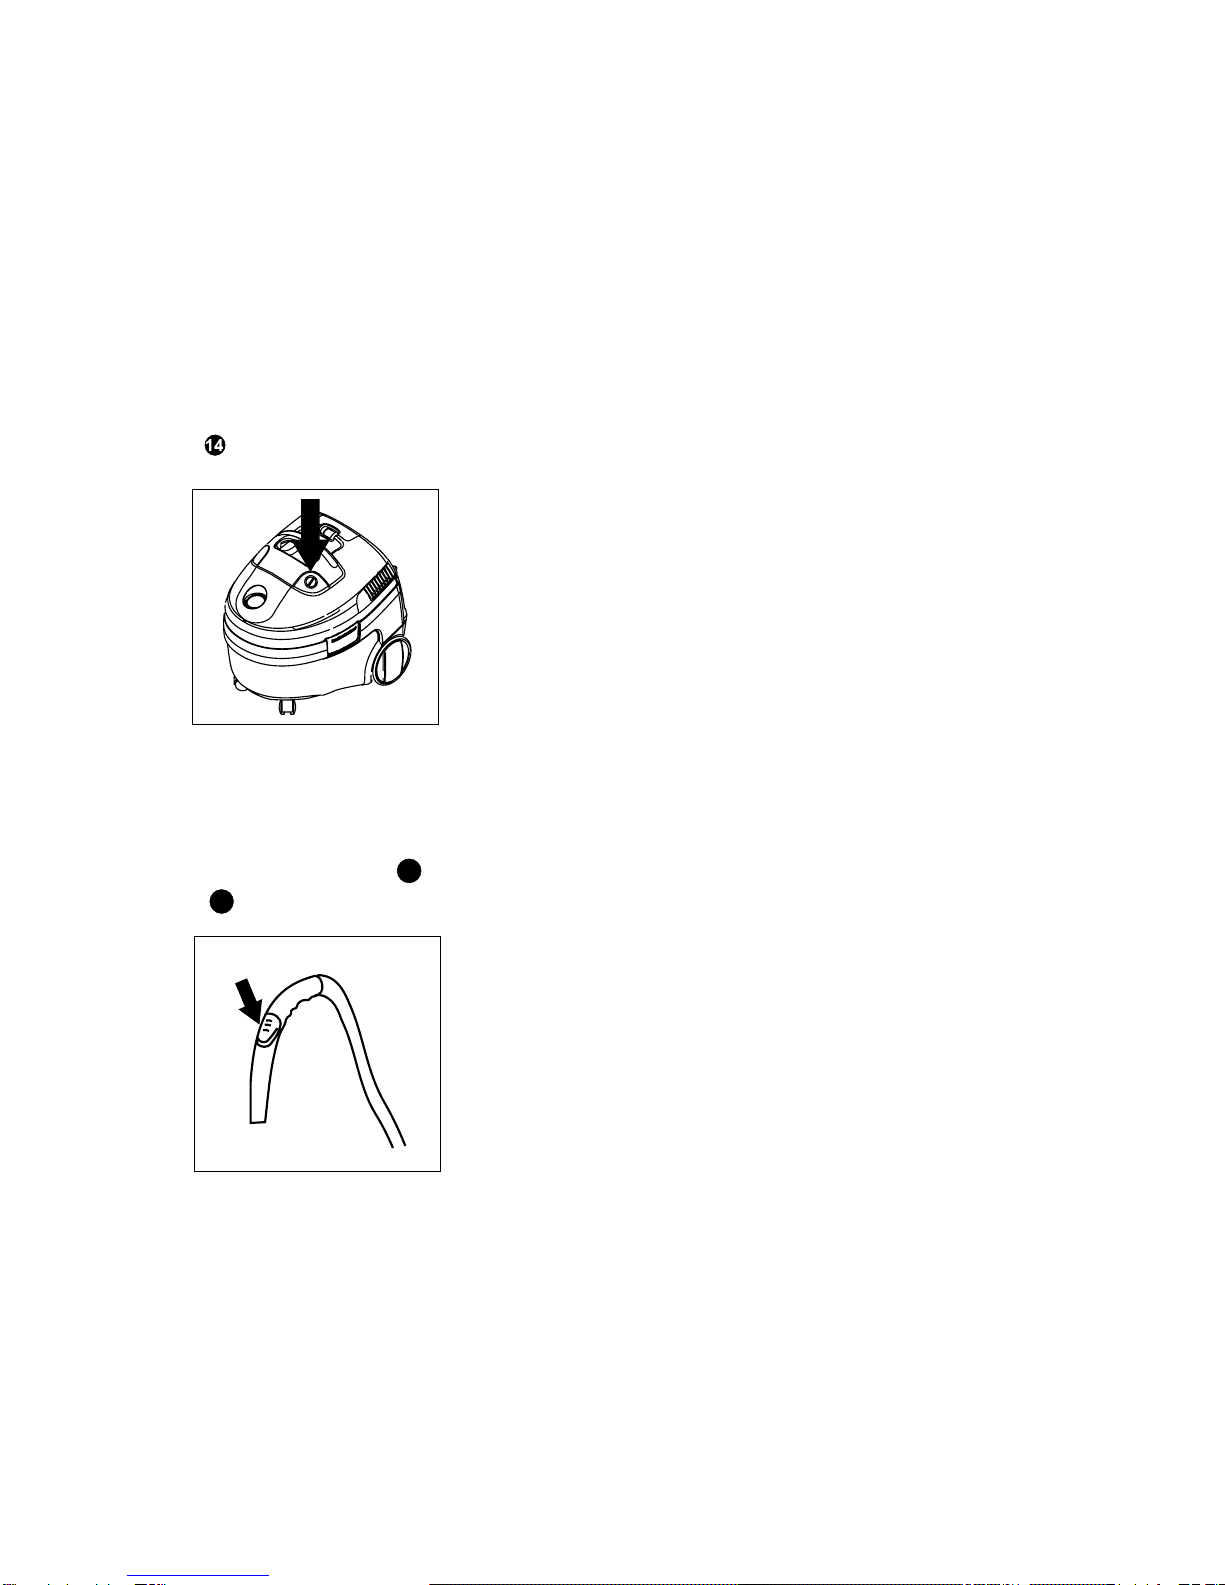
14 Always disconnect the appliance from the
mains supply after use or prior to cleaning
or replacing dust bags or filters.
SAVE THESESAVE THESE
SAVE THESE
I STRUCTIO SI STRUCTIO S
I STRUCTIO S
15 Do not use or keep this product outside
when it is raining.
16 Never modify the cleaner in any way.
17 Repairs to electrical appliances are only to
be undertaken by authorised service
agents. Unprofessional repairs can be
dangerous for users.
18 This vacuum cleaner is intended for
domestic use only. Misuse or use for
commercial or any other purpose will
render the guarantee invalid.
Electrical requirementsElectrical requirements
Electrical requirements
When using this appliance outdoors it
should be additionally protected by a RCCB
(Residual Current Circuit Breaker).
Check that the voltage on the rating plate of
your appliance corresponds with your house
electricity supply which must be A.C. (Alter-
nating current).
For appliances with fitted plug.
If the socket outlets in your home are not
suitable for the plug supplied with this
appliance the plug should be removed and the
appropriate one fitted.
IMP0RTANT:THEPLUGREMOVEDFROM
THEMAINSLEAD,IFSEVERED,MUSTBE
DESTROYEDASA PLUG WITH ABARED
FLEXIBLECORDISHAZARDOUSIFENGAGED
INTOALIVESOCKETOUTLET.
Should the fuse in the 13 amp plug require
changing a 13 amp BS1362 fuse must be
fitted.
For models with cable rewind
If you cut the plug off and let go of the
cable it will rewind into the machine. Therefore
you must pull out a length of cable and secure
it BEFORE cutting off the plug and refitting a
new one.
3
Electrical connection and supplyElectrical connection and supply
Electrical connection and supply
European conformity informationEuropean conformity information
European conformity information
A sample of this product has been tested and found to be in conformity with the following
European Directives.
73/23/EEC Low voltage
93/68/EEC CEMarking
89/336/EEC EMCdirective
Check that the supply voltage details given
on the rating plate are in accordance with your
electricity supply.
IMPORTANT :The wires in the mains lead
of this appliance are coloured in accordance
with the following code : Blue-Neutral, Brown-
Live. As the colours of the wires in the mains
lead of this appliance may not correspond with
the markings identifying the terminals in your
plug proceed as follows,
The wire which is coloured brown must be
connected to the terminal which is marked
with the letter ‘L’ or is coloured red.
The wire which is coloured blue must be
connected to the terminal which is marked
with the letter ‘N’ or is coloured black.
This appliance is double insulated and must not
be connected to the terminal of the plug which
may be marked with the letter ‘E’ or by the
earth wire symbol or coloured green or green
and yellow. Each wire must be properly
connected to the appropriate terminal pin of a
suitable plug and the outer sheath of the mains
lead securely retained by the anchorage
arrangements of the plug. In case of doubt the
plug should be fitted by a qualified electrician
or competent person as the guarantee offered
on this product does not cover any fault in the
plug or damage caused to the appliance as a
result.
(If a fused 3-pin 13A plug is used a standard
13A fuse should be fitted).
4
FeaturesFeatures
FeaturesFeatures
Features
Motor unit
Motor protection panel filter drawer
Motor protection panel filter
Cord wrap hook
Filter condition indicator
Carrying handle
Exhaust filter frame
Exhaust filter
Automatic cord rewind (certain models)
Hose inlet
Float
Latches
Foam pre-filter
On/off switch
Inner tank (certainmodels)
Maintank
Paperbag location slots(on main andinner tank)
18 Tool storage area
19
Hose handle
20
Air bleed
21
Extension tubes
(plasticormetaldependingonthemodel)
22 Hose swivel connector
23 Paperbag(certainmodels)
24 Paper bag holder (certain models)
25
Wet pick up nozzle with inserts
brush and squeegee (certain models)
26
Floor nozzle
27
Upholstery nozzle (certain models)
Crevice tool (certain models)
19
20
21
22
23
18 24
25
26
27
5
Your vacuum cleaner may feature a removable inner tank and large capacity paper bag
and can be operated in a variety of ways detailed in the table below.
Dry usage - vacuuming fine or coarse dry dirt.
Wet usage - picking up liquids or wet dirt, ie leaves.
Using your vacuum cleanerUsing your vacuum cleaner
Using your vacuum cleaner
Pick up option
1 Main tank only
2 Inner tank fitted
3 Paper bag fitted
Usage
Dry and / or Wet
Dry and / or Wet
Dry Only
No liquids or
wet dirt
Application
Maximum capacity.
RECOMMENDEDMETHODFOR
GENERALUSE.
Hygenic dirt disposal.
AssemblyAssembly
AssemblyAssembly
Assembly
Option 1 Using the main tank only
1Release the latches and lift off the motor
unit .
2Remove the inner tank if fitted.
3Replace the motor unit and ensure the latches
are secure.
Option 2 Inner tank fitted
1Ensure the latches are secure.
Option 3 Paper bag 23 fitted
The paper bag can be fitted with or without the
inner tank in place.
1Release the latches and lift off the motor
unit .
2Slide the card collar on the paper bag
23
into
the bag holder
24
and fit into the location slots
on the main or inner tank.
3Replace the motor unit and ensure the latches
are secure.
6
AccessoriesAccessories
Accessories
Hose
1Push and rotate the elbow-shaped
connector on the end of the hose
22
into the hose inlet until it clicks into
position
Hose features a 360oswivel action for
improved manoeuvrability.
Extension tubes
1For normal vacuuming join the two
tubes together .
2Attach the two tubes to the handle .
Some tasks may be easier with only
one tube fitted.
Tools
The tools can be attached to the tube or
directly to the handle.
Floornozzle
General purpose tool that
can be used on a variety of
floor coverings.
1
Upholstery nozzle
Nozzle can be used for
curtains, sofas and
armchairs.
Wet pick up
nozzle with
inserts, brush
and squeegee.
Suitable for
outdoor and wet
usage.
2
3Crevice tool
Used for small
gaps, joints and
corners.
4
On board storageOn board storage
On board storage
Your vacuum cleaner has on board storage
facility for hose, tubes and tools.
Wrap hose around the tool storage area and
position hose handle in location provided.
7
OperationOperation
OperationOperation
Operation
If your cleaner features the automatic
cable rewind pull out the cable fully.
If your cleaner features cable wrap
ensure the cable is fully unwrapped.
Plug into the electrical socket.
Switching on
Switch the cleaner on using the on/off
button .
Controlling suction power
To reduce the suction power during
use, adjust the air bleed 20 on the hose
handle
19
.
Closed :full suction
Open :low suction
Note: When the task is to suck up a
large quantity of liquid, best results are
achieved if the air bleed is opened
slightly.
Motor safety shut off
When the waste tank is full of liquid
the float will automatically switch off
the motor. When this occurs, always:
•Switch off the machine as it may
restart if you lift the motor unit from
the tank.
•Disconnect from the electrical supply
by removing the plug from the wall
socket.
•Raise hose to drain liquid back into
the tank.
•Empty the main tank or inner tank.
IMPORTANT
If the cleaner overturns during use, the
motor may switch off. Return the cleaner
to upright and motor will restart.
8
After vacuum cleaningAfter vacuum cleaning
After vacuum cleaning
1Switch off the vacuum cleaner.
2Unplug from the mains.
3Use a hand or your foot to operate the
cable rewind pedal to rewind the
cable.(on certain models)
IMPORTANT
For safety reasons the final section of
cable rewinds slowly. Lift the plug to
ensure the cable rewinds fully.
4For models without the cable rewind
facility wind the cable around the hose
storage area and cable wrap hook
at the rear of the unit.
Emptying your vacuumEmptying your vacuum
Emptying your vacuum
cleanercleaner
cleanercleaner
cleaner
Option 1 Using the Main tank only
1Release the latches and lift off the
motor unit and carefully place to
one side.
2Carefully lift the main tank and empty.
3Rinse or clean the main tank after
emptying if necessary.
Option 2 Inner tank fitted
1Release the latches and lift off the
motor unit and carefully place to
one side.
2Carefully lift out the inner tank by its
rotating handle and empty.
3Rinse or clean the inner tank after
emptying if necessary.
Option 3 Paper bag 23 fitted
1Release the latches and lift off the
motor unit and carefully place to
one side.
2Gripping the bag holder
24
lift the bag
out of the main or inner tank.
3Slide the bag off the holder 24 and
carefully dispose of the bag.
After each option replace the motor unit
and ensure the latches are secured.
9
FiltersFilters
FiltersFilters
Filters
Your product has been designed to pick up both wet and dry dirt without having to change
or remove the filters.
The table below explains the purpose of each filter.
Filter
Foam pre-filter
(washable)
Motor protection
panel filter
Exhaust filter
(non washable)
Purpose
Stops large dirt particles and
prolongs the life of the panel filter.
Stops smaller dust particles and
protects the motor from damage.
Stops very fine dust particles to
ensure the air leaving the product is
clean.
IMPORTANT
•The motor protection panel filter should be checked regularly for signs of
damage, preferably after each cleaning task. The filter must be replaced
immediately if it has become damaged.
•Always disconnect the cleaner from the mains when checking filters.
•Always make sure all filters are fitted before use. Failure to do so may result in
damage to your product.
To clean the foam pre-filter
1Unclip and remove the motor unit.
2Turn the motor unit over.
3Remove and clean the filter using
a soft brush or wash in warm soapy
water.
4 Ensure the filter is totally dry before
refitting.
5Make sure it is secure on its two clips.
To clean the motor protection
panel filter
1Slide open the drawer at the rear of
cleaner.
2Remove filter and clean between
lower pleats with a soft brush.
IMPORTANT
The filters should be replaced at least
every 6 months or immediately if they
become damaged.
To clean the exhaust filter
1Pull out the exhaust frame .
2Remove the filter and tap to remove
the dirt.
Cleaning the filtersCleaning the filters
Cleaning the filters
If the filter condition indicator shows red either the :
•bag needs to be changed
•foam pre-filter needs to be cleaned
•motor protection panel filter needs to be cleaned
•Also check hose for blockages
If after changing the bag or cleaning the filters the condition indicator still shows red then
the filters should be replaced.
10
Cleaning andCleaning and
Cleaning and
MaintenanceMaintenance
Maintenance
Unplug from the mains before cleaning.
The vacuum cleaner, and all the acces-
sories can be cleaned using a damp
cloth or a non abrasive domestic cleaner
and wiped dry.
To keep the underside of the floor nozzle
clean, vacuum it at regular intervals using
the crevice tool.
11
Purchasing new dustPurchasing new dust
Purchasing new dust
bags and filtersbags and filters
bags and filters
Only use original Goblin bags and
filters. Replacement packs can be
purchased from specialist retailers. If you
have difficulty, call our Helpline number
on the front of this booklet.
If none of the above solutions resolve the problem, please contact your nearest service agent or
telephone the helpline at the front of this booklet.
PROBLEM
The cleaner does not start
Reduced suction power/
filter condition indicator
shows red
Dust expelled from air
exhaust during use
Water expelled from air
exhaust during use
Hose detached from
product during use
Intermittent on/off
switching
POSSIBLECAUSE
No electricity supply
Hose, nozzle or filter
blocked
Filter is not fitted
correctly, is damaged or
is missing altogether
Float is damaged or
clogged
Hose not fitted correctly
Waste tank is full
SOLUTION
Check fuse, cable, plug and socket, if
necessary have them replaced by a
qualified technician.
Remove blockages and refit hose or
nozzle / check filters.
Refit or replace filter.
Remove any blockage and restart.
If float is damaged then contact service
agent.
Refit hose following instructions
carefully.
Switch off product and empty.
Goblin products are intended for non commercial use only.
Goblin has a policy of continuous improvement in product quality and design.
The Company, therefore, reserves the right to change the specification of its models at any time.
Goblin,Mexborough,
South Yorkshire, England, S64 8AJ 8738170 Rev OI
Consumables new Wet and dry UKConsumables new Wet and dry UK
Consumables new Wet and dry UK
Accessory
A/v Goblin dustbags (pack of 3)
Bag holder
A/v panel filter + foam pre-filter + standard
exhaust filter in one box
Floor nozzle
Hard floor attachment for floor nozzle
Wet pick up nozzle
Squeegee insert
Brush insert
Crevice tool
Upholstery nozzle
Plastic tubes
Metal tubes
Telescopic tubes
Flexible hose and handle assembly
Part number
9050475
1781434
9030075
0073534
0073690
7870434
7930271
7924868
0310234
0070834
3770234
3770570
3779870
5330975
UK (local rate call)
0345 010340
The After Sales Division Goblin
Mexborough
South Yorkshire
S64 8AJ
Republic of Ireland
01 842 4833
The After Sales Division Dimpco Ltd
Cloghran
CountyDublin
Ireland
If you experience any difficulty in obtaining service or spare parts, please telephone our Customer
Helpline (during office hours):

Other Goblin Vacuum Cleaner manuals

Goblin GSV303R-21 User manual

Goblin

Goblin GSV303R-21 User manual

Goblin IB70220 User manual

Goblin

Goblin IB70220 User manual

Goblin GVU402R-21 User manual

Goblin

Goblin GVU402R-21 User manual

Goblin IB34050018 User manual

Goblin

Goblin IB34050018 User manual

Goblin Carpet Cleaner User manual

Goblin

Goblin Carpet Cleaner User manual

Goblin IB70222 User manual

Goblin

Goblin IB70222 User manual

Goblin IB70250 User manual

Goblin

Goblin IB70250 User manual

Popular Vacuum Cleaner manuals by other brands

ECOVACS ROBOTICS Deebot 710 instruction manual

ECOVACS ROBOTICS

ECOVACS ROBOTICS Deebot 710 instruction manual

Vax VX32SK user guide

Vax

Vax VX32SK user guide

Shark LIFT-AWAY NV590UK Series quick start guide

Shark

Shark LIFT-AWAY NV590UK Series quick start guide

Kärcher NT 48/1 manual

Kärcher

Kärcher NT 48/1 manual

Living & Co LUVC700R instruction manual

Living & Co

Living & Co LUVC700R instruction manual

Numatic WV 570 Original instructions

Numatic

Numatic WV 570 Original instructions

Kenmore 214.34000 owner's manual

Kenmore

Kenmore 214.34000 owner's manual

Clemas & Co KEVA 20 Operator's manual

Clemas & Co

Clemas & Co KEVA 20 Operator's manual

ECG VT 5220 2in1 Flex Clean instruction manual

ECG

ECG VT 5220 2in1 Flex Clean instruction manual

Dyson Ball DC25 operating manual

Dyson

Dyson Ball DC25 operating manual

Panasonic MCV5740 - UPRIGHT VACUUM operating instructions

Panasonic

Panasonic MCV5740 - UPRIGHT VACUUM operating instructions

Shop-Vac P14-SQ14S user manual

Shop-Vac

Shop-Vac P14-SQ14S user manual

Blaupunkt Bluebot Xtreme user manual

Blaupunkt

Blaupunkt Bluebot Xtreme user manual

Midea VC-35A1Q3 user manual

Midea

Midea VC-35A1Q3 user manual

Neatsvor L100 user manual

Neatsvor

Neatsvor L100 user manual

TECHWOOD TAE-6026 instruction manual

TECHWOOD

TECHWOOD TAE-6026 instruction manual

Vax Mach Rapide XL V-027CC instruction manual

Vax

Vax Mach Rapide XL V-027CC instruction manual

SEVERIN BR 7943 datasheet

SEVERIN

SEVERIN BR 7943 datasheet

manuals.online logo
manuals.online logoBrands
  • About & Mission
  • Contact us
  • Privacy Policy
  • Terms and Conditions

Copyright 2025 Manuals.Online. All Rights Reserved.