Godlike JUPITER-8 Worph User manual

Morph
Instruction Manual
Revision A


iii
©2021 Godlike Productions. All rights reserved. .Roland®, Jupiter 8 are trademarks of Roland Corporation. All other trade-
marks and copyrights are property of their respective companies. Product features and specications are subject to change
without notice.
You may legally print up to two (2) copies of this document for personal use. Commercial use of any copies of this document
is prohibited. Godlike Productions retains ownership of all intellectual property represented by this document.
Morph

iv
Godlike Productions Contact
All Customers:
Godlike Productions
PO Box 1520
Midland DC, WA, 6936, AUSTRALIA
Tel: +61 412 142 114
Fax: +61 8274 6262
Email: [email protected]
Caution
Ensure you have backed up all patches in your Jupiter 8 before using Jupiter 8 Morph. Jupiter 8 Morph
can overwrite your Jupiter 8 Patch memory. You use Jupiter 8 Morph entirely at your own risk and to all
extents allowable under the law of Western Australia, Godlike Productions is not liable for loss of damage,
direct, consequential or otherwise.
https://godlike.com.au
https://www.facebook.com/GodlikeAustralia
www.twitter.com/GodlikeAust
https://www.youtube.com/GodlikeAu

Contents
v
Contents
Godlike Productions Contact ..................................................................... iv
Introducing Jupiter 8 Morph............................ 1-1
Main Features............................................................................................ 1-1
Keeping the Software up to date.............................................................. 1-2
Registration................................................................................................ 1-2
Getting Started ................................................... 2-1
Installation and Activation ....................................................................... 2-1
Setting Things Up ...................................................................................... 2-1
Features of Jupiter 8 Morph ............................. 3-1
Start Up Defaults....................................................................................... 3-1
The Main Pages ......................................................................................... 3-1
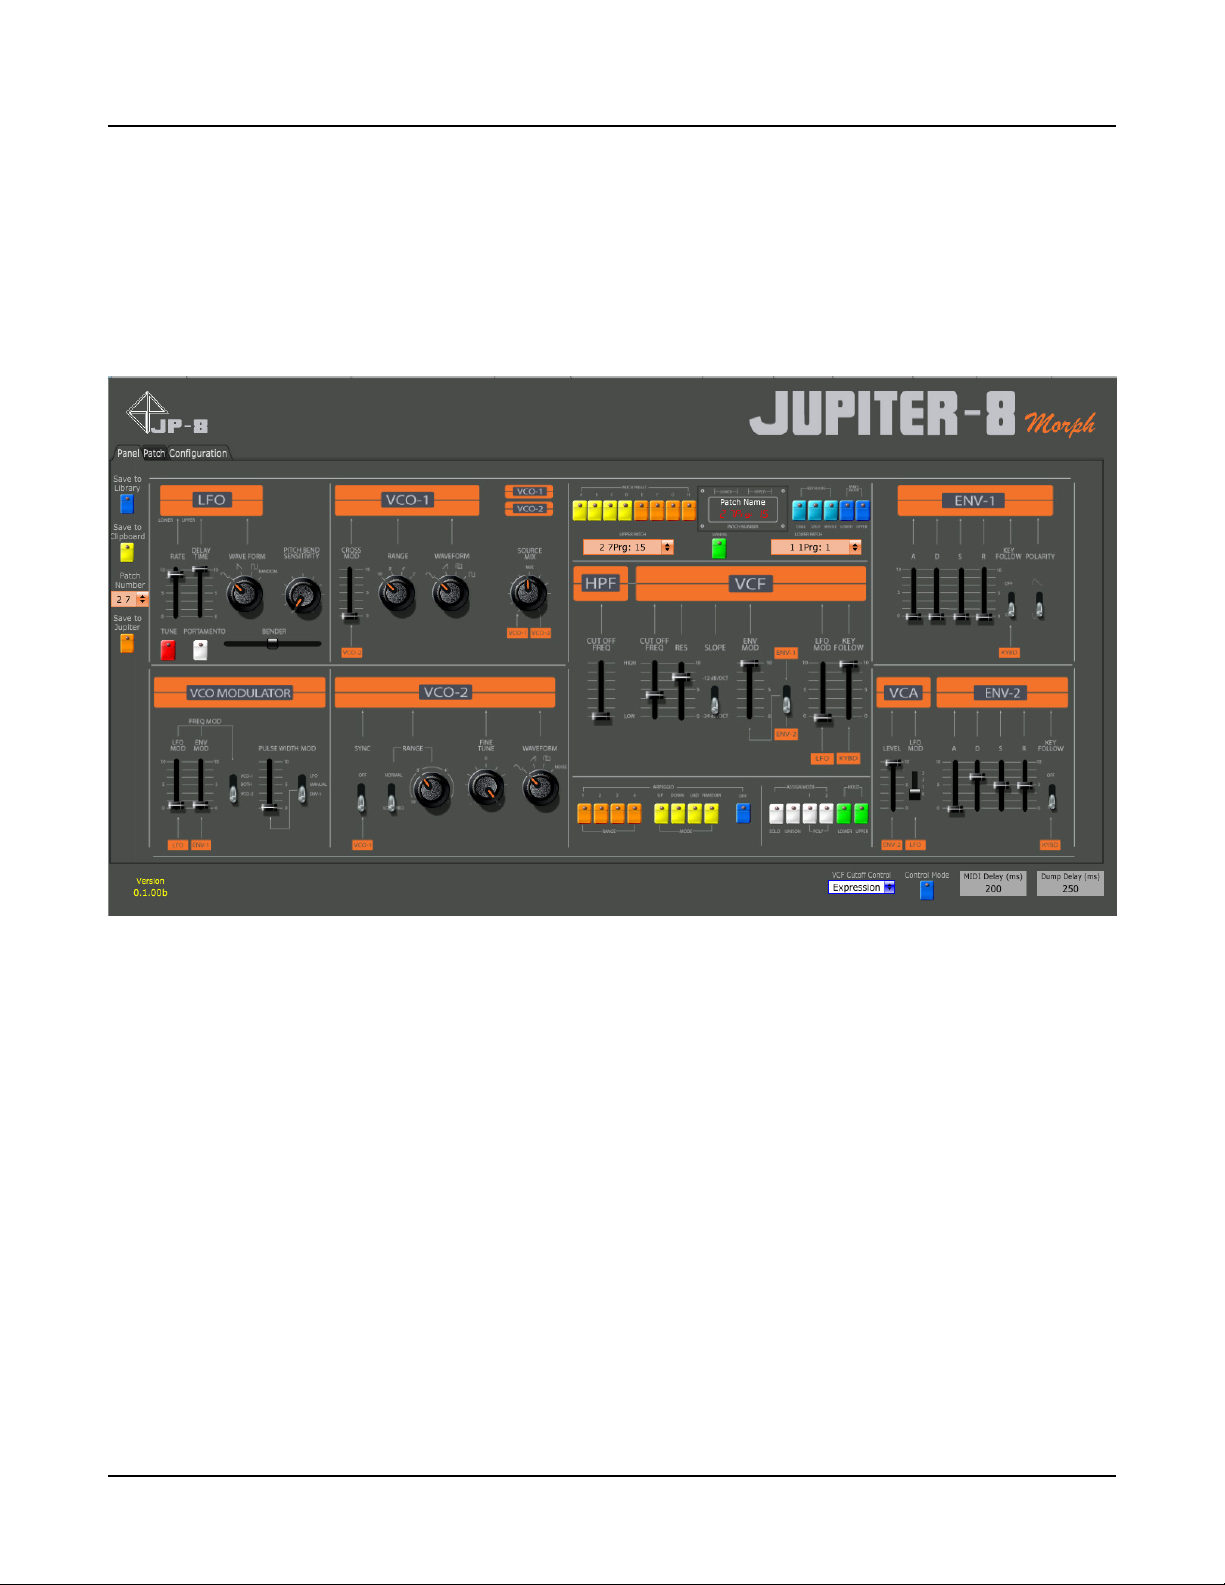
Panel Page .................................................................................................. 3-2
Manual Button .......................................................................................... 3-3
Upper (Main) Patch Selector .................................................................... 3-3
Control Panel ............................................................................................ 3-3
Page Selector ............................................................................................ 3-3
Panel Save Buttons ................................................................................... 3-3
MIDI Dump Delay.................................................................................... 3-4
MIDI Delay............................................................................................... 3-4
VCF Cuto Control .................................................................................. 3-4
Patch Page.................................................................................................. 3-5
.................................................................................................................. 3-5
Import Bank Operations ........................................................................... 3-6
Last Sync Bank Operations ...................................................................... 3-6
Clipboard Bank Opearations .................................................................... 3-7
Library Operations.................................................................................... 3-7
Jupiter 8 Memory Operations................................................................... 3-7
Patch Naming ........................................................................................... 3-7
Copy Options............................................................................................ 3-8
Conguration Page.................................................................................... 3-9
Load Banks Manually............................................................................. 3-10
Save All Banks........................................................................................ 3-10
Time of Last Jupiter Fetch...................................................................... 3-10

Contents
vi
Last Save................................................................................................. 3-10
Library Filepath ...................................................................................... 3-10
Initialize Button ...................................................................................... 3-11
Send Panel Load Button ......................................................................... 3-11
Bank Saved Indicators............................................................................ 3-11
Load/Save Buttons.................................................................................. 3-11
Suppress Warnings Button...................................................................... 3-11
Index.....................................................................I-1

Introducing Jupiter 8 Morph
1-1
Chapter 1
Introducing Jupiter 8 Morph
Welcome to Jupiter 8 Morph
This manual will help you get acquainted with your software.
NOTE: JUPITER 8 MORPH REQUIRES CONNECTION TO A
ROLAND JUPITER 8 FITTED WITH AN ENCORE MIDI INTERFACE.
THIS PLUGIN PROVIDES CONTROL OF THE JUPITER 8 ONLY,
AND DOES NOT PRODUCE ANY SOUND OF ITS OWN
Main Features
Jupiter 8 Morph provides MIDI automation of all front panel controls of a Jupiter 8,
as well as an advanced librarian, that allows for patch naming, author attribution, and
categorization of Jupiter 8 patches. Jupiter 8 Morph provides management of both a
library of patches and of the Jupiter 8’s patch memory.
Sysex dumps can be imported and exported and the library can also be saved, shared
and loaded with any other user, using Jupiter 8 Morph. The Sysex dumps are 100%
compatible with any Jupiter 8 with the Encore Electronics JP8MK MIDI Retrot.
The control of the Jupiter 8 has been carefully designed with a custom MIDI scheduler
in order to manage the load on the Jupiter’s Z80 processor. All control parameters are
mappable to your DAW and the plugin will accept full speed modulation, but provides
control at a speed that the Jupiter 8 can keep up with.

Introducing Jupiter 8 Morph
1-2
Keeping the Software up to date
Be sure to check the Godlike Productions Website at https://godlike.com.au for new
documentation and the latest software updates for Jupiter 8 Morph.
Registration
Jupiter 8 Morph is protected by iLok anti piracy. You will need a free iLok account, and
the license manager software to be able to use the software. Jupiter 8 Morph supports
iLOK Cloud, Computer or iLok Activation
You can obtain the ILok license manager and a free account at https://ilok.com
A trial license can be obtained free of charge in order to test Jupiter 8 Morph with your
Jupiter 8, to ensure smooth operation, prior to purchase.

Getting Started
2-1
Chapter 2
Getting Started
The email that you receive will contain a link to the plugin. The le will contain all of the
versions for your operating system, OSX or Windows. 32 bit and 64 bit plugins are available.
On Windows you will receive a VST2, VST3 and a Standalone EXE le. For OSX, you will
receive an AU plugin and a Standalone DMG le. There will also be a copy of this manual
in PDF format. If you lose your copy of the les, please contact us at https://godlike.com.
au/index.php?id=contact and we will be hapy to send you another copy.
Installation and Activation
Copy the plugin les into your plugin directory.
If you have not already done so, install the iLok licence manager. https://www.ilok.
com/#!license-manager. When license manager is installed, sign into your iLok account, or
create a new account. iLok accounts can be created for free.
When you load up your DAW (or if you run the Standalone), you will be prompted for the
iLok verication. If you have been issued a license already, activate it in the iLok License
manager, or otherwise you can activate a 30 day trial. with the code that came with the email.
The trial is fully featured, but the plugin will expire after 30 days. You only need 1 license,
as you can freely move it between any number of computers, iLok’s or iLok Cloud. You can
run multiple instances of the plugin (if you have more than 1 Jupiter 8) or one machine, but
you will need an additional license if you wish to run the plugin on more than 1 machine at
the same time.
Setting Things Up
Jupiter 8 Morph communicates with your Jupiter 8 over MIDI. Attach a MIDI cable from
the MIDI out of your MIDI Interface to the MIDI In of the Encore JP8MK, and connect a
cable from the MIDI out of the Encore JP8MK to the input of your MIDI interface.
Both cables are required for communication.

Getting Started
2-2
Normally the JP8MK retransmit’s all MIDI received at the MIDI in to the MIDI Out (it
is a MIDI thru port), and the JP8MK transmits its own data as well. Jupiter 8 Morph will
manage this MIDI data and stop MIDI data being retransmitted back to your DAW.
MIDI information will only be received (for Sysex Dumps, for example), while the Control
Mode button is switched off. When this is off, none of the panel controls will tranmit data
to the Jupiter 8.
We need to enable communication with the Jupiter 8. There are 2 ways to accomplish this.
The rst way is direct communication. This is required for the standalone version. In
windows, ensure that the MIDI in and out is disabled in your DAW. Jupiter 8 Morph
will take over these MIDI ports, and unfortunately Windows will not MIDI ports to be
addressed by 2 different applications at the same time.
Load up the Jupiter 8 plugin and under the MIDI menu and set the MIDI in, control and
out devices. The MIDI control device should be set to the same as your MIDI out device.
Select your output channel. Notes will be sent from Jupiter 8 Morph on this channel. If
you wish to use Presets, or Splits, you will need to ensure MIDI input is set to all channels,
in which case Jupiter 8 Morph will send notes received on Channel 2 to whatever channel
you have selected in the output, and whatever notes are received on channel 1 to the output
channel - 1.

Getting Started
2-3
With the Encore JP8MK, the Upper Channel provides note data for Whole Mode, and Dual
Mode.

Features of Jupiter 8 Morph
3-1
Chapter 3
Features of Jupiter 8 Morph
This chapter will help familiarize you with the features of the Jupiter 8 Morph Software.
Start Up Defaults
In general, Jupiter 8 Morph will remember all of the settings from the previous session.
Data structures, such as the Library, Jupiter 8 patches and Last Sync will be remembered
even between the standalone and the plugin (as long as they have the same le path in
the Conguration page). Import Bank and Clipboard will alway open empty, but the last
versions can be loaded manually.
•
The Main Pages
There are 3 windows for the Jupiter 8 Morph Plugin. The main areas of the Panel Page
are:
• Panel. This is the main real time control area of the plugin. The Control Mode
button must be lit for the panel control to send data to the Jupiter.
• Patch. This is the librarian of the Jupiter 8. Control Mode must be o for any
dumps to or from the Jupiter (The Jupiter Bank)
• Conguration. Global parameters and plugin data storage is managed on this page.

Features of Jupiter 8 Morph
3-2
Panel Page
1 Manual Button 6 MIDI Dump Delay
2 Upper (Main) Patch Selector 7 MIDI Send Delay
3 Control Panel 8 Control Mode Button
4 Page Selector 9 VCF Cuto Control
5 Panel Save Buttons 10 Lower Patch Selector (Split, Dual)

Features of Jupiter 8 Morph
3-3
Manual Button
This loads the current controls from the Jupiter 8 front panel into Jupiter 8 Morph. It’s
similar to pressing the manual button on the fron panel of the Jupiter.
If you want to send the current controls from Jupiter 8 Morph to the Jupiter’s buer. Press
the Control Mode Button.
Upper (Main) Patch Selector
Selecting a patch will send a program change to the Jupiter, and the Jupiter will load the
patch. It’s the same as typing the patchnumber using the number keys on the Jupiter’s
front panel. This determines the upper program in Split and Dual Modes
Control Panel
This is a mirror of the Jupiter’s front panel. When control mode is on, moving a control is
the same as moving that control on the Jupiter’s panel. While controls are being moved,
the control state of Jupiter 8 Morph will be updated on the Jupiter 8 at the period dened
in the MIDI Delay (ms) setting. (See below for more information)
Page Selector
Click on the relevant tab to navigate between the Control Panel, the Patch Librarian and
the Category Page.
Panel Save Buttons
These buttons save the current panel state. The Options are:
• Save to Library - This will save to the end of the Library.
• Save to Clipboard - This will append to the end of the Clipboard.
• Save to Jupiter. This will save directly to the Patch Number selected in the Patch
Number combo above, without any conrmation. It will overwrite whatever was
in that patch location. The Jupiter patch library (On the Patch Page) will also be
updated.

Features of Jupiter 8 Morph
3-4
MIDI Dump Delay
Jupiter 8 Morph runs at a much faster speed than both the MIDI bandwidth allows, and
the Jupiter 8’s processor. To ensure that all dump data is received prior to requesing the
next patch, this control inserts a delay between each dump request when receiving teh
bulk dump from the Jupiter 8. If you nd that some patches are missing from the dump,
increase this delay time. We do not recommend setting this below 150ms
MIDI Delay
This setting controls how fast the panel from Jupiter 8 Morph is sampled and sent to the
Jupiter 8. The lower the number, the more responsive the Jupiter 8will be, however the
Z80 processor on the Jupiter 8 was never designed to receive large volumes of patch
information in addition to managing all of the Jupiter’s systems, so setting this number
too low, may overwhelm the Z80 and causethe display to become garbled, or cause the
Jupiter 8 to crash. It may also cause the Z80 to overheat.
If this happens, turn your Jupiter 8 o and then on again, using it’s power button, and
increase this setting. In testing, we found that a setting of 100 ms would cause the Jupiter
8 to hang, 200 ms would cause the occasional screen glitch, and 250ms always seemed
safe.
Jupiter 8 Morph has been designed to only send data to the Jupiter 8 if a control has
changed, however it will send ALL control positions, so modulating everything transmits
the same amount of data as modulating just 1 control (except VCF cuto or Pitch Bend -
see below)
Jupiter 8 Morph will allow you to modulate any and all controls at whatever speed you
like, or that your DAW will allow. This parameter controls the maximum rate that data
is sent to the Jupiter 8. If you change this setting, you don’t need to reprogram your
automation data.
VCF Cuto Control
Encores’s JP8MK allows for VCF cuto control to be set to Expression, or Breath.
Additionally Jupiter 8 Morph can send VCF control messages during SYSEX control of
the Jupiter 8.
When set to Expression or Breath, this slider will send MIDI control messages at a faster
rate (as will the Pitch Bender control). If you are just modulating Cuto Frequency and
Pitch Bend, we recommend setting this to Expression or Breath, as you will get better
responsiveness. If you are modulating even one other parameter, then set this to SYSEX.

Features of Jupiter 8 Morph
3-5
Patch Page
1 Import Bank Operations 6 Jupiter Patch Naming
2 Last Sync Bank Operations 7 Library Patch Naming
3 Clipboard/Sysex Export Ops. 8 Clipboard Patch Naming
4 Library Operations 9 Copy Options (Global)
5 Jupiter 8 Memory Operations 10 Import Bank Naming

Features of Jupiter 8 Morph
3-6
Import Bank Operations
Sysex Import allows you to open SYSEX les exported from Encore Electronics
equipped Jupiter 8’s. Open SYSEX File, will open a le dialog, and will import the
patches into the SYSEX Import List. The Author of imported patches will be set to
whatever is set in the Default Author Box (Press Enter after changing this, for the
changes to be accepted.
Once you have imported the patches, you can select one of more patches and copy them
into either the Plugin Library or the Clipboard, using teh Blue or Yellow Buttons. Note
that the button colour corresponds to the destination Bank (Green for SYEX Import,
Yellow for Clipboard, Blue for Plugin Library and Orange for the Jupiter 8’s Patch
Memory. The icons beside the buttons correspond to the Banks, and are provided to help
remember the functionality of each The Last Sync is a backup of the Jupiter 8’s Patches
in case you mave made manual edits on the Jupiter 8, between sessions of Jupiter 8
Morph.
You can copy multiple patches at once, by holding down Ctrl when selecting patches.
These will be inserted into the desination depending on the position of the Insert Patch
Switch (See Below).
The Load SYSEX to anel button, will load the rst selected patch into the Control Panel.
If or when Control Mode is activated, this patch will be sent to the Jupiter 8’s Buer and
you will be able to hear it played on the Jupiter 8.
To load a SYSEX le into the Jupiter 8’s memory, you will rst need to copy it to the
Plugin Library.
Last Sync Bank Operations
The Last Sync Bank, is really designed to remember the patches from last time Jupiter
8 Morph downloaded patches from your Jupiter 8. Immediately before Jupiter 8 Morph
fetches all patches from the Jupiter 8, Jupiter 8 Morph copies the bank to the Last
Sync bank. In this way, the last state of the Jupiter that Jupiter 8 Morph knows about,
isbacked up. If you have edited patches from the Jupiter 8’s front panel, this gives you the
opportunity to recover old patches if you desire.
It is only possible to select 1 patch at a time, and you can preview them by loading them
to the panel.
The Sync Now button manually initiates copying patches from the Jupiter’s patch Bank
(within Jupiter 8 Morph) to the JP8 Last Sync Bank. ie copy dark orange bank to the light
orange bank.
The Load Sync to Jupiter button allows you to load the selected patch to the patch
location selected in the Jupiter 8 Bank. It will overwrite whatever is currently saved in
that location, without conrming.

Features of Jupiter 8 Morph
3-7
Clipboard Bank Opearations
The clipboard is designed to shortlist sounds from the Library (fr example, for your
current project, ) or to collect sounds together to create a SYSEX dump.
Export to SYSEX will create a jupiter 8 compatible SYSEX le of all the patches in the
Clipboard. Name, Author and Category will not be saved, however this le can be loaded
into the Jupiter 8 without Jupiter 8 Morph. These exports have the same format as native
JP8MK exports.
The Delete From Clipboard Button will delete all of the patches selected from the
clipboard.
Library Operations
The Library is designed to be the repository for all of your patches. You can copy patches
in and out of this bank to and from the other banks, and to the Jupiter and panel.
The buttons work in the same way as the other banks. Copying to the Jupiter Bank will
overwrite patches in the Jupiter 8’s patch memory.
Jupiter 8 Memory Operations
This bank represents the Jupiter 8’s internal Patch Memory. When you open Jupiter 8
Morph, The Jupiter 8 Patches in this bank may not match the Jupiter 8’s patch memory,
especially if you have worked on the Jupiter 8, in between Jupiter 8 Morph sessions, or
when running Jupiter 8 Morph for the rst time.
To synchronize Jupiter 8 Morph with the Jupiter 8, press the Import Jupiter Patches
button. 4 patches per second will be downloaded to Jupiter 8 Morph via SYSEX dumps
(depending on the setting in Dump Delay). This operation will take several minutes to
complete. After this is nished, Jupiter 8 Morph will remain in sync with the Jupiter 8’s
patch memory for the duration of the session.
Patch Naming
This section is identical for Jupiter 8, Library, Clipboard and Import Banks. When you
select a patch in the Patch list the Program Name, Author and Category will update to
show the values for the patch. If you have multiple patches selected, the information for
the rst patch will be shown.
To rename, or set a new author, click and type the new information in the relevant eld.
You MUST press enter for the information to be accepted into the eld and then press the
Update button.

Features of Jupiter 8 Morph
3-8
The information will be updated in all patches selected. To change multiple patch names,
you must ensure that the Bulk Name Changes switch is set to Yes.
Copy Options
These changes are global to the Librarian. By default, Bulk Name Changes? is set to No,
so that when modifying multiple patches, you don’t change their name. This is useful,
if you want to change the Authors, or Category for a number of patches, rather than
changing them one by one.
When Insert Patch is set to Before, copied patches will be inserted at the start of the bank
shifting all other patches down. When Insert Patch is set to Selected, the patches will
all be inserted directly after the selected patch, moving later patches down. If multiple
locations are selected in the destination patch, all patches selected in the source bank will
be insderted after the rst patch selected in the destination bank.
When Insert Patch is set to After, all patches will be copied to the end of the Destination
Bank.
Default Author will be applied to any SYSEX import, when Jupiter 8 is synced with
Juipiter 8 Morph or when patches are saved from the Control Panel. It is recommended
that you change this to your own name. This author information will appear in patch bank
.jp8 les that are shared with outher Jupiter 8 Morph users.
Godlike Productions provides a le sharing service (and discussion forums) under the
Downloads section of https://forums.godlike.com.au.

Features of Jupiter 8 Morph
3-9
Conguration Page
1 Load Banks Manually 6 Initialize Panel Button
2 Save All Banks Manually 7 Panel Load Button
3 Time of Last Save 8 Banks Saved Indicators
4 Time of Last Jupiter Fetch 9 Bank Load/Save
5 Library File Path 10 Suppress Warnings Button
This manual suits for next models
1
Table of contents
Other Godlike Recording Equipment manuals